Hardwood Floor Installation & Refinish
A hardwood floor installation can be very affordable with the right wood and the right installer. We had new hardwood tied into the existing flooring for a seamless and beautiful first floor. We’ll show you how they did it, tell you what to watch out for and shed some light on the oil- vs water-based finish debate.
An empty house has no secrets.
At least, that’s what I thought when we came back here for the final walkthrough before closing.
On our first visit, the house was full of furniture and all the little things that make a collection of framing timber, drywall and paint into a proper home: family pictures on a shelf, potted plants, assorted books and art hanging on the walls.
The only things missing were a potbellied sofa sprout and his suffering wife.


When a house is full like that – full of the memories and mementos of a life lived and a family raised, it’s easy to overlook what’s right beneath your nose. Well, your feet, to be more precise.
Though the carpet looked okay as we wove our way through the rooms and hallways on that very first visit, our final inspection tour told a different tale.

During that last walkthrough, we saw indentations where carpet fibers had been crushed down like alien crop circles. We saw stains that spoke of festive parties, untrained puppies and careless children. And we saw great patches of a subtly different color where sunlight had transformed a whitish-beige into a pale garish green.
Before that walkthrough, Handan and I figured we’d keep the carpets on the first floor – at least for a little while. They looked good enough, and we didn’t want to jump right in with too many expenses.
But once we closed and moved in – once the furniture was removed and the secrets were exposed – we realized that these carpets were well and truly spent.
There would be no more parties on the few remaining patches of untrodden plush.
No more fumbled Super Bowl chili.
No more blotches of blush wine.
These carpets seen their last sole.
But if I thought that I’d seen all the secrets – well sister, I surely hadn’t.
There was one more lurking beneath.
But before I learned of it, my babes and I set out to find a purveyor and installer of hardwood floors.
Now listen up, you ladies and gents of the greater Atlanta area, because I’m going to give you a fine recommendation. No, this post is not sponsored, nor were we compensated in any way. But I believe that great service and a great price should not go unrewarded, so I’m going to tell you about the flooring company we chose – Peach State Hardwood. The company is owned by an affable Brazilian named James who has built himself a fantastic business since coming to America.
James came in with the best price of all the companies who bid the job. But more than price, we got a good vibe from him. We gave him the job and explained that it would need to be done in two phases.
Phase one was the carpet tear-out and new floor installation in the living room, dining room, study and front stairs, followed by a full-floor sanding (minus the kitchen), staining and sealing.
Phase two, to be completed at a later date, will be a sanding, staining and sealing of the kitchen.
If we did it all at once, we’d have to move out for several days, and that just wasn’t an option anymore. Besides, we’ve got something big cooking for the kitchen. Real big. And while it simmers, we need to keep the original floors. You’ll understand why in due time.
James and I bumped knuckles to finalize our deal two days after we closed on the house. A day later, the wood was delivered to acclimate. By Saturday morning, his crew was laying it down.
I love it when a project comes together quickly and hits the ground running.
Handan and I needed to be out for several hours on Saturday, but we did manage to catch most of the important action.
The crew wasted no time. They were barely over the threshold before the knives came out and the sounds of slashing and tearing carpet filled the morning air.
It was during this time that I learned of the deeper secret hidden beneath our feet.

Want a closer look?
Of course you do!

The crew leader told me this was caused by dog urine. He’s seen it many times, he said, but never this bad.
(Of course not. We know how to pick superlative houses!)
I have a very strong constitution, but granular dog piss really tested my limits. I’d been walking on this stuff!
Blech!

Then there was this poor guy. I’ll bet when he woke up that morning, kneeling in a room full of fossilized Fido squirts was the last thing on his mind. I should have given him a proper mask.

Now I don’t know if that was really powdered puppy pee or just the rotting underbelly of some cheap imported carpet pad.
What I do know is that getting hardwood floors installed was starting to look like one of those Einstein moments for my babes and me. You better believe I’ve since turned a hairy eyeball to our upstairs carpet – especially the filthy expanse in the master bedroom. Lord knows what sort of grim ecosystem is thriving beneath us as we slumber each night.
Anyway, after snapping the picture above, Handan and I skedaddled for several hours. What we missed during our absence, after the carpet was removed and the floors vacuumed, was the crew laying down a hardwood floor underlayment which acts as a vapor and moisture barrier.
This is the scene we returned home to.

The guys were fast!
Unlike floating floors, which we installed in our old laundry room and craft room, this hardwood floor had to be nailed in place.
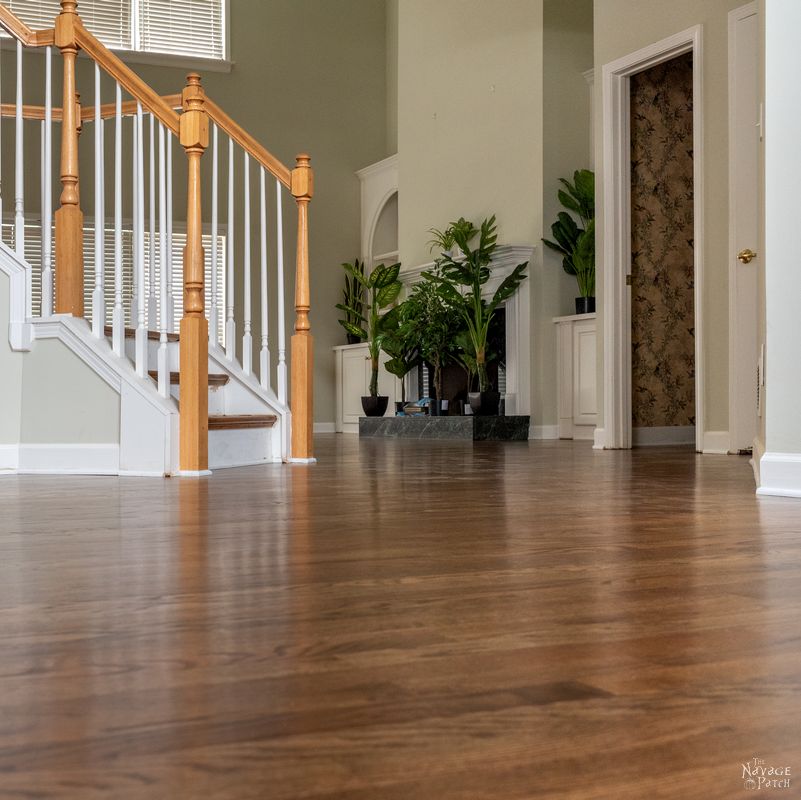
Now here’s the best part. In order to seamlessly integrate the new floor into our existing hardwood floor, they employed a technique called feathering. It involved removing some boards from the existing floor in a random pattern so that when the new and old are meshed, sanded and stained, the eye won’t be able to tell it wasn’t all just one great big wooden floor from the get-go.

I love how this looks!

I’m talking about the floor. Not that dude’s butt.
But feel free to gawk at either, madam. No one is judging.

Hard to believe the scene that played out here just a few hours earlier! The house already felt cleaner, like some Pigpen demon had been uprooted and tossed out on its filthy ear.

By late Saturday afternoon, the installation crew had finished.
The sanding and staining crew showed up bright and early on Monday. Before they started, Handan and I had a choice to make – what color did we want the floor to be?
James had dropped off a booklet with stain colors, and judging by what was shown on those pages, we selected a few candidates.
But when Monday’s crew chief Nathan saw our selections, he raised a brow and asked if we were sure. I told him they looked great in the color pamphlet, but he shook his head and told me they’d be too gray. I asked him to show us anyway.
Damn, was he right!
The closest two shown below were also some of our choices, but they were far too light. The middle two below were beautiful browns in the color pamphlet, but Nathan was right – they were straight-up gray.
He asked me if we’d like to see Provincial.
I said no. Handan had rejected it outright the night before because its color sample was a hideous yellowy brown.
“Oh no!” Nathan said. “Provincial is my most popular color. Probably eighty percent of people choose it.”
I told him to give us a test patch. Couldn’t hurt to have a look!

Turned out that Nathan knew exactly what he was talking about. Provincial is second from the bottom in the picture below. It was just the color we wanted.

Satisfied we weren’t a couple of tasteless Northern boneheads with applesauce between our ears, Nathan packed up the samples and his crew began sanding the floors.
Handan and I scurried upstairs to spy down on them from above. Our catwalk makes a great photo perch!
It’s incredible how powerful this belt sander is! This lumbering ox requires a steady diet of 220 volt Go-Juice, so they had to run a cord all the way to the laundry room and steal power from our poor dryer.

While the big beast of a belt sander made quick work of the floors, they used palm sanders on the stairs, corners, and anywhere the belt sander couldn’t reach.


You see that shop vac? That’s the same one I have. I told you these guys had class! For a quick rundown of how awesome that shop vac is, I would direct you to a little screed I wrote a few years back about cleaning out our old shed. Spoiler alert for those of you who are new here and may not have read it yet: you’ll finally understand the whole “my Calvins” meme that has evolved here at The Navage Patch.

Sanding is loud and dusty work. Fortunately, they sealed off their work area with plastic sheeting, so Handan and I could stay in the kitchen and work on our laptops at our little fold-up table.
But the noise…
The noise became overwhelming after a time. I deemed Handan’s work more important than my own, so I dug out my hearing protection ear muffs from one of the moving boxes and gave them to her. I moved myself out to the deck where things were quieter.
While the hot Georgia sun blasted my senses (yes, I’m aware it’s only May, and yes, I’m aware I’m probably doomed when high summer hits), James’s crew toiled in cool comfort. By early afternoon, the ear-splitting work had finished, and they embarked upon some quieter activities.
The brutish initial sanding may have been finished, but there were still imperfections galore.
This is normal with a hardwood installation. (Notice how I’m talking like a seasoned pro here. What can I say? I’m a professional blogger, and I always have to at least pretend like I know what the hell I’m blathering on about!)
But seriously, wood is an imperfect thing, and that’s what makes it beautiful. But on a floor, you want to conceal most of those imperfections. Whether nail holes, splinter grooves, the hammer they dropped (just kidding, James!) or whatever, a hardwood floor is not going to be perfect when laid nor when first sanded.
And that is where wood filler flies in like Superman to save the day!

My favorite part of that photo is the hammer so casually left in the middle of the floor. If I cropped the photo just right, I could call it “art” and sell it to some Manhattan suckers at an outrageous price.

I can picture myself now, standing in a SoHo art gallery, canape in one hand, dry martini in the other, as I explain my genius vision to a wealthy socialite draped in fox fur and cradling a Chihuahua.
“Yes, you see the filler in the floor represents our desire to cover and hide our flaws from society.” I say. “‘Tis but a flimsy shield behind which we cower in self-conscious fear and self-doubt. But the hammer is there to remind us…to compel us, in fact, to BREAK the shield and expose our flaws to the world in all their raw and naked beauty.” I sip my martini. “We must embrace our imperfections. Only then will we ascend to a higher plane of existence.”
At which point the wealthy socialite gasps, and the words “Oh, my!” escape from her lips. And then her monocle pops from her scintillated brow and plops into her champagne flute.
Okay, okay, back to reality.
If caulk and paint are a contractor’s best friend (“caulk and paint make it what it ain’t”), then wood filler and stain are the darlings of the flooring world. After the filler had dried, the crew hit the areas again with a gentler sanding machine. When they finished, those gaps, holes and imperfections looked like this:


One final vacuuming before staining…

Just as you should do when staining any wood project, the guys sprayed pre-stain on the newly-sanded floor. The pre-stain prevents blotching and helps achieve an even color tone across the floor.

The staining process is great – one guy with a bucket of stain who pours it right on the floor and another guy with a big spinning circular applicator pad.


The edges were stained by hand.


Provincial is a beautiful color. Dark enough to feel rich, but light enough to allow some of the red oak’s natural hues to shine through.

The crew knocked off for the day and came back the next morning to apply the first coat of finish.
Here is the part where you need to make a choice: oil-based or water-based.
When James first came over to give an estimate, he asked if we would like oil- or water-based finish. My initial reaction was to blurt out “Oil-based!” I mean, oil-based is always better, right?
When it comes to polyurethane, it was my understanding that water-based finishes were for sissies who wanted an easy job of cleaning their brushes on the backside of the project.
No serious woodworker would stoop to the level of water-based finish!
You know, it’s truly remarkable just how wrong I can be about so many things and still be alive to talk about it!
So all my prejudices and misconceptions about water-based finishes were laid to rest, not only by James and Nathan, but by the other companies that came through to give an estimate. They explained that though oil-based finish will give a thicker finish and a slightly smoother floor with a little more depth of color, it will always be softer and more scratch-prone than water-based, and it will always yellow over time.
There’s a lot of malarkey out there about water-based costing more. This was the case many many years ago. These days, they cost the same.
There seems to be a lot of noise on the internet that oil-based floor finish lasts longer than water-based. I have no experience, so I can’t give my opinion here, but the four flooring professionals I spoke with all said the same thing: water-based finish is stronger and lasts longer, especially in high-traffic areas.
I’m no flooring expert, so at times like these, I have to go with the consensus.
We chose water-based.
The evening after the first application, Handan and I ventured out onto the floor in sock-covered feet. My babes has an eagle eye for spotting imperfections. She immediately spotted some areas of concern. Some of these areas were commonplace and would have been dealt with as a matter of course the next day.
For instance, this area of dried poly:

What we didn’t know that first night was that before applying the second coat, they’d be again sanding the floor lightly with a high-grit sander.
But there were other areas of concern.
This spot where the wood had split and thrust itself up:

There were some sanding swirl marks in the dining room and other places where hardened poly or cotton fibers were trapped in the finish.
Handan pointed them all out, and I took pictures so I’d remember where they were the next day.

I forwarded some of the pictures to James and then called him to follow up. Without missing a beat, he told me not to worry and that he’d fix everything in the morning.
And sure enough, the next day, his crew sanded down the split wood, filled it and re-stained and re-sealed. Where there were swirl marks, they sanded down to bare wood again, re-stained and re-sealed.
There was one spot where a repair had gone wrong. Handan and I were out at the time, and I got a call from Nathan. I had trouble hearing him, but the gist of what I heard was that he’d be back again the next morning to continue some repairs.
When we got home, Handan discovered this:

Yikes! I sent this picture to James, and he said not to worry, he already knew about it. Nathan had seen right away that the repair wasn’t going to cut it, but he ran out of hours in the day to fix it. This was what he was trying to tell me about on the phone call I couldn’t fully understand.
Nathan came back the next morning and began work on replacing the board.

He replaced the board and sanded the area around it.


New stain, new finish and Bob’s your uncle.

This was the part of the job that impressed me most. Mistakes and flaws are part of any job – especially jobs involving wood. It’s how the company handles those mistakes and flaws that makes all the difference. Because of the repair work, our job took 2 more days than it should have to complete. But James didn’t blink an eye to the extra time and effort. He wasn’t going to stop until we were 100% satisfied, and we never felt he was put off by the extra work.
If the job went perfectly from first step to last, yeah, I’d still have good things to say about Peach State Hardwood, but I doubt I’d gush about them here on the blog. But it was how James handled the problems in this job that made his company really shine. When you find a company like that, you want to share it with the world.
So after all the repairs were completed to Eagle Eye’s satisfaction, they applied the final coat of finish. I asked James about the finish he uses, and he told me he swears by Bona Traffic HD. It’s expensive stuff, but it’s as good as it gets when it comes to a beautiful and durable finish for your floor.

Bona makes another great product that’s almost half the price – Bona Mega. It’s not quite as durable as Bona Traffic HD, but it’s still a helluva good sealer. Thinking it might be fun to try it for our DIY projects, we ordered a gallon. Once I get a chance to try it out, I’ll let you know how it goes!
Here’s a shot while still wet. This is not at all how they look after the finish had dried.

With that last application, Phase 1 was finished!

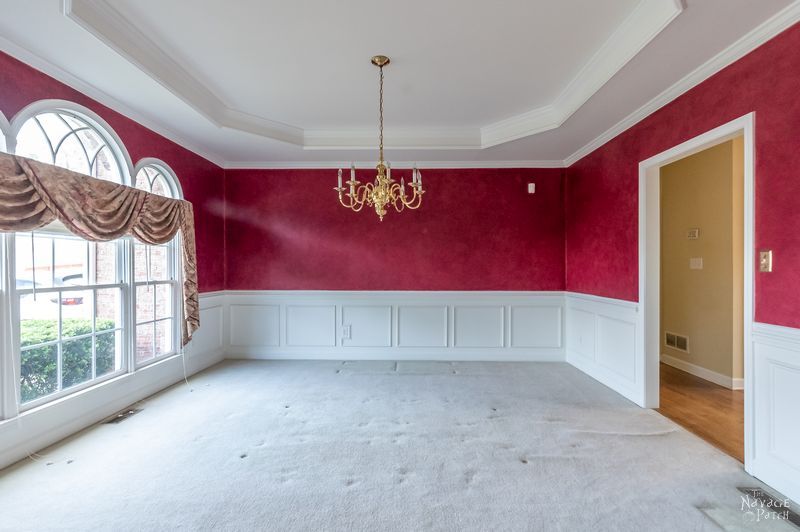
I will be staining the posts and handrails on the staircase soon.

I’ll also be painting the risers and all of the trim – well, I’ll be painting the whole damn room, in fact!

Those are paint chips on the floor – we’re choosing a new color for the dining room!

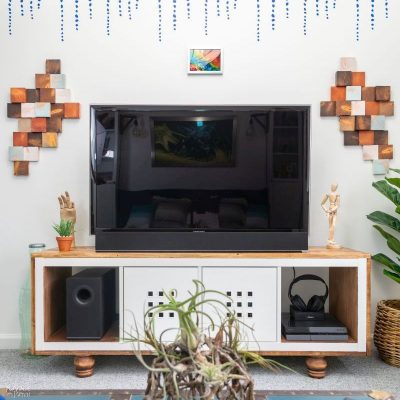
The new hardwood floor makes the space seem so much bigger.


The changes are happening fast and furious at our new house. Stay tuned for more updates and projects!
For those following along:
The Navage Patch Short Term Goals 2020 Checklist
Install radon mitigation system(I’ll write about it soon)Bring power and light to the basementInstall hardwood floors on the first floor Phase 1- Install hardwood floors on the first floor Phase 2
- Stain the staircase posts and handrails
- Kitchen remodel (planning stage)
- Install kitchen backsplash
- Build workbenches
- Build dog feeding station
- Build floating shelves
- Paint interior walls and bedroom ceilings (in progress)
- Change living room fan
- Change foyer chandelier
- Baris’s room setup & related projects
- Office setup & related projects
Change front door lantern and install a second one(I’ll show you soon)- Paint front door
- Remove big shrubs near front door
- Replace the ghost window


Love the floors. I only caution be careful on those stairs, socks and wood are a slippery pair lol, I know from experience the most terrifying morning slipping down the stairs on my rear with an infant in my arms. Thank God the baby was fine but it took about a week for my Rear end to recover LOL. Truly its beautiful.
Good tip! Our son loves to wear socks in the house, so he’ll have to take it easy on those stairs!
Hardwood flooring throughout a house makes it feel so cohesive. They did a wonderful job. Good luck with the painting on scaffolding!
Thanks, Carla! Won’t be long until the scaffolding arrives and I set it up! 🙂
It looks absolutely beautiful!!! You have such a great sense of humor…
Thank you, Marcia! 🙂
Nice job! Having hardwood floors that are finished on site is really the way to go, but unfortunately some of us don’t have that option. Looking forward to seeing all your improvements and hearing about the radon mitigation system.
Thanks, Debbie! I’ll be writing about the radon system real soon.
It’s lovely Greg. Handan has a good eye (obviously – duh she chose you). And the fact that everything/everywhere is named “PeachTree” in Atlanta is no joke. Good luck with that. ? Is there anything more beautiful than a master at their craft ?? Mad props for skilled “immigrants” who come to our country with talent and pride and hope and dreams to fulfill ours and make our country a better place to live. VOTE in November !! Looking forward to the journey you all (?) are on !!
Well said, Cheryl! Yep, these guys are certainly great at what they do!
Thanks for sharing all the steps involved!! It looks great!! The color you picked was perfect!! Thanks to professionals who helped you narrow down all the choices!!
Thanks, Anne! 🙂
The floors look amazing. Great choice. I am over in the Uk now as getting back to Florida at the moment is not happening. Look forward to seeing the rest. Have a good weekend. X
Thanks, Carol, you too! 🙂
Thanks for sharing this! Needed that contact for the hardwood floors in our new-to-home and to add hardwood to living room and dining room, too. I’ll be calling your guy after reading this. Can’t wait to read about the radon mitigation. We might be doing that, too.
Radon coming soon! Here’s the info: James at Peach State Hardwood: 404-490-7140
Not only am I amazed at how the floors turned out, but I’m also amazed at the way you guys/y’all seem to waste no time knocking things out of the park with your to do list!!! Short term goals??LOL I make a list every spring and I’m lucky if I’m able to cross off half! You guys/y’all are truly an inspiration to me!! Can hardly wait for the next update! Keep on keeping on!! PS…How’s Handans honey therapy going?
LOL, I was just thinking that my “short term” list is probably longer than most people’s “5-year plan!” Handan is still suffering, but not as badly. She’s on honey and Zyrtec right now. 🙂
Never having lived with hardwood floors, this process was an eye opener! What a project. So glad you had workmen who were so reliable. You really are checking off stuff on that list!
Having watched them do it, I know now that I’d never attempt a real hardwood installation myself. Floating floors are a cinch. This took some skill!
The floor looks fabulous Greg Handan does have a great eye for spotting imperfections. I agree when you find a good company with skilled craftsmen and an owner that take pride in their work and do a good job, you do want to tell the world, can’t wait for the next stage.
Thanks, Catherine! Things are changing fast around here!
Well this is my second attempt at commenting so I’ll make it short. Something’s wacky with the typing and jumps around. Your floor is lovely ,and after I saw the color in different lighting ..it is beautiful. We had our floors done three years ago when we moved in this tiny house. I don’t know if it was oil based or water-based. But I was told it was a Swedish finish, and that it was a very low gloss. I like high gloss, shiny. But I was not encouraged to go with high gloss. I do like shiny tho. So we’ve only had it for three years and already we have dents and scratches. That’s just a sign of living I guess and as the floor gets older it’ll probably take on a life of its own. We had bought an old Duncan Fife table at a restore, and the top of the table was full of scratches, marks, and even some math problem from some kid had been in dented into the finish. I loved It because it had a story and history. Stuff like that doesn’t bother me, so maybe our floor will have its own story. Of course there’s only the two of us so I can tell who did what. I think you guys are on a Tremendous venture and we are happy to go along with you. As long as you’re paying. Right now we’re having a new roof put on. That is not very exciting. I hope you don’t have to do that. Looking forward to more stories.
Hi Bernice! I’ve never heard of a Swedish finish – something for me to look up and learn about! I agree about the floors taking on a life of their own, but it’s hard to watch that first step – the first scratch or dent – but I suppose they’ll come eventually, especially once the dogs get here!
Wow, that was fast! It looks great. Having lived through three new and two refinished floor projects, I can see that James and his crew are top notch! I’ve always used an oil based (Swedish) finish, so don’t know about water based other than to know that water based indeed does not yellow! I had a maple floor refinished in oil base and it turned an awful yellow. My neighbor’s water based maple stayed a beautiful ivory-white. I never had that problem with my red oak floor though; white oak did yellow a small amount but not as bad as the maple. I can’t tell with the stained white oak because it’s dark like yours. Live and learn! Best wishes on the rest, I look forward to seeing more.
Thanks, Karen! Time will tell how well this finish holds up!
The floors are beautiful. My question is what color will replace the red walls. We just bought a house built in 1845. Oh joyful me. Original floors and some are great the kitchen is not. Wonder if James would journey to Windsor, Ohio. And the red living room just cannot stay.
Don’t worry, that red dining room will not be staying that way! Stayed tuned for that one! 🙂
Seems I’m in the minority here but I actually like the red dining room!
Anyway, nice work. Wish James had a brother in the business in Iowa!
Cheers!
Well, okay, the red isn’t the worst color in the world, but trust me, we’ve found a MUCH better one! 🙂
Hi Guys! Wow, what an improvement over that carpet! It’s wonderful when you find skilled professionals who are masters at their craft and don’t mind an Eagle Eye inspecting every corner :). I’m not sure you actually needed the room to look BIGGER, but it looks lovely. Best of luck in your new home – can’t wait to see how it all unfolds.
Thanks, Leslie – it’s an incredible improvement! Now the first floor has a cohesive look and we love it!
would love hardwood flooring but my home is on piers with forced hot air heat. cold floors in the winter. so carpeting with the best underpad available.
Still, you can’t beat a thick carpet in the coldest winter months!
I found this post so interesting! I was shocked at all the wood filler but it makes sense! My parents had their hardwood floors refinished about thirty years ago and we could not enter the house for 2-3 days due to the fumes! I’m glad they have fixed that issue! The floors are stunning and make your huge home look massive! I can’t wait to see what is next!
Thanks, Giselle! I know, right? So many micro-repairs, but you’d never know it when looking at the finished product. More coming up real soon! 🙂
Hey Greg,
Thank you for sharing! Great color choice and wonderful wood floor! A lot of work has been done. I take off my hat to your masters of the floor – it is really good fellows, you are very lucky with them.
Regards,
Joseph Randall
Thanks, Joe!
We gutted and remodeled the home I grew up in 4 years ago to live in as our retirement home. We have the original red oak floors everywhere but the kitchen and bathroom. We also chose Provincial stain and poly finish and it is still beautiful 4 years later. Cat claws have done a job on it in a few areas but that’s just part of the charm! I’m sure dog claws will do the same. It’s nice having you in our area, now I have a resource for various contractors! Hope you are enjoying the heat and humidity!
Hi Anne – that’s good to hear! We know ours will get marked up a bit with our dogs, but I suppose that is the fate of all wood floors. We’re so happy to be living in your area, and I hope we can help with contractors – we’ve already seen a ton of them! 🙂
Hi Greg, thanks for sharing this, its a really enjoyable read! The new floors look fantastic as well, the team did great and you picked a lovely colour. I’m looking forward to reading about the rest of your long list of projects!
Thank you!
We would love to hear your thoughts on the luxury vinyl plank flooring y’all installed upstairs. We just switched our plan of us installing wood look tile planks to using the luxury vinyl tile.
Not too long ago we installed 1200sq ft of tile for a friend so even though we intended to tile our 1100sq ft house, the thought of going through all that it entails has given us second thoughts. We have read about it and talked to others. My husband is thrilled about the installation part.
Any thoughts would be appreciated, thanks.
Hi Lane, so far we love the LVP upstairs! It not only looks great, but it feels good too. We’re so happy we tore out the carpet and went with LVP!
The final results are awesome.