
DIY Fireplace Mantel
This DIY Fireplace Mantel is made from plywood, but it looks like a high-end wood beam mantel that sells for hundreds of dollars.
It was the last piece of the family room remodel puzzle, and I had put it off for far too long.
To be fair, the entire “family room remodel” was a project that dragged on like the pyramids of Giza or the thing that dude built for his favorite wife. I’m sure his other wives weren’t too fond of that little boondoggle, but hey, being the favorite has its perks.
Anyway, for those who are new here and the rest of us with short memories, this is what the…
What the…
What the heck was I talking about?
Oh right! The family room!
Well this is how it looked when we moved in and for a year or so afterwards:

It had the look of mashed peas and the personality of boiled rutabaga.
When we finally got around to the remodel, just tearing out the hideous fireplace and removing the walls was a huge improvement.
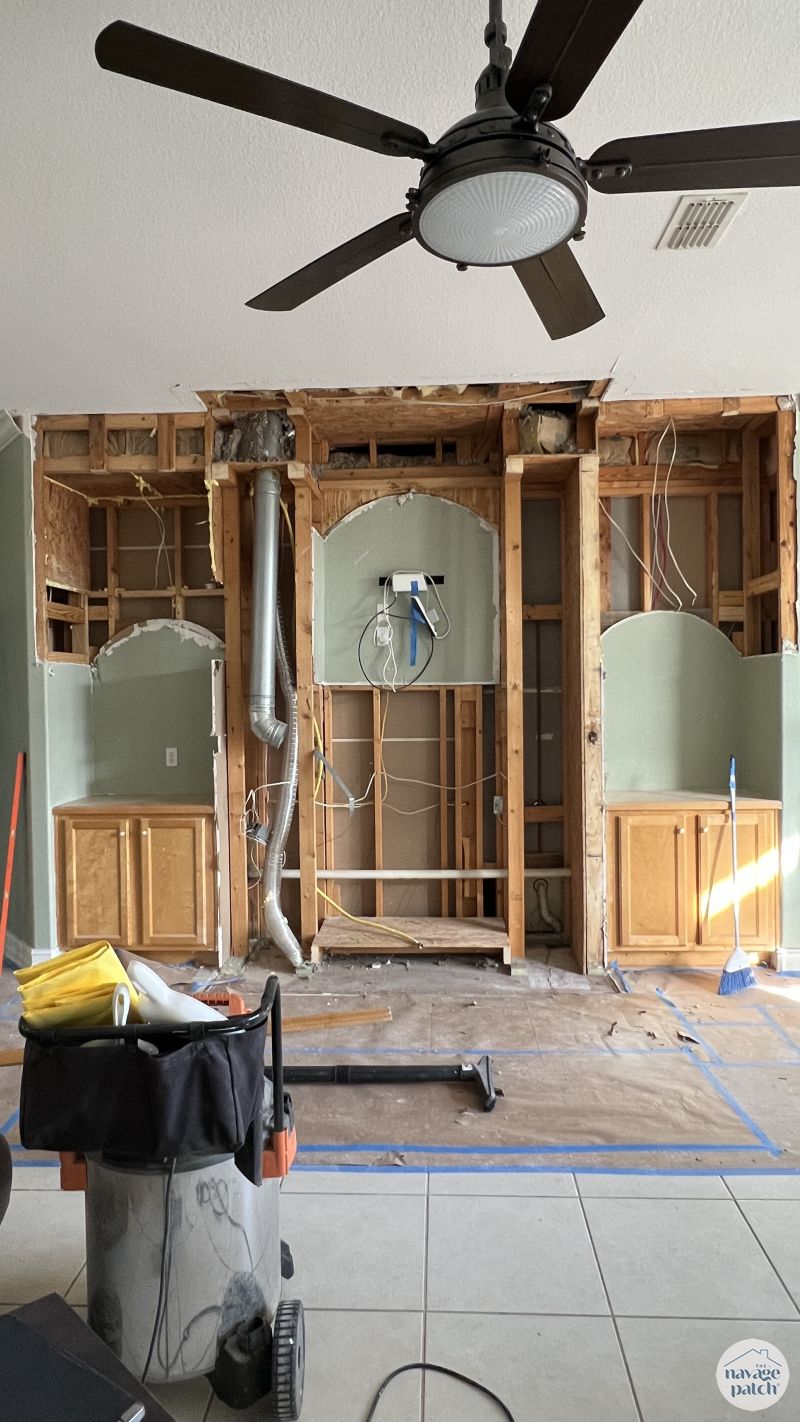
After a whole lotta time, noise, dust, upheaval and unpleasantness, we ended up with a beautiful family room fireplace wall.

But there was just one thing missing…
Yep, the mantel.
We thought about buying one.
We thought about making one from a big honkin’ wood beam.
We thought about making one with corbels (well, not we – that one was Handan’s thought).
In the end, I was democratically nominated to build a lightweight, inexpensive mantel that only looks heavy and expensive. And I nominate you, dearest madam, to read how it’s done.
So throw another log on the fire, another ice cube in your martini, and let’s build a beautiful fireplace mantel!

DIY Fireplace Mantel SUPPLIES LIST
Affiliate links are provided below. Full disclosure here.
- Kreg tools, stain and glue
- HART tools
- 4×8 sheet of 3/4 inch plywood
- One 2×4

DIY MAntel VIDEO Tutorial
Watch our short and fun video below for an overview of our mantel before you read the steps.
Watch Our Tutorial On YouTube
On Tiktok
On Instagram
We love to see our DIY projects out in the wild! If you try this DIY project and take a picture and post it on Instagram, be sure to tag us – thenavagepatch
DIY Fireplace Mantel
The beauty of this mantel is that it is made from a single piece of 3/4 inch plywood and a single 2×4. Assuming you have the glue and stain already kicking around your basement or garage, you can make this beauty for about $70, and you’ll have some leftover plywood for another project. Check the prices on wood beam mantels online to see what a screaming deal this is!
I started by asking The Shrimp how big she wanted her soon-to-be mantel. After some hemming and hawing, we settled on a length, a thickness and a depth which I marked out with painters tape on the wall.
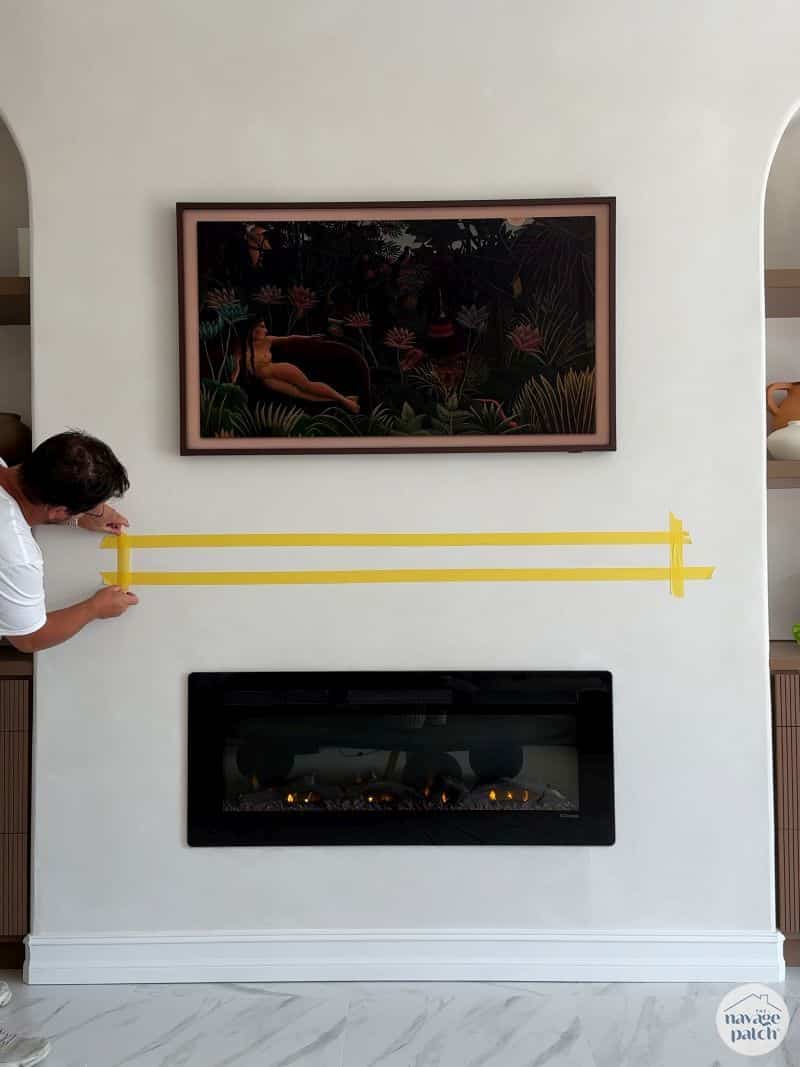
I saw that she was satisfied with the size, so I moved onto the next phase: get me some plywood and cut it.
Now, what makes this DIY fireplace mantel look like a solid piece of wood is its mitered edges. But cutting a clean, straight miter over a 5+ foot edge is really tough with a circular saw or a table saw, but it was a breeze with my Kreg plunge saw on a guide track. For some cuts I used my Kreg Adaptive Cutting System Project Table:

For longer cuts I used the guide track on a piece of insulation foam.
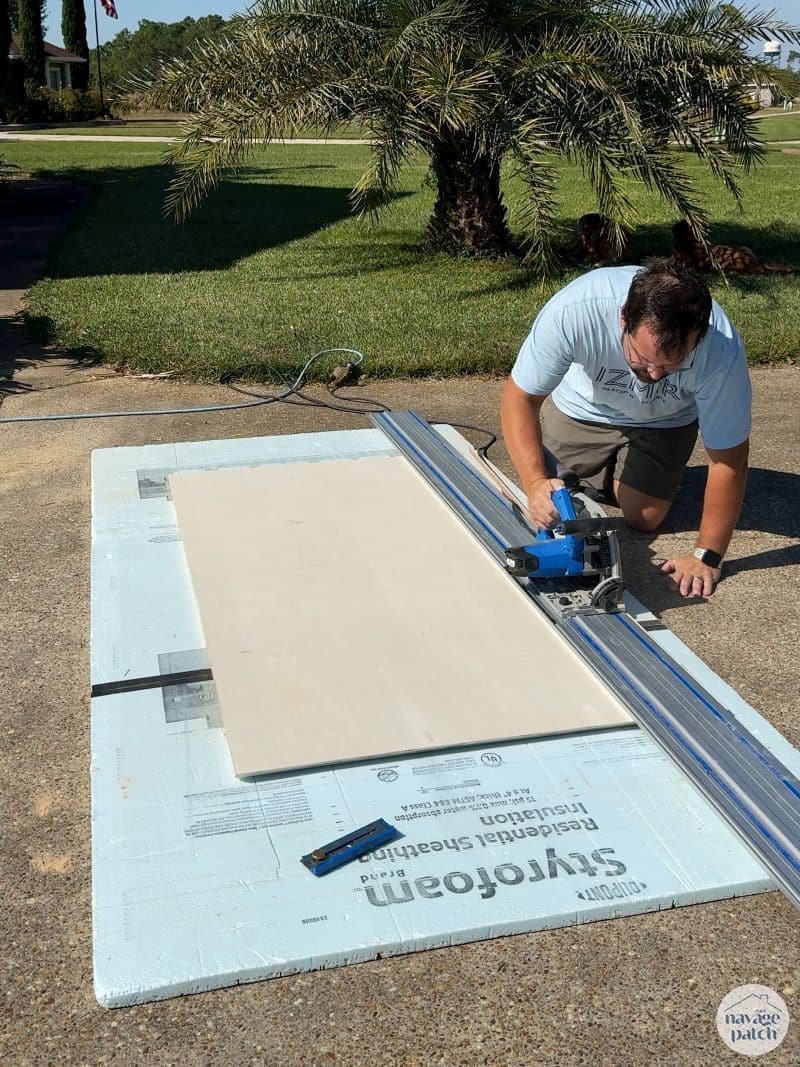
This saw not only cuts a perfect miter but it does so without a hint of tearout. This is a great cutting system, and I will be using it a ton in the future for some upcoming closet builds.
I placed my three long pieces face up, edges touching on the worktable and then ran painters tape down the joined edges.
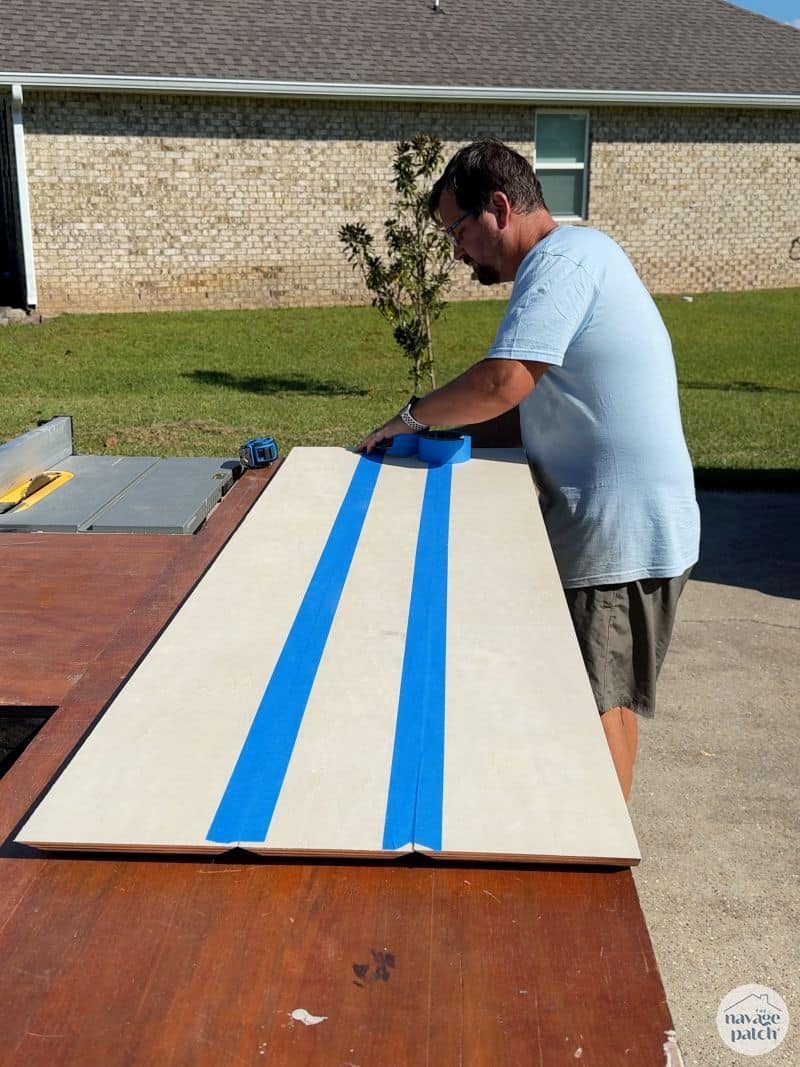
In the photo above there are supposed to be two pieces with one mitered long edge and the middle piece with two mitered long edges. Because I’m a pudding-brained geezer, I cut one of the piece on the left with two mitered long edges. Please don’t hold it against me. 😁Also please note that the short sides of all 3 boards are mitered as well.
I flipped the taped pieces over and spread wood glue down the miter valleys.

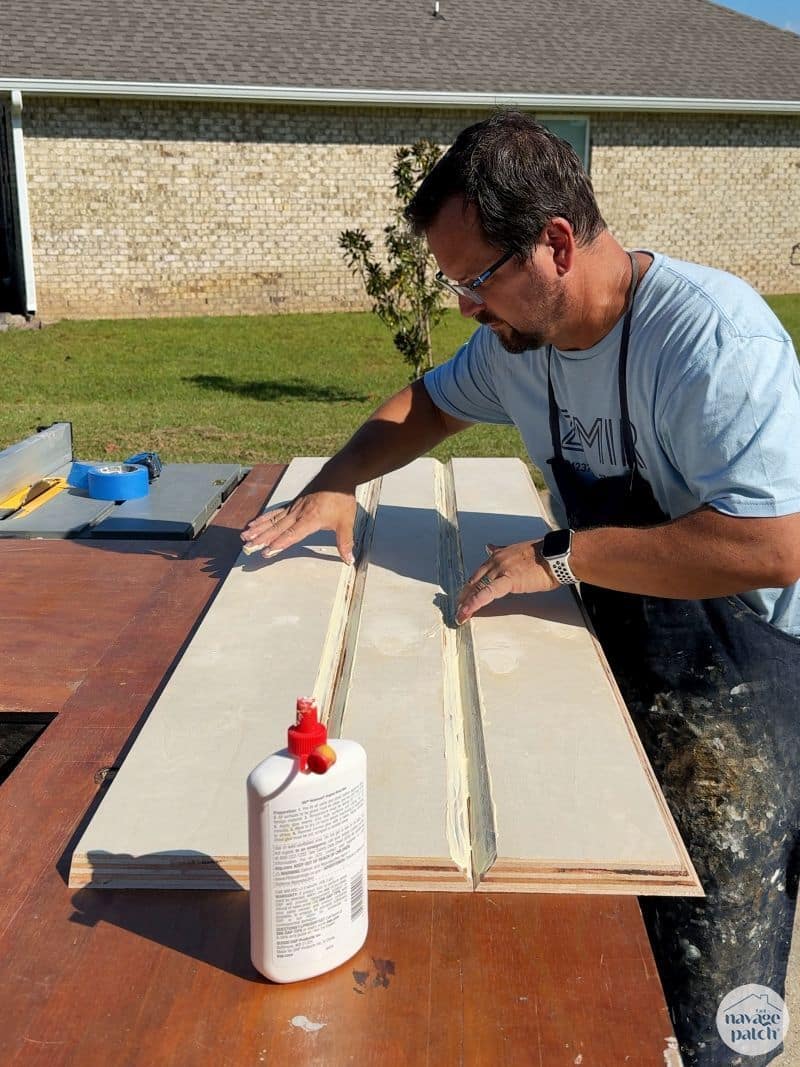
Whatever tool for spreading glue anyone may try to sell you online or in-person, just know that the best spreaders have been dangling from your hands since birth.

After washing my hands, I folded the sides up to form the mantel.

I carefully flipped the mantel onto its face and then squared and loosely clamped it.

When the glue was dry I removed the tape.

Despite my assurances to my parents, my wife and anyone who ever cared to listen that I was born perfect and have been improving ever since, my miter joint (as all my miter joints) was not perfect. Close, but no Cuban cigar.

Dominican perhaps…but not Cuban.
Fortunately, there’s a fabulous hack for such imperfection.

By running the shaft of a screwdriver along the mitered edge, I was able to approximate the perfection I’d long assured those closest to me I possessed.

Next, I lightly sanded the edges and face. Since Covid, the lumber world has pretty much gone to shit. The veneer they now put on plywood is so thin you can see through it. It doesn’t take much more than a rooster fart to blast through that veneer and expose the orange glue and crap wood they use underneath. Sand carefully my friends or your mantel will look like an exceptionally large and straight Cheeto.

I then glued on the end caps – pieces mitered on 3 sides. These complete the wood beam look.


After rounding and sanding the ends, I coated the entire mantel with pre-stain and then stain. What you see below is Minwax Special Walnut.

This turned out not to be dark enough, so I custom blended some other stains and gel stains to darken it to the my babes’ desired shade.

While the stain dried, I built the frame from the 2×4. The way this mantel works is that it fits perfectly over the frame. The inner height of the mantel is 3 1/2 inches – the same height as a 2×4. The supports are super glued and screwed to the long length of 2×4 and their lengths are determined based on the depth of the mantel. For a 6-inch-deep mantel, the supports would be 6 minus 3/4 (the thickness of the plywood face) minus 1 1/2 (the thickness of the 2×4 support beam) = 3 3/4 inches.

I secured the support frame to the wall by screwing it into studs.

Look, I don’t mean to beat a dead horse, but about that whole “born perfect” thing…


All I’m saying is that Superman and I have never been seen together in the same room.
When the stain on the mantel dried, I gave it a couple coats of wipe-on poly and put it in its place.


I was a prefect snug fit, so I only needed to shoot a couple of brads into the ends.

This will allow me to easily remove the mantel if the need ever arises.
Now let’s take a look at the fully finished family room!


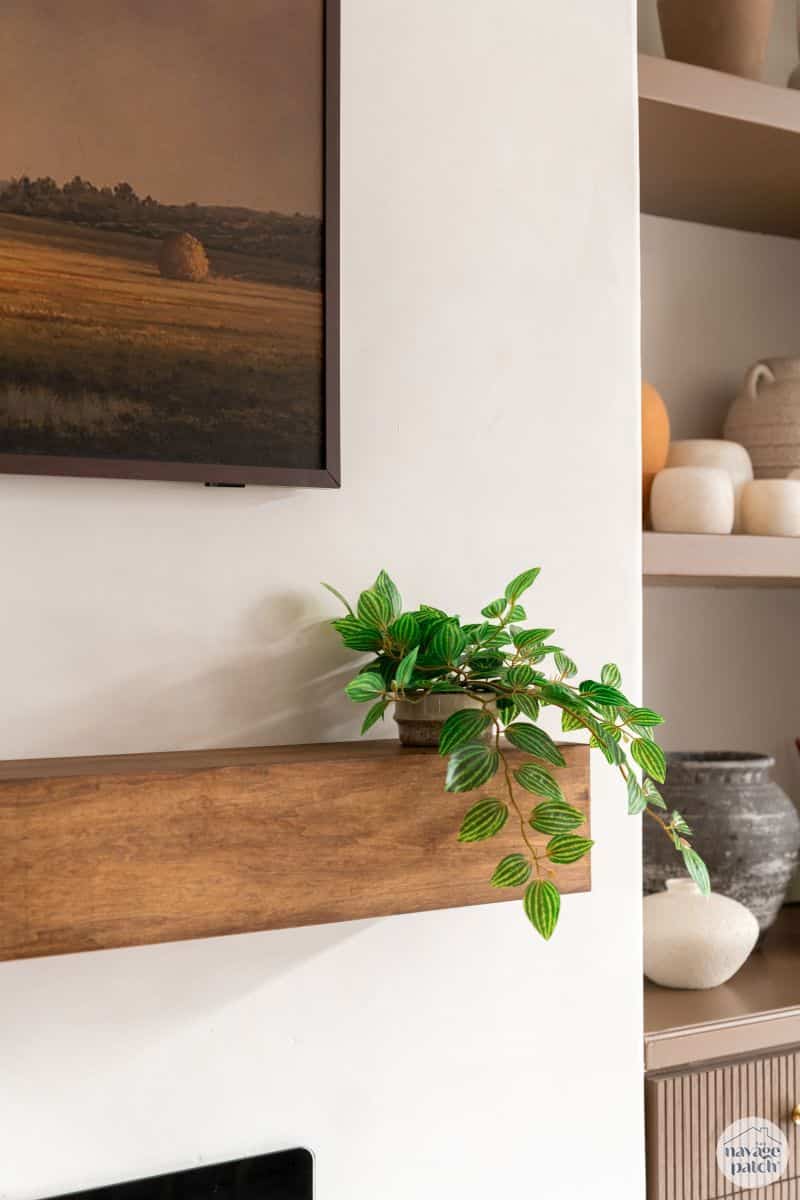


The new mantle looks perfect. Definitely the right way to go.
Thank you, Cynthia! I’m so happy with it. glad we didn’t go the expensive beam route! 😀
That looks great! The room is infinitely better than when you bought the house! lol
Oh I know, right? It was pretty bad when we moved here, but I’m making good progress on updating all the yuck! 😂
Never fails, such a blend of craftsmanship and literate humorous writing. Kudos, ots gorgeous.
Thank you, Christina! I’m so happy you enjoyed it!
Beautiful as usual Greg! Glad you dumped the old fire box and added the streamlined one.
It’s so much better, Karen! There’s really no need for real fire in Florida!
Have you thought about selling your husband? 🙂
I’ll ask her, but I don’t think she’s selling! 😂
Wow!
Thanks, Pat!
Lovely!
Thank you so much, Derry! 🙂
Is that a tv above the mantel?
It is, Debi! It’s a Samsung Frame, so it doubles as a rotating art gallery when not in use!
I’ma believer!! Looks…dare I use the word…perfect! KUDOS. franki
😂 Perfection is my middle name, Franki!
Still debating what’s the best part about this: the fabulous mantel or your writing.
😀 Thank you!!
I love the mantel, but I’m still still sitting here laughing at “rooster fart”.
:D:D:D