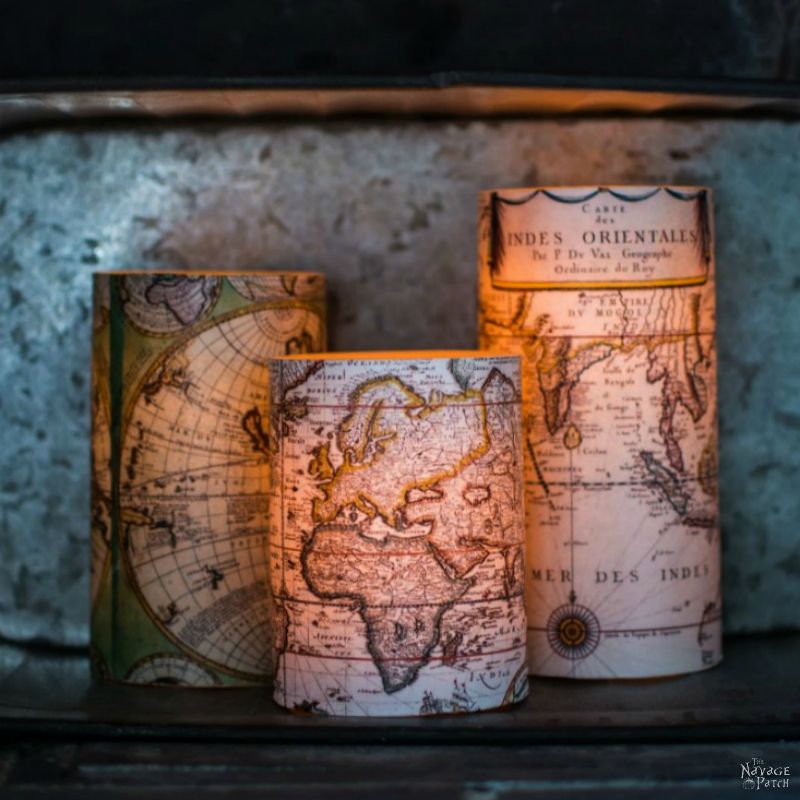
Antique World Map Decoupage Candles
Jazz up those boring LED candles! Get our free antique world map printables, and we’ll show you how to use them to make these awesome decoupage candles!
When I first started crafting, I jumped right in with a decoupage project. What a mistake! Believe it or not, it was way worse than what Greg went through with his first Mod Podge project. [Yeah, right. Easy to make that claim with no supporting evidence. Show pics, or it didn’t happen! -Greg] Every time I tried to get rid of the air bubbles, I ended up tearing the dang paper! After four or five tries, I was so annoyed that I literally cried and swore that I would never try my hand at decoupage again. [It would have been hilarious if she weren’t my wife, and if I didn’t value my life. -Greg] Hahahaha, I know…what a sore loser, right? 😀 But just like anything else in life, the more you practice, the better you become at it…or should I say, the more you practice, the better you handle defeat! LOL. A couple months and many defeats later, I must have trained my nerves well, as I was able to pick up a bottle of Mod Podge without shaking with fear and anger, LOL! This time, surprisingly, everything went excellent, and I managed to make some beautiful antique world map decoupage candles for Greg’s Mom as a gift.
Since a DIY gift is always appreciated greatly, I wanted to share a mother-loved-and-approved project with you, as Mom still loves the ones I gave her three years ago. 😉
Have you had enough of my yapping? [Who could ever have enough of that? *rolls eyes* -Greg]
Then let’s get on with the decoupage candles tutorial, shall we?
Antique World Map Decoupage Candles
The full written tutorial is below, but why not check out the video tutorial first?
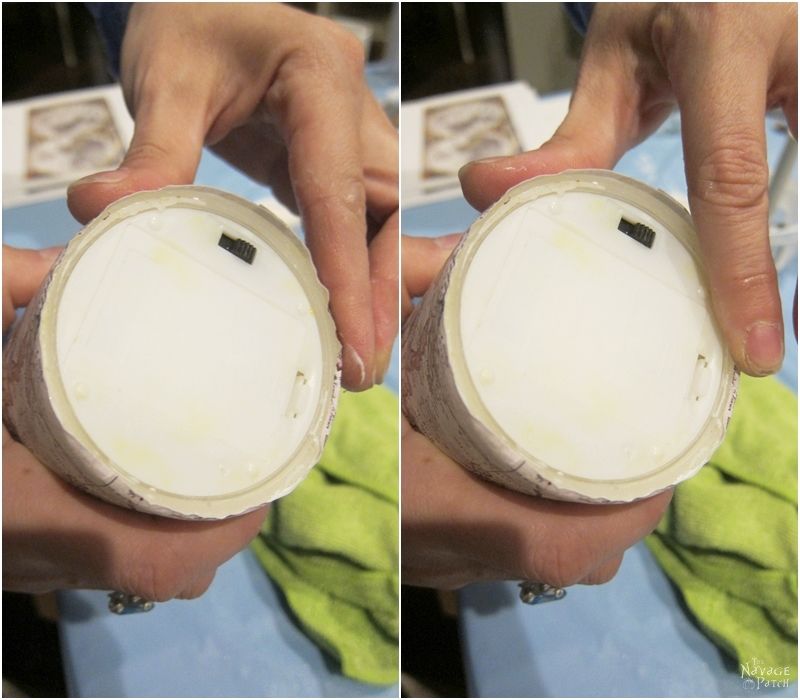
First I took a bunch of measurements to find out the size of my LED candles. Once I knew the candle size, I prepared my antique world maps according to size.
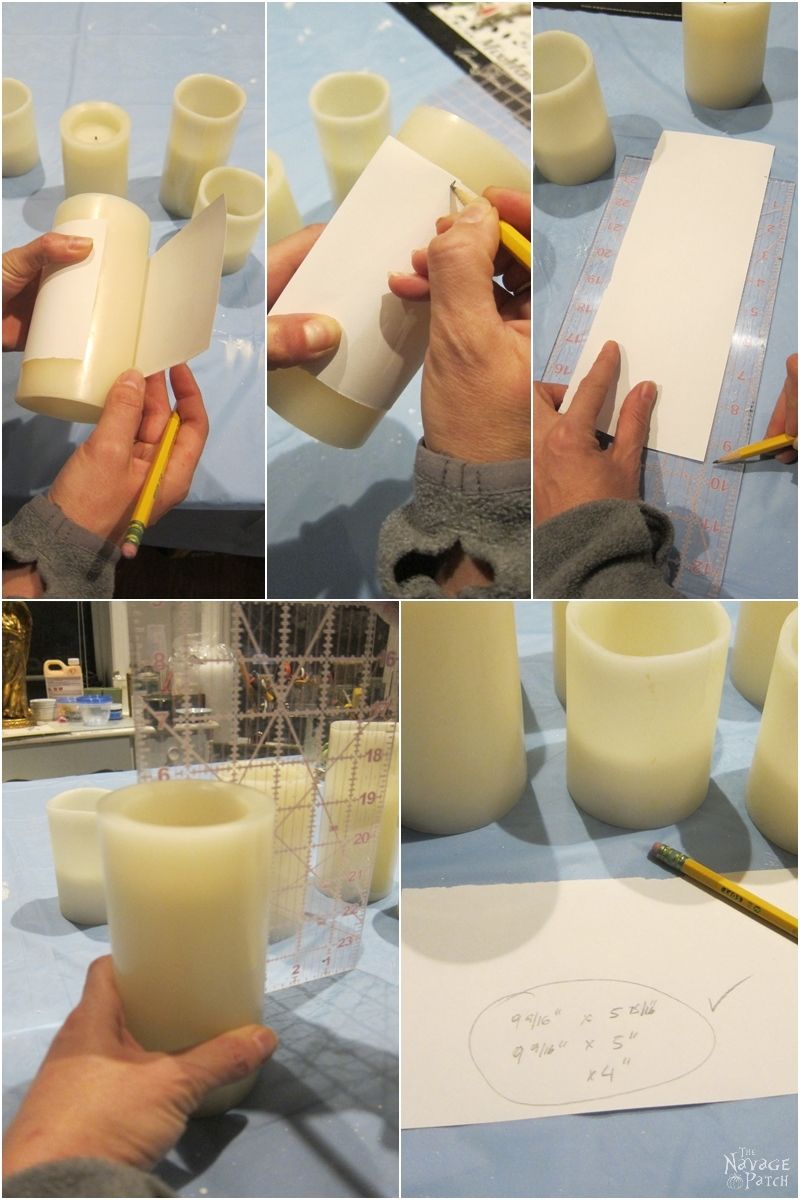
I made several decoupage designs for both 5 inch and 6 inch tall LED candles…and yes, as usual, I am sharing all of them with you at the end of the post. Hence, if you’d like to use those designs, you can skip the step above 😉
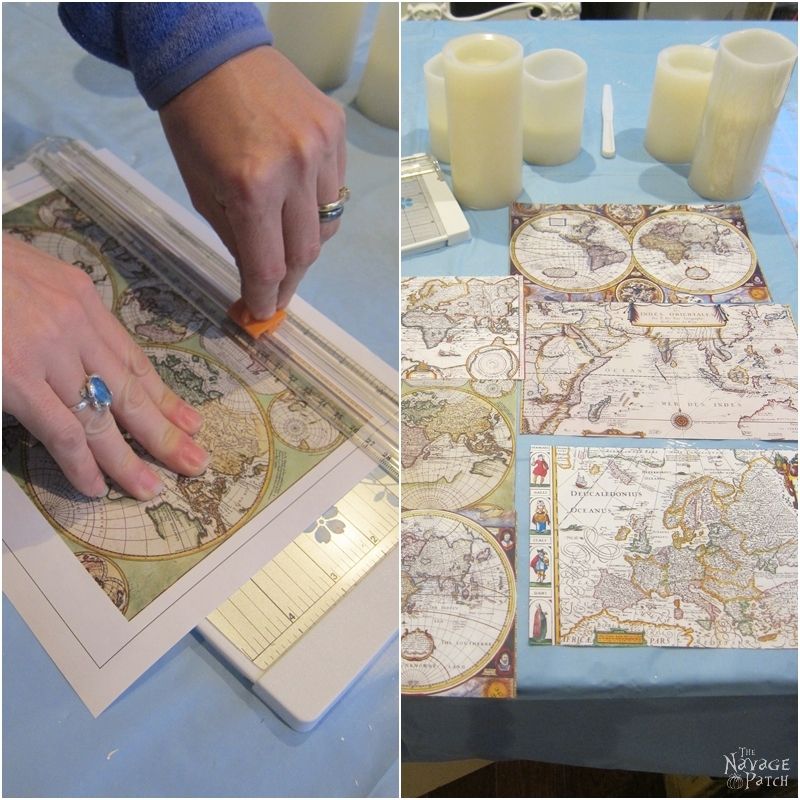
Once I was finished with the designs, I printed them on copy paper (8.5″ x 11″, aka letter-size paper) and let the ink dry for a couple of hours.
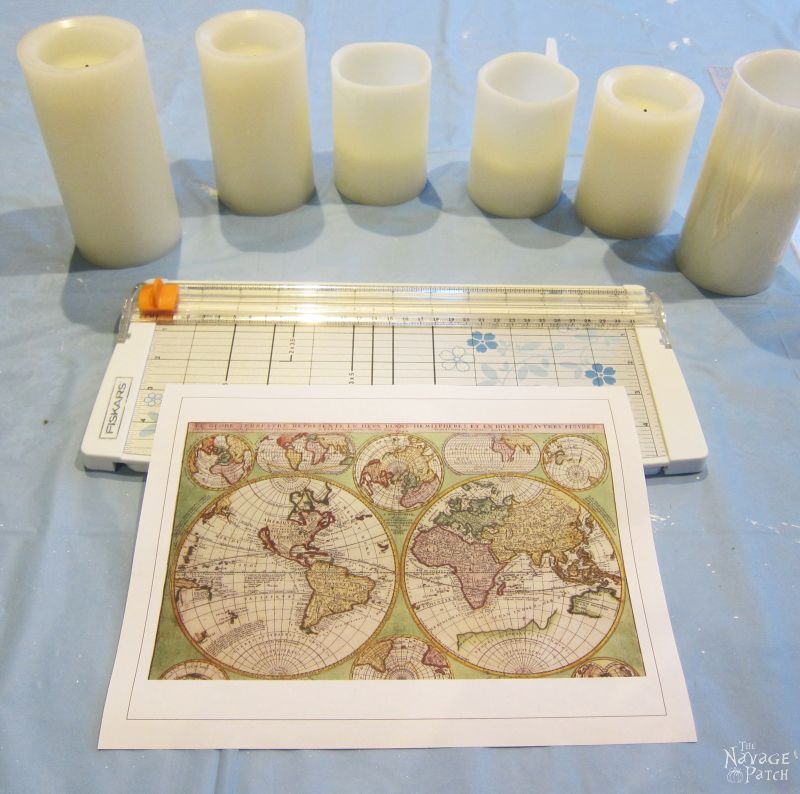
Next, using my paper cutter, I cut my decoupage candle designs. And when everything was ready, I started decoupaging.
Now here is a little hint for you: I normally use two different methods when decoupaging-
When working on this project, I first started with Method No.1, which I usually have great success with on big flat surfaces, as it helps eliminating bubbles. But since the decoupage surface on these candles was small and not flat, I also gave Method No.2 a try, and I have to say that was much easier and faster. Still, I will show you both methods, so you can choose whichever would seem easier for you.
Decoupage Candle Method No. 1 – Spreading the glue on the surface
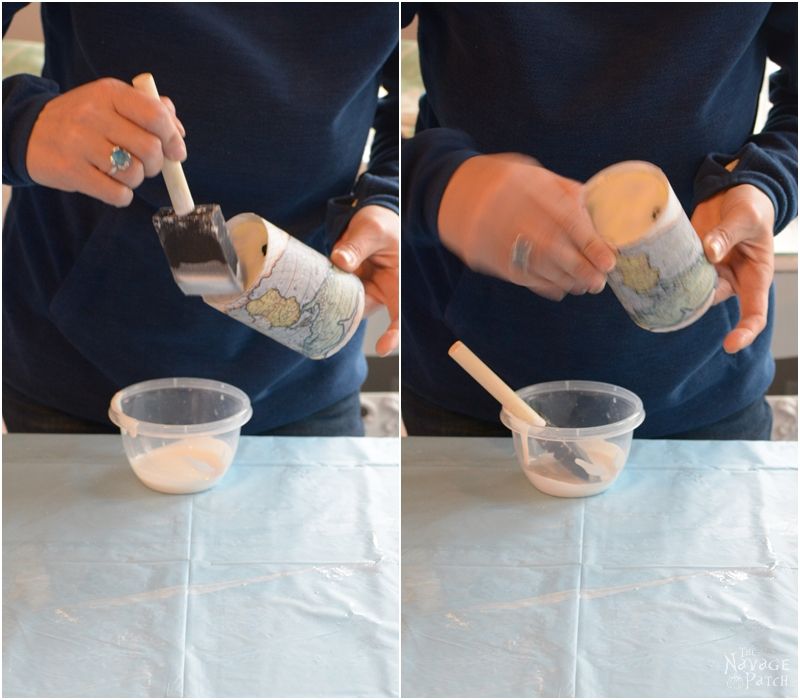
I poured some Mod Podge into a small bowl, as that makes it easier to work with. Mod Podge matte is my preference, but any Mod Podge will work. As a matter of fact, Greg almost finished my bottle of matte while working on that disastrous first Mod Podge project of his, so I had to use whatever Mod Podge I had on hand for this project.
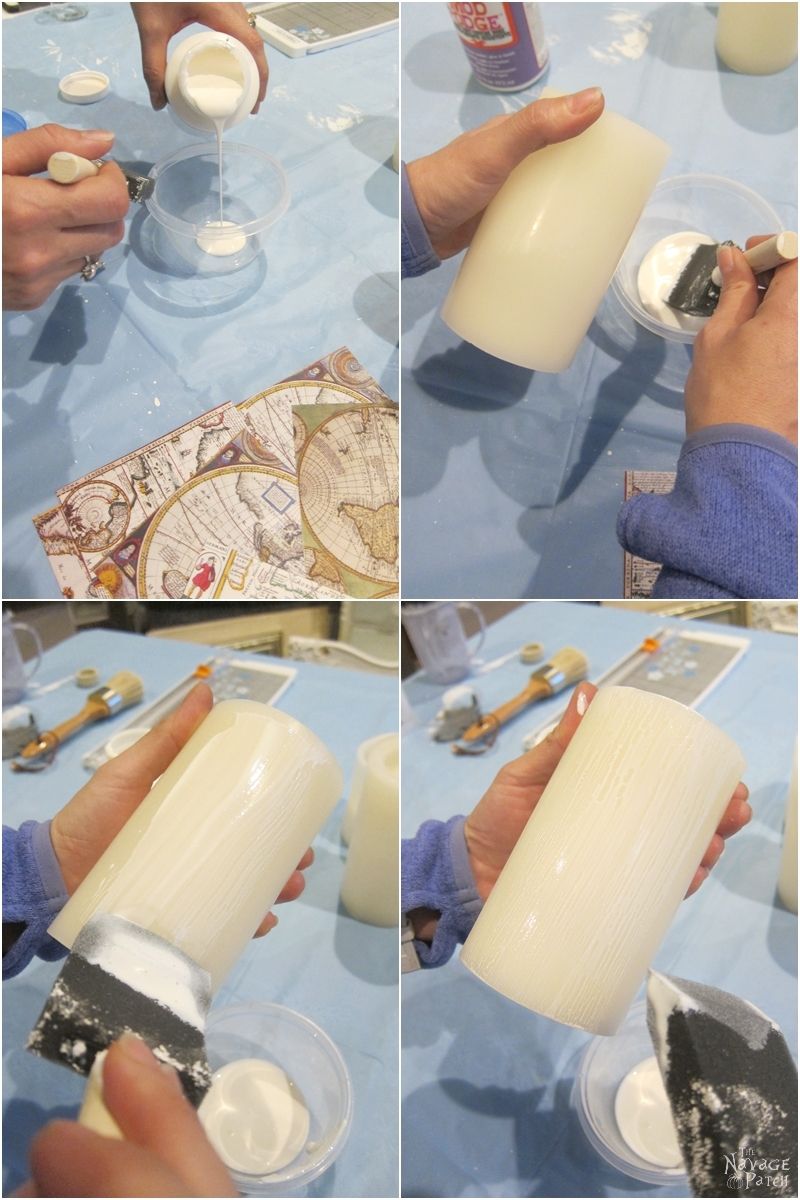
Then, using a sponge brush, I started spreading the Mod Podge on my LED candle. As you can see from the pictures above, you only need a moderate amount of Mod Podge – not too much nor to little. The only trick here is spreading the Mod Podge evenly.
Next, I picked up my paper and placed it on the glued area.
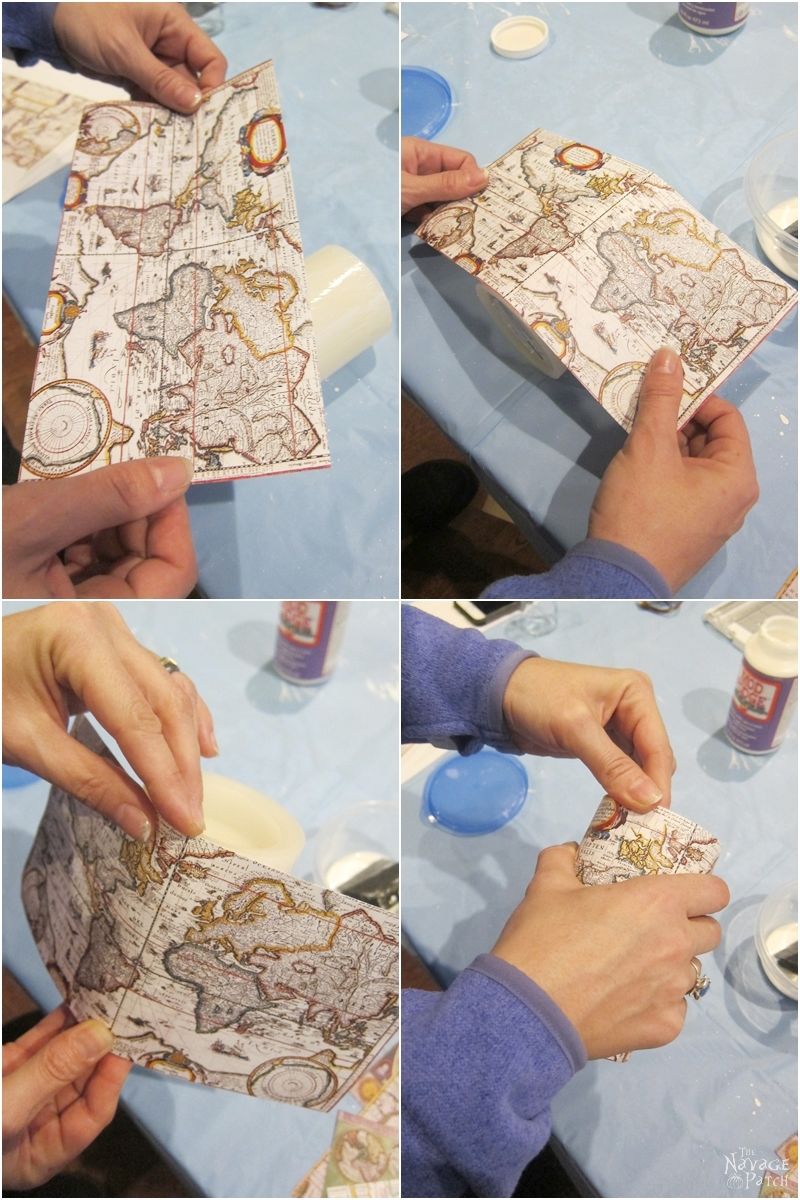
Before the paper settled in its place, I made sure it was aligned with the top of the candle as precisely as possible. Then I smoothed out the paper and got rid of any bubbles.
Once the first area was done, I turned the candle around and spread some more Mod Podge. I again placed the paper and smoothed it out with my fingers to get rid of the bubbles.
Now here is another hint for you: keep your fingers clean! If you get Mod Podge on your finger tips, just quickly clean them with a dry cloth. Otherwise your fingers will become sticky, and that will either create a mess on the decoupage paper, or make it hard to work while handling the paper. So clean and dry fingertips are the key for an easier decoupage candle process.
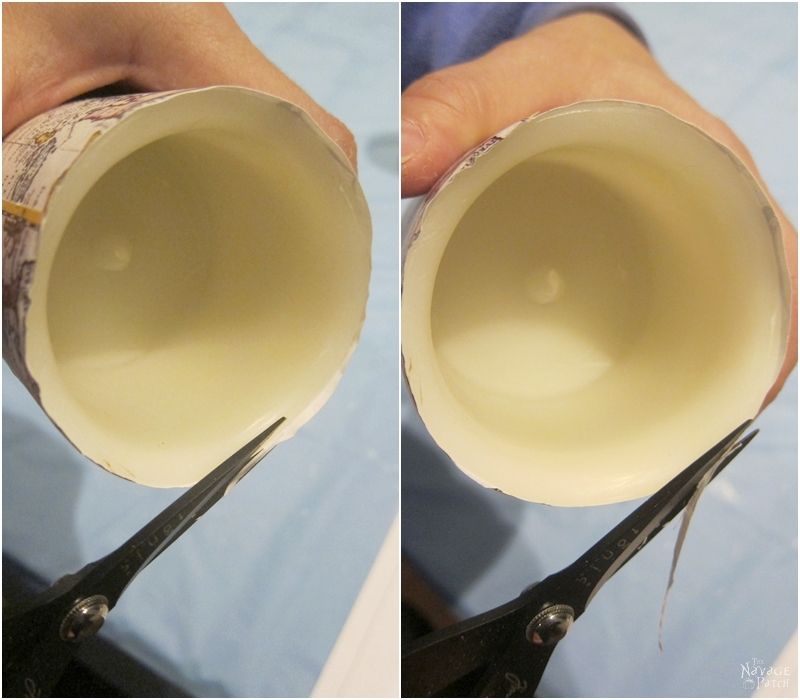
Next, I tidied the bottom and the top of the candles. As I wanted the tops to look really neat, I cut any excess paper with my snippers.
And with the bottoms, I just applied a little bit of Mod Podge to the ends of the paper, and I bent the paper with my fingers, so it would be glued to the bottom.
Decoupage Candle Method No. 2 – Spreading the glue on the paper
I again poured some Mod Podge into a small bowl, as that makes it easier to work with.

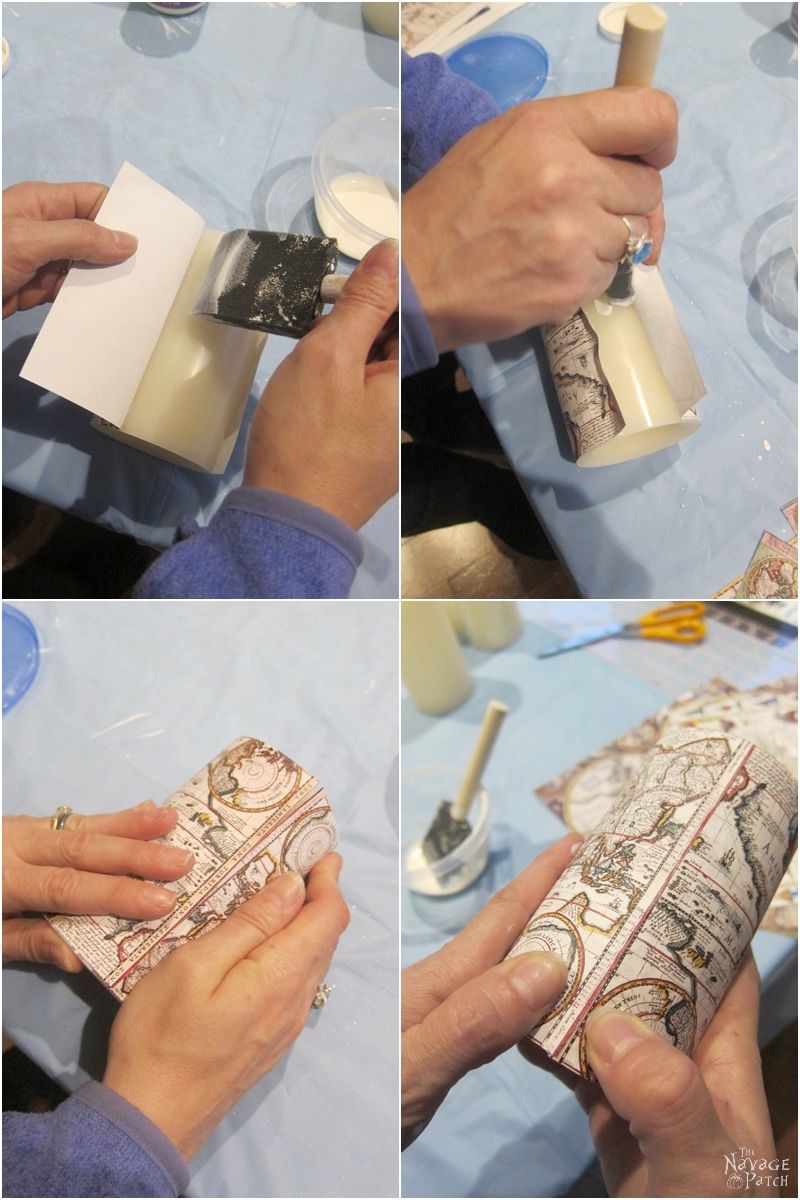
Then, using a sponge brush, I spread the Mod Podge on the back of the paper. Again, I used a moderate amount of Mod Podge – not too much nor too little.

Next, I placed my paper carefully on the candle…

…and I tried to align the paper with the top of the candle as best I could.

Once I had the top of the paper aligned, I gently wrapped the paper all around the candle, and again gently smoothed it with my fingers. This smoothing process gets rid of any creases or air bubbles you may have.
The “clean finger tips” hint also applies to this method. Do you see how I am trying to keep my index finger away from the paper? That is because it had Mod Podge on it, and I knew I would mess up the whole thing if I touched that paper with my gluey fingertip.


Next, I moved on to the bottom of the candle. I added a tiny bit more Mod Podge and bent the sides of the paper inwards so they would be glued to the bottom of the candle.
Once I was done with the bottom, I trimmed any excess paper from the top like I did in Method No. 1.
Now that I’ve shown you both methods I use for decoupaging, you can select whichever seems easier for you. I prefer the first method when the size of the decoupage is big – just so you would have a better understanding, I consider these maps medium size. If the decoupage paper is small, then I go with the second method, because although it is a bit messier, it also is faster.
Once the paper was glued to the candles, I let the candles sit for an hour. This allowed the glue to dry and cure a little. An hour later, I took a new sponge brush and applied the protective coat on the decoupage paper. I put 2 thin layers of Mod Podge with the sponge brush.

After the protective layer dried, my antique map decoupage candles were ready for indoor use.
You may make these also for outdoor use if you like – all it would need is a protective layer (brush on or spray varnish) suitable for outdoors.
Now it is time for the beauty shots. Let’s see if you’ll like my antique map decoupage candles 😉


As usual some close-ups for you to see the details…


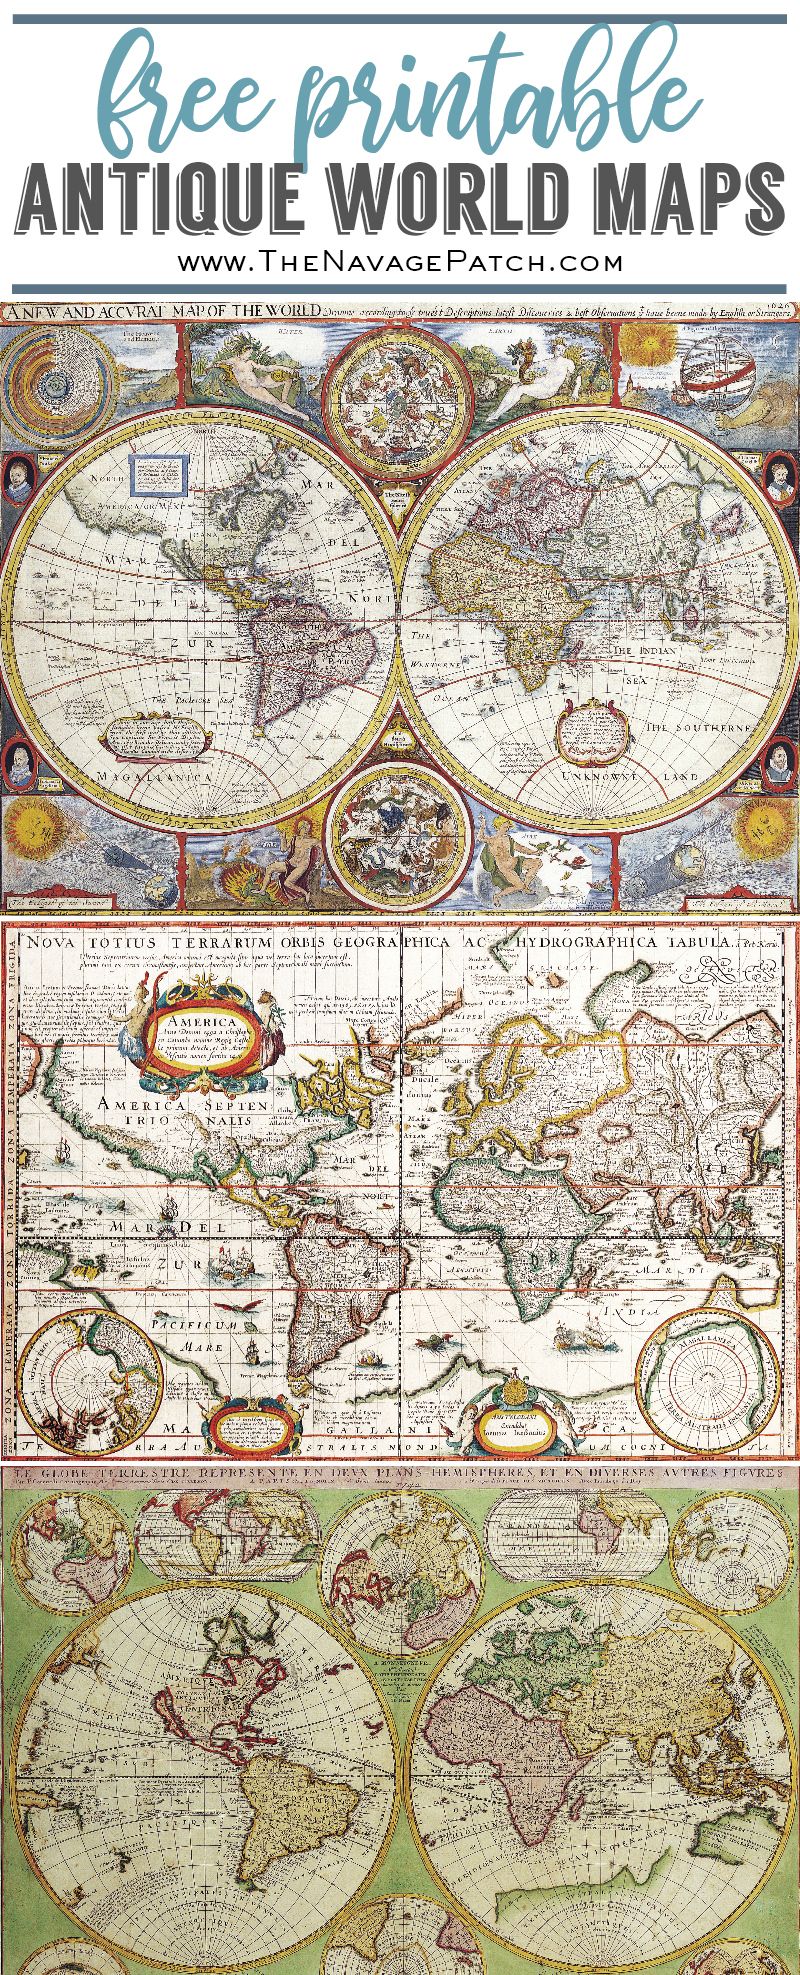
By the way, you will love these printable maps I am sharing. Can you see how clear they are? You can read almost every word on them! 😉

I love the way Greg staged them in these galvanized metal planters.


We love to see our printables out in the wild! If you display our free printables in your home or use our free SVGs in your projects, and take a picture and post it on Instagram, be sure to tag us – thenavagepatch
Free Antique World Map Printables
Please note the maps are designed to fit 5 and 6 inch tall candles when printed to letter size paper (8.5 x 11) and with no scaling. You’ll find them in the Maps section of The VIP Patch.
take me to your
amazing freebies library
If you’re not a Navage Patch VIP, you won’t be able to access our Freebies Library. But that can be easily fixed! Subscribe for free on the form below and become a Navage Patch VIP. Once you subscribe, a password will be sent to you in our Welcome email, and that will give you access to The VIP Patch [Freebies Library].
Handan, xo
Share it on Pinterest & Facebook!

these candles are so beautiful Handan, your hands are so artistic, and i highly recomend that everyone take the time to watch the video,and go all the way through it and read the credits, so they can see what greg was up to lmao xx
Oh you gotta love him! LOLOL. Yesterday when he told me that he finished editing and uploading the video I was like “What editing? Wasn’t it the final version that you showed me?” Then he said he just put the credits for the song and all, so I didn’t think much of it. Only after I hit publish here on the blog did I see what kind of credits he put. LOL. He is so funny!
I am so glad you liked the candles. Christmas is not far off you know 😉
Love the simplicity of the video. Very smooth and straight forward. I think the soundtrack needs some variety, it got a little wearing by the end, even with the vocals. It would be good to include the brush in your presentation of tools which was a great part of the video. The whole video complemented your tutorial really well I thought. I do think you should post the audio outtakes of Greg “directing”, I’m sure they are hysterical!
Derry, thank you so much indeed for your input! That is so very helpful! And I totally agree about Greg audio…hahahaha 😀
These are so beautiful Handan. Thanks for sharing xx
Thank you so much, Kate! 🙂
Great project! I have a bunch of these LED candles around my house. They’re all set to come on at 7:00 p.m. I never thought about decoupaging them. Thanks for the detailed video and the tutorial.
Thank you so much, Carol! 🙂
Printed out maps last night but p/c was so doggoned slow decided to print how-to’s today and to thank you so much for providing the maps. Was so generous of you to provide all of them for us.
Your candles are so pretty and so well done. Hope I can do them justice, look as great as yours. Loved how you staged them in metal container, just happen to have one or two of those containers so will try what you did. Need to get some led candles, will build up supply little by little unless can catch some on sale. Will watch HL or Michaels sales when we get paid again..
Wishing you both a wonderful happy Easter.
Thank you so much for your lovely comment! I am sure you’ll do a perfect job and they will turn out beautiful. Happy Easter to you too!! 🙂
Oh no Handan you moved over to the dark side of video crafting 😉 The candles look gorgeous and the video was super cool to watch. Love the credits, LOL. Weren’t you nervous?
Hahahaha…you just gotta love the power of “muting and adding music” when making a video! That hides all the mistakes and nervousness and even more. LOL. I don’t think I can ever do a video tutorial where I have to talk for minutes and minutes non-stop about the same thing. That really takes a certain skill set which I don’t think I have. Then again, if you ask Greg, he would definitely say that no one can yap better and longer than I about the same thing. hahahahaha 😀
These candles turned out awesome. Thanks for sharing them at Talk of the Town. They are my feature pick this week.
Angie @ http://www.knickoftime.net
Oh my, that is great news Angie! Thank you so much!! 🙂
The candles are beautiful! Thank you for sharing at Ravenwould.
Thank you so much, Kileen! 🙂
They look beautiful! And you’re right, the map is absolutely gorgeous! Love how you describe the process and always love the good humor:) Thanks for sharing at Vintage Charm! xo Kathleen | Our Hopeful Home
Thank you so much, Kathleen! 🙂
Handan, you’ve done it again! I am so charmed by these map candles. I forecast that everyone I know (and maybe even strangers on the street) will be receiving map candles from me this year as gifts. 🙂 Thanks for sharing at the #ThisIsHowWeRoll Link Party.
Hahaha – same here! It looks like I’ll be doing more of these as our friends loved them. They make perfect gifts indeed 😉
Gorgeous! thanks so much for sharing on craft schooling sunday!
Sara, thank you so much indeed! It was such a nice surprise for me to see my decoupaged candles featured! 🙂
These look gorgeous and you are so clever! Thanks for linking up and sharing your DIY idea with us at #overthemoon. I’m pinning and sharing.
Thank you so much, Sue! 🙂
I am featuring your fabulous candles at my link party on Grandma Ideas http://grandmaideas.com I think that these are terrific and can’t wait to make some of my own! Thanks for sharing the maps. I really appreciate it!
Thank you so much, Nina! 🙂
I absolutely LOVE these candles. I’m featuring them today at my Party in Your PJs link party at Grandma Ideas http://grandmaideas.com.
I absolutely love the story of how you two got together. Such an amazing story!
That is great news! Thank you!! 🙂
Omg these are amazing!! Pinning 🙂
Thank you so much, Eileen! 🙂
This is such a great idea! I love the look of the vintage maps being lit by the candles. Thanks for sharing with us on the Family Joy Blog Link Party!
>> Christene
Keys to Inspiration
Thank you so much, Christene! 🙂
This is brilliant! I’ve decoupaged candles before, but never thought of doing LED candles. . . very smart! Thank you for the idea. I’m pinning this for future reference.
Thanks for joining the Grace at Home party at Imparting Grace. I’m featuring you this week!
Oh YAY! Thank you so much, Richella! 😀
These are lovely, and totally my style. Thanks for the great tutorial. I saw you on Grace at Home.
Thank you so much, Pattie! 🙂
Handan your post was our most popular for this week at Sweet Inspiration Link Party! Congrats!
Oh wow! Thank you so much for letting me know. That is indeed awesome! 😀
Thanks for sharing at the Pleasures of the NW DIY party
My pleasure! 🙂
These are beautiful! Thanks for sharing at Merry Monday this week! 🙂 Pinned!
Thank you so much, Kimberly! 🙂
Joined for the old world maps. I couldn’t find any download link.
Perhaps the sign up form had a glitch, but no worries Ruth! I will send them to your e-mail right now. By the way, thanks you so much for letting me know! 😉
I was just about to ask a silly question about what happens as the candle burns down, what a good thing I read that you used led candles before I made a fool of myself!!
I love how these look, and your ‘what I learn’t’ tips are great too. Thanks
Haha – it is always good to question the safety 😉 Thank you for your lovely comment, Julie – much appreciated!
These candles are so lovely. What a great way to make a beautiful and interesting focal piece. Thanks for sharing this at the #happynowlinkup
Thank you so much, Jen! 🙂
Fun idea! This would go great with my “adventure awaits” graduation décor theme!
Yes these definitely would work with such a theme 🙂 Thank you so much, Heidi! 🙂
Love this! thanks for sharing for #iDIYedthat.
Thank you so much, Lindsey! 🙂
What a lovely project. I signed up but did not see the download link for the beautiful antique world maps. I’m hoping you’ll send them. Thank you for sharing.
Hello Carolyn, hahaha – what are the odds…most likely you were filling the form as I was correcting the glitch our sign-up form had! 😀 That has to be why it didn’t add your e-mail to our subscribers list, and of course as a result the link never showed. No worries…I’ll sign you up manually and right after I will send you the maps. 🙂
Loved the maps and Hubby loved the candles I made. I started at the edge of the paper and rolled the candle onto it on the table surface. No bubbles or creases and no glue on me. What a fun project. Thank you.
What a fun project! They came out great, I absolutely love it 🙂 Thank you so much for sharing with us at Dishing It & Digging It & congratulations on being featured this week!
That is such a great news! Thank you so much, Angie!! 😀
What a great idea! Love it. I just made 3 different sized options and will be giving them to my son’s History teacher as an end of year gift.
Oh that is a wonderful idea, Cindy! They indeed would make perfect teacher appreciation gifts (especially for a history or geography teacher). I bet they look fantastic!! 🙂
I think maps are such a cool thing to use in your decor. These map-covered LED candles are great. Thanks for sharing your craft at the #HomeMattersParty this week.
Thank you, Nicole! 🙂
I subscribed to your website but am not able to download the antique map which is perfect for my needs. I too have a bunch of led candles that I didn’t know what to do with.
Hi Alexandra, no worries – I just sent the free printable to your e-mail! Enjoy 🙂
Thanks for linking up at The Pretty Pintastic Party! We just loved these candles, so we’ll be featuring them at the party this weekend. I hope you’ll stop by, grab a featured button, and share some more fabulous posts!
Oh what a great news! Thank you so much, Jamie! I’ll be there definitely! 🙂
Oh my gosh these are SO COOL!!! If I had a DIY bone in my body I would do them myself 🙂
Thank you so much! 🙂
Handan, absolutely LOVE these. Featuring when my party opens tonight.
Thank you so much, Carol!
I tried to get the link to the FREE ANTIQUE WORLD MAPS PRINTABLE, but it did not come through when I joined. Can you send it to me please?
Hello Bob, I just sent the maps to your e-mail. Enjoy! 🙂
These candles are wonderful. I would love to try this project, but the download link didn’t appear. May I have it sent to my email like the other folks here? Thank you so much.
Thank you so much, Nancy! It is on it’s way! I hope you like the maps 🙂
Hi. I joined, but the download link didn’t appear. Can you help me?
Hi Stephanie,
I sent the link to your e-mail. I hope you enjoy the maps 🙂
Same as the previous emails, no blue link appeared. Can I please have the beautiful maps emailed? I work for a travel company and can’t wait o make these for my office?
Hi Chris, I sent the link to your e-mail. I hope you enjoy the maps ?
I thought at first that these were real candles and was wondering how that was going to work. The candles look gorgeous and would make a lovely present. Great detailed tutorial too!
Thank you so much, Claire! Yes indeed, these led candles make great presents!
Hey from Southeastern NC!!! I just found your blog through HomeTalk (gotta love some good ole HT…its a daily thing for Me…ha) and your blog is GREAT! I love blogs that are fun to read instead of skipping all the blah blah blaaaah straight to the DIY! Keep up the awesome work! I will be making the maps for My 17.5 yr old that LOVES old world and the thoughts of becoming an adult to travel the world! TFS the detail on them is the best!!!!
Have a blessed beyond measure day!!!
Erica Smith
Thank you so much, Erica! Haha – agreed! Gotta love some good ole HT – I also love checking out HT on daily basis 🙂
I’m so glad you liked our free printable old maps. I hope you post the pictures of your map project to our Facebook page as I’d love to see them! 🙂
I am not able to download the Antique World Map candles printable after I subscribed.
Hi Joan, I see that you received and opened our welcome email. So you should have the latest password to get into VIP Patch. Once you’re in the VIP patch, just go to Home Decor tab and click on the correct image/button to download the maps. Should you have any issues during downloading please try our Printables FAQ page for initial trouble shooting. And if you still can’t download the printables after the initial trouble-shooting, then email Greg at greg@thenavagepatch.com and we’ll see how we can help you further. 🙂
I swear, if you could reproduce that man you could make a fortune! I would buy one of him! The candles turned out great and you inspired me with so many other ideas. Great job and I am so glad you didn’t let the Mod Podge get the better of you!
Thank you so much, Linda! I’m actually considering it, because Greg also wants three more! LOL
These look fantastic. I love old maps and decor and the light of the candles shining through makes it look so beautiful. They must look lovely on at night. I wondered how the paper would go burning down until I saw you had used LED candles! Much safer and no need to replace them and make more! Genius!
Whenever I decoupage I use a mix of what we call “school glue” or “clag” glue (Clag was the brand every school kid had) and water. I think our big box craft store has started selling Mod Podge but it’s super expensive. There are some projects I’ve seen where I think I’ll have to shell out for the real thing, though, as the ol’ school glue and water isn’t in any way protective (I always use a spray over the top but it still wouldn’t be waterproof in any way!). I’m often jealous at the sheer range over there when it comes to…well…everything!
Oh my God, Jay, how did I miss this awesome comment? Thank you so much, and I’m so sorry I didn’t respond sooner. In Turkey we also use school glue (or white glue as we Turks call it) for decoupaging. I didn’t even know about Mod Podge until after I moved to USA. Luckily the price is not that bad here (especially when you buy a big gallon jug), so it makes sense to use it. 😉
Greg it’s me again. I’m now doing the antique maps on candles. I have spent a couple hrs trying to download the maps to resize them according to Handan directs. Doesn’t work. Here is the message we get ( now hubby is involved) I got a message that says paint can’t read the file. Not a valid bitmap file or it’s format is not supported.
Now what? Diane White. The map is to short. I have 9 to do. Please help
Hi Diane, the maps we share at the VIP Patch are PDF files – meaning that you can’t resize them as I prepared them specifically to fit 5 inch and 6 inch candles. That said, if you give me the dimensions of your candles, I can check if I have any digital maps on hand to fit those sizes.
I hope this helps! 🙂
-Handan
I keep losing my message so I think I will take the file to Staples and have them print them for me But if you have something for a 4″ candle I would love it Thanks
Handan, if you are too busy (which I’m sure you are) then for now I won’t worry about the 4” candle. I have to go an hour away to staples to get the other prints made, I can go later for the 4”” later if you can tell ok for now. Thanks so much for your help
Hi Diane, I emailed you last night. Let me know if the files I sent to you helped.
These are so brilliant.Pinning
Thank you so much, Maria! 🙂
Beautiful idea! I saw a post where a woman made a chandelier out of a lamp shade, I was hoping I could put the maps on a lamp shade! Do you think it would work? Thanks Kind Regards Shirley
Hi Shirley, it certainly would work. I’m not sure if you’ve seen it, but I have a post where you’ll see a map decoupaged lamp shade (with the link to the tutorial) and also our free printable large antique maps (they’re poster size free downloadable maps and you can resize them smaller or even bigger if you like to fit to your decoupage project): https://www.thenavagepatch.com/wooden-world-map-wall-art-and-free-printable-vintage-maps/
I hope you like it! 🙂
just love your method.you have amazing skills.i want to see more tips and tricks like that
Thank you for the great vintage maps. I had a flameless candle that I wanted to decoupage something on. When I saw your post and the cool maps, I knew I had found the perfect answer. I have the map on the candle and now I will wait till the mod podge is dry before adding the coat(s) over the outside. I hope it turns out as well as yours did. Now I need to find another candle. lol
You’re welcome, Karen! I hope yours turns out great!
Thanks for the idea! The tutorial said dimensions would be posted at the bottom, but I don’t see them. Do you know how much paper I should cut for a 3″ wide and 4″ tall candle? Thank you!
Hi Jane, I’m saying I am sharing the designs (aka the free printables) at the end of the post which I’m. You just need to subscribe and to get them. I’m not sure how much paper you’d need for 3″ and 4″ candles, but you can check the designs and see which one would be best suitable.
I hope this helps! 🙂
Handan
I am just discovering this craft and am very eager to jump into to it…but before I do, please help me on this: what type of paper would you recommend I print on for best results? After all, I have: copy paper, inkjet paper, bright laser gloss copy paper, vellum…I want to make certain the colors will be vivid but the paper not so thick the led candlelight will be able to penetrate it. I thank you for reading, and your response. you’ve opened up an entire new world of ideas for gifts and decor in time for my daughter’s wedding in February…!!
Hi Cherie, simple copy paper works best we’ve found – it’s thick enough to hold the ink and thin enough to let the light glow through!
These are absolutely beautiful! What an incredible idea! I’m getting married, and we are planning a pirate themed wedding and I was looking for centerpiece ideas (trying to make it whimsical and not cheesy) and I saw these on Pinterest. I’m completely impressed snc I plan to use this idea! Thank you so much for the inspiration!
So happy to hear it, Gina!