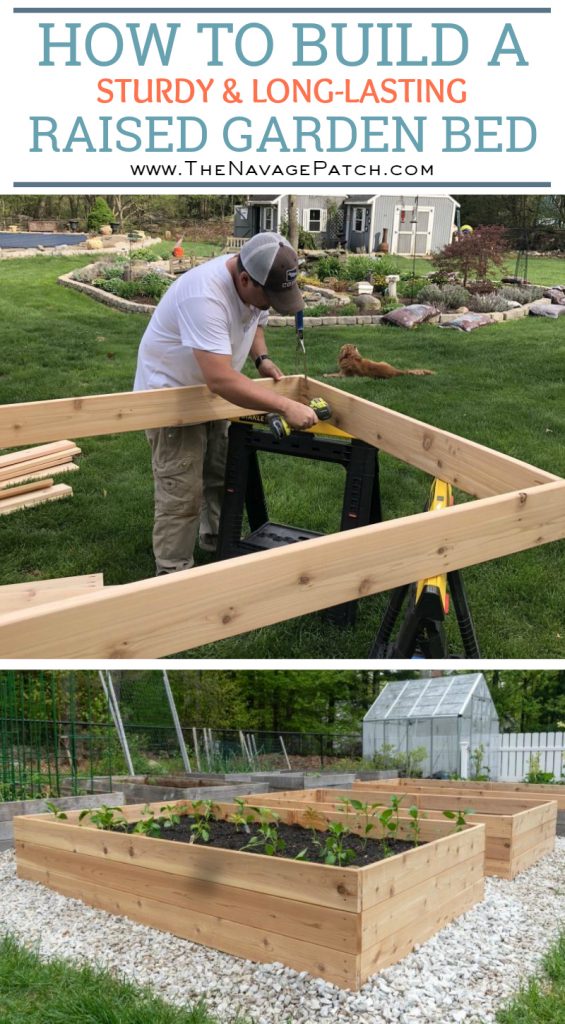
How to Build a Raised Garden Bed in 5 Easy Steps
Learn how to build a DIY raised garden bed for your back yard. This easy project is the perfect addition to any garden!
Let’s face it – you’re not getting any younger.
Before you know it, your knees will have gone soft and wobbly, your hands will be gnarled stumps and your back will protest your every move like PETA at a fur-coat-and-leather-pants convention. Your body will have more snap, crackle and pop than the bowl of Rice Krispies you wish you could eat if you only had teeth.
Yep, you’re not getting any younger. But don’t let it get you down, because I’m here to raise you up! Sound good?
Great! Let’s start with your garden beds.

Are you still scrabbling in the dirt like a 7th century peasant? Look, in-ground gardening is fine if you’ve got a tractor or an ox or a farmboy, but for the rest of us, the ground just seems to get farther and farther away with each passing year. But you don’t have to trade in your trowel for a set of crochet needles and a rocking chair. No way! Instead, you can just bring the ground up closer to you by learning how to build a raised garden bed!
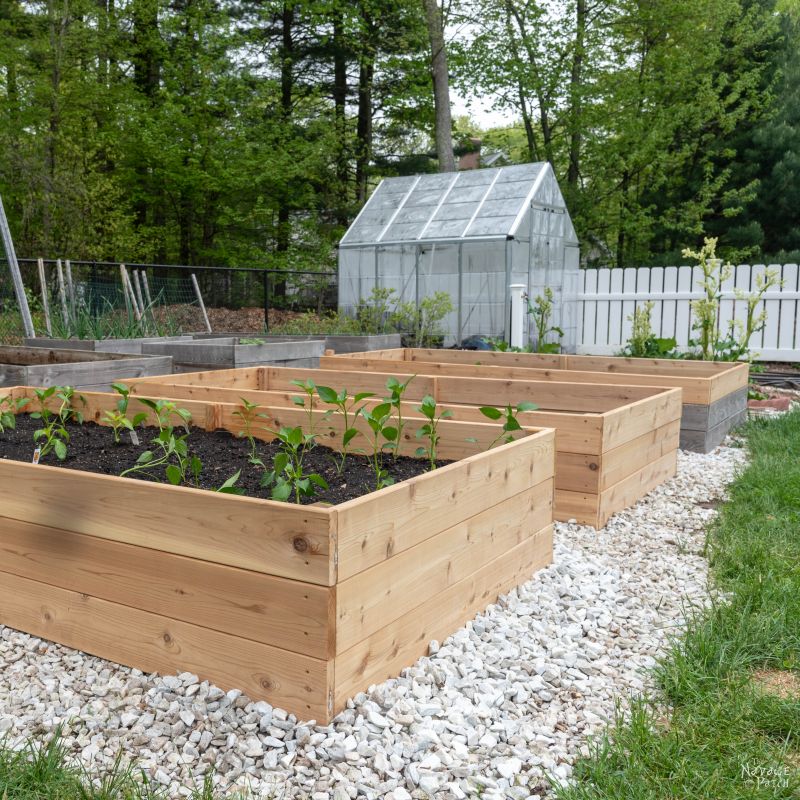
Less bending means less snap, crackle and popping. Your knees and back will be forever grateful! Now, you could buy a raised bed from Home Depot or the like, but those beds are made with boards that are only 11/16 inch thick. Furthermore, the beds are only 10 inches tall – better than ground level, but not by much. As is usually the case, it’s much better to go the DIY route. I’m going to show you how to build a raised garden beds with 1-inch-thick cedar boards that are over 16 inches tall. You can go higher if you like; the choice is yours.
Way back in the summer of ’14, when I was a rosy-cheeked noob in all matters of house and yard, I tore up the sod from a small patch of our yard so I could build us a vegetable garden.

Handan had told me of the wonders of raised-bed gardening, so we decided to give it a try. I staked out a space for three or four 4 ft x 8 ft beds, but that first year, we only got around to building two DIY raised garden beds.

Since we didn’t really know what we were doing, we only made the beds about 10 inches tall, and then, for some strange reason, we placed the raised beds below grade so only about 7 or 8 inches showed above ground.

Like I said – I was a total noob.
The next year, we installed a new fence that we placed farther back than the original one, plus we excavated some landscaping, so we had room for a total of 8 DIY raised garden beds. We built three more 4 ft x 8 ft beds, again only 10 inches tall, but we placed them at ground level. Then we built two 4 ft x 4 ft beds and one 2 ft x 8 ft bed, all of which were 16 inches tall. We gave the extra height figuring we’d grow root vegetables in those beds. Little did we know then just how much easier they’d be to tend!
As the years wore on and my bones ground down, the 4 ft x 8 ft beds became more of a nuisance to work with, especially the two original ones half buried in the ground.
Well, this spring, Handan had had enough of it. She proclaimed that we would raise all of the beds to 16 inches. She further decreed that the original two raised garden beds would be replaced entirely, and those boards that were salvageable would be used to add height to the back beds.
Since these beds are all used to grow vegetables, I only use cedar to make them. Pressure-treated pine is fine for an ornamental garden, but I wouldn’t want those chemicals in the soil if I’m growing food. Around here, the best place for cedar boards is Lowe’s. Their cedar deck boards are a full inch thick – perfect for DIY raised garden beds.
DIY Raised Garden Bed SUPPLIES LIST
Affiliate links are provided below. Full disclosure here.
- (9) 5/4 x 6 x 8ft cedar deck boards (actual dimensions are 1 inch x 5 7/16 inches x 8 feet)
- 1 1/2 inch Kreg screws (I used regular coarse thread. If you can find them, the Blue Kote screws made for outdoors would be better)
- (6) 1 1/2 inch x 1 1/2 inch x 24 inch cedar stakes (I made my own from a cedar 4 x 4)
- 2 inch deck screws or any other outdoor screw
- Circular saw
- Kreg Pocket Hole Jig
- Kreg Right Angle Clamp (optional)
- 4 Sawhorses (optional)
- Drill
- Impact Driver
- Mallet
- Level
- Tape Measure
- Pencil
- Eye protection
- Gloves
For each raised bed, I would need nine 8-foot boards. Yes, DIY raised garden beds can be pricey (the cedar boards here are about $13.50 each), but they last a long time, they look great, and they’re easy on my old bones.
I bought enough for two full beds, plus a few extra boards.

With the seats folded down, all that wood fit perfectly in The Donkey. I could have fit much more!

Step 1 – Cut the boards to size
I hauled my load back home and unloaded it in the yard. Using my portable circular saw, I cut 6 of the boards in half (3 for each bed).

Step 2 – Drill pocket holes
I then drilled 3 pocket holes in the ends of each of the small boards.


While I toiled, Pepper rolled around without a care in the world. Ah, to be a dog in spring!

When we built our previous beds, we assembled them on the ground. That’s fine for the young and spry, but I’m getting to the point where things start to hurt if I spend too much time on all fours. The only thing worse than crawling is sitting Indian style. I sat like that for about 15 minutes the other day while I was working on a new outdoor heater we got for the deck. Then I realized I couldn’t feel my legs. I tried to move them, but my knees had locked. I needed to enlist Handan’s help to get up, and it took all my will not to start blubbering like a baby from the pain.
My son told me a while back that I’m not allowed to say “Indian style.” I asked him what he calls that position. He informed me that it’s called “Criss-Cross Applesauce” or some such gobbledygook.
o_0
I’ll stick with Indian style. As a side note, Poles and Romanians call that position, “Turkish style.” Handan has told me that Turks believe that Native Americans (what we all knew as “Indians” growing up) are Turkish descendants, so it’s interesting that the lotus style of sitting is known today by both names.
Step 3 – Assemble the raised garden bed frames
This time around, I decided to assemble the raised garden bed frames at a proper standing height using sawhorses. I also bought a new Kreg clamp for the project to keep the two boards perfectly aligned in a right angle while I screwed them together. This turns the assembly from a two-person to a one-person job.


We had already dismantled the old bed and removed some of the soil. As I built each tier, we placed it on the ground.


Step 4 – Hammer stakes
After adding the third tier, I hammered in the four corner stakes.

Step 5 – Level the frames & Secure
Since the land sloped away from the back, we wanted to start the leveling process there. We placed the level across the back, and once it was level side-to-side, I drilled pilot holes through the side and into the stake and then drove in the deck screws – 2 for each board.


Once the back was secure and level, we moved to the front. I repeated the process of leveling, drilling pilot holes and screwing.

After pounding two more stakes in the middle and securing them, the bed was finished.
When we built our first beds, we filled them entirely with good-quality garden soil from Home Depot. It’s a great option, but it can get pricey. This year, we filled them with some topsoil we have piled by the driveway that was left over from last year, some yard soil that was just excavated from another project, some peat moss to lighten up the soil and some composted cow poop.
We love how our DIY raised garden beds turned out, and we especially love that all of our beds are now properly raised.

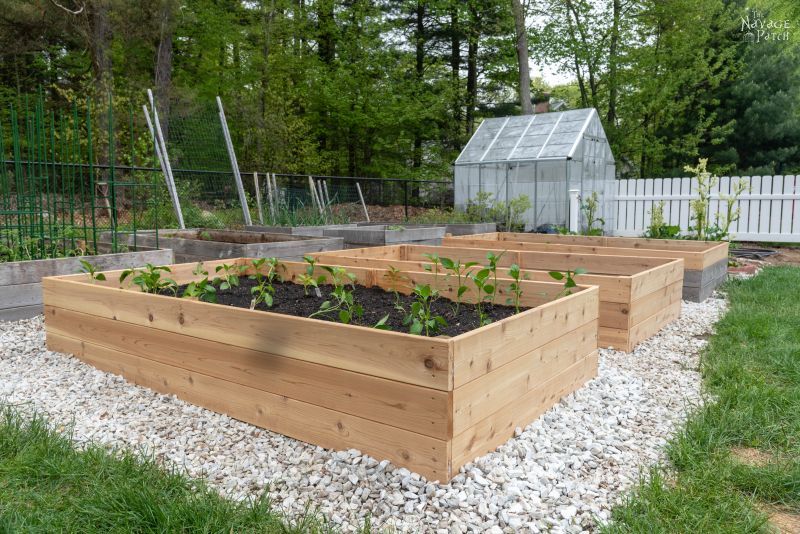

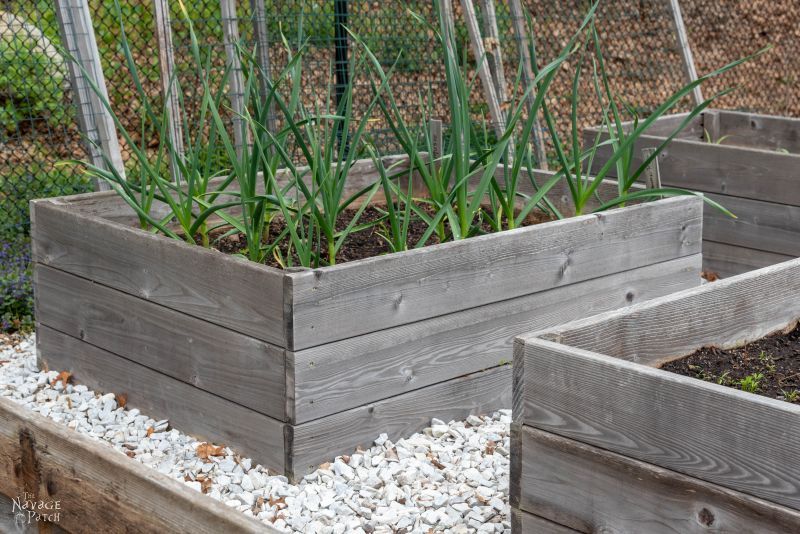
In a year, the new ones will blend right in with the old beds. I love the look of weathered cedar!
So now that you know how to build a raised garden bed, do you think you’ll build one for your garden? Let us know in the comments!
We love it when you share our posts on Facebook and Pinterest!

I don’t see any weeds growing up in the concrete. How did you manage that? The beds look great and as someone much older than you “you may continue to build them higher as you age”, just sayin’.
Hi Carla, there’s no concrete there, but if you mean the crushed stone – I keep the weeds away with Preen!
woohoo veggies out the ying yang xx
I’m hoping, Chris!
Just on ah historic garden tour here in Virginia and voila…raised beds! Yours look so nice and neat and…new! An excellent tutorial…bon apetit!! franki
Thank you so much, Franki!
raised beds are one of the greatest human inventions 🙂 We made a few of them last year just to give them a try and see how it all works, and this year, my hubs built me a new and improved series of 7 and… his mom, a farmer by education, wanted some too 🙂
Hope you have plentiful crops from your raised beds!
and, as a side note to the “Indian style sitting”, Poles are getting politically correct too and my daughter says her kindergarten teachers call this position a “bow-tie style” 🙂
I can’t speak for American Indians, but Handan tells me that Turks have no problem with the term “Turkish style.” In fact, they’re proud of anything called “Turkish” or “Ottoman!” The “Perpetually Offended” class strikes again!
I’ve always been a mild opponent of political correctness 🙂 My best regards to Handan!
Thank you, Maigwen! You too!
so how big are the beds for the tutorial? 4 by 8 ft and 16in tall?
Hi Julianna, that is correct.
Curious why you would join the boards together and not just secure to the 1 1/2 x 1 1/2? Is it really worth the extra effort?!
Hi Kevin, since the 1 1/2 x 1 1/2 posts are permanently submerged in wet soil, they rot faster than the other boards. If I only secured the deck boards into those posts and the posts rotted or got soft, the sides would fall off. Yes, it’s an extra step, but it adds a lot of strength to the bed.
Thank you for making such a humorous tutorial! I was looking for an easy cedar bed tut and was very happy to find yours online. As a Native American or “Indian”, I am not at all offended when I hear the term “Indian-style”. I just usually look at the person, chuckle, smile and say, “Hey, I don’t sit like that.” You’d definitely hear the snap, crackle and pop if I did though! ?
In the future you can tell them it’s actually “Turkish Style” LOL 😀
Hi Greg! Thank you so much for this tutorial. We plan on building these on concrete pads from the dog cages the previous owners had left. Do you still recommend adding the stakes?
Thanks!
Hi Katie, you won’t be able to use the stakes unless there is some dirt to drive them into. However, you may want to make smaller stakes just to help hold the bed layers together. If you are going to be putting the beds on concrete, do you think you’ll have any issues with soil eroding out from the bottom?
We had that afterthought, too and instead removed most of the concrete for where the beds will sit.
I have built a decent amount of beds over the last decade. here are some tips for longevity.
I use 2 inch thick cedar, 3 inch #305 Stainless Steel screws(home depot carries GripRite brand of them), and 4×4 cedar posts. The one inch thick lumber tends to rot in 5 years or less where I live, the coated deck screws rust way to fast and the biggest week link is the corners. I gorilla glue the 4×4 corners to keep moisture out before I secure with screws.
One final note Is that I like to coat my raised beds with raw Linseed oil made by Sunnyside. Raw linseed oil is flaxseed oil as its the same plant its just processed on non-food grade machinery. Regular linseed oil has added chemicals which you don’t want leaching into the garden.
Hi James, these are all fantastic tips. Thank you so much for sharing them!
Great Job!!!
only……….how much is the soil going to cost??? seems like hundreds of dollars.
That depends, Michelle. If you were to fill it all with bagged garden soil, it can get pricey. You could look into having soil delivered by dump truck. It’s a far cheaper method. Cheaper still would be to have some topsoil delivered and then mix in your own organic matter, like composted cow manure. Any way you slice it, the garden soil will cost you some money, but for me, the ease of use and lessened strain on my back made it all worthwhile. 🙂
Hi Greg, thanks for sharing these plans!
How did you make your own stakes out of the 4X4s?
Hi Derek, I’m so sorry for the late response. I used both my table saw and compound miter saw to make stakes from 4x4s. First cut the 4×4 into quarters the long way on the table saw and then chopped them to size and put a point on them with the miter.
Thanks for the reply Greg! I don’t have the table saw, so was hoping you had some trick with just a miter saw. I do have that. Thanks again for posting your plans
Curious if you put any edging between the rock and grass? If no, do you have any regrets?
No I didn’t, and yes I do! LOL, we definitely should have put edging. This year we were planning on edging it and putting in a little fence, but alas – we’re bound for Georgia! 🙂
Have you had any issues with the sides bowing due to pressure from the soil or do the 2 x 2 corner and center stakes keep things tight?
Did you just set this on top of the grass? Or did you dig up the grass and sink them in a few inches?
Hi Naomi, I tore out all of that grass, and it was one giant pain in the butt. If I had to do it again, I’d just build them on top of the grass. 12 inches of dirt will kill anything! 🙂
How did you keep the soil from washing through where the boards stack on each other? I doubled the heights of mine just recently because I’m getting older too and I would like to keep gardening for more years. I used landscape fabric to run just along the sides in the bottom and as far up as the tallest broad to keep the soil in.
Hi Barb, we didn’t do anything, and the soil has stayed in just fine. But your solution is a brilliant one, and a safer one, too!