DIY Bead Garland Candle Holder
This DIY candle holder made with a wooden bead garland is a simple project that will bring a touch of rustic elegance to any tablescape.
It never ceases to amaze me how much money people are willing to pay for the simplest decor items.
Provided, of course, that the item in question is sold by a company that is widely regarded as hip or cool.
Note: hipsters are notorious for spending outlandish sums on otherwise ordinary items, provided there is some sort of “hook” to the product – something that makes it different that the hipster can crow about to his or her insufferable hipster friends.
I’ve told you about the local company who makes outlandishly priced blue jeans sewn on antique sewing machines.
Don’t ask why. The mind of a hipster is as empty as his bank account.
Urban Outfitters was once a destination for the hipster set. Maybe it still is. I wouldn’t know. But recently Handan came across the following pin:

I thought it must have been a typo. Who on God’s Green Earth would fork out one hundred nine dollars and ninety nine cents for a few craft store beads strung together?
Oh right.
Hipsters.
And…and who? Who else buys this stuff? Somebody must – they’re out of stock!
Do you, madam? If so, please let me know in the comments, so I can sell you some beads for $100.
But I think you are much smarter than that.
I think you look at something like that and say, “Nuts to those jerks! I’m gonna do it myself!”
And I applaud you, madam!
So let us, in fact, do this ourselves, shall we?
I’ll bet we can do it better.
And I know we can do it cheaper.
Bead Garland Candle Holder SUPPLIES LIST
Affiliate links are provided below. Full disclosure here.
- 4-6 (or however many you want) 50mm beads
- Assorted smaller beads
- Tassels or other decorations for the garland (optional)
- Hemp cord
- A small piece of craft wire
- Drill
- Pencil (or a dowel)
- 7/8 inch Forstner drill bit
- Torpedo level
- Table saw or a miter box kit
- A square block – I used these metal square blocks, but any block that’s perfectly square will do.
DIY Bead Garland Candle Holder Tutorial
Let’s start with the big beads.
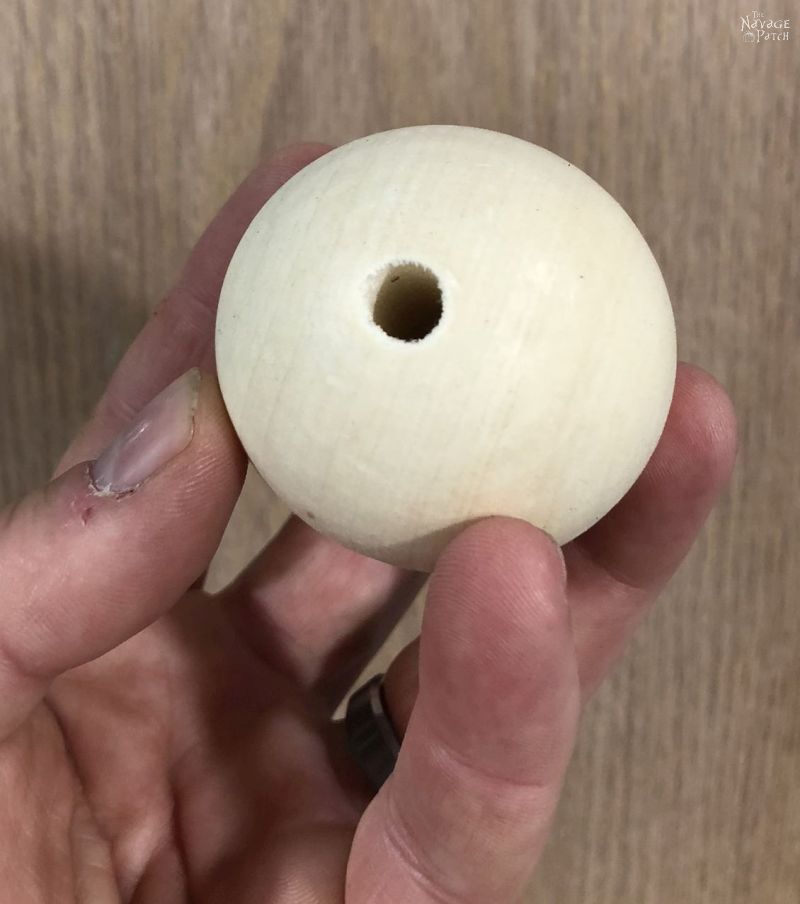
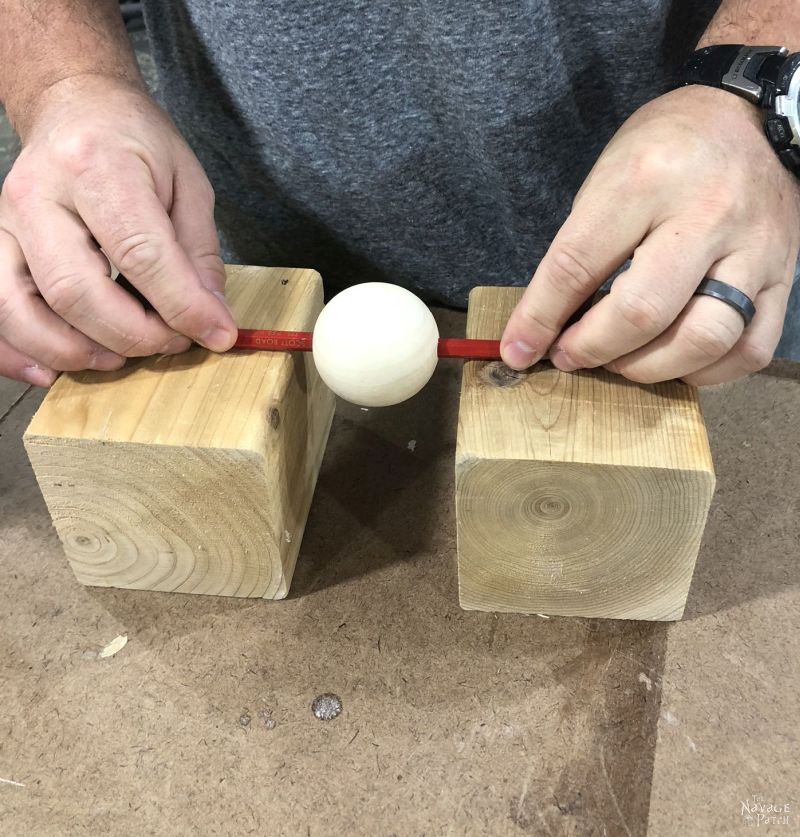
First I needed to drill the candle hole, and that hole needed to be as close to perpendicular to the string holes as possible. My solution was to run a spare piece of dowel through the bead holes and then sit it on two equally sized scrap wood pieces.
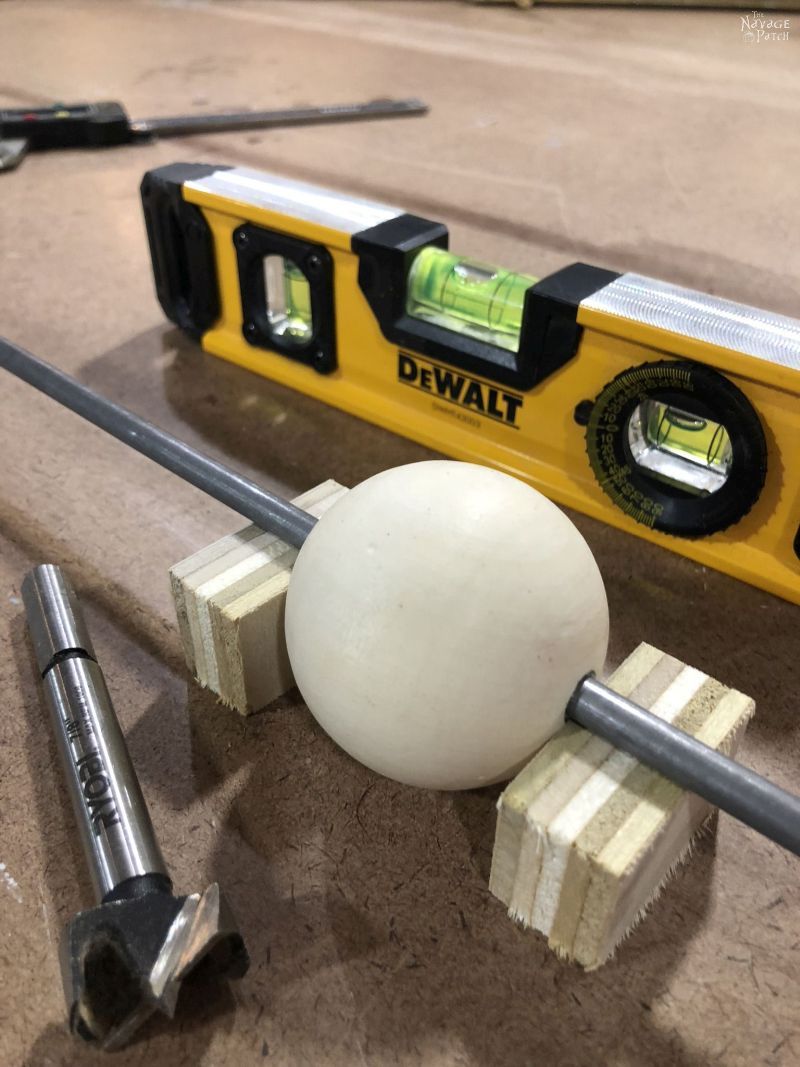
I used the torpedo level to make sure that the dowel sat level on the scrap wood.
I then took the bead, the dowel and the two scrap pieces to my drill press to make the candle hole. I will also show how to make the hole with a handheld drill.
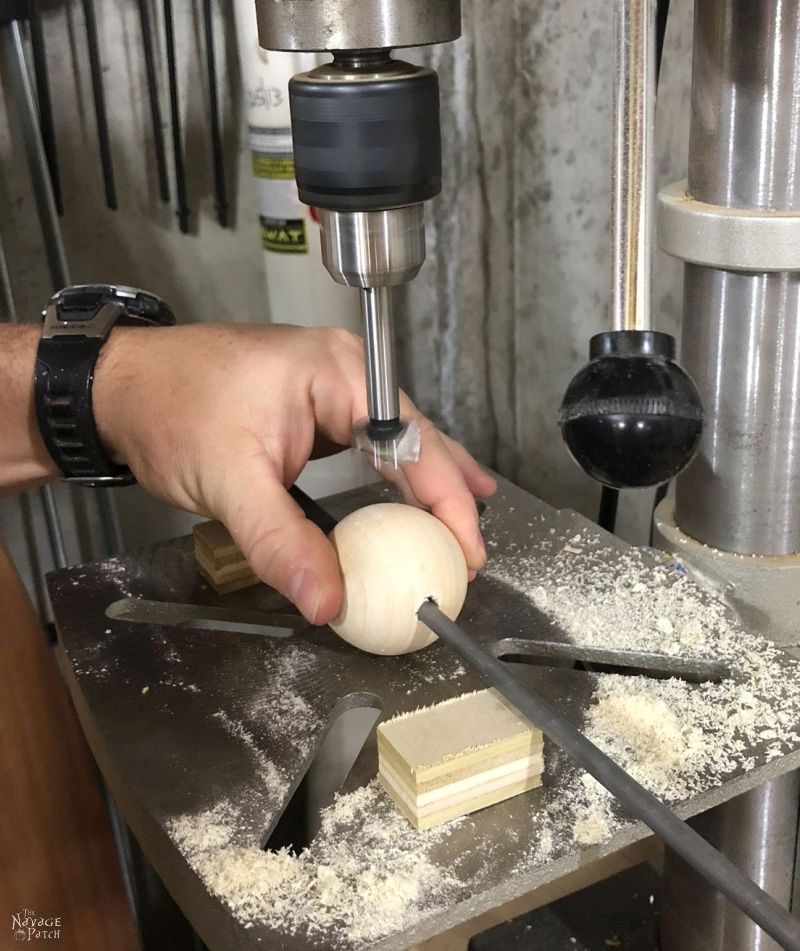
I was careful not to drill past halfway.


I also drilled a couple of candle holes using a handheld drill.
I first inserted a pencil through the bead hole.
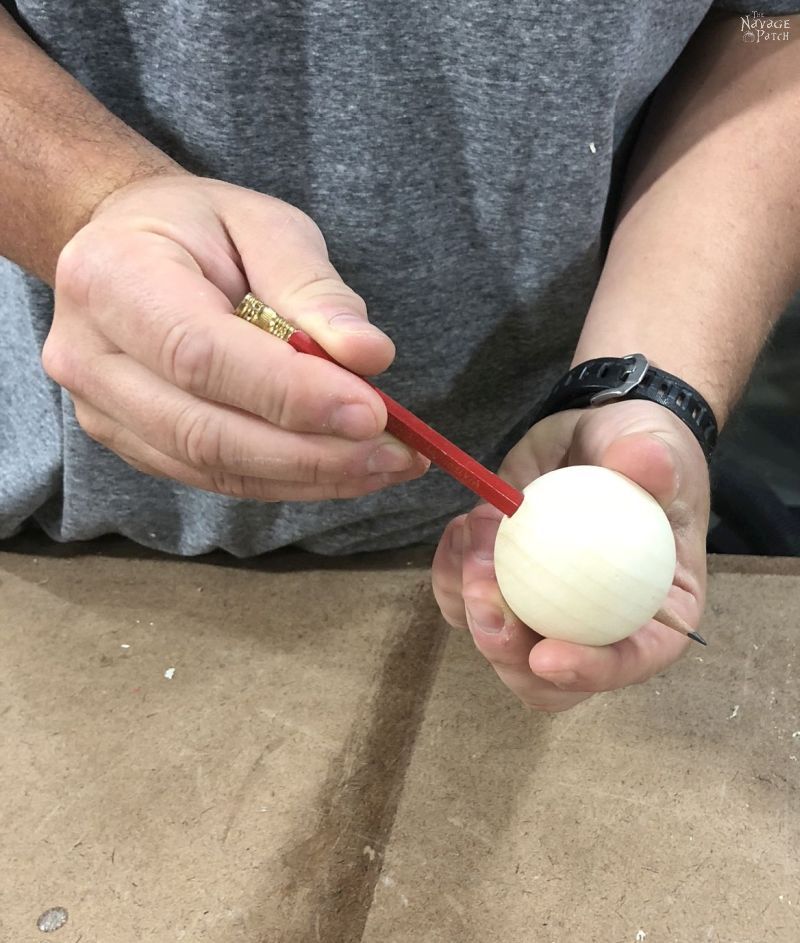
And then I laid the pencil across two scrap wood blocks of the same size.
I taped the pencil to the blocks with duct tape to make sure it wouldn’t move during drilling.

Drilling by hand is a little trickier. It helps to have someone else nearby to check that your drill is as upright as possible.


I drilled slowly and carefully, always keeping one hand on the bead.

Even if the hole isn’t mathematically perfect, there are ways to get the candle upright in the end. I’ll talk more about that in a bit.

The next step was to flatten the base directly underneath the hole, so that the candle would stand upright and not at an angle. This is the trickiest part of this otherwise easy project. I used a table saw with a crosscut sled, but I realize that most of you don’t have that tool. I’ll first explain what I did, and then we’ll talk about some easier workarounds.
I clamped my metal blocks against the fence of my crosscut sled. The metal block is perfectly square, and I would reference my cut from its face.
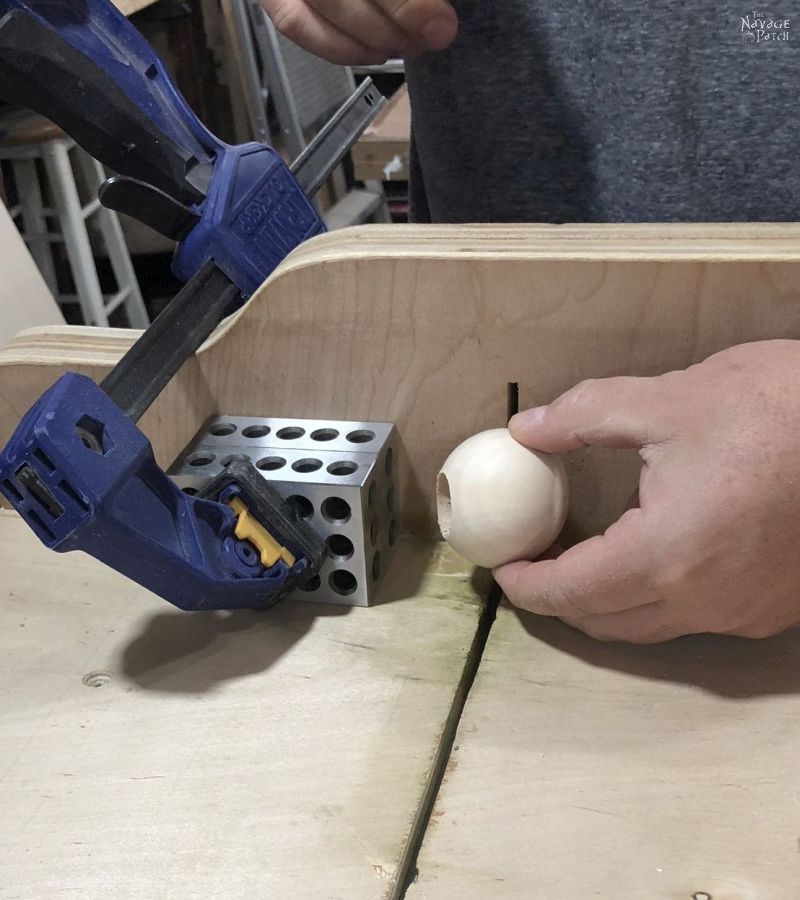
I pressed the drilled face against the block.

I then adjusted the block so that a small section of the base would be cut off.
Slowly and carefully, I ran the sled past the blade.


This gave me a perfectly flat bottom that was parallel to the opening of the candle hole.
But, since most don’t have a table saw handy, you can try the same thing with a miter box kit. And if you want an even easier solution, then you can use some wall tack or poster putty. Duck Brand makes a good poster putty that is white, so it won’t stand out as much as the blue brand that most people buy. Just stick a bit underneath the big bead, and you’ll be able to position it perfectly upright.
Once the big beads were finished, it was time to string together my DIY bead garland candle holder.
This is the part of the project where I got to sit down. That’s a real benefit of these small crafts – I don’t have to stand all the time!
Handan and I started laying out bead designs until we hit upon one we both liked.

Handan then fashioned me a sewing needle of sorts made from a twisted piece of craft wire. Forgive the blurry pic – my phone was on portrait mode.

I used this makeshift needle to create my garland. For an in-depth tutorial on this process, please see Handan’s DIY Wood Bead Garland (and DIY Tassels) post.


When I reached the end, I looped on a tassel and then ran the cord back through all of the beads.


When I reached the other side, I tightened the garland and then tied off the cord with a square knot.


I trimmed the excess cord, leaving a bit on the ends.

And then I stuffed those ends back into the last bead.

The next step was to place the candles into the holes. I had originally chosen the diameter based on some old candles we had on hand. When I recently bought new candles at Michaels, they were slightly thinner, so to make them fit snugly, I first dripped some melted wax in the hole and then inserted the candle. This is the same method you can use if your hole was drilled at a slight angle.
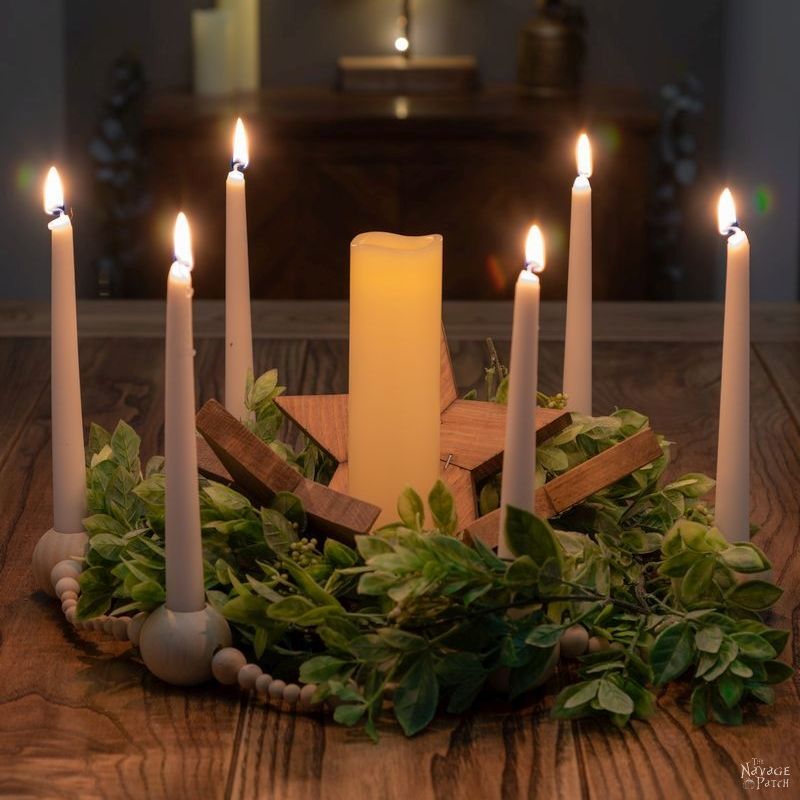
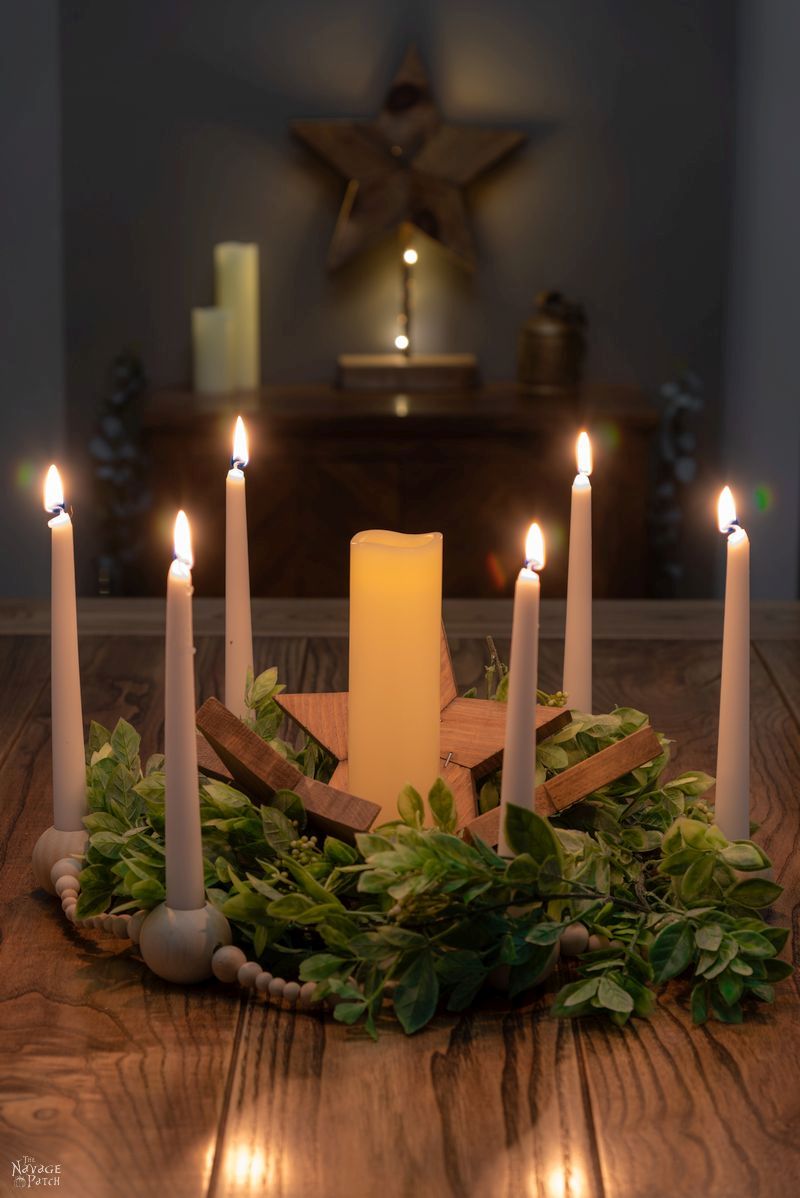
With candles secured, my DIY bead garland candle holder was finished and ready for use.
Though it is meant for all seasons, since Christmas is coming, I used a mix of red and white candles…


…and wound the garland through some greenery.


It’s a versatile garland that even works in a circle!


We love it when you share our posts on Facebook and Pinterest!


That’s nuts!!! $109!!!! Crazeeeeeeeee. Thank goodness we’re DIY’ers and have people like you and Handan who can show us how to make it.
Agreed! Obviously whoever is buying these has a lot more money than sense! And, on a side note…thank you Greg for cracking me up on a daily basis! I enjoy The Navage Patch so much that I’ve passed it along to my husband who now shares my enthusiasm for you, Handan and all your amazing projects! I’m hoping the he-man diy-er will rub off on him! Keep up the fabulous work!
LOL, awesome! I was hoping I had a male reader out there somewhere 😀
You have 2… 🙂
WooHoo! Our ranks are strengthening!
And they’re SOLD OUT!?!
Of course, your DIY bead garland candle holder is so much nicer than Urban Outfitters – and priceless because you made it yourself!
Well, thank you so much, Sara!
Wow! I think your version is even better! Love it!
Thank you so much, Collier!
Ain’t it da trut!! We just used “scrap” blocks of wood in incremental heights, burnished them after boring holes for candles…Thanksgiving centerpiece (plus leaves, etc.) Luv yours! franki
Franki, that sounds really cool! Send me a pic greg@thenavagepatch.com
Nice job! I so enjoy your posts. You’re a very entertaining writer! The picture at the table saw made me cringe though – My finger had an unfortunate run in with a blade on our table saw last year – so there’s no way I would attempt that! Be careful!!
Don’t I know it! It only takes one run-in with the blade to get a little shy. I was very careful though!
Greg, I love you. I really do. Like a brother love you. You make me chuckle while I drink my coffee, often causing me to spit it halfway across the room.
Sometimes I laugh out loud and embarrass myself. I can’t wait to read your posts and smirk along with you and learn some marvelous DIY or just envy (like today) what you accomplish. I think ANYONE who would spend the enormous amounts of money being charged for “hip” stuff at “hip” retailers is a complete dumb ass in many different ways. I just wanted to tell you this stuff. Have a good one and tell Handan “Hi”!
And I love you like the long-lost sister I never met because there was a mix-up at the hospital, and I was mistakenly thrown out with the syringes only to be raised in a landfill by mutant scavengers. Where do you think I learned my scavenging skills?
Hey There. Since we won’t be having all the kids home for Christmas this year (first time ever) I’ll be going all out for our everyone-home-and -accounted-for Thanksgiving celebration. I’ll be making your beaded garland themed for Fall instead to place along our dining room table. I noticed the wooden stars you added to the setting pictures and am wondering if you might have a template/dimensions you’d be willing to share. I can’t thank you and Handan enough for your brilliant tutorials. I very much appreciate your hard work and effort and humor in each and every post. Thank you for a wonderful site!!
Hi Debra, if you can wait one week, you’ll have a full post about those stars (and some bigger ones, too!), including templates for many different sizes!
Great candle holder. Love the stars…do you have a tutorial or pattern for them?
Hi Dorothee, I’ll have a full post about those stars including templates and tutorials next week!
Another winner Greg! And I ALWAYS so much enjoy the story you tell of a project’s execution!
Thank you so much, Constance! 🙂
Looks great Greg. I’m not much for power tools, so would have to get the hubs to help, but i just found some wood bead garland at Michaels that I’m planning to use with greenery to add a natural element to my decor. I’m also interested to see the post on the stars, I was going to ask about them but Debra beat me to it.
Thank you, Sandy! Yep, that post will be published next Tuesday!
love this and those stars wow, hipsters are not us old hippies are they, if i bought that i would have had to give up eating lol, still typing lefty and still in limbo about stupid node xx
Oh, no, Chris – hipsters have nothing to do with hippies, so you’re safe, lol! I hope your arm heals quickly, and we’re both praying on the node.
You are really rocking the KISS principle these days! I love this! And I’m so glad you are going to do the stars! I was going to ask!
KISS is a hell of lot easier than those ridiculously complicated projects I used to do, Derry, LOL!
As at today’s current exchange rate that works out to $150.54 Australian! I ain’t got that kind of money! Yours is waaaaaaay nicer and cheaper,…I mean…not CHEAP..oh heck you know what I mean!
If I was not as worried about losing a finger when I use a saw, then I would get out my stash of wooden beads ( I am a bower bird, I have lots of useless pretty things, or actually pretty useless things more correctly.) and would have a go at making one.
So, would you sell yours for Aus $50? You’d still make a profit!
Cheers from the Land of Oz
Yikes! But isn’t everything expensive down there these days??
Alethia,
I love that term! Bower Bird. SO much nicer than hoarder! Thank you!
I love t! A little salt poured into the hole will also help to secure the candle.
Oh that’s good to know! Mom, you’re always full of little useful tricks – thank you!
That’s a good idea, Mom!
WOW! The fingers were really dangerously close to the table saw blade, but it’s a great little project. There must be a way to clamp the ball to flatten a side of the ball.
There probably is, Marvin. The safest bet would be to use an old-fashioned miter box. It’s a tricky proposition – getting two parallel planes on a sphere!
Also, sawing the ball flat on one side on a band saw would be safer. On some of my projects, I hold the material within 1/8th of an inch and never been nicked. But my hand has been known to bump the band saw blade and never drew a drop of blood.
I know who buys those type of items: People like me that don’t have the expertise or tools to do the work. Dolores
*Opens mouth. Inserts foot*
Brilliant job as usual, have to say anyone buying those expensive ones must have b***s where their brains should be. I won’t ask toolbox Tony to make me those his reply would be spherical objects!:-)
LOL, Thank you, Catherine!
I wish I’d seen this post when they hadn’t sold out of the one at Urban Outfitters. I absolutely would have paid 109$ for it! I saw one like this probably 8+ years ago on a Danish site that did not deliver to the US. So I thought, I’ll make one. Nothing about this project is as straightforward as you make it out to be. It’s nearly impossible to get a hole perfectly perpendicular to the stringing hole. It’s nearly impossible to drill those holes equal heights so your candles are equal heights when placed inside. It’s nearly impossible to get the bottom cut truly straight. So what I have now is wood beads of various results stored away for nearly a decade because I so love the idea but cannot make them work. Add all the cost of the beads, special tools etc and your darn skippy that thing is worth 109$.