
Turquoise Inlay Console – An Antique Dining Table Upcycle
For this dining table upcycle, we took an old, beat-up mahogany dining table ($5 at a tag sale) and transformed it into a gorgeous turquoise inlay console.
Handan and I spend a lot of time searching for ugly furniture at tag sales, on Craigslist, and at Put & Take. We gather these sad things, these castaways and afterthoughts, these forgotten step-children of wood and glue, and we strive to liberate the beauty held captive within.
This beauty may be masked by splotchy stains or Crayola scribbles.
It may be hidden beneath layers of faded teal and coral paint from 1985, or hidden behind a peeling patina of My Little Pony stickers.
The beauty may be smothered by decades of grime or scarred by keys, claws, and kids.
But each tortured piece imprisons a pearl.
The fun lies in finding the pearl.
Usually it’s obvious and easy: sand and stain or prime and paint. Often we need to repair, replace or fabricate.
But sometimes we find the pearl hidden even deeper within.
On a muggy summer Saturday that promised rain before nightfall, we chanced upon a tag sale. Folding tables in the driveway held the usual assortment of old books, rusty tools, arcane appliances, and the accumulated knick-knacks that come with Building a Life together.
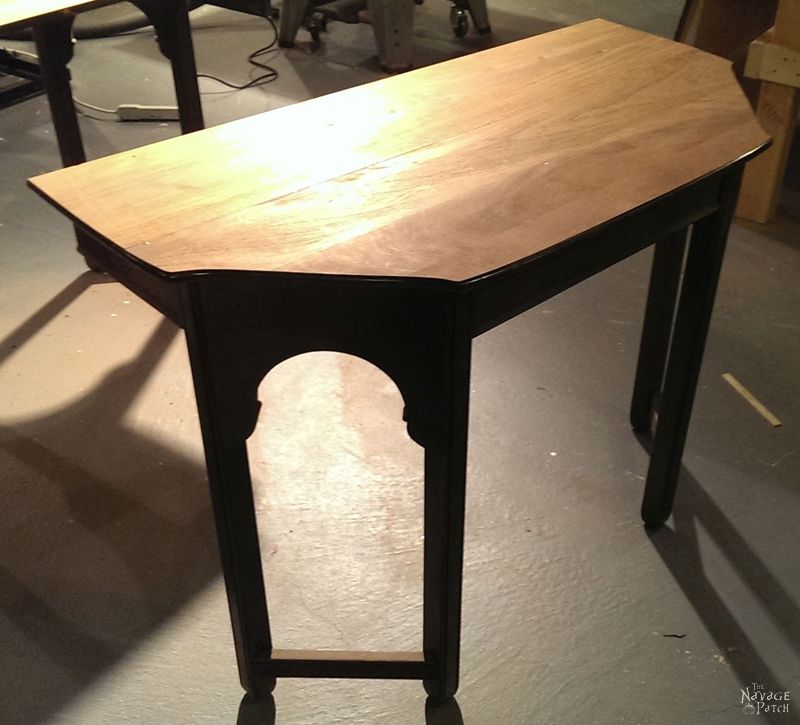
The garage harbored a few bigger pieces – a washing machine from the 1940s, a clunky upright piano, a heavy roll-top desk, a beautiful Les Paul Standard guitar (sadly asking market price, not tag sale price) and a dining table.
An ugly, scratched-up mess of a dining table.
But it was made of mahogany and was purported to be an antique. Handan zeroed in on it and negotiated a $5 price.
That woman could bargain the humps off a camel.

Now, I can’t be certain, but I believe they may have used the table as a skating rink.

Handan saw the potential for two console tables right away. She sees through the bullsh!t and straight to the most optimal solution.
But I on the other hand…
I see past the obvious and into the convoluted Heart of Confusion.
I see the Path of Extreme Resistance.
So I had this idea that I would sand all the wood down and refinish it, restoring it to its former glory as a formal dining table.
To this end, I bought a hand-held belt sander…
…and immediately destroyed any hope of restoring the table to its original form.
Okay, you may be wondering why I chose a belt sander. Wouldn’t an orbital sander have sufficed? They’re just scratches, right?
Right. BUT.
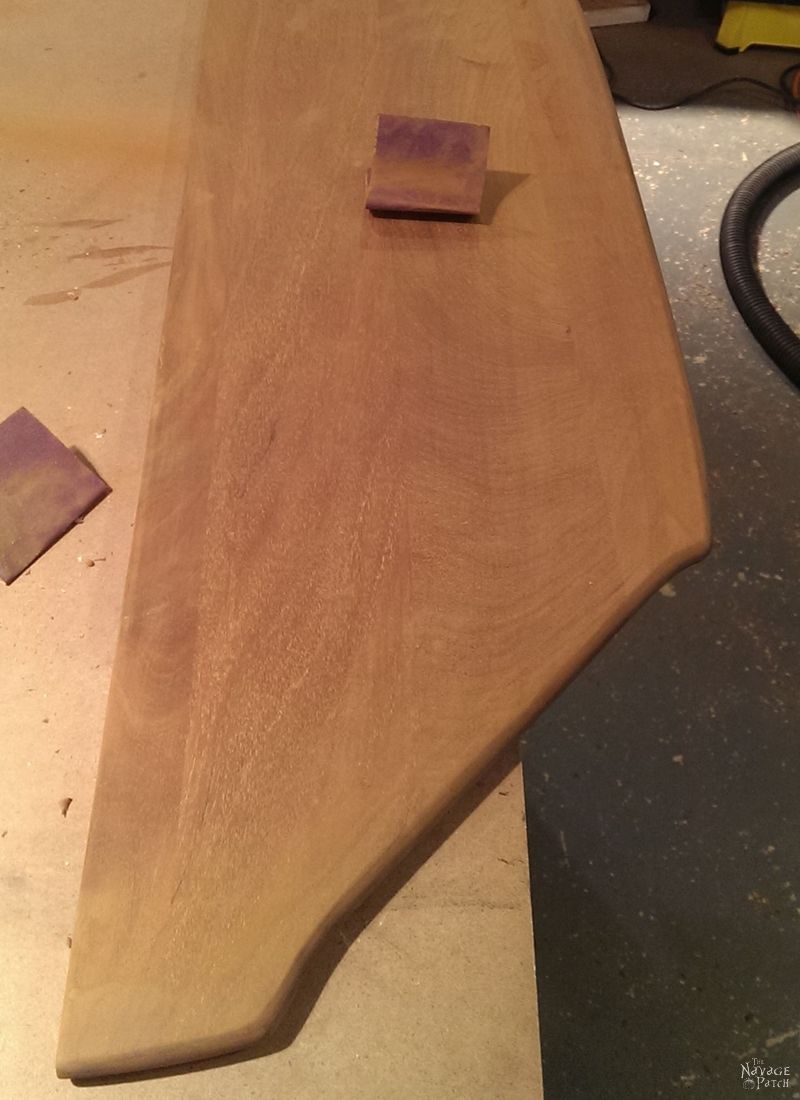
The two grooves that run around the table DON’T LINE UP WITH THE GROOVES ON THE LEAVES! I’m not OCD, but I can’t abide a flaw like this. See for yourself:

My solution was to sand the table down past the groove lines. Things started out well.
I think…

…but ended badly. The grooves were deeper than they first appeared, and the belt sander is a cruel and unforgiving bitch. In my feverish zeal to eradicate any trace of the wretched grooves, I had failed to notice that the back end of the sander had removed vast swathes of routed edging. I needed a new plan.

Still thinking that I could restore the table, I decided to run it through the planer. But my planer was only 12 inches wide, so I would have to cut the table top into manageable pieces. I removed all the extension sliders, brackets and catches from underneath the table and unscrewed the top. That left me with two semi-circular ends and three leaves. After cutting the ends in half, I planed everything down past the two grooves.

I glued the end pieces back together and placed the top back on the legs.
And this is where I completely lost interest in restoring the piece as a dining table.
Truth told, I didn’t really like the looks of the table. The wood was nice enough, but the double legs looked dated, and I didn’t like the curves and arches for a dinner table. I remembered that Handan wanted to make console tables, so I switched gears and turned the project in that direction. I cut the end pieces in half (again!), chopped the side supports from the frame and got busy with the sandpaper. I did a lot of hand-sanding on this piece. I don’t know why – it just felt right to hand-sand this one.
It was here that I decided a turquoise inlay would look pretty good in that table, so I hopped online and checked out the prices for crushed turquoise.
Jeezum Crow! $17 for one ounce!
I wanted crushed rock, not sterling silver!
So what do we do every time we get sticker-shocked? Yep. Learn how to Do it Ourselves. A quick search on Ebay produced a few peddlers of raw turquoise stone and turquoise mixed with other minerals. I got some chunks of turquoise and some chunks of a turquoise/chrysocolla mix. I bought a small length of black pipe from Home Depot in which to crush the rock, then sifted and sorted it into four grades.
You can find all the details of crushing your own turquoise in my Turquoise Inlay Cheese Board post.

I chose a simple pattern of alternating 1 1/2″ and 1/2″ holes, primarily because I had Forstner drill bits in those sizes, and circles seemed easier to handle than any other shape. Unfortunately I took no pictures of the entire inlay process with this project, but I will summarize the steps. If you’d like to see the full step-by-step inlay process, you can find it in my Turquoise Inlay Cheese Board post.
After the holes were drilled to a depth of about 1/4″, I filled them in with a mixture of all but the largest grade of crushed stone. With the crushed rock sitting just proud of the surface of the table (in other words, the crushed rock bulged above the surface just a bit), I drizzled on some super glue and let the whole mess set for a while. Then came the hard part: sanding. It takes a lot of time and even more sandpaper to smooth down turquoise. I started with a random orbital sander, but it wasn’t doing the job, so I moved the piece to my standing belt sander. This is the big, surly older brother of the hand-held belt sander. It is powerful and will remove a ton of material real quick, so I had to be careful. It did a great job of scouring off the excess in a short amount of time. After the belt sander did the bulk of the work, I used the random orbital to polish the stone and get the rest of the table smooth and ready for finishing, but first I attached the top to the base with wood glue and two small L-brackets.

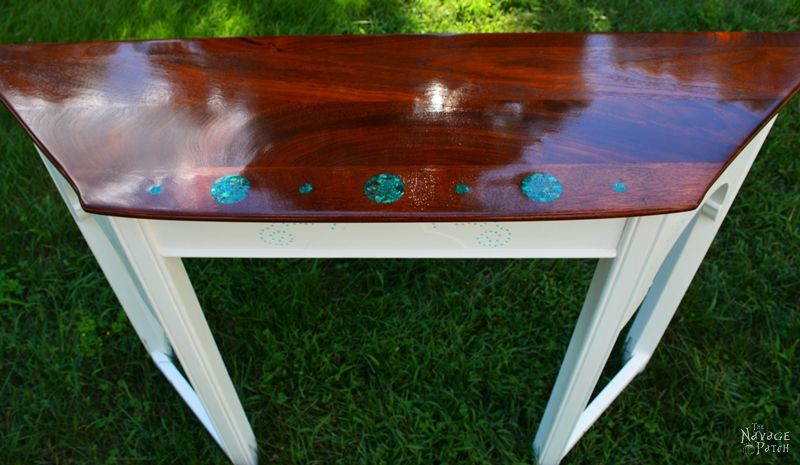
This is mahogany, so staining it would be criminal. I just reached for a can of my wonder finish![]() and let the natural beauty shine through.
and let the natural beauty shine through.

Moving on to the base, I thought simple white would offset and complement the rich red of the mahogany and the blue/green of the turquoise. After two coats of Handan’s homemade chalk paint, I highlighted some cosmetic dimples in the original wood with a paint similar in color to the inlays. Handan finished the base with Annie Sloan clear soft wax and power buffed it until it glowed with a soft sheen.

And that was it. The beauty was freed from the beast, and we now have a gorgeous turquoise inlay mahogany console table.


I am so very impressed!!! I read every word…and sat in awe at the pictures of progress. At your leisure I would like a list of items you might be looking for and since I work at the Second Chance with your Mom, I am in a position to eyeball items you might appreciate! Just a thought! Good luck to you in all your endeavors. You certainly have not only an “eye” but a great talent to make it all come together. Sincerely, Jerry Dean
Thank you, Jerry! Handan and I will come up with a list and let you know.
Greg & Handan, this is totally SCHWEET!!! I adore your ingenuity, how you listen to the piece and walk through each step. Color me a new subscriber! 🙂 Happy Thursday! 🙂
Thank you, Christina!
I have seen thousands of upcycling and have “saved” many pieces myself. I think this is truly amazing and love how “out of the box” adding the turquoise was!
Thank you, Julie!
Absolutely beautiful! wonderful creative talent ! The richness of the Mahogany is stunning……being obsessed with rocks/stone myself, it’s nice to see these two elements together in a very pleasing manner……the choice of stone for your inlay is spot on! the tone of the color is just right with the color tone of the Mahogany, wonderful accent color. The bright white base is perfect to contrast and showcase the top……i love how you balanced out the color of the stone with the turquoise dots on the base…..very nice job indeed.
Thank you, Rosemary!
Clearly one of the better posts I’ve seen on Hometalk, probably because I do similar things, just don’t post them…. 🙂
Thank you! You should post them!
The projects you’ve shown are so beautiful! Do you sell any of them? I’d love to have one of your cutting boards. I love beautiful things but am ” all thumbs” when trying to create something. Good intentions, but alas, no talent. Love seeing what you’ve done…BRAVO!
Thank you, Yvette! I hope you enjoy your board!
OMG! I always wondered how inlay was done (can you tell I am a total newbie to refinishing furniture!) and figured it was far too complicated to even attempt but now… This is stunning!
Thank you, Giselle! Inlays aren’t too hard. Two pieces of advice:
1) Smaller is easier! Time and difficulty of sanding increase exponentially with the size of the inlay.
2) You’ll need A LOT of 60 grit sandpaper to bring the rock down to flush with the wood. Then you’ll need a normal amount of the other grades to make everything smooth and shiny.
Good luck! Send pics if you give it a try.
Greg
This is so gorgeous! What a great rebirth to a well loved and used table. When I read that it had turquoise on it I was thinking the whole table was turquoise and had to read this (on Hometalk). I mean I couldn’t all be turquoise could it? I love what you did.
Thank you, Katharine! I’m sorry for the late reply – for some reason your comment was flagged as spam, and I just spotted it in the spam folder! -Greg
Seriously, we have to stop meeting like this! LOL Now I’m visiting from the Friday’s Furniture Fix party where your link caught my eye. It’s a good thing I’m finally following you because I’m in awe of your talent and creativity!
Thank you, Marie! I saw your other comments on two of Handan’s posts. This time you’ve landed on one of mine 🙂 We both thank you for reading and commenting! -Greg
Wow this was a pleasant surprise! This turned out fantastic! Sometimes it helps to have an utter fail and then have to revise your plan for the better. Aren’t you glad you didn’t just restore it?
So happy I didn’t just restore it! I don’t think I would have liked the table with those arched legs, but they look good on the console! Thanks for reading and commenting, Mary! -Greg
An amazing makeover. The thumbnail doesn’t do it justice. I hope you get lots of click thrus because this is a feast for the eyes. Thanks so much for linking to Friday’s Furniture Fix. Sharing out on IG and FB later today. XO susie from The Chelsea Project
Thank you so much, Susie! 🙂 -Greg
Wow, that is an amazing upcycle! The turquoise is a brilliant addition, and I love that you left it unstained. I also LOL’d at your belt sander comment, since I discovered the unforgiving nature of one quite recently on my friend’s dining room table! Thanks for sharing your amazing transformation at Merry Monday!
Thank you, Megan! I wonder how many projects have been ruined by newbies with belt sanders? 😀 -Greg
Beautiful Job!! A few months ago I tried the inlay stone on a scrap piece of walnut except I used an epoxy resin. Have you tried that? I had seen the super glue way too, but went with the resin instead. I had planned on using this for a floating shelf,somewhere! I got a mortar and pestle and ground up my own stones. You might check Etsy. There are a few sellers that have bags of all sorts of stones and they aren’t too expensive. I got 3 or 4 different kinds. If you want to see how it turned out, here is the link to my blog. It’s the 2nd one down.
Thanks! http://makemeprettyagain.blogspot.com/p/in-works.html
Beth, your project is awesome! I think that resin is the way to go for bigger projects like yours. Do you have any close-ups of the inlay? I’d like to see how the two methods compare when viewed close in. Also, what other rocks did you use? -Greg
Thx Greg,,, I used, (you’re gonna make me look up how to spell these!!) Apatite, chrysocolla and sleep beauty turquoise. I found a guy on Etsy, “TheGrindingShed”. I also used some recycled glass. The seller also sent me a rock of lapis or something else that was blue (i sound like a moron don’t i?!) that I crushed. I do have some other pics. I liked using the resin. I ordered that off of Amazon after I read about another guy who used it on a floating shelf. Its crystal resin by Gedeo. super easy. Sanding wasn’t too bad.
send me an email and I’ll send u the pics.
This is excellent info…thank you, Beth! My email is greg@thenavagepatch.com
Oh wow! I just saw your inlayed shelf and it is gorgeous! I am also in love with your pond and garden. Now Greg’s “honey do” list will be growing even longer as I signed up for your blog updates 🙂
Gosh You guys really rocked this one! As A flipper myself I must say how impressed I am with this. I see flips all the time and I must say this is super creative and executed in a superb manner! And thanks for sharing your technique, truly an inspiration!
Thank you, Brenda, that is such a nice compliment! 🙂 -Greg
You had a ton of work with this one, but it was totally worth it. It’s beautiful! Thank you for sharing at The Really Crafty Link Party! Pinned!
Thank you so much, Teresa! I agree…it was worth the effort! Thank you for pinning!
Wow! What a spectacular transformation! Thank you for sharing at Merry Monday!
Thank you, Amanda!
Whoa. What a fabulous transformation!
I love the how the stones pop on the top of the table and the little swirly dots are the finishing touch.
Thanks so much for sharing your creativity at the The DIY Collective! Please join us this week to show off your latest project!
Have an awesome day!
~ Ashley
Thank you so much, Ashley! 🙂
I can’t remember the last time I was so impressed!
Thank you so much, Anny! 🙂
That is so pretty!! Very impressive! You could never imagine what the table looked like before!
Hi Anika, thank you so much! 🙂
You are so talented!! Great work! It’s beautiful!
Thank you so much, Christin!
This is stunning! As a rock collecting nerd, I absolutely love the inlay; it’s unexpected, but the finished result is amazing! I’m featuring you at the Talented Tuesday Link Party this week!
Thank you so much, Stephanie! 🙂
wow, love the inlay! thanks so much for sharing this and all your other projects on craft schooling sunday, you guys are really unique and add something truly special to the party!
Thank you so much, Sara! We are both so thankful for your kind words and sharing of our projects!
Greg and Handan, I love the story of this table turned console table and how it came to be. I can so relate to best laid plans going awry…seems to be my modus operandii. But I can’t imagine this console with it’s inlaid torquoise not being…so I’m glad you had to alter your plans.
I would love for you to share this post on our Link Party, From The Archives Friday, which features posts 6 months and older. We love giving a second life to those oldies but goodies. Hope to see you there.
Hugs, Lynn
Hi Lynn, I’m so with you on the “best laid plans!” I don’t think I’ve ever done a project without messing something up or taking the project in an unexpected new direction. But that’s also what I love about doing what we do…I never know what I’ll end up with! 🙂
Oh My Goodness!!! This is seriously a piece of art!!! I love how your mind works to make a piece truly unique! Beautiful! Thank you so much for sharing this piece of inspiration!
Smiles!
Terry
This is truly gorgeous and unique!! I love it and want to make something like it, too. Thanks for sharing. Linda @Crafts a la mode
Thank you, Linda!
O’my, that is exactly what I want to do to an old piece that I have in the basement. It is wormy oak (I think)but the top has a crack in the 24″ wide board. No wonder it cracked! I wanted to fill the crack with turquoise but couldn’t find a reasonably priced source and wasn’t sure how to hold it in the crack or make it smooth. Can you share the e-bay link for the stone? Thanks for sharing all this info, maybe I will finally get this piece done!
Hi Lyn, start here to shop for turquoise:
http://fave.co/2l55Gvn
And be sure to check out the following post:
https://www.thenavagepatch.com/turquoise-inlay-cheese-board/
I go much more in depth with how to crush and inlay the turquoise in that cutting board post.
Good luck!
Greg
Absolutely brilliant! Great job!
Thank you, Aletheia!
Wow, guys, this table turned into such a stunning and unique piece! You are so creative, it is so gorgeous!
Thank you so much, Katrin! I love that one, too. It holds a special place for me, as I think it’s the piece that brought my upcycling game to the next level 🙂
Wow, Gregg once again you have amazed me. You purchase the most worn & abused object & turn it into a beautiful piece of furniture. Can this old mom adopt your family? Great job!!
Well thank you so much, Marcia! I think we’re available for adoption 🙂
Hey! Why have I not seen this before since I have been following you for quite a while? This is so lovely! If I was visiting and encountered this in your home,it certainly would have stopped me in my tracks. What vision. Did Handan have an idea for the table , or just let you go and do? This is just a sweet piece!????
No worries, Bernice – that’s why we’re occasionally updating some of our old posts and republishing them! 🙂 Making a console was Handan’s idea, the rest was mine. Shocking, right? I do have ideas from time to time, lol!
Clever boy!
Thank you, Janice! 🙂
Wow Greg! Just an awesome amount of work and following of an evolving vision! Really beautiful……I envy you your collection of heavy-duty power tools!
Thank you so much, Connie! 🙂
This is beautiful!! You both do amazing work! Love your posts!
Thank you so much, Renee! 🙂
I am completely blown away! I truly never expected the outcome based on looking at other blogs and finding them lacking. Thank you for your work!
Thank you, Lee! I’m so happy you liked it! 🙂