
DIY Carousel Jewelry Organizer
Let me tell you about my spring fever: though my mind races with a million project ideas and tingles with giddiness when I think about working on them, my body reacts like a bear waking from hibernation, too slow to move a muscle. Okay, maybe it has nothing to do with the warm weather, but it has everything to do with this morning’s constant coffee consumption coupled with the long hours of yard work we did all weekend… still… better to blame the weather than listen to the groans and protests of this aging body. Otherwise, how will we muster the energy to tackle all the projects we have planned for this summer, right?

Speaking of projects, if all things go as planned, this summer we’ll be completing two room makeovers (the guest bathroom and the master bedroom), and we’ll be giving a little upgrade to our backyard (which we already started). We will soon start working on our master bedroom, but first I need to get the small details sorted: a face-lift for my old picture frames, so I can create a small gallery wall, DIY valances for the windows, a DIY jewelry organizer, some shelving to display decor items, an update for our night stand lamps, a small makeover for our IKEA furniture and maybe… I know, I know… poor Greg! He will be pulling his hair out when he sees the “small details” list, as most of the items will involve his work… hahaha.
Having a pretty long list in mind, I wanted to get a head start with one of the things I could do on my own. As usual I went to our “famous” junk mall basement and saw this cabinet door sample which is another Put & Take find.
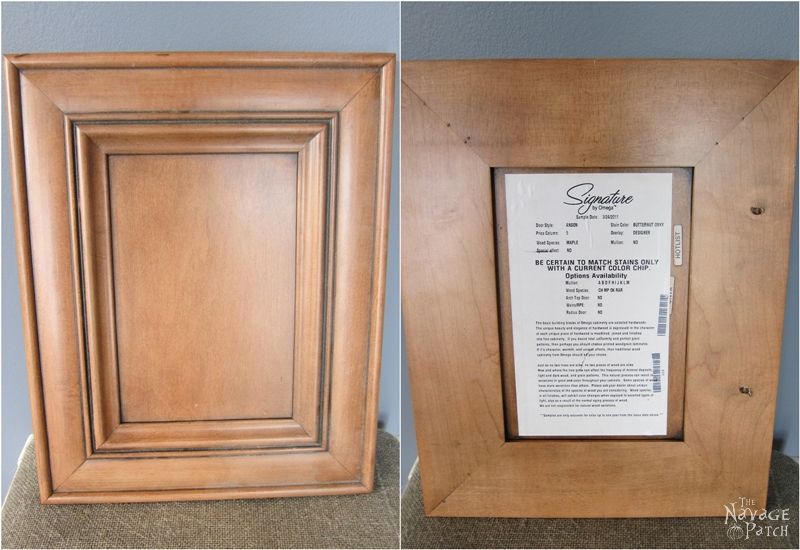
I thought with a little paint and some knobs here and there I could jolly well turn it into a jewelry organizer like the ones I’ve seen on Pinterest. Before starting anything, I also looked for some suitable knobs and in my stash I found this instead…

I bought my carousel hooks from Hobby Lobby, but if you don’t have a Hobby Lobby close by this carousel hooks from Amazon is also really pretty.
Since I had the hooks and a nice base (cabinet door), the plan was simple: paint the front side of the base white (leaving the back alone), add the hooks in the middle of it and “voila!”, right? Well not quite exactly. Let’s rewind a little and go step-by-step, shall we?
The cabinet door sample was made from a very good quality MDF (medium density fiberboard) covered with laminate. With latex or chalk paint painting a laminate piece can be tricky as latex or chalk paint would have hard time sticking to its very smooth surface. This is where the primer would fly in with its red cape and blue tights and save the day. That said, even without primer, if you were to paint a laminate surface, you would probably have no issues as long as you gave enough time between coats so the paint could dry and cure a bit. Since I had all the time in the world, I decided to go ahead with painting. After my homemade chalk paint was ready custom color matched to Old White, I gave it a coat of paint.


The next day, I gave it a second coat of paint, but only to the outer frame. When I placed the carousel hooks in the middle to get a feel for how it would look when finished, I felt like something was missing. The middle part where the hooks would be needed something to tie-in the two colors. I decided to decoupage the middle area, so I didn’t bother giving it a second coat. Once the second coat of paint on the outer frame was dry, I started sanding and distressing it with 320 sandpaper.

After cleaning the sanded areas of its dust with my little helper, I wanted to protect the painted outer frame before starting the decoupage, so I waxed it with Annie Sloan Clear Wax. With Annie Sloan Clear Wax I usually use an oval waxing brush, but for taking the excess wax off and buffing, I always use cheesecloth as it doesn’t hold lint. I buy cheesecloth in bulk as it is cheaper and also I use it a lot: for cleaning/dusting around the house or when I need to prep a piece for painting.

Once the outer frame was waxed, I started on the prep for the decoupage. I found this scrapbook paper design on Pixel Scrapper which is one of my “go to” websites for finding free images. If you like this scrap book paper design you can download it in high resolution (for personal use only) by clicking on the picture below.

The color of this design was too tan-ish for our bedroom and the carousel hooks, so I adjusted it give it a soft purplish hue instead. Once I was finished with the design, I printed out the paper design on cardstock paper and cut it to the exact size. A little note here: depending on the piece I want to decoupage and the end result I want to have, I either use cardstock paper or thinned paper. As the cardstock paper I use is pretty thick it eases my job during application – it doesn’t crumble or break apart so bubbles are easy to remove. But because of its thickness I would only use cardstock paper for furniture or pieces where I want my decoupage to stay solid. For decoupaging a candle I would rather use copy paper or even thinner paper, as I would want the candle light to show through the decoupage. Anyway… Back to the jewelry organizer…

After cutting the cardstock paper to size, I applied Mod Podge Matte to the area I wanted to decoupage, then I placed my paper on the Mod Podged area. When the paper was nicely set in its place, I applied 2 coats of Rust-Oleum protective coat. Once the protective coat dried I screwed the carousel hooks in its place.

This is the part where I was hoping to say “voila!” but I realized that the screws were too long and were sticking out from the back. As I was looking for new set of screws to fit the carousel hooks, Greg fixed my issue by grinding the back of the screws down which led me to give a nice finish also to the back.

I didn’t want to paint it because the screws were still sticking out a tiny weeny bit. I thought if I filled the middle area and decoupaged the whole back with the same paper, it would do the job nicely.
I cut a piece of foam board to fit the middle part and pushed it in to its place.

Next I printed the scrap book design on a bigger cardstock paper (11 x 17 this time) and using Mod Podge I decoupaged the paper to the back. After applying 2 coats of Rust-Oleum protective coat on top of the paper I added a saw tooth picture hanger to the back and two small bumper pads at the bottom corners to protect the wall paint from any scratches. And that was that!

Here is my carousel jewelry organizer.


It looks quite pretty, doesn’t it?
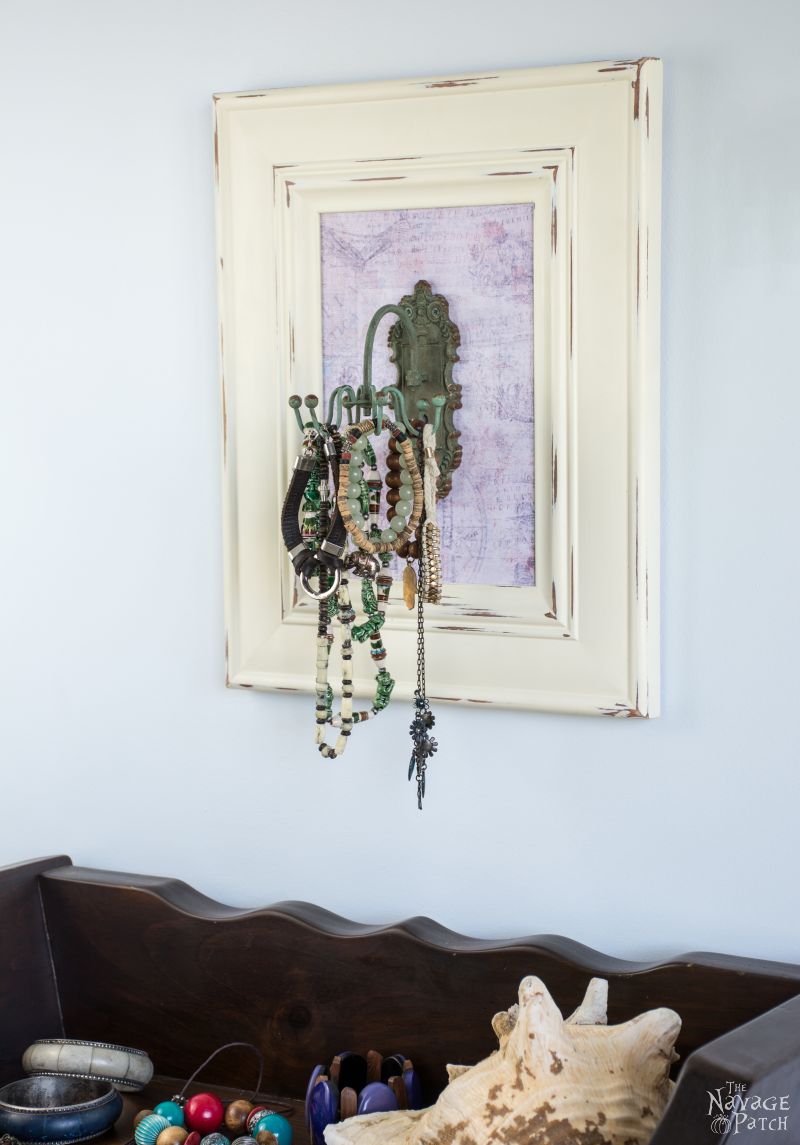
I love it!… not because of the look, but because of its function: now I don’t get all frustrated trying to untangle my necklaces & bracelets each time I want to use them.

I also think using this carousel instead of knobs was a better idea. As a carousel keeps the necklaces at a distance from the wall, it is very unlikely that the wall will get scratched. In other words, I don’t have to worry about doing touch-ups every now and then 😉

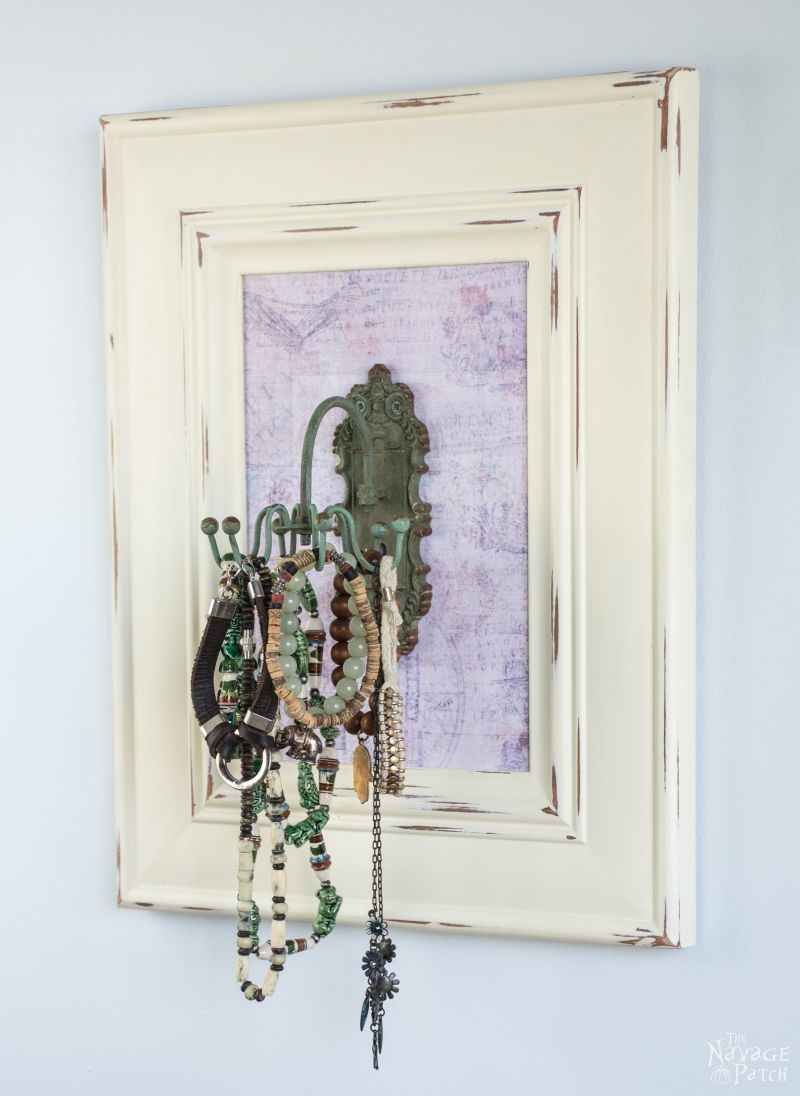
As usual some close-up shots for you to see the details…


Here is where I can’t help myself from bragging about my paint brush. I seriously love the work it does…always smooth and brush-stroke-free finishes. I couldn’t be happier with it.


I love this carousel hook so much that I am planing to make a similar one for my belts. Not that I can get to it anytime soon, as we have to fix the yard first, but still… added to the list 😉

Handan, xo
What a beautiful project! I love the colors you chose!
Thank you so much, Carolann! =)
Very clever and creative and pretty too!
Thank you so much, Marie 🙂
Handan I love everything about this pretty jewelry organizer. This is what I call major thinking outside the box. The decoupage turned out very pretty and the hooks in the front are really unique. I hope you can share it with us over at Sweet Inspiration.
Thank you so much, Mary! I indeed am so glad that you liked it…I will definitely link it up to Sweet Inspiration on Tuesday 🙂 Have a fabulous weekend! x
LOVE THIS! I just found your blog through Hometalk and I’m glad I did. You and Greg seem to be a perfect match and I will enjoy all the projects you come up with and the interesting stories of your adventures. I’m hooked! Much aloha from Kailua, Hawaii.
Thank you so much for your heart warming words, Andi! We are also very glad that you found us!! 🙂
Handan, xx
Love this! I’ve wanted to make a jewelry holder for my fashion-loving 6 year old. Visiting from Wow Me Wednesday.
Thank you so much, Victoria! Have a great week and please give my hugs to your little one 🙂
So pretty! My next big project is to update my guest bathroom, which is also MY bathroom, and I plan to make several jewelry displays, and this is a front runner!
🙂
https://gwingal.blogspot.com/
Thank you so much, Nikki! 🙂
Thanks for sharing your good idea! I have a hook similar to yours and it does look lonely hanging all by itself. Mounting it on the door with your lovely decoupage behind it really beefs it up. Now you have a lovely and useful showpiece!
Thank you so much, Ruth! 🙂
This is adorable!! Love the aged wood look!! Thanks for sharing on My 2 Favorite Things on Thursday!! Hope to see you again tomorrow!! Pinned!!
Thank you so much, Elaine! I thank you for hosting such a great party 🙂
Your jewelry organizer is so cute, Handan!! You even decoupaged the back! I am too lazy for that… I know what is having tangled jewelry and your solution is great.
Thank you so much for sharing at Sweet Inspiration, I hope you have a wonderful week!
Thank you so much for visiting us, Pili!
Normally I try to finish the backs of any frame or anything goes on the wall, but I usually go for painting only as it is simple. With this one though I had to decoupage it as I used foam board in the back middle part to hide the end of the screws.
Thanks once again and you too have a fabulous week! 🙂
Your jewelry organizer turned out really great Handan! I love that you used the door to frame it like a piece of art., and the distressing looks fabulous. Thanks so much for sharing at Vintage Charm. I’m pinning.
Thank you so much, Tuula! Your wonderful words always make my day! Hope you have a fantastic weekend! 🙂
Such a great project. I really like the decoupage in the middle, definitely makes it pop. The carousel really makes it! What a great idea for the jewelry holder. Awesome. Thanks for sharing with us at Funtastic Friday
Thank you so much, Mistie! I thank you for hosting such a wonderful party! 🙂
This is such a clever idea! I love how rustic you made the frame look. I also get tons of ideas from Pinterest. I find that has the best resource for DIY projects. Thanks so much for linking up for the Best of the Blogosphere!
Thank you so much, Chelsee! Pinterest is my favorite source for inspiration 🙂
What a cleaver and beautiful idea!!
Thank you so much, Kate!
What a clever project! You are amazingly creative. *impressed*
Thank you so much, Sarah! 🙂
Oh! This is PERFECT! I have one of these hooks that I bought for hanging my outfits for the week- but the weight would be too much for it and it pulled out of the wall.
I just went through and cleaned up my jewelry display and now only have a few key pieces- I’ll for sure be thinking about this when it comes to my new jewelry display!!
Thanks for linking up with us at Talented Tuesday!
Thank you so much, Kristina! 🙂
What a pretty and fun way to organize! Thanks for sharing on the DIY linky!
Thank you so much, Helen! 🙂
What a creative project! And you can use this idea for so many things in addition to a jewelry holder. Love the job you did with the antiquing. 🙂
Thank you so much, Wendy!
I love this – I need one (and more jewelry!) I think I’d even like a long one to hang horizontally with several hooks!
Thanks for sharing with us on Throwback Thursday!
Mollie
That is a good idea, Mollie! Not that I have that much jewelry but I surely can use that idea for my belts 😉
I love this! I need about 10 of them in my house 🙂
I’d like to invite you to share this at the brand-new Farmhouse Friday link party which kicks off this Friday at 6:00 am PST! I am giving away a $50 Amazon gift certificate to celebrate, and I will also share your linkup on DIY Farmhouse Style Facebook group where I admin, which at this writing has over 130k members! 🙂
Hope to see you on Friday!
Michelle
The Painted Hinge
http://www.thepaintedhinge.com
My daughter loves this boho look in her apartment! I have to show her this! It’s so pretty! She has tons of jewelry scattered and This is perfect!
Thank you so much, Maria! 🙂
Very cool project Handan. I’ve been the queen of cabinet doors since I found a huge stash. I also have a jewelry organizer in my draft! Love the carousel you found, it’s perfect!
Thank you so much, Susan! 🙂
Wow Handan what a brilliant and artistic imagination you have! That looks fabulous, classy and expensive. I ‘m desperate to do some crafting but limited to Needle felting at the moment due to my aches and pains.