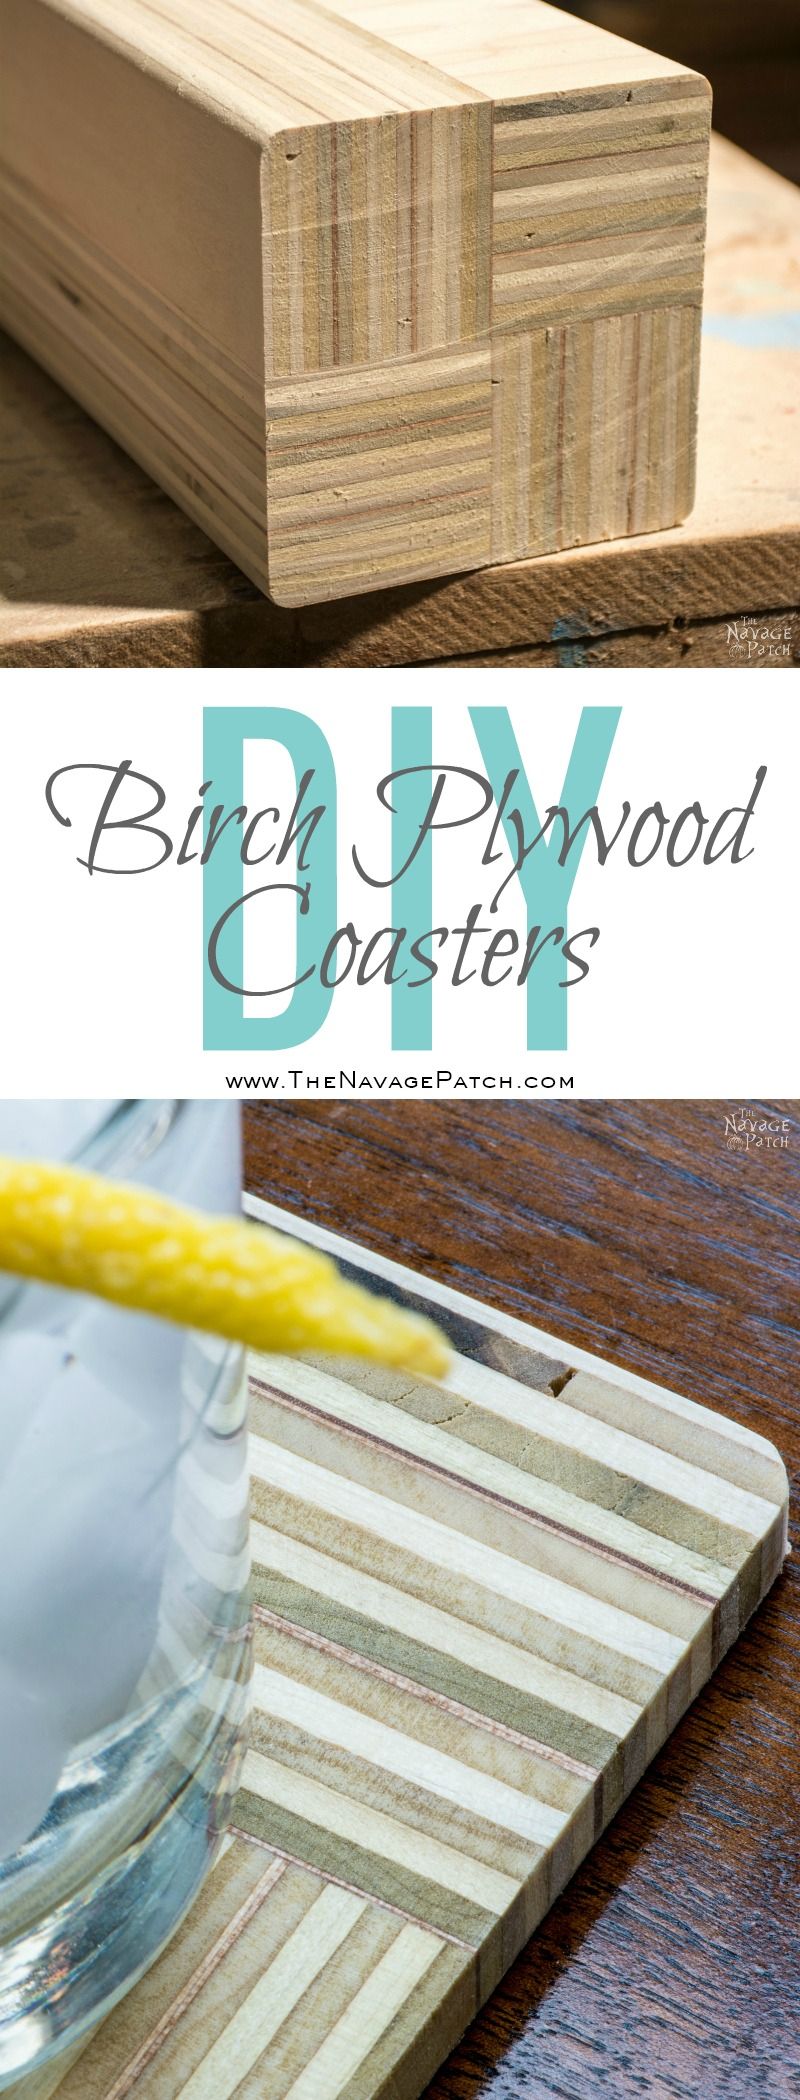
DIY Birch Plywood Coasters
I am a light sleeper, a victim of a hyperactive mind that enjoys long conversations with itself at 3 am. My night mind is a skipping stone, arcing and floating into dreams, then smacking the surface of consciousness before lifting off again into slumber. As night wanes, and the golden filigrees of sunrise reach out into the dark, my mind becomes more active still. It starts to wake, but remains firmly planted in the dreamsphere. This is where inspiration lives.
On one such morning a few weeks ago, I found myself dreaming of cocktail coasters. I dreamed I was making one of thick hemp rope or jute, winding it in a flat coil until it became a coaster. The conscious part of my mind said, “Hey, that’s cool! Let’s make some!” But then it realized that coasters like these were nothing new. In fact that particular design had likely been pilfered from the vaults of my long term memory, as I seem to remember my parents having identical coasters back in the 70s or 80s.
But that sliver of conscious mind wanted to make coasters now, so it cajoled my dreaming mind to come up with a new design.
And my dreaming mind did. The following coasters were made to the exact plan put forth by my subconscious: design, materials and execution. All of it was shown to me, so building them was quite easy, as I already had the plans!
Okay, enough of the lucid-dreaming hippie-babble! Summer is on its way, and we’re gonna need some coasters for our cold beers, icy cocktails and wine glasses! Do you need any more reason than that? Didn’t think so. Let’s make some coasters!
These coasters are made from 3/4″ birch plywood, available at Home Depot and Lowes. A 4’x8′ sheet costs about $45, and would make enough coasters to build a bar. You may be able to get smaller pieces of plywood, but the smaller the piece, the higher the price, generally speaking. Go buy a 4’x8′ panel, have the nice folks who work there cut it in half or in thirds, use some for coasters and keep the rest for other projects. Good quality birch plywood is a must-have in my workshop. I use it for everything from crafts to cabinets.
Whatever you do, don’t buy cheap plywood! Not only will it have too many holes and gaps in the layers, but the layers themselves will not be as beautiful with the greens and reds and whites.
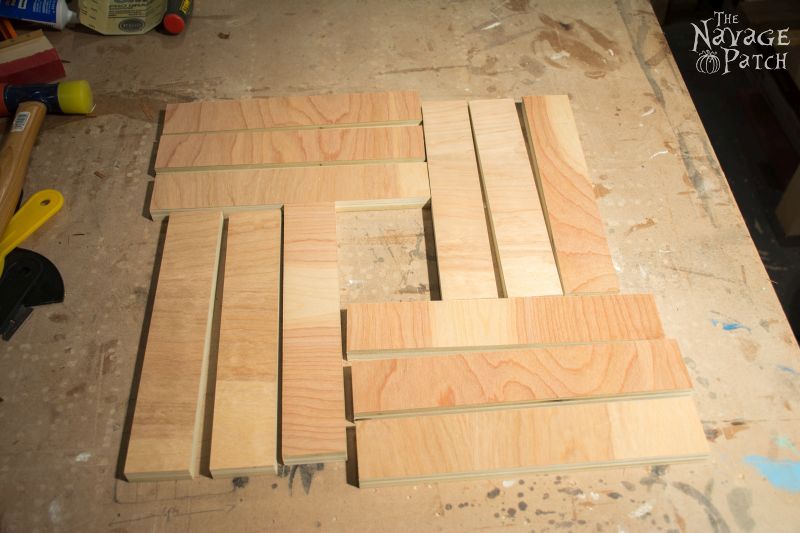
I had some scrap plywood in the workshop, so I gathered them up and started measuring.

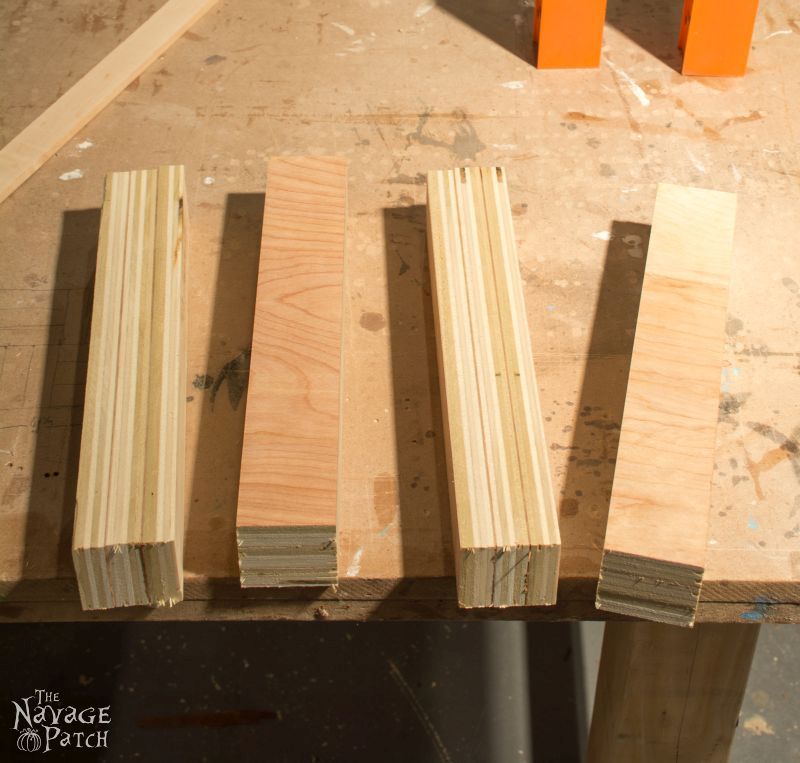
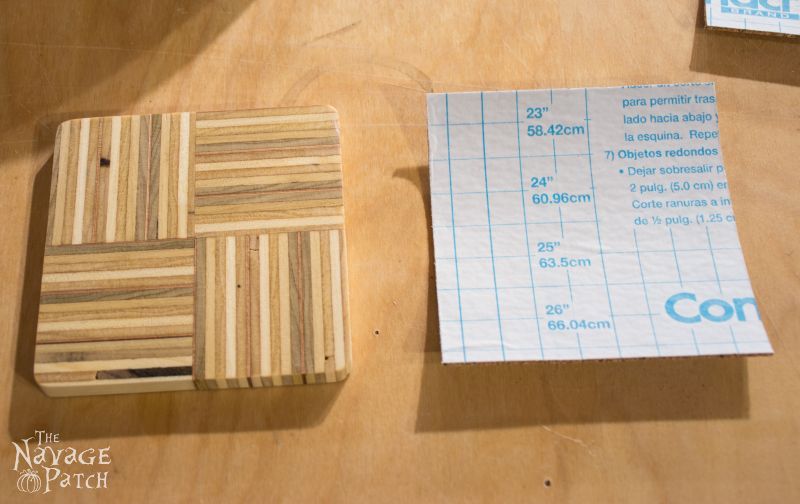
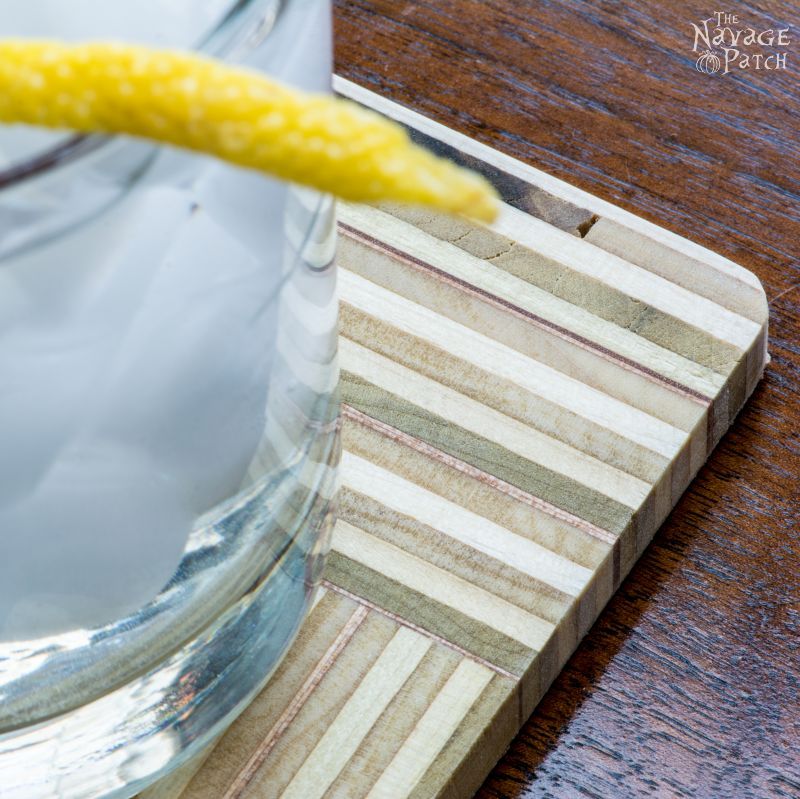
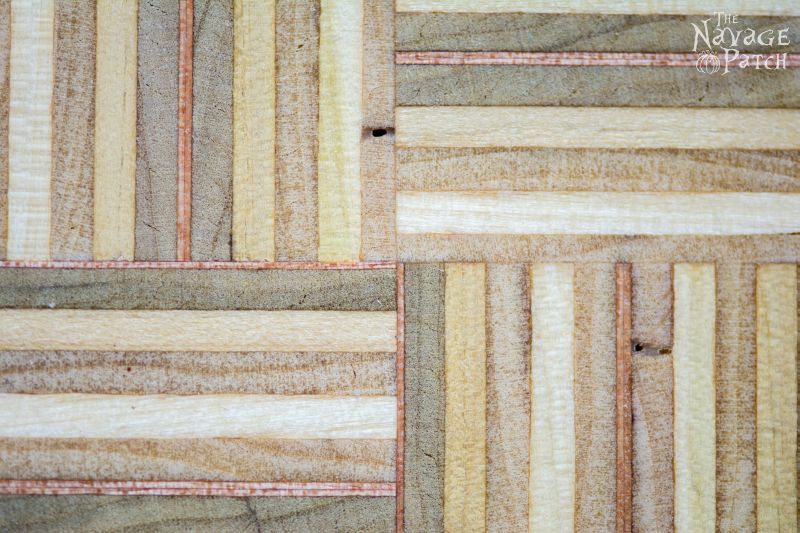
In general, square coasters measure 4 inches to a side. I would be making these coasters to have an alternating end-grain pattern which meant they would be built from four 2-inch-square pieces. Since this 3/4″ plywood was in reality only about 11/16″ thick, I would need to sandwich three pieces together to get to 2″ (actually it gives me about 2 1/16″). Since three stacked pieces are 2 1/16″, then I would need the strips I cut to be 2 1/16″ wide. I know, this sounds confusing, but have a look at the picture below and you’ll see how things are shaping up. I cut 4 groups of 3 strips. Each strip is 2 1/16″ wide.
Next I arranged each of those groups of 3 together to give me four long blocks with a height and width of 2 1/16″.
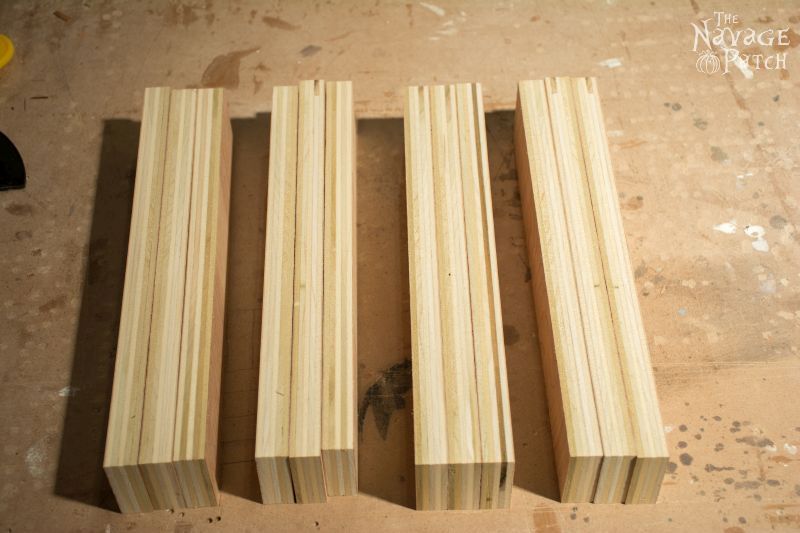
I glued these groups together. To make things quicker, I put them all in one clamp, but I didn’t glue the 4 groups together.
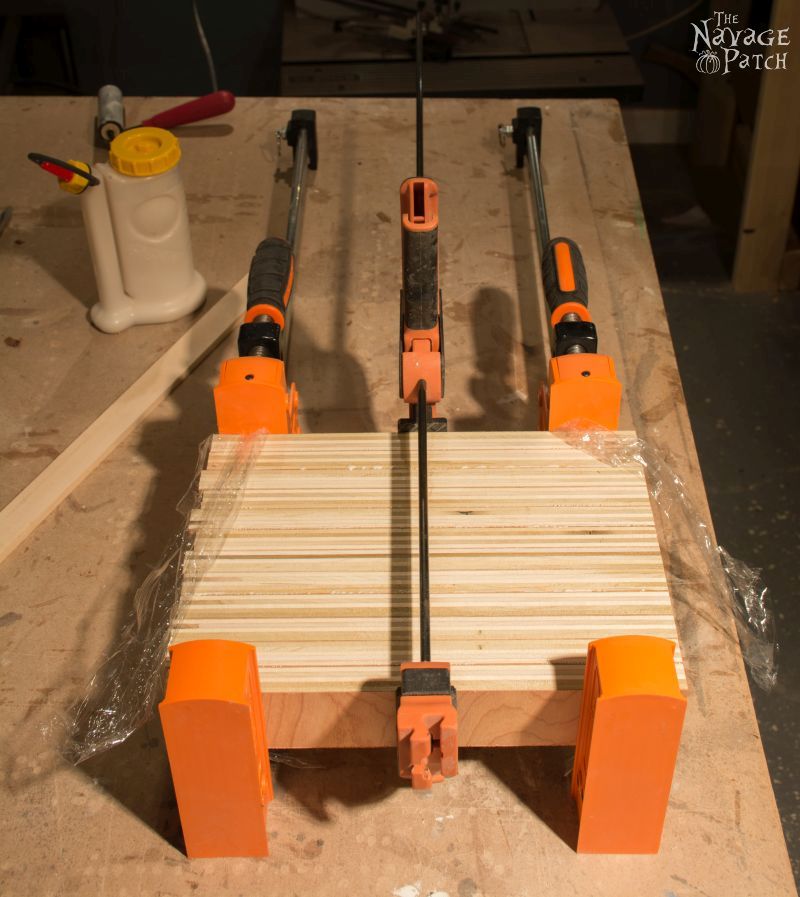
And when the glue was dry…
Since some of those edges were a little rough, and some of the pieces shifted slightly as the glue dried, I took them over to the table saw and shaved all four sides until they were smooth and still square. When it came time to glue the blocks together, I took a shortcut and glued all four at once. This was a mistake. I should have glued them together in pairs, then glued the pairs together. This was my mess of clamps trying to glue them all at once.
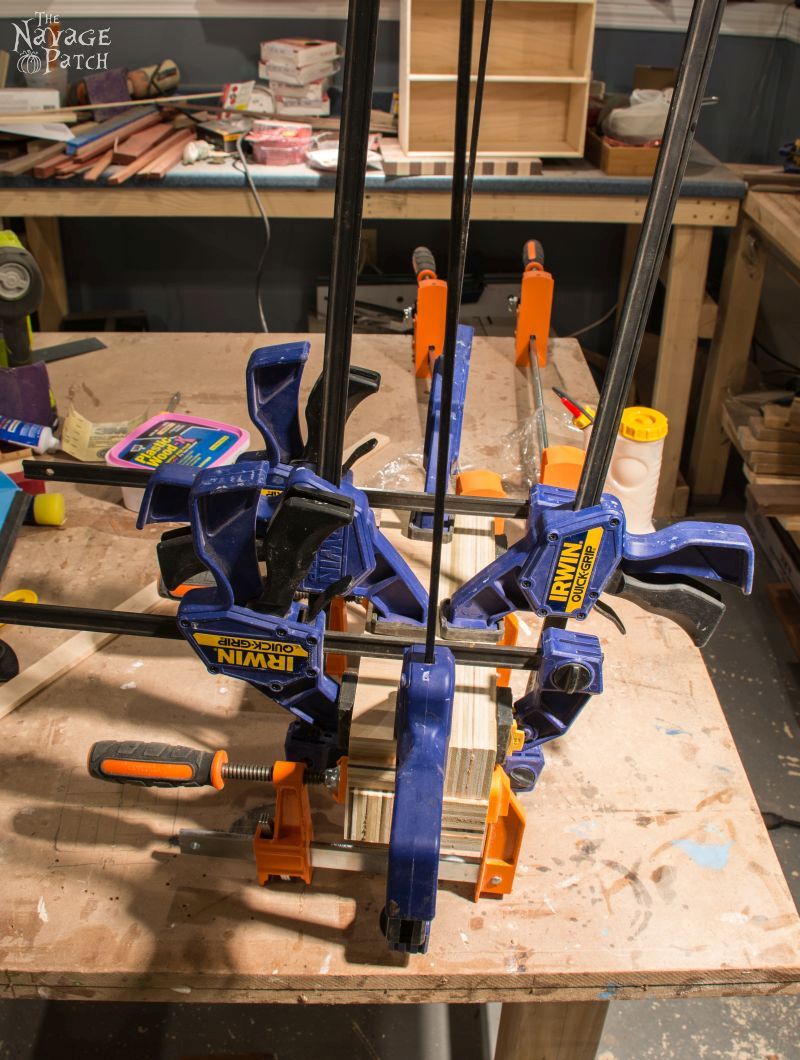
I didn’t get enough pressure on all sides and had to do a little wizardry trying to get glue into the cracks with a razor blade, then re-clamping the whole thing again. Eventually it all worked out. Again, as always happens, things shifted a tiny bit as the glue dried. I took the block back to the table saw, set the fence to 4 1/16″ (remember, gluing the blocks together gave me a final block measuring 4 1/8″ to a side). I cut two sides with the fence at 4 1/16″ then set the fence to 4″ and cut the other two sides. I now had the exact size I wanted. I took my router with a roundover bit and ran it down the edges. The same result could also be achieved with sandpaper.
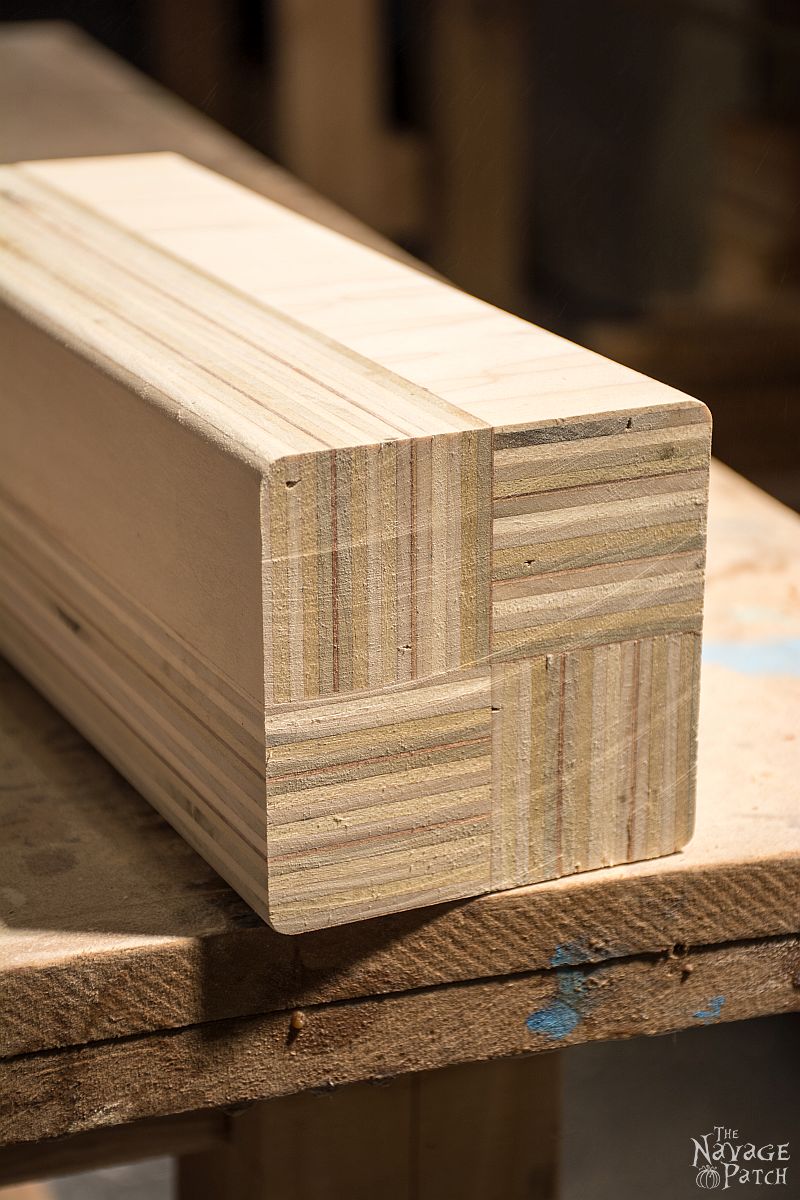
This plywood log reminds me of liverwurst. I have no idea why, since I’ve never in my life owned a log of liverwurst. I tried it once at a friend’s house when I was 10 or 11 and decided that it was very likely humanity’s most terrible creation – a societal and cultural nadir from which we as a species may never fully recover. Anyway, back to the coasters…
Now that I had my log of liverwurst plywood, it was time to start slicing off coasters (aw, man, now I’m back to thinking about thick slabs of liverwurst, and I’m starting to get queasy).
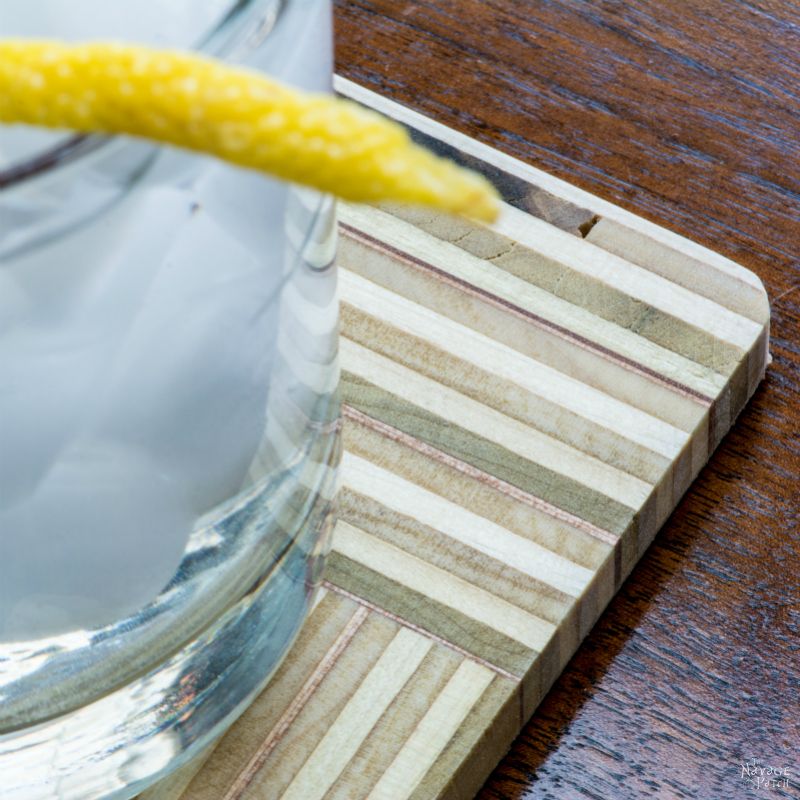
I decided that I wanted my coasters to be 5/16″ thick. I arrived at this precise dimension using the ultra-sophisticated and cutting-edge technique of holding my thumb and forefinger in front of my face and moving them towards each other until the space between them looked about right. Then I measured that space.
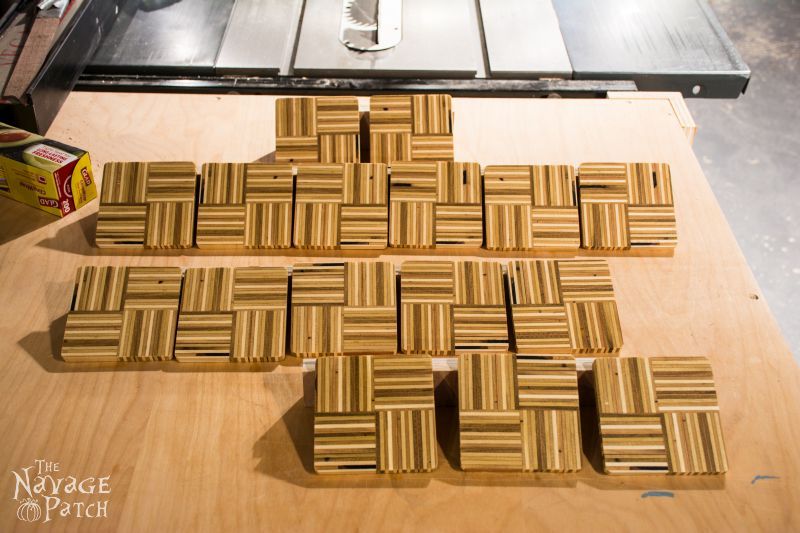
I brought the liverwurst plywood to my radial arm saw and started slicing. To my everlasting surprise and delight, not only did the coasters stay in one piece, but they felt pretty damn sturdy! I sliced off 17 of them – 4 sets of four (for gifts or sale), plus one for me.
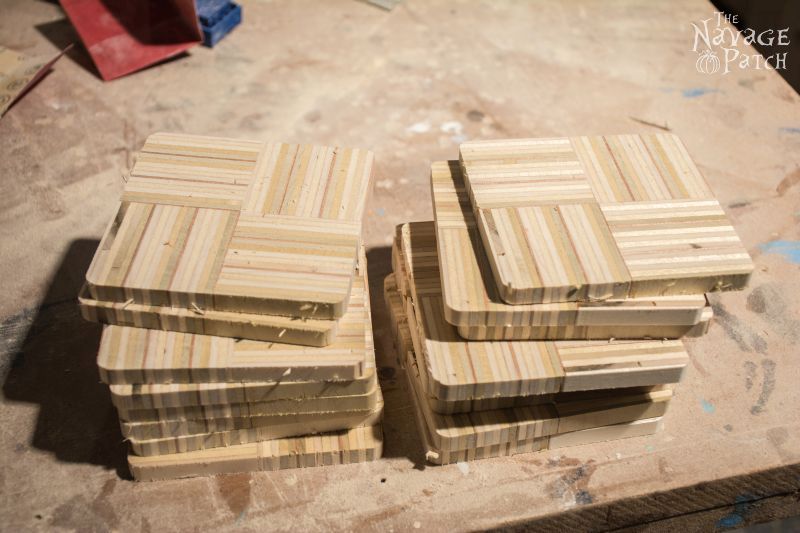
They were a little rough around the edges, but really what would you expect from something that spends its life holding a drink? I sanded the edges and faces with 220 and 320 grit sandpaper, then lined them up for finishing.
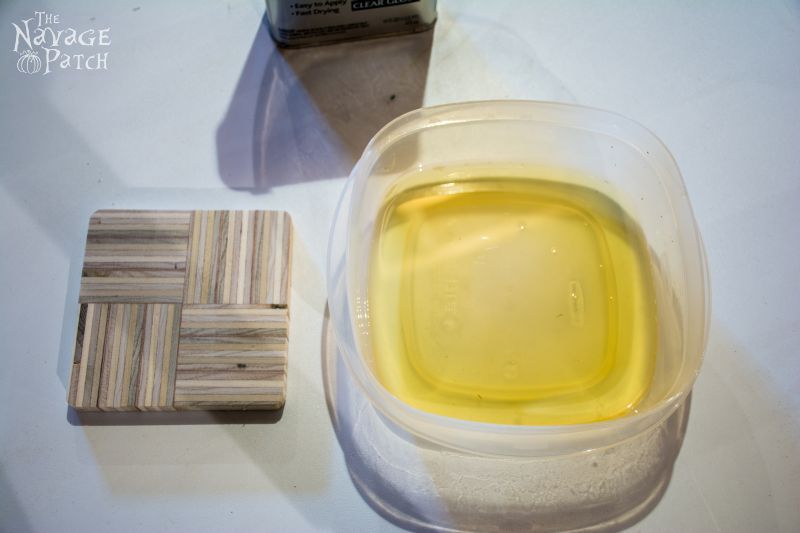
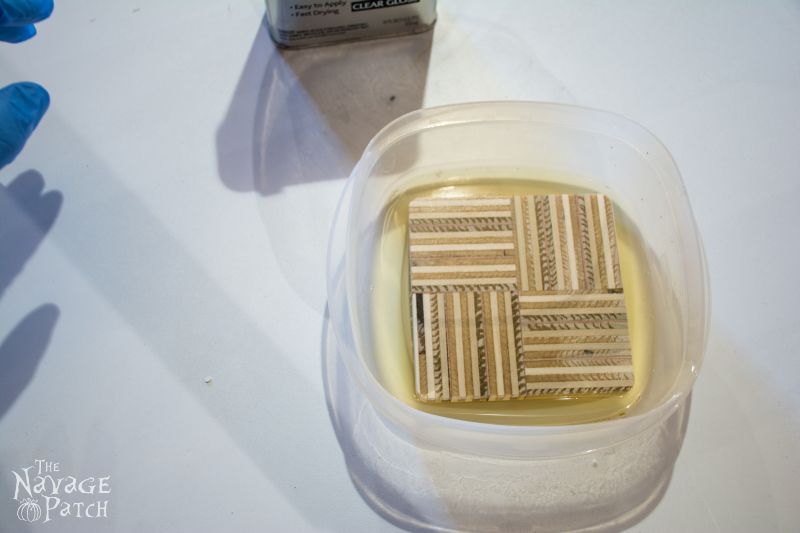
Since these cocktail carriers were so small, I thought that brushing on polyurethane would be a colossal pain in the @ss, so I decided to give them a bath in something a little thinner than regular poly.
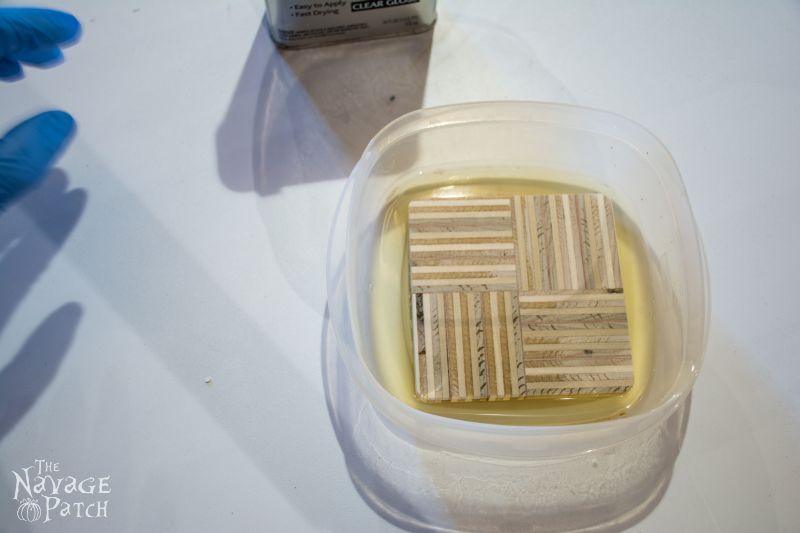
In went the coaster…


And that end grain just slurped up the finish.
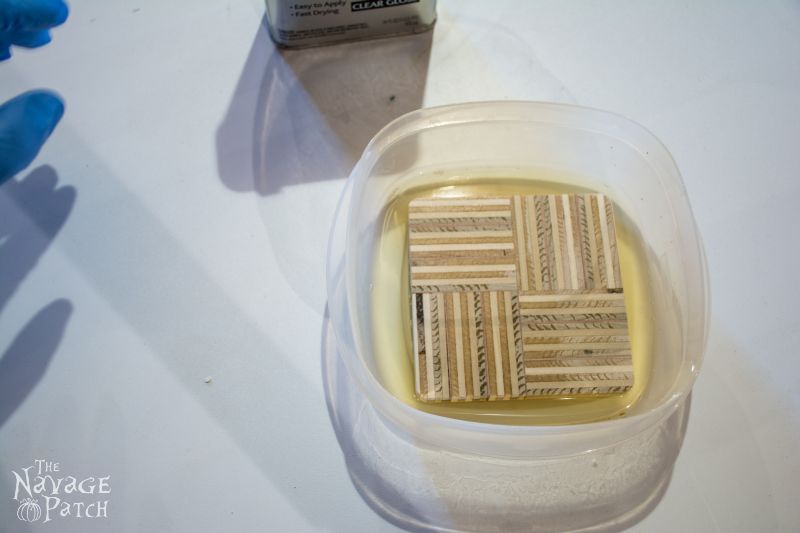
After a few seconds, I flipped it over.

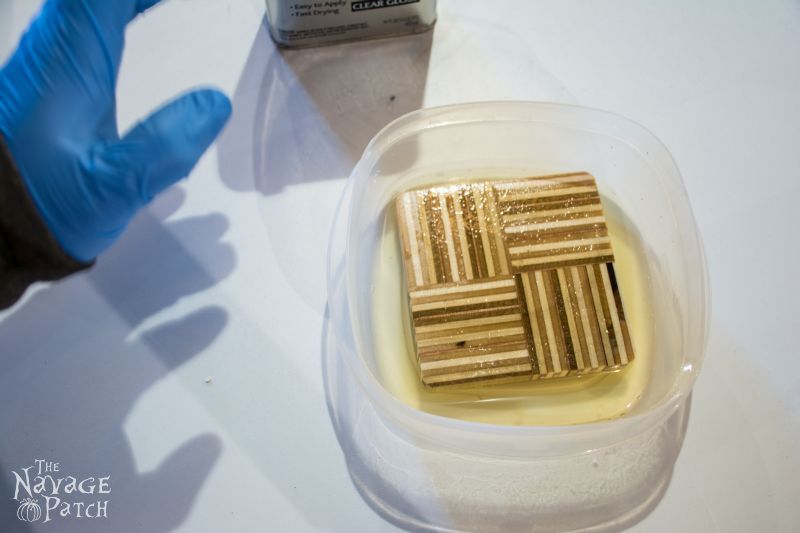
And that coaster was totally sealed. I took it out of its bath and let it towel-dry for a bit.
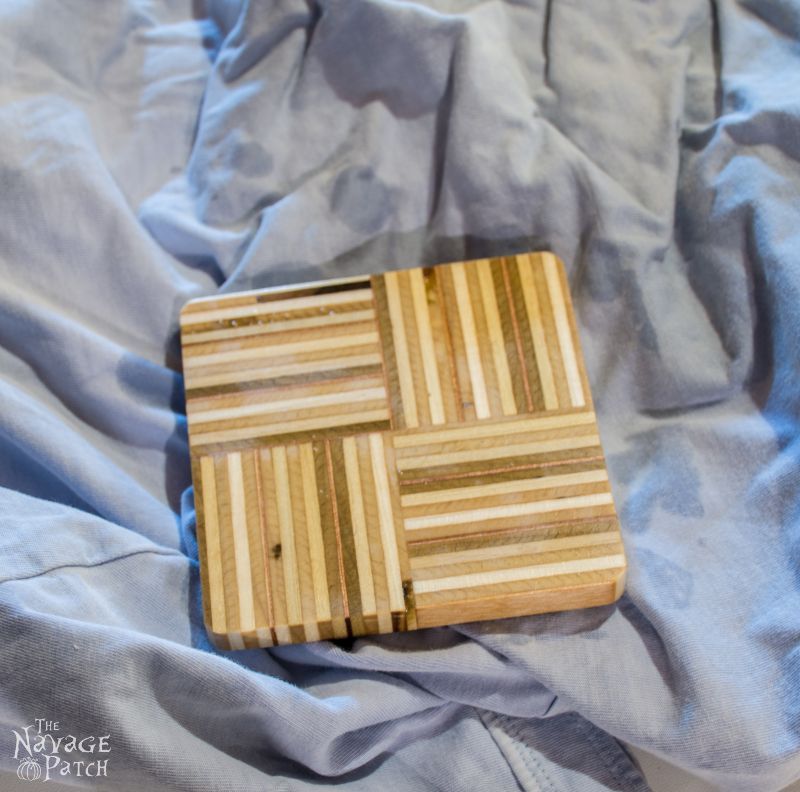
Then I placed it and its brethren on an angled drying rack (a few strips of plywood set on end).
Since there was so much finish in these coasters, I let them dry for about a week before proceeding to the next step.
Update: March 2017 – After heavy use with wet glasses (sweating iced drinks several times a day), water penetrated into the plywood and caused the coasters to swell and split. I would recommend more than one poly bath, and even a coat of traditional poly to help. Ultimately, water will win. As the wood naturally expands and contracts, it will crack the poly coat allowing water to penetrate. The best use for these coasters would be with dry glasses, but they still last a pretty good while with additional coats of poly. And if you only use them for company, then they will last a long time!
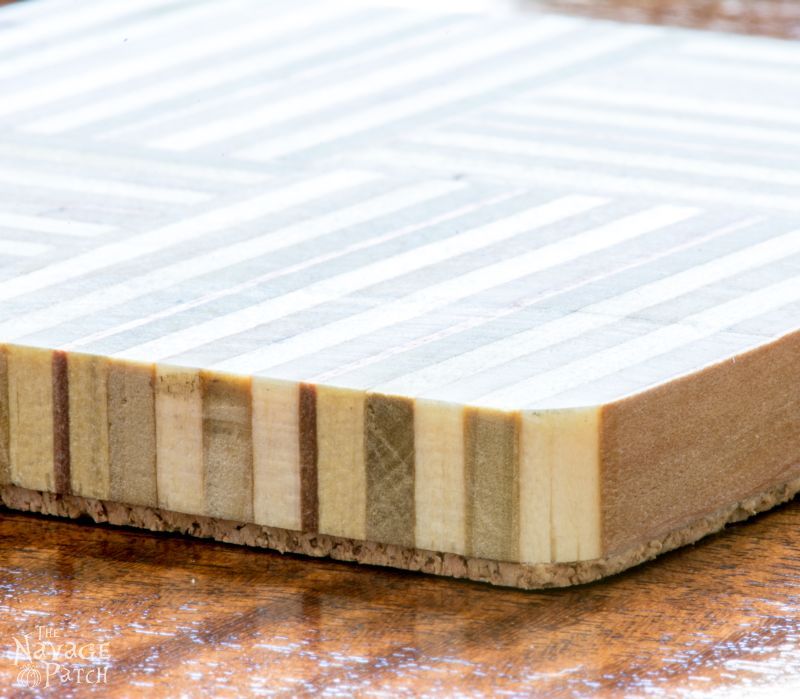
When I thought they had dried enough, it was time to put a cork backing on them to protect any wooden furniture they may be used on. I found this perfect cork backing on Amazon, that couldn’t be easier to cut and apply.
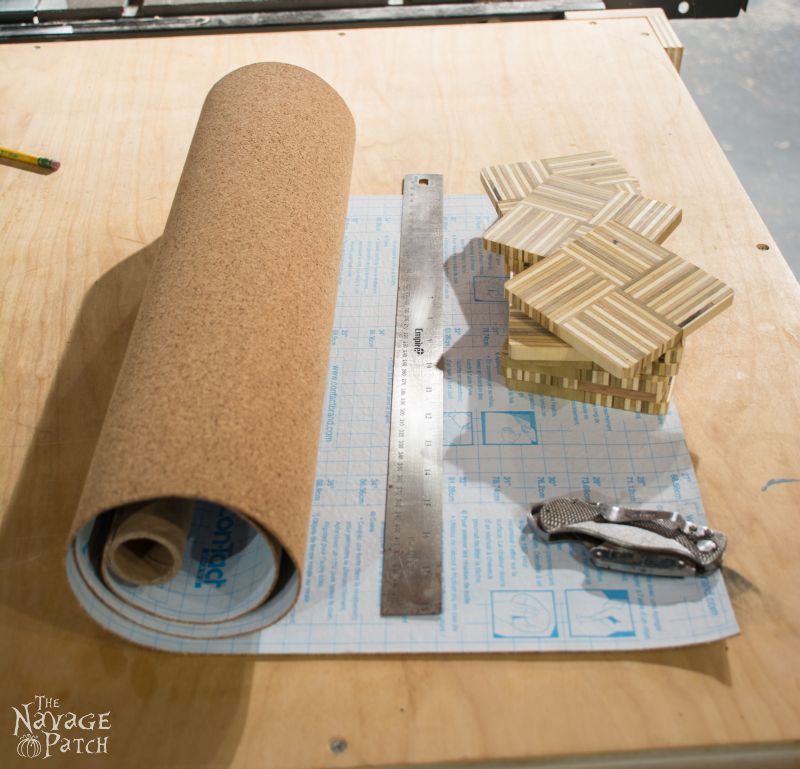
I cut pieces just slightly larger than the coasters so I could trim them to size once they were applied.
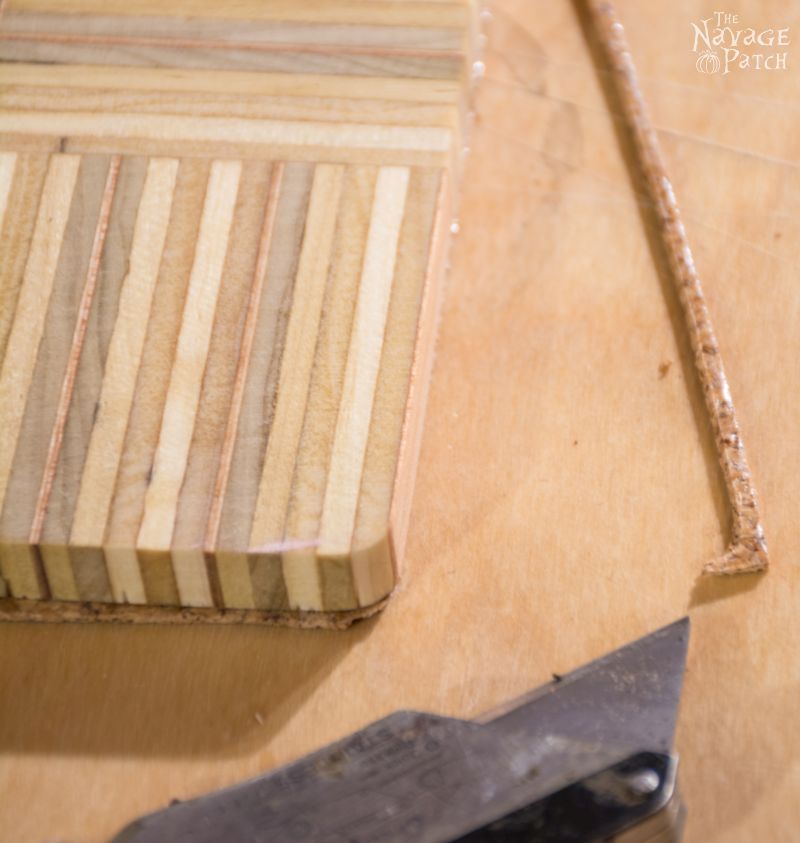
Here is the backing applied, but untrimmed.
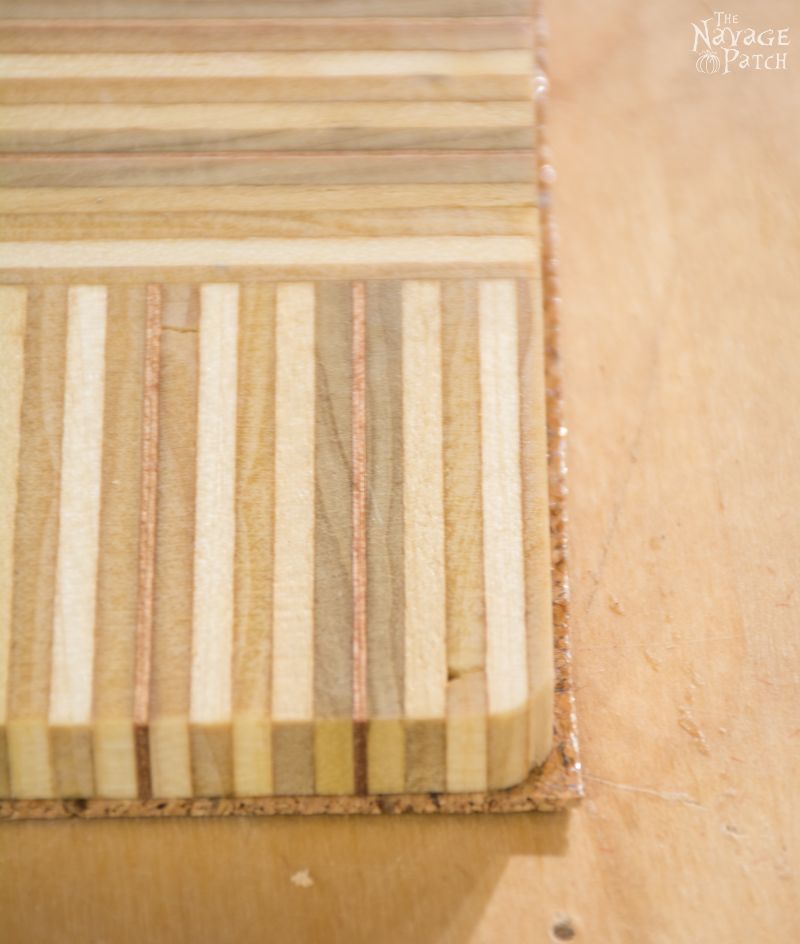
Using a sharp-bladed utility knife, I ran the blade around the coaster, holding it at a 45 degree angle, so it slightly undercut the cork. This gave the final piece a more professional look and feel.
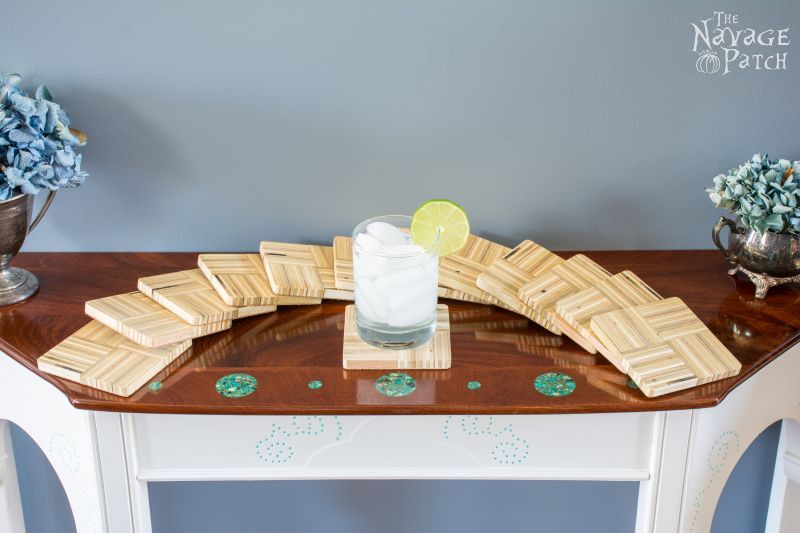
And that was it! The only thing left is to give these poor little sots the drinks they were born to carry.


We love it when you share our posts on Facebook and Pinterest!


wow these are gorgeous ….you can email me for my address so you can gift me some ha ha love them xx
Christmas is coming soon. Soonish. Eventually. 🙂
I love your writing style! Your tool savvy building skills impressed the heck out of me. The coasters are amazing – lucky are the recipients of your gift!
Thank you, Marie! This blog has been a fun way to practice writing. I’m glad you enjoy it 🙂 -Greg
These are so stunning! Just beautiful and the craftmanship is amazing. Bravo!
Thank you, Dorothy!
I loved reading your writing style. Especially the first paragraph of this post. Thanks for sharing such a clever coaster. That’s how they make beautiful chopping blocks too, I think.
Thank you, Ann! Cutting boards are indeed made in a similar fashion. You can read about that in an earlier post of mine: https://www.thenavagepatch.com/the-story-of-a-board/
Woah!
Great job and fantastic outcome. These coasters look awesome (and very modern).
Thank you, 2+C!
Wow! That would be quite a project for my boys to make . . . and they’d make lovely gifts. Visiting from Tuesday Talk.
Thank you for visiting, Abi! I hope your boys make some for you!
Impressive, thank you for the thorough tutorial! Thanks for sharing at the Talk of the Town link party.
Thank you, Becky!
Wow, they look amazing! I wish I could tell my brain to come up with an awesome design for something and it would just obey. (It would probably be a dessert item, though.)
#happynowlinkup
Thank you, Jenny!
These are pretty darn cool! I have thoughts of cake at 3 am, I like your thoughts better.
LOL, thank you, Sandra!
These are gorgeous! Really beautiful craftsmanship. But now I can’t get the image of liverwurst out of my head. Ha! Thanks for sharing such a detailed tutorial. Have a great weekend!
Thank you, Christina! Mmmm…liverwurst.
Oh my goodness! These are so fun looking with the wood grain lining up in different directions. Excellent tutorial, and you’re so dedicated to use a razor blade to get the glue where you needed it!
Thank you, Audra!
Greg, I so enjoyed reading this post. I too spend my sleeping hours in a semi-comatose state thinking of projects. Oh, the perils of being a blogger! Haha! I am also repulsed by liverwurst so I can understand that sentiment. As I was reading and scrolling I saw one photo where you had all the coasters lined up and in my blurry vision, it looked like a piece of art. You are missing your calling Greg, you have to make art from plywood! You can do this, after turning these humble pieces into such cool coasters you can do it! Thanks for visiting us over at Sweet Inspiration and inspiring us some more.
Thank you, Mary! I hope you had a great Easter celebration! I could see the plywood art thing working. And if I tired of looking at it on the wall, I could take it down and repurpose it into coasters! 🙂
These are gorgeous. So glad to have found you guys, I love what you are doing here and love the story of how you met. I’ll be following your projects and I’m featuring the coasters this week on the Pretty Pintastic Party, so you’ll get loads of new pins. Hope to see you back this week!
Thank you, April! We’re glad you found us, too!
Thanks so much for sharing these cool coasters at The Pretty Pintastic Party! We love them so much we are planning to feature them at the party coming up this weekend. We hope you’re stop by, grab a featured badge, and share some more great posts!
Awesome! Thank you, Jamie! 🙂
Wow, these are so great! SO much craftsmanshio in these coasters. Great job. Thanks for sharing at Merry Monday!
Thank you, Sara! 🙂
Beautiful work!! Looks very time consuming but the outcome is sure amazing! Thanks for sharing at our DIY Crush Craft Party!! Hope to see you this Thursdays at 7pm EST. Have a great rest of the week!
Thank you so much, Denise!
Love these coasters…they are gorgeous works of art! And about that liverwurst..my mother is German, so I was the unlucky kid who got to bring Liverwurst and Muenster cheese sandwiches to school for lunch every day.. . guess how popular I was? Thank goodness the nightmares of my childhood have finally stopped! Thank you so much for sharing with us at Friday Favorites! I would love for you to join me at mustlovehome.com for the Wonderful Wednesday Link Party…and enter our $40 PayPal Cash Giveaway for May!! Hugs – Christine at Must Love Home
Thank you, Christine! Liverwurst and Muenster…well the Muenster part isn’t so bad!
Wow! I’m so impressed. These coasters are absolutely amazing. Thanks so much for sharing at Vintage charm. Pinning!
Thank you, Tuula!
I love this project! Who would think that plywood could be so pretty? I’m featuring you tomorrow night for “Best of the Weekend.”
Thank you so much, Paula! 🙂
Your coasters look wonderful! Thanks for taking us through the process and for sharing at Snickerdoodle Sunday. Pinned and Tweeted.
Thank you very much, Beverly!
This is such a cute idea. I never would have thought to do this. I love the wooden look and will have to try this! I love how detailed your posts are on creating these DIY projects. Thanks so much for linking up for the Best of the Blogosphere!
Thank you, Chelsee!
Nice! I am a sucker for end grain projects. Especially if they hold drinks.
Thank you, Lisa! Me too!
Awesome! I love this project. Pinning.
Thank you, Virginia!
These are amazing! Well done!
Thank you, Meg!
Oh I LOVE these, adding this to my Build Projects board so I have this saved!
Hi Tarah, thank you so much!
These are so beautiful! I want to make a whole bunch for gifting. Thanks for sharing at the Wednesday Showcase party.
Thanks, Kati! They are awesome gifts!
Greg, I love the dreamstate, or using the subconscious mind to figure things out. I feed my mind all kinds of info about a project or a problem that needs solved and set my mind to work on it while I do other things. Sooner or later, hopefully sooner, a resolution pops out. Love that. Works so much better for me than pushing myself to figure things out, forcing things doesn’t work real well for me.
Enough about that though. These coasters are so cool. I love the look of the different colors in the birch plywood, it makes for such an interesting piece. And it would work with almost any decor! Perfect coaster in my book.
Question, when you soak the coaster in the poly-like coating and then laid it on the towel, doesn’t it want to stick or mar the finish a bit? And when you prop them up against the wood to dry? This is really interesting to me, I couldn’t figure out how you were going to place them to dry after dipping. Inquiring minds want to know! LOL
Hi Nikki,
The towel doesn’t stick to the coaster or mar the poly since wipe-on is a much-thinned version of regular poly. After a minute or two on the towel, all of the poly has been absorbed into the coaster, so there isn’t a layer of poly to mar. Ditto propping them on the wood – all the poly is inside the coaster. Here’s an update on their durability: after two months of constant wet use (martini on the rocks every night, often left overnight in a puddle of water) my test coaster finally split at one of the seams. Not at one of my seams, but between layers within the plywood. I may make another batch and give them a second poly bath. I believe that would solve the problem. I also experimented with cutting coasters off the “loaf” with a band saw. That introduced slight ridges, which actually look pretty cool and act as water drainage. I’ll have to update the post accordingly if I can muster the time and energy to document it all!
Greg, these are pretty cool! I’ve been making coasters too (not like these at all) and I used two part epoxy to coat them. Works well, but a lot of effort for a small project. I just found your blog and have been reading it for DAYS now, love you two!!!!
Hi Karen – the epoxy would be a much better sealant than varnish. These coasters are great for dry to moderately wet glasses. Epoxy would make the impervious to the wettest glass!
I so appreciated the rambling conversation-style of this post, it was written exactly as I would have with my ADHD brain 🤣 I also was hooked from the first paragraph and super glad you gave the update about the finish! All around great work!
Thank you so much, Michelle! 😀