
DIY Coffee Table with Ball Legs
This DIY Coffee Table is an easy IKEA hack that pays off big with bold modern looks at a fraction of the price of you’d pay in a store!
I have four legs.
I know that may sound strange. Most men only claim a maximum of two. Three if they’re boasting.
But the fact is, I’ve been hauling around four legs since we lived in Connecticut.
My babes bought them for me with grand plans that I’d incorporate those legs into a coffee table she wanted me to build for our living room.
They’re beautiful legs, really (not unlike my own) – turned wood, nice shape, and just waiting for a table to be plopped on top of them.
But then we moved to Georgia, and the legs remained in their box, tucked away in a forgotten corner of my basement workshop.
And then we moved to Florida. No basement here. So the legs have been consigned to a storage unit 10 minutes drive from the house.
Still, they’re good legs, and I might have made something of them, but then a funny thing happened.
Somewhere in the last couple of years, our style changed, and those turned legs are no longer the belles of the ball. The sort of table they’d be best at supporting was not the sort of table that was welcome in this new home of ours.
Instead, The Magnificent Shrimp wanted a different sort of table to go with our new family room sofa. She wanted something grand (it’s a big space), and she wanted something with ball legs and an amorphous shape. She wanted something modern.

I know, I know. After years chasing the farmhouse bandwagon, we’ve finally gave up the chase and let the tattered and broken-down thing roll into a well-deserved grave. We’re now leaning towards the present with our style while still embracing the past of certain cultures.
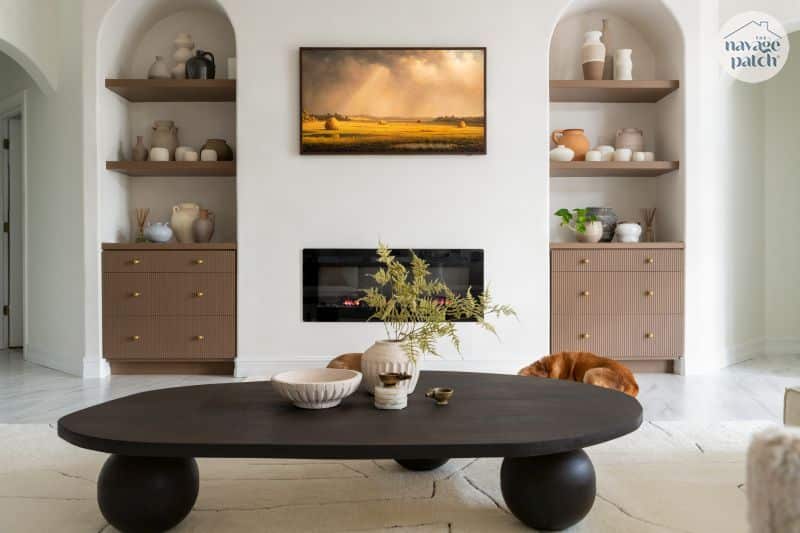
Before I get to the build, let’s have a look at the space before we transformed it with a new sofa, new rug and new coffee table.
The IKEA sofa picture below was perfectly fine, but as I said, we wanted something more modern. Ditto the Pier 1 chairs. They’re all perfectly good and comfortable, and they’ll all be re-homed in our son’s new house.

As for the “coffee table,” it was a makeshift thing we got at a tag sale years ago – some sort of DIY storage chest on industrial casters.

The good news is that it’s still with us, living its new best life as a plant stand behind the new sofa! Anyway, let’s get on with this coffee table build!
Ball Leg Coffee Table SUPPLIES LIST
Affiliate links are provided below. Full disclosure here.
- All supplies can be found here
- (6) IKEA Blanda Matt 11″ serving bowls
- Minwax stainable wood filler
- DAP Weldwood instant wood adhesive
- Stain Gloves
- Varathane Kona gel stain
- 3/4 inch plywood
- Wood glue
- All tools can be found here
- Random orbit sander
- Jigsaw

DIY Coffee Table VIDEO Recap
Watch our short and fun video below for an overview of our coffee table before reading all about it!
Watch Our Tutorial On YouTube
On Tiktok
On Instagram
We love to see our DIY projects out in the wild! If you try this DIY project and take a picture and post it on Instagram, be sure to tag us – thenavagepatch
DIY Coffee table Tutorial
The IKEA bamboo bowls have a smooth finish on them, so for the glue to grab, I first sanded the rims with 150 grit sandpaper.

I glued the bowls together with my go-to instant wood adhesive. As far as I can tell, this is just CA glue (judging by smell), but there may be something else in there to make it specialized for wood. Either way, it’s a hell of a lot cheaper than buying those dinky-ass tubes of super glue!

I think it would serve well as a bamboo Death Star.

Some folks on social media expressed concern because they thought this glue couldn’t hold the bowls together nor the balls to the table. I put their fears to rest by telling them about the 4th sphere I made. When the glue had set for about 20 minutes, I took a hammer and chisel to the seam and gave it 3 good wacks.
Nada.
The spheres and table are rock solid.
Next, I put wood filler into the seam and then spread it out with a putty knife.


When the filler dried, I first tried hand-sanding the balls. This was a moronic endeavor that I soon abandoned in favor of my random orbit sander.

I didn’t just need to sand the wood filler – I had to remove the finish from each ball so I could stain them. Hand sanding would have taken forever and left my arm gimpy and useless.

Perfect! So I mentioned I made an additional test sphere. On my first run, I sanded with 80, 120 and then 220. Lemme tell you right now to stop at 80 or 100. Bamboo stains splotchy (even with pre-stain), so you want all parts of the sphere to absorb as much gel stain as possible, and that means a rougher sand.

I chose gel stain because it goes on darker for the first coat, and the second coat can be artistically applied to cover any imperfections. At this point, I hadn’t yet learned of bamboo’s prenicous character, so I forged ahead with my staining gloves and gel stain.

I’d never used stain gloves before. I’m pretty sure you’re only supposed to use one, but I was staining a sphere, so I thumbed my nose at convention and donned two. I was skeptical at first…

But after a few rubs and caresses, I warmed up to the gloves…

And soon began to enjoy them.


Though they did make it hard to scratch a facial itch or adjust my glasses.


I wiped off my first coat and was rather appalled at what I saw.

To be honest, I thought it had a cool and edgy look, but I knew the Shrimp would absolutely hate it, so I set it aside to dry so I could apply a second coat.

The second coat went on more evenly, and I smoothed it out with a small folded rag saturated with stain.

This was the look we wanted!

I made the tabletop from two sheets of 3/4 inch plywood.

After stacking and clamping them, I freehanded my design which I based off of this table from Wayfair:

My dimensions are roughly 6ft by 4ft, much bigger than the Wayfair table.

Freehanding a perfect curve is not a skill I possess, but I think I came pretty close to the inspiration, and in fact, I like mine even better!

I cut out the shape with my jigsaw fitted with a clean-cut blade. With this blade, the cleanest cut was at the bottom, while the top had only minor tear-out.

After the cut, I brushed wood glue all over one face.

Then I placed the top piece onto the glued piece, lined them up, and clamped them with every clamp I could muster to keep the edges perfectly closed.


When the glued had dried, I sanded the edges in anticipation of applying edge banding, but I didn’t consider two things…

And that let to fifteen minutes of frustrating failure.

Edge banding (and especially edge banding that is 1 1/2 inches wide) needs a perfectly edge , otherwise, it will want to warp. But wood doesn’t warp well, so trying to fix one warp, sends a multiplicative warp-wave down the whole strip.
And the issues is, jigsaw cutting almost always leaves a non-square edge, so the moment you hit a curve, the problems start. This was compounded be sanding with a random orbit sander. It’s impossible to get a square result.
In a nutshell, it’s a waste of time because the wood will win, you will lose, and anyone watching will be laughing.
There were two solutions to this. The first was to buy a portable spindle sander – which I did. That would allow me to square up the edge. But after doing it, I decided to give it a go without edge banding to see how it looked.
Long story short, I was happy with no edge banding, so I left well enough alone. Little did I know my troubles were just starting.
Like a well-trained DIY boy, I applied pre-stain, because that’s what you’re supposed to do with plywood.

And it might have been fine, except for one little thing…


Well, mabe a few dozen little things – all of them streaking across my tabletop. Those mill marks were awful, but I hoped they’d go away after a second coat.

They didn’t, and now I was faced with a choice: wait for Handan to come home and point it out immediately or suck it up and start over.
I chose the latter. I sanded off all of the stain and then oh-so-carefully sanded out the mill marks. The veneer on these sheets is absurdly thin, and I did sand through it in a few spots, but fortunately, all was hidden by the gel stain in the end.

I applied to coats of gel stain with no pre-stain. Again, the name of the game was to get as much color into the wood as possible.
Moving back to the legs, I wanted to add a 1 1/2 inch riser between the balls and the underside ot he table. This would bring the tabletop height even with the cushions of our new sofa.

I used my favorite instant wood glue for the task, and I can assure it’s a rock-solid bond


After gluing the risers (which I cut from a 2×4 with a jigsaw), I glued them to the bottom of the tabletop.


Handan and I carried our new coffee table and put it in place. In a few days, I’ll be sealing it with several coats of satin wipe-on poly, but we just couldn’t wait to get it into its new home!

Penny and Pepper seem mildly impressed.

How about you?


If you’re in the market for new furniture, please check out Castlery – they have an amazing selection, and if you do order, be sure to use promo code TNP50 for an additional $50 off orders $1500 and above. This is stackable on any other sales and promos Castlery is offering. Valid now until Dec 31, 2024.


What can I say? Everything in your room is beautiful. The table is wonderful.
You are a very talented man and I enjoy watching your videos. thank you for sharing your talent.
Deirdre
Thank you so much, Deirdra! Handan has the real eye for design – I just bring her ideas to life! 🙂
It appears you didn’t stain the bottom of the table. I’m kinda surprised at that shortcut.
Time is a precious commodity these days, Sheri. I didn’t even have time to poly the top right away! 😀
That is so cool! I love the table and the sofa. We love the ball legs, and the cool hack you used to come up with them.
So, the sofa came from Casterly? The room looks like a catalog photo for modern comfort. Love it 😍
Thanks, Mo! I can’t take credit for that IKEA hack though – the ideas been floating around for years! And yes, that sofa is Castlery – we love their furniture!
Did I miss the fireplace redo in this room?
It’s beautiful! Appreciate your detailed step by step instructions and pics. Your elderly fur babies are adorable 🙂
Thank you, Trish! 🙂
Greg,
Another great idea! I wish I had your creativity, what a modern look for your living room. You’re right, your dogs look mildly impressed, but so cute.
Thank you, Michele! 🙂
How are you and your family faring with the hurricane? Did you have any damage to your yard and house? Did you do much prep before it arrived?
I sincerely hope you and your family are all OK.
Hi Sue, we were 100+ miles away from the eyewall, so while we were technically in the hurricane, all we had was light rains and gently breezes. Today was far windier with sunny skies!
Love this idea! While I won’t make the coffee table, buying those bowls and gluing them together has set off an avalanche of ideas!
Greg and Handan, your blog is the best! Hope y’all are doing okay after Helene. I know you were on the “good” side but having been on the “good” side as well, I know wind and rain can still present problems.
We made it through with no issues, Abby! It was a rainy day with occasional breezes.
Awesome awesome and more awesome on top!
Thank you, Constance! 🙂
Absolutely stunning! Your wife and I have a lot in common as our wheels are always spinning. Handan is so lucky to have someone like you that can actually bring the visions to life. I wish I could say the same but unfortunately my ideas are simply my ideas and have been since I can no longer do the woodworking myself! You have in fact got my wheels spinning again because your table is simpler than anticipated. Yes of course, a lot of work but a challenge I seriously need. Well done my friend, well done!
OH and by the way, I loved the multi-toned sphere on your first attempt as well!
Thank you, Shirley! I hope you do try this or something similar. And remember – the two-tone look is 80 grit sandpaper followed by gel stain with no pre-stain!
GREG! Did you actually sand and fill those bowls on your beautiful NEW kitchen bench??!! 😵💫
The shrimp is certainly far more chill than I. My husband wouldn’t survive such a crime 🤪 (even if was building me a gorgeous new coffee table)….
Yes, BUT, I have a 2ft x 4ft clear silicone mat on the countertop – we keep it there all the time to protect the stone!
Great job! Your style has really changed and I love it. Great picture above your fireplace. Where did you get it! If you say you made it yourself I know I will never be able to get to your skill level. Who am I kidding, I can’t compete with the imagination and skill you two have. I will just keep watching and admiring.
Hi Mona! I’m so sorry for this late reply! That picture above the fireplace is our Frame TV showing artwork!
Beautiful! The whole room!
This is such a fun and creative DIY! Ball legs add a unique, playful touch to any coffee table.
Thanks, Sarah!
Love the modern look of this coffee table! It’s such a fun and easy project to bring a new vibe to my living room.