
DIY Faux Card Catalog Cabinet (Apothecary Cabinet)
That was a big empty hole. I figured it would benefit from a shelf. I cut one to size from 1/2 inch birch plywood, making sure to cut it just the tiniest bit too long, so I would have to hammer it tightly into place. This allowed the shelf to sit in place without me holding it, so I could level it and install supports.

I removed the shelf for staining and started planning the doors.
The doors would be the heart and soul of this project. I wanted them to look great, but I needed them to be easy. I decided that I would use 1/2 inch birch plywood for the cabinet doors and 1/2 birch plywood rectangles for the faux drawer faces. Before I got into building them, I had to figure out my hinge situation. Since this piece was a chest of drawers, it didn’t fit neatly into the frame/frameless cabinet classification. It was technically frameless, but there were wooden drawer stops (I think that was their purpose) on the inside that would interfere with hinges intended for frameless cabinets. To solve this, I needed to cut notches in the stops to accommodate the hinges. I used a small hand saw for this.

I later made these notches even bigger, as that eased my job of installing the hinges.
With the hinge situation worked out, I turned my full attention to building the doors. My idea was to install 9 faux drawers faces to each door. I measured the space for the doors, accounting for a 1/8 inch gap all around and then cut the two pieces of 1/2 inch plywood. I then did some arithmetic to figure out the best dimensions for my faux drawer faces and the optimal spacing between them. I ended up making my drawer faces 8 x 7 inches and leaving about a 1/2 inch gap between the drawers. I had two different sheets of 1/2 inch birch plywood on hand. One sheet, I had just bought, and the other, I had bought a while back. They were very different in color – one much darker than the other. I decided to cut drawer faces from both sheets and to mix up the grain pattern. On some, the grain would be horizontal and on others, it would be vertical. I hoped this would give a cool effect. After I cut all the faux drawer faces, I arranged them on each door.

The faux drawer faces all met up with the edges of the cabinet door. I made a spacer from a scrap piece of wood for the inside pieces. When everything was laid out nicely, I traced each piece with a pencil.

Then I stained the area between the lines. I rubbed the stain too much on the first door, so my pencil lines disappeared. Oops. I rubbed more lightly on the second.

While the stain dried, I ran the top edges of my faux drawer faces across a router fitted with a chamfer bit. The same result can be obtained with sandpaper and a sanding block. You can see the result below. It gives a more realistic look to the faux drawers.

As you can tell by the can of pre-stain, I was ready to start the staining process. Since I had a lot of pieces and would be using a few different stains after the pre-stain, I decided I’d had enough fumes already when staining the cabinet. I put on an organic vapor respirator. For small staining jobs, I generally wear nothing, but in my unventilated basement, I like to wear a respirator for bigger jobs. Breathing easy makes a big difference!

Plus, you can play around making breathing noises and telling anyone who will listen, “Luke! I am your father!” Since no one was around, I had to play Darth Vader with the dogs. They were entirely unimpressed with my James Earl Jones impression. What the hell do they know, anyway? Yeesh, everyone’s a critic these days.
Once I was geared up with my respirator and nitrile gloves (nitrile gloves are a must when staining – the organic solvents in stain will eat right through latex) I got to staining. Like I did with the cabinet, I worked my way through the stains. On some pieces, I favored the light stain, and on some, I favored the dark. Here are the faces after the Weathered Oak:

The nine at the top of the picture have only Weathered Oak and the nine at the bottom have a coat of Weathered Oak plus Classic Gray:

And here’s how they looked after a light coat of Jacobean on top of the Classic Gray and Weathered Oak:

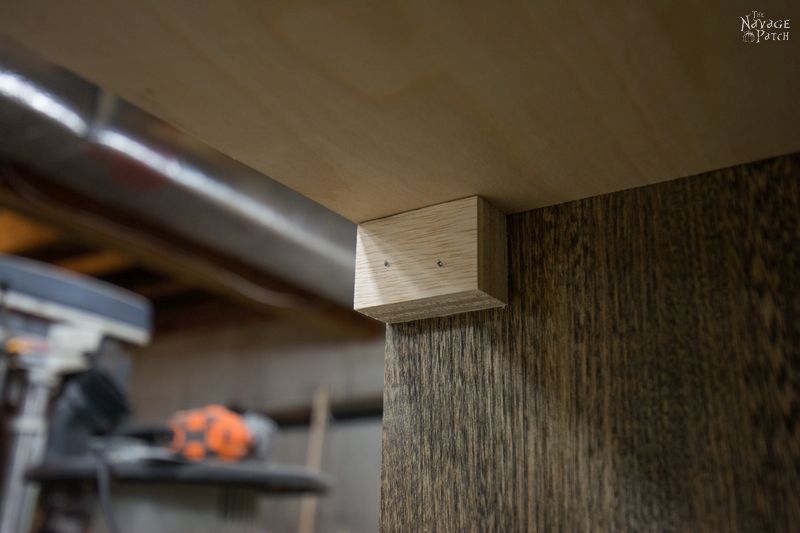
While the faux drawer faces dried, I prepared the legs.
I wasn’t satisfied with the bun feet and furniture legs offered at Home Depot, so I decided to DIY bigger and better feet from the ones they sell. Okay, okay, fine. It wasn’t my idea. It was Handan’s. Whatever.

I unscrewed the screw tip from the taller piece…

…and then glued the two together.

When the glue had dried, I stained the feet using pre-stain, Classic Gray and Jacobean. Since it was a different wood (basswood) than the rest of the project, it took the stain differently. The grays are more pronounced on the feet, and it gives a really cool look.

Next, I glued the faux drawer faces onto the door. I didn’t take pics of this process, since I was totally concentrated on getting the faces lined up perfectly.
When the glue had cured, I drilled holes for the handles that we found for the faux drawer faces. We had been looking online at all sorts of options, and most of the pulls and handles and rings that I liked ran about $8-$15 each. That would have added a lot of money to this project. Then Handan remembered one of her stashes of pulls that she had bought from a tag sale in the summer of 2016. We tried one out to see how it would look. It was perfect, so I created a jig from an extra drawer face so I could drill all of the holes in the exact same spot on each face.

Once the holes were drilled, I turned my focus to installing the hinge hardware. To make things easier on myself, I purchased the Kreg Concealed Hinge Jig to help align and drill the necessary holes. What a lifesaver – I wish I had known about this jig when I made the built-in bookcase and cabinet for our upstairs hallway!
After I confirmed that everything was lined up and functioning correctly, I removed the doors and put them aside for waxing.

Next, I installed the stained shelf, using a mallet to tap it into place. I didn’t glue or nail it, in case I ever want to remove it in the future.

I then tipped the cabinet on its back so I could install the feet. I first tried a mounting plate that would accept the screw…

…but since the plate wasn’t recessed, it was visible and left a noticeable gap between it and the foot. I unscrewed the plate and mounted the feet directly by drilling a hole for the screws and gluing the feet to the cabinet base.


I waxed the top, sides, doors and feet with Fiddes & Sons wood wax. It’s a great product for wood furniture products, and I recommend it highly. I buffed the wax with an electric buffer – a must-have for anyone who does a lot of waxing.


I then installed the drawer handles and then re-mounted the doors.

My final step was to put a backboard on. I didn’t take pictures of that process, but I used 3/16 inch MDF board from Home Depot. I secured it in place with brad nails, in case I ever need to remove it.
With that, my DIY Faux Card Catalog Cabinet was finished and ready for my office!


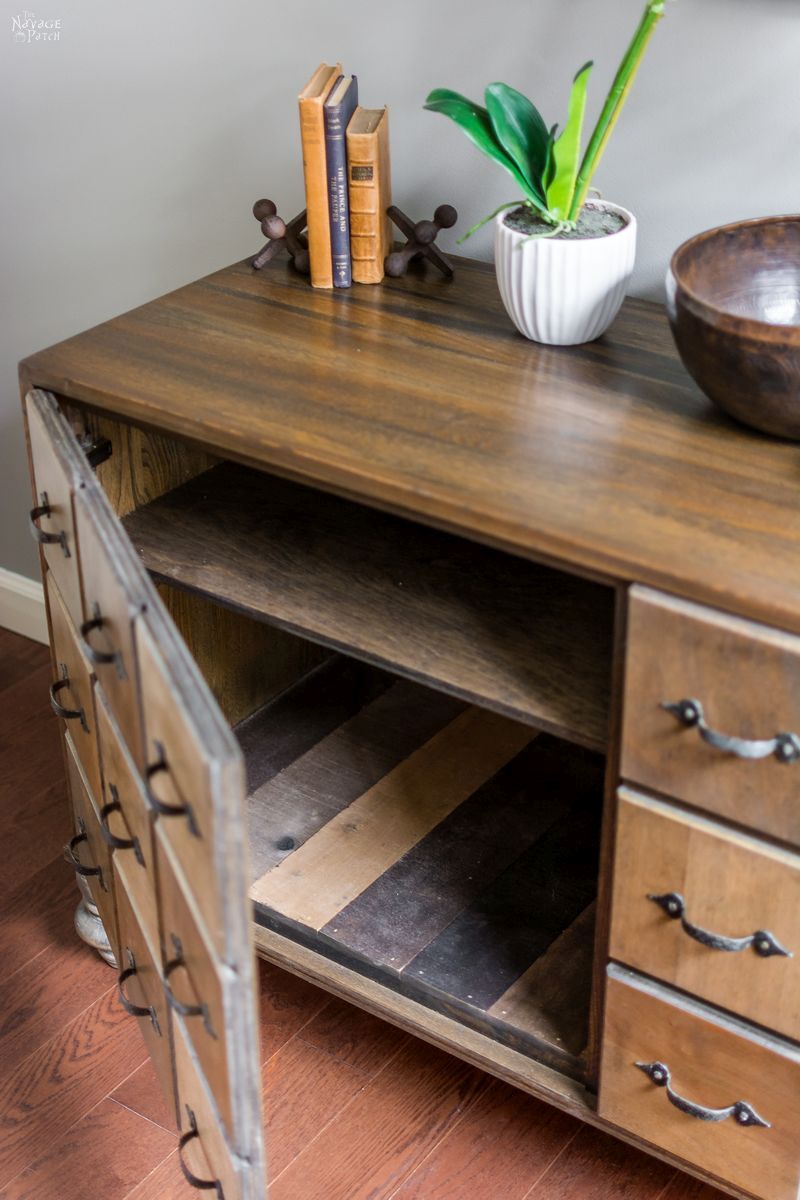


I’m sure glad I thought of this project! What a great idea I had, right? I wonder why Handan can’t think of stuff like this??
Uh- oh.
Ah, NUTS! She heard me again!
RUN AWAY!
wow now that halloween is over i wish again i lived next door i would be dragging all of my crappy furniture over to your house for makeovers ha ha, this turn out awesome love love love it xx
Thanks, Chris! I’ll let you know if anyone moves out on our street, lol! But I don’t think you’d enjoy the weather these days 🙁
OMG this is gorgeous. You both have such great talents. LOVE IT.
Thank you so much, Dee!
Wow Greg you weren’t kidding when you said ugly piece of furniture !But what a transformation ,you have created something spectacular as usual.Iv’e been neglecting the N patch lately, so much to do but for the last month haven’t done anything ,been too busy playing with Halloween Apothecary , next distraction will be Christmas Decs.
Thank you, Catherine, and welcome back!
I love the faux-card-catalogue-cabinet. You are two very talented upcyclers. I have pinned a number of your ideas to friends.Please keep up the good work.Bye.
Thank you so much, Pauline! We will certainly keep making and posting!
This is beautiful! All the stuff you & Handan do turns out fantastic!
Thank you so much, Rami!
This peice is absolutely fabulous. You did an outstanding job. I have a question, unless I missed something, or misunderstood something, why did you completely take apart the peice you had at the begaining? Why not just show you made this gorgeous faux-card catalog cabinet, instead of as if you were using the peice of furniture you started of with? To me, it do not appear you used it at all.
To the readers, please don’t jump all over me, I am only asking a question, after all, I do love both peices of furniture.
Hi Ivory, I did use the piece that was sitting in the garage, but I removed the drawers, internal drawer supports and legs. I used the carcass of the original piece – its bones – because they were sturdy, and the wood was interesting. When giving new life to an old piece, sometimes all that’s needed is a little paint or stain, but sometimes more drastic measures are needed, as was the case here. I was going for an entirely new look and functionality. Sure, I could have built the whole thing from scratch from plywood, but that would have given me a less-sturdy, less-beautiful result that would have cost more money, and required more tools and time. With this card catalog cabinet, I still can see the old piece when I look at it as a reminder of what it once was.
This is awesome! I totally agree that not sanding out every imperfection gives it character. It’s imperfectly perfect in every way 🙂
Thank you, Sara! Yep, perfect is boring – imperfections keep things interesting!
And you did it again Greg. It looks spectacular. I’m not a big fan of that mid century stuff either. It looks like something you’d find in a 70’s porn star’s house, not that I’ve ever been to one though 😉
LOL, thanks, Michelle!
This project is GORGEOUS, but honestly I just followed you on Pinterest because I loved the humor here 🙂 Those “skeptical faces” had me rolling! Cheers 😉
LOL, thank you so much, Marissa! 😀
This is absolutely stunning!!!! Love it, you did an outstanding job!
Hi Tammy, Thank you so much!
great story and cabinet! shoulda made a video! love it. thanks for sharing. keep up the great making.
Thank you, Susie! 🙂
As much as I *ahem* liked the Mid-Century Monstrosity, I have to admit that you really improved (on what remained of) it.
That being said, there are two things I’d like you to tweak, if I was Babes #2.
One: I’d want the feet color to match the cabinet color.
Two: I’d want the feet under the cabinet more, so the edges of them lined up with the sides of
the piece itself, vs them being lined up with the wider bottom piece.
Now, if you’ve ever wanted two women, I’ve changed your mind!
P.S. I LOVE the way you write. You’re hysterical!
Good lord, another babes? I’m only human, Steph! 🙂 That said, I actually agree with you. Especially on point number 2. Placing the feet like that was a dumb accident. I stuck them in the corners, forgetting that the bottom had an overhang (underhang?)
It is so much work! I am working on one. All you need is a router or even a hand saw to cut the shapes of the doors in the drawers. If it is all faux anyway why not make it easy. Also you still have the use of the drawers which seems more practical than cabinets. Love your work tho!