DIY Built-in Bookcase
A DIY built-in bookcase was the perfect solution for a small unused space in our home. The space looks much better now, and it’s a useful storage area!
Aristotle once said that nature abhors a vacuum – that a void cannot exist because the denser matter that surrounds it will flow into it as it seeks a new balance.
My dearest wife is living proof of this idea.
Give her a void (or a room), and she’ll fill it.
She started in this house with a small crafting area in my office with a little secretary desk that I refinished for her back when we first began crafting and woodworking. This area soon became unusable for crafting as wood scraps and foam balls and little paint cans and printers and paper all competed for real estate on a small chair and tiny desk, so we dismantled this area and cleared one of the garage bays as her new crafting space.
Before long, this area became unnavigable with accumulated supplies and future projects.
Soldiering on, we cleared a spot for her in the basement with a big workbench and some shelves. But Handan prefers to be closer to her family when she crafts, so the basement workshop became storage depot number two, filled with scratched-up dressers, broken chairs, ancient steamer trunks, empty picture frames, and assorted doodads, thingamabobs and whatchamacallits bought and scavenged over several months and years of weekend tag sales and weekly trips to the town dump’s Put and Take.
So in the spirit of promoting close proximity to her loved ones while she crafts, we evicted the bed from guest bedroom #1 (which adjoins the living room/kitchen) and set up yet another crafting space.
Can you guess what happened next?
To make a long story short, I’m told that if we can just move the linens from the closet in the room-formerly-known-as-guest-bedroom-#1, all of Handan’s storage needs will be well met, and everything will be awesome.
Hence, the DIY Built-In Bookcase, aka Keeper of the Linens!
Here’s the before shot of the future home of the DIY built in bookcase. It’s a weird little nook at the top of the stairs. We never knew what to put here. A tree? A Ming Vase? A statue? A martini bar? A throne?

DIY Built-In Bookcase Plan
I laboriously hacked out whipped up a plan in Sketchup using 3/4″ and 1/2″ plywood with 1/4″ for side trim, hutch back and door panels. The counter would be real wood of some sort, most likely stained dark, but I hadn’t yet reached a firm decision when I was making the Sketchup model. The 1/2″ plywood was an 11th hour substitution just to save a few dollars. In hindsight, that was a mistake. Going forward I will build entirely from 3/4″ plywood, except for trim, backings and door panels. I’ll explain in more detail later.

I decided to make the cabinet 26 1/2″ deep. That would bring the doors right up to the glass blocks shown in the “Before” picture above.
I cut the carpet to 26″ deep. That extra 1/2″ would slide under face frame of the cabinet, which I would leave 1/2″ off the floor to accommodate the height of the carpet. By doing this, I would be able to tuck the cut edge of the carpet underneath the cabinet to give a nice clean look. The face frame is still 3/4″ in this plan drawing, even though it’s 1/2″ in reality.

DIY Built-In Bookcase – Area Preparation
There was an outlet in the way on the right side, so that would need to be moved forward. I started by prying off the baseboard, cutting and removing the carpet and pad, then using the reciprocating saw to cut through the tackless carpet strips before finally pulling them up with a pry bar.


To relocate the electrical outlet, I first cut power to the outlet (electricity is fantastic when it flows through wires and devices, far less so when it flows through humans), then I cut away the drywall around the existing outlet and pried out the gang box. Fortunately, I only needed to move the outlet as far as the distance between two studs, or 16 inches. This meant that it wasn’t necessary for me to drill through one or more studs to run the wire to the new location. I marked and cut the new hole for the outlet and added a jumper to the exposed wires.

There was no way I’d be able to hammer the gang box into the stud, so I opted instead to epoxy it.
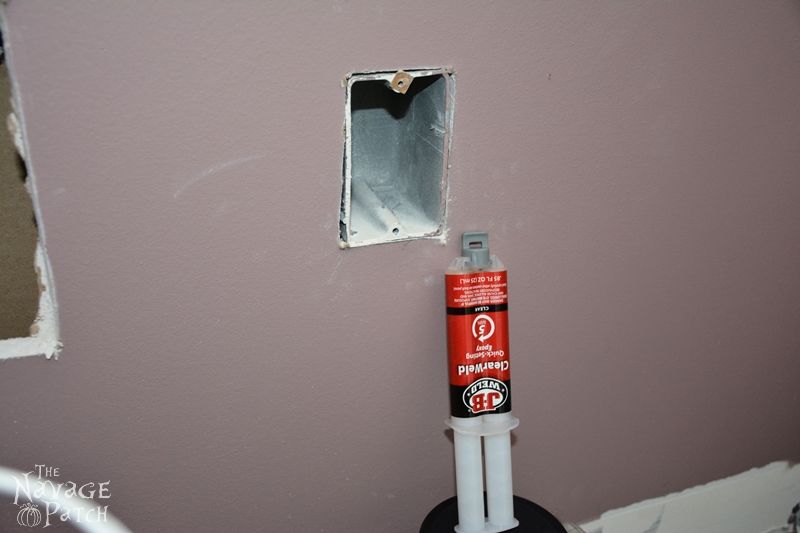
Once the epoxy set, I ran the wires into the gang box, connected them to the outlet, and screwed it into place. I left the big hole on the left open since it would be totally and securely covered by the side of the cabinet.

With the site prep finished, it was time to start work on the built-in! I broke it down into four components: the cabinet, the doors, the counter top and the hutch.
DIY Built-In Bookcase – Building the Cabinet
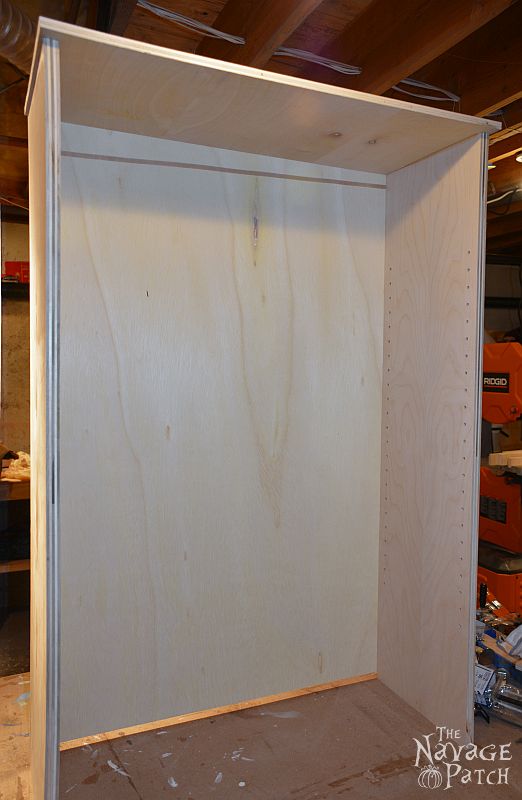
With the site prepped and ready, it was time to start work on the cabinet. Using Sketchup, I generated a cut sheet for all of my pieces, so I knew how many pieces I could cut from each 4’x4′ piece of plywood. Once I had everything laid out, I cut the pieces with the table saw and labeled them for easier assembly.

Using my Kreg Jig, I drilled pocket holes in the pieces that would need to be joined.

Using a clamp and a square, I assembled the face frame. Remember in the last post when I said that swapping 1/2″ for 3/4″ was a bad idea? Well here’s why. Even though it is possible to use the Kreg Jig to make pocket holes in 1/2″ plywood or stock, if you screw up your distance in the slightest, or if you over-tighten the screw just a wee bit, your screw tip is going to bulge or even poke through the front of your piece. I discovered this only after building the whole frame. Backing out the screws helped, but there were still holes to fill with wood filler and bulges that wouldn’t totally flatten. Oh well, this is a first-time project, and mistakes are expected and welcome, as each one teaches a valuable lesson. Sometimes those lessons feel like cold slaps to the face though!


Once the face frame was built, I attached supports to the cabinet sides with glue and screws, then fixed the face frame to the cabinet with glue and brad nails. For my next built-in project, I will probably wait until the cabinet is installed before attaching the face frame. More on that next.

You can see in the next photo just how well the cabinet fits in its space. Almost too well. I was so careful with my measurements and cutting, but I only measured the space where the cabinet would sit. Since the dwarf walls have that over-sized cap/handrail on them, I needed to slide the cabinet into place starting from the top of the stairs. But I didn’t measure the width at the top of the stairs. Ugh. Another lesson learned: houses are not square. After pushing and bumping like a housefly at a window pane, I finally measured the opening and found it to be 1/16″ less than where I measured the cabinet would sit, a measly 3 feet away. My only option was to partially dismantle the cabinet by removing the left side panel. This is where NOT attaching the face frame before installing the cabinet would have been a good idea since I had to bash the side panel away from the face frame with a rubber mallet. But once I got that side panel off, I was able to slide the cabinet right in and re-attach the panel in place. Phew! I put in a few shims (did I mention that houses are never square?) to level it out. Did you notice the new wall color? Handan just finished painting the night before I installed the cabinet frame. You can still see the blue painter’s tape everywhere.

I glued and screwed in a permanent shelf bracket and installed the shelves to see how they fit.

DIY Built-In Bookcase – Building the Doors
Having beaten, hammered and cajoled the cabinet frame into its new home, I returned to my basement lair workshop to begin fabrication on the doors. Normal people buy cabinet doors. They go to Home Depot or Lowe’s, they choose from the pretty selection, and they go home satisfied and stress-free. Lunatics, sadists and professional cabinet makers build their own.
I am not a professional cabinet maker.
I’m not even a hobbyist cabinet maker.
I’m as green as a bullfrog and equally qualified when it comes to cabinetry.
So of course I opted to build my own doors!
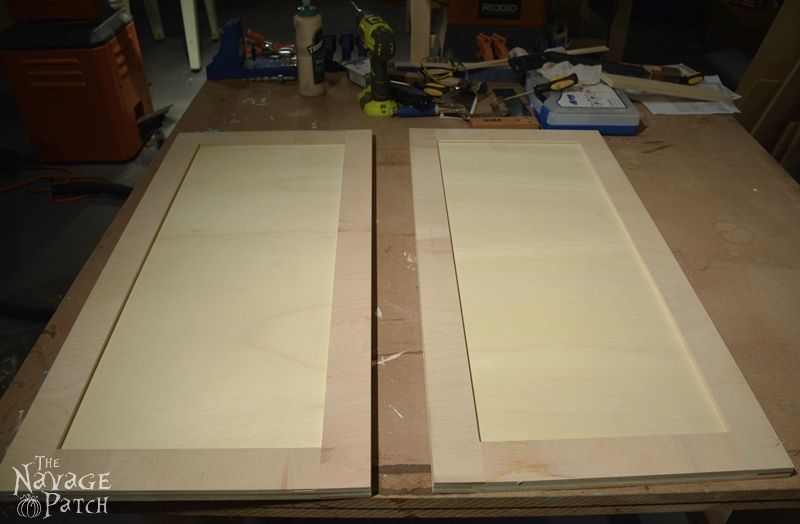
I had already cut the door frames from plywood, but they needed a groove cut into the inner sides. This would eventually hold the door panel – a piece of 1/4″ plywood. Oh, and they also needed a tongue to fit in the groove. Tongue and groove. Sounds simple, doesn’t it?
See the grooves? See the tongues?

This took far longer than it should have. After trying nearly every machine in the shop, I settled on routing out the grooves and using the table saw to cut the tongues. This may seem obvious, but I started with equally obvious ideas – like using a dado to cut the grooves. It worked, in a way. But in a much more important way – the way of looking like crap – it failed. I don’t know why I had such dado woes, but I chalked it up as “user stupidity” and tossed the dado blades aside. There are no pictures of these taxing minutes and hours. You see, the camera only emerged when I figured out just what on earth I was doing.
It all fit together, so I slapped on some glue and clamped it up before it had a chance to change its mind.

I repeated the process with the second door and ended up with two very rudimentary doors. I really can’t stress to you enough how much work and despair and grief went into these two simple frames housing a thin yellow panel. To make beautiful doors – the kind with fancy routed panels takes skill that must be paid for in blood and soul-sacrifice.
The next job was prime and paint, followed by hardware installation. The handles went on without incident…

…but when hinge time rolled around, things got a little wonky. To start, I measured wrong and drilled the holes in the wrong places.
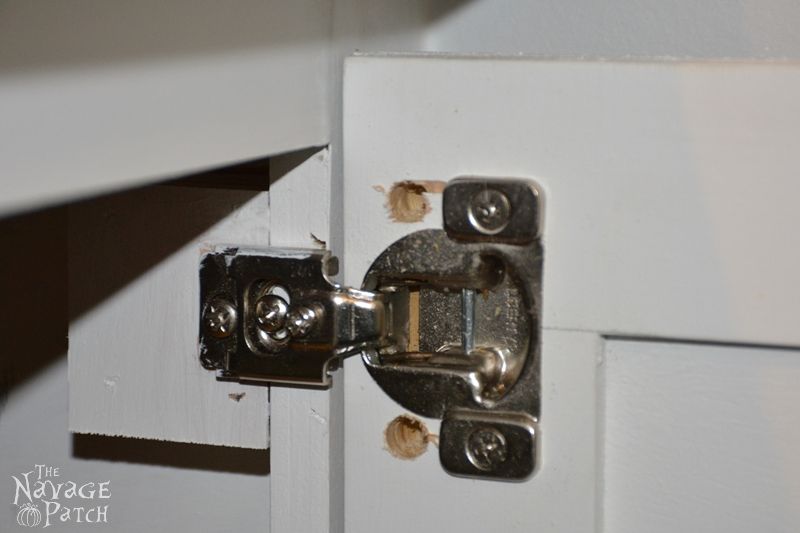
I could live with that, so onward and upward. But then, as I was drilling the new holes, I punched the drill bit all the way through.
Through the front.
The part people look at.
At this point I wanted to Hulk Smash everything in sight, but this wasn’t my first time in the Dumbass Rodeo, so I brushed the failure from my jeans and got busy with the wood filler.
Then I made time with the sandpaper.
Then I got reacquainted with the paint.

Then all was well.
DIY Built-In Bookcase – Building the Countertop
I was really excited to start building the countertop, because I had a vision in my head, and I had to figure out if I could extract it from my brain and make it a reality. I wanted to do something a bit rustic, I wanted to use pallet wood if possible, and I wanted it to be dark to offset the monotonous whiteness of the rest of the piece.
But I also wanted it to have some color.
Since I didn’t have a clear plan of how I was going to achieve my desired color, I turned to the webs and found a site describing exactly what I was looking for.
Becky from Beyond the Picket Fence has a great tutorial for a really cool technique that combines paint with stain on top. It really works well on rough-sawn pallet wood. You can see the overlapping curves from the big circular saws they use to cut these boards at the mill. Since this wood is for shipping pallets, no effort is made to make clean cuts.
All the better for us!

Since the pallet wood wasn’t thick enough to make a sturdy countertop on its own, I first cut a piece of 1/2″ plywood to the required dimensions to act as a base. I then laid the pieces on the plywood to get a rough pattern and fit.

I marked and cut the overhanging boards and refit the trimmings into the pattern until I ended up covering the plywood. With everything cut to size and in their places, I glued and brad-nailed the pallet wood to the plywood. I didn’t worry about small imperfections in alignment or fit. The little gaps between the boards were part of the rustic look I was going for. When all was dry, I trimmed the edges with the table saw.

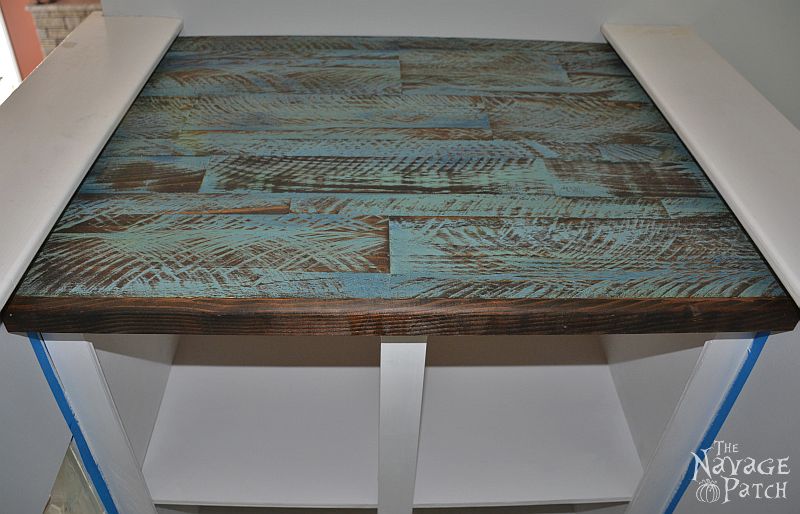
To achieve the look I was going for, I decided I’d paint 4 coats of 4 different colors before I stained. I went to our paint shelf and found 4 little sample bottles of different blues and greens. Using a cheap $1 chip brush, I dashed some paint on the wood. There was no need to be careful here. I was just trying to get a thin coat of color onto some parts of the wood.

Using the same brush, I slapped on some green.

Then more blue of a different shade.

And finally a little bit of a darker blue.

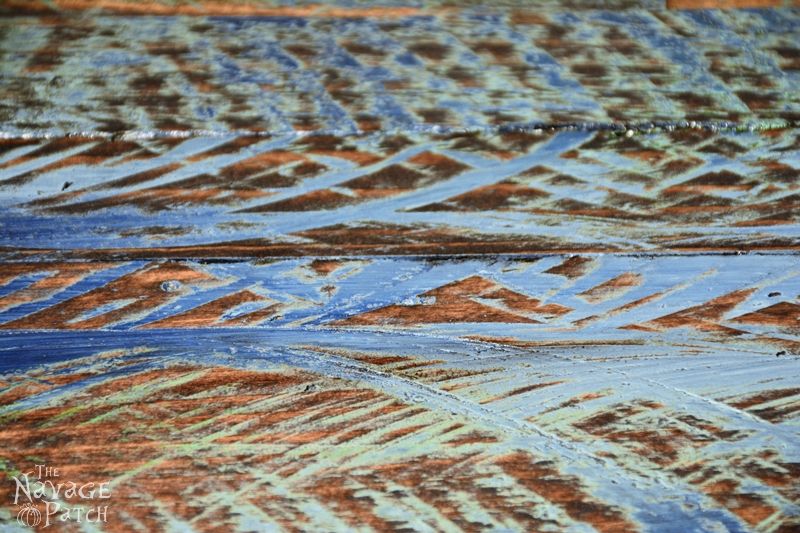
The topcoat would be Minwax Dark Walnut stain![]() .
.

But first I needed to sand off some of that paint to expose the wood. Those heavy saw blade marks were perfect for trapping some paint in their grooves.

Ready for stain.

Using a new chip brush, I applied a heavy coat of stain so it would seep into the spaces between the boards. Instead of waiting 10-15 minutes for the stain to absorb, I wiped it off immediately so it didn’t get a chance to dull the pain too much. I ended up applying another coat after this to darken up the stained areas a bit.

I love how it turned out. This is a fantastic technique that I’ll definitely use again on future projects. Check out some of the detail.


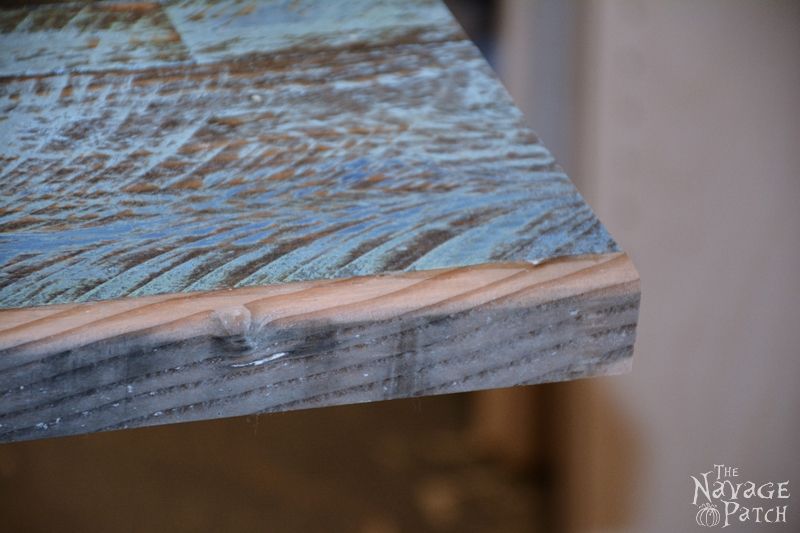
All that was left was to add a strip of wood to the front to conceal the plywood base. I found a piece of pallet wood that had a rounded edge. Perfect for the countertop.

Here it is glued and brad-nailed in place. I stained it dark walnut after this, but didn’t take a picture.

Next I attached the top to the sides with countersunk deck screws.

In the background of the lower picture, you’ll notice the face frame for the hutch. I didn’t take pictures of that process, but it was identical to the process of building the cabinet face frame in. I then attached the plywood back with glue and brad nails.
Now the face frame, attached with glue and brad nails.

I inserted the plywood shelves to check for fit.

Then I added a facing to the shelves so that they would have the same look and weight as the rest of the hutch. Can you guess how? Yep. Glue and brad nails. It’s the breakfast of champions.

With the hutch carcass built, it was time to move on to the trim. Using 1/4″ plywood, I made some pieces for the side. These are purely decorative. Oh yeah, glue and brad nails!

The last thing to do before painting was to install the crown molding. Sounds easy, but it was an outright bitch. I highly recommend that anyone attempting a crown molding job first gets a crown molding jig for their compound miter saw. I cut the pieces without the jig and had to re-cut several times before I got an acceptable fit. The slightest error in the cut results in a hideous joint. My dogs whimpered and cried at my initial efforts. But, smart guy that I [think I] am, I bought much more molding than I actually needed, because I figured I’d repeatedly screw it up. Anyway, several nailings and pryings and renailings later, I ended up with a decent result.

Next I primed and painted. While the paint dried, I installed the countertop.
DIY Built-In Bookcase Assembly
It was pretty straightforward. The fit was snug, but I secured it from the underside with a few wood screws just to be safe.
When the hutch was dry, I lugged it up from the basement for installation. It was here that I also installed the doors.

Finally! At long last, and by the grace of many gods, I finished this project. It took longer than I anticipated, but it was well worth the effort for the end result and the knowledge gained.
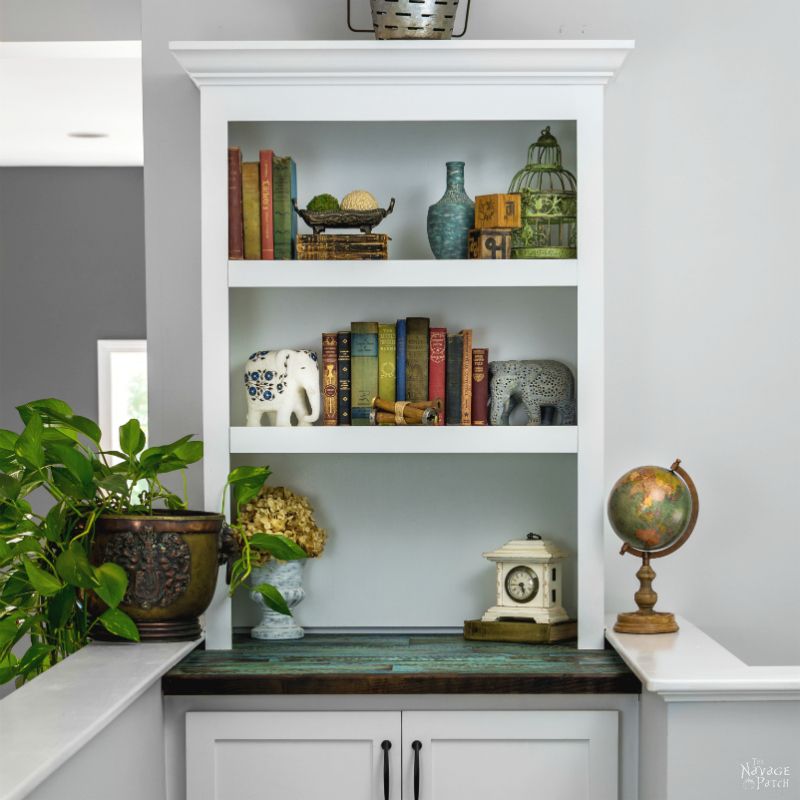
Pretty close to the Sketchup plan!

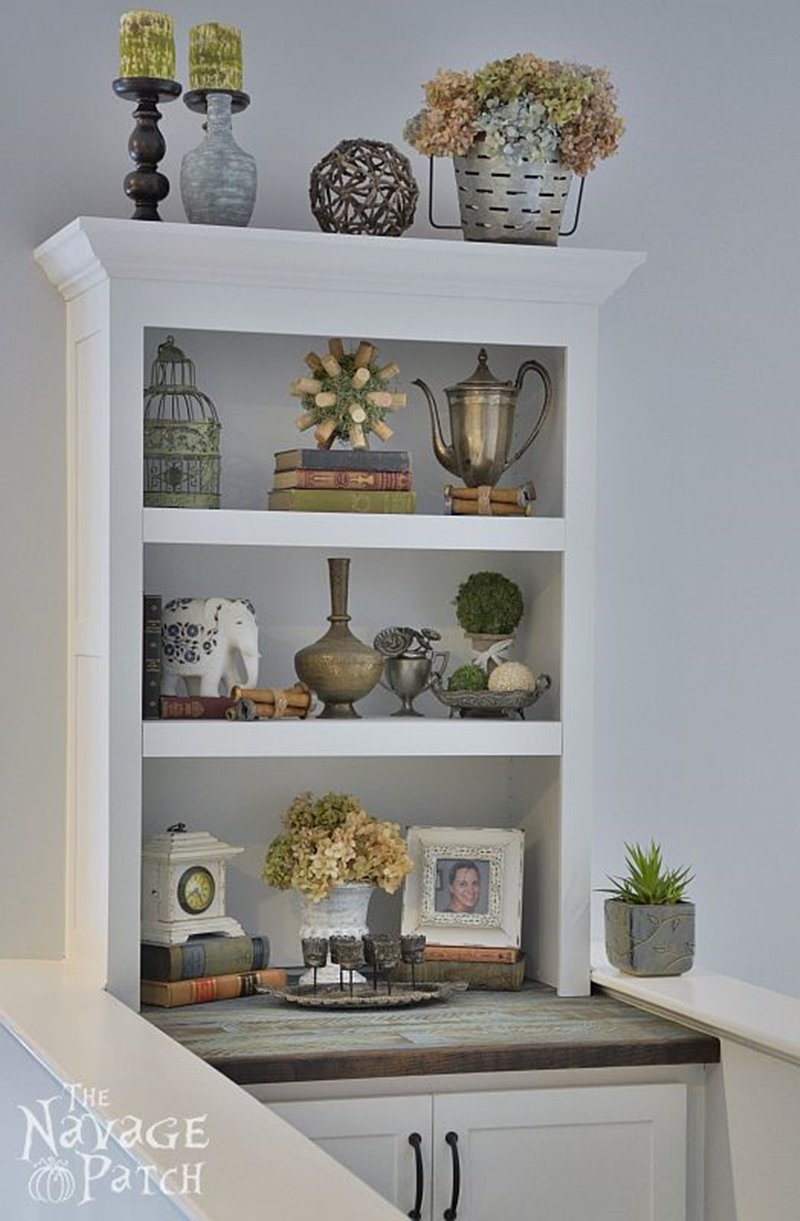
I caulked all the edges and let Handan at it. Linens went in the cabinet and doodads adorned the shelves. What a great change from the boring nook!


I began this post by quoting Aristotle. I will close the tale by doing so again.
“Change in all things is sweet.”
And in this house, that’s a river of sweet.


Awesomeness as usual. That countertop is teriffic!
Thank you, Kay! 🙂