How to Fix Floating Floor Gaps the Easy Way
Learn how to fix floating floor gaps with a simple and inexpensive DIY floor gap fixer! Why pay $60 when you can make one for just a few bucks!
Floating Floor Gaps
If you have laminate or engineered flooring, there’s a good chance you’ve seen gaps develop between some of your planks. Lord knows we have! They started appearing after our first year in this house, and they’ve been growing steadily ever since.
All laminate flooring and some engineered wood flooring (like ours) are floating floors. This means that the floorboards are not nailed, glued or stapled to the subfloor. Rather, the whole floor acts as an enormous jigsaw puzzle that lies on top of the subfloor below but is not in any way attached to it. Floating floor installation is also ideal when installing new laminate, engineered or luxury vinyl flooring (LVF) over an existing floor, like ours that sits atop an older tile floor.
Floating floors are designed to allow for the seasonal expansion and contraction of the flooring planks. But what happens when there’s just too much contraction?
In our case, all of the floor gaps coincide with the main HVAC duct that runs just below the subfloor. This run of flooring must get even hotter and drier in the winter than anywhere else in the house.
As these gaps grew over the years, we started to think that we may need to replace the whole floor.
As you can guess, that idea didn’t sit well with either of us, so I took to the internet for a solution.
How to Fix Floor Gaps – Quick Video Tutorial
Watch our short and fun video below for an overview of how to fix floating floor gaps before you read the written tutorial.
How to Fix Floating Floor Gaps
I learned almost immediately that we weren’t alone.
That made me feel better!
And then I found a product made specifically for our problem. It’s called the Floor Gap Fixer – an aluminum block with a sticky substance on one side. It also comes with a cheap rubber mallet. All this for $60 on Amazon or $50 from their website.
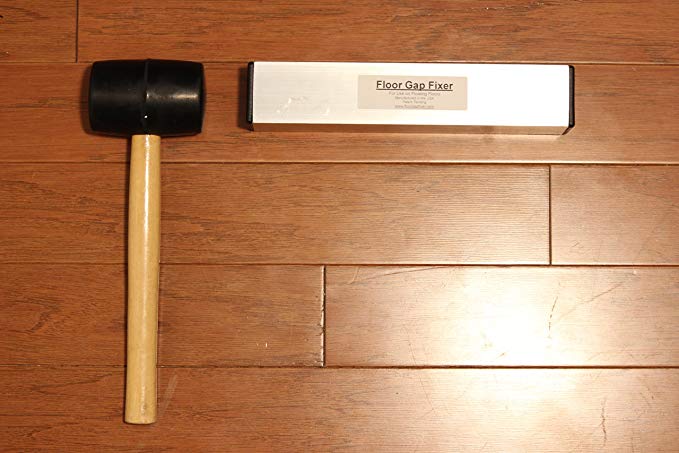
The idea is that you stick the floor gap fixer on the board that has a gap at the end and wack it with the mallet. This closes one gap and opens up another behind it. You then close that gap, and the next, and the next until you’ve hidden the gap behind the nearest baseboard.
How to Make a DIY Floor Gap Fixer
It’s so simple, but the product really seemed like a ripoff considering what you got. I already own several rubber mallets, so I didn’t need their cheap one.
As for the metal block, I could duplicate that with a piece of 4 x 4 lumber and make my own DIY floor gap fixer. I have tons of it in the basement.
And the sticky stuff? I figured some extreme strength double-sided tape would do the trick.
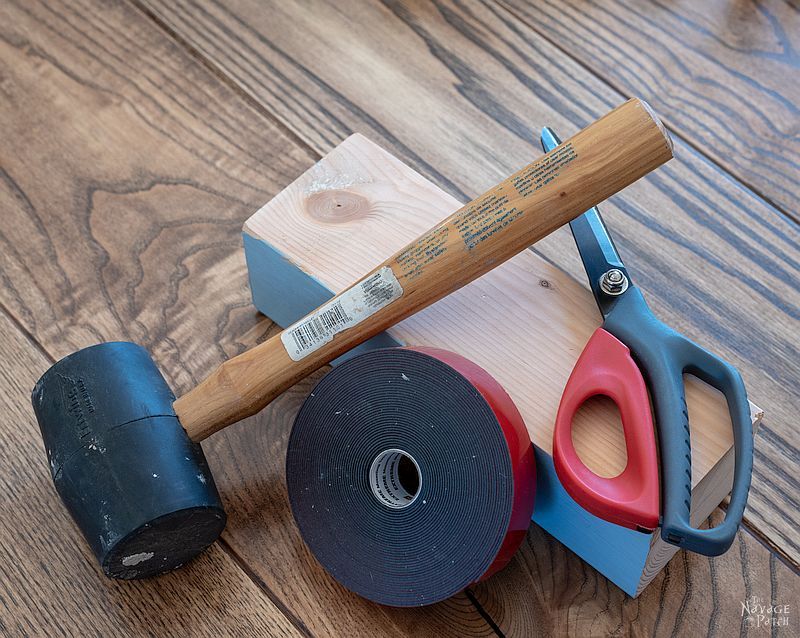
I sanded one side of my DIY floor gap fixer with 150 grit sandpaper so the tape would get a good grip on it.
To clean or not to clean before using the DIY floor gap fixer?
I had seen some talk online of cleaning the floors first with a window cleaner or ammonia, so I’ll tell you my experience with both cleaning and not cleaning first.
When I cleaned the floors first, the double-sided tape bonded more strongly to the floor than it did to the DIY floor gap fixer. This made it difficult to remove the block from the floor, it and required me to scrape the tape from the floor with my fingers.
It also meant that I had to use new tape for each gap. Not only was that time-consuming, but for a lot of gaps on a big floor, the price would start to creep up. Even so, it would still be cheaper than buying one, but why waste money?
When I didn’t clean the floors, my DIY floor gap filler had more than enough grip to get the job done, and removing the block was a breeze. I was able to close several gaps before the stickiness finally gave out and required me to change the tape.
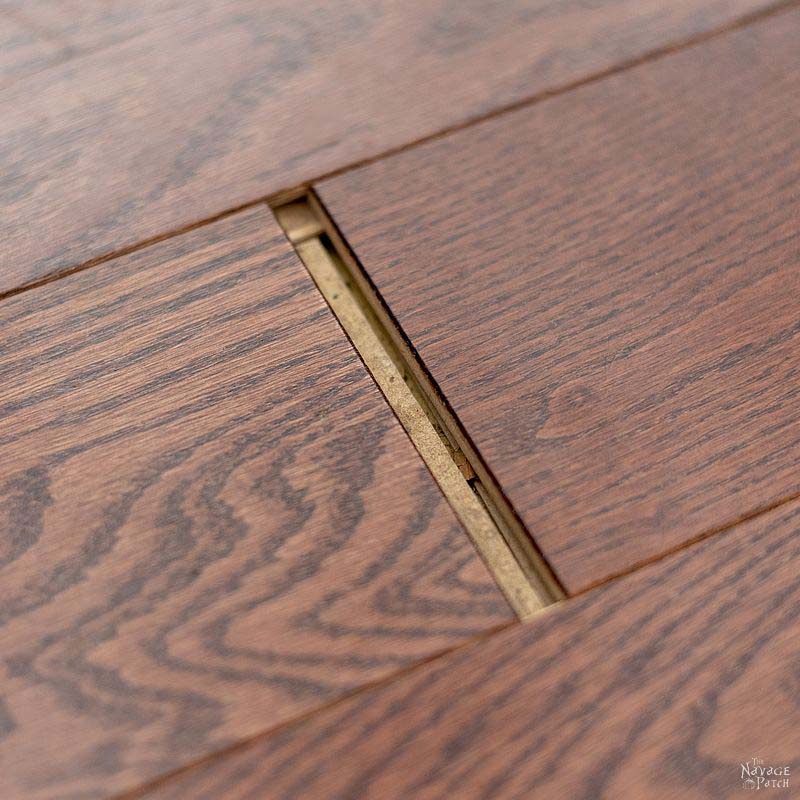
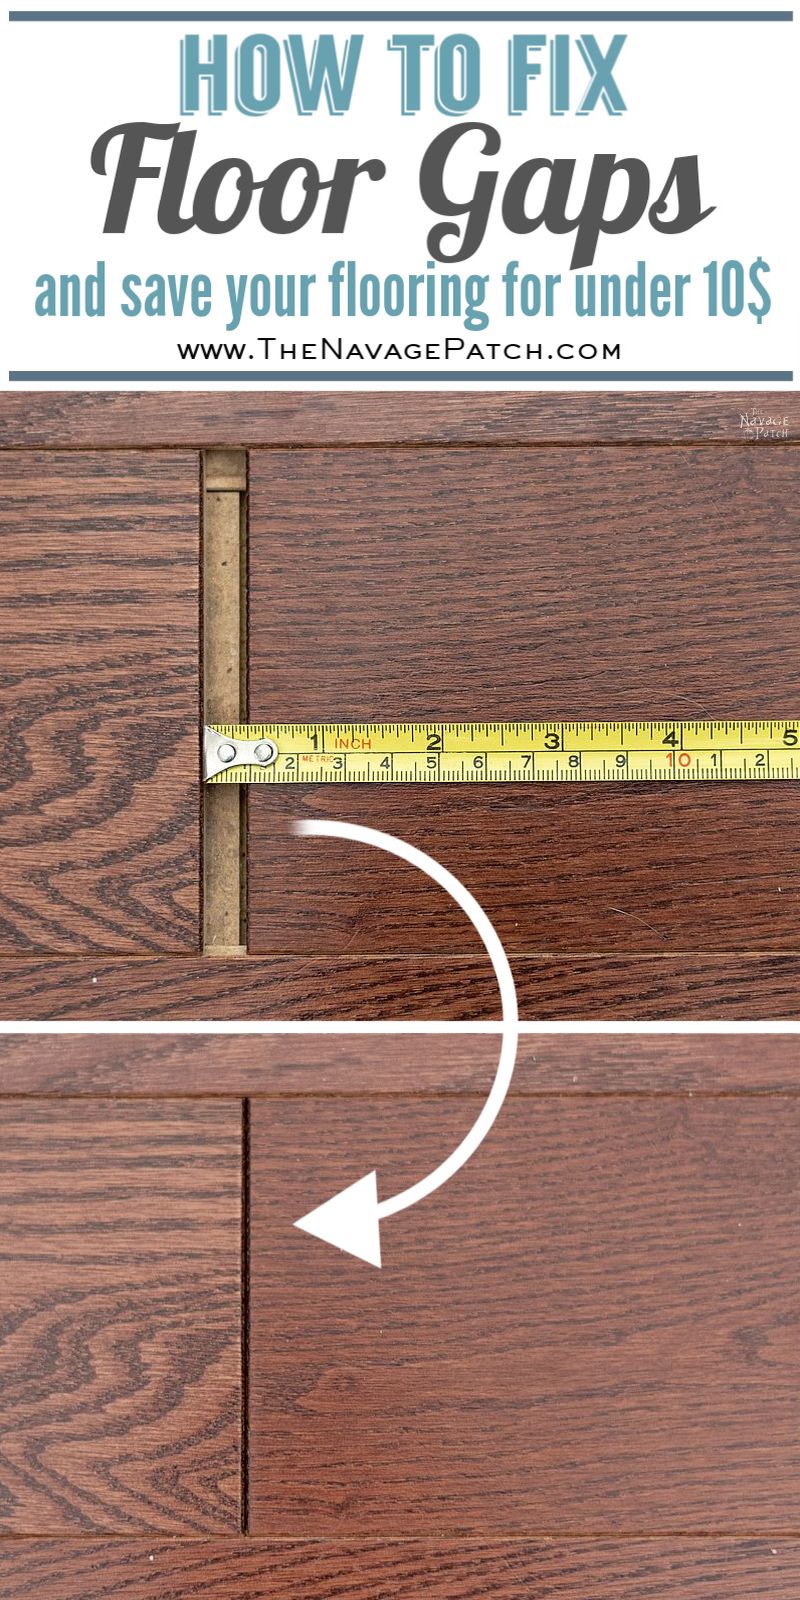
As you can see, we had some big, honkin’ gaps! That’s a 3/8 inch gap. Handan nearly fell in the other day! 🙂

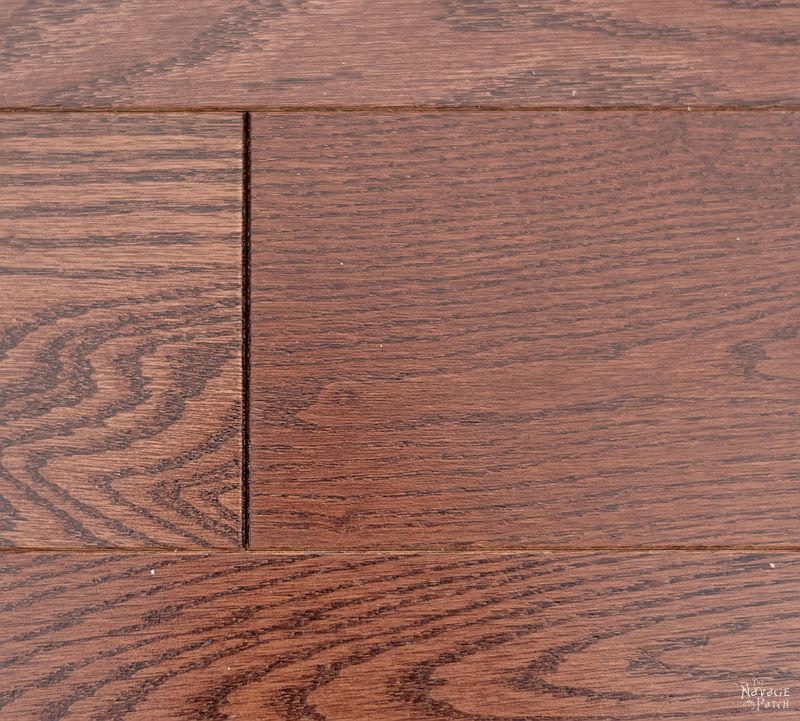
After a couple of wacks on my DIY floor gap fixer, here’s how it looked:
How to Fix Floating Floor Gaps YouTube Video Tutorial
This process makes more sense when seen in action, so we made a little video for you guys. Enjoy and say goodbye to those floating floor gaps!
We love it when you share our posts on Facebook and Pinterest!
really want to see video of your floor gap fixer but can’t find it.
Hi Mary, the video is right at the end of the post. If you don’t see it, it’s possible you’re running an ad-blocker that is also blocking the video.
it’s not fixed the floor at all! a couple of weeks and you will get back gaps again. just say. I know it, I have the same situation years.
It’s been nearly a year, and those gaps have not returned, so I’d call that a fix. A floating floor is designed to move – to float – with changes in temperature and humidity. So if the gaps show up again, it’s a five minute fix! My solution is better than any other I’ve seen, and I’m sticking with it, but thanks for writing. 😉
I have the same problem too on my floating engineered floor. However, I do put some wood glue on the gap first then use the very same tool to close the gap in hope the gap won’t return again.
Good solution, Winnie!
I vacuumed out the space then ran a thin line of wood glue before closing the gap. Wipe any excess with a damp paper towel. As long as you don’t glue the long edges the floor should still be able to expand and contract without problems.
Thank you!
I just put on a clean, sticky soles shoe and kick the joints together…no money, no tools, takes about 4 seconds per joint.
Yep, that was the first thing I tried, but my boards wouldn’t budge! Had to use something a little stronger.
That’s what I’ve been doing all winter, but the gaps come back within a day or two. I’m not sure what to think. We’ve had them for 4 years and this is the first winter it has happened?!? Any thoughts?
Hi Selena, you could try adding a shim where the final board meets the wall (this would be hidden under the baseboard). You’d be eliminating an expansion gap, but it seems like you’re have excessive expansion, so I think you’ll be okay. Good luck!
Yeah, next time before you close the gap put some carpenters glue.
Good tip!
Same here. My sneakers take care of these spots in seconds. Really glad this free fix works because they do shift and reappear every month or so.
So what do you do at the end of the flooring to keep it from re-occurring? Shim, pin, or put wood glue between gaps before closing?
Hi John, I didn’t do anything. A floating floor needs to float, and if the gaps open up again, it’s a 5 minute fix to close them. We moved out of that house a year and a half after I closed the gaps and none had yet re-opened, nor had any new ones appeared.
Any suggestions for side gaps?
Thoroughly enjoy reading about your adventures, and of course, the beauty you and Handan create. Especially, the repurposing of “junk”. ?
Hi Janine, side gaps are a different beast. I assume you’re talking about hardwood floors? Depending on the width of the gaps, you can use an epoxy filler or wood filler. Some people also cut thin strips of original flooring and fit them in. If you’ve got an old wide-planked wood floor, my favorite technique is to fill the gaps with jute. You can stain the just to match the floor, then push it into the crack with a putty knife, a scraper or a screwdriver.
Our floor is bamboo, so I think I will have to resort to “fixing” it with an area rug!?
Was your bamboo installed as a floating floor? If so, this trick will work. If the planks were nailed, then yeah, a rug may be your only option!
I have bamboo and 4-5 side gaps have opened. Will try this solution which seems like it should work. I’m hoping that the higher humidity in summer will close some of the smaller gaps. I have radiant floor heat (the best!) so know its drying out the bamboo (Plyboo–outstanding quality).
I’ll be curious about the humid summer closing smaller gaps. I was counting on that when I first discovered the gaps, but they only widened over time!
Thanks for this post, it came at the perfect time. My floor has two little gaps. I have had repaired once. Will do it myself now.
It’s so easy, Frani, and you’ll save a ton of $$$ 🙂
I’ve had side gaps open up on our vinyl click and lock plank flooring, any suggestions how or if they can be fixed?
I’m not sure if side gaps in vinyl can be fixed, Sue. You should talk to the installer to see. IF you installed the floor, then I’d check with the manufacturer or retailer. Good luck!
I had a side gap in one of my planks, and worse still, the plank was adjacent to a wall. I placed my block on the plank with just enough room to insert a wooden hammer handle between the wood trim and the block and pried it back into place. Worked like a charm.
Good solution, Alan – thank you for sharing!
I have to say this is timely! We have the same problem but ours opened up along the length. Unfortunately our floor is glued at the joints so I have a feeling this solution might not work in our case, but this is pretty awesome for your floor!
Thank you, Sara, yeah yours is a different solution, and there are many to choose from!
Buy a 2x2x12 or similar rubber block for cleaning sandpaper/abrasive belts and disks for under twenty bucks. get one surface nice and clean. It may help to run that side on a belt sander to ‘soften’ it. Put that side down on the floor and stand on it. Hit the end with a RUBBER mallet to drive the planks together. DO NOT HIT FOOT!!! Same process but no tape to bother with. Smaller ones available under ten bucks but needs to be at LEAST 1.5×1.5×4 inches.
That’s a good technique, Philip, and it’s one I tried, as I do have one of those rubber blocks. But our planks were just too stubborn to budge, so I had to take more drastic measures. This technique should work for many, though!
I got a flooring jack. You can use an old piece of baseboard between the jack and drywall to distribute the force against the drywall and keep it from cracking. They’re cheap and a great tool to have around.
I have the same problem except it is with linoleum in a camper. The Rv dealer wants over $2500 to fix it by replacing everything. Any ideas on how to deal with his problem????
Hi Don, the same technique should work if the flooring was installed as floating. If the tiles/planks are glued, then this trick will not work. Good luck!
Brilliant! Great little video too!
Thank you, Judy!
We are experiencing the same thing. . Only differance is our floating floor is attached to each other with adhesive. I figure if they can spread with the adhesive they should be able to knock back into place as well. Thoughts?
Hi Marianne, it can’t hurt to try! Just start with a few light taps and go from there. Good luck with it!
We put down a floating floor also, which has decided to do a migration in every direction possible. I looked at all the options online and chuckled at the outrageous contraptions. If you have a pair of shoes that won’t scuff the floor that have a real soft sole ie tennis shoe or something with gum sole. Put your weight of one foot on the plank that is in the correct place and use other foot/shoe sole to “flat foot push” (with the ball of the foot) the plank that needs to be adjusted.
That’s the easiest method, but it didn’t work on ours. It was the first thing I tried, but our boards were a bit stubborn!
i am glad you added the video, i am a visual person and it did make sense of the post and looked way easier glad y’all are back xx
So are we, Chris! We hope you’re feeling better and healing up nicely 🙂
I wonder if gluing a sticky silicone pad (like the kind you can buy to put on your car dashboard to hold a phone, keys, etc.) to the bottom of your piece of wood would work so that you don’t have to keep replacing the (extreme-stick) tape? Even less waste if a “permanent” silicone pad could be used. I think that the biggest problem might be finding a glue to adhere to both the wood and the silicone — only silicone sticks to silicone, so some sort of silicone glue would have to be used. Maybe something in the caulk/adhesive range? When these silicone pads get dirty/dusty, you only need to wipe them off with water to get them sticky again. Just a thought.
That’s a great idea, Cynthia! I’ll bet that Loctite PL Max would adhere the silicone to wood. It would be more expensive with the silicone and the adhesive, but you’d have it to use over and over again through the years.
Thank you, thank you, thank you, and thank you. I can now move the rug that hid the gap in our floor. The previous owners did the same thing(put a rug over it) so on our walk through we didn’t catch it before buying the house. Lesson learned?.
My husband fixed it with two mallets in about 4 minutes!!!!!!! Keep the blogs coming as they are both educational and a good read.
You are so very welcome, Peggy! It’s amazing how many people have this problem but didn’t know how easy it was to fix. I am so happy you got rid of your gaps! 🙂
I wonder if this process would work on a wood floor..
Hi Paula, wood floors are usually nailed in place, so it likely wouldn’t work.
Thank you so much. I live on my own and it cost so much to get someone in to fix things. Finally an inexpensive project and I can do myself. Six years ago when I bought my place ( very run down) the inspector said I would likely have to replace the floor completely. So, thank you, for sharing your knowledge. Helpful video also. ?
Hi Tracey, it’s amazing the things we can do ourselves that “professionals” would charge and arm and a leg to do for us! I hope you are able to use this technique on your floors. It’s an incredibly easy fix, and when you’re done, you’ll feel like you have new floors again! 🙂
This is great…thank you for simply solving a problem that I thought was going to be very complicated and expensive!!! I am heading to the store tomorrow to buy the supplies and repair our embarrassing floor gaps. Your video was very helpful…hopefully I can fix our gaps as easily.
Hi Claire, I’m so happy to help! I can’t imagine how many people have overpaid a “professional” to fix this issue, or worse yet, replace the floor! Good luck with your fix! 🙂
How can I fix my floors between the door going in to another room I didn’t want a threshold they mess up in laying the floor and would not fix them and put a threshold there and I don’t like that I wanted it smooth can you help me with this problem
Hi Karen, I’m not sure if I can help or not, but if you can send me a photo, I’ll try. Thanks! greg@thenavagepatch.com
I am so happy to find your post! I had my furnace go out in January and because it was the coldest part of our winter my house only had heat from an electric fireplace and one of those Amish heaters. The doors were closed in the rooms that were not used to minimize what was being heated until I could get this heater fixed. The heating company had to order parts and we had some really bad situations with the weather so our heater didn’t get fixed until March due to those issues where parts couldn’t get shipped due to road closures and airport shutdowns. Needless to say we received several gaps in the flooring due to the cold and then hot temperatures. Your post saved the day. I was thinking I would have to pull out the molding and go that way, but now I’m off to the hardware store to get my double-sided tape. Thanks for your post.
You’re welcome, Linda! I’m so happy you found my post before you did something expensive. Good luck to you! 🙂
I had this same issue. I went to harbor freight and they have a tool with suction cups, one on each side. It has a lever on each of the suction cups. Lock the handles down and tap with a rubber ballot, the board moves and closes the gap. Costs about $10.
Hi Teresa, I’m sorry for this late reply – I must have missed this comment. The suction cups are a good solution if your planks are wide enough. Unfortunately, our planks are thin, and I couldn’t find a suction cup small enough to fit within their width.
I just bought this suction cup too too. It can’t be sucked on my engineered floor AT ALL. But, I just put one foot on it and press it and it works to close the gap.
I wanted to try that, but our planks are too narrow!
Harbor Freight suction did not work with my floors because they are too textured, so on to plan B. Home Depot does not carry the tape you recommended, but does cary in the store Scotch 1 in. x 1.66 yds. Permanent Double Sided Extreme Mounting Tapehttps://www.homedepot.com/p/3M-Scotch-1-in-x-1-66-yds-Permanent-Double-Sided-Extreme-Mounting-Tape-414DC-SF/203405976. If anyone knows, would this product work? Might it be too sticky? If not, I can order the product recommended, but I’d rather fix the problem not and not have to wait. Thanks for making this page.
Hi David, the product you linked to is perfect! It’s not too sticky – just put two strips across the block as I did in the video, and you’ll be fine. Just be careful when pulling up the block. Gently rock the block until the tape loosens.
Thank you so much for taking the time to answer my question. I”ll get what Home Depot has, not what you recommended at first and try it. Understand about rocking the block to get it loose.
What a great and inspirational video. Hopefully you can help me too. I had a real hack install my Regal engineered hard wood floating floor. It’s a concrete sub floor with a pad/moisture barrier. It’s a tongue and groove(all grooves must be glued). He glued all the short ends together and some of the long pieces together. Now there is separation on 80% of the 1700 sqft that was installed. Please help!
Can you send a few picture my way, Thomas? I’ll try to help, but I need to see it first. greg@thenavagepatch.com
Great video but I absolutely loved the credits lol.
Lol, thank you, Renika! 🙂
Question what direction do you hit the block to close up the gap because isn’t there a clicking method to the floor?
There’s no clicking method on our floor, so I just hit them away from the closest baseboard 🙂
As an alternative to the tape, try gluing a piece of the beaded rubber matting that is placed on shelving to create a slip-free surface for glasses, dishes, etc. It comes in rolls and can be purchased at any hardware store. I lay a piece of it on my kitchen countertop, under my wooden carving board, when I’m carving a roast to keep the board from sliding around on the countertop. If it can do that, I’m sure it will work as the tacky surface between your push block and the flooring material. It’s also great to put on wooden chairs (unglued), underneath seat cushions, to keep the latter from sliding around. Really a useful product.
Gerry
That’s a great tip, Gerry – Thank you!
Lol! I do think the rubber mat will work. We had a good size gap on our floating floor and my husband used his work-boot with Vibram rubber soles, gave it a quick kick with the heel and Walla easy fix!
I have a little bit of a different issue with my floors. Squeaking.
It’s ranch house. Built in 1959. Well kept.
I notice the squeaking pretty much along where the heating duct below in the basement that runs along in a straight path between the living room and dining room and along the hallway up to the entrance of one of the bedrooms.
I tried nailing the 2X6 and plywood in basement, but no fix. I even placed glue at the junction of the 2X6 and plywood….but nothing.
I’m thinking now to use special screws to drill onto the floor hoping to get the 2X6. The screws will go in enough that the head snaps off below the surface of the floor. Problem is: don’t know where the 2X6 are.
Any ideas from your end if there’s a better way to fix this? Email me.
thank you.
Hi Paul, if the squeak follows the HVAC line, then it may not be your wood floor at all, but instead it may be the sheet metal of the ductwork causing the noise. It may be metal-on-metal (perhaps the brackets rubbing against screws), or it could be wood-on-metal (joists rubbing on the ducts). Have someone walk on the floor while you’re in the basement, and try to determine if this is the cause. If so, we’ll take it from there.
Hey Greg! exactly right that the floor gaps coincide with the main HVAC duct.
I thought so!
I have a solution that is FREE! Put on a pair of gym shoes and kick the board to close the gap. Then do the same to the board behind it. Before you kick the board, apply a bit of wood glue to the gap. After closing the gap, wipe of excess glue.
That was the first thing we tried, John! Our boards are wedged too tight for that. The floor gap fixer gives the umph it needs to move our boards.
We have 3 gaps. They have been repaired two times and I am able to close the gaps, but—I want them closed permanently. Do you have a suggestion for that. I considered glue but was leery of that. TYA
Hi Frani, I’d be leery of glue also. A floating floor is meant to float. I don’t think it’s a good idea to hinder that movement. If you’re having repeated issues, your house must undergo extreme seasonal humidity fluctuations, so the floor is just responding to that. I’m not an expert, but I’d say that the occasional fix is the way to go. If anyone reading has another thought, I’m all ears!
I just used a mirror/glass suction cup handle thing! Attaches to the floor without damage!
Hi Julie, I would have gone that route, but the width of our floor boards is narrower than any cup available, so it wouldn’t have worked!
I put on my Crocs (not the toe string type) or a good pair of jogging shoes and give a good forward kick onto the board and it snaps into place and so on until I finish the row. Completely free.
It’s a good technique and the first thing I tried. Unfortunately, our boards were stuck tighter than shoes could handle!
I had boards that gapped on a regular basis. I pulled the shoe molding off and saw that the row of boards where the gaps appeared was cut ta bit too short leaving an overly large expansion gap between the wall and last board. I closed all the gaps using a variety of the above methods and then inserted a small piece of flooring and glued to the last board to reduce the expansion gap to the manufacturers specification. Problem solved.
Hi Joe, that is a great tip – thank you! If my boards gap again, I’ll remove the floor moulding do as you recommend.
I just want to say that I have NEVER commented on anything I have ever watched or purchased. I truly enjoyed your video!! It was educational and very cute!!
Hi Karah – oh wow, I’m honored to be the first!! I hope you poke around our site – I think you’ll find more stuff you’ll like! 🙂
Thank you so much for this easy fix!! I had about 4 gaps & I was able to find a roll of 3m double sided tape, 2×4 piece & hammer in our garage, I did exactly as you said & now NO MORE GAPS!!! We have bamboo floating floors & the tape didn’t give me problems coming up! I put the tape up the side of the 2x4s & that helped me pull the 2×4 off at the same time removing tape from the floor when gap was gone!! Ty again!!
Good good! I’m so happy you found this post useful, Christina! 🙂
You can clean two sided tape with isopropyl alcohol and a lint free rag and it will be sticky again.
Wow, I didn’t know that – thanks, Tom! Learn something new every day!
This was super helpful and totally worked! I ended up using a regular wooden block and it worked just the same! – Thanks!!
So glad to hear it! Thanks for letting us know! 🙂
I live in the city and didn’t want to waste wood by buying an 8 floor 2×4 that I would only use 10 inches of. I used a .25×3 instead so that I didn’t feel bad about waste. While I almost hammered my wrist a few times (almost, I’m unscathed) it still worked like magic. The tape was not reusable and I had 5 sections to do, but I barely had enough.
I’m so happy with this solution. It was so easy, saved so much money, and my floors look so much better!
Thank you for your creative problem solving!!!!!
So happy to hear it, Wes!
Floor gaps are pain in the ass. Thank you for sharing this solution.
That they are, Donald. At least there’s a cheap and easy way to fix them now!
Dude! Wish I’d seen this hack a few weeks ago when we installed our LVT floating floor, it would have saved us a ton of time and effort from installing then removing planks because they weren’t quite tight enough after we finished. We used the installer kit but with this we could tighten up the joins after we’d installed more planks in the row or even after we’d set the next row. Thanks so much for a great tip.
Ahhh, better late than never! You can use one for your next install! 🙂
What do you do with the gaps that are left by the baseboards?
Hi Marisa, unless you’ve got Grand-Canyon gaps, there shouldn’t be any gaps by the baseboards. Floating floors typically leave 1/4 inch space between the edge of the floor and the wall. Typical baseboard is 3/4 inch thick. That leaves 1/2 inch of leeway on either end of a run of floorboards. Even with our really big gaps, no gaps showed under the baseboard.
Hello!! This is great! We have bamboo floating floors but our issue is the separation is lengthwise with the plank. Any ideas on fixing that? Thanks for your help!
Hi Sue, that’s a tougher issue to solve, and it generally involves filling the side gap. Some use putty, some use glue and sawdust. For antique hardwood flooring, I once saw a cool fix involving stuffing oakum (tarred fiber, kinda like rope) and sealing with tar.
I tried this today, and it worked great! Thank you for posting, it helped me fix three gaps in my laminate floor.
Really appreciate the article.
April 29 2021
Happy to hear it, Mike!
Greg and Handan, thank you for this great, well explained solution. I’m writing my situation and then at the end a question or two – I think it’s good for others to hear about situations that may be similar to their own. My house is in Toronto thus 4 seasons. In 2010 I had 5″ engineered wood flooring installed throughout the ground floor, no basement, just a crawl space with FAG heating ducts running under the floor. It’s now 2022 and the first winter I have been at the house, I usually only come in late spring/summer. I noticed a few gaps and now with running the heat regularly more are appearing. I asked my maintenance man and he shrugged it off as not an issue I should worry about. That was good news but I always like to know ‘the why’ so I can decide what to worry about 🙂
Are the gaps strictly a cosmetic issue or should they be fixed as per your instructions to prevent some future problem?
Do the gaps come in the winter due to dry FAG and then disappear with the summer humidity?
Thanks again for this great solution and confirming that others also have this issue!
Oh, the things I am learning being the first winter at the house 🙂
Patricia
Hi Greg,
Thanks for the video. We just got a floating floor in the bathroom. Should that problem arise, I will remember watching your video. Not that I’d be the one doing the fixing’, but one never knows. Love the blog and crafty ideas. Hugs. Still glad it’s you moving and not us. Sigh.
Thanks, Beverly! Want to come help move some boxes???
Thank you so much for this! SO happy I don’t have to hire someone to fix!
So happy to help! 🙂
I spent 35 years of my life selling floors of all varieties. Great little video! You’re a very handy (and funny) guy to have around. Thanks for the laughs and tips.
Thank you so much, Candy! I’m happy to hear this from a pro! 🙂
You guys are hilarious! I love the credits section. My floors are so loose I just out on my crocs and slam my foot on the floor in the direction I want the flooring to go and keep doing that till the gaps are closed, and wait a week or two and do it again. The floor boards/base boards need to come off and put some blocker in there to keep the flooring tight… or convince “tight wad hubby” that this ol’ 1974 model house just needs new flooring throughout!
Thank you, Sharon! We tried the shoe method, but the boards were just too tight. Sounds like yours are pretty easy to fix though – at least temporarily!
Would this work if the gaps are on the sides of the planks?
Hi Janet, unfortunately no. That is an entirely different problem this method won’t fix.
How do you know which direction to place the block.
That’s a good question. I usually pick the side that is closest to the baseboard and I work the gap towards that side.
I use a few small drops of super glue in the gap before I close it, the gaps have stopped.
That’s a great idea!
We have a floor in our dining/kitchen area like this but there is only one place where we ever get a gap. When I notice it, I just push it back together with my foot. Works better if I am wearing sneakers. Thanks for all of your great posts; your info and sense of humor always make my day!
I tried the sneaker method, but all I got was a stubbed toe! 😂
How do you keep the floor from moving again and having a gap again
unless you put a little glue in the gap before closing, they will continue to open over time.
Doesn’t say how to stop from happening again ? I have vynle floor and it happened almost as soon as they installed I move it back A month later moves again
You, sir, are a GENIUS! I was fortunate to find your article and video, and today, I fixed the gaps in the floating floor I inherited when I bought my home. It could not have been simpler! I used a 2×4 and found that by putting my foot on it with my body weight (and the 2-sided tape), I was able to use the rubber mallet while standing. Thank you for a hack that was easy and effective!
Happy to hear it, Steve!
This is great, some homeowners tend to DIY their repairs.
Thanks John!