
DIY Snowflake Wreath
This gorgeous DIY snowflake wreath is perfect for the front door or anywhere you want a little holiday spirit in the house!
We all have our own first reaction to snow. Mine is forever shrouded in the pre-history of the early 70s – a time so fundamentally different than today, that it may as well be depicted by hieroglyphs carved into living stone. But it probably involved a lot of running and whooping and behavior closely resembling a family pet.
As told to me by my babes, Baris’s first encounter with snow was markedly different.
He was suspicious of the stuff. Who knew what it contained and where it came from!

He eyeballed it warily as his mother held him above a snow-covered Kazakh park. He began to suspect two things at that moment:
- The woman named Mom who held him above this frozen wasteland would need to be watched closely, and
- There was more to life than milk and diapers. Much more.
As my babes lowered his little body down towards the pillowy white snow, Baris’s legs seemed to be magnetically repelled by the hideous white stuff. His torso continued on a downward trajectory, but his feet and legs hovered safely above the frigid scene below him.

Something had to give. He was flexible, sure, but he was no gymnast! At some point physics would take over, and he, along with his diapered rump and chubby legs, would be plunged into what could only be described as certain white death!
His big eyes went wide as the full extent of his impending doom became clear to his inchoate 1-year-old brain.
His rear end settled into the snow-covered grass just as his legs came to rest in front of him. He regarded his feet, then took in his surroundings and then glanced up at the traitor who had placed him in this predicament. Tears welled in his eyes and his lips began to quiver…
*******

We may love or loathe a snow-covered landscape and the temperatures that make it possible, but I think we can all agree that the singular snowflake is above reproach.
No two are alike, and we adore them all in their infinite perfection.
In my last post, I showed how to make a light-up snowflake with resplendent colors, but I know that’s not everyone’s cup of tea, just as not everyone swoons over a snow-covered hill.
But I think this week’s snowflake will resonate more broadly. This DIY snowflake wreath has a classy elegance that should appeal to almost everyone.
So enough of my jawboning. Let’s get making!

DIY Snowflake Wreath SUPPLIES LIST
Affiliate links are provided below. Full disclosure here.
- (7) Pine & pinecone branch
- (7) Red frosted berry spray
- (6) Pine pick
- (12) Faceted berry spray
- Small pine cones
- Dollar Tree foam floral disks (2-pack)
- Hot glue gun
- (3) Remote-controlled fairy light strands (6.5ft each strand)
- Zip ties

We love to see our craft projects out in the wild! If you try this seasonal craft project, take a picture and post it on Instagram, be sure to tag us – thenavagepatch
DIY Snowflake Wreath VIDEO Tutorial
Watch our short and fun video below for an overview of our snowflake wreath before you read the detailed step-by-step tutorial.
Watch Our Tutorial On YouTube
On Tiktok
On Instagram
DIY Snowflake Wreath Tutorial
Step 1 – Make 6 bunches
Lay a pine and pinecone branch on a table, then fan out the stems of a red frosted berry spray and place it on the branch.


Place a pine pick on the branch so the branch sticks up above the pick.

Nestle a faceted berry spray into the pine pick and fan out its branches.


Zip tie the bundle just above the first branches to keep the tie from showing.

Repeat this until you have 6 bundles.
Step 2 – Prepare the foam

You’ll need to excavate 6 channels on each foam disk. I started with a ruler to get the lines in the right spot.

I used a wood dowel to make the gouges bigger, but they still weren’t big enough to accommodate the bundles.
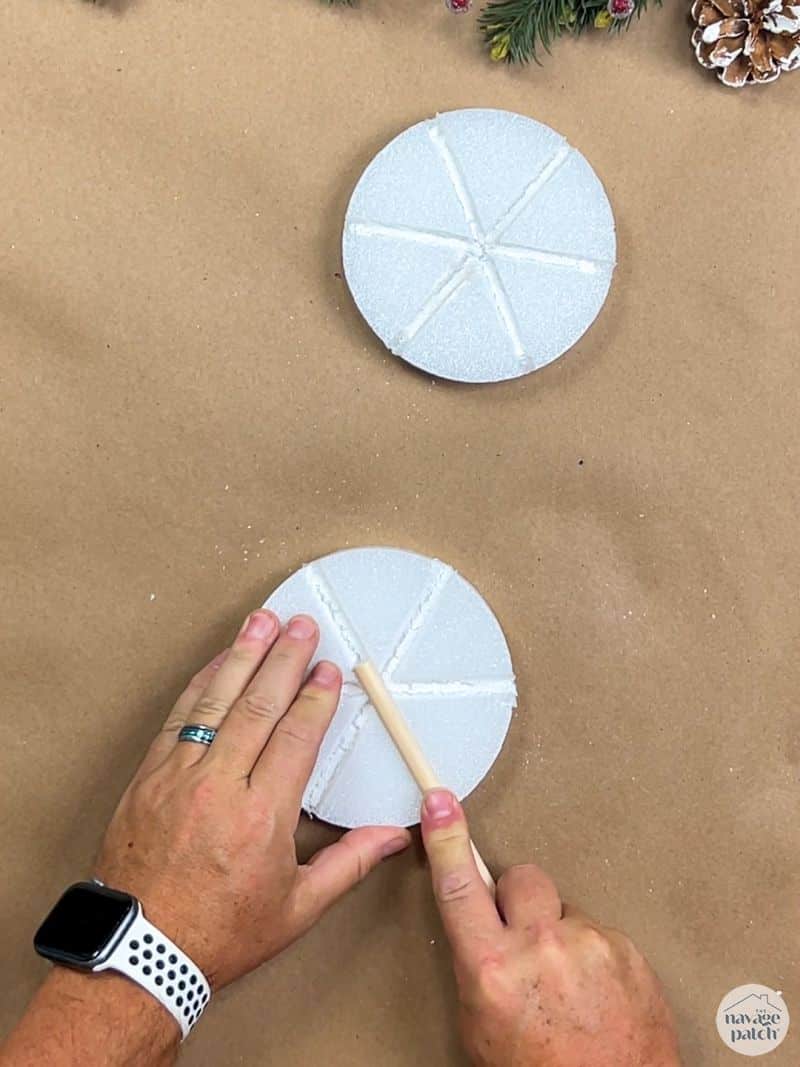
I finally got the channels deep and wide enough with a fat Sharpie marker. An X-acto knife would probably be easier for this step!

Step 3 – Trim the bundles
Trim the bundles with a wire cutter until about 2-3 inches of each stem remains.


Step 4 – Glue the bundles
Add hot glue to one of the channels, and then lay one of the bundles in and press down until the glue hardens.


Repeat this with the other bundles.


Slather hot glue in the channels of the second disk and everywhere else and then glue it on top of the first one.


Step 5 – Fill in the wreath
Pull a bunch of needle clusters from one of the spare pine branches and insert them around the edge of the exposed foam disk.

I first punctured the foam at an angle with a small stick, then I added a drop of hot glue and inserted the pine.


Just keep poking and sticking until you’ve filled the foam.

Stick a faceted berry spray into the edge of the foam disk between each bundle. Make a pilot hole with a wooden skewer or small dowel.

Next, trim the end off the faceted berry spray…

Squirt in some hot glue…

Then jam that sparkly sucker right up in there!

After the six faceted sprays, fill the center with small pinecones. Maybe start with a larger one in the middle…


And then surround it with smaller ones.

For a final pop of color, cut the little stems from a red frosted berry spray and stick them around the pinecones.


Step 6 – Add lights!
It just wouldn’t be a Navage Patch wreath if it didn’t have lights! Add 3 strands of remote-controlled fairy lights and hide the control boxes behind the greenery.

Phew! Alright, let’s have a look at this beauty!

I love the faceted berry sprays.


It looks great during the day, but it really comes alive when the sun sets!

If you like our snowflake wreath, please drop us a comment below and let us know!


This is beautiful! I can’t wait to try it. Thank you for sharing all your creative ideas. I’m creatively challenged, but I’m good at copying!
Thank you so much, Kari! I hope you copy this one brilliantly! 🙂
OMGosh, this is awesome!! I was just thinking we need a redo for our door wreath and this fits the bill. Love the snowflake shape.
You guys rawk! 🤩
Hey Mo! I’m happy you like it! Send us pics if you give it a bash.
Beautiful! Love this wreath. I’m looking forward to making a couple of these. Your instructions are so clear and the photos helpful. Your posts are the best! Thank you.
Thank you so much, Deborah! I hope yours turns out great!
This is absolutely gorgeous. Ditto Kari on the creativity. I don’t know how y’all come up with all the ideas you do.
Thanks, Debi! 🙂
What a beautiful alternative to the traditional Christmas wreath. Please let us know what you used, and how you attached, the hanging mechanism. Thank you for sharing your creative ideas.
This is absolutely beautiful! I’ll have to keep this in mind for next year when the holiday floral picks are more plentiful. Well done!
Acutually, it IS next year. LOL I guess I mean Christmas later this year.
Thank you, April! Happy New Year!
One of the most unique & beautiful wreaths I’ve seen. Do you ever sell your wreaths?
Thanks, Pam! Nope I just make ’em for Handan! 🙂
Wow wow wow, that is one of the most beautiful home made wreaths I have come across and im a huge lover of Christmas decorator. I make so much of my own decorations and this will be my new door wreath for this year and most likely many more to come. thank you for sharing your beautiful wreath idea. Happy Ho Ho to you and yours for 2024
Thank you, Michele! I enjoy making wreaths for Christmas – endless options and opportunities! Merry Christmas to you and your family! 🙂
As usual Greg, your wreathe is awesome! Do you ever stop and “measure” the growth of your crafting skills??? Really have come a long way. Hope you all have a happy Holiday Season!
Thank you so much, Kathy! I just have to look back on old posts to see the growth! And now I’m building bigger things like the shed I constructed from scratch last summer. Hopefully I’ll find the time to write about it this winter!
This wreath is absolutely magnificent! I’m going looking for the artificial greens this week. Thank you for so generously sharing this project.
It is my pleasure, Patricia! Enjoy the make! 🙂