DIY Wood Slat Accent Wall
A wood slat accent wall is a simple DIY that really pops! Get this gorgeous modern look and transform any room for about $15!
Apparently, paint isn’t good enough.
Not anymore.
Nor is wallpaper, for that matter.
I guess the problem is that paint and wallpaper are just too…too…two dimensional, ya know?
I know, I know, when it comes to wall coverings and colorings, we’ve lived in perfect harmony with 2 dimensions since the dawn of time. Don’t get me stared on textured walls – I know they are technically 3-D, but I’m ignoring their existence for the moment. But in this age of Instagram, Pinterest and the burning need to out-Jones the rest of the universe, the DIY set have been throwing whatever they can against their walls to up the interior design ante and show the world just how fabulously three dimensional they are.
Perhaps you think I’m kidding about the whole “throw a bunch of shit against the wall and see what sticks” thing (well, duh, I kid about pretty much everything), but this time I’m totally serious as well! I remember a few years back, someone chopped up some old chairs and stuck the pieces to a wall. If that weren’t enough, someone else sliced a few chairs in half and hung the half chairs on a wall! And if that’s not 3-D enough for you, another intrepid soul said, “Half chairs? Pffft! Hold my beer!” and then proceeded to hang a series of whole chairs on the wall.
Because 2-D is for troglodytes.
3-D is where it’s at!
I can’t even walk by a wall anymore without thinking, you know what that wall needs? You know what would make that wall really stand out from all the other loser walls?
Another freaking dimension!
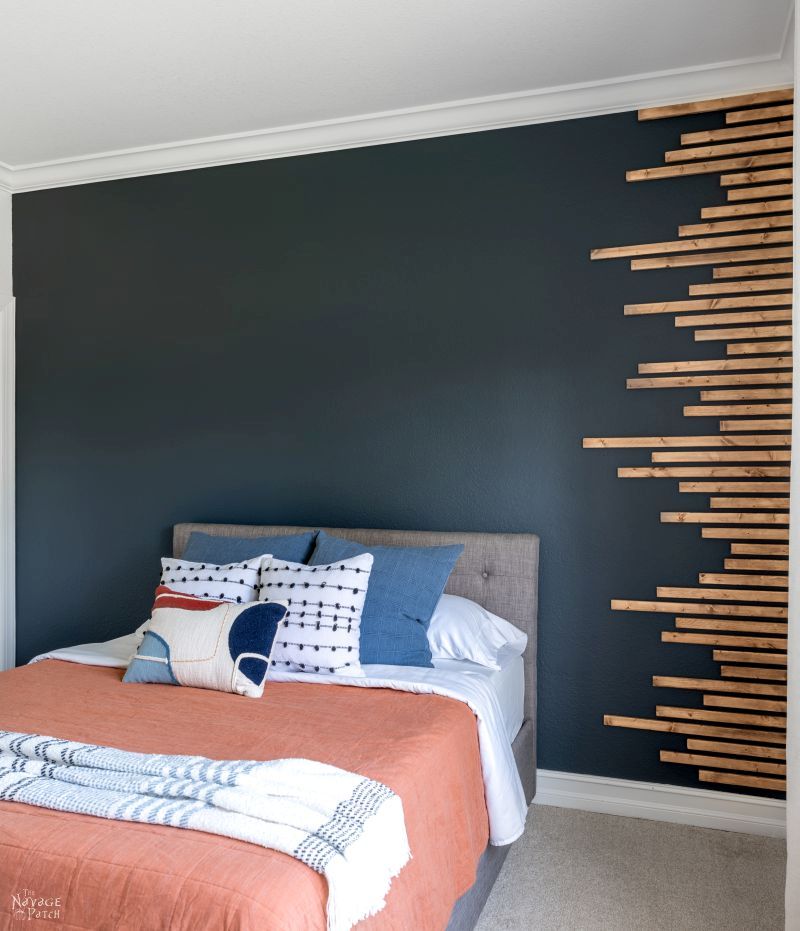
So of course, with Baris’s young adult bedroom makeover in full swing, my babes thought his room would be the perfect place for me to try my hand at converting the wall behind his bed into something a little more…three dimensional.
And hey, if my babes wants The Boy to have a multi-dimensional accent wall, who am I to say no?
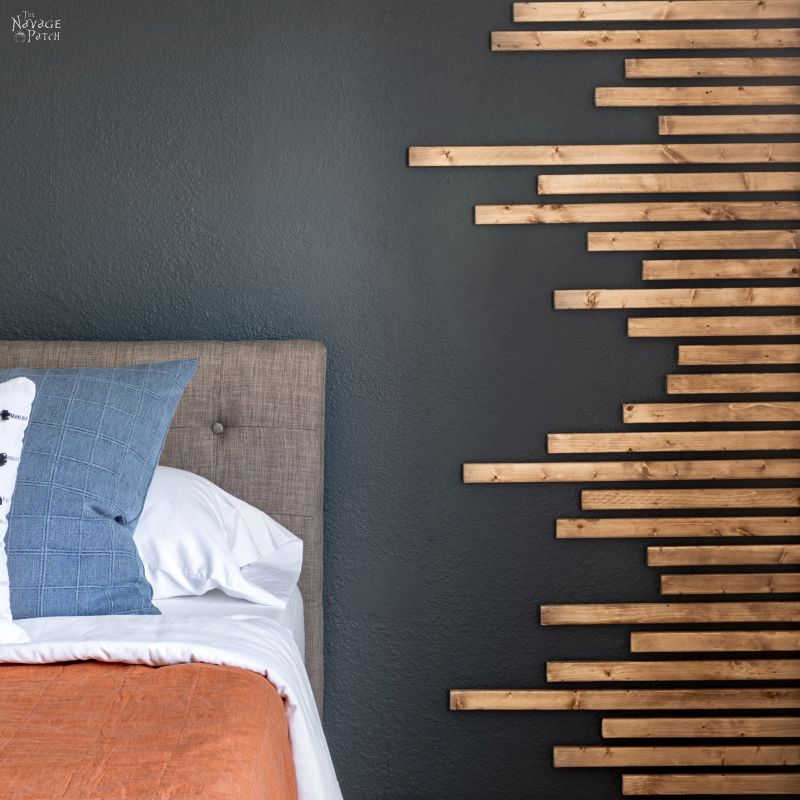
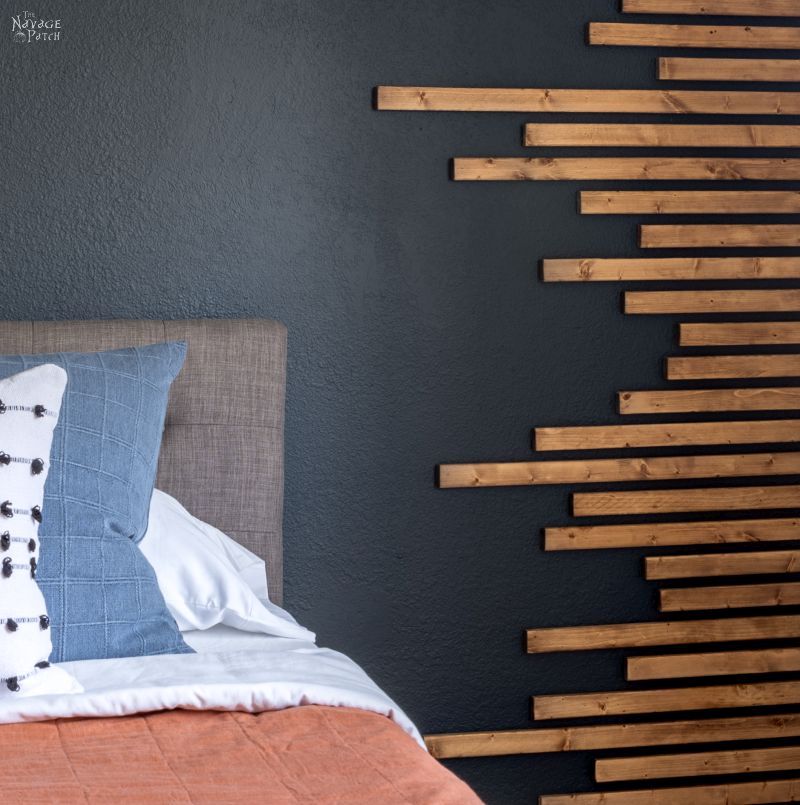
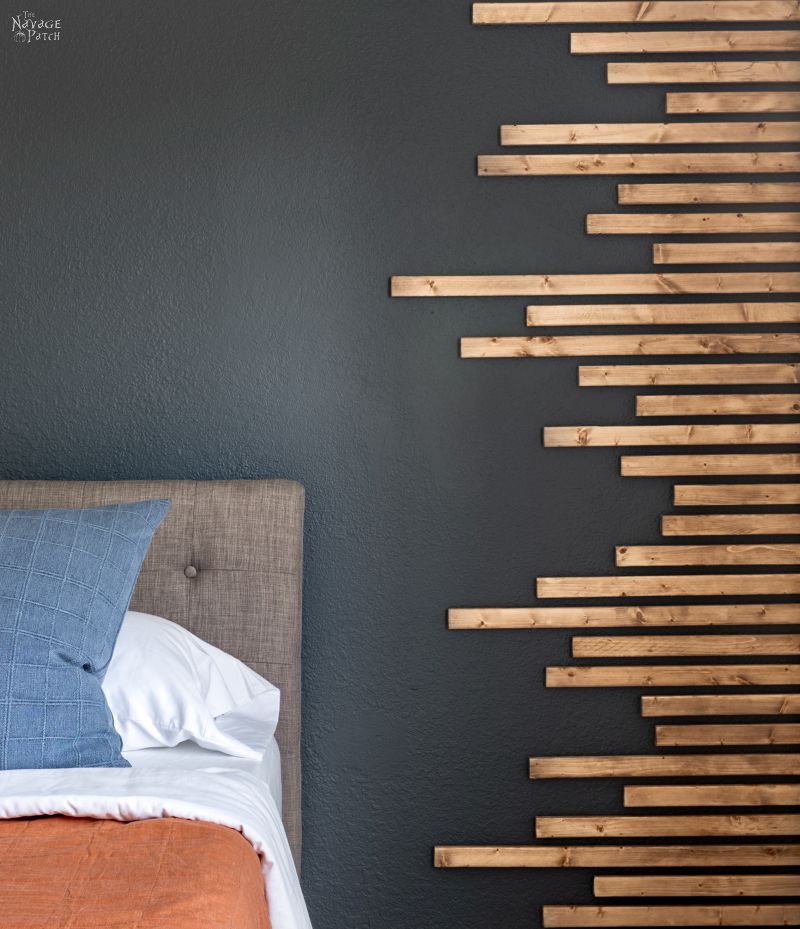
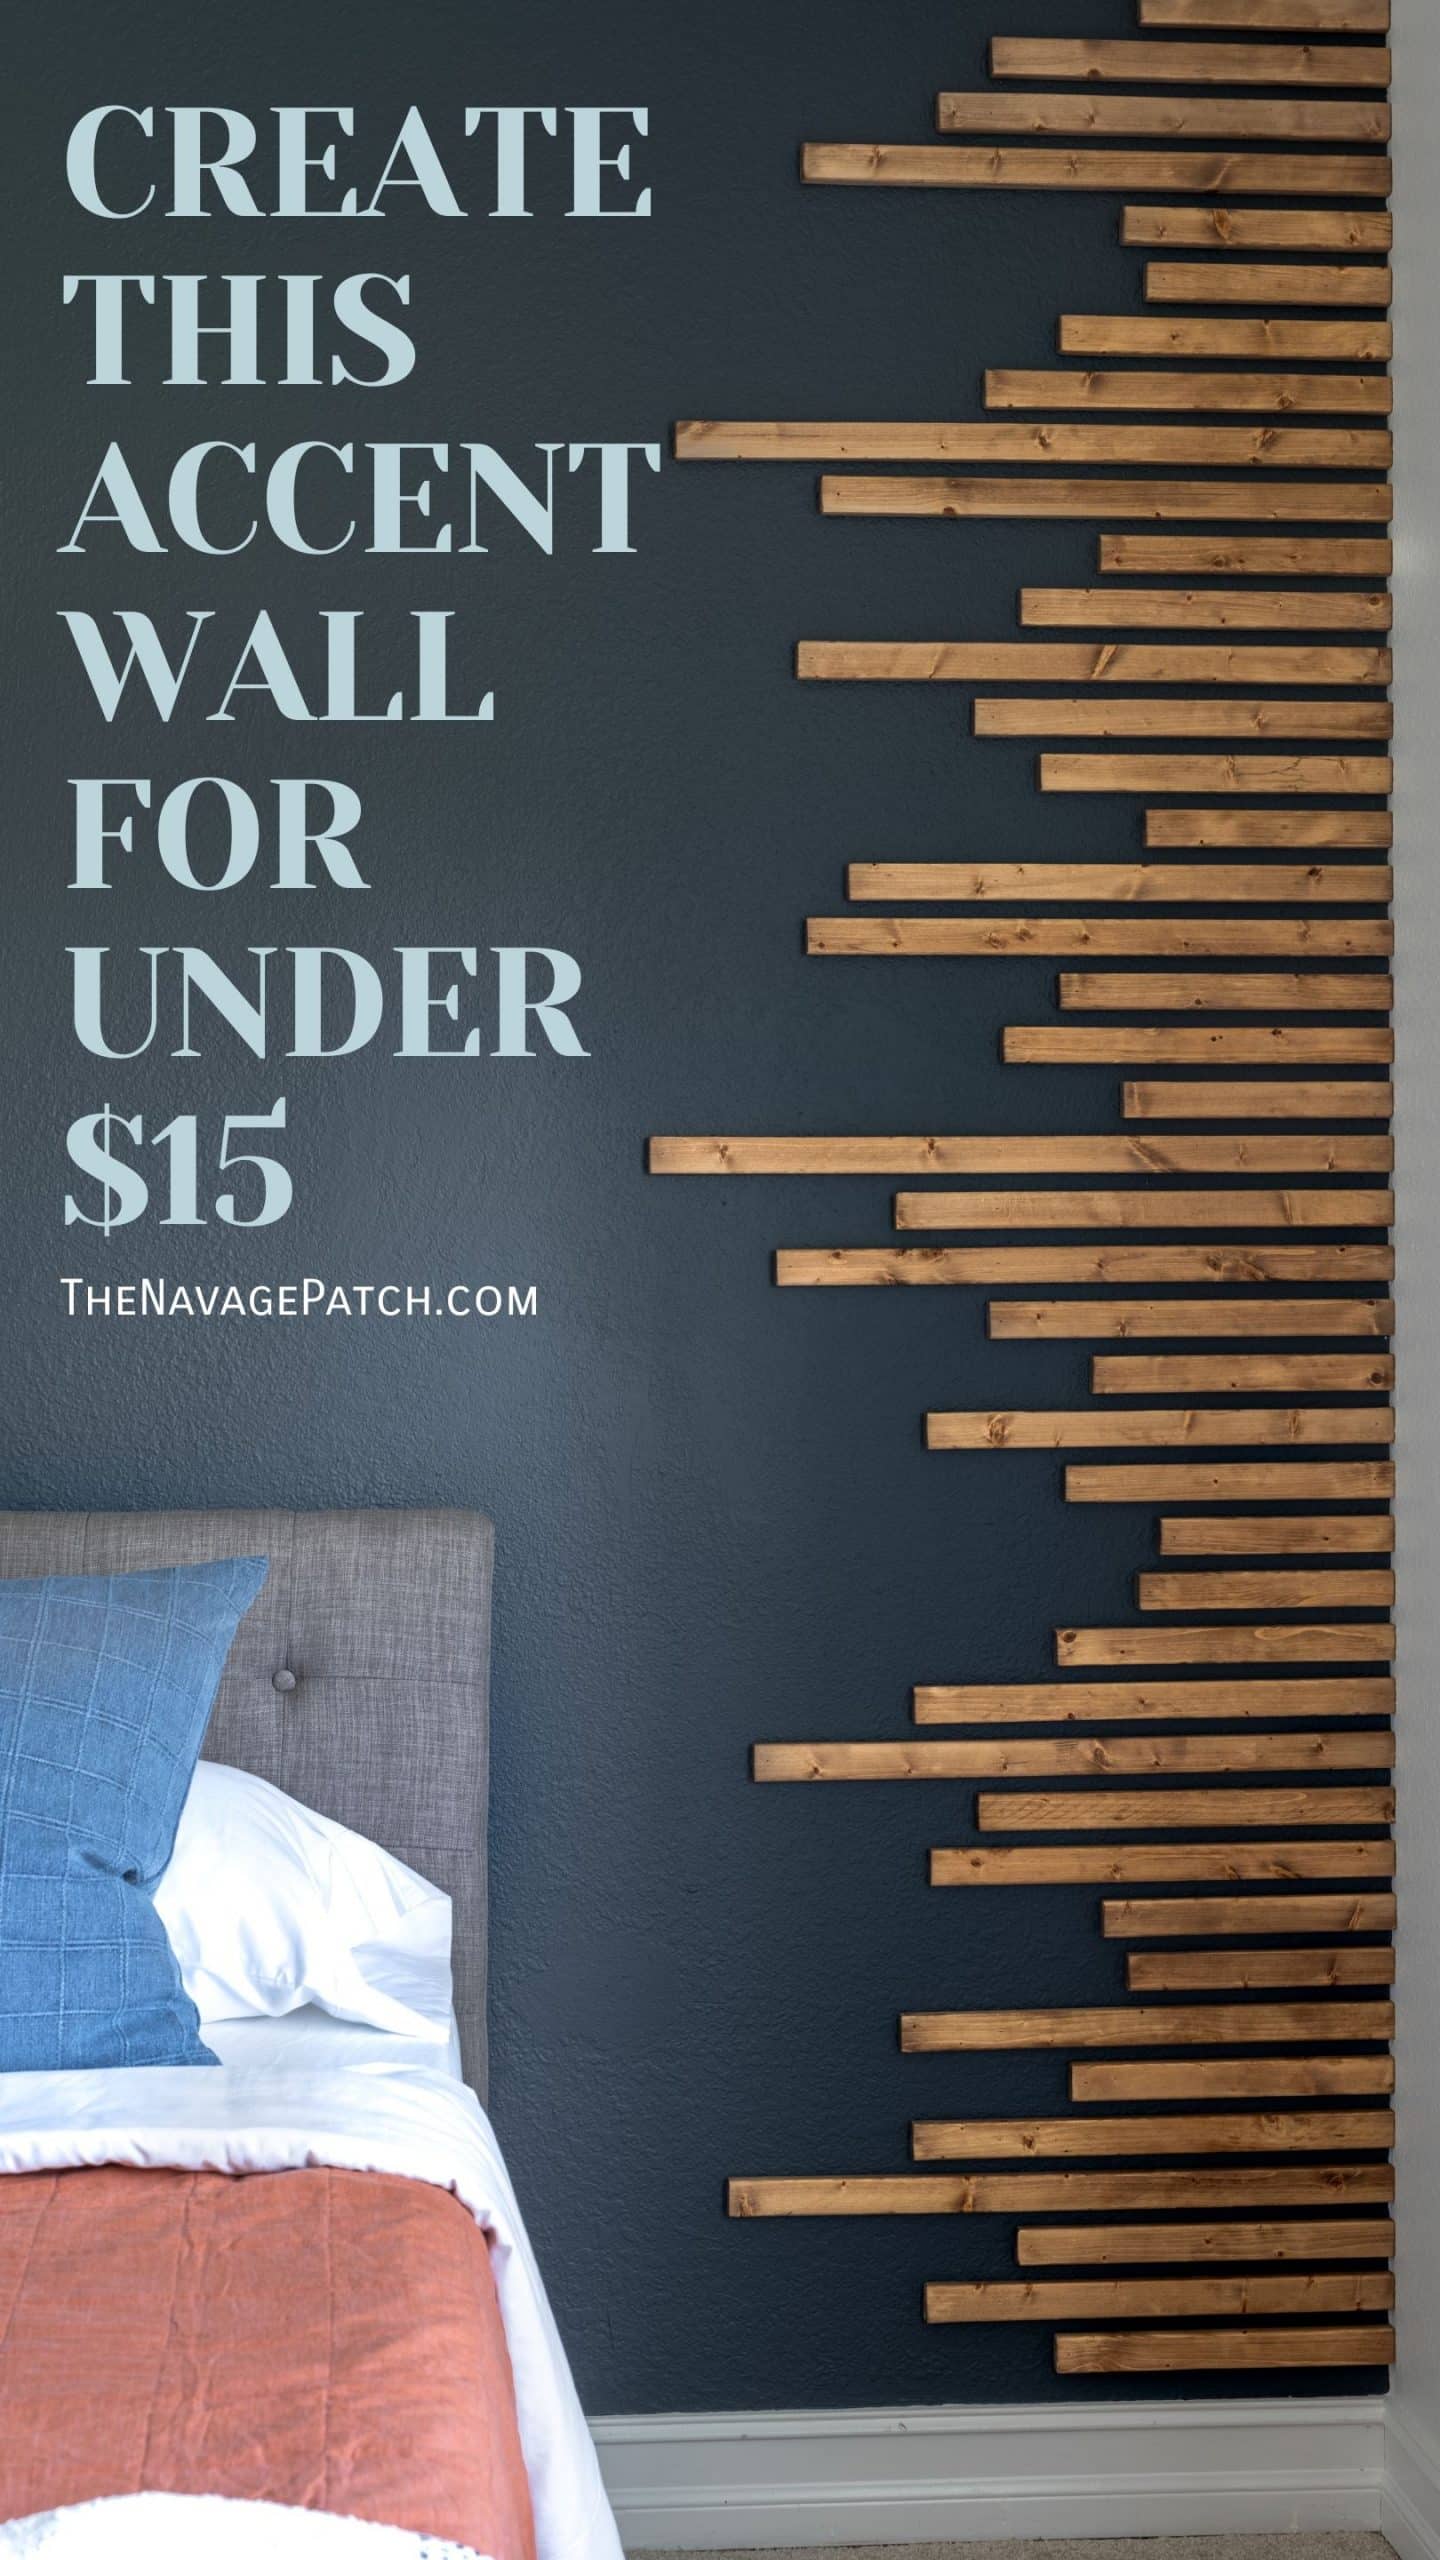
We put our heads together and decided that some wood slats on the right side of the accent wall would look modern and cool, and the warm tones of the stained wood would perfectly complement the blue/gray of the wall.
But moreover, we’d have our very own three-dimensional wall that would finally allow us to hang out with the cool kids on Instagram.
WOOd Slat Accent Wall SUPPLIES & Tool LIST
Affiliate links are provided below. Full disclosure here.
- Wood furring strips cut between 10″ and 30″ lengths
- Power miter saw or inexpensive miter box
- Tape measure
- Torpedo level
- Brad nailer
- Orbital sander
- Pre-stain wood conditioner and stain of your choice (optional)
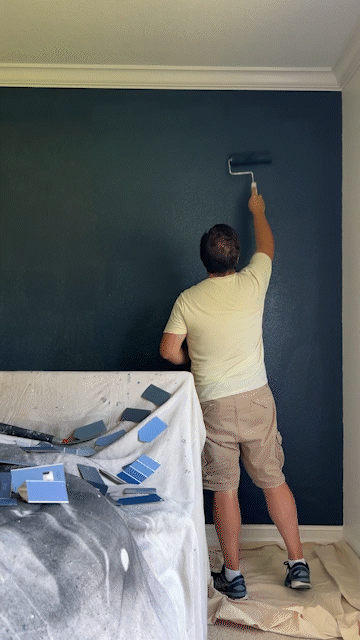
My first order of business was to paint the wall behind Baris’s bed to something dark. We considered Coffee Nook by Magnolia and a couple of dark blue/grays we had samples of from Lowe’s, but in the end, we decided on a color called Sea Serpent from our local Sherwin-Williams store.
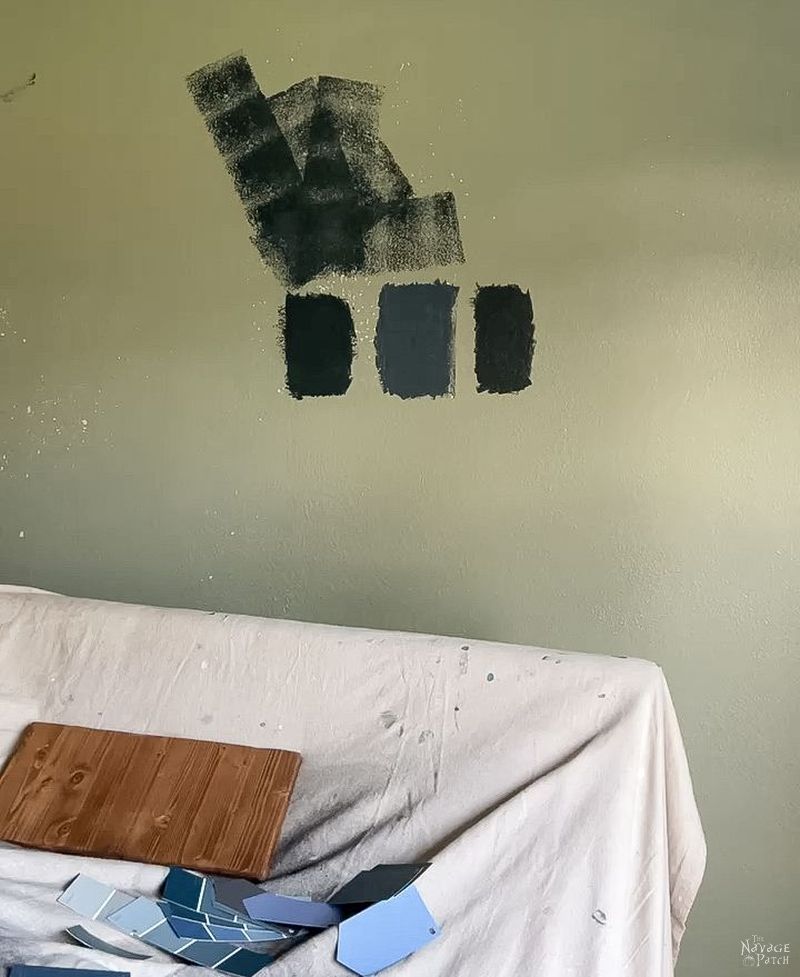
By now you should know my feelings about the green color half this house was painted when we moved in. Literally any color would be an improvement, and I couldn’t wait to banish the last of it from this room.
There are few things in life as satisfying as painting over a bad color with something awesome.
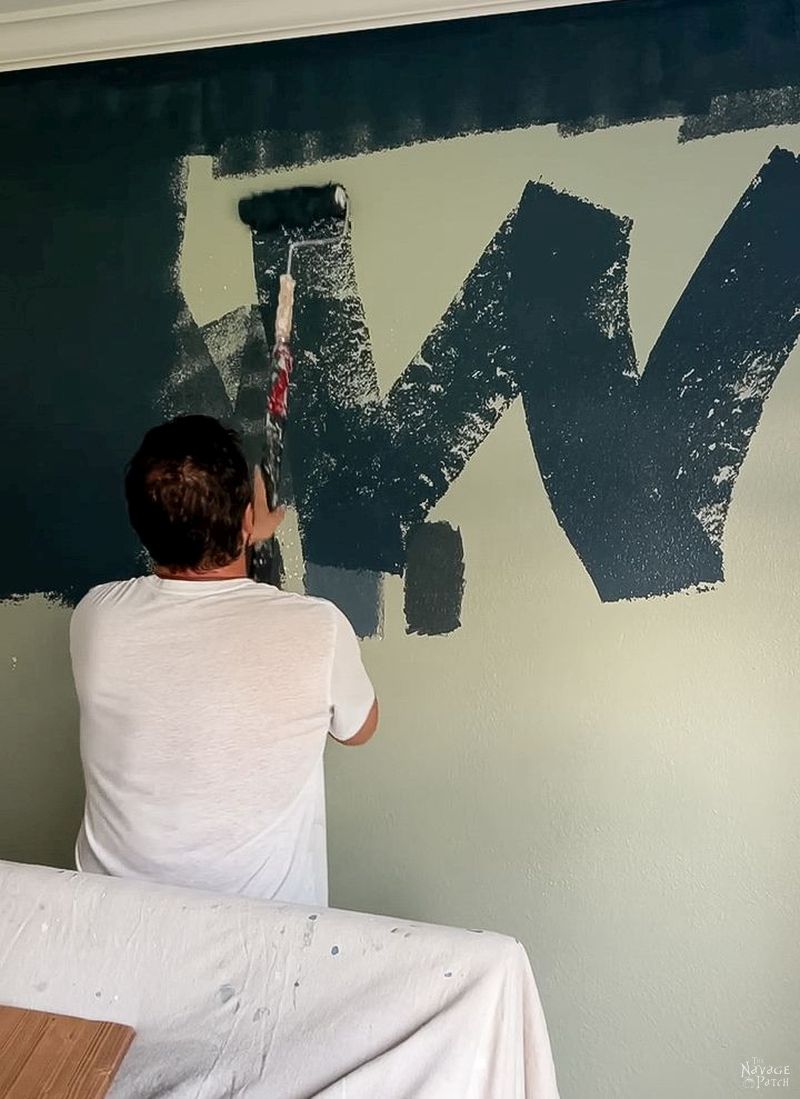
This green was persistent – it didn’t go quietly and easily but instead insisted on two coats to cover. But no ugly paint can resist The Disco Painter!
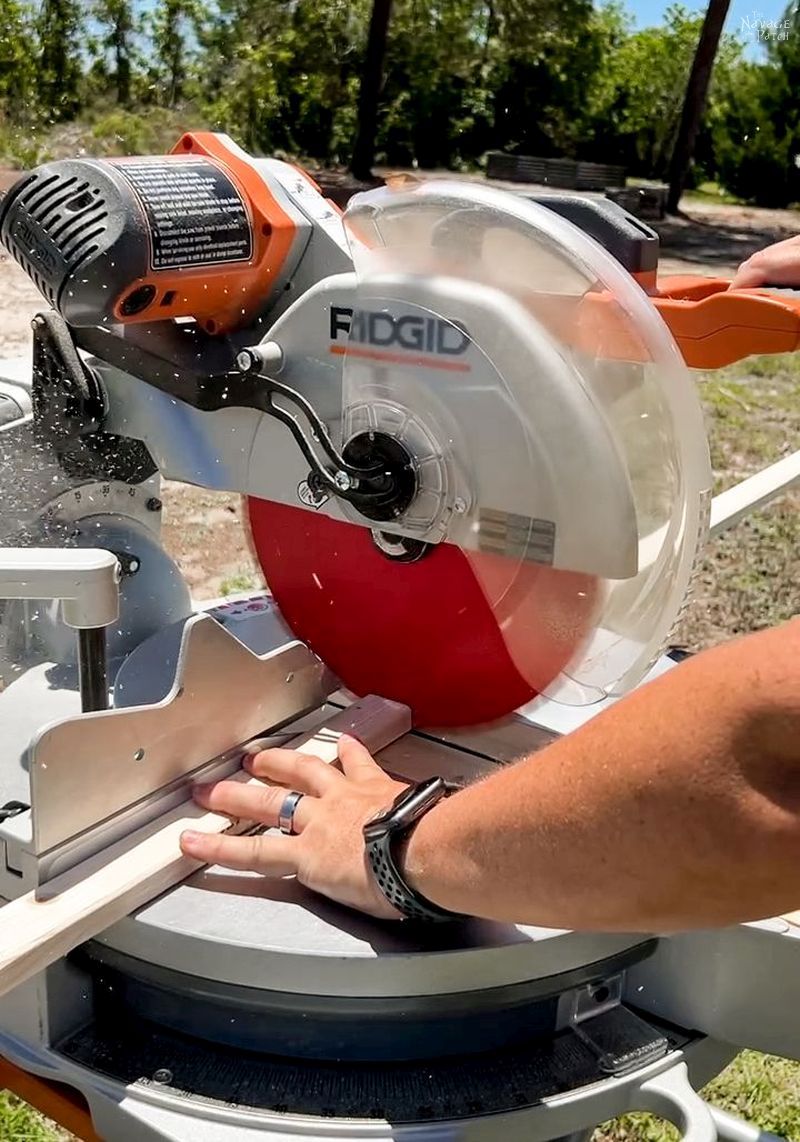
While the Sea Serpent got familiar with its new digs, I headed outside to cut the slats.
Now, as we all know, wood has become a luxury good like a Rolex or a super yacht, so we had to think carefully about how we approached this wood slat accent wall. Sure, we could have bought oak or maple strips, but then we’d have to withdraw Baris from college and put him to work in the salt mines to pay for it.
Alternatively, we could have gone with a fancy, high-grade pine, but I would be forced to sell a kidney on the black market, and honestly, I don’t know if I trust the black market surgeons in this area yet. They did make a good offer on my liver, but I told them I needed that for my nightly martini.
So that left furring strips, the last (relative) bargain left in the Wide World of Wood. Now here’s the thing – as with all wood, there are differing grades of furring strips. I used the cheapest, and honestly, you really don’t need anything fancier. A single 1-inch by 2-inch by 8-foot furring strip costs $1.48 in these parts, and I used 10 of them for this wall.
Assuming you have already have a saw, sandpaper, stain, and some sort of nailer, a hammer or screws, this wood slat accent wall is a $15 DIY! Go out and find me anywhere in this country you can get such an astonishing transformation for so little money!
DIY Wood Slat ACCENT WALL VIDEO Tutorial
On Tiktok
We love to see our DIY projects out in the wild! If you try this DIY project and take a picture and post it on Instagram, be sure to tag us @TheNavagePatch!
DIY Wood Slat ACCENT WALL Tutorial
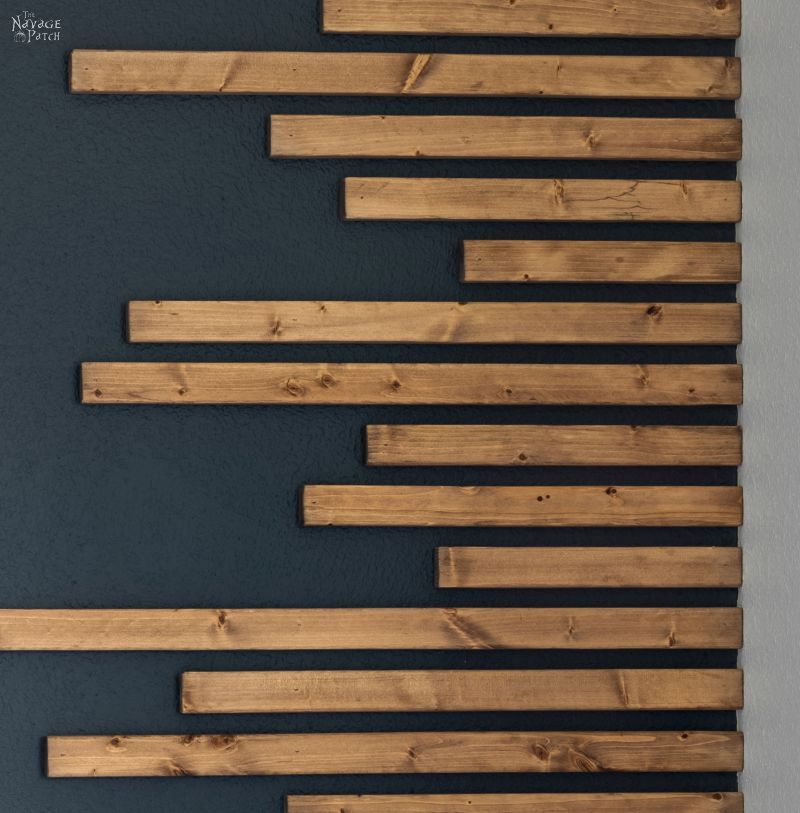
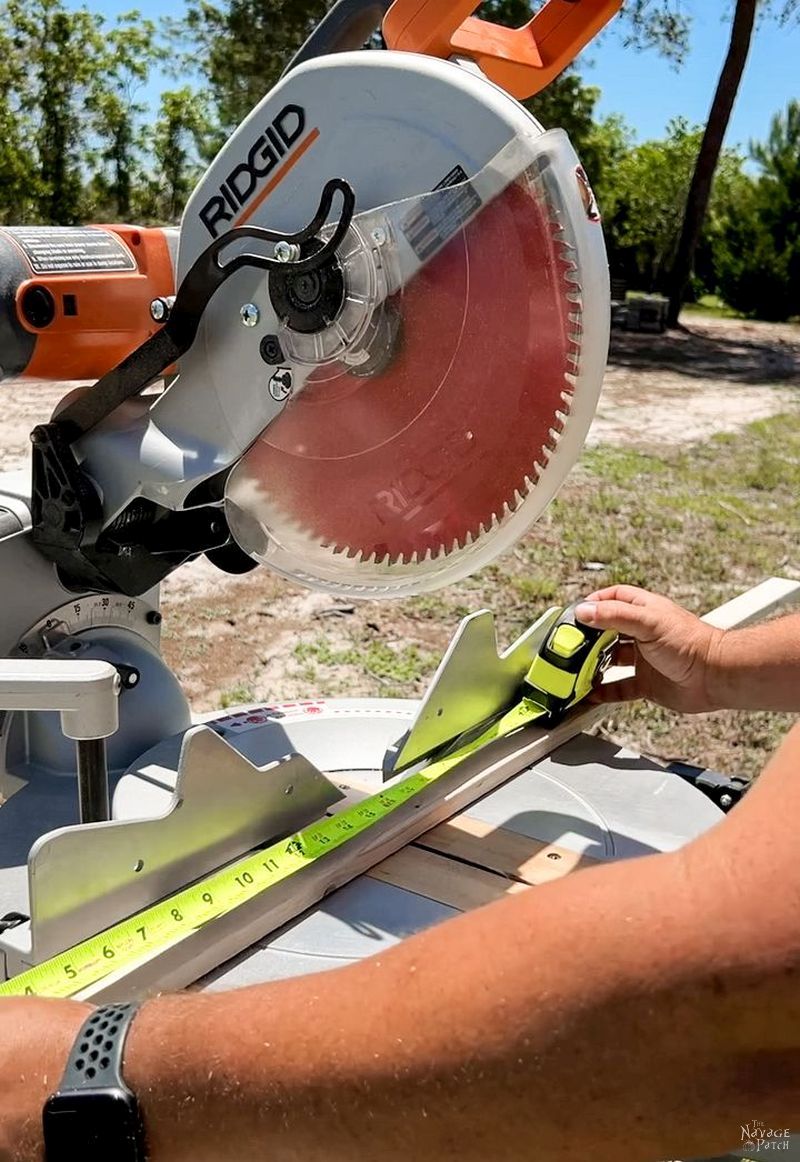
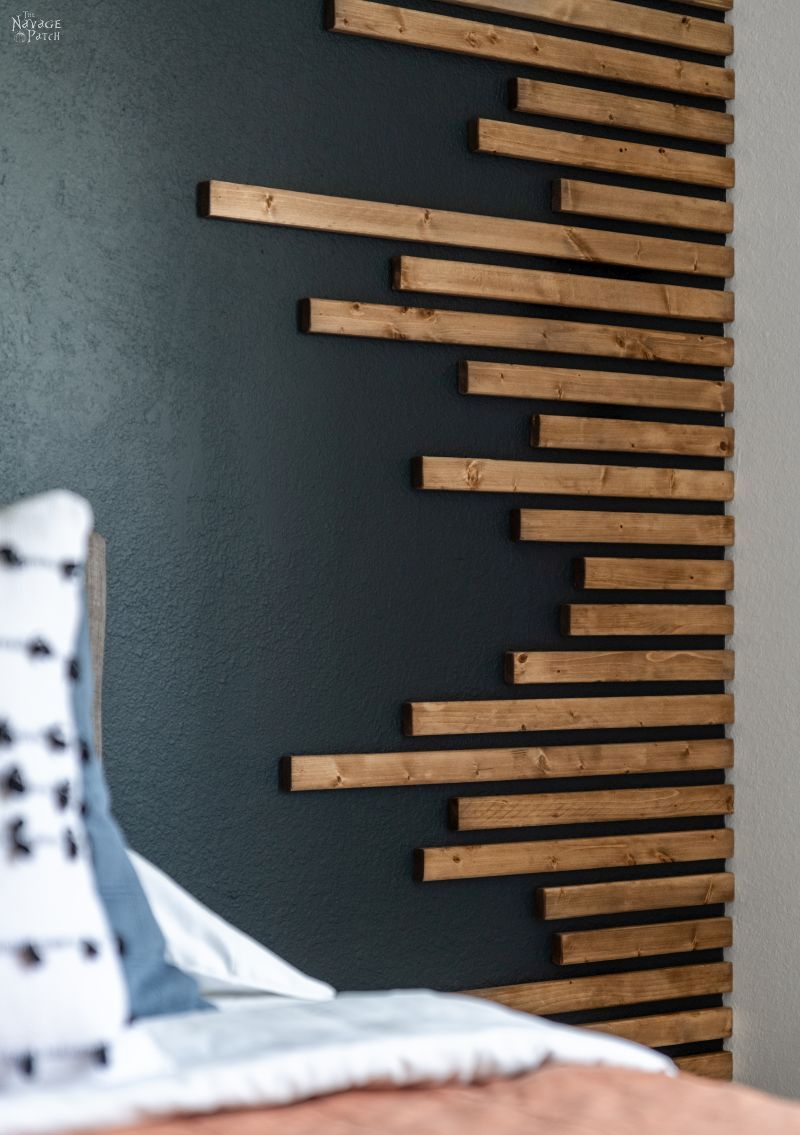
The idea was to cut a bunch of random lengths for the wall. We decided to range the pieces from 10 inches up to about 30 inches. I cut them with my power miter saw, but furring strips can be easily cut with an inexpensive miter box.
I’ve said it before, and I’ll say it again – I love working outside in the Florida sun!
Awesome Product Alert!
There are two tools I can’t get enough of: random orbit sanders (I think I have 8, including a square palm sander and 2 detail sanders) and tape measures. I don’t know what it is about tape measures, but when I feel the right one in the store (the right one has a certain heft and the tape pulls out just so…) I simply must have it. Doesn’t matter how many are at home – I must have it. Recently, I picked up a measure from a brand I’d never heard of – Komelon. It was the cheapest one in the store, but it had the heft, the tape slid in and out just so, and best of all, it had this totally rad self-locking tape, meaning the tape locks as you pull it out. No silly thumb levers to contend with! I bought it thinking it would make a good backup, but it has since become my go-to measure for almost everything around the house (and in the yard).
I measured and cut 44 pieces, varying their lengths between 10 and 30 inches.
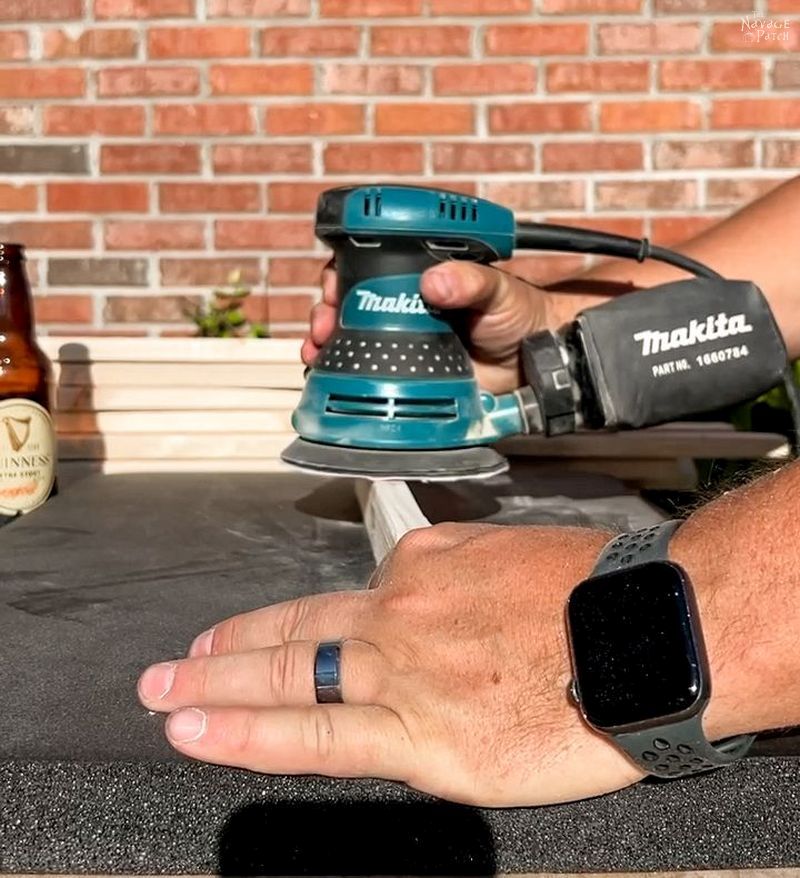
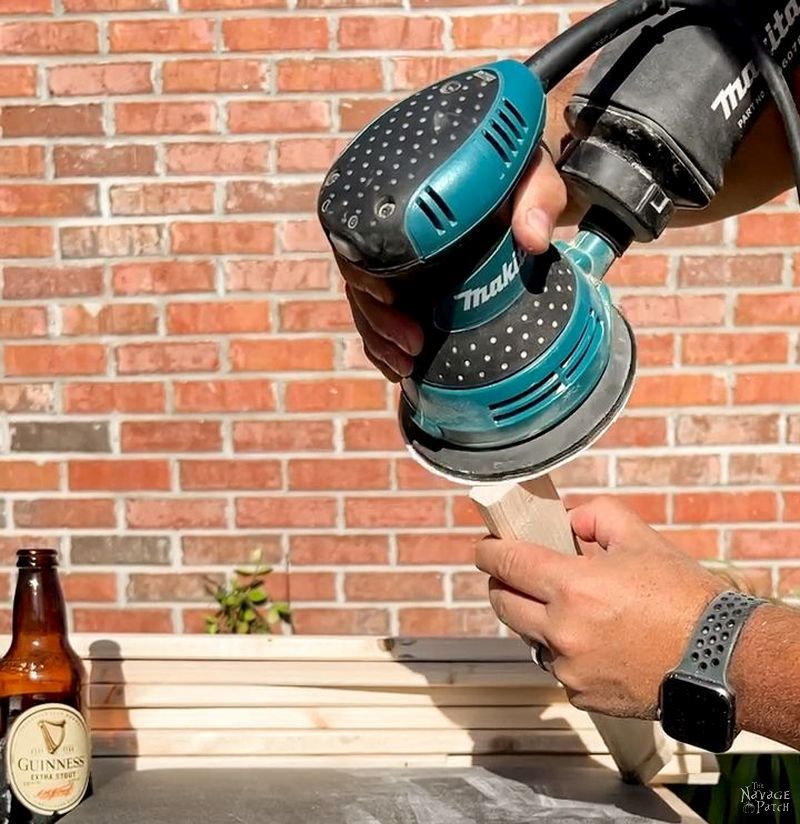
The furring strips have rounded edges, which we preferred to sharp edges, but since they can be a little rough, I still sanded each piece all over, except the side that would go against the wall.
I put a new rounded edge on the ends…
And since I already shamelessly plugged my favorite tape measure, I may as well tell you about my favorite random orbit sander – it’s my little Makita pictured above. You will not find a better and smoother random orbit sander for the money. There is only one sander I’ve owned that was smoother – it was a Bosch, and it was the smoothest. Unfortunately, after trying and returning 3 of them, I determined that they all suffered from the fatal flow of leaving excessive squiggly marks on wood. The Makita is only slightly less smooth, but the results are far better. I’m sure I’ll buy another Bosch one of these years to see if they fixed the problem, but until then, this little Makita has my heart. As a bonus, it’s also the lightest, and as I get older, that makes a big difference! More on that when we get to the brad nailing part of this project!
Okay, so pine does not stain evenly without a pre-conditioner applied first. My favorite pre-stain wood conditioner that is widely available is made by Varathane. You can find it in Home Depot for about $15. I don’t recommend buying it on Amazon, as their prices are outrageous. If you do need to order pre-stain from Amazon, I’d go with Minwax – it’s nearly as good as Varathane, and the price won’t put you in the soup line.
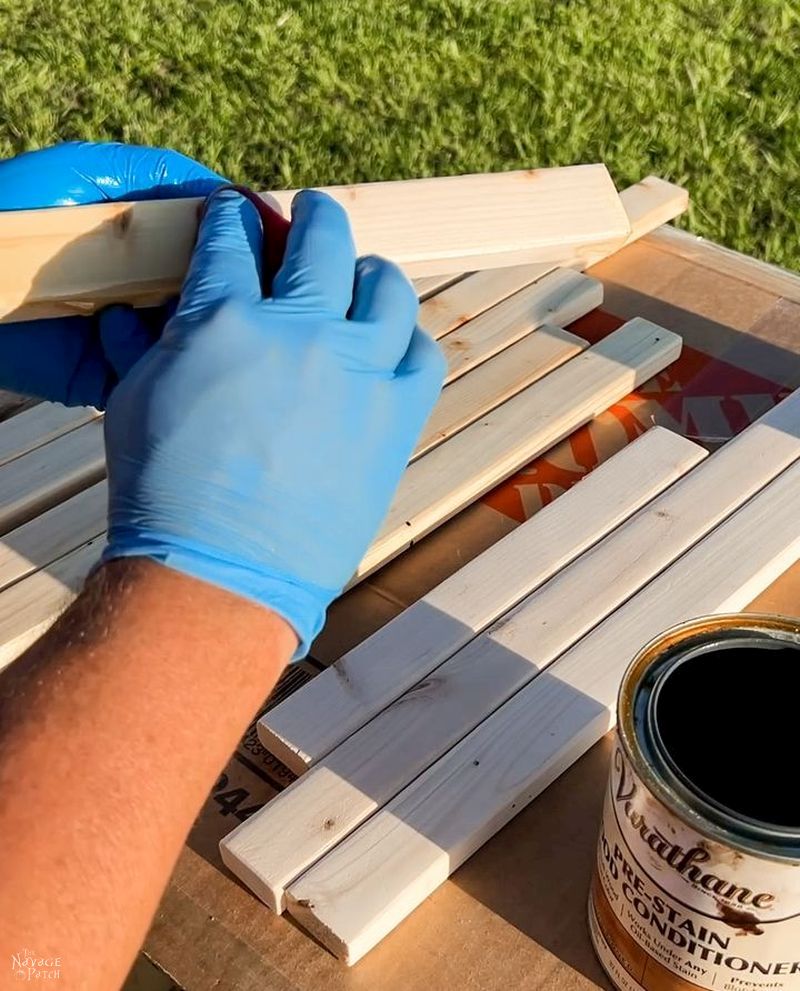
We wanted a color much lighter than our favorite – Minwax Special Walnut – so to get the lighter shade, I just applied MSW directly after wiping off the pre-stain. The wood was still saturated and not able to absorb as much stain.
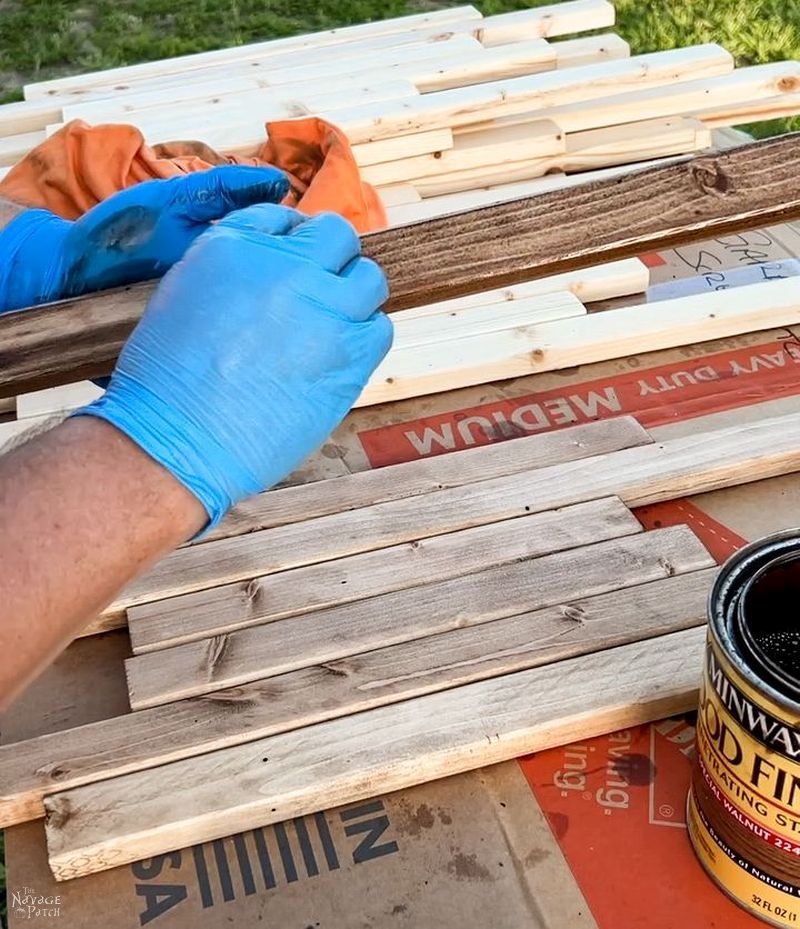
To prevent the stain from penetrating too much, I wiped the slats immediately after applying the stain.
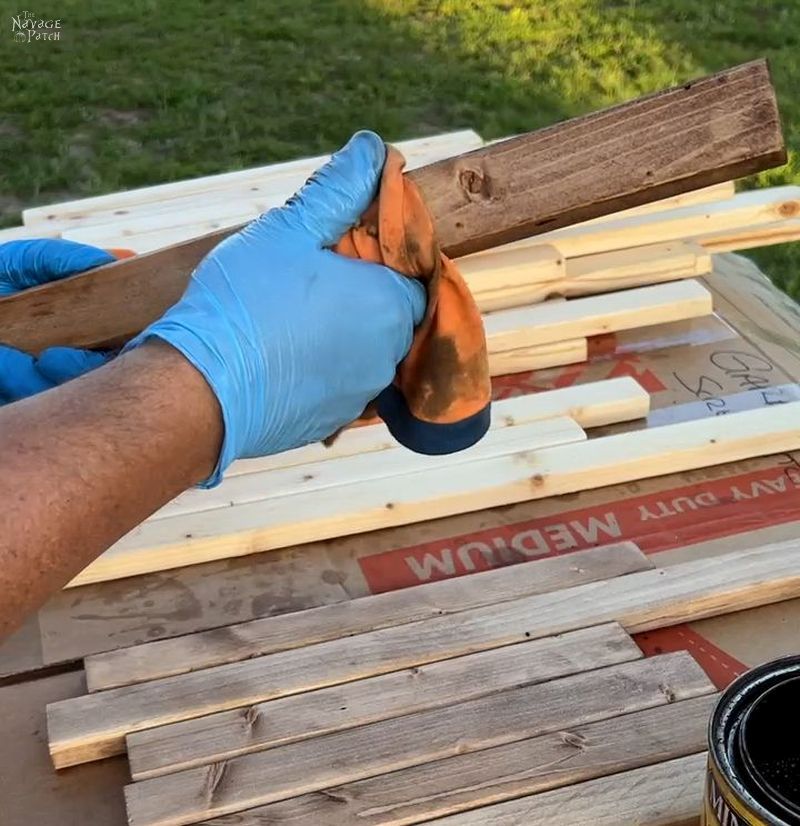
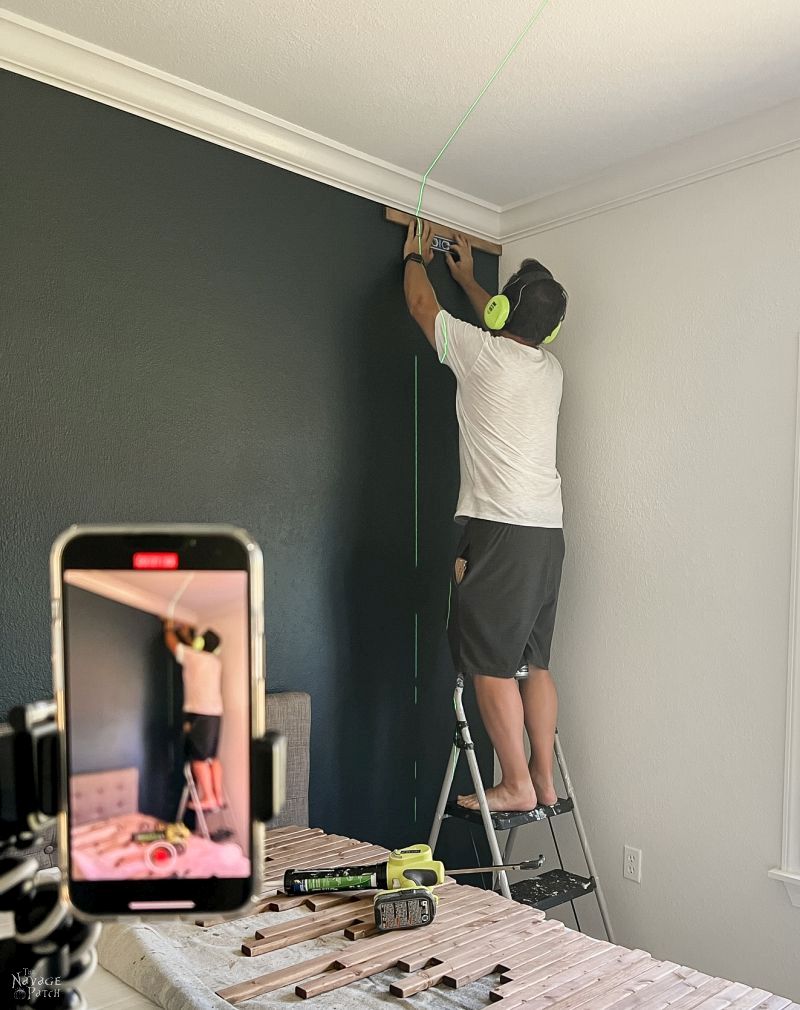
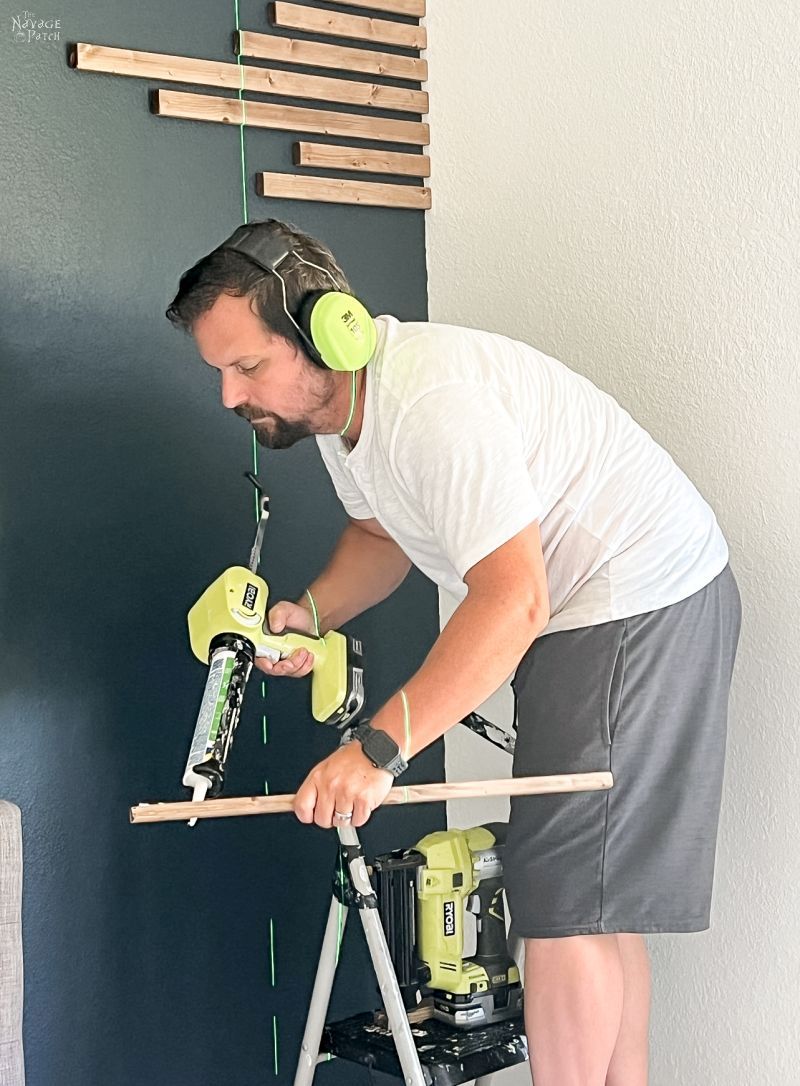
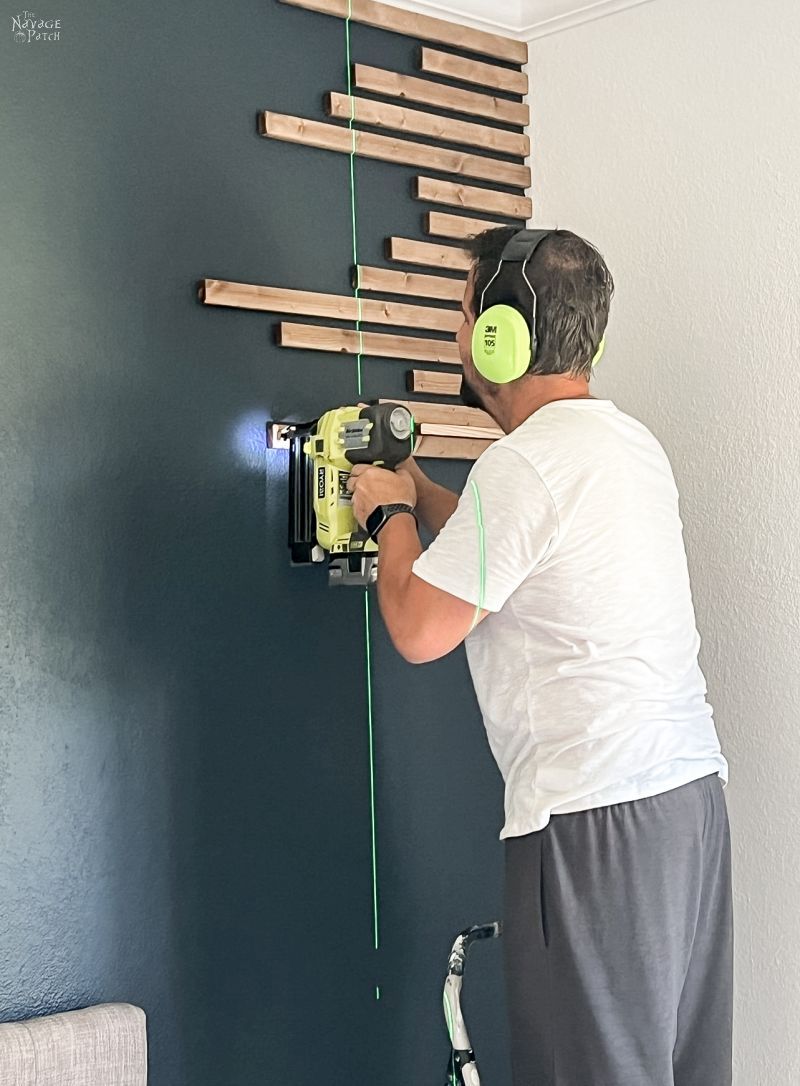
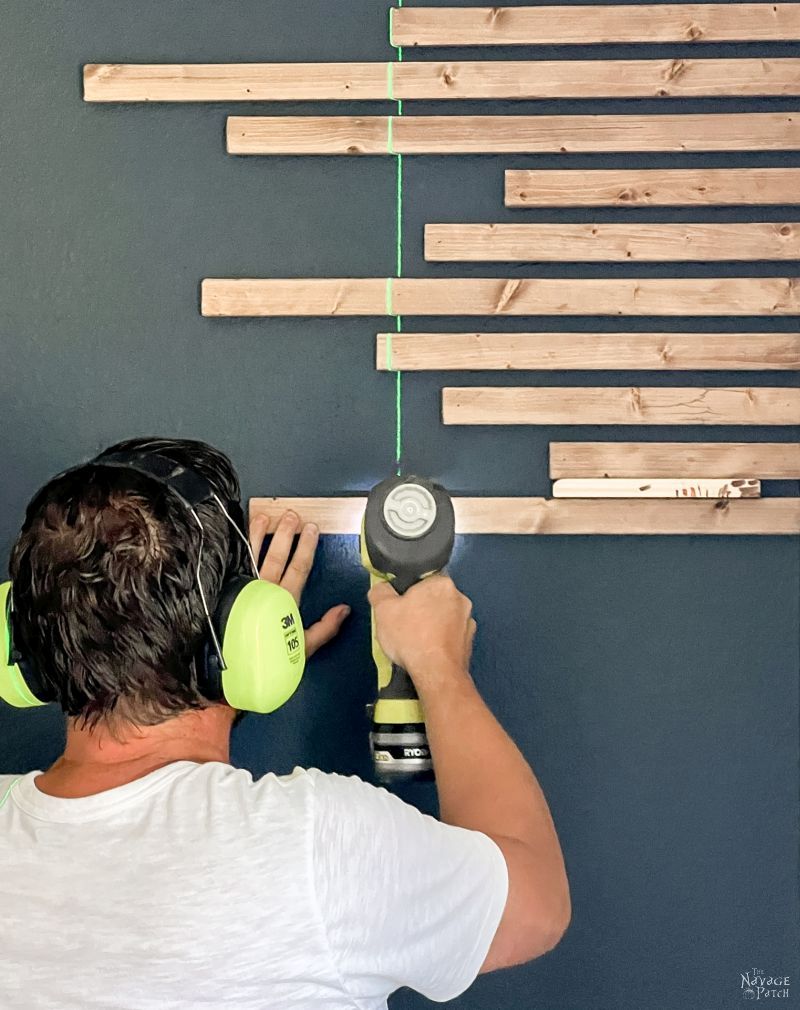
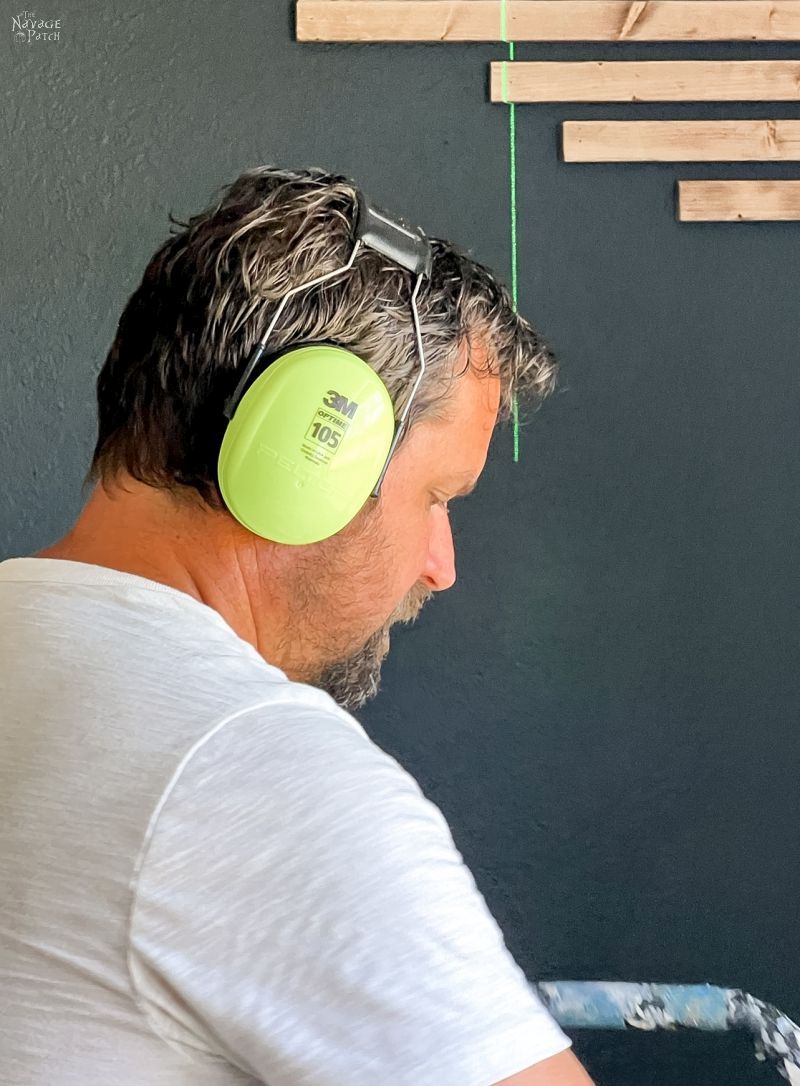
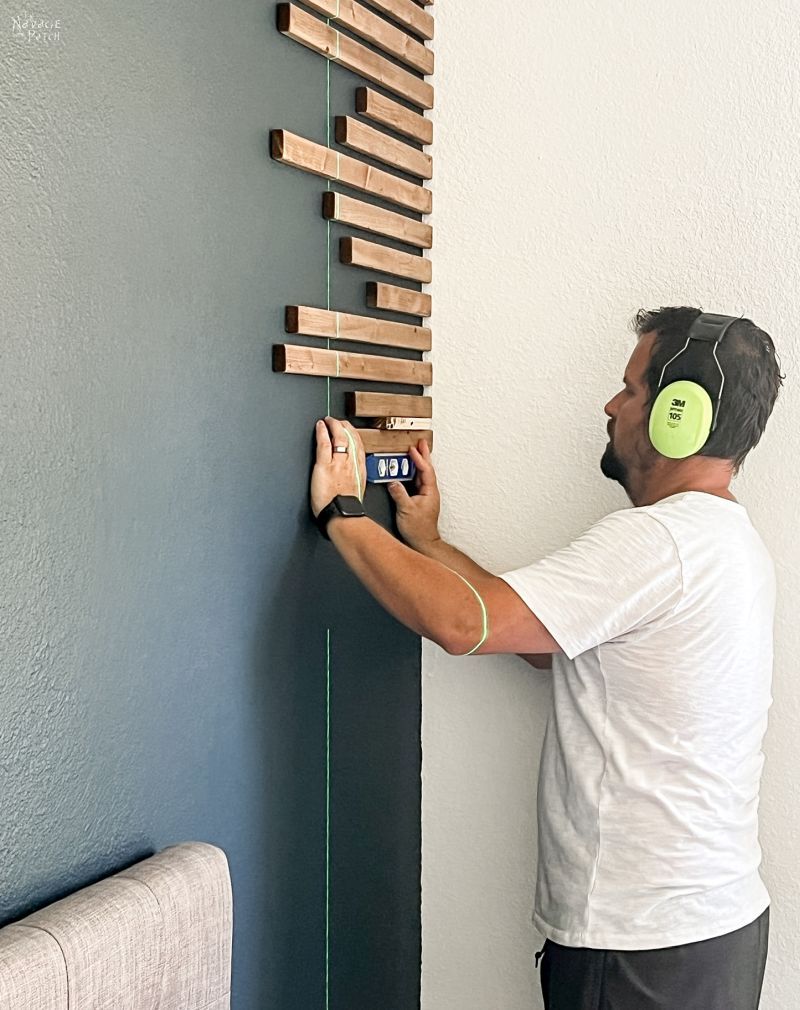
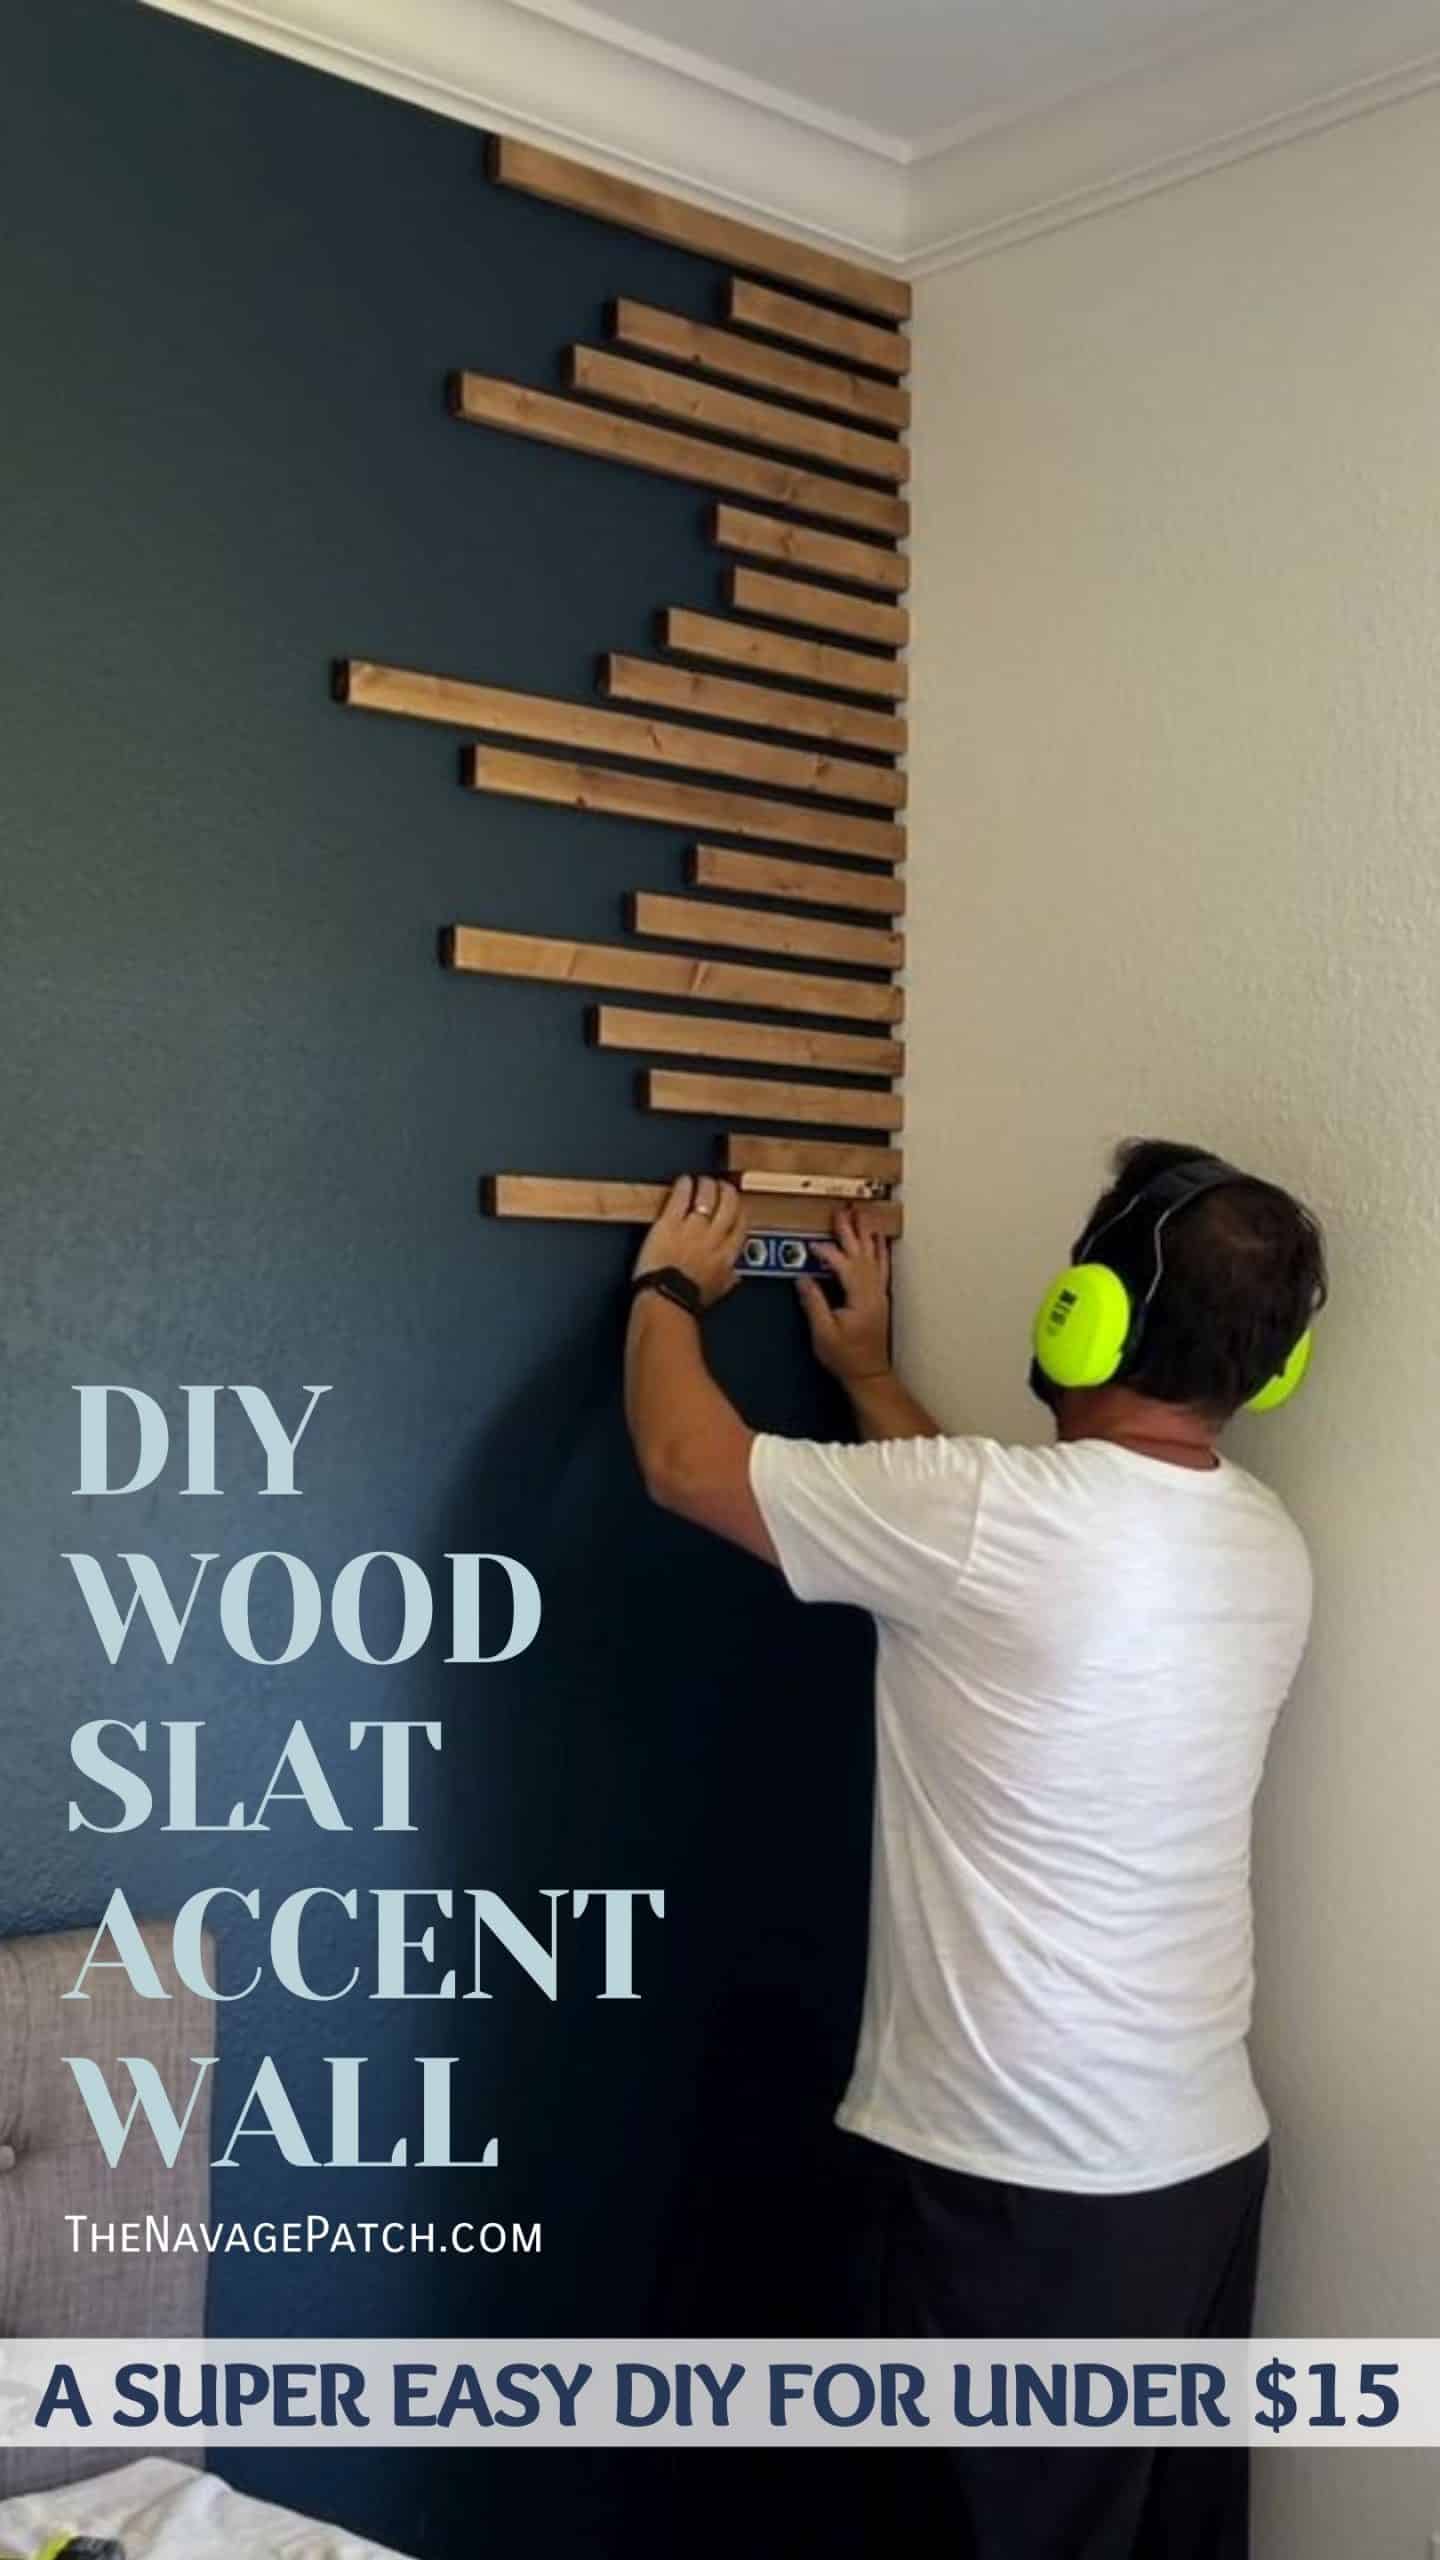
I set the stained pieces aside to dry overnight. The next day, I installed them. Since these slats are so light, we figured that 2 or 3 brad nails would be more than enough to keep them secured. I set up a laser level to mark the first stud. Whenever possible, I would shoot brads in the stud as well as the corner stud. Those slats shorter than 16 inches would be secured by a corner brad and one in the drywall – more than enough for how light they are.
I started at the top with a slat, a torpedo level and my brad nailer. As expected, the room wasn’t square, so I had to leave a tiny (but unnoticeable) gap between the left side of the slat and the crown molding.
Once I had the slat level, I shot the brads. I know you can see the gap in the photo below. It was my first board, and I must have had a nervous eye, because it wasn’t close to level when I checked it again after nailing it. Another great thing about brad nails – it was no problem pulling off the slat, removing the brads, and re-nailing it again when I had it properly leveled.
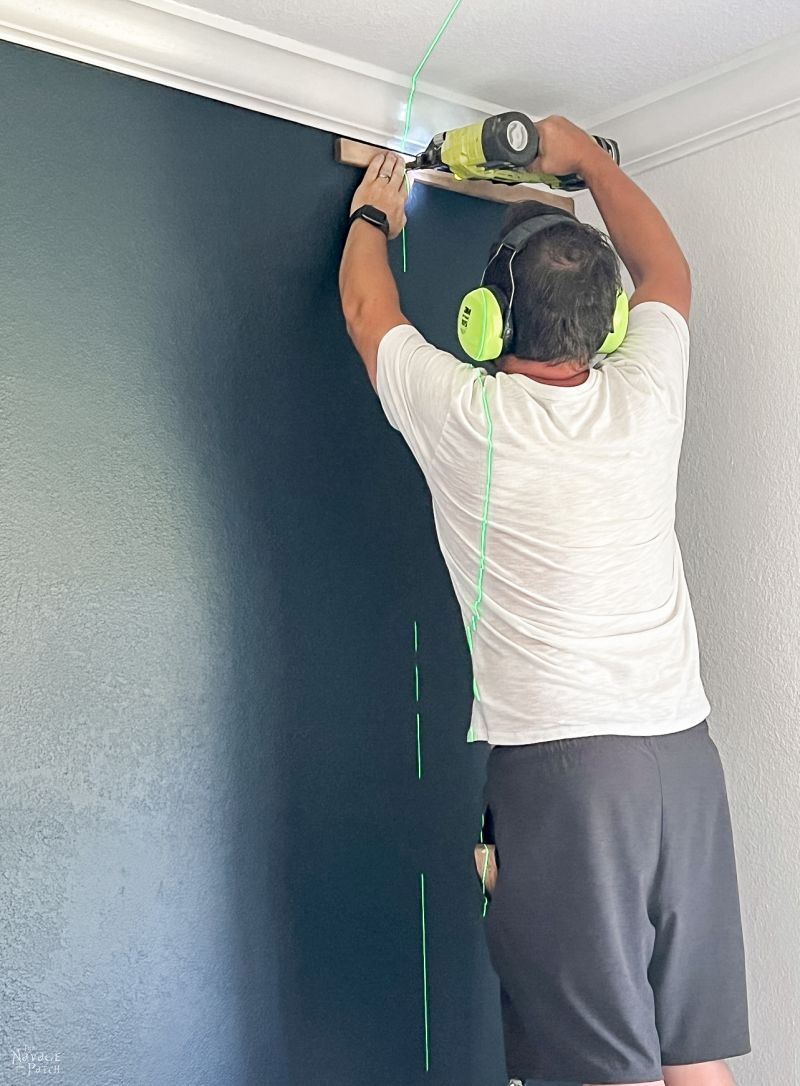
I used a spacer made from a scrap piece of 3/4-inch-thick edge-glued board. In the future I will make small shelves for the wood slat accent wall from the same board. Even though I used a spacer, I still checked the level of each new slat. A small error up top could magnify as I worked down the wall.
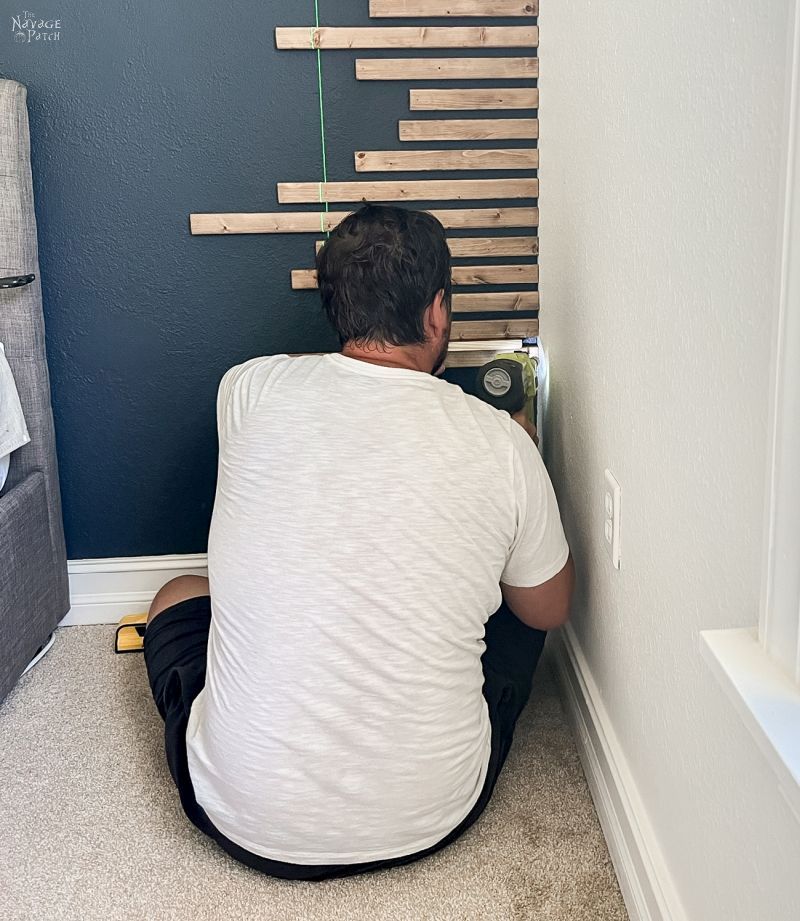
For the longer slats that stuck far past the 16-inch mark, I put a small dab of construction adhesive on their ends. I bought the cheapest and least-strong adhesive I could find. If we ever want to remove these slats, the small amount of adhesive won’t do much damage to the wall, if any. It might tear off a small layer of paper – an easy fix with spackle – or it may just peel off a bit of paint. Since this is Sherwin-Williams paint, I would hope that there would be no damage at all!
As I worked down the wall, I realized that I was getting too old to be power-lifting the Ryobi cordless brad nailer with the oversize battery. After this project, Handan and I went to Home Depot, and I finally joined the pneumatic revolution. I now have a beautiful and super lightweight DeWalt brad nailer and air compressor. [Ladies, this is the best hint I can give you: Get your babes the right tools, and he’ll love trying his new toys on the projects you want him to finish 😉 -Handan]
There’s really nothing to this project, and there are more complicated ways to install the slats, but brads and an occasional dab of glue works for us. No need to over-engineer things!
Get this man a shower and a shave!
Towards the bottom I took a seat and continued my work.
We miscalculated the number of slats we needed by one, so I quickly ran outside to make the final one from some leftover furring, not bothering to wait after stain.
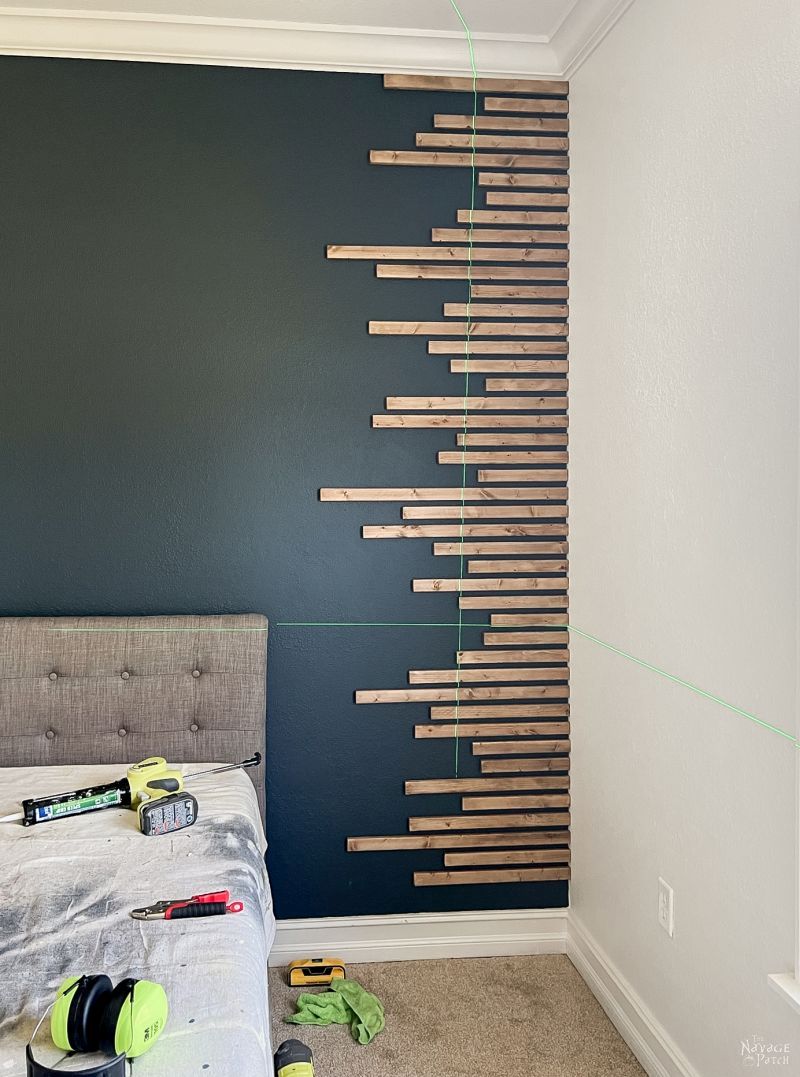
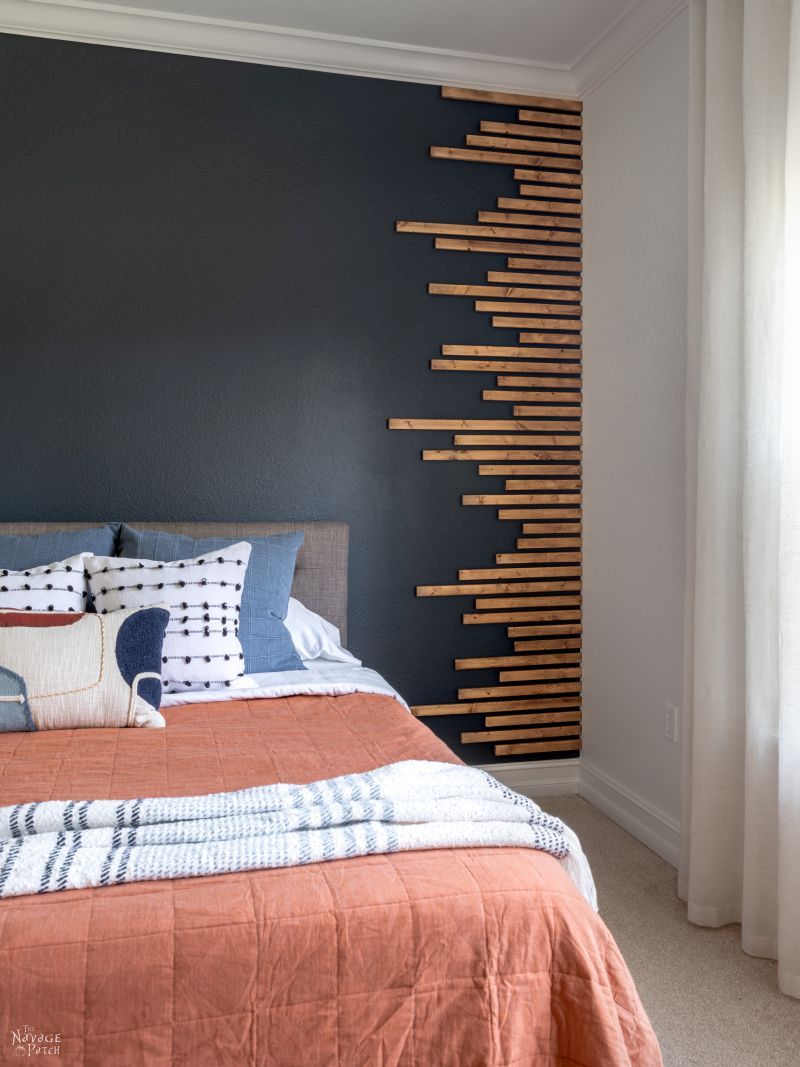
Baris’s new wood slat accent wall looks amazing. I never would have guessed that such a simple and inexpensive DIY could have such a big impact!

And we’re not finished! This space will fill with more great stuff as I plug along with Baris’s bedroom makeover.
Oh, and in case you’re wondering – he’s home now, and he loves the wood slat accent wall and the room so far!
Share it on Pinterest & Facebook!
It looks very cool for a young guy! My hang-up when considering decor like this is the upkeep–I must be getting old or lazy or both, lol. Will the furring be tricky to dust? I’m sure the sanding will help a lot.
No, they’ll be super easy, Kristi. The wood is smoooooth. Once-a-month dusting is all that will be needed!
Not gonna lie – I love the look of your accent wall and the wood slats, but my first thought was how much of a pain it would be to dust. 🙂 That thought was followed by thinking it could be a fun way to display little miniature figures. We may need to add some to our gaming room! And thanks to your clever writing, it looks pretty easy to do!
It’s totally easy, Melinda, and as for the dusting, I think once a month would be overkill (if I’m the one cleaning, lol)
Bonjour, puis je savoir sur quel mur les lattes ont été posées svp ? Est-ce possible pour un mur en placoplâtre ? Merci.
Hello, I installed the strips on drywall
I’ve leveraged the very well priced one-by woods for projects myself but we have to choose each piece carefully because they’re quite wonky. They’re also full of knots and gouges and I wind up using so much wood putty that it might have been cheaper to go up a grade. Must be socal thing. Your wall looks great and I always love reading your how to’s and tips!
I think it depends on when you get to the pile, Jennifer. A new shipment has tons of great wood in it. And I’ve noticed that overall here in Florida (granted in my limited experience), the furring strips are higher quality than I used to get up north. Maybe we get better wood because we’re closer to the mills? I don’t know. But yeah, sometimes you have to shop around for one by to get usable stuff.
I mean… it’s under $20 right up until you got the pneumatic brad nailer lol 😀
But really, this is gorgeous! My husband and I just bought our first house and now I’m getting ALL of the ideas from your blog. Muwahahahaha!
The best part is I’m more the handyman of the relationship so he rolls his eyes everytime I ask for a trip to Home Depot.
To be fair, I bought the pneumatic nailer after this project, so I don’t count the cost against it, lol! I’m happy to hear you’re using us as your inspo – but your hubs will start to hate me if you start roping him into the projects! 😀
That looks great! We did this exact same thing a couple of months ago on a small wall we have in our bedroom. It’s quick and easy and makes a statement. Love it! I wish I could post a pic of mine here to show you. Lol!
Awesome! Email it to me, Kate – greg@thenavagepatch.com
It would be really cool to slip in a bedside table between those slats! Love this idea!
We will be putting small shelves in some of the spaces, and he’ll have some custom bedside tables in front!
I agree, it would be cool to have a floating half circle with the same wood stain in between the bed.
I LOVE that wall!!!!! The color and the wood just are amazing together!! You did an awesome job. Thanks for the inspiration……now if I can only inspire my better half 😉 lol
Thank you, Katherine! Dump a few furring strips on the sofa – he’ll get the hint, lol!
Puis-je vous demander c’est quoi des bandes de fourrure s’il vous plaît ?
Les bandes de fourrure sont des planches de 2,5 cm x 5 cm x 2,5 m
Terrific job, Greg! I’m pretty sure Baris couldn’t help but appreciate any project you did for him with such obvious love, right?
Thank you for showing us another inspiring project. As a confirmed troglodyte I’ve been tempted to take on adding a square grid to one of my walls. You’ve made those furring strips look very decorative. I’m beginning to feel less afraid of failing; as you say, the brad holes would be easy to cover up if the project isn’t going as smoothly as I hope.
All the best to you & your family.
Yes! Never fear failure, Debra – it’s part of DIY, and there’s no getting around it. Everyone one of fails – I sure do it a lot. As bloggers, we do share our failures, but I know on IG it can seem like everyone’s perfect. Don’t fall for that baloney! Just try – anything! There’s almost nothing that can’t be fixed if things go wrong. Have fun! 😀
Beautiful! The wall looks so chic, & it’s something I can envision doing in our house. The clean-freak in me (I tend to be a bit OCD), however, imagines the painstaking chore of dusting the tops of all of the slats!
Bah! Dust Shmust! It won’t be so hard to clean – besides, stained wood hides dust pretty well, lol!
what is the gap size between the slats?
3/4 inch 👊
Hey Greg, Hayden & Baris!! 1st let me say “Congrats” Baris on the 1st GREAT year at College!! Keep up the great job and let NOTHING or NO ONE stand in your way of your dreams!!! I know you’re making your parents extremely proud!! The blog post about the upcoming redo on his room was a heart wrench because I could feel how proud your Dad is for you!! You have many of us praying and rooting for you!!!
2nd I’ve written a few emails to you about how funny you make your post & like before Greg, you NEVER cease to crack me up at some point reading the blog!! Y’all seriously are one of my most favorite to read! Always such great inspiration, very well explained & just a joy to read!! It’s as tho we’re there and just having a normal everyday talk!! Lordy it would be a hilarious of a good time to actually be there doing DIY’S with y’all bc we’d all be sore from laughing!! Love your sense of humor!! Love the wall! The furring strips are such an awesome cheap alternative! The price of wood today is ridiculous and shocking everytime I walk into the stores! Just got to add that for those asking about the dusting it isn’t a problem bc you sand them smooth! No harder than regular baseboard or chair molding!! Just the usual wiping or run a vacuum brush over it will take care of it. I’ve used furring strips before as chair rail molding and beveled them to use as window molding yrs ago when I was just starting out and couldn’t afford better even way back then!! Hahaha sorry for a book here!! As always don’t stop what y’all are doing & keep the laughter coming!!!
Blessings & Friendship,
Erica
Thank you for this beautiful comment, Erica – you really made our day! Be careful what you wish for though – if you showed up to help us out, I’d likely hand over my tools, tip my hat and kick back for a nap! LOL! Thanks again for writing! 🙂
Looks really good. Makes a huge difference to the wall — and the room in general. It’s next to impossible to find firring strips that are even CLOSE to straight. You did a great job! Thanks for sharing another DIY project.
I’ve found great furring strips down here in Florida, Michael, but anywhere you are, the key is to land on them when they open a new shipment!
Sounds good. And, sounds like I need to learn how to spell “furring”. LOL! 🤣
Wow, this wall is almost as cool as your writing style. When you first wrote about it, I showed it to my son whom was adamant that it was just the thing that would make his new room perfect.My only concern is that you explained everything so well that I now have no reason to not give it a try 😉
LOL, go for it and post the finished product on IG and tag us!
I really thought I wouldn’t like this wall, but surprisingly, I think it’s great. Love the Sea Serpent paint as well.
It’s surprisingly beautiful! 🙂
They look great! What size are these slats?
I used 1×2 furring strips to make those. The lengths vary from 10-30 inches.
Wow I love this project. Will try in my living room/dining room/kitchen (open area :)).
Greetings from Germany
Thank you, Deni! Good luck, and please send me a picture when you’re done!
My partner and I were obsessed with this and re-created it in our new apartment.
We are in LOVE! Wish I could share a picture here.
Thank you for sharing this great idea! 😍
Thank you! Send a pic to greg@thenavagepatch.com! Or if you’re in IG, post a pic or video and tag us! 🙂
Oh! I can see a nice climbing plant going right up those slats.
Oh yeah, that would be great!