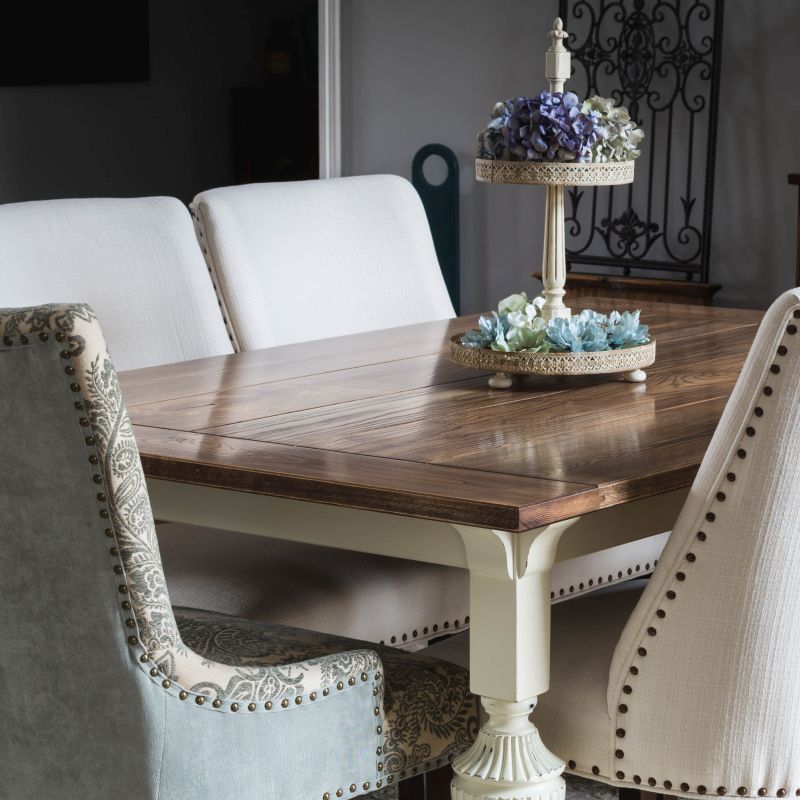
Farmhouse Dining Table with Gothic Revival Legs
I then extended that small line across the length of the table end. I did the same process on the edge of the end boards. But in my haste and excitement, I pulled the router away from one of the end boards while it was still spinning. This caused some damage, and may have led to some screaming.

Here’s how my mistake looked when the two boards were together.

I texted this picture to Handan and proclaimed that I had ruined the whole project. I was feeling angry and a little melodramatic.
She told me to stop being an idiot and that no one would notice it. I knew better, but then I realized it was a pretty easy fix with some wood filler. Crisis averted!
I glued the spline into the groove on the table side and then attached the end board with glue. I hammered it into place with a rubber mallet and then used ratchet straps for compression. Ratchet straps are a great way to keep large or awkwardly-shaped pieces together for a glue-up. The clamps on the ends are there to ensure the tension from the straps doesn’t pull the end boards upward.

When the glue dried and the straps were off, I checked my work. Everything looked pretty good, but there were a few gaps on the bottom of the table.

Instead of wood filler, which never looks good with stain, I wanted to try something new. I had recently learned a new technique for filling wood that uses the sawdust from the project you’re working on and shellac.

I heaped some sawdust into my little mixing bowl…

Then I spooned in some shellac…

And mixed it until it became a spreadable paste.

I used a splinter of scrap wood as a spatula to spread the mixture into the gap.


I let it dry, and then I sanded it smooth.

A perfect fill!

Once I had all the gaps closed, I stained the bottom with Minwax Weathered Oak and sealed it with two coats of polyurethane. Once that had cured, I started working on the legs and the apron. But to keep all the tabletop work in this section, I’m going to skip ahead to how I finished the top. We’ll take a look at the legs in the next section.
Our original plan was to stain the table only with Minwax Weathered Oak. It doesn’t give a lot of color, but it adds incredible depth and pops any latent colors in the wood. Before I stained, I sanded the whole top with 150 and 220 grits by hand. It’s nearly impossible to prevent swirl marks with a random orbital sander, and I didn’t want to risk it. Even if you don’t see any swirl marks with your naked eye, they have a way of popping out with the first coat of stain or the first coat of finish. Even with hand sanding, I found small areas of imperfectly-sanded wood only after I had applied polyurethane. Finishing is the biggest pain in the butt!
Okay, on to the staining. I applied the first coat of Weathered Oak.

Stain on. Wipe off.

It was a beautiful color, but we wanted something a little darker. I knew going darker would obliterate much of the beautiful grain and subtle colors, but we had to do it. We chose Varathane Kona to darken it up. I applied it only a few minutes after the Weathered Oak, so the table wouldn’t absorb as much. I also applied it sparingly with a rag while Handan worked behind me, wiping it off after only a few seconds.

Varathane Kona gives the purest brown I’ve ever seen in a stain. But as soon as I finished staining, I started to notice an odd and curious and terrifying thing.

Little splotches.

Everywhere.

Now, you may be thinking, did you use pre-stain conditioner?
No, I didn’t. But! But neither did I use it on the flip side, and it was fine. And the Weathered Oak that was already on there would act as a conditioner anyway. So it was a real mystery where these dark splotches were coming from. I found it equally strange that they appeared both in the softer (white) parts of the wood, and in the most dense parts (the knots).

I stared at the table in disgust while a vile geyser of vituperative language erupted from my mouth. At that moment, in every port on Earth, sailors covered their ears in shame.
Handan waded into my invective stream and tried to cut it short with some kind words.
“It looks okay my babes. You don’t really notice it.”
My fury turned towards her. “I NOTICE IT!”
With one last eruptive gout of foul language and anguish, my anger was extinguished. The candle that burns twice as bright burns half as long. And I had burned so very very bright.
I stared down at the wretched thing before me. My misery. My failure. My monster. At that moment, I felt a keen kinship with Victor Frankenstein, as I looked upon that which should have been divine, but was instead a freakish mockery.
Those spots.
Those damnable spots.
And then, like the Phoenix rising from its own ashes, ideas blossomed in the scorched earth of my mind.
Sand out the spots.
Sand even more to create a “distress inversion,” or light showing under dark.
Re-stain with Weathered Oak to refill some of the distress inversions.
It just might work.
It would work, dammit!
“Woman! Bring me my sandpaper!”
Handan just laughed at me, so I got my own sandpaper.
A couple of hours and a few bags of sweat later, I had the table just where I wanted it. I had sanded out all of the spots, added some more areas of distress inversion, and lightened the tone on the entire table. Here’s how it looked after sanding, but before re-staining.

Now, you may be scrolling back and forth between the two pictures and saying to yourself, that Greg is so full of baloney! I don’t see that much difference between the two pictures!
Madam, I went through about 40 quarter sheets of sandpaper, and worked until my hands cramped into gnarled and twisted fists of pain. Removing stain by hand with 220 grit sandpaper is donkey work!
Anyway, madam, let’s get back to the issue at hand, shall we?
The sanded table looked good, but I wanted to darken those white areas just a bit. I was hoping that Weathered Oak wouldn’t disappoint. It really is a miracle stain.

It added back just the right amount of warmth. I loved it.
I let the stain dry for a couple of days, and then I started the finishing process.
Because I didn’t use any pore filler, and because there were both dense, knotty areas and softer, white areas, I wanted to go for a thinner wipe-on poly instead of a thicker brush-on poly. Since wipe-on polyurethane is simply regular poly (satin or gloss) mixed with mineral spirits, I decided to mix my own. It’s much cheaper that way, and you can control how thick or thin you want the poly to be when you apply it. I mixed three parts Minwax Satin Polyurethane with one part mineral spirits and applied it to the table with a folded cotton rag. I like to use old white cotton t-shirts for this.
Here’s how it looked wet, just after I applied it.

And here’s how it looked when dry.

I applied a total of four coats, and after the first, second and third coats, I rubbed the table with 0000 steel wool, applying medium pressure.


After the fourth and final coat, I sanded with 2000 grit sandpaper, applying only finger pressure. This was just to remove any dust spots or tiny raised areas.
Okay, that’s about it for the tabletop. Let’s get back to those legs!
Part 3 – The Legs
The legs posed an interesting challenge. Our original plan was to keep them as-is and incorporate them into the new design. We found out pretty quickly that that wouldn’t work out as planned. I had removed the legs in two pieces from the original table. You can see the two pieces in the picture below. Each piece has two legs, a curved crossbar support and a spacer support piece along the top (or bottom in the picture, as the table is upside down).

I had been messing around with how much more wood I’d have to add to get the table to the correct height (I was aiming for 29 inches – right in the middle of the recommended 28-30 inches). While I was doing this, Handan came down to have a look. She immediately saw what I did not: with those curved crossbars, the only way we’d be able to fit 6 chairs around the table would be if they were so far towards the ends that the heads of the table would have their feet resting on the crossbars. If we moved the legs in from the ends, then we’d only be able to fit 4 chairs. This was a major roadblock, and Handan wasn’t entirely thrilled with me at that moment for not accounting for this in my plan. The reason these legs worked with the original table is that the original table was much wider than the one I was building, so the legs were tucked far underneath the table no matter where you sat.
We tried all sorts of positions, but nothing worked. My only solution was to break down the legs even further. If we got rid of the curved crossbar and the top support, then we could position the legs wherever we wanted, say, at the corners. I reminded Handan that this was, in fact, supposed to be a “farmhousey” table, and farmhouse tables usually had their legs at the corners.
Handan agreed, and I set my attentions to demolishing our antique even more. Hehehehe. A rubber mallet made quick work of the corbels.

My bulging, chiseled muscles made mincemeat of the curved crossbars.

And my chisel helped persuade the last few recalcitrant corbels that refused to abandon their posts.

Handan declared the operation a success and celebrated with a fist pump…

…and by flipping me the bird, UK style, LOL!

We may squabble and bitch from time to time, but we always have fun. She’s my babes!
Click on “Next” to continue.
OMG! I was laughing so hard throughout this post. You are FUNNY!
Great job on the table. As always, very entertaining. .
😀 Thank you, Revital!
That is a beautiful table. Very well done. Love the chairs too.
You are such a talented writer! Great post. Very entertaining and informative. What a combo.
Thank you so much, Amy! 🙂
Your table turned out beautifully and I love, love, love the chairs you put with it. It’s more country chic! I have to ask where you learned your woodworking skills. I have none and would have nailed the boards together thinking glue wouldn’t be enough! I envy your and Handan’s skills! You should put out a how-to blog for dummies like me!
Thank you so much, Giselle! I learned all my skills through trial and error, YouTube and reading random stuff on the web. Trust me, I had no skills at all when we moved into this house 4 years ago!
Wowza, great storytelling and a gorgeous ending to the Table saga. Well done ?
Thank you so much, Jacqui! 😀
That project turned out gorgeous! What a great way to save beautiful legs from an old table. The entire project is to die for. Love the chairs too!
Thank you, Dawn! I appreciate that very much! 🙂
Gorgeous! What a beautiful table, the finish turned out beautifully. And those chairs….great choice! Handan is right, those little rings on the back really make them special! Perfect match.
Thank you, Claudine! Yep, Handan has a great eye for those kinds of things! 🙂
Great job. I felt your pain with those dark spots.
Love the chairs, too.
As a Brit I find how you measure in inches in the US so, so difficult. aarghh 55 1/16″ – 5 3/8″ Ever thought of going ‘metric’?? So much easier, believe me.
Thank you, Di! Lol, Handan wishes we’d go metric, too. I wouldn’t mind a bit, but until then, the Imperial system doesn’t bother me, either 🙂
BEE-YOU-TEE-FULL work! You have much talent for woodwork as well as writing! Thanks for sharing your efforts! The Dining Room is a stunner.
Thank you, Linda! We are thrilled with the table and with the dining room makeover! 🙂
GORgeous! You tackled a big job and it turned out great. I would have given up a long time ago.
Thank you, Jeanine! I would have given up, too…but Handan would never let me, lol! 😀
WOW!!! WOW WOW WOW!!! It’s fabulous!!!!
Thank you, Derry!
Absolutely beautiful. I did notice the feet are straight on instead of facing the corner of your beautiful tabletop, as they originally did. It looked odd to me so l compared them to your original photos. Any reason why? Great job!
Good eye, Hilary! Yes, there is a reason. If we had the legs facing out from the corners, it would have been impossible to attach them securely to the apron. We decided that facing out towards the ends of the table looked good enough, so we ran with it! 🙂
BEAUTIFUL!!!!! You and Handan made a gorgeous table. That table was special in its time, but you two created something you can be proud of every time you walk by it. I Love it.
Thank you so much, Cheryl! I am so proud of it every time I see it!
The table is gorgeous! Absolutely worth all the blood, sweat and tears! Simply stunning! I am going to have to try both wipe on poly and bondo!
Thank you, Barb! You will love both of those products!
Oh my freaking gawd! I can’t believe it! You have the exact same chair as I do! The green one with the arched back, in the basement. Mind you mine is in the storage shed waiting for a makeover.
Anyways, what a fantastic mammoth effort you did! I can feel the torment of perfectionism!
I love the way you are real and miss bits of the job. All comes good in the end though, hey!
One point; I notice you didn’t use biscuits joiners to join the table, just curious as to why?
Fantastic post and fantastic photos.
Well done!
Great minds think alike, Aletheia! I have four of those chairs that I bought along with a kitchen table back in 1995. It was my first adult furniture purchase! Regarding biscuits – they are not necessary when gluing pieces along the edge grain. A good quality wood glue (like the Titebond III that I use) will give a joint that is actually stronger than the surrounding wood. Things get wonky with end-grain, though. The side grain of the end boards attaches to the end grain of the main table. That is not an ideal joint. Furthermore, there is more stress on that joint than any other on the table. Because of this, I used a spline joint. You can think of a spine as a biscuit that runs the length of the joint. One last note: though biscuits are not needed with edge glue-ups, they can help keep the boards in alignment during clamping. The ash that I used was very dense and rather thick, so I’m wondering if a biscuit would have helped or hurt with my warping problem. If I could have applied enough pressure to straighten the boards and get those biscuits locked, it may have helped a lot. But if I couldn’t get the board straightened enough, then I’d lose my chance at gluing them together. I think for thinner, softer boards like pine, using biscuits might help if some of the boards aren’t perfectly straight. They may also help for those who don’t have clamps.
Amazing work! You guys make a great team.
Thank you, Barbara! We think so too 🙂
I’ m exhausted…I read it TWICE!! First for me and then my hubbie heard me chortling away…and I read it…again to him. He, too, is a “woodworker” and I’m a little bit “Handan.” The table is so “farmish”…it is gorgeous! KUDOS!! (one of those exclamations was from my hubbie.) franki
LOL, thank you, Franki! I’m so happy you guys liked the post 🙂
That table is simply gorgeous! GORGEOUS! I just hope your amazing restoration/makeover will be a sort of inspiration for my hubby, we have 2 more or less “antique” tables waiting for some mercy in our garage…
Thank you so much, Maigwen! If your husband gets inspired, please send us some before & after pictures to greg@thenavagepatch.com.
Oh my goodness! I absolutely love how the table turned out! Is just breathtaking! Plus I read the whole thing and I just love everything in there I definitely laughed out loud a few times!! Hehehe GREAT JOB!!
Thank you very much, Kristy!
Beautiful! What type of brush did you use for the legs? I’m refinishing an ornate piece and am daunted by the details.
Hi Heidi, I usually keep a set of cheap artist brushes handy, and I use them with the ornate pieces, such as these table legs. They sell similar ones also at Michaels, and they end up being cheaper than the ones on Amazon if you use a coupon.
Here is the one I get from Amazon: https://amzn.to/2P040P6.
And here is the one I get from Michaels: https://fave.co/2o4TieB
The table turned out amazing! I was laughing so hard at your commentary throughout the post! I started reading from the failed table attempt post (I feel your pain there). That was SO MUCH hard work! You did a wonderful job. Now I understand why custom tables cost so much HA! I’ll definitely be back to read more about your projects!
Thank you so much, Katt! Oh, what a pain in the ass this project was, but it was worth it in the end! 🙂
Beautiful work on this table! I fretted a bit when you took the corbels off the legs and was so happy to see that you were able to incorporate them into the new design! All my projects have issues, too and there have been many times where cursing has ensued. I am enjoying your blog – loved the adventure stories – you could make those into a book!
Hi Jeanne, thank you so much! I don’t think I’ve completed a single project without some sort of issue or problem. DIY is life, and we figure it out as we go. That means a lot of mistakes and a lot of learning!
I found your blog a few months ago and just have to say, your writing is amazing and the projects incredible!! I literally spit coffee out from bursting into laughter on the horse hair brush comparison.
The table is gorgeous!! Kudos in buckets!!!
I come up with all sorts of projects and let my “babes” in on the plans with “…so, hon, I was thinking…”, at which point hubbie says, “…and I’ll be doing”. We’ve read lots of your posts to prepare with “our” projects…thank you!
Welcome, Andrea! I’m happy to hear that I’ve not only entertained you but have also given some good advice. Good luck with your projects! 🙂
Wow!! I am so impressed with your perfectionist woodworking skills. And your hilarious storytelling abilities got me hooked. What a terrific
team you and Handan are. I do a little furniture refurbishing and I learned a ton from watching this tutorial. I am definitely a fan.
Thank you so much, Barbara! Handan and I are happy to have you along on our adventure! 🙂
Well, I’m a little late to the party but had to comment anyway. I read through the previous nightmare that you had with the original table and honestly, I would have loved it the way it was, horse hair and all. And I nearly cried when I read you were going to use just the legs for another project. But, that said, the final result was just BRILLIANT and I love it so so very much. Far more than the original table. This was truly what I would consider my magnum opus but I know you have many of these types of projects under your belt so you may not agree. I think the spots on it WERE your tears, lol. But you worked it out and I believe it was serendipity. It truly was better BECAUSE of the mistakes and disappointments. This is a lesson in the greatness of perseverance and determination. GREAT job. Just amazing.
That was one heck of a project, Tracy, and I don’t know if I’ll ever make another furniture piece as complicated. Time seems more scarce these days. But I still have the memory of that build, and more importantly, we’re still using the table in our Florida dining room!
That is a table meant to be used for a lifetime and passed on to future generations. I would leave a detailed description of the hell you went through to get it done, and tape it to the bottom of the table, lest someone not appreciate what went into it. I wanted to post some of the things that made me laugh out loud but there were so many, why bore you with your own material? lol It truly was a great read, an amazing job and I felt like I was on this adventure with you. I can appreciate a job well done and this really qualified. Thanks again.
Hi Tracy, thank you for this lovely comment! I love your idea about passing it down with a note. I just may do that! I’ll print out the blog post, seal it in a ziplock and tape it to the bottom! 😂😂😂