How to Easily Create a Gallery Wall and Free Botanical Printables
Take the pain and frustration out of hanging frames for a gallery wall with this foolproof method for getting level and evenly-spaced frames every time! When you’ve finished hanging your frames, you can fill your gallery wall with our free vintage botanical printables!
Until recently, one of the most dreaded commands from The Commandant my dear wife was “Babes, let’s hang these picture frames. I want to make a gallery wall.” Oh, the humanity! The horror! The endless fiddling with levels and tape measures and hammers and nails and drills and screws and drywall anchors! The yelling, the cursing, and the frustration! And finally, after the last tear is shed, looking at the frames on the gallery wall and seeing that THEY AREN’T EVEN STRAIGHT! GAAAAAHHHHHHH!!!!
I came to loathe the term “Gallery Wall.” I would hide in the closet, trembling with fear, whenever Handan went frame shopping or wanted to hang some of our printables.
Did you know that hanging pictures with your spouse is the leading cause of divorce, weight gain, hypertension, fatty liver, cancer, eyeball puss, flaky skin, webbed feet and gout? It’s true. I read it on the internet. That makes it 100% true.
Well, I have some good news for you today. I’m going to show you a 100% divorce-proof way of hanging picture frames with your spouse that is guaranteed to result in perfectly-spaced and level frames and a 100% reduction in eyeball puss, webbed feet and gout. You’ll need to eat less, stop drinking, quit smoking, start exercising and use moisturizer to cure the rest.
And if learning how to easily create a gallery wall isn’t enough for you to break out the Champagne, we’re also going to hook you up with a slew of new botanical printables to get you in the mood for spring.
Unless you want more winter.
In that case, you can stop reading, walk outside and cram some snow in your shorts. It’s up to you.
Oh, you’re still here? Huzzah! Then enough of my fatty liver yapping – let’s get to it!
Our foolproof method to create stunning and straight gallery walls requires the following easily obtainable items:
- Command Picture Hanging Strips
- Painter’s tape
- 48 Inch Beam Level (or a yard stick and a small level)
- 9 or 12 inch torpedo level
- Frames (duh)
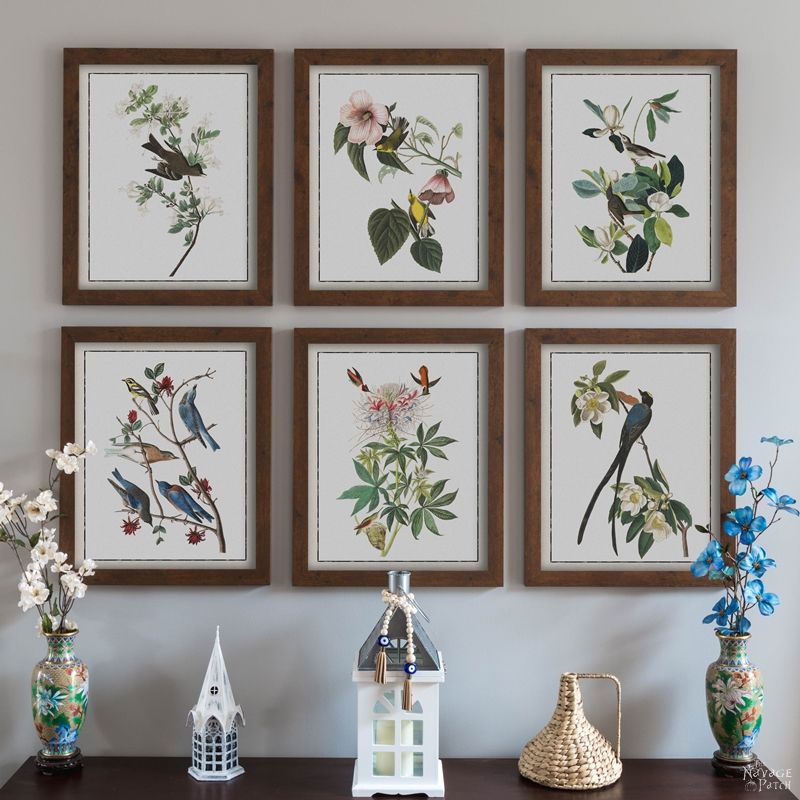
The picture below shows what you’re aiming for. When we originally hung our frames, we forgot to take pictures of the steps leading up to this point, but fret not, young Wall Warriors, we’ve recreated the steps below, so keep reading!
But first things first! This post is a part of our Dining Room Makeover series, and the second item on our checklist was to paint the room. If you remember, it used to be a darkish blue. We wanted to lighten the room, so we painted it all with Behr’s Natural Gray, except for a small accent wall that we painted with Behr’s Slate Gray.
What a difference! The lighter tone opens up the space and creates breathing room for the furniture we want to add. It also makes a great neutral backdrop for our wall hangings, including the gallery wall shown in this post.
Important note: wait at least a couple of days before trying this method of picture hanging (a week would be optimal), as it relies on adhesion, and the paint needs to be properly cured to avoid peeling it off the walls.
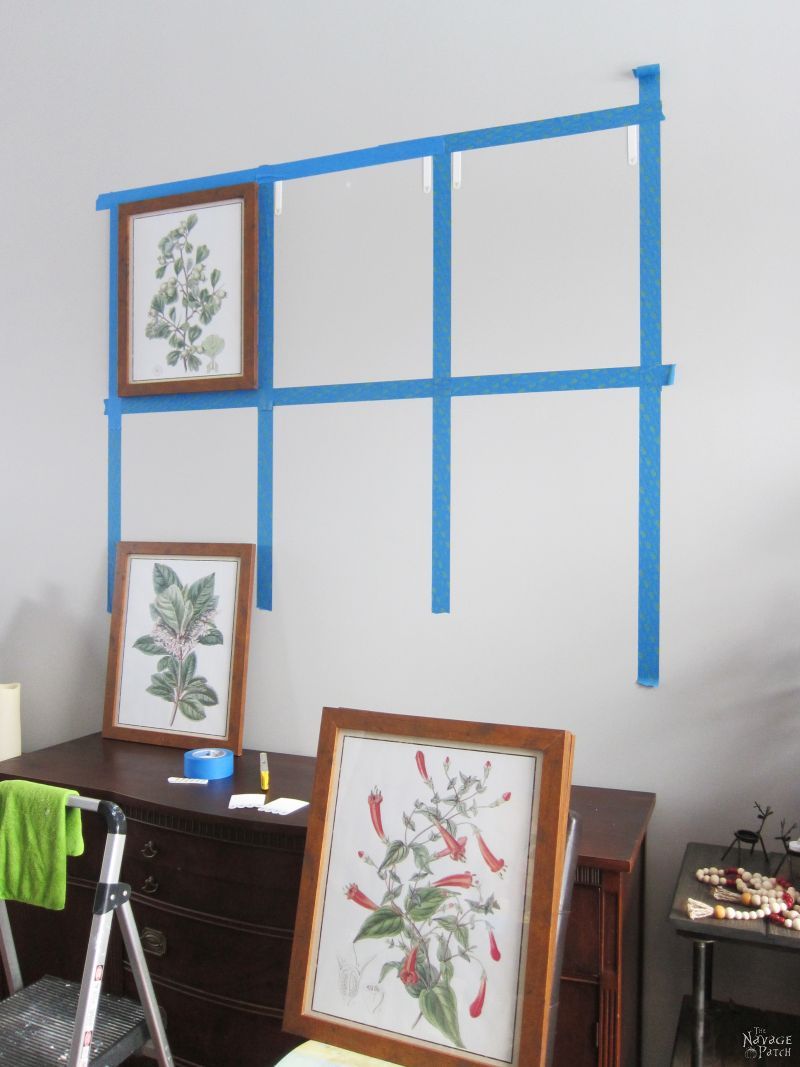
First, you need to establish a baseline on the wall from which you will reference all of your frames. We like to use 1.88 inch blue painter’s tape, as the width of the tape also acts as a spacer between frames. You may use thicker or thinner tape depending on your needs. To get that baseline, you’d normally have to put the beam level on the wall and mark the line with a pencil. Then you would run the tape along the line. This method works fine, but in the end you have to erase a pencil mark from your wall, and if you pressed too hard, you may never get it fully erased. Sometimes the eraser can leave a permanent mark as well. I’m talking from experience here, folks. But my genius wife came up with a solution. I mean, really, are you surprised? She’s like Wonder Woman crossed with Godzilla Einstein!
Here’s how you do it. Lay your beam level on a table and attach the painter’s tape as shown in the first picture below. Be sure the tape is aligned with one of the edges of the level. Next, double the tape back over, so the sticky side is facing up, and then run the tape down the length of the level. Tear the tape a little past the end of the level, but don’t attach it to the level like you did in the first step. Rather, you want to hold onto that end with your fingers. This will make it easier to make any last-minute micro-adjustments and to stick it to the wall.
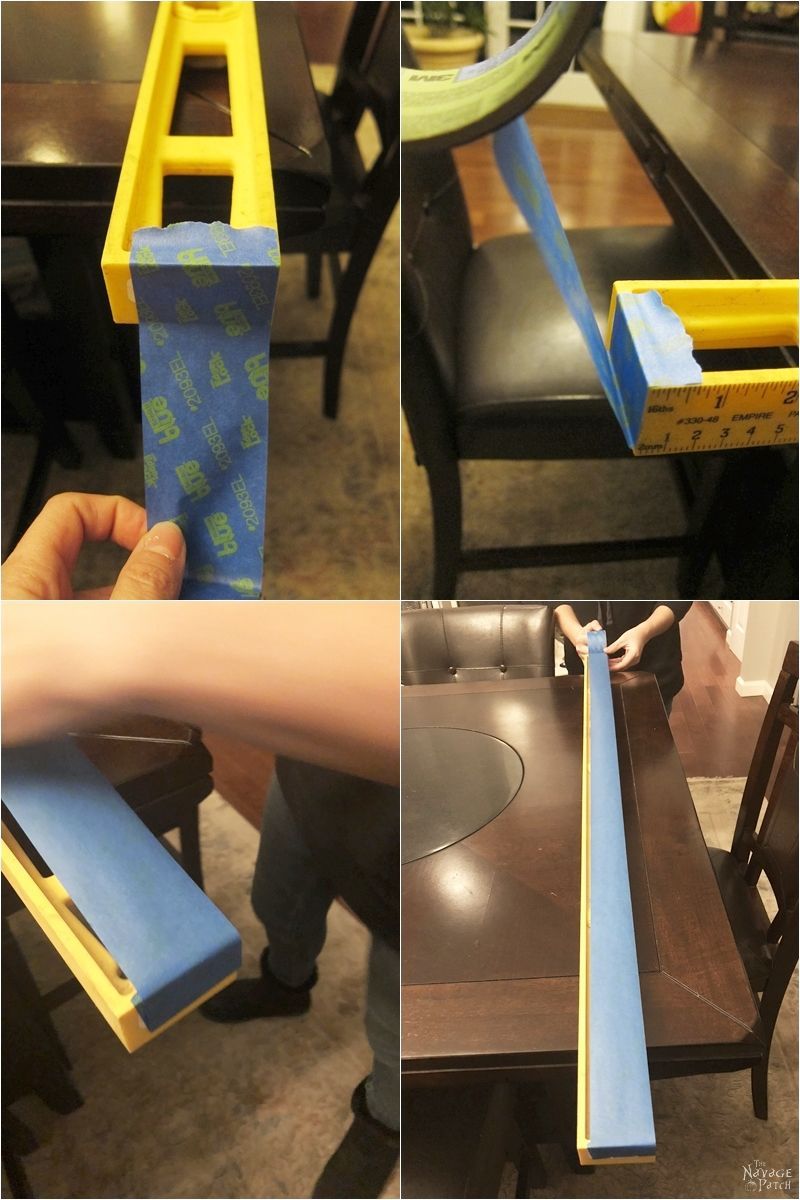
Find the area where you want your baseline and simply hold the level up close to the wall. Once your level is level (heh), press it against the wall. Press the tape firmly against the wall with the hand that was holding the loose end, and then peel the other end off of the level. Presto! You now have a perfectly level baseline, and you didn’t muck up your beautiful walls with hideous pencil marks.

From here, your next step is to hang the middle frame of the bottom row. Depending on how heavy your frame is, you’ll either need two or four Command Strips to secure it. Our frames are 16×20 with Plexiglas instead of glass, so we only needed two strips – one on either side up top. Frames with real glass might require a strips on the top and bottom corners.
The key here is to attach the Command Strip flush with the top of the frame, as shown in the second and third pictures below. This will make remounting the frames after a picture swap a breeze.
Once you’ve applied the strips to the frame and peeled off the backing for the wall side, simply find where you want to hang that middle frame and align it by matching the tops of the Command Strips to the bottom edge of the tape.
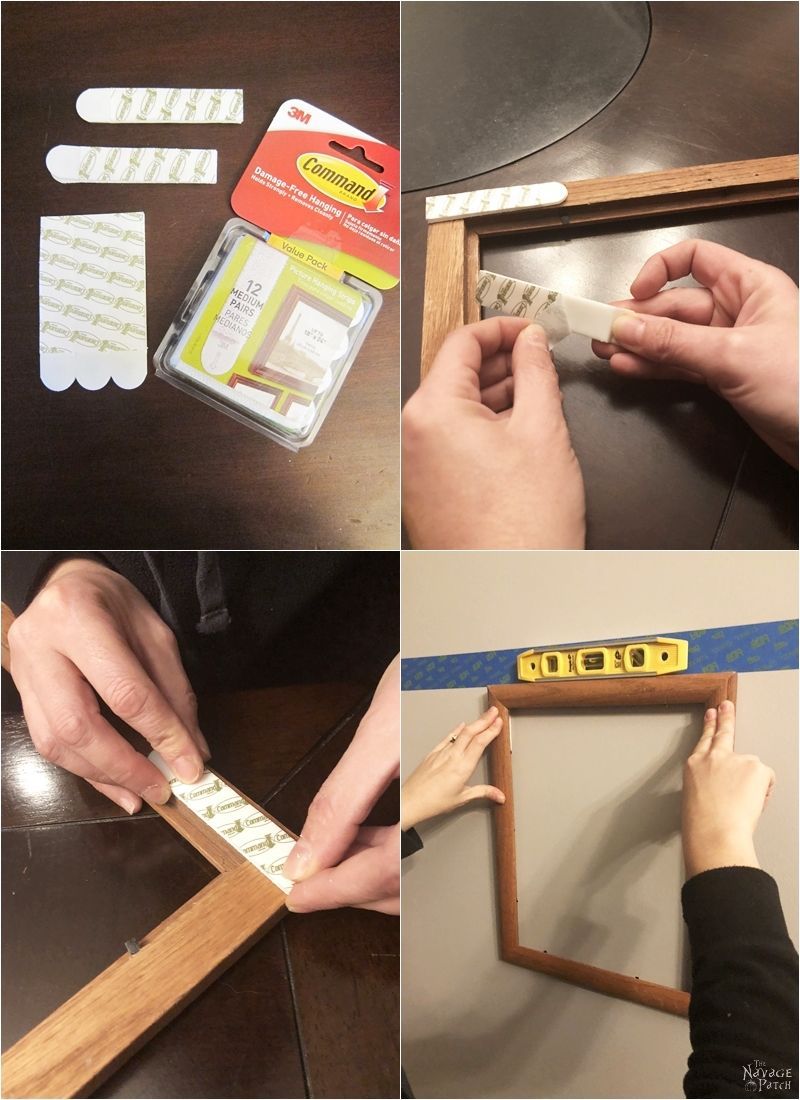
You can check your work with the torpedo level. You’ll see that the frame is perfectly level.
From here, it’s just a matter of putting more strips of tape on the wall, using the sides of the hung frame as a guide.

You can use your beam level to check those vertical bands of tape, and you’ll see that they are perfectly level.
You can hang the first frame of the top row by referencing the bottom of the frame against the top of the baseline tape. Then you can run another line of tape across the top of the frame, as it’s easier to hang while referencing from the top.

From here, you just hang them one-by-one until your gallery wall is finished. As the last step, peel off the painter’s tape and enjoy your new gallery wall!

Hanging tip: be sure to really press hard on the frames to secure the Command Strips to the wall. The frames are held on the wall by tiny plastic hooks and loops (basically like extra-strength Velcro). If you don’t press really hard, you risk having the wall adhesive give way before the Velcro.
To re-hang your frames after swapping out pictures, you align the top of the frame with the top of the wall-side Command Strip. Since you already applied the frame-side Command Strip flush with the top edge of your frame, you’ll have no problem hanging the frames perfectly, time after time.
I don’t know what I like best about hanging pictures with the Command Strips. You can’t beat how easy it is to replace the frames over and over again, but equally awesome is the fact that if you ever want to move the frames or remove them entirely, there are no holes to fill and repaint. No. Holes.
Do you know how many times I’ve had to patch and repaint our walls? I don’t either. I can’t count that high.
With the Command Strips, you just pull down on the tab until the wall-side comes free. No holes. No adhesive residue. It’s brilliant!

Okay, so now that you have your awesome new gallery wall, let’s fill it with some printables! Since spring will be rolling through in a month or so, we thought it would be a good time to push out some spring-themed printables. We’re offering three sets of six printables: flowers, birds and orchids. Each set comes in two sizes (16×20 and 24×36) and with two different borders (ivory and aged paper). The bird prints come also come with a blue fabric-texture border. That’s 84 printables! Jeezum Crow, sometimes I think we’re nuts, but you guys are worth it, right? 😀


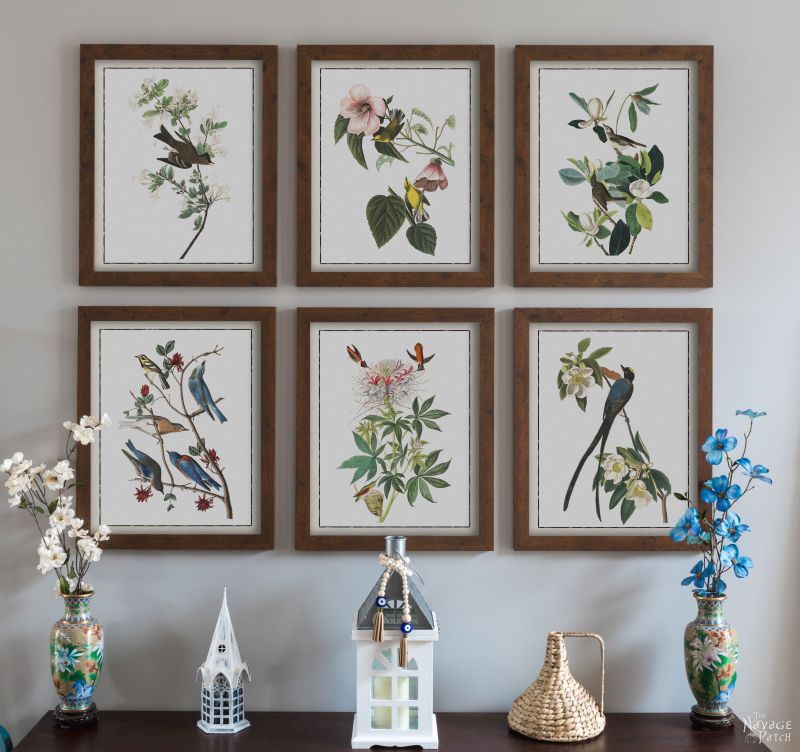
We love to see our printables out in the wild! If you display our free printables in your home or use our free SVGs in your projects, and take a picture and post it on Instagram, be sure to tag us – thenavagepatch


Here’s a peek at the room so far. The walls are painted, the gallery wall is up, and yes, that’s the Afghan rug on the floor. I’ll cross it off the list, but I’ll also talk a little more about it in a future post.


Dining Room Makeover Checklist
Moodboard and plan.Paint the room.Create a gallery wall and design printables for it.Decide on the rug.- Buy Chairs.
- Build dining table.
- Build a small console table.
- Makeover/upcycle antique wardrobe.
- Makeover/paint the buffet table.
- Decorate dining room.
Click here to see more dining room makeover posts as we continue to cross items off our checklist!
And now let’s get to the free printables. Although Handan designed today’s offerings to fit into a 16×20 inch frame or a 24×36 poster frame, you may scale them up or down as necessary. 24×36 inch scales down easily to 20×30 / 16×24 / 12×18 / 8×12 / 4×6 inches, and 16×20 inch scales down to 12×15 / 8×10 / 4×5 inches with no problems. If you need help with scaling down these printables so you can print them using your home printer, then make sure you check out our “How To Easily Resize Pictures” post.
Note: If you don’t have a large format printer like the Canon i8720 Printer (prints up to 13×19 inches) and are wondering the best place to get these large printables printed bigger than 8×12, we recommend trying Staples in your area or Amazon print shop. Both stores offer custom-sized prints on matte or glossy paper, and they both cost about the same. Staples also offers Engineering Prints, which are really affordable for large-format prints, but in some areas (like ours), they must be ordered from their online print shop.
Okay, now that I’m done blathering on about sizes and print shops, you can click on the button below to download the printables you’d like! You’ll find all these vintage bird & botanical printables under the “Vintage Illustrations” tab in The VIP Patch.
If you’re not a Navage Patch VIP, you won’t be able to access our Freebies Library. But that can be easily fixed! Subscribe for free on the form below and become a Navage Patch VIP. Once you subscribe, a password will be sent to you in our Welcome email, and that will give you access to The VIP Patch [Freebies Library].
Share it on Pinterest & Facebook!


Brilliant timing! I thought I’d spend a bit of time online before starting to install kitchen shelves and I have my beam level and PENCIL sitting there looking at me as we speak.
As soon as I finish my coffee I’m heading for the painter’s tape and banishing the pencil and eraser to the naughty corner.
Thank you genius Wonder Woman!
You did ok too Greg ?
Kismet! Good luck with your shelves, Carol!
Oh my goodness! I cannot believe how different the room looks! And thanks for the printables. I actually have 16×20 frames that display my engineering prints!
You’re welcome, Laura! I hope you enjoy them!
These printables are GORGEOUS!
And…I think even I could manage straight frames with this method of hanging frames.
Usually I purposely hang things “randomly”…it is my claim to fame and it is how I have avoided the not-level hanging. But I am pretty sick of it! lol
Thank you, Claudine! No need to hang em randomly anyomore!
The room looks great! The carpet is perfect there…….warms up the entire area!
Thanks, mom!
Holy Smokes! I love the gallery wall, and the hanging method! And I have been looking for the very same kind of prints you offered. My bedroom and hall walls are going to be very happy.
Awesome! We’re happy to help your walls look their best! 🙂
You’re hilarious, Greg! I’m glad you found a way to avoid all those nasty diseases! 😉 Thank you for the tutorial and the lovely printables!
Lol, thank you so much, Julia! 😀
Oh that’s so clever and looks stunning , What a beautiful room it looks about the size of our bungalow .I’m about to redecorate our living room and been wondering how to do a decent job of hanging the family mug shots . Thanks for the advice and the entertainment .
Thank you, Catherine, and happy hanging!
Wow, the dining room looks so different already. Do you guys ever sleep? Love the tips you shared. Gallery walls freak me out a little, if you get it wrong you end up with a wall full of craters and a hubby that sleeps on the couch for a month. Do you know we can’t find command strips here in S Africa. Why is that, we have to either hammer everything in or try find double sided tape that doesn’t go all googey when the temperatures change. Maybe we should apply for an import license for them, we would make a killing.
Handan wouldn’t ever sleep if I didn’t force her to go to bed. And then she won’t wake up until I force her! LOL! I’ll talk to Shaun about the Command Strips. Maybe we can get some to you.
Thank you a LOT for your tips on how to create a gallery wall without destroying my happy marriage.
I followed your instructions to the letter and everything worked out perfectly 🙂
Happy to hear it, Douglas! I’m here to help!
Hi Handan, I have not seen your blog for a while and found your post featured on THe Boon DOcks blog this week, lucky me. I’ve missed checking out your projects. I love this hint on how to put up pictures, I would never have thought of using the painter’s tape to line them out. And the pictures are wonderful!! I would love to have you share on my party #omhgff. I have pinned your project!
Hi…
I really would love your beautiful printables for my home.. I’ve tried to get them but for some reason I never receive an email back from you to download them them.. I don’t know what I’m doing wrong.. I currently do not not have any botanical prints in my home and after changing if my style to a very simple farmhouse style .. my hubby restricts my buying so I try to do do everything on the diy.. if you don’t care to send them to me I’d be much appreciated.. thank you so much …
Hi Barb, don’t worry, I’ll help you out! I see that you’ve been subscribed for a very long time, so if you keep re-subscribing, you won’t get the Welcome Email again with the password. But that’s okay, because the password to the VIP Patch is written at the top of every email we send out. So check your inbox from yesterday, find our email and look near the top for the password. If you’re unsure about how to use the password and download the printables, please see our Printables FAQ page here: https://www.thenavagepatch.com/printables-faq/
If you’re still having trouble, you can write me at greg@thenavagepatch.com. Good luck and enjoy the botanical prints! 🙂
Great tutorial, Greg! Thanks to your genius wife…and your incredible skills. You are quite a team! I enjoy reading your blog…it is so entertaining and I find myself laughing out loud. You should seriously consider becoming a writer, as in maybe producing a novel. In your spare time, that is!
Thank you, Tina! I’ve thought about it but don’t have the time right now. Maybe next century, lol! 😀