
DIY Christmas Decor: Faux Tree Repurposed 3 Ways
8-Foot Faux Alpine Christmas Tree
As the Put & Take find didn’t have one, first I needed to make a trunk, so I took a little walk around our woods. I was looking for a thick and pretty long tree branch, and soon I found a fallen tree branch which fit the bill perfectly. Before carrying it into our house, I cleaned it properly, as deer ticks are everywhere, and I didn’t want to bring any nasty creatures inside.
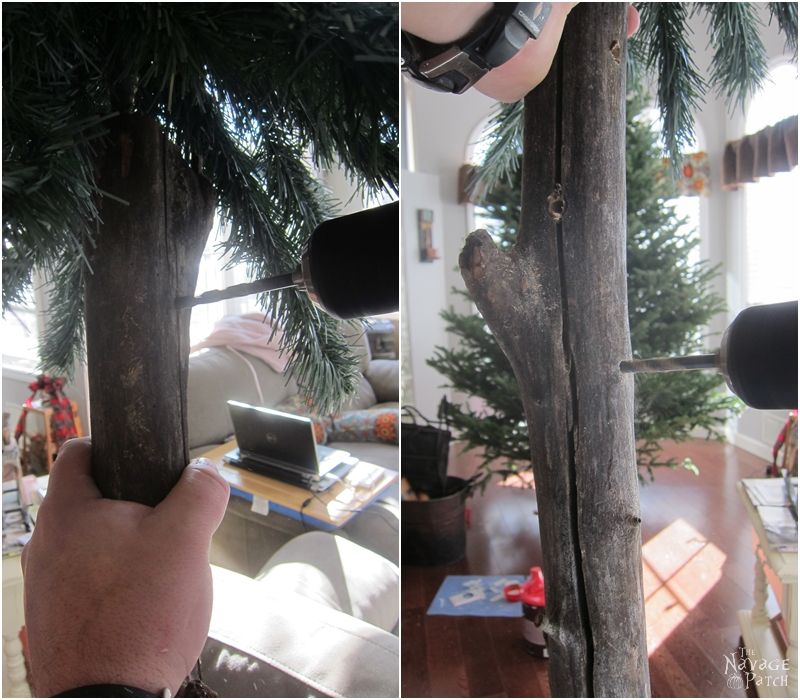
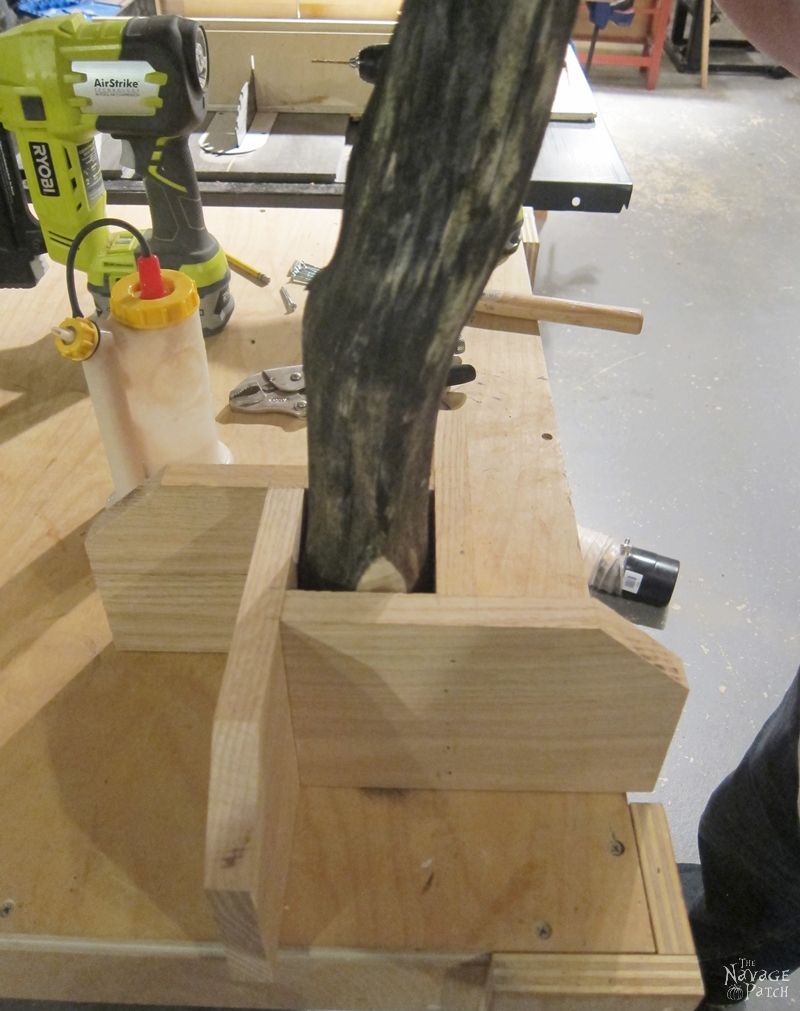
Once my new tree trunk was ready to take in, I gave it to Greg for him to cut a bit shorter – it was a really long branch. Then I asked him to drill some holes in it: one hole right on the top center of the new tree trunk, and the other holes in the body.

The plan was to drill several holes in the tree trunk, so I could insert the faux tree branches. But before going any further, I wanted to test how these faux tree branches were going to fit, so I did a test drive with the tree top.
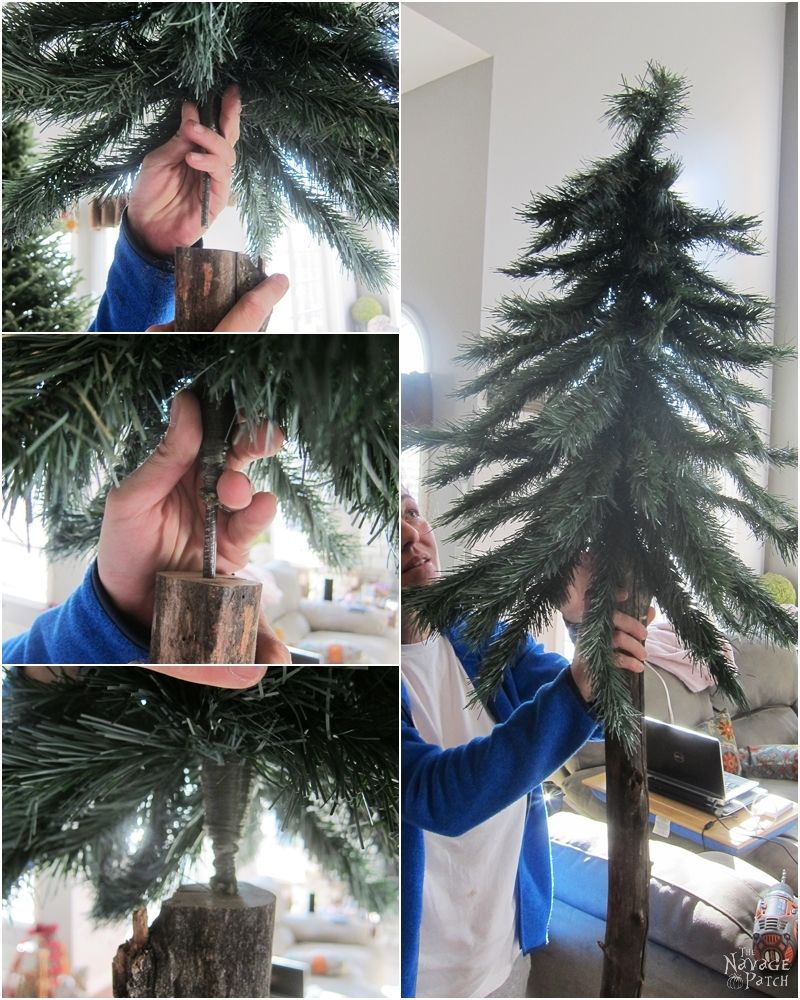
Okay, excellent fit! Now it was time for Greg to drill more holes in the body of the trunk. He drilled the holes all the way through and in a rotating way. The spacing between each hole was around 4 inches.
When all the holes were drilled, I also asked him to help me with the tree stand. I know… this was supposed to be my project, right? LOL. What can I say? He loves earning extra ‘Good hubby‘ points! 😉 [pfffft…I’d rather sit on my butt! -Greg]
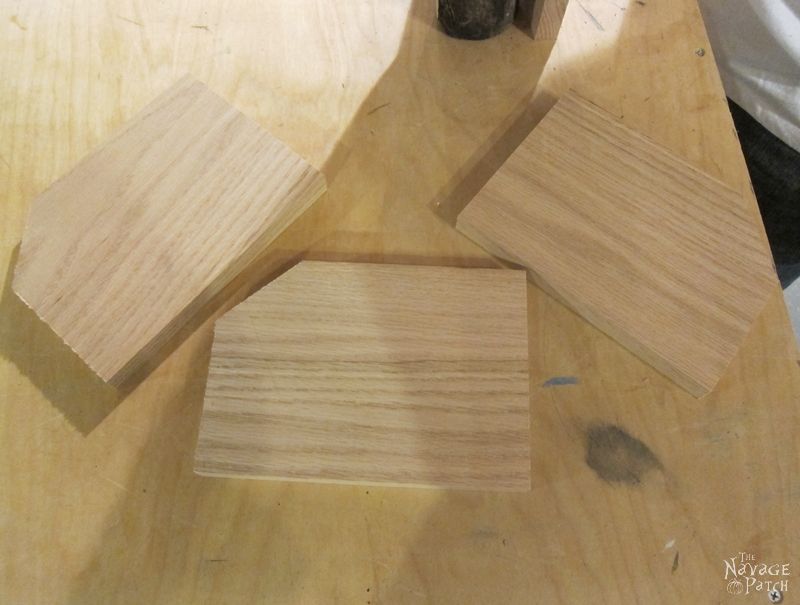
For the tree stand, I went and found 4 pieces of scrap wood in the basement, and Greg cut them to size. I also asked him to cut one corner off of each piece so the stand wouldn’t have pointy corners.
Next, I set the wood pieces around the tree trunk for Greg to mark them.
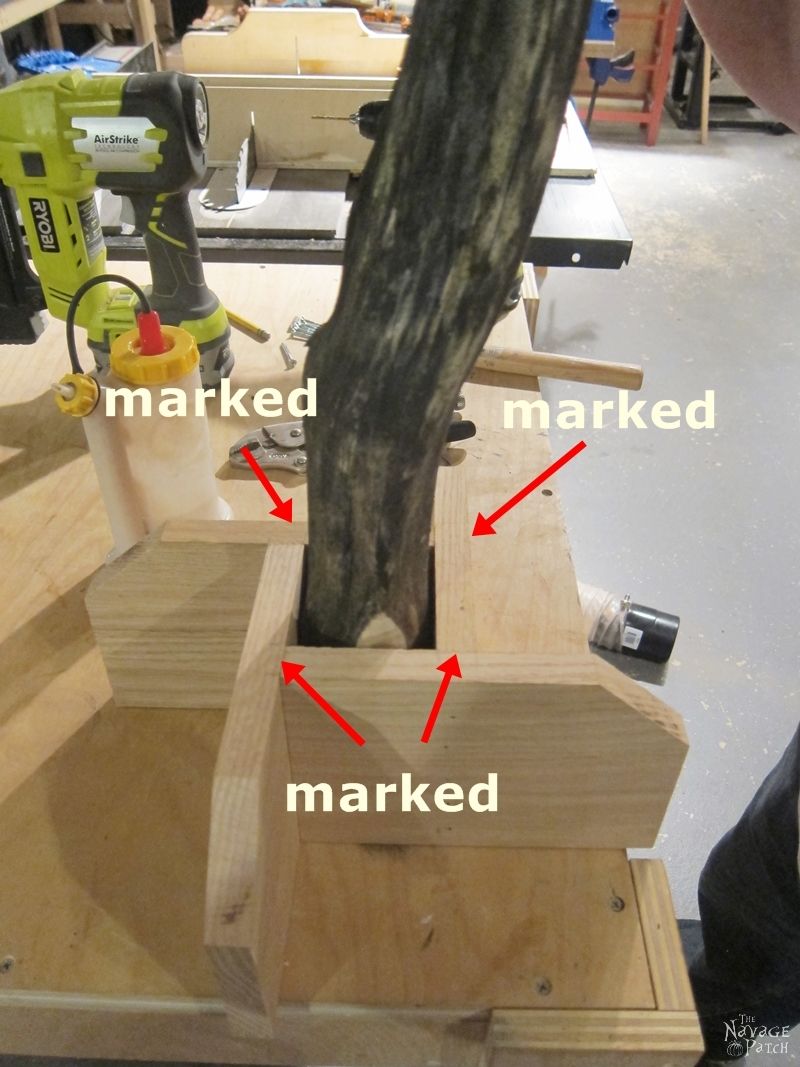
Now that the pieces were marked, using wood glue and brad nails, he started attaching them to each other at the marked areas.
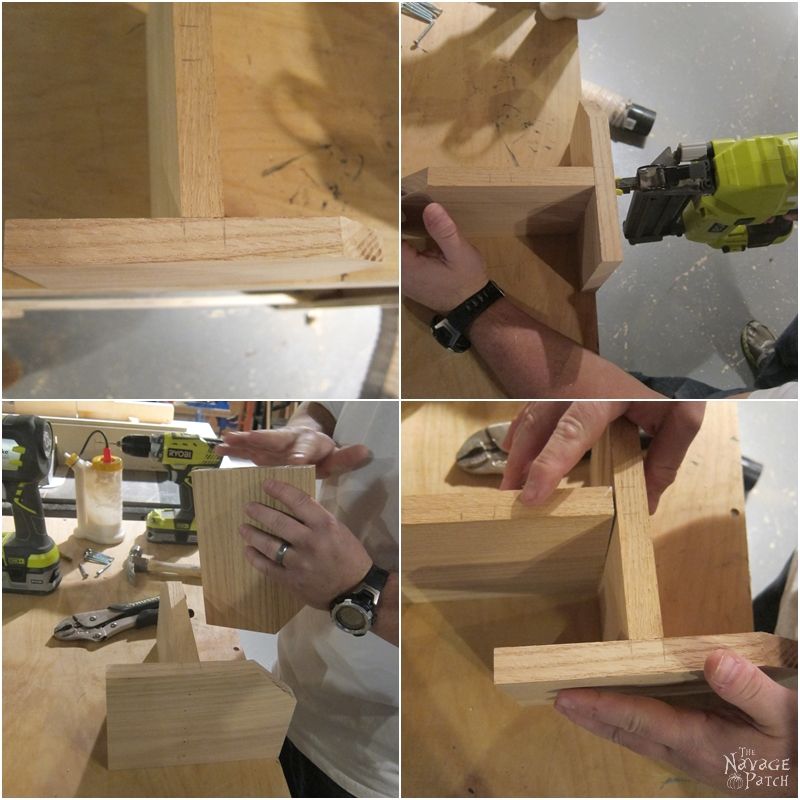
And within 2 minutes my tree stand was ready 😀
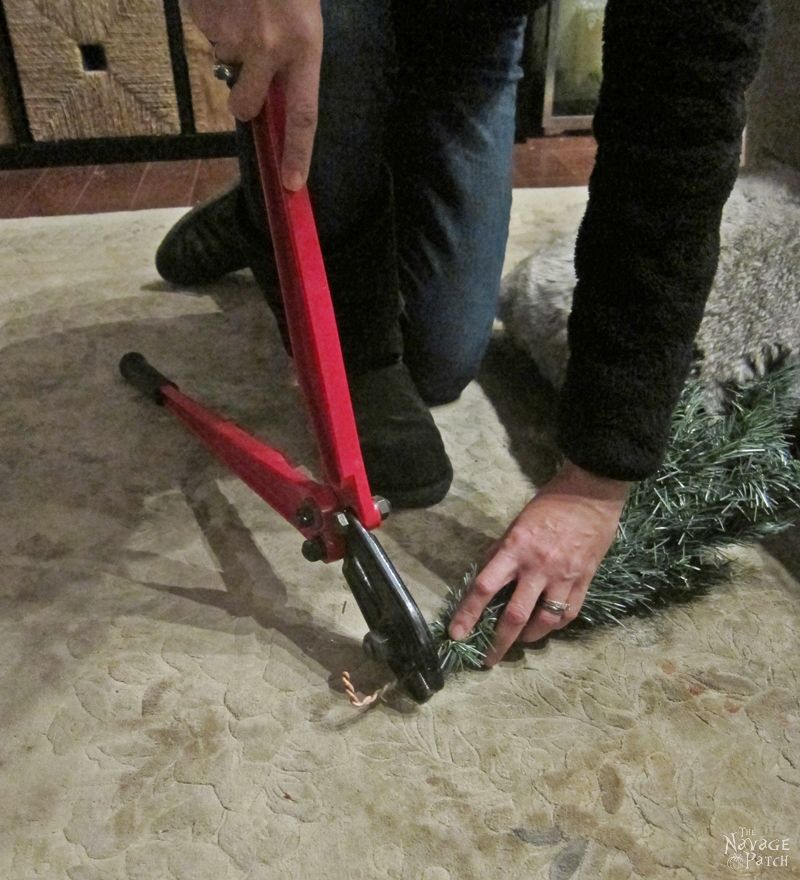
Next step was attaching the faux tree branches to the tree trunk. But before that, using heavy duty bolt cutters, I cut the steel stems a bit shorter, as I didn’t want steel stems showing when the tree was finished.
To attach the faux tree branches to the trunk, I simply inserted the branches into the drilled holes. As it was a nice and tight fit, I also bent the branches a bit downwards to lock them in their places even better.
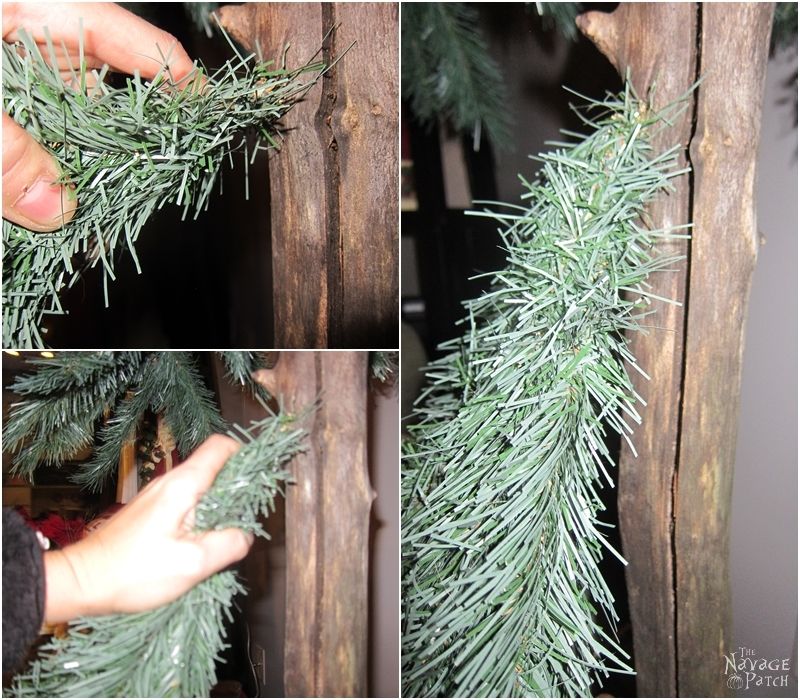
Once all the branches were in, I started arranging them to get my faux Alpine Christmas tree into the shape I wanted.

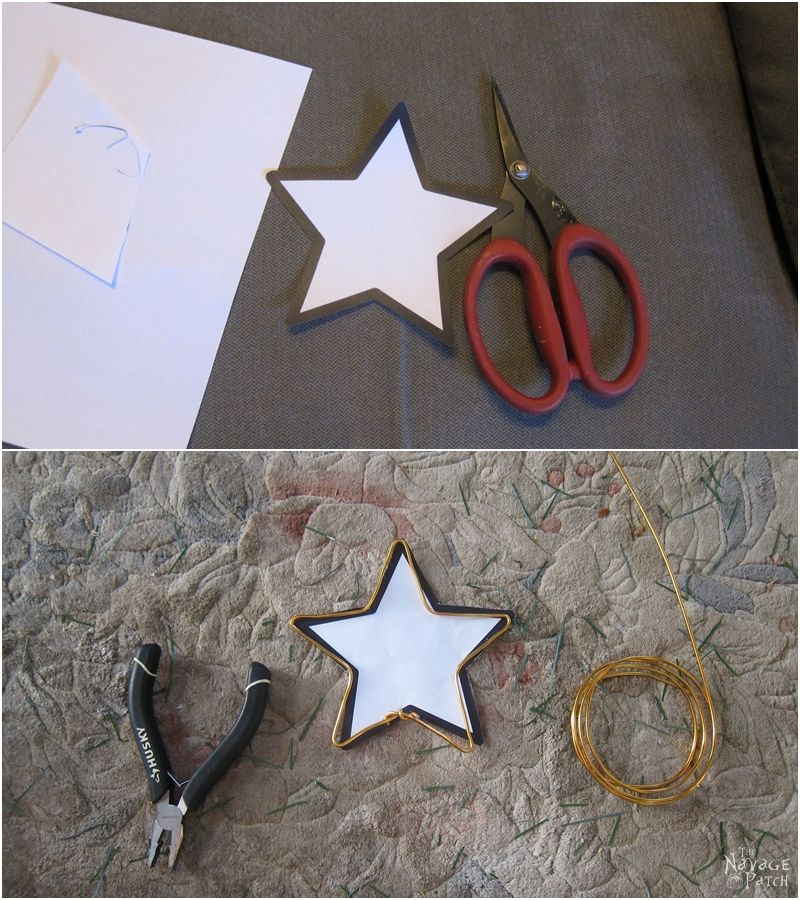
There it was: my 8-foot tall Alpine faux Christmas tree! But I thought it was missing something. I didn’t want to add Christmas lights to it, because I wanted it to keep its plain, but cute, appearance. Instead, I could put a small star on the top branch, and if I could make a lighted star, it would look perfect! But the issue was the top branch was very weak, so the lighted star had to be pretty light. Therefore I had to use light craft wire to make that star shape.
To do so, I found a star shape that I liked on the internet and printed it onto copy paper. Then I cut the star shape out. Using craft wire, I traced the shape of the star and created my wire star form.
Then, I wrapped that wire star with starry string lights.
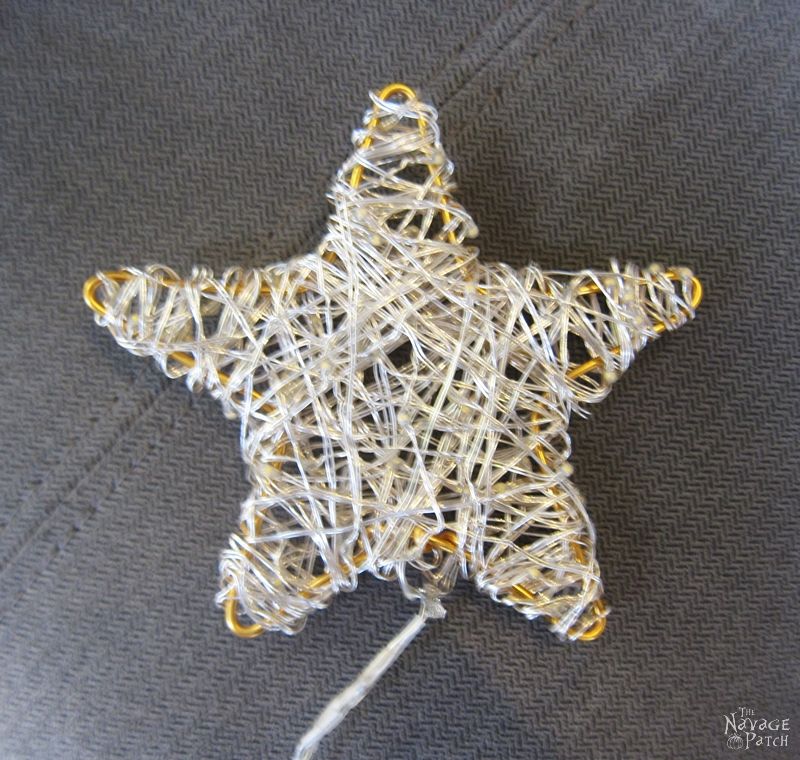
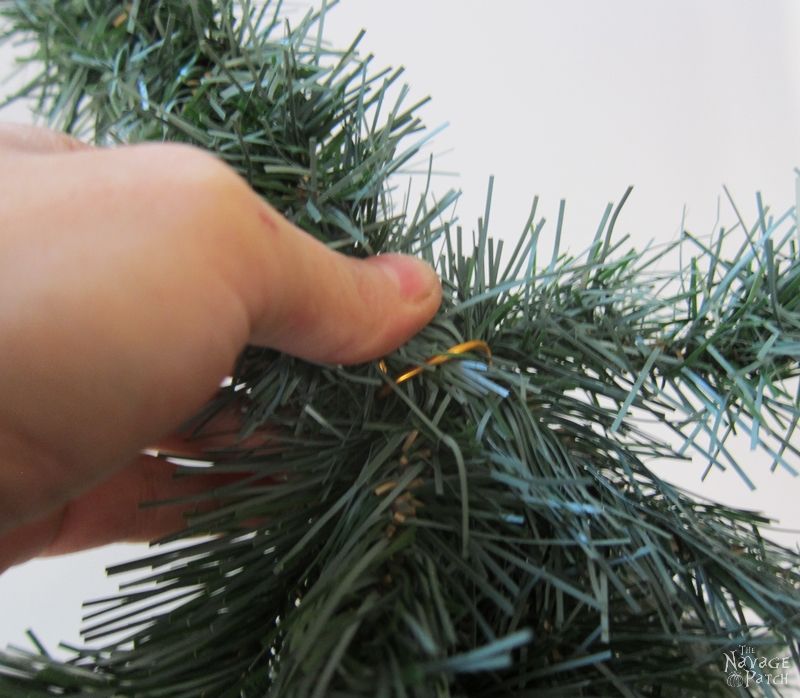
Starry string lights are pretty light-weight, but the star still wasn’t light enough for the top branch to carry it. Hence, I attached another piece of craft wire at the bottom of my star and I turned it into a pick. Then, to cover the ugly wire, I wrapped some Dollar Store cheap garland around it.
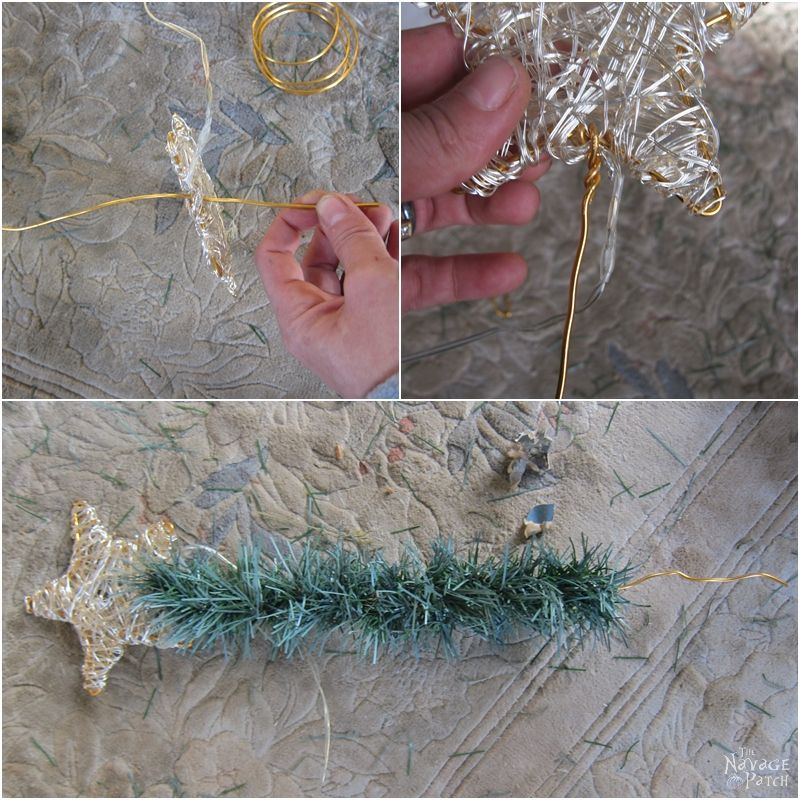
As the final step, I wrapped my lighted star to the top branch, and that was it.
Here is how my lighted star looks. Cool, right?

And finally, here is my favorite one of all three…[drum roll] I present to you our DIY 8-foot faux Alpine Christmas tree!


I love this tree! It gives such a cozy feel to our living room. Overall, this tree cost me $10, which basically was the cost of the starry string lights. But seeing a similar 8-foot Alpine tree online for $220 a week after I finished my tree is priceless! 😀
Handan, xo
Really nice, Handan! Very imaginative. Hope the boys ate a little crow for laughing at you. 😉
Thank you so much, Grace! Lol. Oh it was nice to see their expression after we hung the DiY outdoor Christmas garland 😀
Finally !! for a couple of years i was looking for somethings rigid to put around my doors but in a store the ones that you buy does not bend easily and it s all crooked. Thanks for this simple but genius idea. !
You’re very welcome! I’m glad you liked the idea 🙂
Handan, you guys always amaze me with how you put things together, your porch is beautiful and I love the tree you made for insde!!! Would love to have you share your home on #OMHGFF http://ohmyheartsiegirl.com/friday-feature-linky-party-45/
Have a great weekend, Happy Holidays!!
Thank you so much, Karren! I would love to share it as I love your party!! 🙂
Awesome!!
Thank you so much, Robyn! 😀
What creativity! I’m just amazed at it all and LOVE every bit of it too!! GREAT JOB!!
Oh thank you so much for your lovely comment, Linda! 😀
I am sure if santa reads this post, he will hire you both to decorate his house next year xx merry Christmas
Lol. If that could happen I would be totally up for it, but I am not sure about our Grinch 😀 Merry Christmas to you and to your family too!! xx
You go girl!!!!The decorations looks amazing and that alpine tree is to die for. I want one!!!
Thank you so much, Michelle! Yes, the Alpine tree is my favorite! Guess what we named it? ‘Charlie Brown’s scrawny tree’ hahahaha 😀
That’s an amazing save and repurpose. It all looks so gorgeous and even better that you can enjoy it!!
Thank you so much, Amy! Oh we love how our portico looks now! It took me 4 days to get it all done, but the time given to all was so worth it 🙂
Hmmmm — I have a fake tree in my attic — which project will i do…… Thanks for sharing on the Pleasures of the NW’s DIY Party!
Thank you so much, Helen! Next week I will be sharing even more…thank you for hosting that wonderful party! 🙂
Wow, I have to admit I was skeptical how you were going to get all that out of one faux Christmas tree but you did and judging from the photo of the assembled alpine tree, have more branches to spare. Very clever way to make a strong garland for your portico. It all looks so beautiful and what a story to share to your guests about the old dilapidated Christmas tree that kept on giving. Merry Christmas!!
Thank you so much, Marie! Merry Christmas to you and your family, too! 🙂
I love all three ideas. I am definitely going to try the swag as I never use the bottom row of branches on our tree. Thanks for the great idea!
Thank you so much, Kristal! The bottom row of branches indeed would make the best candidates for swags, because they would be slightly bigger and fuller 😉
B R I L L I A N T !!!
Thank you very much, Cha!! 🙂
Your tree is so much nicer looking than so many fake trees. It’s got soul. I glued bark around my fake tree and use a stand similar to the one you built. My cats love it!!!!!!!
Oh wow, Nancy! That is a brilliant idea! If I happen to find another faux tree (of course I will make sure to check if it has a trunk next time) I will definitely try your idea 😉
My Dad has the same tree and when we replace it with a new one next year, I’m going to use the branches to make the swags and garland! Beautiful job.
Awesome! I am sure they all will look so beautiful! When you finish them can you post a picture or two on our Facebook page? I would love to feature it!! 🙂
That was the very first post I have read Word for Word top to bottom, your creativity is awesome and I loved everything and your Alpine tree is also my favorite.
I like it with just the star.
Thanks for sharing your great ideas.
Merry Christmas
Brenda ?
Thank you very much, Brenda! I am indeed humbled by your wonderful compliment!! 🙂
I love all of your projects here – especially the swags, as I have two garage lights that I haven’t been able to figure out yet. Now I do!
Off-topic question – What is on top of your lamp (that is standing next to your Alpine tree)? And what is it’s purpose? For the life of me, I can’t figure that one out! 🙂
Thank you so much, Laura! Oh that is our wi-fi router, lol… Hopefully when Greg starts building the media cabinet for our living room, it will have a better nesting place 😉
Loved this. I’ve also used the branches in my outside flower pots. Add some plastic big ornaments and battery operated lights.
Oooh, good idea! 🙂
Absolutely LOVE your creativity!!! So beautiful!!
Thank you so much, Erika! 🙂
Your alpine tree is so perfect. The white garland with trees and reindeer is adorable. Where did it come from?
Thank you so much, Susan! I bought the garland long ago from Ramstore (a store similar to Stop&Shop) in Kazakhstan…it has to be at least 8-9 years old if not more. Originally it had black leather string, but over the years that started break from here and there, so I had to redo it with red, white & black baker’s string and sometime later strengthened it with chunky white yarn 🙂
Wow! You have some great ideas! Thanks for linking up for Friday Favorites. I’m featuring you this week!
Oh wow! Thank you so much, Jerri! 😀
Great repurposing Handan. I love the tree it looks like something out of Dr. Seuss. But now my daughter is looking over my shoulder and says I’m wrong. It is more like Tim Burton’s style. Anyway I want to wish you and Greg Happy Holidays.
Thank you so much, Mary! Merry Christmas to you and to your family too!!
This is all so creative! What talent you both have for taking ordinary and making it extraordinary! Your outdoor decor is wonderful and the tree looks great, too! Thanks for sharing at Snickerdoodle. I’ll be featuring this at tomorrow’s party.
That is awesome! Thank you so much, Beverly! 🙂
Love it. Have used old tress for numerous things. I know what you are talking about. Very pretty.
Thank you so much, Lois! 🙂
WOW! You guys are awesome! Love your projects.
Thank you so much, Stephanie! 🙂
Ok…so I have had a “spare” 6 foot tall faux Christmas tree that I bought for $2.50 at the end of the season, a few seasons ago, that I did not want to pass up but had no idea what to make of it. THANK YOU! I now have a few choices. (I love all of the projects that I have seen you and the Hubster create – not just these).
Awesome! I am so glad you liked our projects, Alecia! 🙂
WHAT a super idea!!! I just found this link from Pinterest (I LURVE Pinterest for finding hidden gems like this!) You guys are super resourceful! 🙂
Thank you so much for your lovely words, April! It makes us so happy to receive comments like yours! 🙂
Saw this from Pinterest … great idea to salvage trashed trees.
How do you store it? Can it just fold at the links?
Thank you so much, Tsu! I store the garland in a plastic storage bin. Something like this: http://amzn.to/2BQjJtG. It doesn’t really fold at the links but it bends enough, so it fits into a storage bin.
Haha, the same thing happened to me! Brought the tree home and it was missing the trunk, base and top. No wonder the box was so light. I’m going to give this alpine tree a try, I love the way it turned out. Very clever!
LOL – Thank you so much, Collette! 🙂
Lovethe swags! What size bell and sprays did u purchase from the web link u added?
Thanks, they r beautiful!!
Sharon
Thank you so much, Sharon! Here is the link to the exact bell spray: http://fave.co/2sV2eIF. 🙂
Just wondering how many branches did you use? My husband cut me some tree trunks today and hopefully I can start asseembling soon. Love yours!!
Hi Julie, sorry for the late reply – I used 1 on top, then 2 on each row. I made the rows alternating so the 2 branches would cover more area without crowding the look. The number of the rows will depend on how tall you want your tree to be – somewhere around the middle of my branch, I stopped adding more rows. I hope this info helps!
You’ve got great ideas. Love the swag gonna try it?
Thank you so much, Rebecca! 🙂
It’s 2018 and I’m just seeing this posting and I LUV it! You did a fantastic job decorating that immense portico (with Greg, of course)! I’ll be looking for discarded trees this year to make the swags next year; THANK YOU for sharing.
Thank you so much, Donnamarie! I love those swags the most – they are so easy to hang over on our lanterns and they look awesome! 🙂
I love this!! I’m so glad I didn’t throw away my old Christmas tree! I’ve already made the body of the swags and I’m waiting for the sleigh bell sprays to be delivered. (I ordered them for the link you provided because they’re perfect). I’m sure once I post the finished project, I’ll be asked by my family and friends to make them some.
Thank you so much, Debra! Please send a picture to us when you finish it, as I’d love to see it! 🙂
That’s fantastic!! Great job!
Thank you, Crystal! 🙂
Thank you so much, Crystal! 🙂
Wow, what a great idea to turn it into an outdoor garland! My old tree is going to need to be retired in a couple years, but I plan to put it out on the back deck off the dining room outside to add some cheer there. I’ll have to keep my eye out for other castoff trees to turn into garland. Thanks for sharing.
Thank you, Michelle! 🙂
Hi Handan,
I am, just now in 2020, seeing your amazing transformation of a boxed Christmas tree with missing parts. You are fantastic innovator! I can’t wait to go to my thrift store and get a Christmas tree. I want to make those garlands. Your home looked so pretty.
Hoy me alegre mucho de ver tus videos. Soy de Colombia y no habia visto esta clase de árbol, alguien me hizo un regalo con adornos y todo y me encanto, Era el 15 de septiembre del 2021 y tan pronto llegue a la casa lo que hice fue ponerme a armar el árbol. Lo unico que sabia era que iba por tamaños y colores. Lo arme, pero quede como inconforme y eso que dure casi 1/2 dia. Lo desarme todo y compre alambres delgados y de colores y lo marque uno a uno nuevamente cada paquete, y termine. Luego le puse luces led blancas muchas. Y comencé con adornos. Quede exhausta. Les cuento ya no volvi a desarmar el árbol, así lo tengo en la sala con todo. De vez en vez lo miro, le cambio algo, le pongo algo, La verdad me alegra verlo en mi sala. Pero el cuento es que veo tus videos, y algo que deje fue una parte completa de hojas de abajo, las mas grandes, y que creen voy a adornar el balcón como tu lo hiciste, no voy a doblar varillas sino a comprar amarres, pongo luces, y bolas creo yo, pero te sigo tu idea. Gracias. O mejor a ambos. Gracias Adios. Marleny de Colombia. Un abrazo y que tengan una feliz navidad 2021 y venturoso año 2022. Le pido a Dios que lo pueda ver en Diciembre también.
Hola Marleny, ¡Me alegra que hayas encontrado útil nuestro blog! Espero que tenga un hermoso árbol de Navidad este año. Les deseamos una muy Feliz Navidad y un Próspero Año Nuevo. ¡Por favor, manténgase a salvo y saludable!
HA! Hubby wanted to chuck out my poor little ‘half of it missing’ Christmas trees I have been hoarding…I mean saving. They shall have a Christmas rebirth now. Thank you for sharing these great ideas. Any more ideas…I do have three trees and no large entry way arch to fill in.
Ha! Never give up hope for those hoarded stragglers! We’ll keep our thinking caps on for new ideas!
Great idea thank you for posting!
Thank you!
Lady, you are the “Queen”!!! I bow to your DIY-ness!!! I love the idea of your garland as I, too have a very tall entryway (although mine is just straight across at the top). I’m going to be on the lookout for a crap-load of tree parts!!!
Thanks for sharing! 😀
I moved into my newly purchased townhouse late in November of last year. Between the stress of moving and the strains on my bank account, I ended up grabbing a very skimpy artificial tree at the last minute, thinking that this year I’d do better. I foresee a very impressive front door swag.
I’m looking forward to making this place really right for the holidays after three years of dreary make-dos. Now all I have to do is remember where I frantically stashed all those boxes of shiny things and wire edged ribbon while unpacking from the move. Better start soon; it’s already July.
Awesome! I hope you have a great Christmas this year, Mandy!
I realize this is quite old. But, I have to comment. First, Greg on that tall ladder made me nervous.
When you said “color coded branches” I almost went in the garage to see if my old tree was still there. I hate that tree ! Plus, my paper with the position of the colors went missing. You had to lay all the branches our and decide longest to shortest, then, you put the lights on. A few years back, I decided I was never putting that tree together again. I found a two part tree with lights for $15. Then my daughter says ” I love that tree. Don’t get rid of it”
Those color coded branches were amazing! These days, there’s no need – most trees come in just two or three parts, and they branches are already installed. So much easier! 😀
I love the 8’ tree great idea , but where did you get the branches for the tree. I would appreciate the advise. Thank you . I follow you constantly.
I’m so sorry for the late reply! I found the branch for the trunk in the woods near our house. The faux branches I stuck into the real branch came from an old faux Christmas tree we found for free.