How to Weld in Cricut Design Space
Learn how to how to Weld in Cricut Design Space with our simple, one-page and easy-to-follow Cricut Cribs!
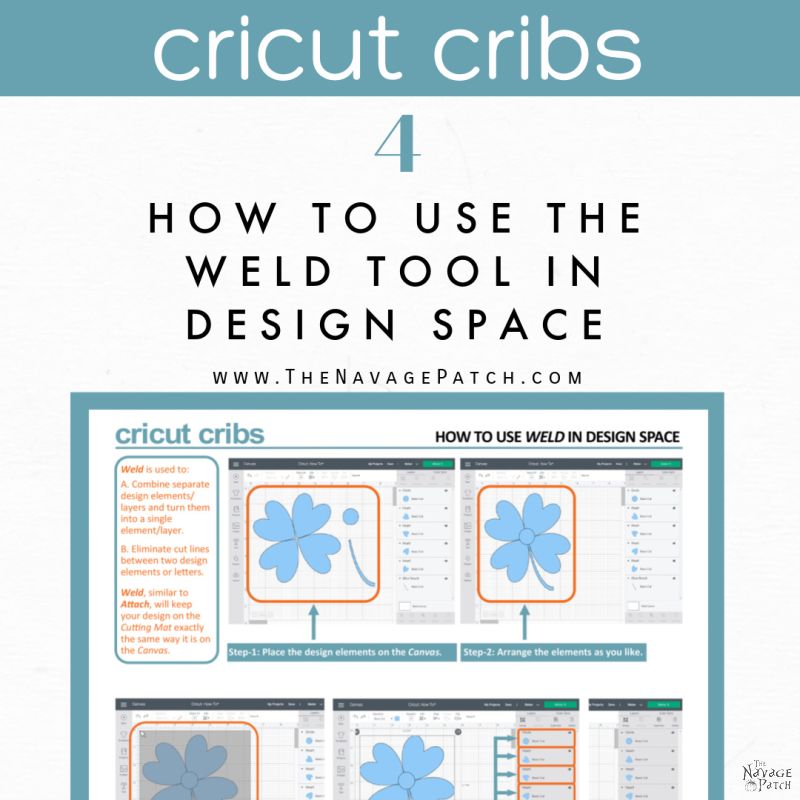
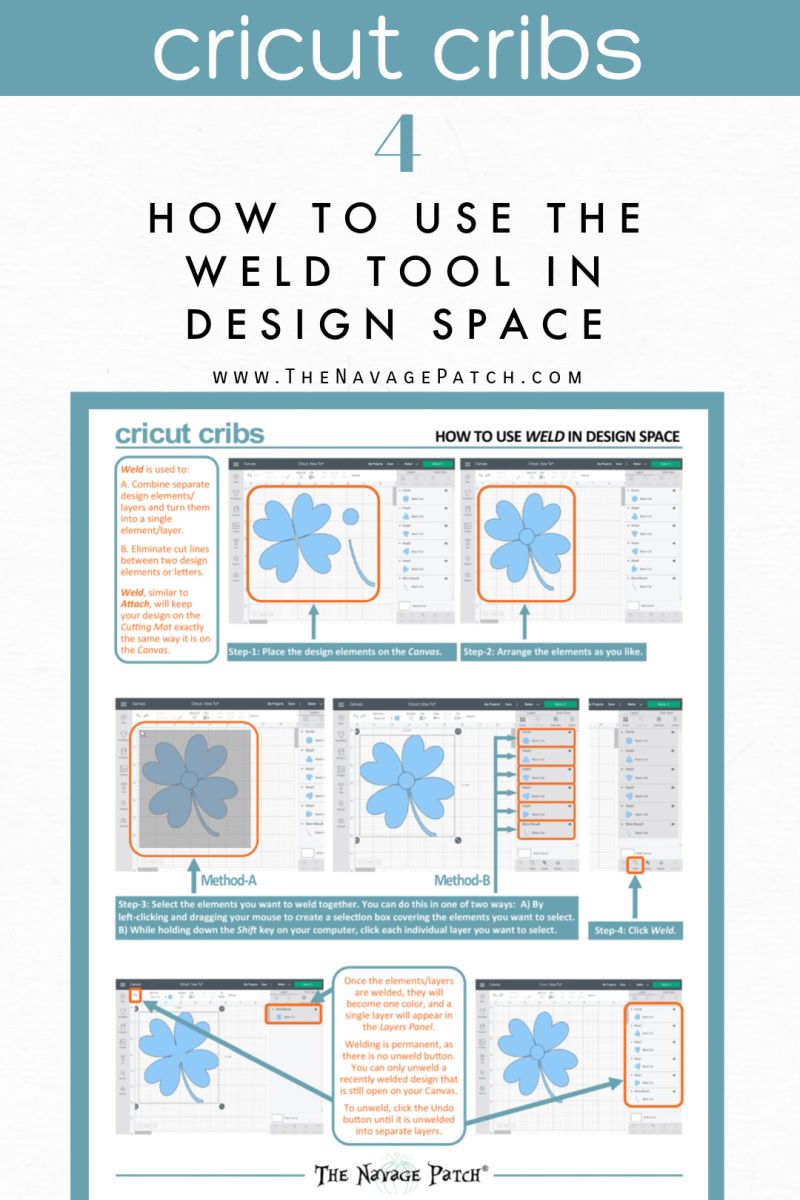
The Weld feature Cricut Design Space allows you to combine separate design elements or layers and turn them into a single element or layer. Weld also eliminates the cut lines between two design elements or letters. This is useful when you want to create a new shape from a group of other shapes, as in our clover example from hearts below. Weld is also used to create flowing cursive text and will be the subject of a future Crib.
How to Weld in Cricut Design Space
Step 1 – Place your design elements
Place all of your design elements on the Canvas.

Step 2 – Arrange the elements
Click and drag each element into its place.

Step 3 – Select the elements to be welded
Select the elements to be welded in one of two ways:
Method A) Make a selection box covering all the elements by left-clicking and dragging the mouse pointer diagonally across the design.

Method B) While holding down the Shift key on your computer, click each individual layer you want to select.

Step 4 – Weld
Once your elements are selected, click Weld.

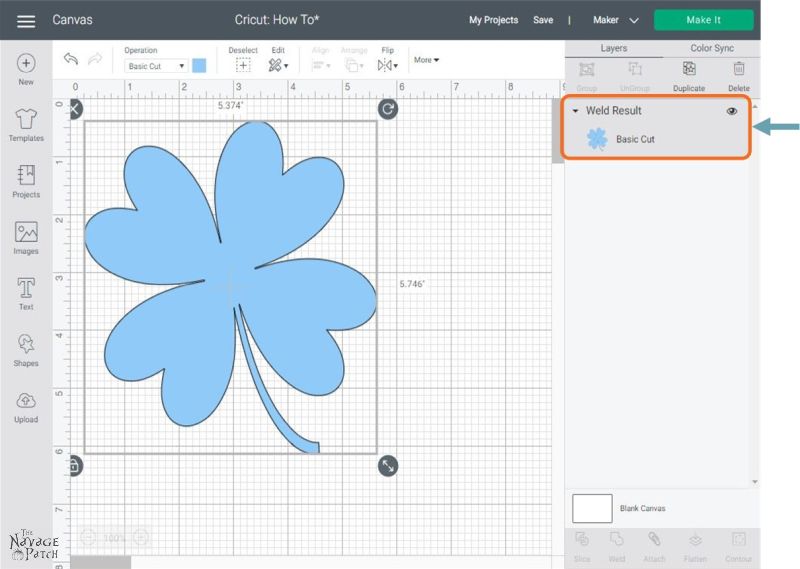
Once the elements/layers are welded, they will become one color, and a single layer will appear in the Layers Panel. You are now ready to send this design to the Cutting Mat!
Beware: Welding is permanent action
Welding is a permanent action; there is no Unweld button. You can only “unweld” a recently-welded design that is still open on your Canvas. To “unweld,” click the Undo button until your design is unwelded into separate layers.

Tip: You can weld design elements even if they are not touching or overlapping
This is useful when using the Slice tool, which will only work on two design elements/layers.
What? You don’t know how to use Slice? Don’t worry! That’s the subject of our next Crib!
*******
So what happens now?
Well, from here, you have a ton of possibilities, and they are the subject of our other Cricut Cribs!
Remember that all the Cricut Cribs can be found on our Cricut Tutorials page.
Free Printable Cricut Cribs: How to Use the Weld Tool in Cricut Design Space
Now it’s time to click on the button below to download the free printable Cricut Cribs and get on with your Cricut crafting! Please remember this Cricut Crib is designed as a one-page PDF and to fit 8.5×11 inch paper. But you should also be able to print it on A4 size paper by selecting the “scale to fit” setting on your printer. You’ll find this one-page Cricut Design Space Tutorial under the “Cricut Cribs” sections of TNP VIP Lounge.
take me to your
amazing freebies library
If you’re not a TNP VIP member, you won’t be able to access our Freebies Library. But that can be easily fixed! Subscribe for free on the form below and become a TNP VIP. Once you subscribe, a password will be sent to you in our Welcome email, and that will give you access to TNP VIP Lounge [Freebies Library].
We love to see our printables out in the wild! If you display our free printables in your home or use our free SVGs in your projects, and take a picture and post it on Instagram, be sure to tag us – thenavagepatch
Share it on Pinterest & Facebook!
thank you for this – how is it different than doing the same thing but hitting ‘attach’?
Hi Shelly, attach is similar, but different. In the example given with the hearts, selecting attach would merely group those layers together, but there would be cut lines where the hearts overlap or meet. With weld, any areas that overlap or meet will have the cut lines removed. The picture below will clarify. The left panel shows 4 hearts on the canvas. in the middle panel they are attached – you’ll notice the cut lines. In the right panel they are welded – the 4 hearts are now 1 image. think of attach as a paper clip holding several pages together – those pages are intact and loosely held by the clip. Think of weld as if you brushed each page with glue and stuck them on top of one another. It’s a permanent action that cannot be undone (except in the circumstances described in the post). I hope this helps!

