Laundry Room Update
It’s a major renovation, but we can still call it a Laundry Room Makeover, right? Much has changed since my last laundry room update, so let’s see where we stand and what’s still to come.
I know, I know, it’s been almost two months since the last laundry room update. I can’t imagine the suffering you’ve endured waiting for this next installment. Like a big-haired, pimply-faced 1980s teenager waiting for her crush to call by the forest green wall-mounted telephone in the kitchen (the one with the extra long cord so her mother could gossip with the neighborhood biddies while making a casserole), I’m sure you’ve all been pining away by your email’s inbox, pressing SEND/RECEIVE every two minutes in the hopes that a Navage Patch Laundry Room Update would magically appear.
Well, madam, your wait is over. Your update is here, and it’s hotter than the Camero-driving schmuck with the feathered hair, concert Tee and skin-tight gray corduroys (with a hair brush in the back pocket) you waited in vain for all those decades ago.
The laundry room renovation has been moving along – slowly – since my last update, but we’re almost done! All that remains is for me to build the cabinets, relocate some light switches, repair and paint a wall, build a shelf and paint the door that leads to the garage. Yes, that is still a lot of work, but the major work is done. Let’s have a look.
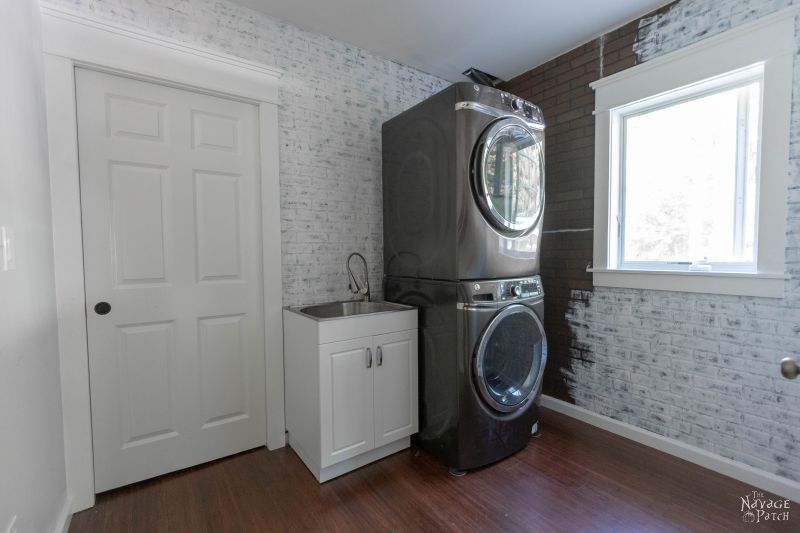
When I last updated our progress, the room looked something like this:
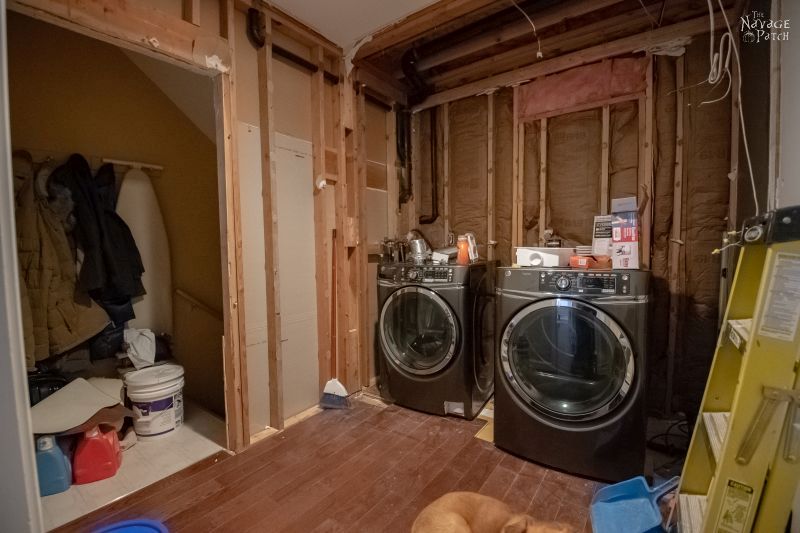
The first thing to go after that picture was taken was the floor. As I think I’ve mentioned in the past, that is engineered hardwood pictured there. It’s pretty much everywhere on the first floor, except for the master bedroom which has real hardwood.
Anyway, underneath that engineered hardwood is white tile – the same white tile that we removed in our guest bathroom renovation.
We removed the wood floor, broke the tiles and removed the subfloor. When that was done, I had a look at the height between the sub-subfloor and the old flooring, which still runs through the rest of the ground floor.
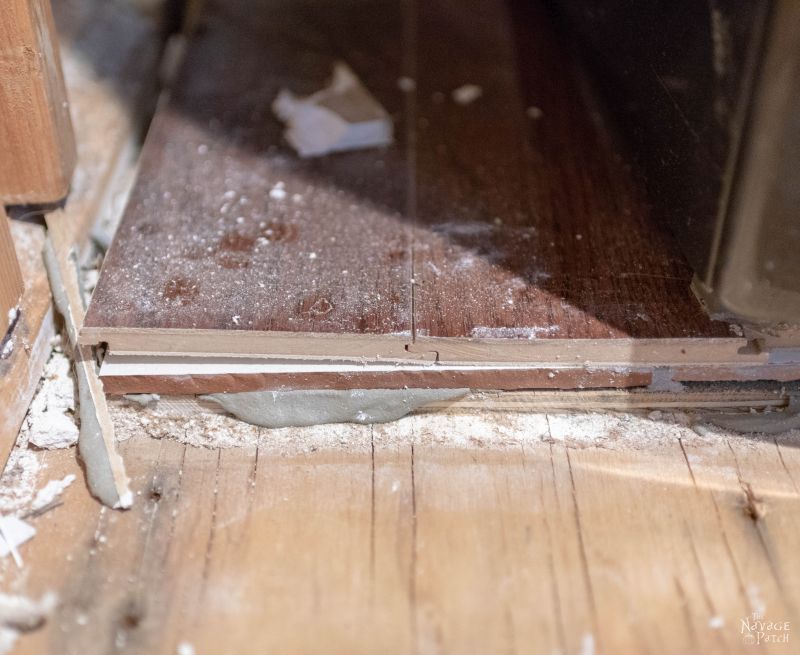
Since we would be running our new bamboo floor right up to the kitchen floor, I’d have to match heights as closely as possible.
The distance between the sub-subfloor and the top of the engineered wood floor in the kitchen was 1 3/8 inches. Our new flooring is 9/16 inch thick, so that means I’d need to make up 13/16 inch to make the two floors meet evenly. The one thing I knew for sure that I wanted was 1/4 inch cork underlayment. That brought me down to 9/16. Handan and I also decided to add a moisture barrier to keep the summertime humidity in the basement from seeping through the subfloor and into the bamboo flooring. I found an inexpensive but highly rated barrier on Amazon that was 3mm thick. That’s a hair under 1/8 inch. That left me with 7/16 for the subfloor. Regular OSB (oriented strand board) subfloor seems to come in all the thicknesses under the sun. Except 7/16 inch. Why would it? That’s the size I needed, so of course it doesn’t.
Well, if I couldn’t get flooring material to suit my needs, I’d just have to look elsewhere – like roof and wall material! Ha! The Home Depot gods tried to thwart me, but I outfoxed them.
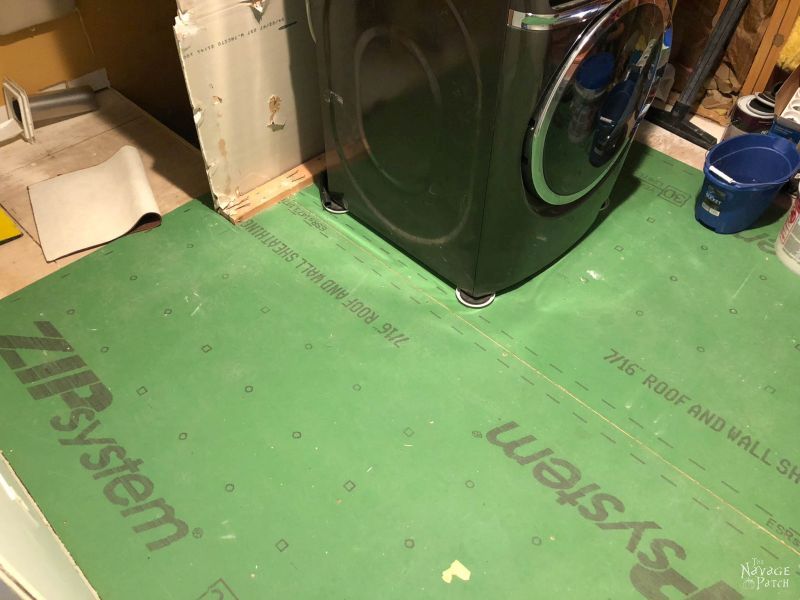
The Zip System roof and wall sheathing makes a way better subfloor than crappy OSB, and it comes in 7/16 inch thickness! I had all my flooring components planned and ready. Now I just needed the flooring.
Handan and I had ordered some Cali Bamboo flooring from Lowes.com. For whatever reason, they’re never able to get this stuff in stock under a week. Whatever. We had time. We ordered 5 boxes of Antique Java bamboo flooring and waited.
During the wait, I read up a little more on bamboo flooring. Our house sees some pretty wild humidity fluctuations – 20s in the winter up to 70s or 80s in the summer. That’s a no-no with bamboo flooring. I’d have to mitigate those swings somehow, especially since we want to re-floor the entire ground floor with this stuff at some point. I’m planning to upgrade our humidifier to help with the wintertime lows. The summer is easier – I just need to run the AC more than I usually do. If I can keep the humidity in the 35-55 year-round range, I think we’ll be good.
Now, since we were coming off winter, and the house was drier than the Kalhari desert, I wanted to double the normal one week acclimatization period to two weeks. I’d read and heard horror stories of people laying their new bamboo floor the day they brought it home from the store, and mere months later having gaps appear large enough to trap small rodents. I’d not fall into that trap.
A little over a week later, I got an email from Lowe’s telling me that my flooring was in. I hightailed it to Manchester to pick up my goodies. After giving my name at the pickup desk, I took a seat and awaited my glorious bamboo flooring.
Ten minutes later, a sheepish-looking guy pushed a cart up to me and mumbled something about a few planks might be broken, but they could replace them.
I looked at the boxes.
I looked again.
I looked at the awesome lady behind the pickup desk.
She looked like she had seen a ghost.
I looked back at the boxes.
Each of the four boxes looked like they had been dipped in meat juice and served to a pack of starving velociraptors. Not a single box was unscathed. They were all torn open from the ends, gashed through the middle and beaten to hell and back. I started inspecting each one. Every box had at least two damaged planks – those were the two in the top and bottom of each pack. God knows how many were damaged inside.
The woman at the pickup desk voiced the question rattling around my brain.
“How on earth were these cleared by Receiving to be delivered to the customer?”
She offered her apologies. She was clearly embarrassed for Lowe’s. I told her it wasn’t a big deal. We could just order them again and move on. To be safe, I ordered 5 boxes this time, just in case there were more broken planks. I tried to get expedited shipping for my troubles, but they said there was nothing they could do about shipping times.
Another week+ went by. During that time, I picked up another internet order – a new fan for my office. The next day, I received an email from Lowe’s thanking me for picking up my order. Since I barely glanced at that email when it came in, I just assumed it said that my new flooring was ready for pickup. Back to Manchester I went.
When I got there, the same nice woman was working the pickup desk. She remembered me, and we had a laugh over the boxes the week before. I gave my name again, and she searched the computer for the order.
But there was a problem.
She couldn’t find the order anymore.
It looked to her like it had been received, but there was no record of it being ready for customer pickup. Furthermore, there was a new order number, and it wasn’t showing delivery until the following week.
She was confused, and she wrote an order number on a piece of paper and gave it to one of the guys to run back and check.
A long time later, he came back with a cart.
There were 5 boxes on the cart.
They were all torn to shreds.
The woman at the pickup desk couldn’t believe it. I chuckled to myself and told her she should probably call a manager.
While we waited for the flooring manager, we figured out that the guys in Receiving didn’t accept this shipment for customer pickup, hence the new order number. But if I hadn’t mistakenly showed up at Lowe’s that day, I’d have never known, and I’d be waiting two weeks for the shipment.
The flooring manager was mortified that this had happened to me twice. She assured me that she would make it right. I again tried for expedited shipping. She told me she’d see what she could do. Turns out she couldn’t do anything, as the third and final shipment arrived a little over a week later.
My girl at the pickup counter was there again. We were both nervous. She went back personally to pick up the order this time.
She came back 5 minutes later.
And the boxes were perfect.
I took them home, and Handan and I opened the packages and laid the planks out in my office where they would spend the next few weeks acclimating to our house.
While we waited for the floor to get used to its new environs, there were some tough jobs to be tackled that required professional help. Though Handan and I probably could have figured out how to install a window and how to run a new dryer vent outside, there was also some plumbing work to be done, so we decided to have a small contractor tackle them for us. Spring is our busiest time of year, and we didn’t have the bandwidth to do every aspect of this project ourselves.
Since we were not only moving the dryer over but also up, we needed to run a new vent pipe outside from a different wall. The contractor came up with a good solution for that.
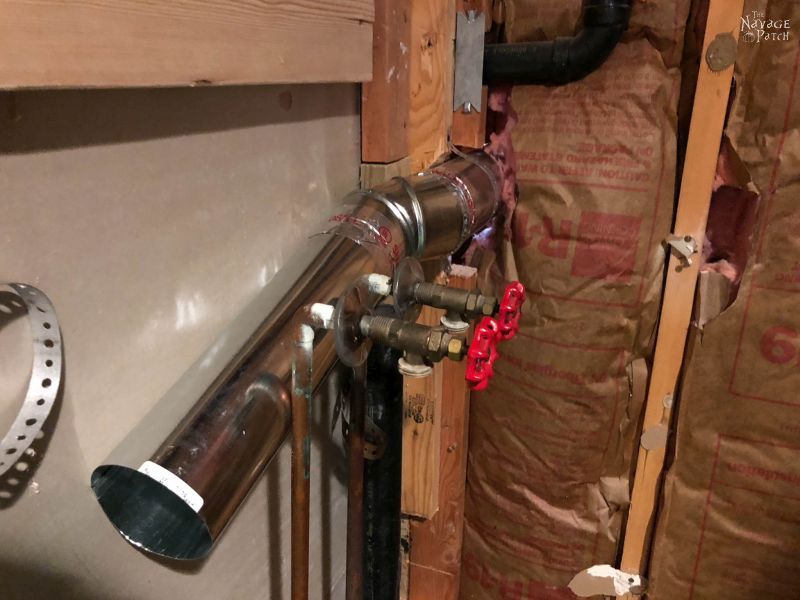
We also wanted the washer pipes and spigots to be cleaned up and housed nicely. On the following picture, you can see where the vent will come through the wall.

That dryer vent connection was a neat little find on Amazon. It’s a magnetic coupling, which makes connecting the dryer to the exhaust vent a breeze!
The back of the dryer has this connection.

The connecting ring on the wall has the magnet. When you push the dryer back towards the wall, the ring magnet pulls the metal ring pictured above and makes a perfect connection. Best idea ever!
With the washer and dryer plumbing sorted, our contractor turned their efforts to the window. They removed the siding outside and started the cut.

Once they had a hole, they filled it with a new window. And with that, everything changed inside!

There’s a reason the builders framed a window there. It makes sense! This house needs more light – it craves it! That one little window has opened up a dark corner of the house and filled it with glorious sunlight. You should have seen Handan’s reaction when she first saw that room with natural light. You’ve never seen such joy!
Now the room needed new walls and a new ceiling. I’ve been down Drywall Lane before. It’s a very long road, full of horrors. I decided to let the contractor drive it this time.
They had all the drywall up in a day.

There were some drainpipe anomalies that they had to contend with. Back when that space was a closet, the ceiling was lower in order to accommodate the drainpipe coming down from the second floor bathroom. They were able to cover up all but a corner. The same applied to the dryer vent. Part of it had to stick through the drywall. All is okay, though, since my custom cabinetry will cover both those spots, and no one will ever see them.

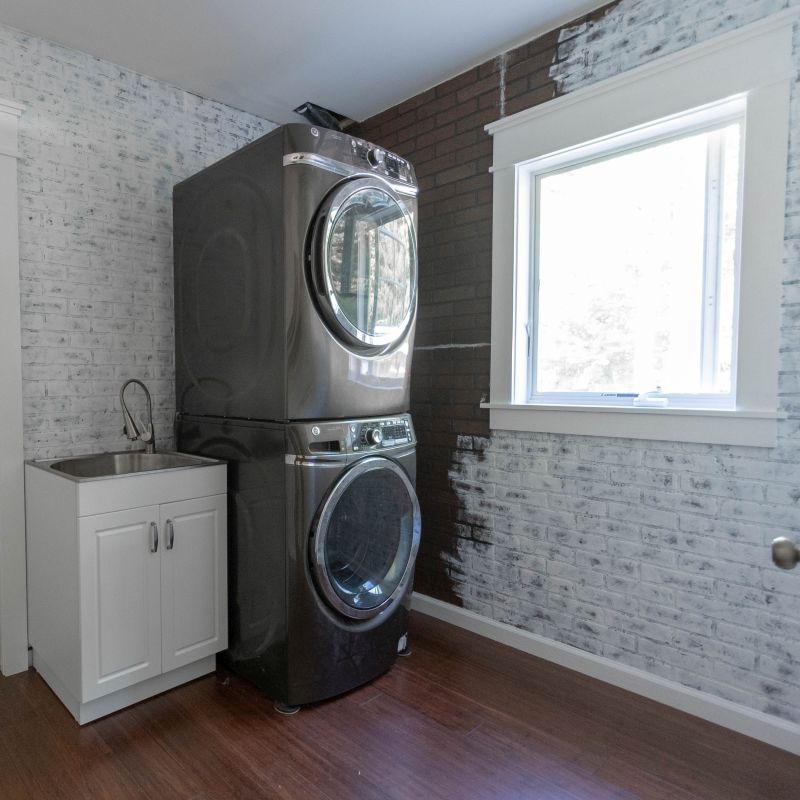
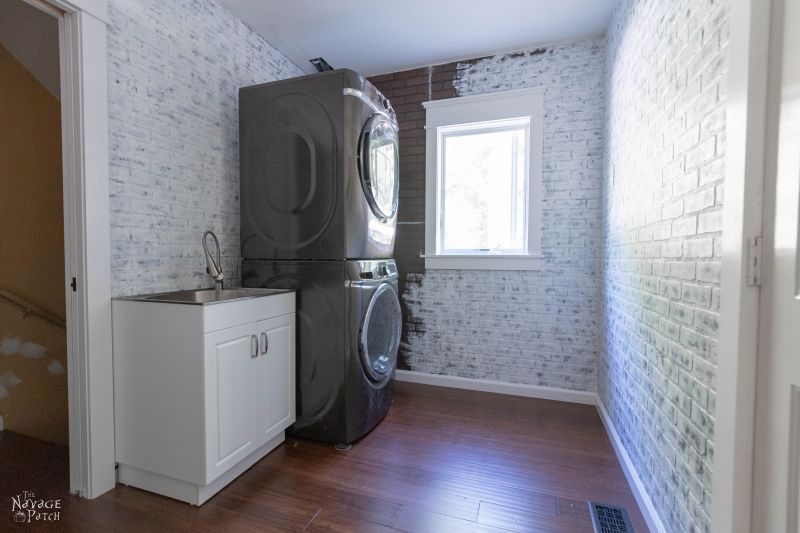
Part of Handan’s vision for the room is to have whitewashed faux brick on three of the four walls. Lowe’s carries the panels we were looking for, and we installed them with the help of some paneling glue and finish nails. Even without the whitewashing, the brick walls look great!

Once the faux brick was in, we moved on to the flooring. We lost ourselves in that part of the project, and we don’t have any process pics to show. It was a really simple process of laying the moisture barrier, then the cork underlayment and then the bamboo flooring. We got click-lock flooring that didn’t require glue or nails. Perfect for DIYing! Since we ran the flooring into the basement stairwell, we needed a piece that would act as a stair nosing.
The stair nosings offered by Cali Bamboo are ridiculously expensive, so I decided to engineer my own. I cut the final piece by the stairs to hang over by about 1/2 inch, and then I routed it with two different sized roundover bits.
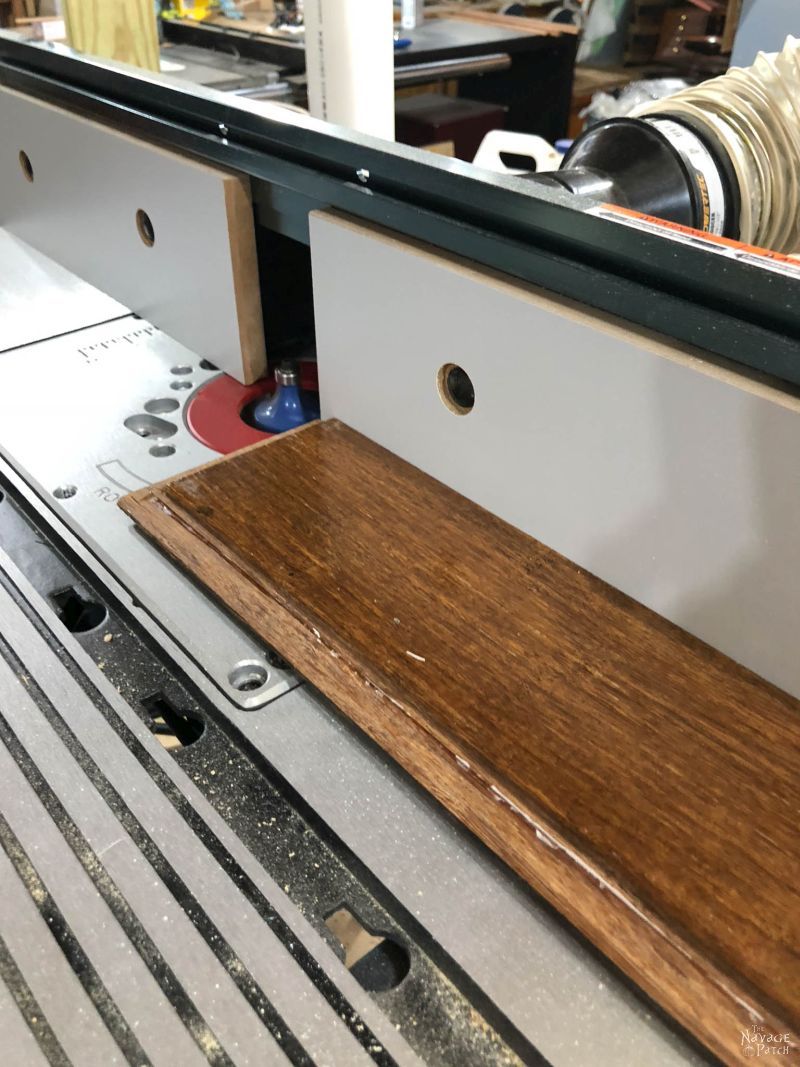
We secured it with extra adhesive and finish nails, since this board would see a lot of stress. I still need to put a few coats of pulyurethane on the edge that I routed.

For the trim around the doors and windows, Handan wanted to go in a different direction than the standard builder-grade trim. We designed our own trim based on Craftsman Style trim we’d seen online. This style certainly isn’t new for DIYers, but we modified our design a bit to make it a little more pleasing to our eyes. Making the trim is simple. We used 1×6, 1×4 and 1×2 pine boards. The 1x4s went to the sides and the bottom and the 1×6 went up top. We used the 1x2s and a 1×4 ripped lengthwise to make the rest of the top.


And as you can see, Handan has already started whitewashing the walls. She’ll have a full tutorial on a simple way to paint faux brick – much easier than the other methods floating around the blogosphere. Keep an eye out for it soon.
Here’s another peek behind the washer and dryer.

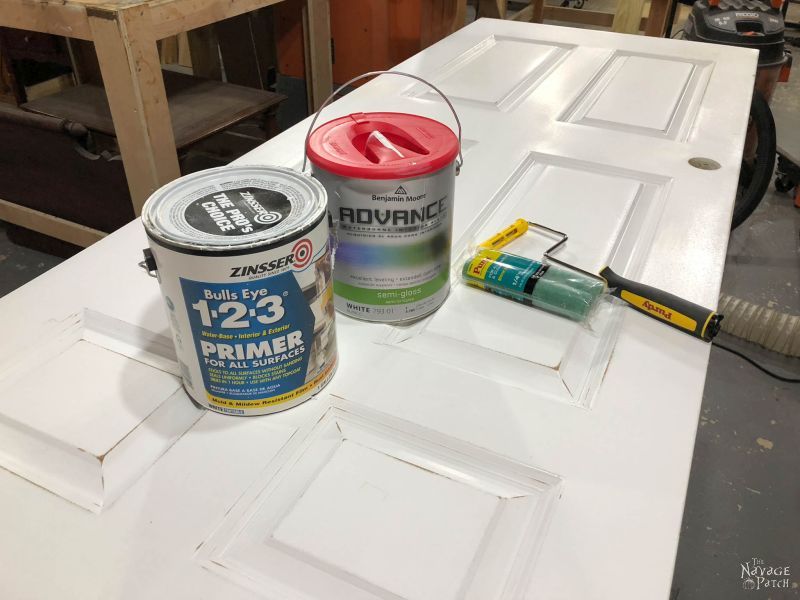
Before we could hang the pocket door, I needed to paint it. The original paint had yellowed, and the door looked awful. I took it to the garage and scuffed the old paint with my random orbital sander and detail sander.

I then took the door to the basement for a coat of primer and two coats of paint. What a difference!

With the pocket door hung, our contractor plumbed the lines for the utility sink. When that was done, we just had to drop the sink in place and make the connections.
And that is where we stand as of this writing.
Here is the Kichler light we bought a while back.

As one of our readers warned, it gives off a pretty yellowish light, but since it will only be used at night, we think it’s okay.

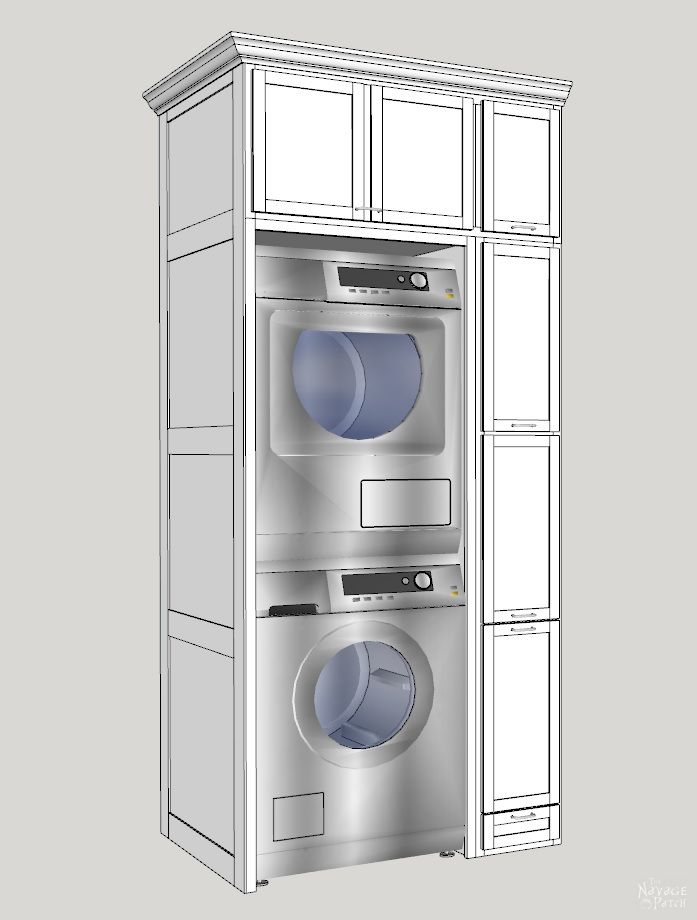
As I mentioned at the beginning of the post, I still need to build the cabinets. Here is how I’ve designed them on Sketchup.
I also need to move some wiring on this wall, indicated with the red oval.

Then I’ll repair and paint the wall.
Handan wants some sort of small shelf for the wall across from the washer and dryer. Once I get a handle on what she wants, I’ll build and install it.
The final step will be to remove an repaint the door that leads to the garage, as that has also yellowed terribly over the years. It looks even worse when contrasted against the awesome new pure white of the trim and walls.
That’s it for now! I’ll be back with the final reveal soon. In the meantime, we’ve got a lot of good stuff in the works. I’ll be talking to you in the comments!
It looks terrific! Question, how on earth do you handle the fumes from the Zinsser???? And in the basement, no less?
Thank you, Derry! It’s funny, I don’t find the Zinsser fumes bad at all!
wow that room be way nice already and besides the projects you listed I wondered were you going to install a library ladder for shorty to reach the dryer lol xx
LOLOL – Greg cooks and does the laundry around here. Why do you think I proposed to him before he could even get a chance to runaway? LOL xo
Ha! Shorty doesn’t need to reach the dryer!
You will have to let me know what you think of the bamboo. I has a friend of a friend install my flooring and he talked me out bamboo because he swore it marked up too easily. He claims he laid a bamboo floor for a client and by the time he was done there was so many scratches and dents that the people were very disappointed. I had always read how durable bamboo was but relented to him. I still wish I had bamboo floors!
I will certainly let you know, Giselle. So far, so good. We did our own surreptitious scratch test in the store, and I think the Cali bamboo performed extremely well. Of course it scratches at some point, but I can’t imagine dog claws or the like ever making a dent. What did you put down instead of bamboo?
I’ve got. “Laundry room Love!!” Sensational!! franki
If that love extends to the actual laundry, you’re welcome here any time, Franki! 😀
Oh, my! That looks terrific! I love the brick, Handan did a terrific job! The floor looks beautiful as well. Really, I love it all so far and the cabinets will be the final touch. Do you have space in there for a table to fold on?
Thank you, Claudine! Lol, it’s funny, but we didn’t plan for a table! All the laundry gets folded in the bedroom!
A great job! The window is a nice addition.
Greg, do you know any tricks about painting doors. I agree that it is best to place it horizontally for painting but then you prime one side, wait for it to dry, prime the other, wait to dry, and so on, and so on …. aaaarghhhhhhhhhh!!! for each coat of paint. I suppose there is nothing one can do about it? 🙁
Hi Val, I prime and paint one side at a time. One coat of primer, wait about 2 hours, paint the routed parts with a brush and the flat parts with a roller. Repeat about an hour later. I use Floetrol to help the paint level better. Using a roller is much quicker and easier, and it leaves no brush marks. Only downside is that the finish isn’t as smooth as brushing. Acceptable trade-off for me. One door takes two days. I’d rather spend the time to do it like this than paint it in place. That’s a misery, lol!
The room is looking great! I’m in love with that magnetic dryer vent connector though–would make it so much easier to disconnect the vent for cleaning.
Thank you so much, Sandy – that vent is the best!
Ohhhhhh LAWD, it’s looking so good!!!!
Thank you, April!
I love our stackables – but how do you move them?
Hi Debbie, we moved from that house several years ago before ever needed to move them, but I did design and install them to slide fairly easily!