Painting 101: The Complete Guide On How To Paint A Room
Painting a room isn’t as easy as loading up a roller and slapping it on the walls. From picking your paint to prepping the walls to painting, we’ll show you how to do it the right way. We’ll also share our tips & tricks to make the job go smoother and quicker. If you want to learn how to paint a room – read on!
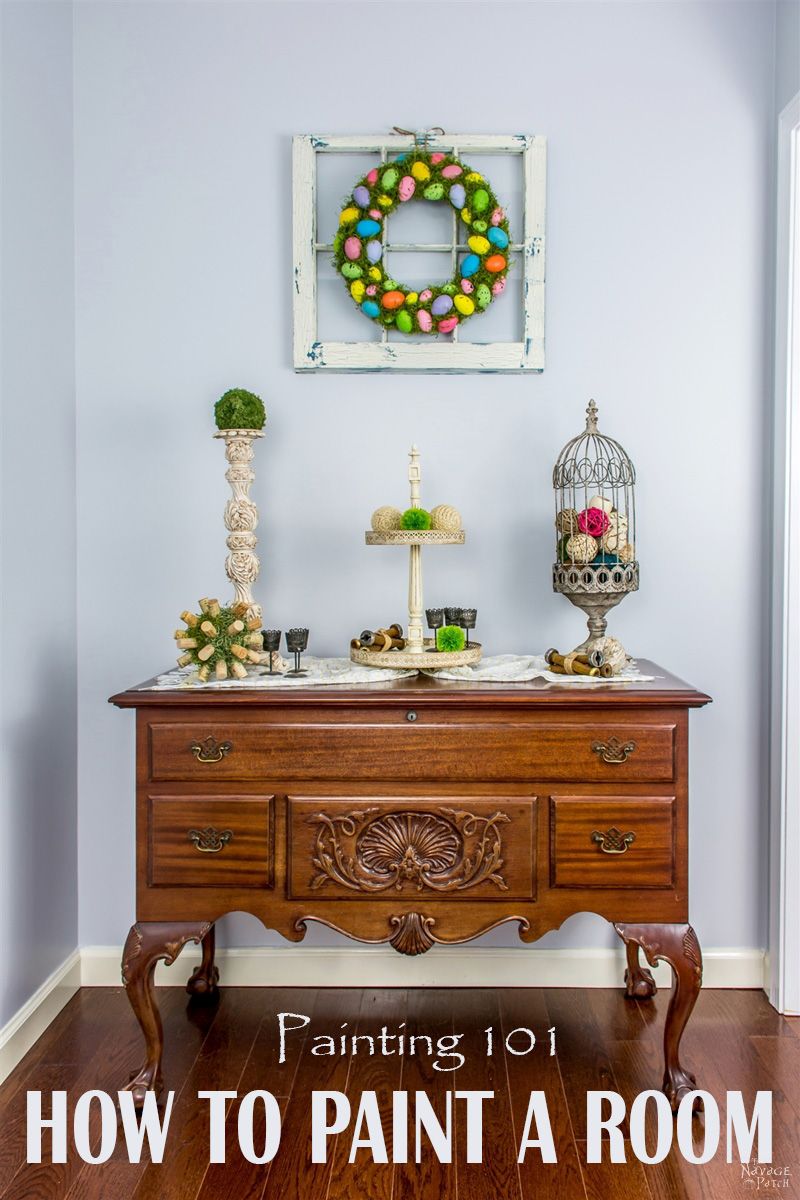
We love the color of our living room walls (Behr Natural Gray), but it sure took a while to find the right color! The same goes for all the other walls in our house. We’ve painted every wall at least once, many of them twice, and some of them three times! We are now expert painters, and we’re not done yet! Since Greg has limits for how many times he’s willing to repaint a wall, lately I’ve been doing most of the painting. I still have a few rooms to go, and I’m ready to get to it, so what better time to show you the tricks and techniques I’ve learned from my three years’ experience in painting walls?
But before jumping in to how to paint a room, I want to give a “LONG POST” warning, so you can grab a cup of coffee or tea before carrying on with the rest of post.
Since this is a complete guide on how to paint a room, first let’s talk a little about the paint itself: you know…the differences between high-quality paint and standard paint…or are there any differences at all? Apart from the price, the biggest difference between high-quality and standard paint is the amount of what I call goodies they have. First, let’s look at the usual suspects that you’ll find in a can of paint. Don’t worry, this won’t be a boring chemistry lesson…it’s all good info, really! 😉
All paints have two types of pigments: prime and extender. Prime pigments provide the color and hiding power (think of hiding power as the optical performance of the pigment – the better the hiding power, the better one coat will cover and “hide” the surface underneath the paint). Prime pigments are the expensive pigments. Extender pigments are referred as fillers, and they are less expensive They contribute very little to the color and are added to the paint to increase the pigment volume at little additional cost.
Then there are additives and binders (or resin). Binders contribute qualities like adhesion, gloss, durability, scrub and stain resistance, moisture and crack resistance etc., while the additives would contribute to shelf-life, overall feel, surface-life (on-the wall life) and UV- and rust-resistance of the paint.
And then there are solvents (primary and co-solvents), which also define the quality of the paint, but not with a positive correlation. Primary solvents liquefy the paint and carry the solids. In other words, if you are buying a water-based paint, then the primary solvent would be water. Co-solvents, on the other hand, help your paint form a tough and durable film. But with the low VOC (Volatile Organic Compounds) trend these days, paints tend to have less co-solvents. While the primary solvent usually constitutes 50% to 75% of the total paint volume, co-solvents only account for 0% to 10%.
Among all these ingredients, pigments, binders and additives are what I call my goodies, whereas solvents are the liquid. The bottom line is that a high-quality paint will have less liquid and more goodies in it, and would therefore give a better experience while painting and better end-results when finished.
Now that we know more about the paint itself, let’s talk about choosing the color and the sheen.
Tips On Choosing The Color And The Sheen
Consider the artificial and natural lighting of the room.
When we first moved to our home, I couldn’t wait to change our wall colors. Therefore, despite all the great advice I got on why I shouldn’t decide on the wall colors before living in our house for a few months, I decided that we should jump right in and paint everything. And you know how well that decision worked out, right? We ended up painting our entire house almost twice and some rooms even three times! So my first tip on this topic will be:

This is what I call the Golden Rule. Lighting is the most important factor, because it changes the appearance of colors:
- Direct sunlight shows the colors in their natural form (without any additional affects).
- Indirect sunlight tends to make colors appear warmer than they actually are.
- Artificial lighting can cause colors to appear warmer or cooler depending on your lighting choice (incandescent warmer, fluorescent cooler, etc).
In our first round of painting the house, we were in our “little did we know” era, hence we happened to paint our living room (which gets a lot of direct & indirect sunlight) with Martha Stewart’s Cayenne color (a very nice terracotta-ish color). By that summer, Greg and I couldn’t bear spending time in that room, because it just felt too hot! Now that we know better, we learned how lighting and color can change the “perceived temperature” of a room. Now we tend to go with warm colors for our north-facing rooms and cool colors for our south-facing rooms.
Use the color illusions to your benefit.
Painting is all about creating illusions, and color is the best tool, as it can alter or define the feel of a room.

Additionally:
- subtle colors make a room seem spacious.
- intense colors make a room seem smaller.
All of these illusions are influenced by the lighting and the colors around it. So with this, we again visit back to the Golden Rule, as light is one of the main factors that affects a color’s appearance 😉
Darker colors tend to show more imperfections on the paint’s surface and the wall underneath due to their low Titanium Oxide (TiO2) content. TiO2 is the pigment that gives paint most of its hiding power. But the content ratio of TiO2 also defines how dark your paint can be tinted, as it is a white pigment. This is why darker colors usually have lower hiding power than lighter colors. Counter-intuitive, right?
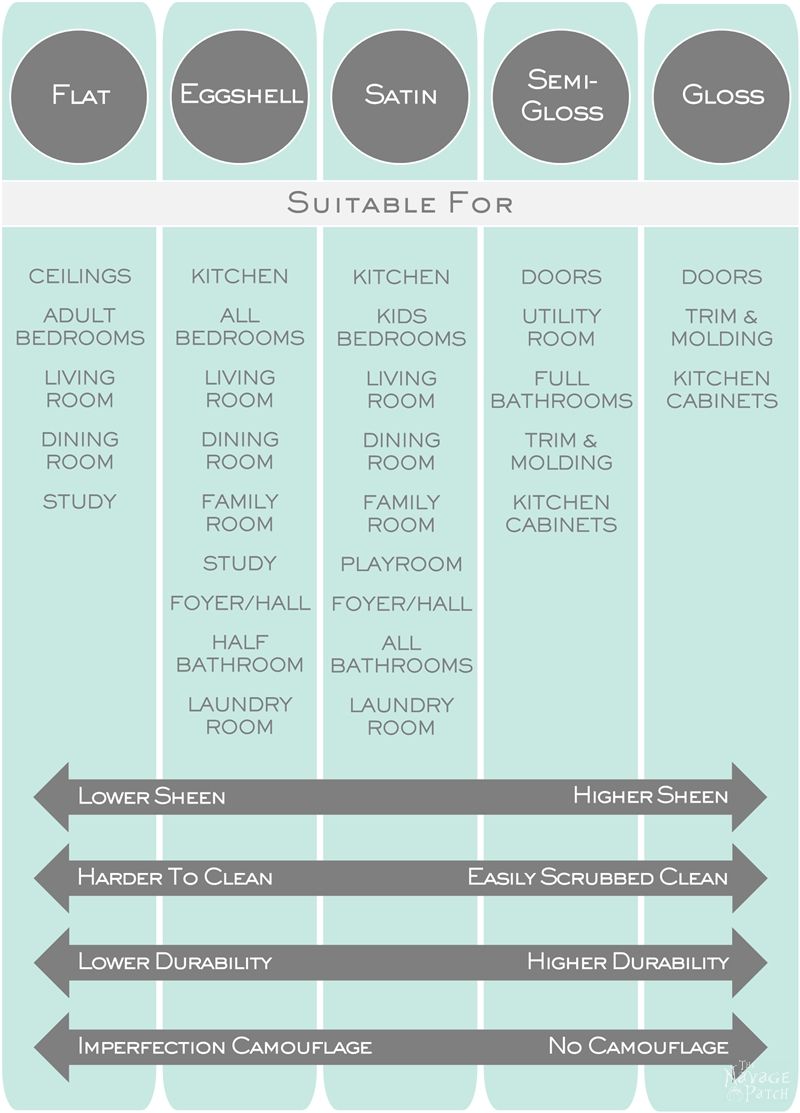
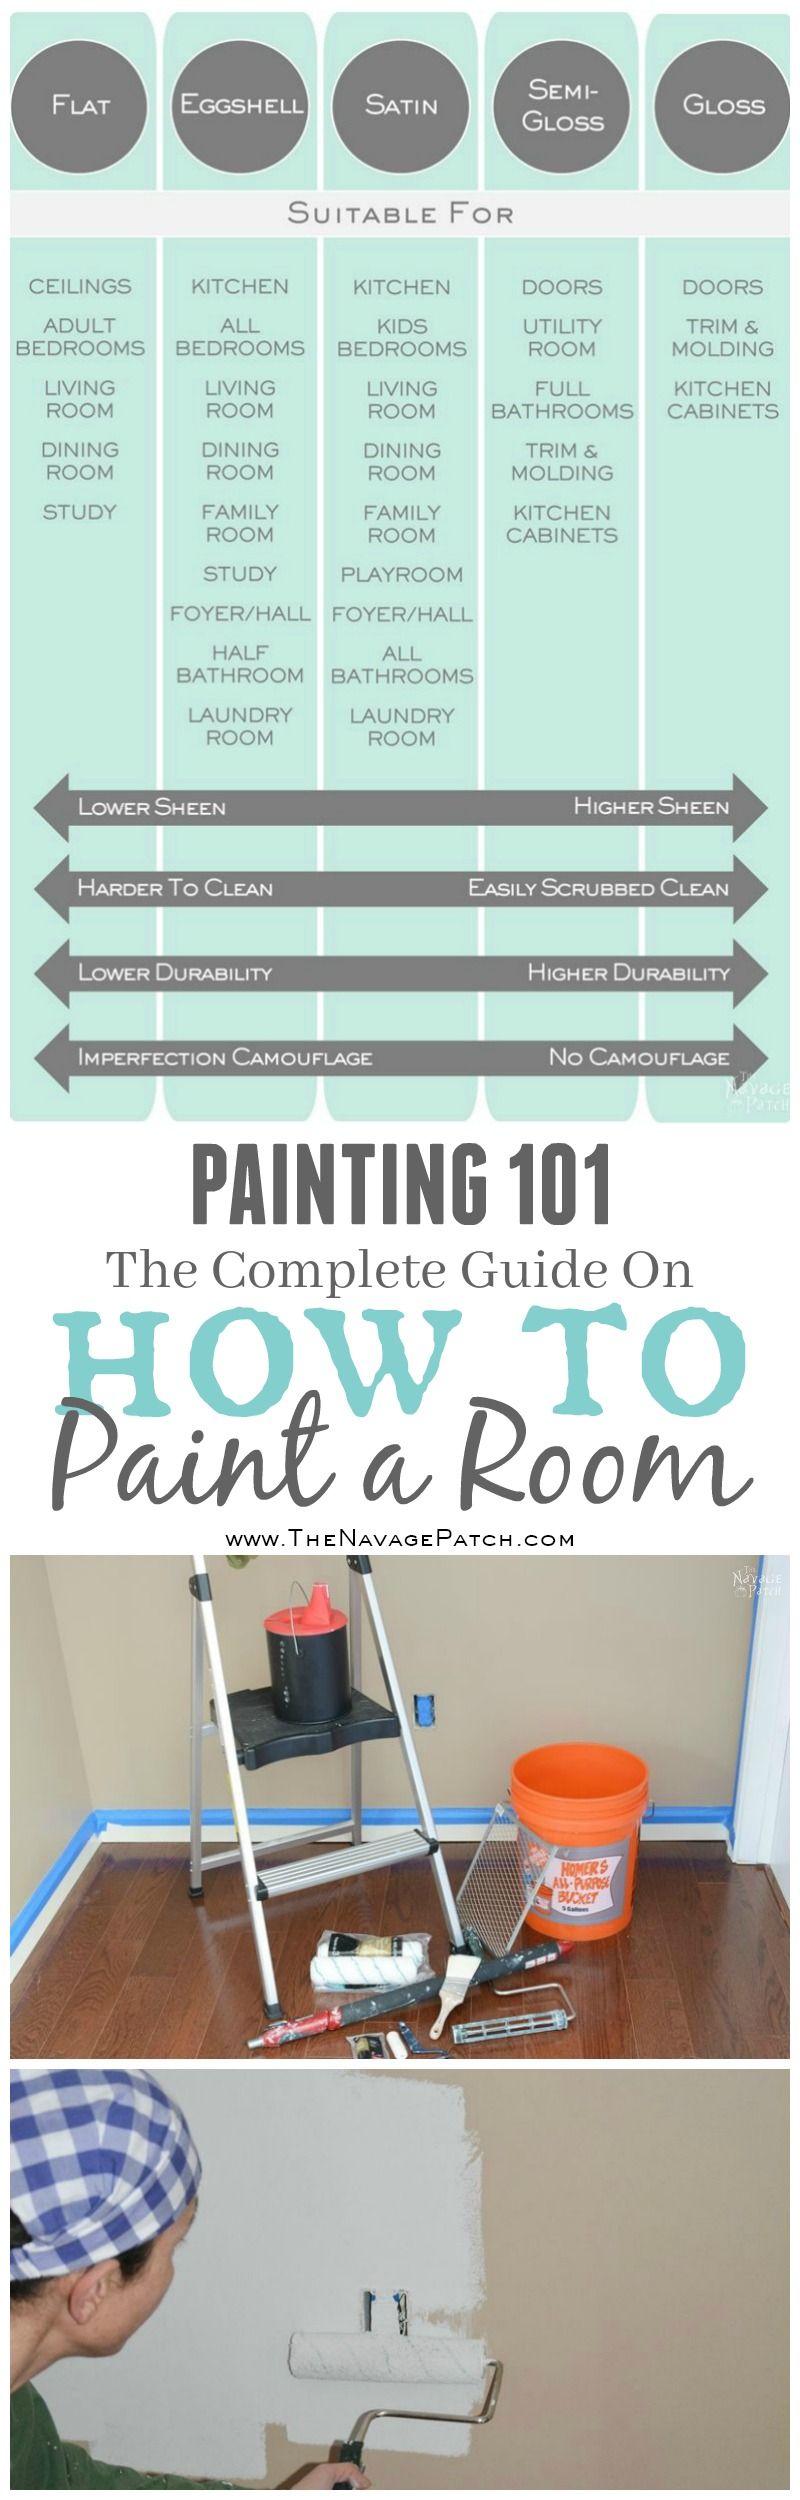
First, decide on the sheen, and then narrow down your color choice.
Sheen is a measure of reflected light, so it influences a color’s appearance when viewed from different angles. Glossier sheens tend to show surface imperfections more than flat sheens, since the angles created by the imperfections reflect light differently.
Sheen affects the durability and cleanability of the paint: the glossier the sheen, the more durable and cleanable the paint. That said, touch-ups are always easier with the lower-sheens like flat and eggshell, as they will hide the imperfections much better. Therefore, the best advice I can give on this topic is:

As a picture can tell a thousand words, I prepared the table below to provide some guidance on how to choose a suitable sheen based on the room/area. I hope you’ll find it useful! 🙂
Paint chips are good, but paint samples are better.
Most brands give their paint chips for free, and they are helpful when trying to narrow down your color choices. But once the colors choices are down to two or three, try the paint samples on your wall to help you decide on the final color.
As different light conditions affect the appearance of colors [never forget the Golden Rule! 😉 ], here are a few things to keep in mind when trying the paint samples:
- Paint two coats of big swatches (even larger than 12″ x 12″) to resemble the final look of the wall.
- Leave the swatches on your walls at least a day, so you can see how the color changes with the light over the course of a day.
- If you are planning to use the same colors in another room, then instead of painting the big swatches directly on the walls, just paint a piece of drywall or foam board with 2 coats of sample paint. This will allow you to move the swatches to any room or any place in a room to see how light affects the color throughout a day.
- Certain brands do not make their paint samples in all sheens, so just go for the closest sheen when you are buying your sample.
And as a bonus hint…
Trust your Designated Photographer’s eye!
I know this sounds a bit strange, but every home has a Designated Photographer who has a better eye for photography than other family members. In our home, our Designated Photographer is Greg! What can I say…apparently my eyesight is not that great, and I can’t even differentiate the undertones in certain colors, just as I can’t distinguish dark navy blue from black…but of course, we discovered this only after we painted our home almost twice with the colors I chose! LOL. I know, right?
Nowadays, I only join in when it comes to the “light/dark/cool/warm” selection and ask him to choose the color that will work best in that room. And oh boy!..does he do a great job with that!
So, trust your Designated Photographer’s eye, as he/she will see more than you, including light illusions, how colors work together, permanent features and other details of a room. Seeing all these aspects becomes important when you want the paint color to highlight all the great features in a room and minimize the attention on the poor areas.
Now that we have talked about what to consider when choosing the right color and the sheen, let’s have some action, shall we?
How To Paint A Room
Planning
Although planning to paint a room doesn’t take much, here are some things to keep in mind:
- If you are planning to paint an entire room from ceiling to floor, start with ceiling first, because unless you cover your walls entirely, you may end up splattering them. Once you are finished with the ceilings, then you can move on to walls, then the trim and finally the floor.
- If you are painting the floor, start with the farthest corner from the door and make your way towards the door. Although this is common sense, on some of the construction projects I have worked, I have seen painters who forgot this simple rule and either had to step on the painted area or had to wait for the paint to dry properly to be able to exit the room!
- I usually paint in the fall, winter or spring, as those are the times we have low to normal humidity in our house, and the room temperature is always around 70ºF. These are the perfect conditions for taping and painting.
- If you are buying the paint from Home Depot or Lowe’s, keep in mind that you can’t return it – even the unopened cans – if you change your mind or don’t like the color or just have too much leftover paint. Before buying paint, calculate your need so you buy only enough: typically, a gallon of paint will cover 200 sq feet with 2 coats of paint (400 sq feet with a single coat). That said, covering textured, rough or un-primed surfaces may require more paint.
Prep work
Prep work is the most tedious part of all, but trust me when I say: the better your prep work is, the quicker and easier your painting will be, and the better end-results you’ll get. I don’t cut corners when it comes to prep work!
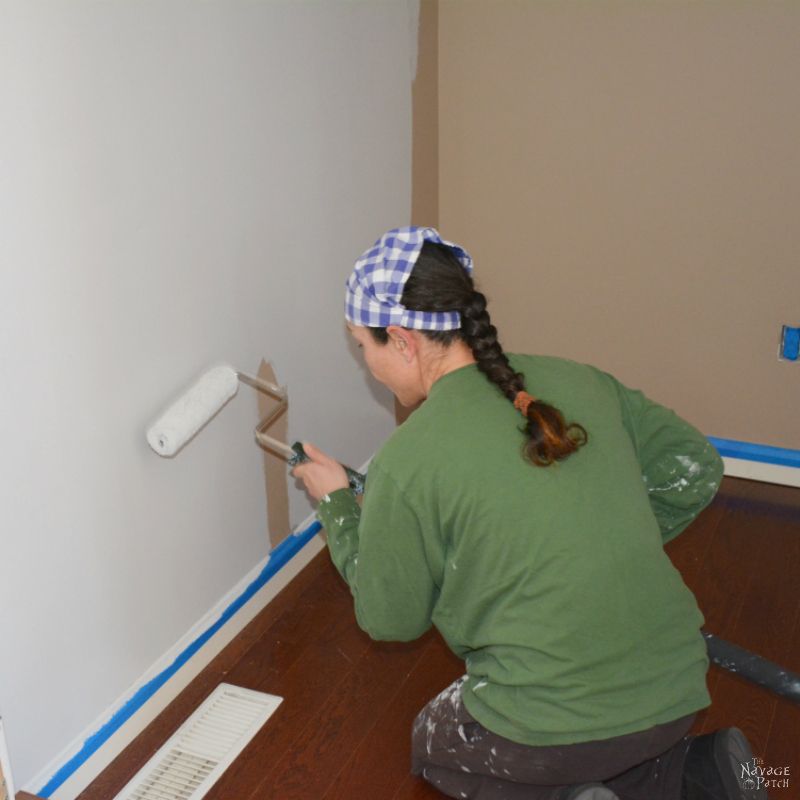
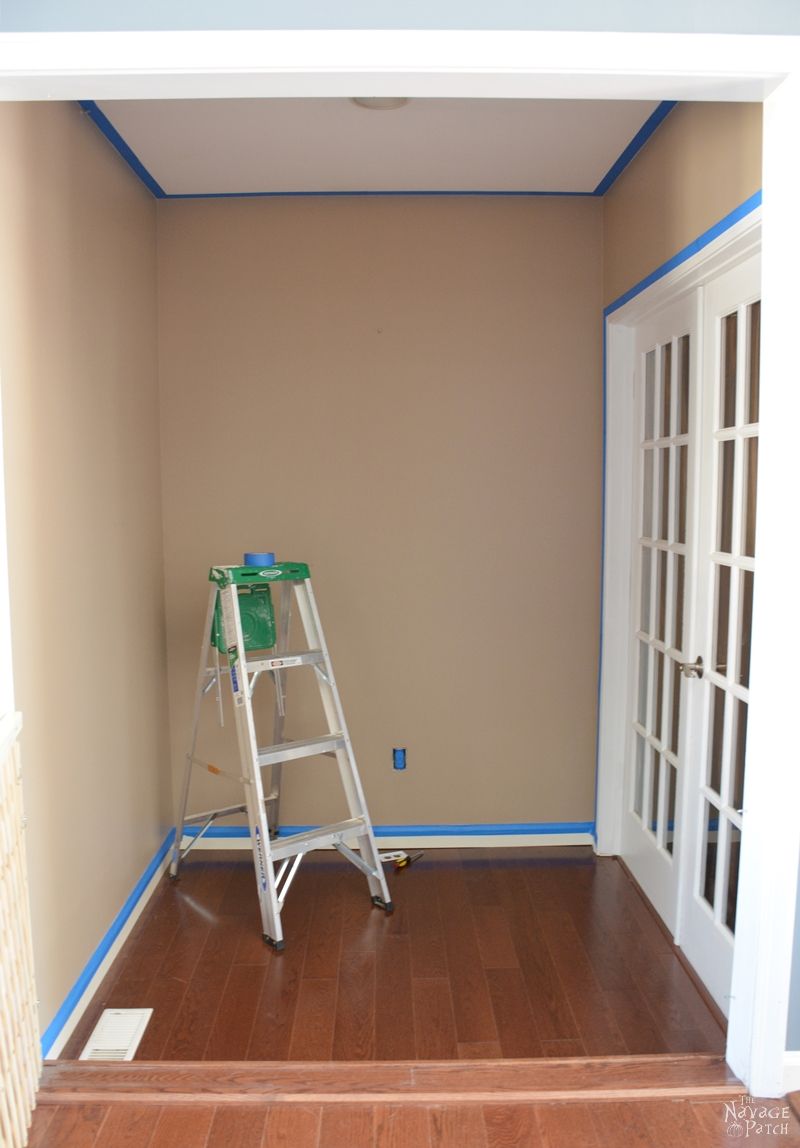
As I prefer working with a roller more than working with a brush, first I start by taping off almost everything in a room: trim, edges of the ceiling, and the outlets/switches. Although taping all these areas takes time, I save that and a lot more during painting, since I minimize the need for cutting in. Unless I am painting a room with a popcorn ceiling or painting a tight area where I can’t fit a roller, I almost never use a brush when painting walls.
Here are my DOs and DON’Ts for taping:
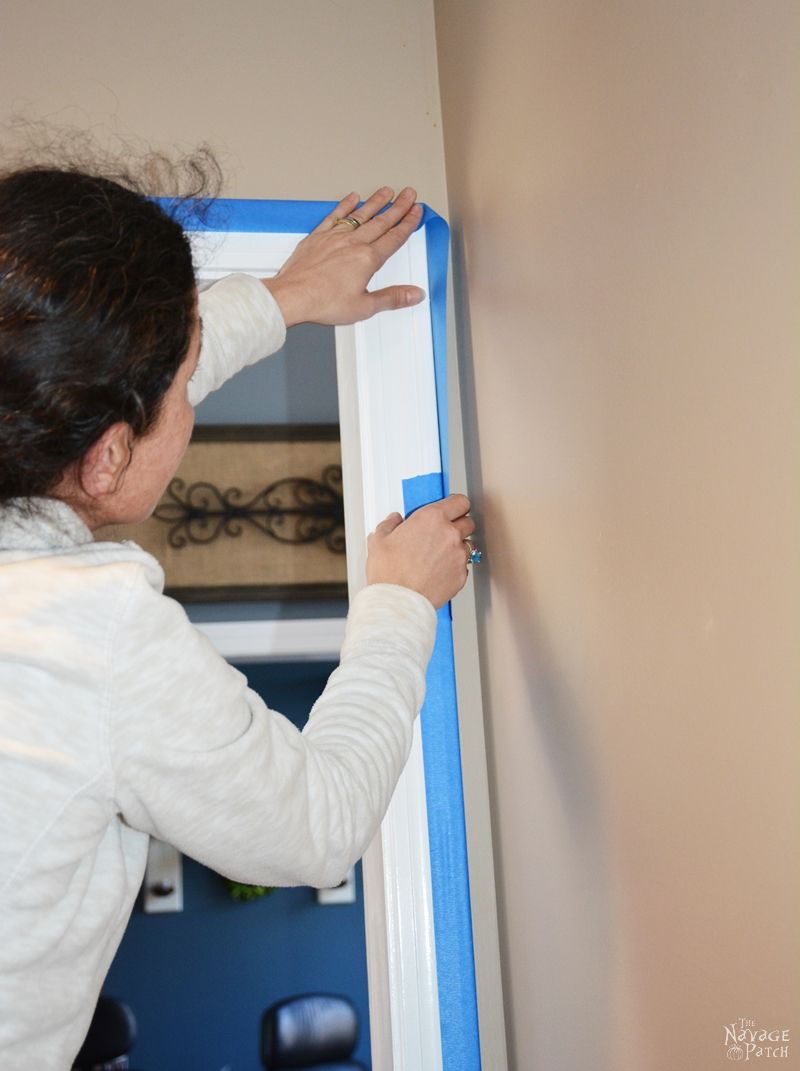
- As masking tape occasionally leaves a sticky residue behind, I prefer using the 1.88″ original blue painter’s tape. And no… there is no need to get fancy with the tape, since they all do the same job, if you know how to seal the edges.
- Before taping, I wipe the trim and the edges of the ceiling with a clean, dry cloth, as painter’s tape sticks better to dust-free and dry surfaces.
- I try to tape using long strips. Longer strips help prevent paint from seeping underneath the tape.
- I never stretch the tape, because stretching will prevent the tape from sticking properly and will allow paint to seep underneath.
- Once I place the tape, I burnish it, as this helps to remove the air bubbles and helps it to stick properly. In other words, I rub the tape with my finger nails, applying enough pressure at the edges of the tape. If the tape still doesn’t stick properly, then I use a putty knife to seal those edges. That said, I always put the least amount of pressure necessary on the tape when taping ceilings, because flat ceiling paint is not durable, and the tape may pull off the existing paint when you peel it off.
- I make at least two-inch-long overlaps when connecting two sections of tape (as shown in picture below).
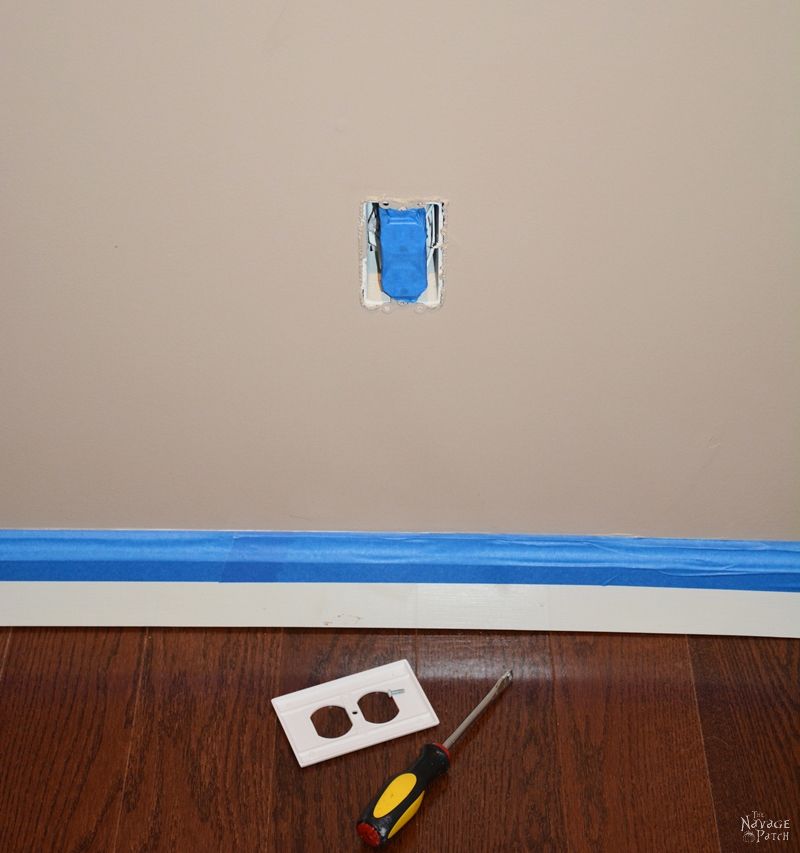
Once I am done taping the trim (meaning baseboard and all other woodwork) and ceiling edges, I remove all the wall plates and tape the front face of the outlets and switches – of course without touching any cables! I do this so I can paint over them without having slow down in those areas.
Hint: after I remove the wall plates, I put them in a small Ziploc bag together with their screws, so I won’t lose the screws.
After taping, I get ready for the dirty work. I put on my painting clothes (old clothing that I don’t mind ruining) and a bandana to protect my hair from the dust and possible paint splatters.
Since our house is fairly new (built in 1996), I don’t test the existing paint for lead. But if you are living in a house that was built before 1977, then make sure to test the existing paint for lead before you do anything with those walls and trim. If the existing paint contains lead, then skip the next step (which is repair and sanding), as exposure to lead-paint dust or chips can cause serious health problems. Please take proper safety precautions when dealing with lead paint, because we love having you around as our reader! For even more exciting safety talk please visit our Disclosure page. 😉
Now that we are done with the safety warning, let’s move on to the next step.
I repair the walls, if needed, and then I give the walls a good sanding with a sanding sponge. I apply very little pressure, as this is only to get rid of the uneven areas and to smooth the wall surface. Although while doing this little area I forgot to wear a dust mask, I suggest you wear one, as inhaling paint dust is not good for your lungs.

After sanding, I wipe the walls with a damp cheesecloth to clean them. If I am working on the kitchen walls, then depending on how dirty they are, I may use a degreaser or TSP (Tri-Sodium Phosphate) instead, because paint won’t adhere to greasy or dirty surfaces. And if I am working on the bathroom walls, then the prep takes me even longer, as I watch out for mildew spots. I make sure to kill all the mildew before I re-paint the walls, because those spores can live under the paint and can ruin the newly-painted surface in the long run. As I said, I never cut corners with the prep work when painting walls!
When I am finished cleaning the walls, I vacuum the baseboard and the floor, so that dust on the floor (from sanding) won’t get kicked back up and stick on the walls while I am painting. And with that, the walls are ready for me to paint, so I gather my tools and supplies for painting.
Tools and supplies
Ladder: I use a ladder mostly for taping and painting the wall edges where the wall meets the ceiling. As ladder incidents happen quite often, I try to minimize the need for a ladder, and I always be very careful when I am using one. I suggest you do the same. Remember: safety always comes first!
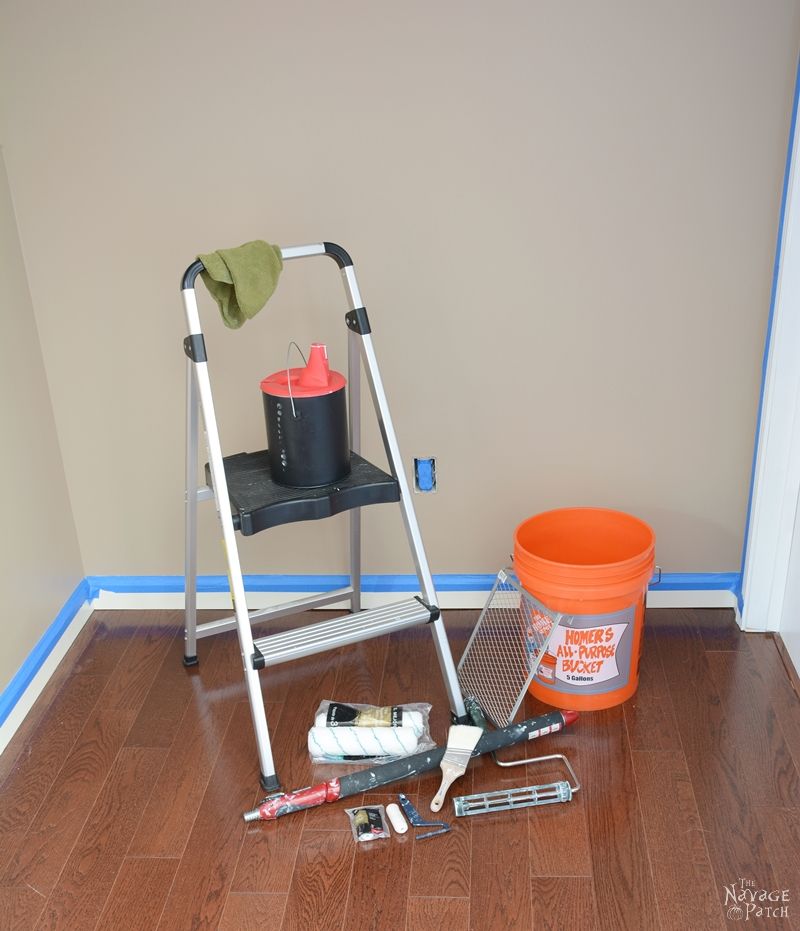
Extension Pole: I think an extension pole is as important as the roller or the paint itself, because it minimizes the need for a ladder, and it may even speed up the painting process! I call mine “my little life saver,” and it’s not an overstatement. Seriously! It is practical, light weight, sturdy, and it simply eases my life, as it extends with the push of a button. Besides, it is not at all expensive compared to others I’ve seen at our local hardware store. I couldn’t recommend it more, as it saves a lot of time and effort during painting.
Roller (roller frame): There are basically two things you need to consider when choosing a roller frame: the size and the squeakiness. Yes, you read it right…the squeakiness! If you are planning to paint a big room and happen to have a “Holy Squeak” like my old one, it will suck all the joy out of painting! It may even drive you insane! LOL. So when you are buying a roller frame, just check if the frame turns/spins without any issues when you apply a little pressure. Paying a little bit more for a quality frame will pay off if you have a big job ahead of you. Trust me!
Although you may find several sizes at your local hardware store, 9 inch frames are what most DIYers use. If you are considering a bigger size (such as 14″ or 18″), unless you are a professional painter and have lots of surface to paint, I would suggest you to reconsider, as they are hard to control. 😉
As I mentioned before, I try not to use a brush, because I don’t like having a brushed band on the walls I paint. That is why I also have a mini roller which works wonders in tight areas or edges. If you’d rather use a roller than a brush, then I highly recommend getting a mini roller, as I am sure you’ll love the speed and performance this little guy will provide you.
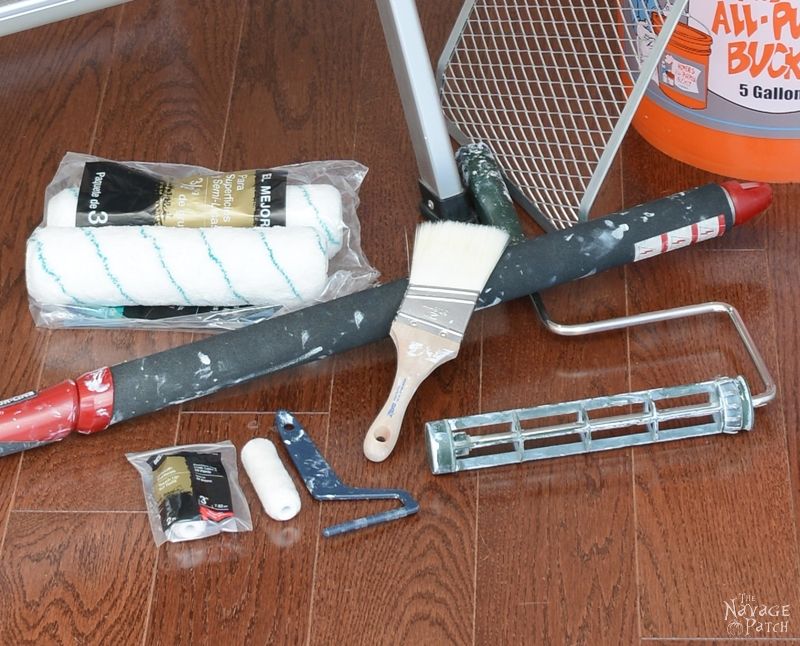
Roller Cover (Sleeve): The rule of thumb for buying a sleeve is the smoother the surface and the higher the sheen, the shorter the nap length should be.
- Short nap (1/4″ to 3/8″) for smooth surfaces, especially when using high-sheen or oil-based paint.
- Medium nap ( 3/8″ to 1/2″) for flat, low-sheen or semi-gloss paint. Basically it is suitable for almost every wall in a house 😉
- Long nap (1/2″ to 1″) for rough surfaces such as pop-corn ceilings, textured drywall, brick or masonry. When using a long nap sleeve don’t overload it with paint, as long-napped sleeves can create quite a bit of splatter.
Although most DIY websites online will recommend buying a high quality roller cover (which are pricier), I like using Home Depot’s “Best 9 inch (3/8″ nap) microfiber roller cover” when I paint. It may not be the best roller cover out there [no pun intended ;-)], but I have always had good results with it. Besides, it is cheap enough for me to throw it away after painting instead of dealing with the hassle of cleaning.
Cut-in Brush: I only use a paint brush when the area is too tight to paint with a mini roller. If you are familiar with my paint projects, then you would know that my all time favorite paint brush is Zibra. Once you use one, you won’t want to use any other brush, as no other glides on a surface or carries the paint as well as a Zibra does. Depending on what I am painting, I either use a Zibra 2-inch cut-in brush or a Zibra 1-inch square paint brush. If I can’t find a Zibra cut-in brush at our local hardware store, then my second choice is a Wooster 2-inch short angle sash paint brush, as it feels very comfortable in hand with its flexible handle.
Here’s a hint for choosing the right brush: if you are using oil-based paint, go for natural bristle brushes, because they hold oil-based paint better than synthetic bristle ones. But if you are using latex paint, then go for synthetic bristle brushes, such as nylon or polyester, because synthetic material won’t absorb water like natural fibers.
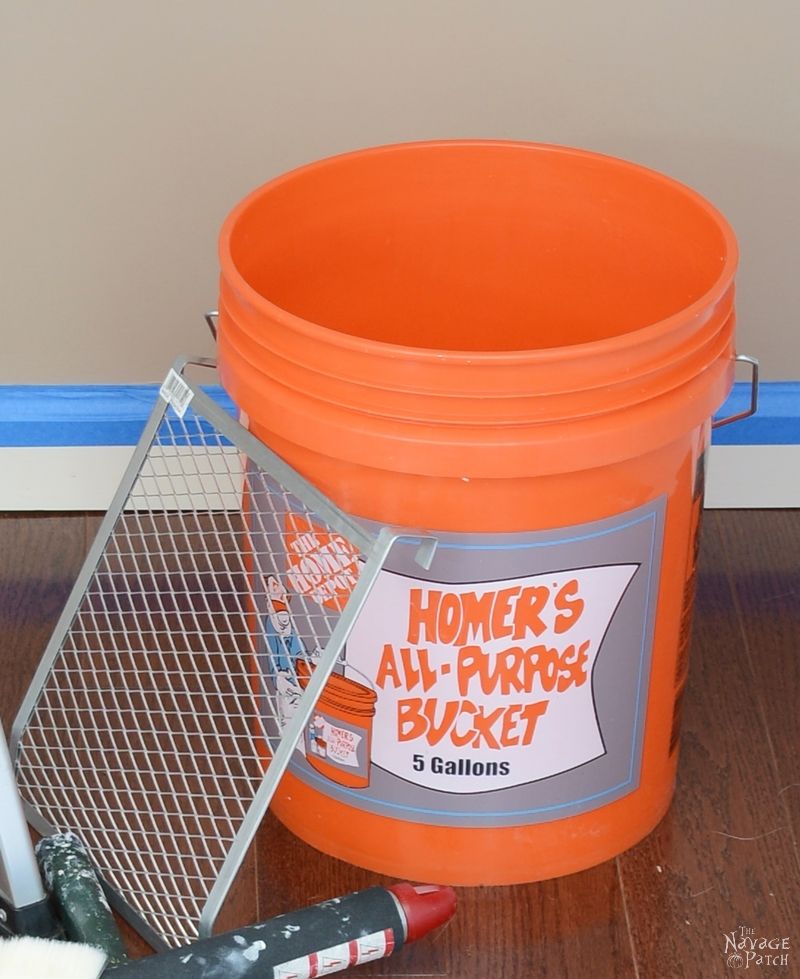
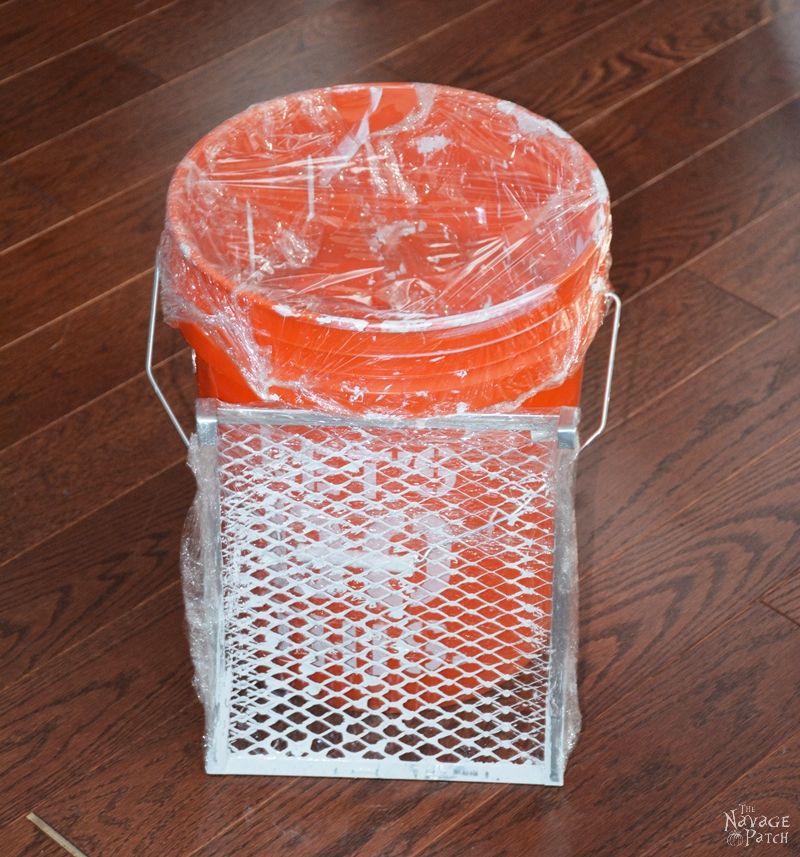
Paint Bucket and Roller Screen/Grid: If you are planning to use a paint tray to paint a room, I urge you to instead buy a paint bucket and a roller screen. I don’t want to bore you with all of my reasons why, but you’ll be glad you did! 🙂
Paint Can Cover With Pour Spout: This is optional, but it is again one of those little tools that makes your life easier. We have one for every open can of paint. I haven’t tried any other brands, but I can swear by the one we have: it is practical and easy to use. Even in long-term storage, it keeps the paint from drying out much better than the paint can’s original lid. It is simply awesome!
Before using a paint can cover with a pour spout I used to poke holes in the rim of the can, so the paint could drip back inside after each pour. If you don’t poke holes, the paint will dry in the rim, and you’ll have trouble putting the lid back on. But with these pour spout covers, I don’t go through that trouble anymore.

Drop Cloth: I know, I know…you haven’t seen a drop cloth in the pictures till now (nor will you be seeing it in the upcoming pictures!), because I don’t bother using one when painting small areas. Besides, our first floor is hardwood which has a good protective coat, so wiping off paint drips is easy. That said, anytime I paint a room that has porous flooring such as carpeting, bare concrete, tile (grouting is porous) or unprotected wooden, I definitely use a canvas drop cloth.
I know there are cheaper options, but if you can afford it, I suggest getting a canvas drop cloth, as it is the best. First of all, it is the most resilient and durable one out there. Once you buy it, it will last you for years. Second, it absorbs paint without letting it seep through to the floor like thin bed sheets would do. Plastic drop cloth won’t allow paint spills and splatters to seep through either, but the paint doesn’t dry as quickly on a plastic drop cloth as it does on a canvas one. And guess why that is important? Well, if you step on those paint drips, which you most likely will [experience talking here, hahahaha :-D], you’ll end up carrying it all around the room.
If you are worried about a canvas drop cloth being slippery (since you can’t really tape it down as well as you could with plastic or paper ones) you may want to try the ones that have rubberized backing.
Another thing to keep in mind for a drop cloth is what you are planning to paint, and if you are using paint sprayer or not. If your project is painting ceilings or if you are planning to use a paint sprayer, then a plastic drop cloth or old bed sheets would be a better choice in terms of cost, since you’ll need to cover a lot of space.
Damp Cloth: I always keep a damp microfiber cloth with me to wipe drips and splatters. Although I rarely need/use a dry cloth, I still keep one close and handy: my painting clothes! hahahaha 😉
Goof Off: This is again optional. I rarely use it, but I thought I should list it, as it does a pretty good job to clean paint off almost everything.
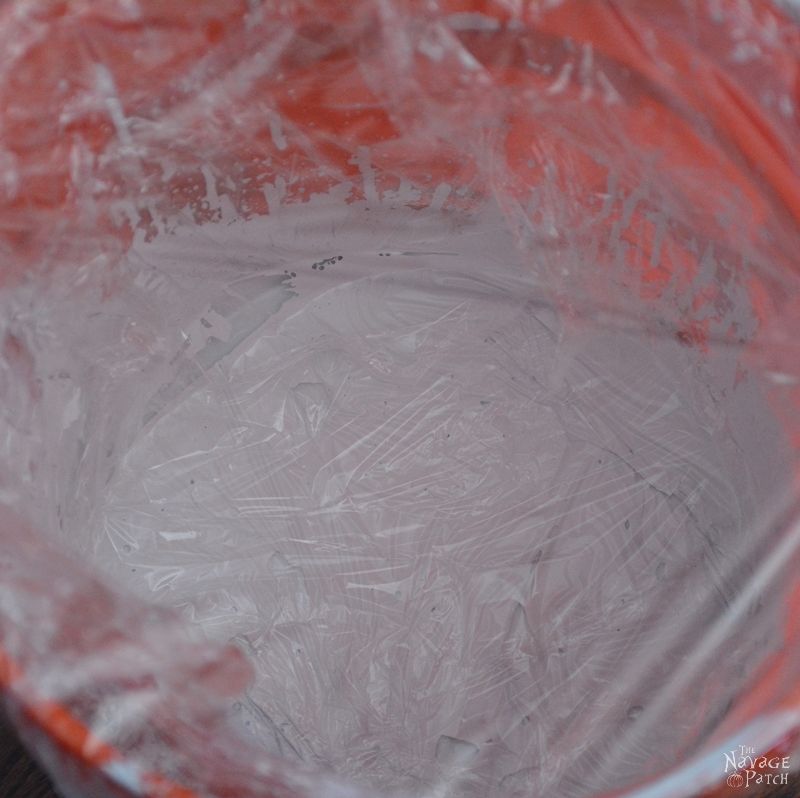
Cling Film (Saran Wrap): If I need to give a break for more than 10 minutes, or if I am waiting for the first coat to dry, then I use cling film to wrap my roller, brush, paint and the paint bucket. Trust me when I say this: no plastic bag or roller/brush cover is as good and airtight as cling film! Only with cling film can you let your paint wait a day in the paint bucket or on the roller without worrying about it drying.
And with that, we are ready to get started!
Start rolling
First, I rinse my paint bucket and dry it with a lint-free cloth to make sure there is no dust in it. Then, I wet my hands slightly and rub the roller cover 3-4 times. By doing so, I clean the roller cover from any loose lint and fibers. Once I am done with this little prep, I pour the paint into the bucket and attach my roller to the extension pole.
To load my roller for the first time, I dip it into the bucket about 1/2 inch and start rolling it up and down against the screen. I repeat this step and by the 4th or 5th round, my roller is loaded with a good amount of paint.
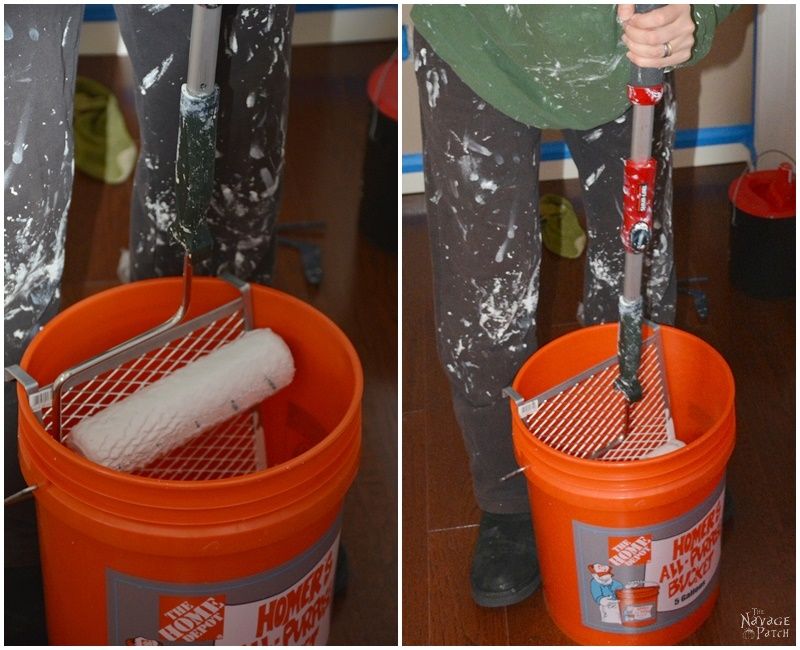
I know submerging the roller into the bucket seems irresistible, but don’t do it! Once the roller is submerged, paint will seep into the small gaps between the frame and roller cover and will get trapped there. Later on, that trapped paint will find it’s way out in the form of millions of splatters!
For the same reasons, if you need to put your roller down for a minute or two, don’t dunk it in the bucket. Just place the handle’s U-shaped neck on top of the grid, so it hangs without touching the paint in the bucket.

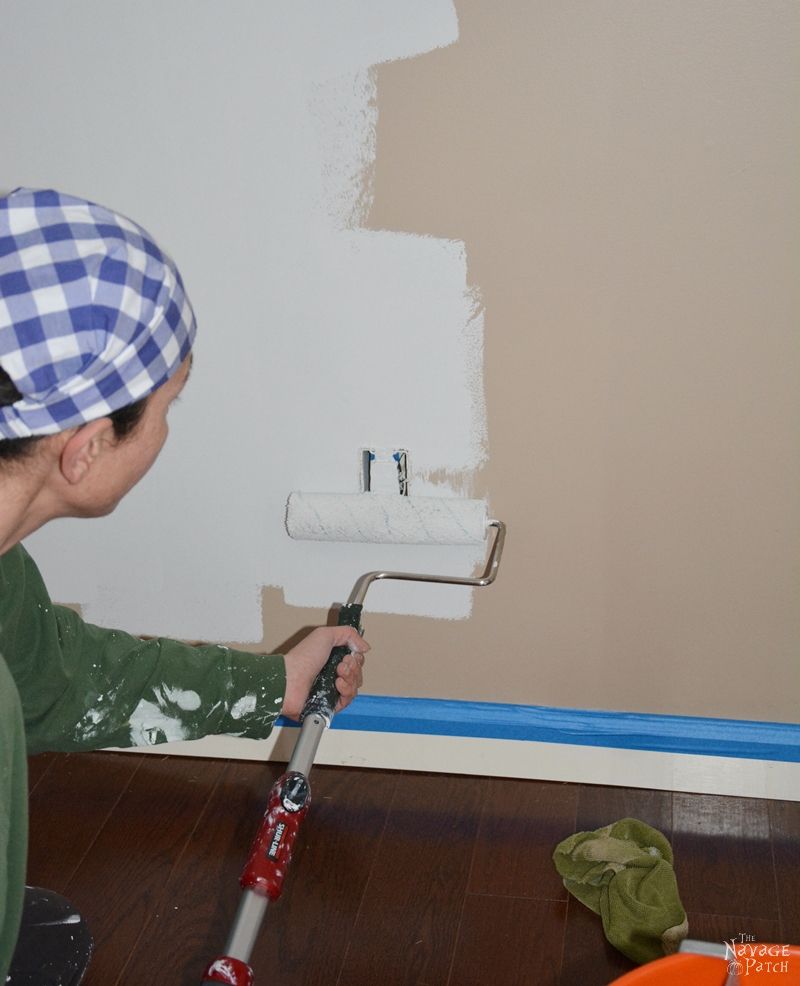
Once my roller is loaded, I start painting. I start from one end and move continuously toward the other end of the wall, because keeping a wet edge on the wall is the key to avoiding lap marks.
If I am painting a normal-height wall (8 to 10 feet) I make a “W” shape and start spreading it to fill in the gaps. But with walls higher than 10 feet, I make an “N” shape. A higher wall means that I will be spending more time reaching all the way up and down, so I don’t like to go to far horizontally with each roller of paint.
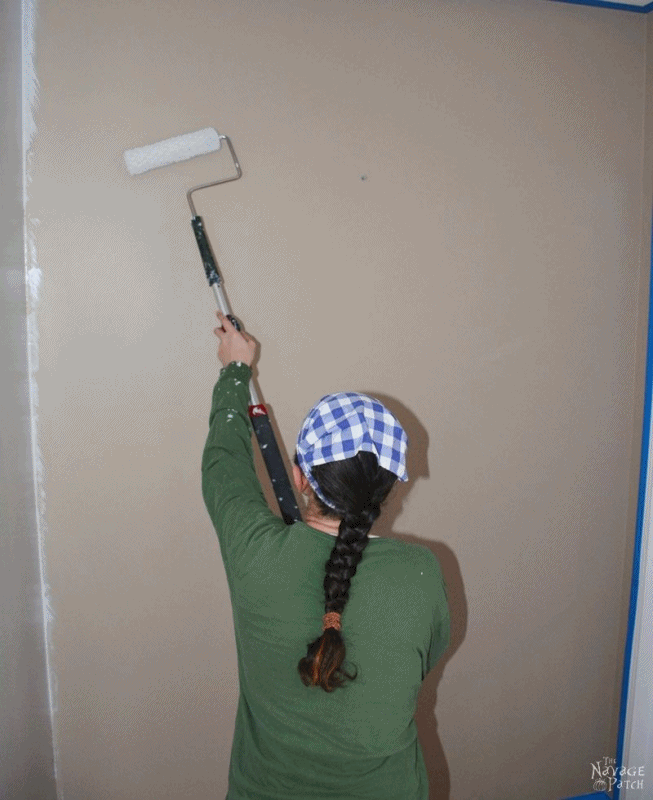
The key to easy and neat painting is never to force the paint out of the roller. In other words, don’t press the roller too hard against the wall. If you need to press hard just to get some paint on the wall, that means there is not enough paint left on the roller. At that point, just load your roller once again.
Depending on the area, I always do two coats of paint, if not three, as this is the usual standard in the construction industry: one coat of primer + two coats of paint. But nowadays, many paints come as paint and primer in one, so I skip the primer coat and just do two coats of paint. That said, if I am painting a brand new wall (bare drywall) I usually go for three coats.
First Coat
When I am painting the first coat, I always start with the main area and then move on to the edges. In the main area, I push my roller as close to the ceiling edge as possible. As can be seen from the pictures below, taping the ceiling edge helps a lot throughout this process. That is another reason why I always use 1.88″ original blue painter’s tape. Since it is as wide as a roller, it forgives your possible mistakes in advance. 😉
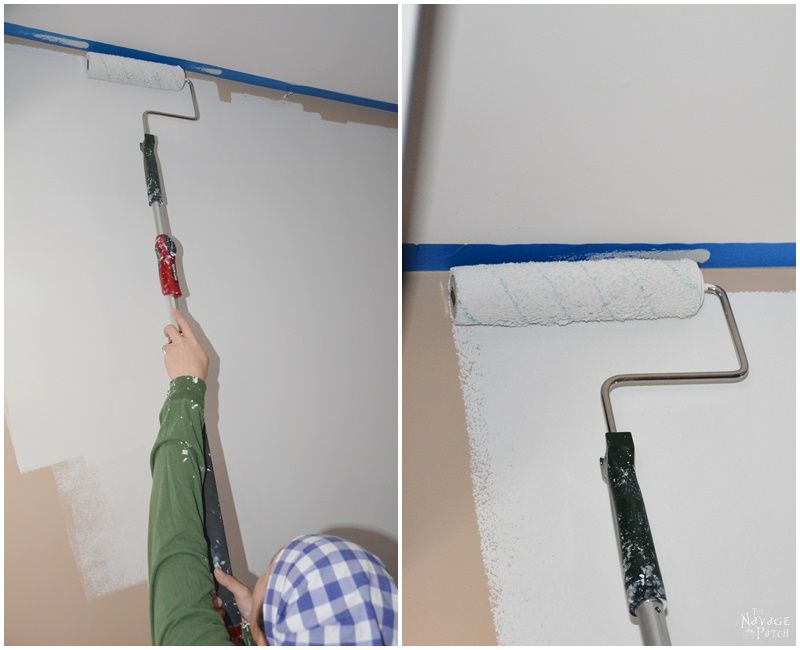
Once I am done with the big main area, I move on to the edges. During the first coat of painting, I try not to load my mini roller too much, as it helps with locking the tape’s edge even better.

As for the trim’s edge, I just roll right to it. It has been 3 years since I painted my first wall, and I experienced seeping paint only 3-4 times to date. That is why sealing the tape’s edge is important, as it saves you a lot of time with your paint process.

The same goes for the outlets. Since I taped the outlets, I can paint right over them. All these may seem like small details, but they help with the painting speed. Keeping a good pace is important to have a uniform spread, which of course effects the overall finish.
If I see bleeding (surface drips), I roll my roller over them:
- I never use my mini roller for these drips, only my 9 inch roller.
- I apply light to very light pressure to my roller.
- I don’t use a newly loaded roller or an empty roller. If I just loaded my roller, then I carry on with my normal painting, and when the roller is back to a normal load, I go back and roll over these spots.

And with that, I finish the first coat of paint on the first wall and move on to the first coat on the next wall.
Once I finish the first coat for all the walls, I check the surface for drips, roller lint, or other imperfections, and if I see any lint, I pick it off with my fingers and roll over that spot once again.
In between the two coats, I usually give about 1 to 2 hours for the paint to dry. If the room is big, then (usually) by the time I finish the last wall, the first wall would be dry, so I can start the second coat right away. But if the room is small, then I start wrapping my tools with cling film and wait until the first coat is dry.
I cut a big piece of cling film and place it directly on the paint in the bucket. I also put cling film over the inner walls of the bucket, so the paint splatters there wouldn’t dry, flake off, and get mixed into the good paint. I try not to leave any air bubbles when placing the cling film.
Once I am done with the inner part of the bucket, I also wrap the top, so everything is covered properly. Then, I wrap my roller and the roller screen, so I don’t have to deal with any dry paint particles when doing the second coat.
Here is a handy hint for you: if you can’t start the second coat on the same day, put the bucket and all the wrapped tools in a cool space. Cling film helps to keep the paint and the rollers intact for a full day, but in a cool space, you can prolong that duration for another half a day. In cold temperatures paint takes longer to dry.
If you are painting in winter time, the paint on outer walls will always take longer to dry than the interior walls. Before you start painting the second coat, always first check if the outer walls have dried.
Second Coat
When doing the second coat, I change the sequence: I start with the edges, then move on to main area. This time, I load my mini roller normal since I need to keep a wet edge to avoid a “band-look” (professionals call it “hatband”.)
I always start with the first wall I did when I painted the first coat, so the drying time remains the same for all the walls. Then the rest is the same. I load my brush and keep rolling until I finish the entire room.
Here are some bonus hints:
- Many professional painters “box” their paint. In other words, if they have multiple cans of the same paint, they pour all of them into the paint bucket, mix them together, then pour them back into the paint cans. This is done to avoid the slight variations of the sheen and color which the color mixer at the paint store may cause. You may want to do this, or you may want to go with my method instead: when starting a new wall, I make sure my paint can won’t finish halfway through a wall. If it seems like it will, then I use a new can and keep the one that was already open for future touch-ups.
- Before loading the roller cover for the first time, I make sure that I pushed it fully onto the frame. Otherwise, the roller cover will start sliding out little by little, and every time I load my roller, paint will get trapped in-between the roller frame and cover. And you know what happens then, right? Trapped paint finds its way out in the form of extra splatter. So in the same context, if in the beginning I don’t have much splatter, but later on happen to see a lot of splatter, I first check if my roller cover has slid from its place. 😉
- When painting a room with a popcorn ceiling, since it is almost impossible to tape the ceiling, I run a flathead screw driver along the ceiling edge. This creates a a small groove and helps me cut in without getting any paint on the ceiling. I have to say, this step helped us a lot when we painted Greg’s grandmother’s house, as all her rooms had textured ceilings.
- I never use the sample paint for touch-ups, as the sheen may not be the same. Besides, the quality of a sample of paint and a gallon or a quart of paint is never the same.
- I also never use a brush for touch-ups. I either use a good sponge brush and dab it on the wall to have the same roller effect, or I use my 4″ mini roller. Although there are even smaller rollers, I choose my 4″ one, because the smaller ones may not have roller covers with the same nap thickness.
- Since latex paint takes about 30 days to cure, regardless of the sheen, I don’t clean the walls before the paint cures. Although semi-gloss and satin sheen paints are more durable than others, that durability comes into full effect after the curing period. That said, any material that has a curing period (such as concrete, or paint) achieves most of its strength and durability by halfway point of that curing period. Therefore, if the walls get dirty before the paint is cured, I wait until at least 15-20 days to clean them, or if it bothers me too much, I just do a quick touch-up.
Finishing and cleaning
As soon as I finish painting the room, I go to the first wall I painted and start removing the painter’s tape from the ceiling edge and the trim. In other words, I try to peel of the tape while the second coat of paint is still wet. That way, I don’t run into the usual issue: the new paint’s film peeling off together with the tape. But if the second coat has already formed a tough film before I’ve had the chance to remove the tape, then I use a utility knife to slightly score the edge to release the paint film before pulling the tape.
When removing the tape, I pull it at such an angle that it is almost like pulling the tape back over itself (as seen in the picture below).
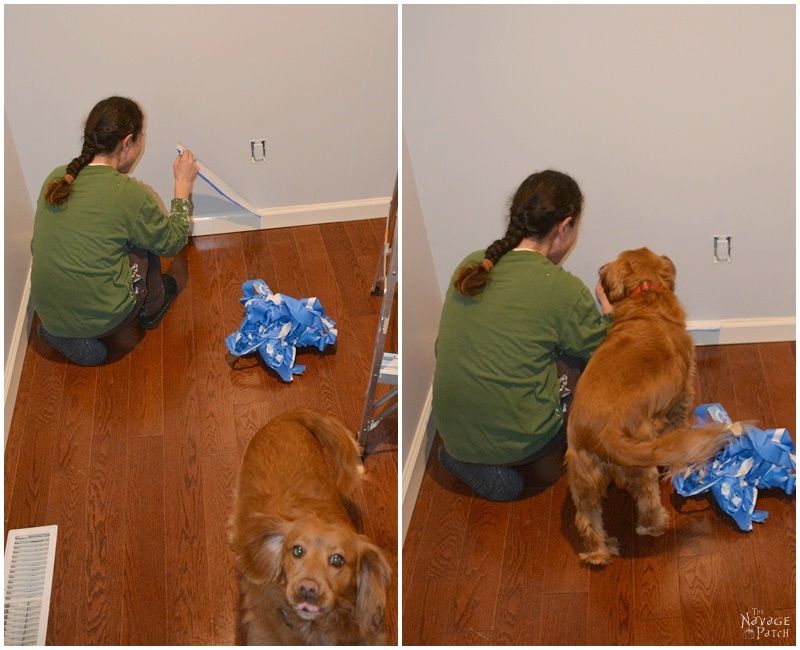
Another hint with removing the tape is to move your hand closer to the pull point, so the distance between wouldn’t be more than a foot. Since pulling the tape can be tricky, I sometimes ask for for advice from our Master Tape Puller pictured above! 😀
When removing the ceiling tape, I try to be gentle, as ceiling paint is not durable enough to withstand a strong pull.
Once I am done with the painter’s tape, I move on to storing the leftover paint. Using a paint strainer, I strain most of the paint back into the can. After closing the can’s cover, I write the room’s name (and which walls, if applicable) on the can and store it in our basement, as it is a cool and dry area. As we don’t have a utility sink, I don’t clean the paint bucket straight away. Instead, I let the paint dry entirely, then I peel the paint from the bucket. Doing it this way saves me the mess and a lot of hassle.
Then I clean my rollers. Well…I only clean the roller frames, since I throw away the roller covers. I use warm to hot water and latex paint just washes right off of my roller frames. If I used a brush, I wash it with warm to hot water using a paint brush cleaner and some mild dish soap.
I give at least 24 hours for the paint to build a moderately strong film before I put the wall plates back in their places. Once that is done, my painting project ends.
If you managed to come this far, especially without taking any breaks, KUDOS TO YOU! 🙂 Did you know you read 6200+ words? I know it seemed like a small novel, but as you can see, when the topic is painting, I have hard time keeping my mouth shut (or my fingers from typing)! LOL 😀 Joking aside, I hope you found it interesting, informative and most importantly, a complete guide on how to paint a room!
Handan, xo
Don’t forget to save this idea to Pinterest, so you can find it again later!
well chatty handan, i read it all ha ha and i must say you did a good job with it, i was married to a painter for twenty some years and although he passed away in 1996 as i read i could still hear the words from his mouth matching your written words, he would have hired you in a new york minute xx
Wow, Chris, good job on reading the whole post, LOL! I kept asking Greg if it was too long, but he kept telling me “Nope. It’s good. Keep writing, woman!” He may have had second thoughts when I made him read through it twice! Hehehehe 😀
your page loads sooooooo slow
Hi Charles, thank you for the heads-up. We are aware that some people with slower internet connections or older computers have had issues with loading speed. We’ve taken steps today to correct the situation, so hopefully you’ll see things speed up over the next few days, as the changes get fully implemented. -Greg
That’s a really good tutorial Handan. I’ve found a few similar things out during my own attempts to paint, but I learned some new things too… including a couple of “why didn’t I know that BEFORE I painted my dining room?” moment 🙂
Great piece of work. Thank you!
Thank you so much, Suzie! When I first started painting I was pretty much like “How hard can it be? it is just painting.” Now looking back at it, I can see how naive I was to think so. It is not that painting a wall is hard, but not knowing all these little hints before, I managed to turn it into a never ending torture for both Greg and I. LOL :-D. No wonder why Greg will do anything but painting a wall -that is how much he dislikes it, hahahaha 😉
Handan, I wished I read this years ago before I learned many of these tips the hard way. 🙂 We’re a military family that moves every 1-3 years, so as you can imagine, we’ve painted quiet a few walls, too. Picked up the textured ceiling screwdriver tip from you today. I’ll have that in my arsenal now if I ever need it.
Thank you so much, Susan! That is exactly what I was thinking when I wrote this post: I wish I knew all this before we painted our house the first time – by now we would be done with it. But I guess this is our process of wising up with the DIY projects. Nowadays, I read a lot more before starting a new DIY project, so I can learn from others’ experience and mistakes, and save my time and money (if I can) by not doing the same errors 😀
I read the whole thing also. It is not story telling like Greg, but it is great and useful information. Will be pinning it. Btw Handan, seeing you on the large scaffold in a prior post of your 2 story den was very motivating. You rock!
Thank you so much, Nadine! I am so happy you found it useful! Oh there will be more of those moments on the scaffold as we are planning turn the kitchen’s main wall to faux brick wall. We’ll see how that will go, but before anything else we need to complete our living room makeover, so we are focusing on that at the moment 🙂
Hi Handan hope you all had a nice Christmas, Happy New year to you guys! Lots of good info here that you put out! I have learned a few hard lessons along the way with painting and choosing the right color thats for sure. I wish I had this info you put out years ago, LOL.
Thank you so much, Sandra! Happy New Year to you too! I love your blog’s new theme by the way. 😉
I made it Handan and it wasn’t even hard to do 😉 Loved these tips. It’s probably the most complete guide I’ve ever read and I learnt a lot. I really need to get one of those grid thingys. That’s a really cool little contraption and so useful too. Hope you guys have a beautiful 2017, can’t wait to see what you’ll be up to this year.
I am so glad you liked it, Michelle! 😉 I know this was a pretty long one, but I wanted to include everything in one post instead of scattering them into several small posts.
Oh that grid and the paint bucket are the best things ever as they make the whole painting process go faster. 😉
Great information! Pinned it to refer to on my next paint job! Thanks for sharing on the Pleasures of the NW’s DIY party!
Thank you so much, Helen! 🙂
Definitely some great tips, and they make painting go much easier too.
Thank you so much, Christine! 🙂
There’s so much goodness in this post! We’ve re-painted most of the rooms in the house, and will probably continue for a few years. Definitely pinning this post for future reference!
Thank you so much, Leslie! 🙂
Handan my father was a painter, and he never told me half of the things you have written here. Great tips and so practical. I’ll definitely be pinning this. Your little helper is also very cute!
Why, thank you…I am pretty cute…oh…you meant the dog.
Thank you so much, Mary! Oh Pepper is the sweetest thing ever. She is mommy’s little darling! 🙂
He sure is a keeper! 😉 (the husband and the dog!)
Hahahahaha 😀 Yes, they are indeed!
Awesome painting tips! We would love to have you at our To Grandma’s house we go link party that opened this Wednesday morning and lasts all week! Its at grandmashousediy.com 🙂
Thank you, Tarahlynn! And thank you for the invite. I will definitely be at your party 🙂
Just beginning the process of painting to get a home we’ve lived in for 21 years ready to sell. This is perfect timing!! Just love your site!
Thank you so much, Crystal! I am so glad you like the Patch 🙂
These are great tips for painting a room!! Thanks for writing this up! There’s a lot of wonderful information that will make painting a room so much easier now.
Thanks so much, Keri! 🙂
I wish I had this post years ago when I first started painting rooms in the few houses we’ve had. I learned the hard way over the years. So many other tips that I will be using in the future now too. Thank you for sharing at Link It Up Wednesday!
Thank you so much for visiting us, Kileen! I am glad you you found the info useful 🙂
Thanks for sharing this past week at the Inspiration Spotlight Party. Both Your tutorials were awesome. We are featuring this tutorial Friday! Hope to see you again. Feel free to share any of your posts. Pinned & shared. Theresa @DearCreatives
Wow. This is awesome news! 🙂 Thank you so much, Theresa!!
Handan, great turorial! I loved it and linked to it in my post as well as to your choosing right sheen infographics! 🙂
Thank you so much, Nadia! 🙂
This was great!!! Pretext I would have failed! Who knew there was so much to know about pigments and lighting!! Learned more about painting in this one read than I ever knew!! To bad I hadn’t read this information years ago!!! Thank you!!!
I’m going to be painting my laundry and bathroom soon and it’s the first real paint job I’ve done. So this tutorial was super helpful. I didn’t know a lot of those things and you have so many tips and tricks that only come from experience.
Thanks, Handan!
Good luck with your painting project, Jay! Yes we’ve gotten a looootttt of painting experience in this house, and it still is carrying on (I’m about to go and paint Barish’s room now – LOL)
Thanks for the tip to be gentle while removing ceiling tape. Ever since I moved into my home, I’ve dreaded the light blue color of my ceilings and I’ve always wanted to repaint the interior of my home. Because it sounds like painting could be quite a delicate process, I think I’ll contact a professional to handle the painting for me.
Great article and some cool advice from some great influences. Thank you so much for sharing.
I liked that you said that one thing to consider when you are in need of a new painting in your home is to compare the price of paint in order to find one that is within your budget. I have been thinking about painting my home again but I have been worried about the cost. I will be sure to consider comparing the pricing of different brands in order to find one that I can afford.
Great advice, I will absolutely use. I’m not sure why it’s rarely mentioned when talking about paint, but the Light Reflective Value- LRV, is so helpful. On a scale of 1-100, 1 = darkest, 100 = lightest, helps determine the amount of light will reflect in a room. A regular, averaged sized living room is best using 50 LRV or higher, to keep the room from being too dark. I noticed that you used a similar definition when explaining the paints sheen. Well, thanx for the helpful advice! Love the color of your hall in the example of Monochromatic.
Nice Work, I really liked reading the blog. Extremely informative and helpful. Keep sharing more good content.
This is the best tutorial I have ever read. Plain and simple, so easy to follow. Thankyou also for the tips, I shall try to remember them. I’m starting my new project today so wishme luck.🖌️
Thank you so much, and good luck!
I just wanted to say thanks for all the great tips you shared on room painting. I definitely appreciate it!
One thing I wanted to mention is that it’s really important to consider the artificial and natural lighting of the room before deciding on a color. For example, our living room looks completely different in the morning compared to in the evening because of the different lightings.
So yeah, just wanted to point that out and see what you think! Keep up the good work sharing your tips with everyone 🙂
Thank you, Carl – you’re so right about the lighting!
I couldn’t agree more with the importance of choosing the right paint for a room. After years of painting, I’ve come to appreciate the difference between high-quality and standard paint. It’s not just about the price; it’s about the “goodies” they offer. Prime pigments for color and hiding power are crucial, and those binders and additives play a significant role in durability and overall quality. It’s like a chemistry lesson for your walls, and investing in quality paint is worth every penny. Happy painting!
Your talent is amazing! Can’t wait to see more of your artwork”, can you do sometime lines verticals lines with two different color
Loved the emphasis on boxing paint and managing tape removal—two areas that trip up DIY jobs. One nuance we’ve seen help is lightly back-rolling after cutting in ceilings to reduce picture-framing, especially with high-chroma colours. Also agree on avoiding sample pots for touch-ups; sheen drift is real. Curious—have you found a favourite roller cover nap for light orange-peel walls that balances coverage without telegraphing texture?
This is such a thorough DIY guide! I do have one thing to add – a pro tip to create crisp lines and prevent bleed under the tape. Using your fingernail to press it down is helpful, but it won’t fully cut it. We use the back seal method, which means that you lightly paint along the edge of the tape with the paint that’s underneath the tape. So if you taped your trim, paint with the trim paint along the edge of the tape. Once that’s dry, paint over it with your wall paint and continue your project. When you remove the tape, you’ll have a perfect line with zero bleed!
Fantastic guide! I love how you cover both prep and painting tips in such a clear, easy-to-follow way. The advice on choosing colors, testing samples, and keeping a smooth finish is super helpful. Definitely bookmarking this for my next DIY room project!
I saw one of these in South Korea and I bought one.