
Castaway Bookcase Makeover
Mondays are never easy. But the worst is the Monday after a week of vacation – you never know what’s going to hit you when you get slammed with a week’s worth of work. To give you a better idea, I found this video on youtube which pretty much sums it up 😀
Yup! That is exactly how my morning was when I went to the office yesterday. LOL. But on the bright side, being a very busy bee, I didn’t even know how the day passed, and even better, I caught up with all my work! YAY!
Now it is time to catch up with my blog posts, since I am behind schedule with that too. I know, I know…what can I say? My brain tends to shut down when on vacation, hence I forgot to write about my very first furniture painting project as I said I would. [Woman, you’re getting old! hehehe -Greg]
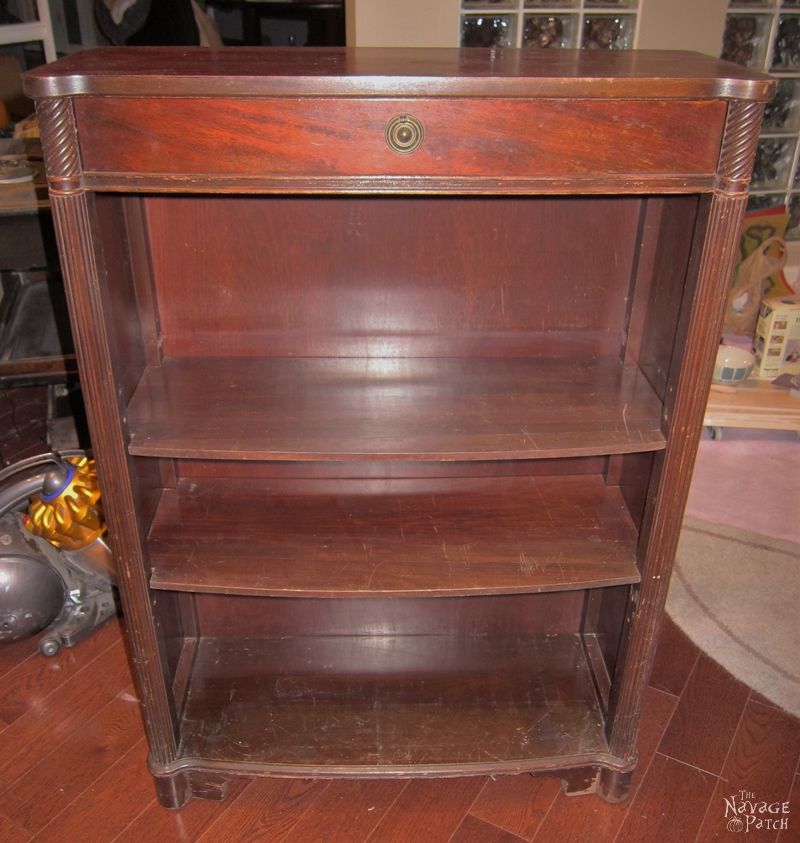
We found this guy at Put & Take, and he was a real castaway, as no one wanted to pick him up. Actually, he looked pretty handsome for something you’d find at Put & Take, but his shelves were warped and he had scratches all around. I guess that was the reason why no one bothered to take him home. But he looked good to me!
At the time, I didn’t have any experience with furniture painting. I mean, I painted small frames and things like that but never a big piece that would count as furniture. Therefore, I thought this could be the perfect opportunity to try furniture painting, as it was free. In a way, what did I have to lose, right?
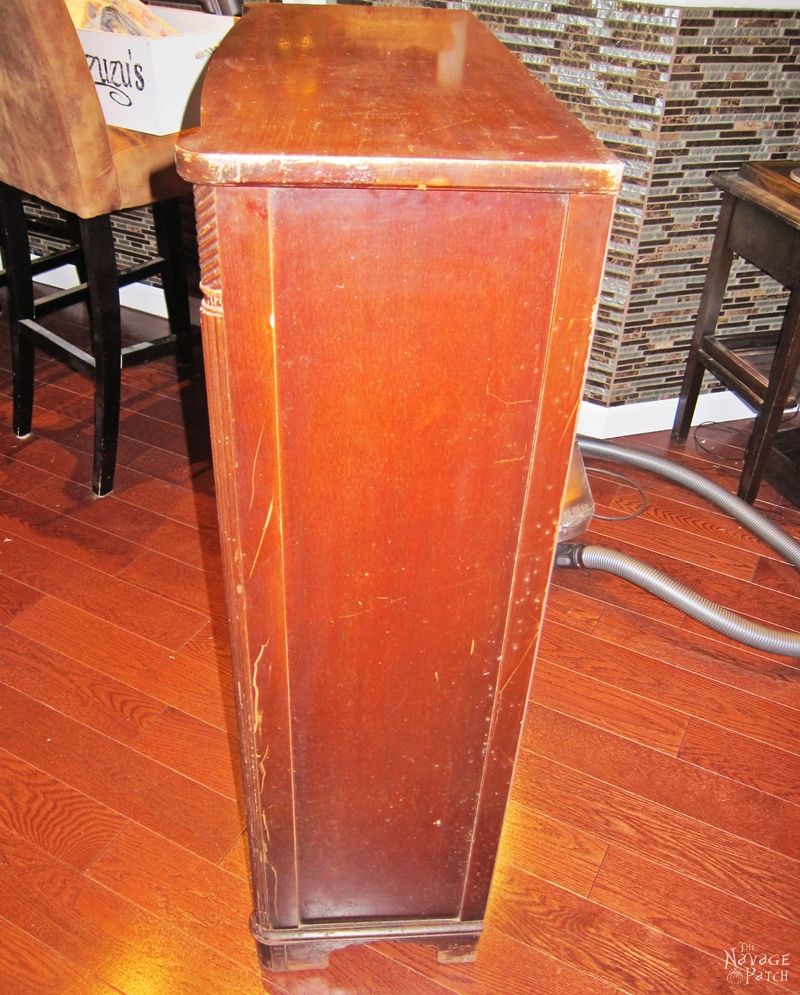
First, I took the drawer and shelves out and gave the entire body a good cleaning with our vacuum cleaner. Then I wiped the body with a damp cheesecloth. Thus far, it felt pretty much the same as my smaller-scaled paint projects, as I always start with cleaning.
Meanwhile, I asked Greg if he could somehow save the shelves. This project was before we started blogging, so I only have two progress pictures of the entire project. But I will try to explain what he did to best of my ability: he soaked a big towel into hot water and wrapped it around the shelves. Then he left the shelves under the sun with some weight on them. He waited until the towels dried. He did all these steps several times. This whole thing was to warp the shelves the other way, so they would become normal. Although at some point I totally gave up on the shelves as I thought his ultra-genius un-warping method was going to ruin them all, to my surprise, the shelves turned out normal… I mean they were no longer warped! [in other words – I’m a super-genius! -Greg :D]
I prepared some homemade chalk paint custom color-matched to old white and gave the body and the shelves 2 coats of paint. Little did I know, the bookcase was made of mahogany and the sap would usually bleed through the paint when you paint the mahogany. Unfortunately, my project was no exception, and the top of my bookcase turned into a splotchy mess – the bleed-through was brownish in some areas and pinkish in other areas.

Not knowing what to do, I asked Greg, and he suggested that I use oil-based primer. I sprayed primer on only those areas where I saw bleeding, but that didn’t work. I gave it another go with the primer, but again no luck! Since Greg’s suggestion didn’t work [she probably didn’t do it right – Greg], I tried Google and found out that shellac could work for such cases. So this time, I tried spraying shellac on the problematic areas. Once the shellac dried, I painted once again to see if it worked. Guess what? It worked like a charm! Ok, maybe I had to re-apply the shellac and paint it again for those stubborn areas, but as a result the shellac did the job, and the bookcase was painted with at least 4 good coats of paint. I know… what a pain in the back project for a first timer, right?
After the final coat of paint, I sanded and distressed the body and shelves of the bookcase. Then I applied Annie Sloan’s clear wax all over and got on working with the drawer.
As this was my first time furniture painting, I didn’t know if the drawer would slide back in nicely with the paint layers on the side of it. Hence, I decided not to take a risk with painting the drawer, but instead I would decoupage the drawer’s front face with a nice fabric and be done with it.
To do so, first I took the drawer pull off then applied Mod Podge to the drawer face…

…and I glued the fabric on it. Once the fabric was glued, I turned the drawer upside down (face down) and trimmed the excess fabric with my rotary cutter.
In the last minute, I also decided to spray paint the drawer pull with Rust-Oleum’s Heirloom White to create some contrast with the fabric, and that was the end of this project.
Here is my very first refinished furniture.


How do you like him so far?

As usual, here are some close-up pictures for you to see the details better.


Here are some close-ups of the drawer.

I have to say rotary cutter is the way to go if you want to have clean cuts with your material. I don’t think I would be able to get such a result if I were to do the trimming with a pair of scissors.

Did you know this was hand painted? Yes! At the time I didn’t have my paint sprayer, hence this whole project took me a week and a half to complete. Well… then again, it was my first time refinishing such a big piece, so I was really taking my time with it.

2 important things I learned throughout this project. Regardless how you paint (with brush or paint sprayer) the key to a nice and smooth surface is:
- painting with very thin coats. By thin coats I mean 2 or 3 coats that makes what you would call one good coat. The thinner each coat is the better results you’ll get with big and flat surfaces.
- taking your time with the final sanding of the chalk paint. It makes all the difference in the world.

And this is the back.

As you may see from the decoration, it has been exactly one year since I refinished him. The paint is holding up great. He first lived in our dining room for a while, but then I found an ornate etagere to replace him and he ended up in our laundry room. Since that is the first room you see when you enter our home from the garage, I wanted something decent in that room, and this guy made the cut for that.


Handan, xo
He is very handsome! You did a great job.
Thank you so much, Cecilia! As my first, this little bookcase is very special to me 🙂
Love him! Your fabric choice is perfect! I’m curious about the moss ball with the wine corks. Did you make that? I’m always looking for projects using wine corks. I hate to throw them away.
Thank you so much! Yes, I made the moss ball with the wine corks. The tutorial for that project is here:
https://www.thenavagepatch.com/moss-balls-and-topiaries/
I also have another project about wine corks which you may like. It is a wall art and the tutorial for that one is here:
https://www.thenavagepatch.com/cork-art-for-the-cork-dork/
I hope you enjoy both of the tutorials 🙂
Oh my gosh! Using a whiffle ball…Genius! And I love the wine cork/wine bottle wall art. It can be personalized in so many ways. Both are pinned. Thanks for your quick response. I’m a fairly recent follower of your blog, and just love it. 🙂
I am so glad you liked our blog and both tutorials 😀
.I have that exact same bookcase. My grandma gave her to me. I’ve been wondering what to do with her. Mine’s a girl.?
I fell in love with your bookcase even before you made it over, warped shelves and all! Perhaps Greg is a genius; I would have expected the shelves to have been ruined too! I love the way your painting and distressing brings out the beautiful details. I am so glad you didn’t give up on your first big project!
Thank you so much, Giselle! Oh you should have seen how worried I was about the shelves. Knowing there is no stopping Greg once he puts his mad scientist hat on, I told him if he ruined those, he would have to make 2 shelves exactly like the original ones. I guess that kind of fired him up to get them right no matter what 😉
Nice job! I bought a petite dresser 2 years ago that was painted mint green and pink. I spent for-frikkin-ever stripping it, then had brain freeze whenever I tried to decide how to paint it (the wood/stripping job was not good enough for stain). I finally jumped in and finished it this past weekend. Homemade gray-ish chalk paint and clear wax. Wish I’d known about the “final sanding of the chalk paint”, as I had to re-do the drawers because of that. Love the contrast of the drawer on yours. You both have such creative minds. Really enjoy your blog.
Thank you so much, Kay! Stripping paint is a hard job, therefore I almost never strip paint. I guess I am too lazy for that. Greg on the other hand almost always strips the paint on a previously painted piece. It is because he is the woodworker in our home, so he is always curios to see what is underneath that blob of paint.
When I have an already painted piece, I first do the lead paint test (just in case) and if that test is negative then depending on the surface I may give a prep sanding. That only happens when the previous paint job was too bad or had deep brush marks showing. Otherwise I don’t bother with initial sanding ever, but just paint the piece then spend time on the final sanding.
I only like to have brush marks or deep ding marks on a piece if I am to use antiquing wax it, because with antiquing wax the more brush marks /deep ding marks you have, the better the final look will be. 🙂
My lazy self would probably not have sanded either, however I am married to a wood-aholic, who was adamant that I see what was under the paint. Even with the bad job I did stripping the paint, he still grumbled when I painted it. I also just read (on the lane trunk post) where you don’t use a painted piece for a month or so to let the finish “set up.” Another great hint I’ve learned from you. It will probably take me that long to decide on pulls anyhow LOL.
Love your make over. I have a cabinet almost like yours and it needs a makeover too. You are inspiring me.
Bev
Thank you so much, Beverly! 🙂
What a beautiful transformation!! I love the way you’ve arranged things on the shelves too. Thanks for sharing at the Pleasures of the NW’s DIY Party
Thank you so much, Helen! That was my very first project…way before blogging. Brings back great memories 🙂
Love the choice to decoupage the top drawer. It came out great and gives a nice contract in color and texture. Great job.
Thank you so much! 🙂
How fun to find a shelf that has a drawer on top! Lovely makeover!
Thank you so much, Audra! Yes I have to say that drawer is really useful 🙂
That’s very pretty! I’m thinking about doing something similar to an old dresser we have out in the garage. Thanks for sharing it with us at the Family Joy Blog Link Party this week!
Thank you so much, Melissa! 🙂
Your bookcase turned out great! I need to remember the shellac trick for the future. Thanks for linking up with Merry Monday this week!
Thank you so much, Emily! 🙂
That turned out great, I cannot believe no one wanted that piece! Thanks for sharing this at the Dishing It & Digging It Link Party.
Have a great day 🙂
Thank you so much, Christine! 🙂
What a gorgeous transformation. Nice work!
Aloha,
Charlee
Thank you so much, Charlee! 🙂
Nice save!! You did such a wonderful job with this transfomation!! Love the colours that you chose!
Thank you so much for sharing your fabulous project with us over at Waste Not Wednesday! 🙂
I’m a little behind but I wanted to stop by and thank you for sharing on last weeks Pleasures of the NW’s DIY party