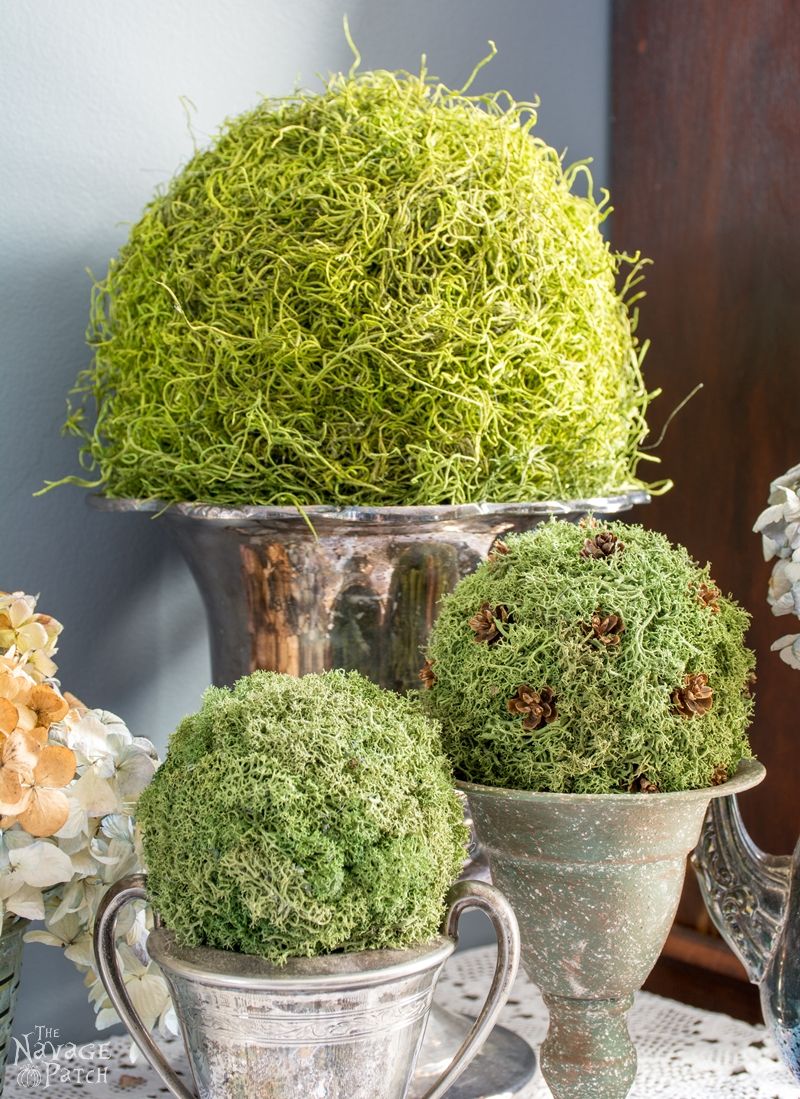
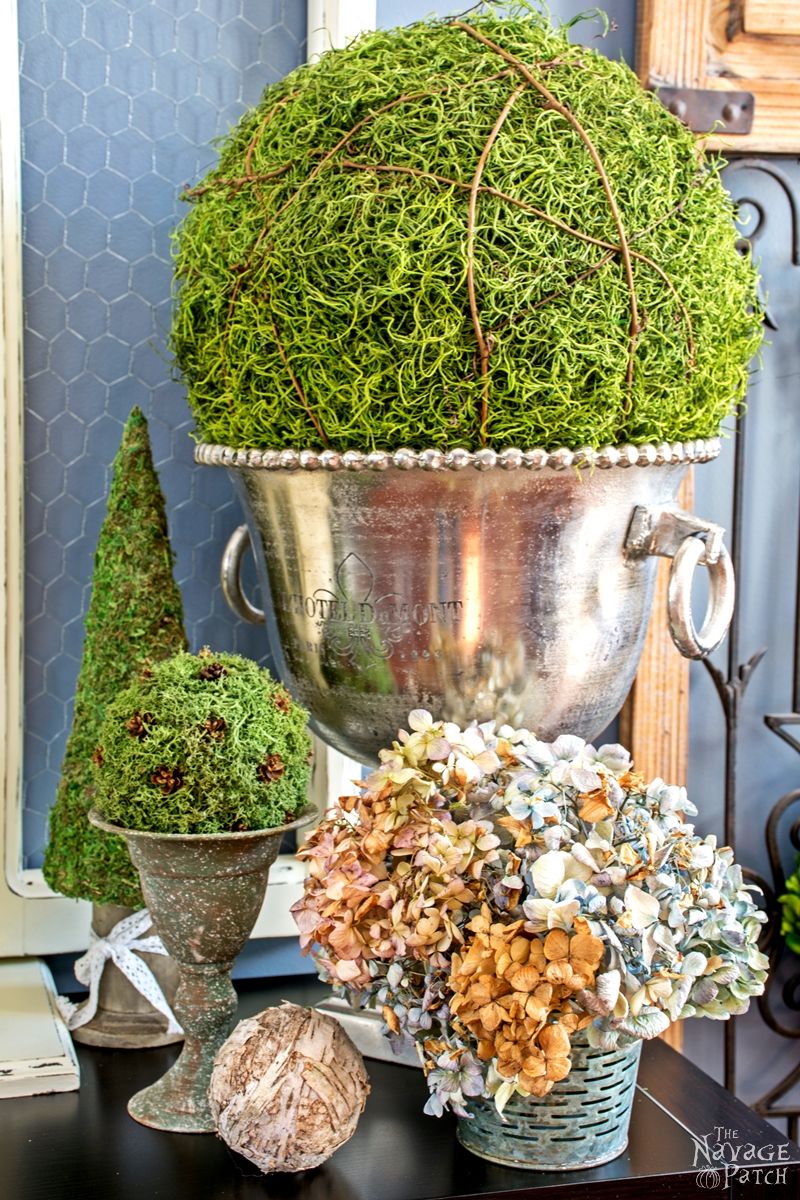
Moss Balls and Topiaries (Size Does Matter!)
After last week’s blizzard, I’ve had it with winter! I guess the idea of our deck being colder than our fridge doesn’t sit well with me. It makes me feel like a vegetable put on ice to keep crunchy until served! But since winter wants to stick around, it seems I am left with two options:
- Behave like a caveman and yell at winter to leave.
- Act normal and ignore it. If winter still wants to get cozy, then simply imply that it is no longer wanted by changing the home decor to Spring.
I chose the later and started flirting with Spring. I haven’t done much yet, but I’ve done enough to remind me of beautiful warm Spring weather: moss balls and topiaries.
They may look like a lot of work, but they were quite easy to make. So no, I didn’t need the skills of Edward Scissorhands to make these beauties 🙂
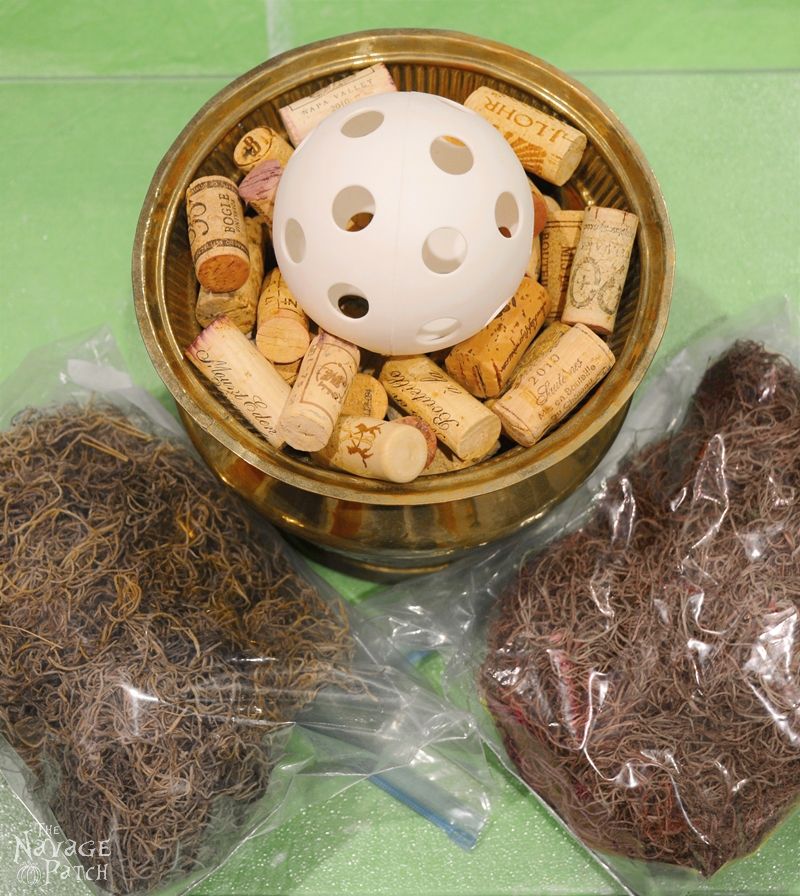
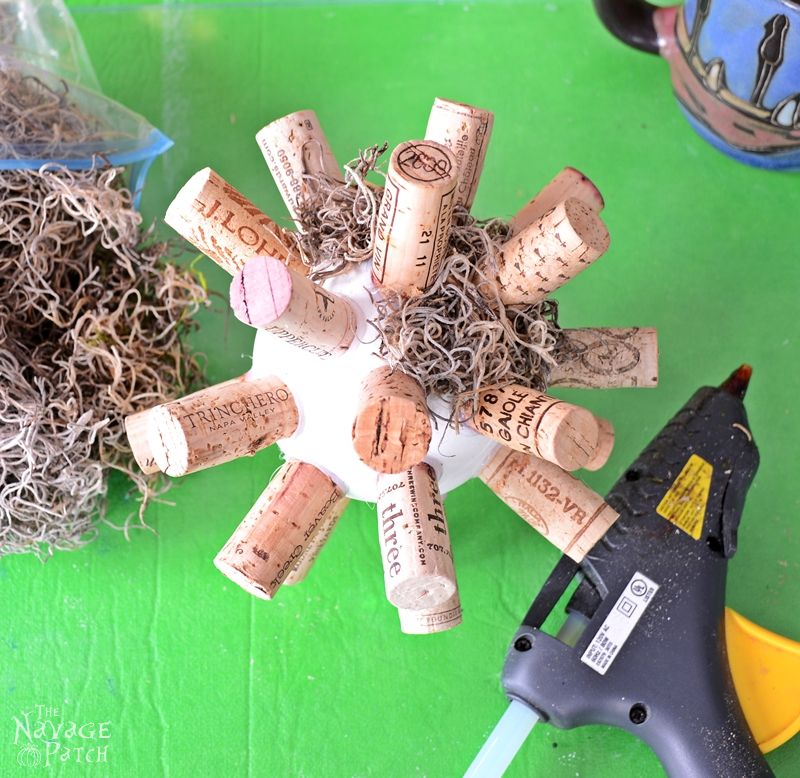
My first project was a cork & moss ball, or the “World War II Sea Mine” as Greg calls it. I used some natural color Spanish Moss![]() , wine corks, a hot glue gun and a Wiffle Ball
, wine corks, a hot glue gun and a Wiffle Ball![]() . Any plastic or Styrofoam ball would suffice to make this one, but I prefer a Wiffle Ball
. Any plastic or Styrofoam ball would suffice to make this one, but I prefer a Wiffle Ball![]() , because not only did I already have one on hand, but also its circular holes make the cork placement easier.
, because not only did I already have one on hand, but also its circular holes make the cork placement easier.
First I started hot gluing the corks in the openings of the Wiffle Ball![]() .
.
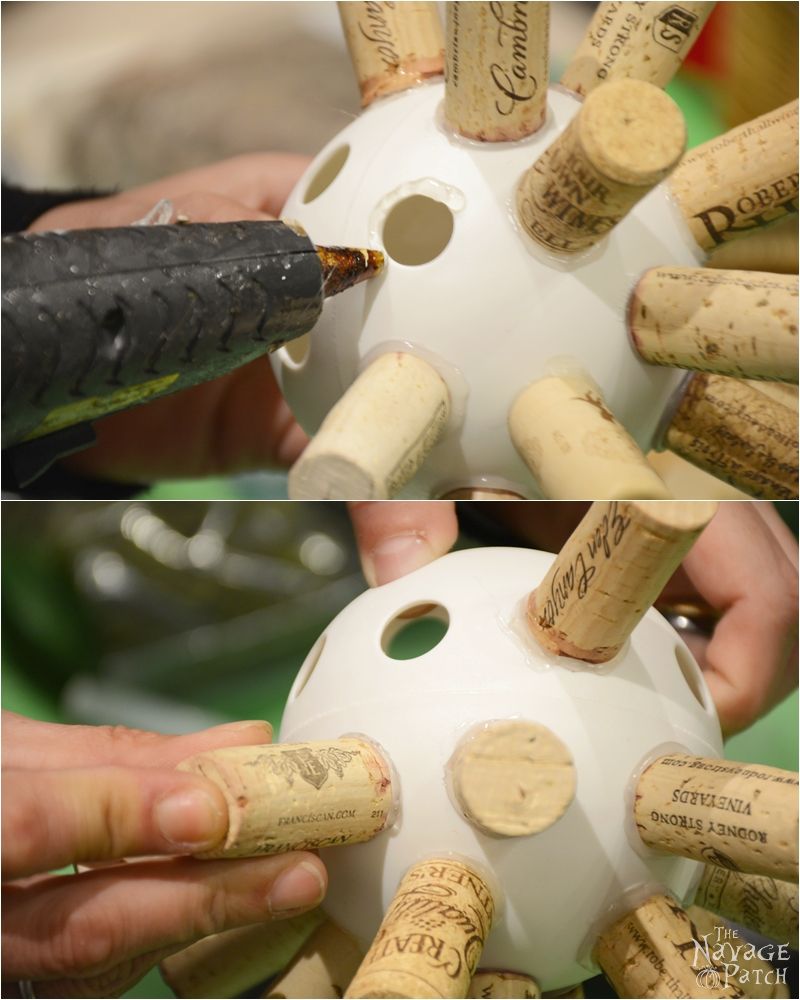
Once all the holes of the ball were filled, I hot glued Spanish moss![]() in between the corks.
in between the corks.
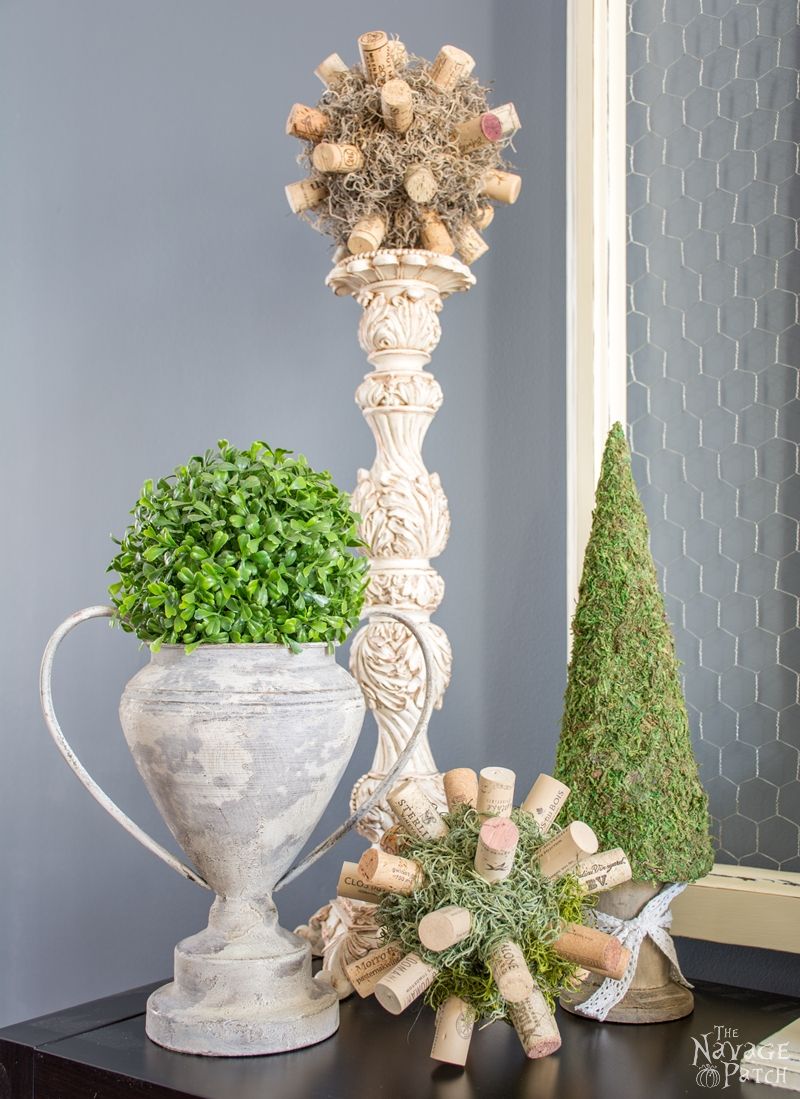
I used green Spanish moss![]() for the one I made last year, which you might have seen in Greg’s “Filling the Void” post. Not to have two WWII Sea Mines exactly the same, I decided to use natural color Spanish Moss
for the one I made last year, which you might have seen in Greg’s “Filling the Void” post. Not to have two WWII Sea Mines exactly the same, I decided to use natural color Spanish Moss![]() with this second one.
with this second one.
The pine cone & moss ball have the same principle with the WWII Sea Mines. I started by hot gluing pine cones to the openings of the Wiffle Ball![]() .
.
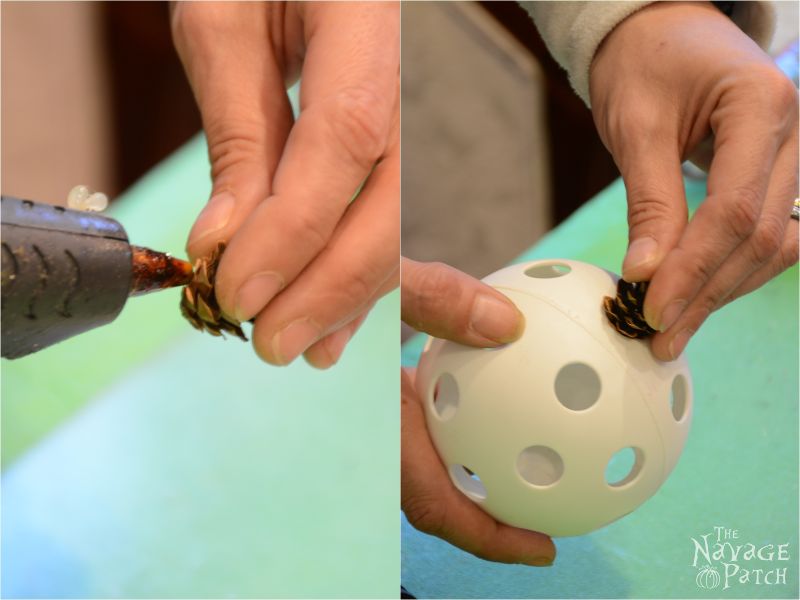
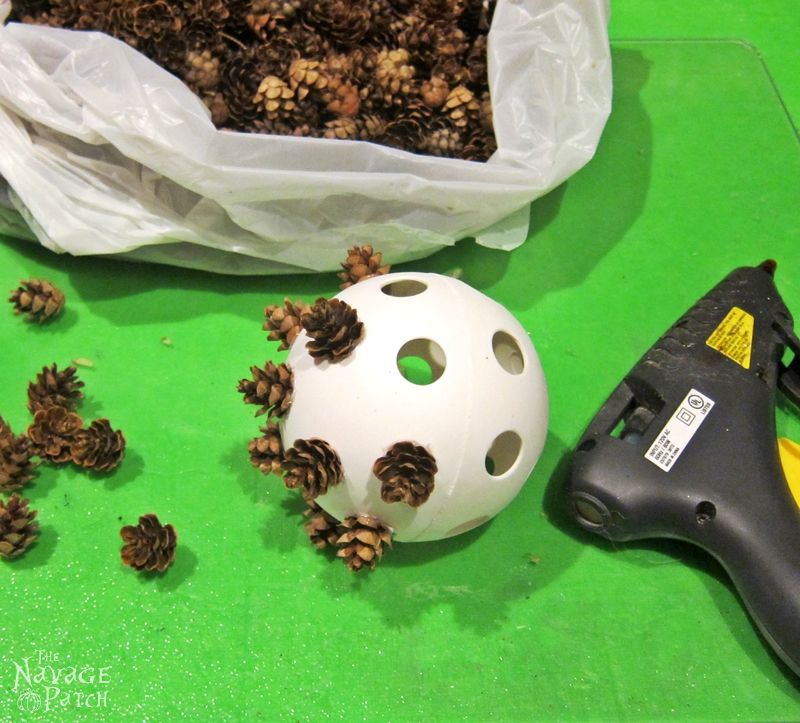
Once all the openings were covered with pine cones, I hot glued reindeer moss![]() to the areas between the pine cones until all the white surface was covered.
to the areas between the pine cones until all the white surface was covered.


After tackling the small ones, I decided to go bigger. I bought an 8 inch Styrofoam ball![]() and two 12 inch half Styrofoam ball forms
and two 12 inch half Styrofoam ball forms![]() from Amazon – one 12 inch single ball is pricier than 2 half ones. Other than the size of the balls, the process was almost the same.
from Amazon – one 12 inch single ball is pricier than 2 half ones. Other than the size of the balls, the process was almost the same.

Now here is something interesting I learned while making these bigger moss balls moss ball topiaries (another nightmare word for me to pronounce!) Apparently any moss ball bigger than 6-7 inches gains a much more sophisticated title in stores – Moss Ball Topiary – and is more expensive. So regardless of functionality – which is home decor in this case – size does matter! Anyway… back to the subject.
I first painted the Styrofoam balls![]() with dark green acrylic paint. This is so I wouldn’t have to use too much green Spanish moss
with dark green acrylic paint. This is so I wouldn’t have to use too much green Spanish moss![]() to cover the white Styrofoam which could peak through from underneath.
to cover the white Styrofoam which could peak through from underneath.

After the acrylic paint dried, I started hot gluing the green Spanish moss,![]() section-by-section, and that was that.
section-by-section, and that was that.

Here is the finished 8 inch moss topiary.
With the bigger moss ball topiary (I can’t help myself giggling at the name), it was pretty much the same process. The only difference was that I decided to add some vines on top of it so it would resemble the real deal. To accomplish this, I randomly wrapped some vines on the top part then hot glued the vines’ ends at the bottom of the ball.
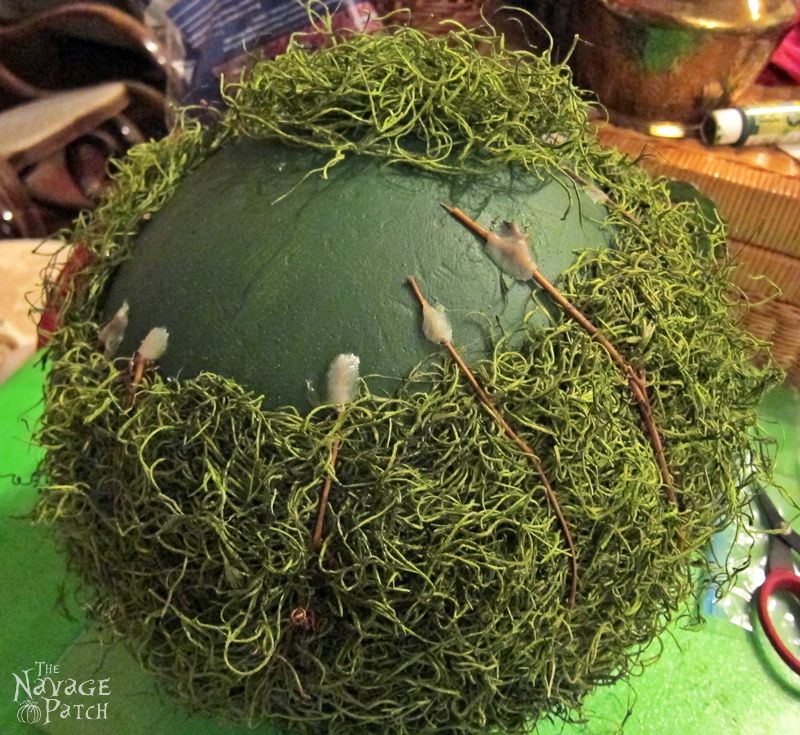
Then I covered those unsightly ends with more green Spanish moss![]() .
.
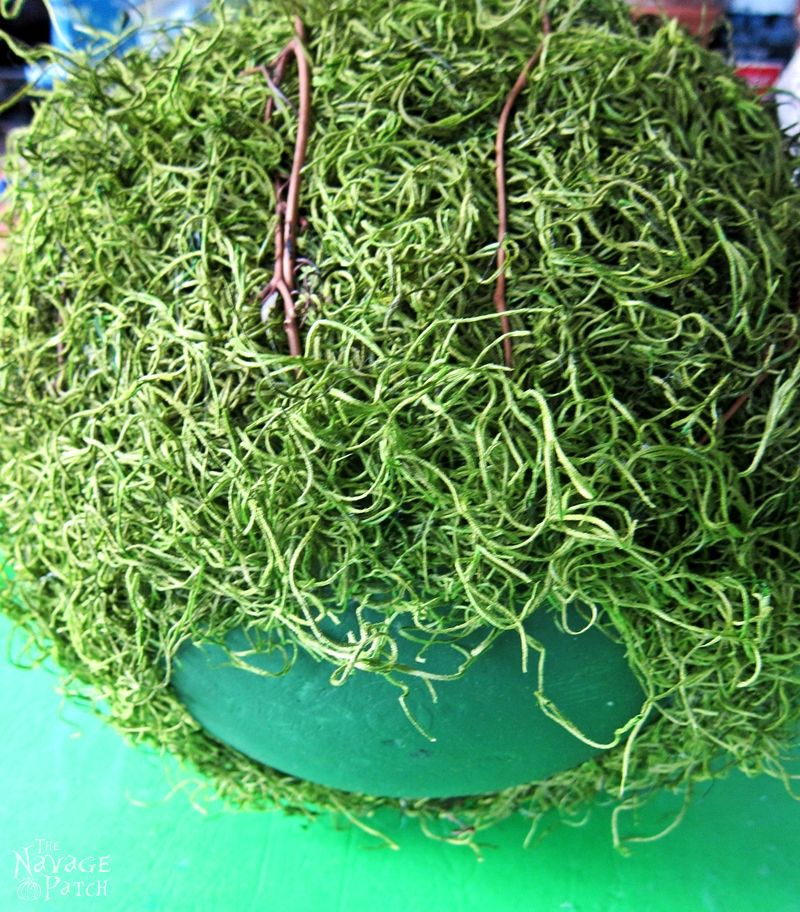
I didn’t wrap vines all over, because only when the bottom part is free from vines would the topiary sit flawlessly on its urn.
Since I made it this far with the moss topiaries, I thought I should try to make something different than just a ball shape. That is when I came up with this little guy.

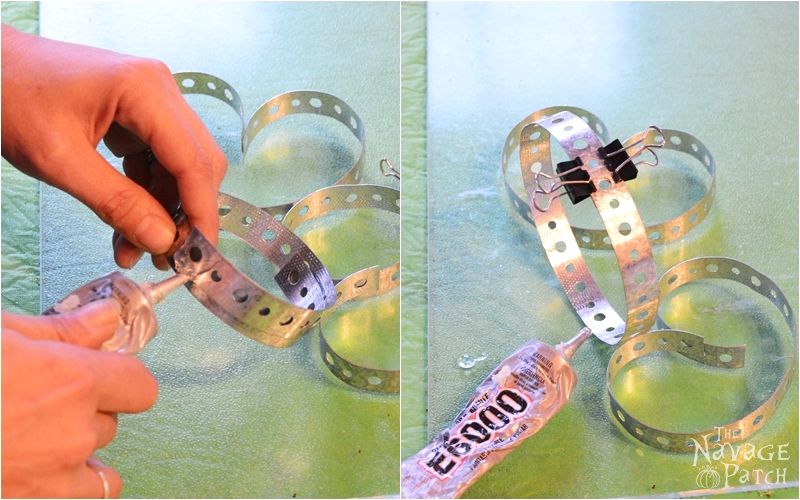
For this one I used metal strap![]() . The ones I had at home were perforated, but it didn’t matter since they were going to be covered with sheet moss
. The ones I had at home were perforated, but it didn’t matter since they were going to be covered with sheet moss![]() . I cut 3 pieces of metal strap
. I cut 3 pieces of metal strap![]() of the same length.
of the same length.

Then one-by-one, I glued them to make a sphere as shown in the pictures below.

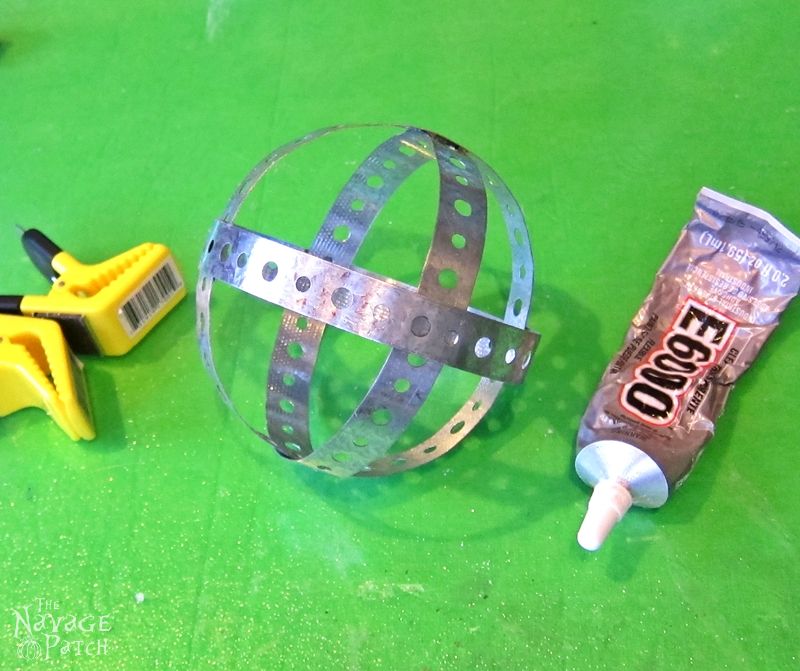
Once the sphere was formed, I hot glued sheet moss![]() until the metal surface was fully covered with moss…
until the metal surface was fully covered with moss…
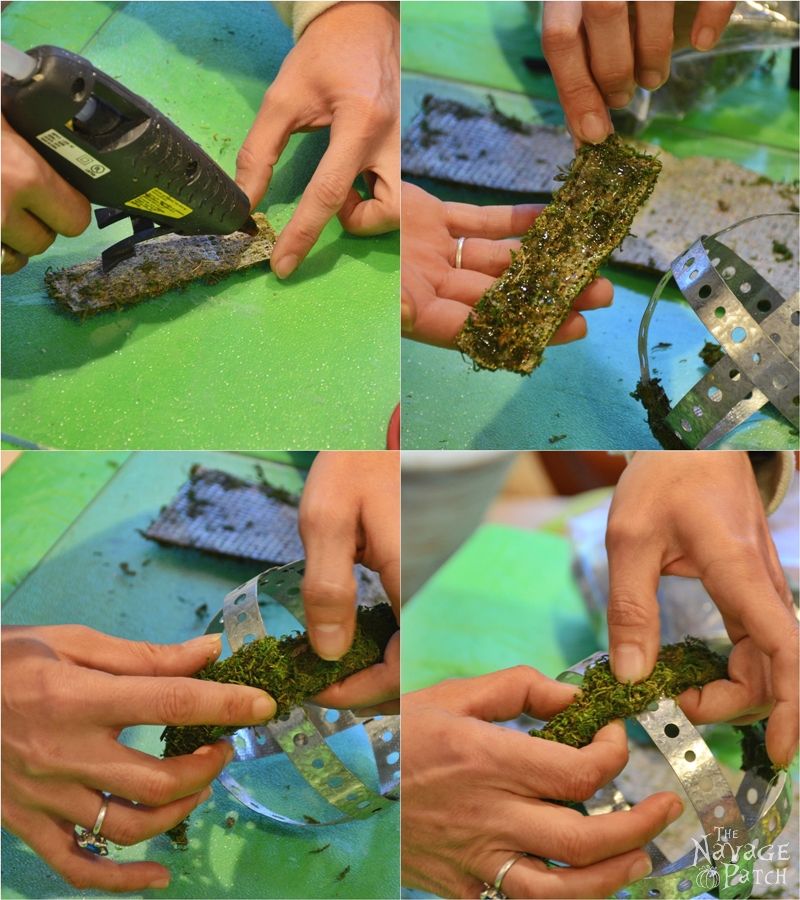
…aannddd voila!
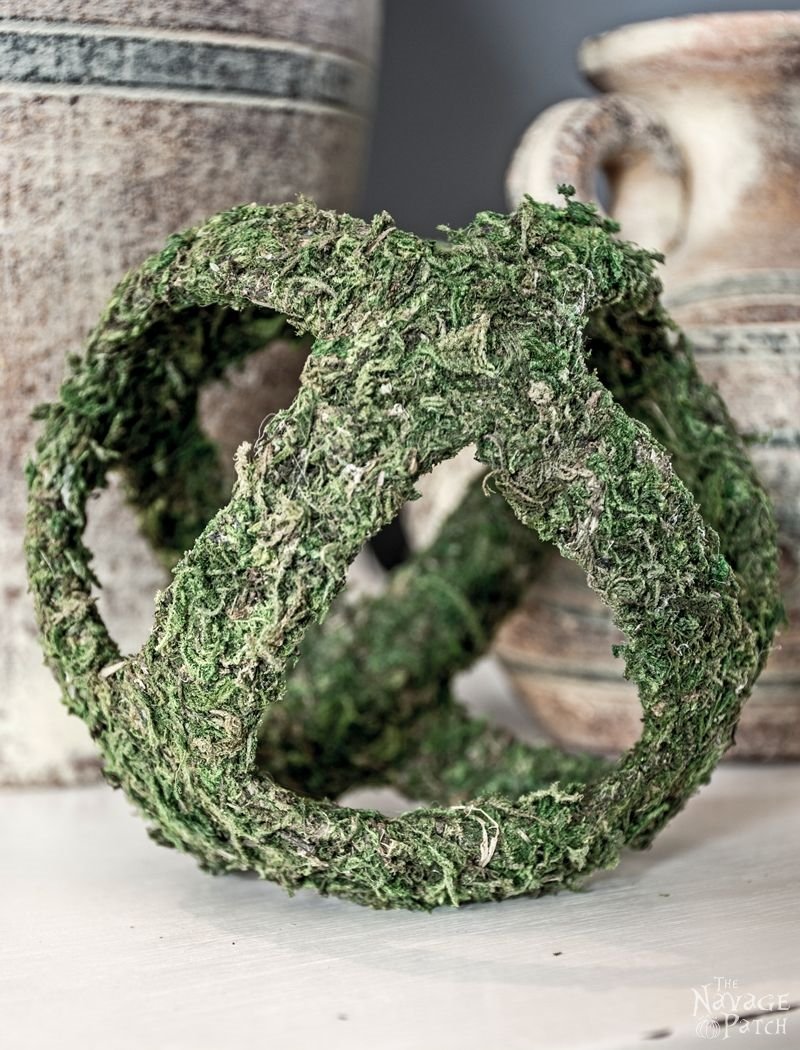
Here they are all together.

I have to say this was one of the most enjoyable projects I have worked on.

Having these beauties around gives me spring fever!

Handan, xo
We love it when you share our posts on Facebook and Pinterest!


styro foam & Wiffle balls,oh my. Corks & metal straps.I luv the sphere always wanted one and using a wiffle ball LUV LUV LUV
Thank you so much, Maria!
Garden Club idea
Oh great! I hope they like it! Thanks, Debbie!
Beautiful! So clever to use the wiffle balls and metal strips. I have one question. Whenever I’ve used hot glue on styrofoam, it melts the styrofoam. Did you do anything special to avoid this?
I recently made some small moss balls, too. You can read about mine here: https://ourmtnest.wordpress.com/2016/04/08/diy-moss-balls/
Thank you so much for your lovely comment, Carolyn! There are two types of glue guns, high heat or low heat. Or you can get them to have both settings just like the one I have. As the main trick to get the hot glue cooled down a little before it hits the StyroFoam’s surface, I either do this with the gun’s settings or change the way of the application depending on what material I am using: If the moss is sheet moss, I spread the hot glue on the sheet moss, then I glue it on the SytroFoam. By the time I put the hot glued sheet moss on the StyroFoam, the hot glue cools enough not to deform the StyroFoam. If I am using Spanish moss then I know I have to hot glue the StyroFoam directly. In that case, I raise my hot glue gun’s tip a little higher (about an inch or two) rather than keeping the tip very close to Styrofoam’s surface. That way I give the hot glue drips chance to cool a bit before they hit the StyroFoam.
Also StyroFoams come in two different surfaces. If I am using the prickled surface Styrofoam then I make sure I use my hot glue gun on the low heat setting as they are a bit less heat resistant in my opinion. If I am using the smooth surfaced Styrofoam then I know I can set my my hot glue gun on high heat setting at least for a short while if I need to.
I hope these hints will be helpful 🙂
Too cute! I love moss balls!!! laura
Thanks so much, Laura! =)
These are all so clever and SO pretty. Love the way you used so many different and unusual items. Beautiful pictures. Thank you for sharing with us at Talk of the Town.
Thank you so much, Betsy!
Oh, wow. How great to see so many different moss balls. You did a lovely job. I saw your link at Diana’s Adirondack Girl @ Heart/Vintage Charm Party.
Thank you so much, Ann Marie!
love this tutorial. I have thought of making some moss balls, and this really helps.
Thank you so much, Sheila! I am glad you liked it 🙂
These are awesome! I want to make one of each design. I especially love the cork one and the metal orb. Thanks so much for sharing at the Wednesday Showcase. I’ve pinned these for later!
Thank you so much, Kati! I am so glad you liked them 🙂
I love your project very unique using the wine corks and the tiny pines is wonderful!! But really everything is wonderful and make a beautiful presentation!!
Thank you for sharing on the Oh My Heartsie Girls WW this week!!
Hope you have a great week!
Karren
Oh Karen, thank you so much for your wonderful comment! Your words made it my day! You too have a great week!!
Handan, x
These are so lovely, and the vignette is really beautiful. Thanks so much for sharing at Vintage Charm.
Thank you so much for your kind words, Tuula! and thanks for hosting such a wonderful party!!
Absolutely beautiful moss ball decorations!! I especially love the cork one!! So unique! Thank you so much for sharing at my craft party on Thursday! Would love to see your newest posts this week, which starts at 7pm EST.
Thank you so much, Denise! Oh yes I’ll be definitely be there at your party 🙂
Stopping back by – Loved your project!!You have been Pinned, Tweeted and Posted to facebook! Congratulations -Your post will be featured this week at the Friday Favorites Link Party. The party goes LIVE on Thursdays at 7PM at mustlovehome.com I hope to see your there! Hugs – Christine at Must Love Home
Christine, thank you so much indeed! You are an ACE!! 🙂
I’ve made moss balls and topiaries before, but I’ve never seen such a variety as you have here! I’ve pinned this for future reference.
Thanks so much for joining the Grace at Home party at Imparting Grace. I’m featuring you this week!
That is wonderful news! Thank you so much, Richella!!
These turned out great – very clever use of an old wiffle ball! Thanks for linking up with Merry Monday this week.
Thank you so much, Emily! I thank you for hosting the party 🙂
Loved everything you did! You are so creative! So glad I found you via Imparting Grace’s link up party!
Thank you so much, Karmen! 🙂
Hi, just saw this post featured on Grace at Home and am obsessed! I use topiaries in all of my decorating and will hot glue moss onto just about any surface I can find, so this post was so fitting for me. LOVE all of your creative ideas. Pinning it all and can’t wait for the next rainy day to try these methods out myself. Thanks!!!
Thank you so much, Ashley! 🙂
Fabulous! Loving all things moss-
just started a moss project so am so glad I stumbled on your post- Love the cork version! so unique!
Thank you so much, Christina! 🙂
These are GORGEOUS! Love the wine cork ball! Just letting you know I will be featuring your moss balls and topiaries on Best of the Weekend, tonight! Hope to see you back with us again!
Oh that is awesome news! Thank you so much, Amy!! I will definitely be there 🙂
These are beautiful! I have to also ask, where did you get such wonderful silver urns???
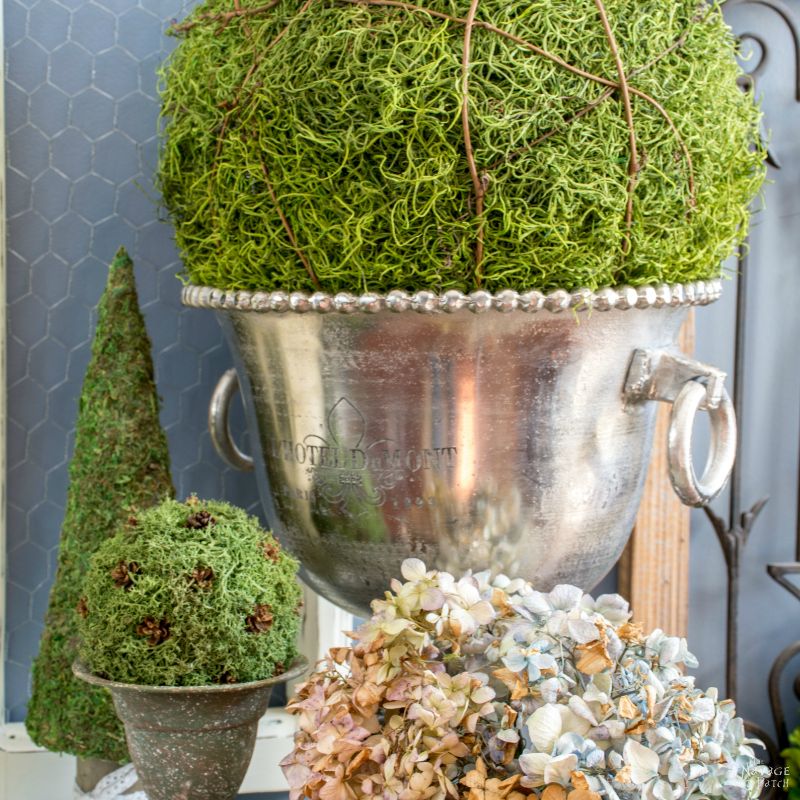
Thank you so much, Nikki! Those urns are actually champagne buckets 😉 I bought the one that holds the biggest moss topiary for $25 at Home Goods, and I bought the other one which holds the 8 inch topiary from a tag sale for $5.
How big is the opening on the large champagne bucket in your pic? I am trying to figure out what size foam bowl to get for a 10 inch wide pot. Should I get a 10 or 12 inch foam ball? Thank you.
Hello Megs,
I am so sorry for the late response. Just seeing your question now. I measured them: The big champagne bucket’s opening is 11 1/4 inch and holds the topiary made from 12 inch Styrofoam ball. The other one is 7 1/4 inch and holds the topiary made from 8 inch Styrofoam ball.
Wow! So inspiring! I am so excited to get started on replicating these~~ASAP! Beautiful displays too, you got it all honey!
Thank you so much, Denise! x
Really unique! Something I would pay a lot of money for at a boutique! Thank you for the detailed tutorial for so many beautiful pieces.
You are so very welcome! I thank you for your visit and lovely comment! 🙂
I would have never thought about gluing moss to make topiaries like this. I think it is amazing and will definitely try this some time in the future. I love the metal one and the cork one Awesome displays!
Thank you so much, Marjan! 🙂
Well, I for one am glad that you went a little moss crazy! What great ideas and inspiration. Really love the big one with the vine wrapped through. Now,all I need to do is find a great silver champagne bucket like you have to display them!
Thanks so much, Lynn! Oh I love moss… As I have a black thumb with house plants, preserved moss is my only way to have some green in our home 😀
I love the placement of these beauties in your decor! Really ties it all together!
Thank you so much, Christin!
You make it look so easy! And I love the one with the corks! Thanks for sharing at the DIY party on Pleasures of the NW
Thank you so much, Helen! I thank you for hosting such a great party!
These are BRILLIANT! I have been wanting to make some of these to add to our home! Thank you for the inspiration 🙂
Thanks so much, Sam! 🙂
Just fantastic! I love moss balls and you have so many great inspiration here! Pinned for later!
Thank you so much, Linda!
Thanks for all these great ideas!
Once again, I love these! This has been my first visit to your site and all 3 projects that I have read so far are so cool! I would love to have any of them in my home. Not only are the projects gorgeous your tutorials are so spot on, anyone, even me, could follow!
Madam, I love your moss balls, and I have to admit that I have never, ever said that to another woman before! LOL You should be highly flattered! LOL And you are right, size does matter!
Hi Nikki, wow, I am truly humbled by your awesome comments! Oh, don’t worry, people are always commenting on my moss balls…it’s like they don’t even see me anymore! LOL 😀
Very creative and cute ideas. Topiaries are so pretty and add a great touch to a vignette.
Thank you so much, Linda!
This are great ideas and so much fun! I can’t wait to get back home and make a pair of mine for my buffet – I hadn’t thought of them before. And now that I know how to make them….
Thanks for sharing with us on Throwback Thursday!
Mollie
Thank you so much, Mollie! They are great to decorate with. Also I have a black thumb when it comes to house plants, so we don’t have much greenery in the house. But these moss balls make up for that 🙂
I hope BHG and House Beautiful see these because this is one awesome project! Absolutely gorgeous.
Awww…thank you so much, Sandra! Your comment made my day!! 😀
Gorgeous ideas, love anything that helps spring hurry up! Thanks for sharing this at the DI & DI Link Party, we loved reading it 🙂
I thank you for visiting us, Christine! 🙂