
Dining Room Remodel Plan and Wall Framing
Our dining room remodel is underway and shaping up fast! With the columns gone, it’s time to put up some new walls!
To understand where you are, you must first know where you’ve been. So if you haven’t already done so, please go read the prelude to this post, The Column Conundrum. Go now. Shoo! Don’t worry, I’ll await your return with baited breath.
Back so soon? Huh. You just skimmed it, didn’t you?
Well, in this age of 15-second videos and 6-second attention spans, I should count myself lucky that you even clicked on the link at all. Let’s carry on with our dining room remodel, shall we?
Dining Room Remodel
Framing the Walls
I left you last time after our intrepid craftsman (who spoke no English and whose name I never learned) had finished installing the temporary supports that would hopefully be sufficient to prevent the collapse of our roof. I mean, on the bright side, I guess I could look at a roof collapse as fertile ground for a whole new crop of DIY projects and blog posts, right? But on all the other sides….yeah, not so much.
Well, I’m tickled purple to inform you that the house didn’t collapse, nor did a sinkhole swallow me whole, nor have I been struck by lightning, though apparently I came close yesterday when mowing the lawn with noise-cancelling headphones on. Just as I was mowing the final strip in the front yard, I spotted my neighbor Grady – a fine Southern gentleman – gesticulating in my general direction and pointing at the sky. I powered down the mower and removed my hearing protection to hear him saying “Get inside!” Now, if a Southerner tells you to get inside, you better skedaddle, because they’re usually unfazed by the goings-on above their heads. No sooner had I parked the machine than a tremendous rippling crack tore the sky apart overhead. Yeesh, I should probably look up more when mowing!
Anyway, with all safe and sound with the temporary braces, Diego (I’m just going to call him Diego until I learn otherwise) carried on with our dining room remodel and began to frame the new walls. Let’s talk a little about those walls. We have three wall sections planned – a short one near the front door, an even smaller one near the kitchen, and a larger, 3-panel wall in the middle.
To rewind a bit, here’s a view from the dining room towards the front door from when we first moved in.

Wall number one will be installed where the first column was. It will envelope the roof cable (we only removed one, and I’ll explain how we compensated for it in a bit) and mirror the wall on the other side of the front door. This will give a symmetrical look to the entrance, and it will allow us to decorate those two small wall sections flanking the front door.
Here’s how it looked after Diego framed it:
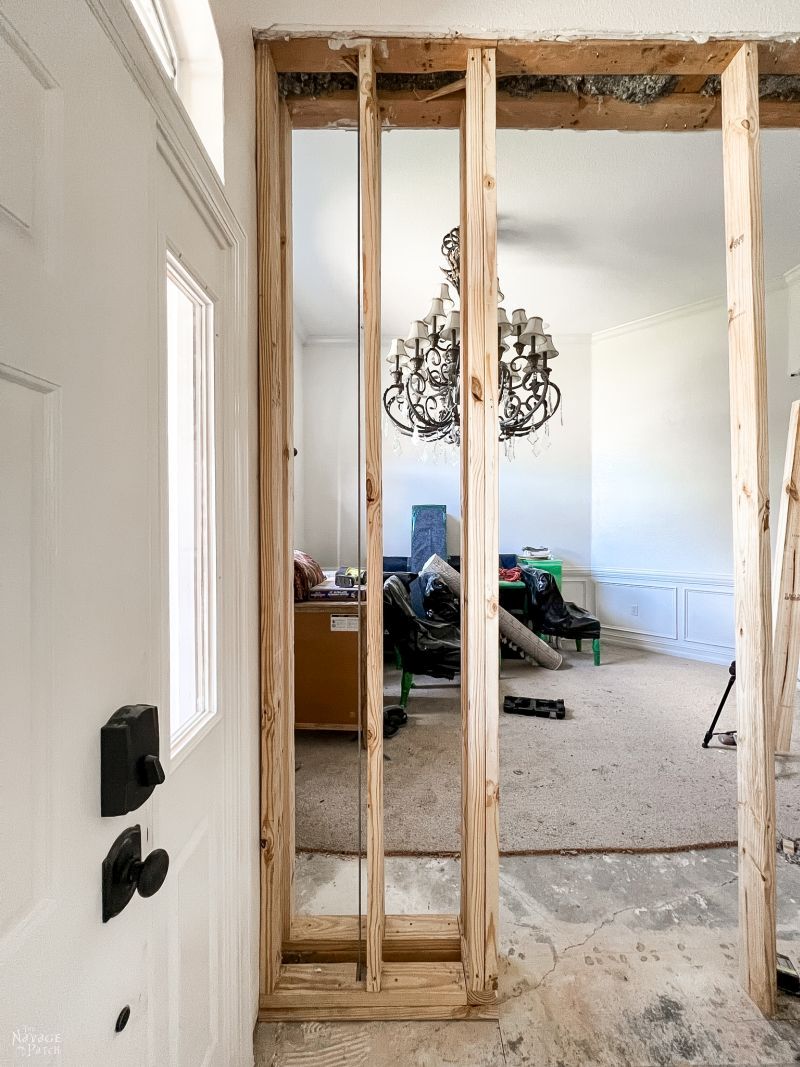
You can see the roof cable in there. The bottom wall plate has been notched to accommodate it.

Over on the other side by the kitchen, the wall is even smaller – just long enough to cover the cable there.

And in the middle, a three-paneled wall. In the picture above, you can see one side of it. It also ends just after the roof cable that was there. You can also see the footprint of the column that was there. But the other side is not symmetrical with the placement of the column, and that is why we had to go through all that stress of de-tensioning that cable and removing it. Handan’s original plan was to have the new wall covering that cable as well, but in the 11th hour, she realized that a wall that big would cut off too much light from the living room beyond, and it would make the dining room feel too closed-in. Her solution was to mirror the wall, to make it symmetrical. And that meant cutting the cable. Below is the framed middle section. The cable is still there (at the time of this photo, anyway), just off camera.
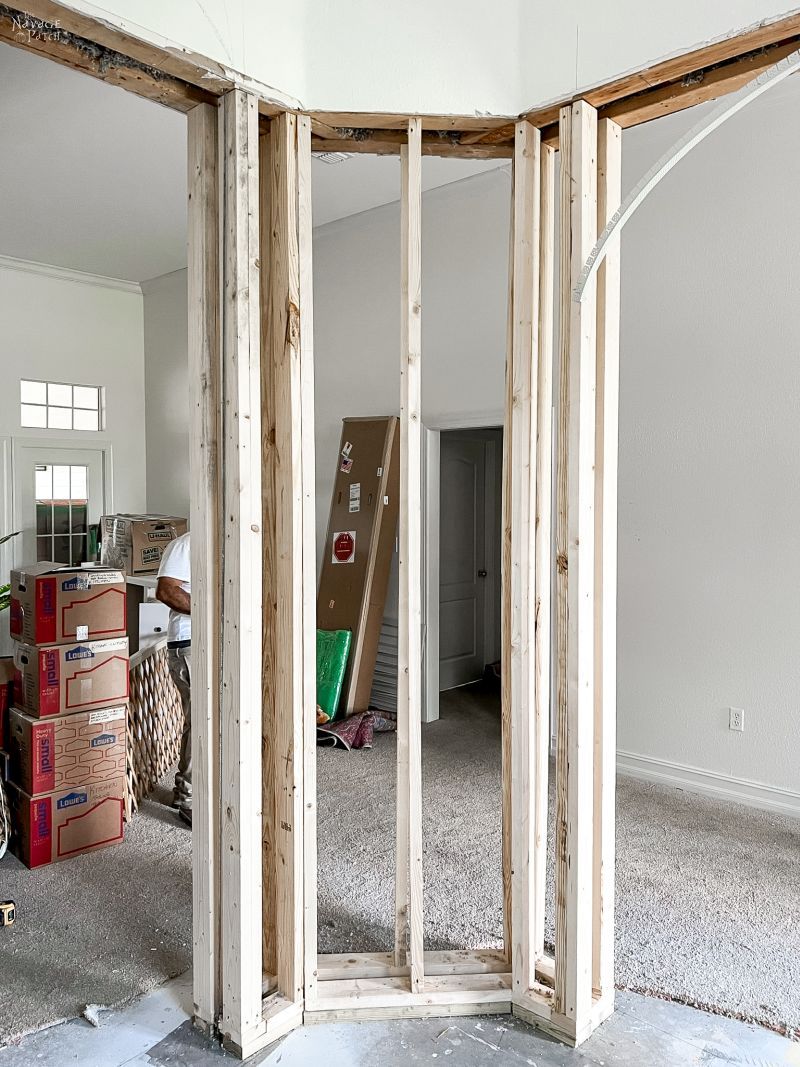
The picture above gives away part two of our wall plan: arches!
Laying out the Arches
There are plenty of arches in other areas of the house, so we wanted to expand upon that theme with this dining room remodel. Diego laid out their curves with plastic corner beading.

Notice the roof cable in the picture above. If we built the wall to encompass it, we’d lose out on all that wall space behind it for decorating and photographing, as the space would be too closed off to showcase.
Framing the Arches
Diego traced the arch onto 2x4s and cut them to shape.

Dining Room Remodel Walls
Instead of drywall, we asked Danny (the contractor and Diego’s boss) to use cement board. I had a pallet of it in the driveway that I had planned to lay on the floor before installing LVP. This would have brought the LVP level up to the level of the existing tile, and it would save on the effort of demolition. Well, that plan changed (it was my idea to change it this time). I told Handan that I thought it would be easier in the long run for me to demo the foyer tiles and lay the LVP directly on the concrete. When it comes time to demo the kitchen, we’ll enlist some help, and we’ll get a dumpster – that stuff is heavy!

And if putting cement board up instead of drywall seems a little…off, well yeah! It would be if we were going to be finishing the wall as-is!

But we’re not going to do that! I’ll tell you the plan soon, but first I want to address the missing cable. With every yapping head on television going all Chicken Little about a “triple-dip La Niña” and an “unusually active Atlantic hurricane season,” I wasn’t about to sit back and content myself with only 3 out of 4 roof cables keeping a roof over our heads! And since the cable we removed was the double-thick main cable, I wanted a solution that would withstand a Category EF-5 Sharknado!
Keeping the Roof Secure
Our solution was to install Simpson Strong-Tie connectors for the stud packs and two foundation-to-beam Simpson Strong-Tie straps. Please forgive the crappy photo – it’s a screengrab from a video.

There’s a light coming from the attic in the photo above – that’s Diego securing the straps to the beam. He had a heck of a time up there. It must have been 130 degrees at least, and he was clanging and banging for at least a half hour to get them properly secured.
A Plan for the Walls
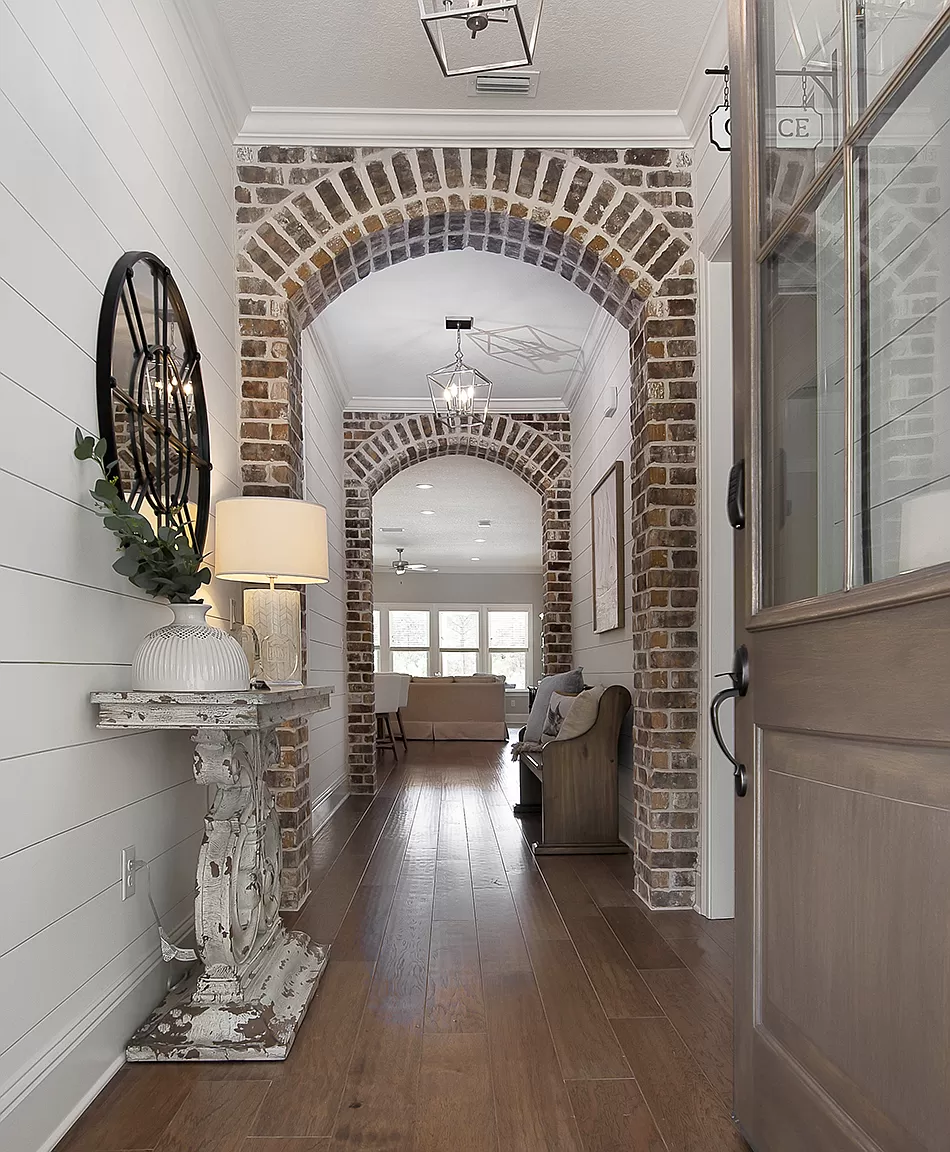
Now, as to why we used cement board instead of drywall (some of you may have guessed already), we will be covering the newly-constructed walls with thin brick! Here’s one of my babes’ inspiration photos.
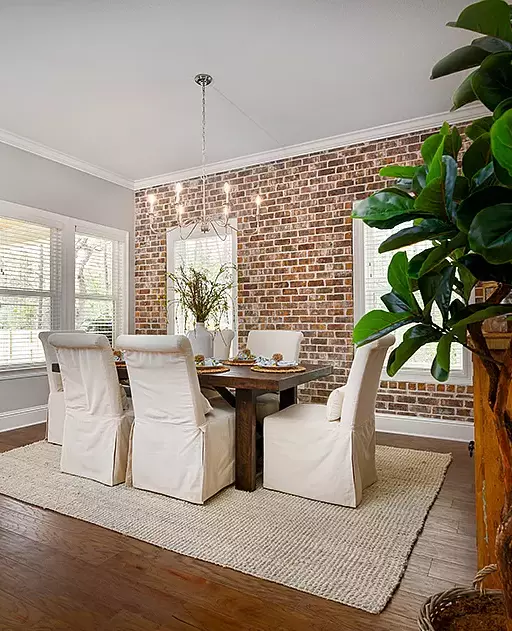
Brick arches are going to look amazing in this space, and they are going to unlock so many design possibilities in our new home!
A Few Things to Do Before Carrying on with the Dining Room Remodel
But before we install the brick, there are a few other items we need to check off our list:
- We need to install the LVP before the brick. Though we may end up putting some sort of baseboard or moulding along the bottom of the brick, by having the brick installed over the LVP, we have the option of not having any base moulding if we decide we like that look better.
- That means first removing all the furniture and boxes from the dining room and living room and then ripping out all of the carpet and carpet padding.
- Removing the floor tile in the foyer – yours truly, a hammer drill and a whole lot of PPE!
- Before finishing the LVP (we’ll start at the far end of the living room by the lanai and work towards the front door), we need to get rid of (as reader Cathy, put it) The Elephant in the Room. Yep, that ridiculously oversized chandelier has to go. After receiving a quote of $1000+ to remove it, we said nope, we’ll do it ourselves! We’ve estimated its weight to be about 200 pounds, so that should make for some super fun times!
In my next post about this area, I’ll take you on a little LVP flooring adventure. We’ve selected a gorgeous color and pattern, and it’s actually been sitting in the garage for a month and a half just waiting for us to get to this point!
Stay tuned for more excellent adventures in DIY!
Gee. The fun never ends, does it? You’re going to have a showcase home when you’re all done. Excited to follow along. Our trip to Gulf Shores was great. A couple days of rain — so we opted for shopping! Beach days were wonderful. Nothing like hanging out on a beach with the wind keeping you cool. Back home, safe and sound, we’re already planning our next getaway.
Never ends, Michael! We have some of the best beaches in the world here – glad you and the family had a blast!
I love the idea of the brick wall. My Dad put one in the dining room in the house he built for us when I was growing up. I also had one in an apartment I lived in years ago. Are you using similar brick to what was pictured or are you going in a different direction?
Glad the columns are gone. I like the arch idea as well. You and Handan have really delved into these projects. They are so much more than little “cosmetic” makeovers.
Thanks, Gail! The brick should be somewhat similar, but not as dark, I think. We’ll see how it looks when it’s installed!
This has been a fascinating adventure and I am glad to follow it from my comfy arm chair! Looking forward to the next installment. Appreciate your creative solutions to your problem; good job!
Thanks, Angie – I think this room/area is going to be amazing!
You’re redeeming yourself…little bit by little bit…just sayin…”franki the column”
LOL, now I understand your last comment! 😂😂😂
WOW!!!! What a change! I love the brick idea.
It’s a huge change, Patti – wait till you see the floor!
Brilliant but not surprised – love the arch and the brick! My husband and I have remodeled 4 houses through 40 years of marriage. I loved the process so am getting to live it again vicariously through you and Handan.
Oh wow, you’ve put in your time! Sit back and enjoy the show now, lol!
Such talent!! You two are quite creative!! And the brick??? Love it!!! Enjoying watching right along from California!!
Thank you, Cheri! I think it’s going to be awesome!
Just don’t hire Del Boy and Rodney to remove that chandelier. 😉 (Not sure if you get Only Fools and Horses over there but if the link doesn’t work Google the chandelier episode. It might give you some tips for what not to do.)
https://youtu.be/LFuYIi5-igc
LOL, nope, it’s going to be a DIY take down!
Why not just ask him his name? “¿Cómo se llama?”
Did you get a permit for this work? Seems like a structural engineer would be required to make structural changes like that!
Hi Courtney, this isn’t technically structural work. We had a structural engineer involved when we were deciding about the columns, and he agreed they weren’t load-bearing in the traditional sense. The main reason for them wasn’t to hold the roof up, but rather to hide the tension cables that are helping to keep the roof on, and the tension of the cables did put a load on the columns. We’ve more than compensated for the load-bearing capabilities of the columns with how the walls are framed with stud packs. And the hurricane straps on the new wall are enough to compensate for the removed cable. Also, in our county, no permit is required for work like this (no electrical, plumbing, etc) unless you’re building an addition over 100 square feet to a living space in the home.
Really like the brick idea! Good luck with all this.
Thank you, Hanneke!
You guys are so cool! The idea for the brick entries will look uh-may-zing! That will completely change the feel of the dining room from crazy toga party to stylish modern rustic. Can’t wait to see how it looks once it is all together.
Question: does that big-ass chandelier help hold the roof down as well?? Seems the weight of that bohemiath could be helping to hold things in place. It makes me think of ‘War of the Roses’ every time I see it.😂
Thanks, Mo! Yeah, I’m pretty sure that chandelier is holding the solar system together. Every time I look at it, it makes me think of Star Wars – I’m pretty sure it could take out a planet.
Thank you for taking us through the project! The arches and the brick will look absolutely fantastic! Can’t wait for the big reveal. Now, get to work!! LOL…
Get to work? That assumes I’m ever allowed to stop, lol! 😀
I like your work and your ideas!
Best wishes from Bavaria- Germany😉
Hi Andrea, thank you so much and thanks for stopping in from beautiful Bavaria! 🙂
Oooohhhh the brick arches are going to be awesome! I see potential back ache in your future.
Ache is my middle name, Cheryl! 😀
I love your vision for this space and it’s coming together nicely. If the “Death Star” chandelier wasn’t so heavy, it could be re-purposed to make a killer Halloween chandelier. Good luck safely removing it.
Thank you, Julie! Oh, there’s no chance of moving that beast! 😀
Now that is interesting! Brick walls, slider doors and beadboard. I smell a remodel here as well! Thank God I don’t have any such columns…..
Oh, you’re not kidding, Nancy – those columns were absurd!
Hi hi. Love your dining room . It looks so sprookjesachtig. That’s Dutch. Hum …..fairy. Like in those fairy tales. And you did a good job with the remodeling.
Thank you so much, Meredith! We can’t wait to finish it and show it off to the world!
I so appreciate your team creativity! I do like the arch idea and having brick on the wall(s). So glad I am privy to The Patch’s goings on. Thanks for such thorough instruction. Did you do anything with the columns after removing them from their place of disgrace or just discard them to the column cemetery? I was picturing them in my mind as a reconstruction of a Roman temple in ruins somewhere in the back forty.
Unfortunately, they had to be destroyed in order to remove them. But wow, where they heavy!