DIY Farmhouse Table
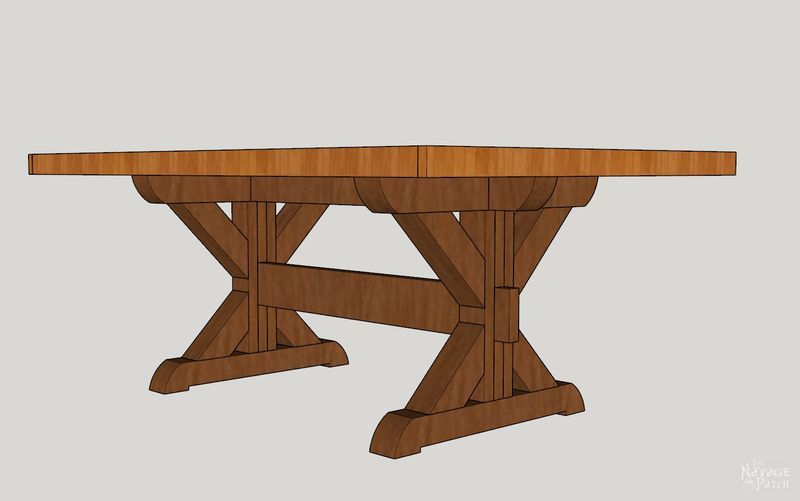
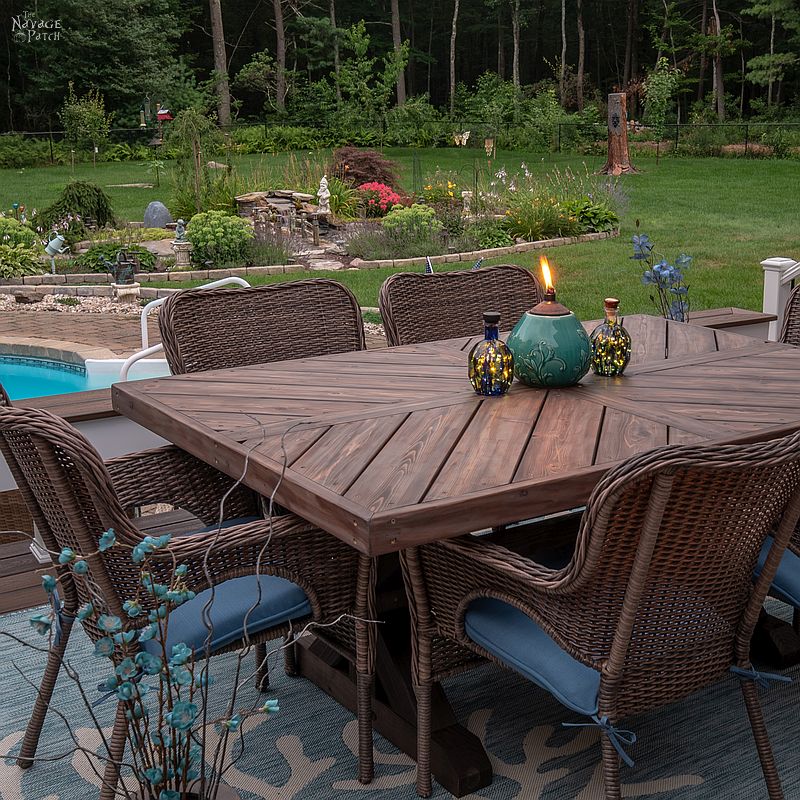
Our DIY Farmhouse Table is made of pressure-treated pine with a cedar plank top to keep the cost low and make it suitable for outdoor use. Swap in pine for the pressure-treated and cedar, and you’ve got yourself an even cheaper indoor trestle table!
We did it.
We finally did it!
Our new deck is finished, furnished and ready for the big reveal.
Oh, but not today. Nope, I’m gonna make you wait a little longer for that post, ’cause I’m a jerk like that. 🙂
But I still have something good to show you.
It’s big.
It’s heavy.
And it’s made out of wood.
Yep, the last piece of the puzzle is our new DIY farmhouse table that we’ve been building for the last few months.
As usual, it started with Handan assaulting me with Pinterest pins on Skype messenger.
“My babes, I want a table like this one.” She’d write and then shoot me a Pin showing happy, smiley-faced DIYers building a trestle table.
I disliked them immediately and trusted them even less than I liked them.
Anyone who smiles that much is selling something.
And anyone who smiles that much while building something is full of shit.

Still, I took note of the design and filed it away in the monkey cage my brain.
And then, the inevitable…
“No, wait! I want it like this one!” Another Pin, another farmhouse table.
And again…
“Forget the previous photos. I really want it like this!” Yet another trestle table Pin.
With all the mind-changing that women does, how the heck am I supposed to keep it all straight? My head is like a Midwestern road. Information travels in one ear, and it’s a straight shot through to the other ear where the information promptly exits. Nice and simple (stupid) – in, out, and Bob’s your uncle!
It looks something like this:

Contrast this to Handan’s brain:

So of course, I designed the wrong table on Sketchup. I had to go back in and modify my plans.
And then I designed it wrong again, because I tried to make it too fancy.
But fancy wasn’t what we wanted. We wanted Simple Stupid. If you’re not familiar with our new motto, please read this post.
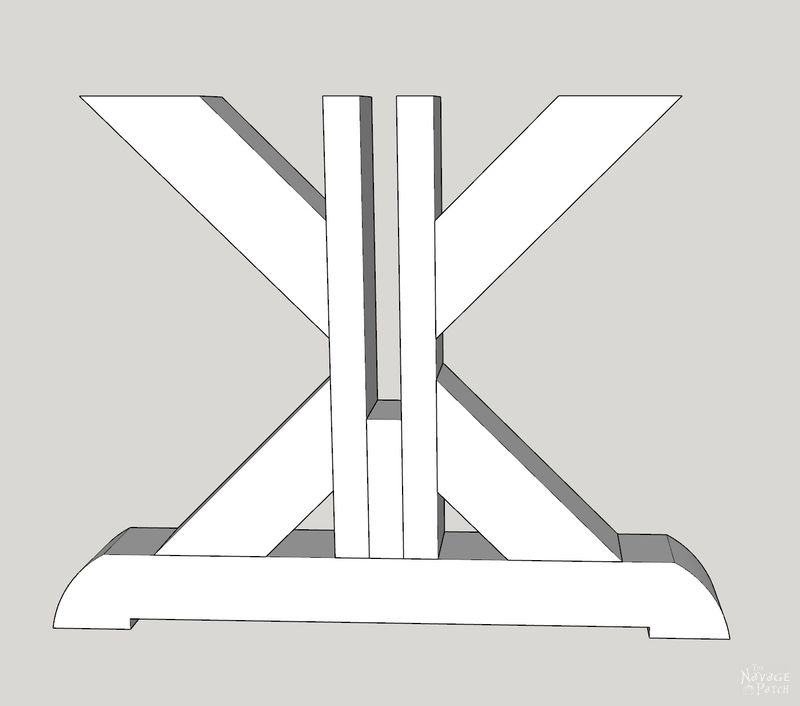
With that in mind, I finally designed an acceptable trestle table. With any luck, it would look something like this:
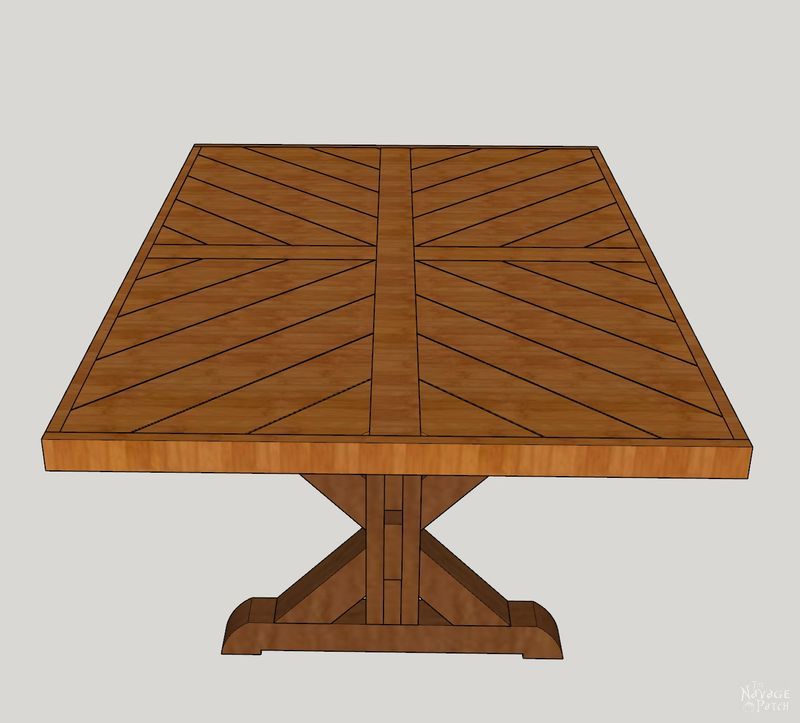
The herringbone table top was Handan’s idea. I think it would really set our farmhouse table apart. Or it would reduce me to a quivering mound of jelly. That remained to be seen.
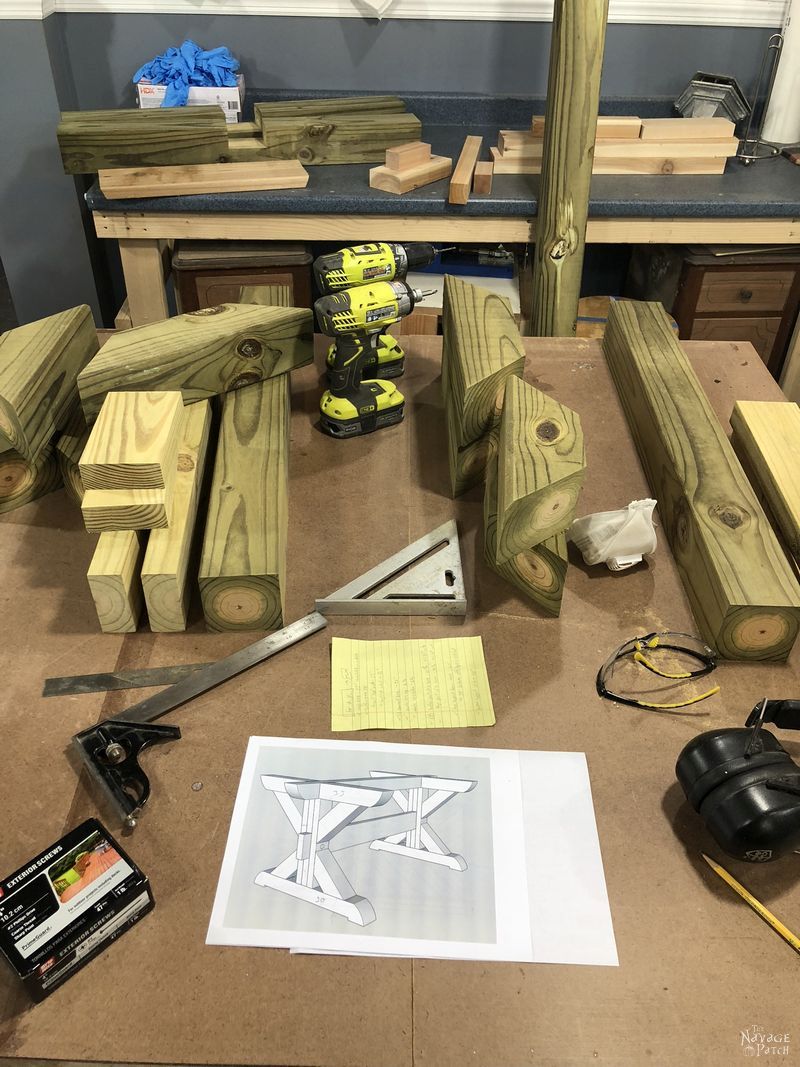
To keep costs to a minimum, we decided to build the base from pressure-treated pine 4x4s instead of cedar. We reserved the cedar for the table top. For indoor use, I’d use straight pine for all of it.
DIY Farmhouse Table Materials LIST
Affiliate links are provided below. Full disclosure here.
- (3) Pressure-treated pine 4x4x8
- (1) Pressure-treated pine 2x6x10 (ask the store to cut it at 62 inches)
- (1) Pressure-treated pine 2x4x12 (ask the store to cut it in half)
- (3) Pressure-treated pine 2x4x10 (ask the store to cut two of them at 62 inches and one at 80 inches)
- (8) Cedar deck boards 5/4x6x12 (ask the store to cut six at 96 inches, one at 60 inches, and one at 76 inches)
- 4 inch decking or exterior screws
- 2 1/2 inch decking or exterior screws
- 1 5/8 inch decking or exterior screws
- Kreg Jig
- Varathane stain
- Varathane spar urethane
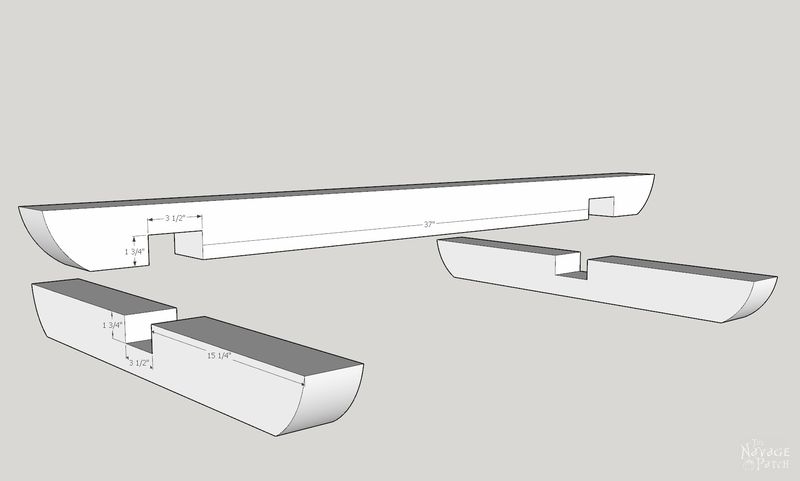
DIY Farmhouse Table Cut List
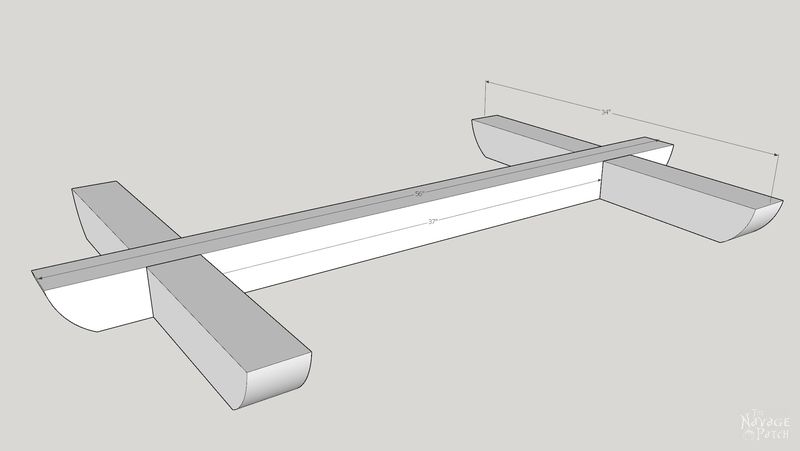
4×4 Pressure-treated pine
- (2) 34 inches
- (2) 30 inches
- (1) 54 inches
- see diagram in post for angled cuts
2×6 Pressure-treated pine
- (1) 61 inches
- (1) 48 inches
2×4 Pressure-treated pine
- (2) 61 inches
- (2) 46 inches
- (4) 19 3/4 inches
- (8) 16 3/4 inches
- (2) 8 inches
- (2) 6 1/4 inches
5/4×6 Cedar deck boards
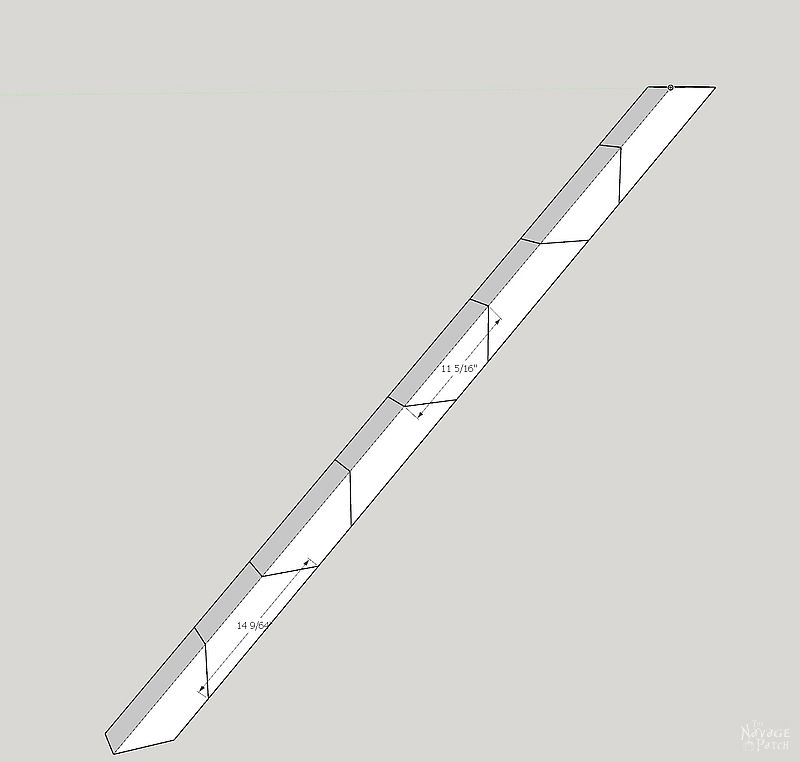
For herringbone pattern (rough estimates – see diagram in post for angled cut dimensions)
- (8) 36 inches
- (4) 30 inches
- (4) 24 inches
- (4) 19 inches
- (4) 12 inches
- (4) 8 inches
For center cross pieces
- (1) 68 inches (ripped to 3 1/2 inches wide)
- (2) 21 1/4 inches (ripped to 3 1/2 inches wide)
For trim
- (2) 70 inches (ripped to about 2 3/4 inches)
- (2) 48 inches (ripped to about 2 3/4 inches)
Let’s build our trestle table!
The pressure-treated pine we bought was super-saturated with creosote, and it weighed a ton! I had worries that the wood wouldn’t take stain, but I pushed those thoughts aside and started the build.
I first cut my pieces for the base.
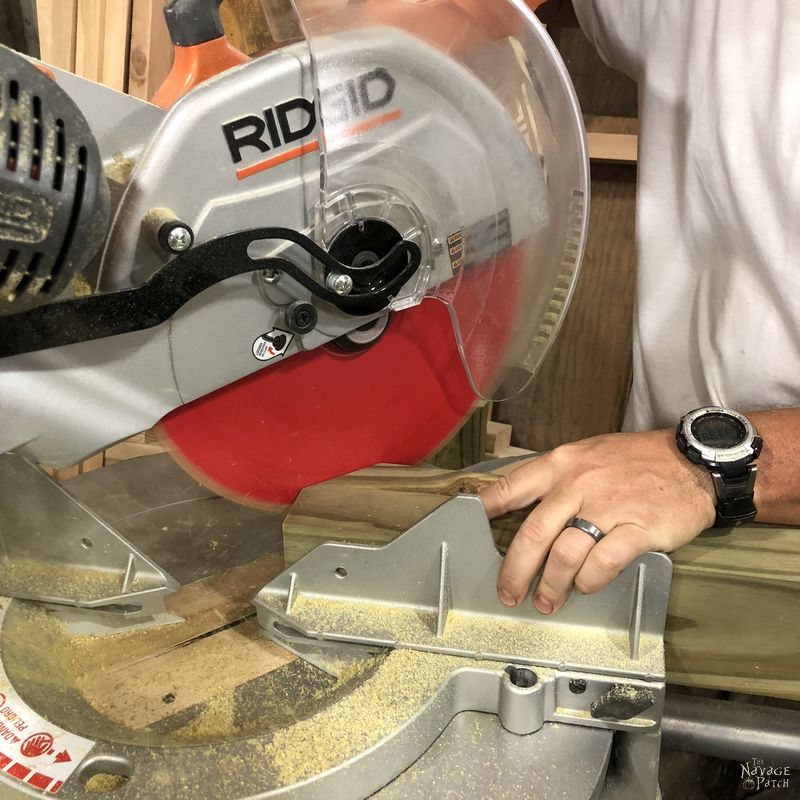
Although I had designed those nice curves on the legs, our new motto of Simple Stupid rang through my head, and I decided to just chamfer the ends – basically cutting off a piece at a 45 degree angle. I measured and marked for the cuts.
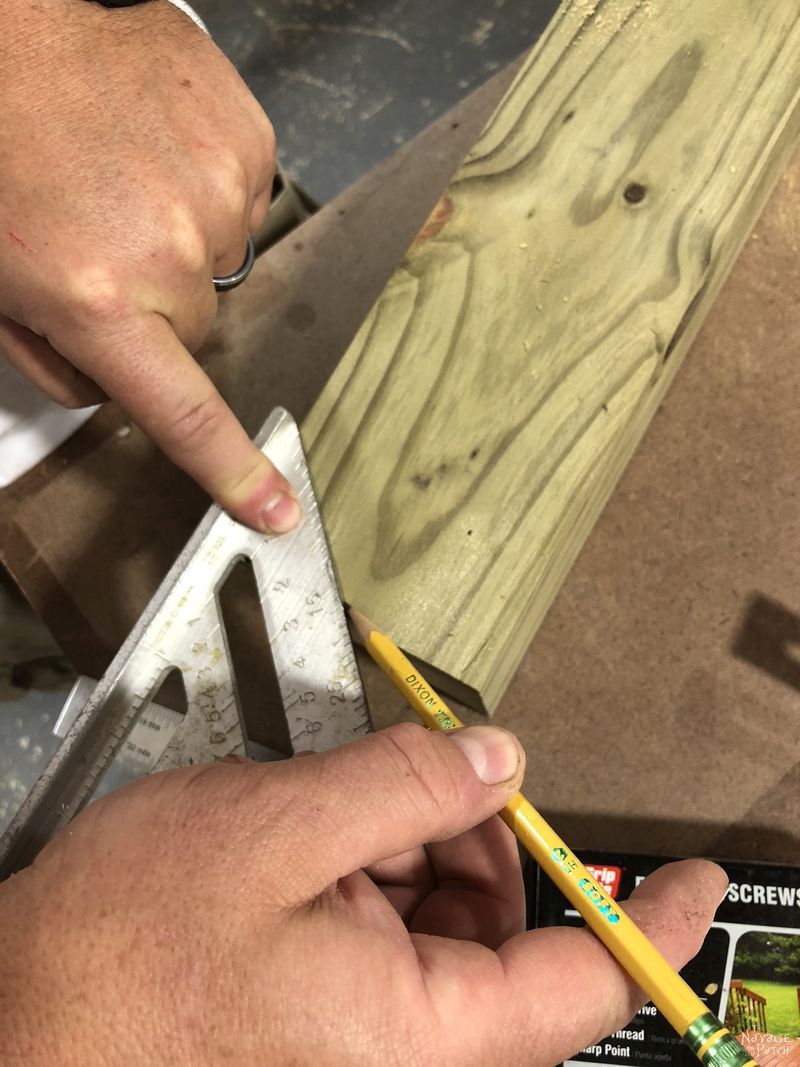
And then I chopped off the corners.
I next measured and marked the area I needed to cut out to make “feet” on the base. I measured in 3 1/2 inches from both base ends and then up 1/2 inch.
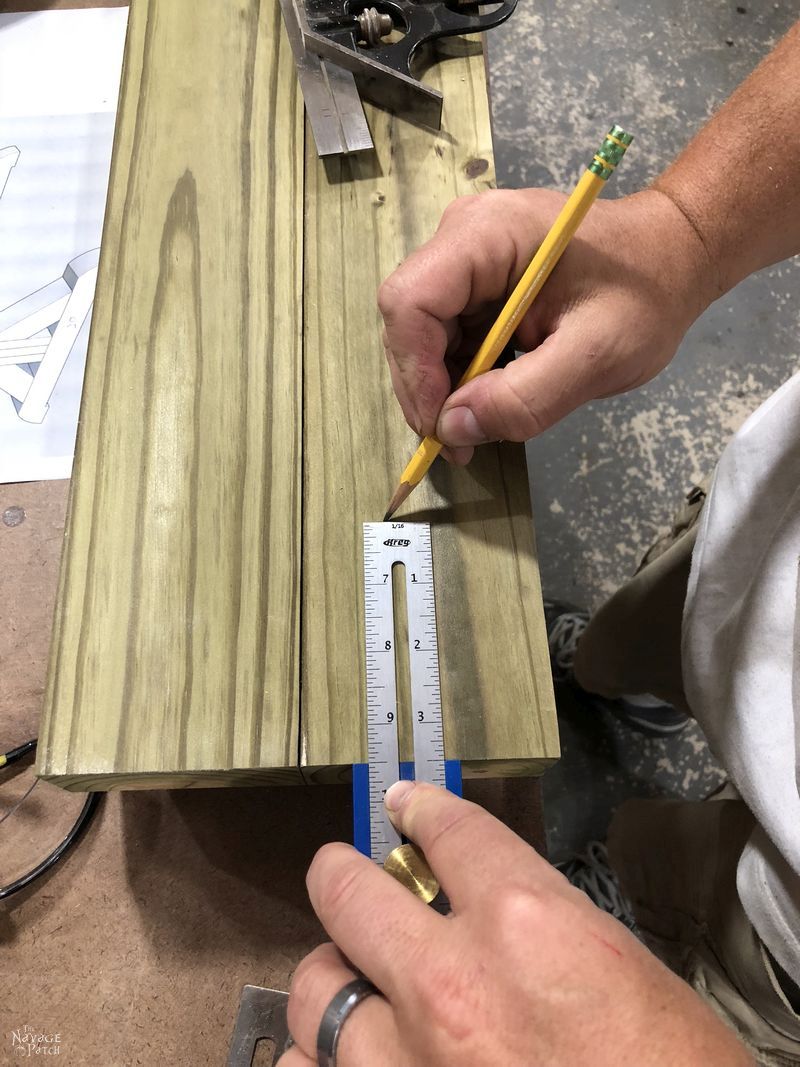
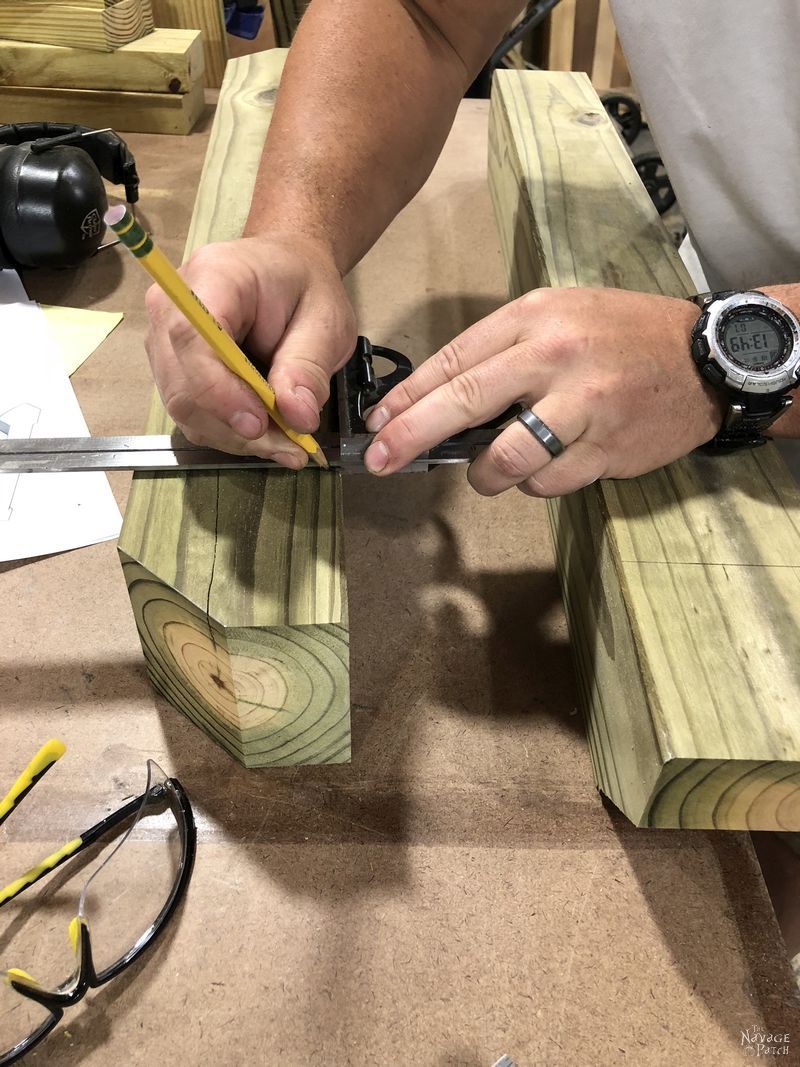
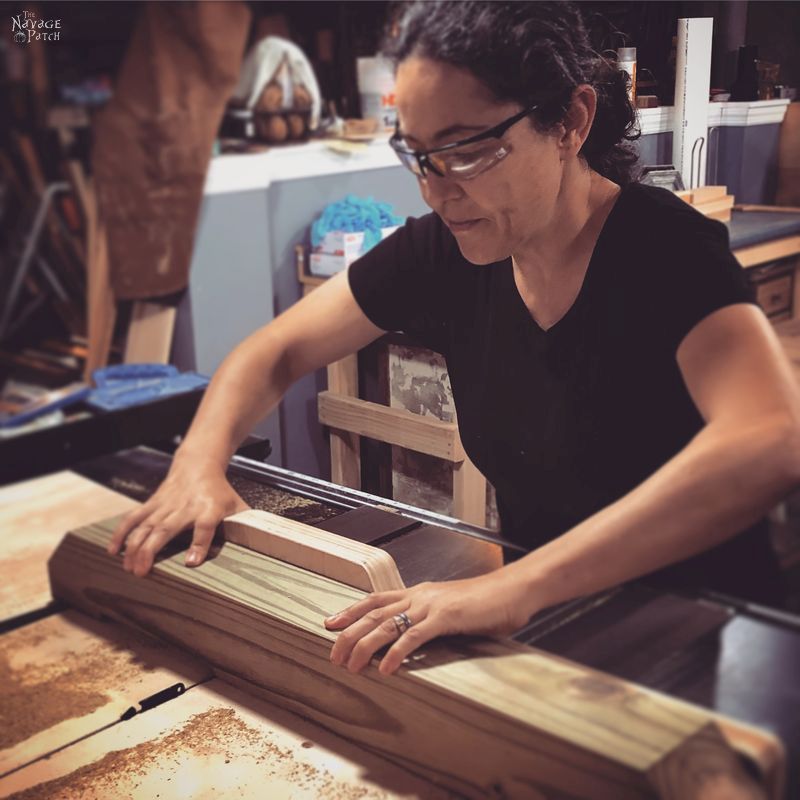
Cutting out this notch would give me four “feet” for the table. I used the table saw and passed the wood back and forth, cutting off 1/8 inch with each pass. That’s about 184 passes for each base!
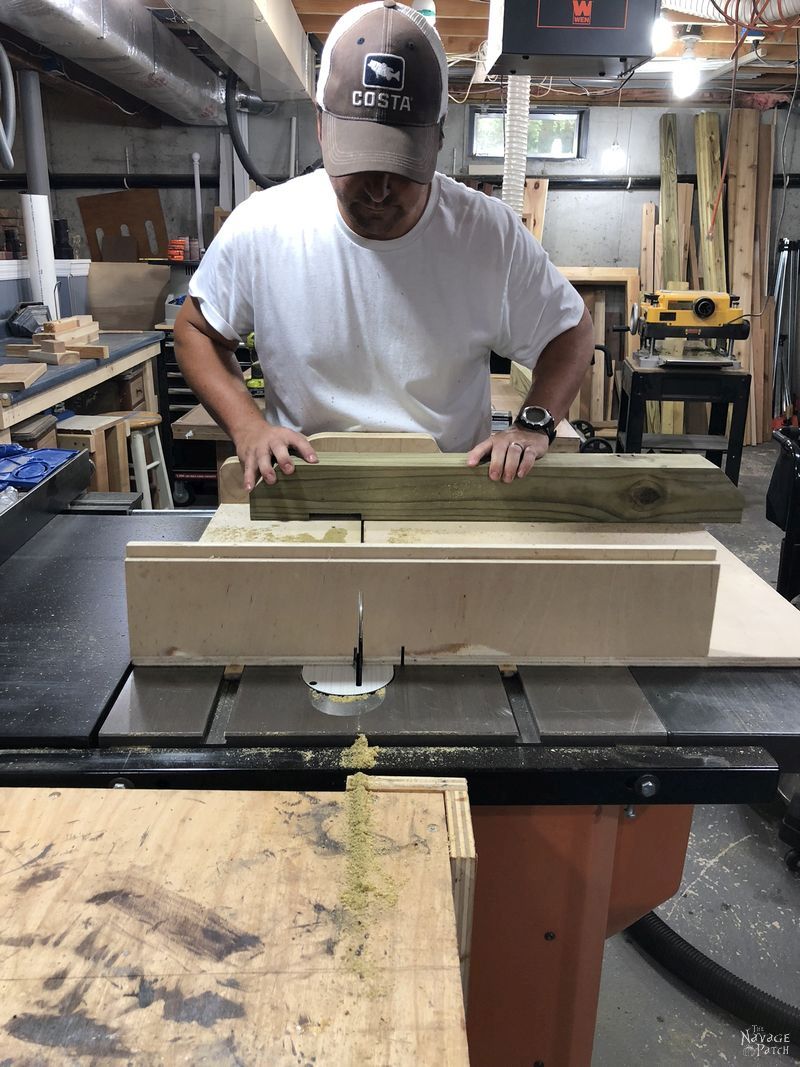
This got a little tiring and boring, so Handan offered to help. It was her first time using the table saw. I gotta say, she looks way better than I do using that saw!
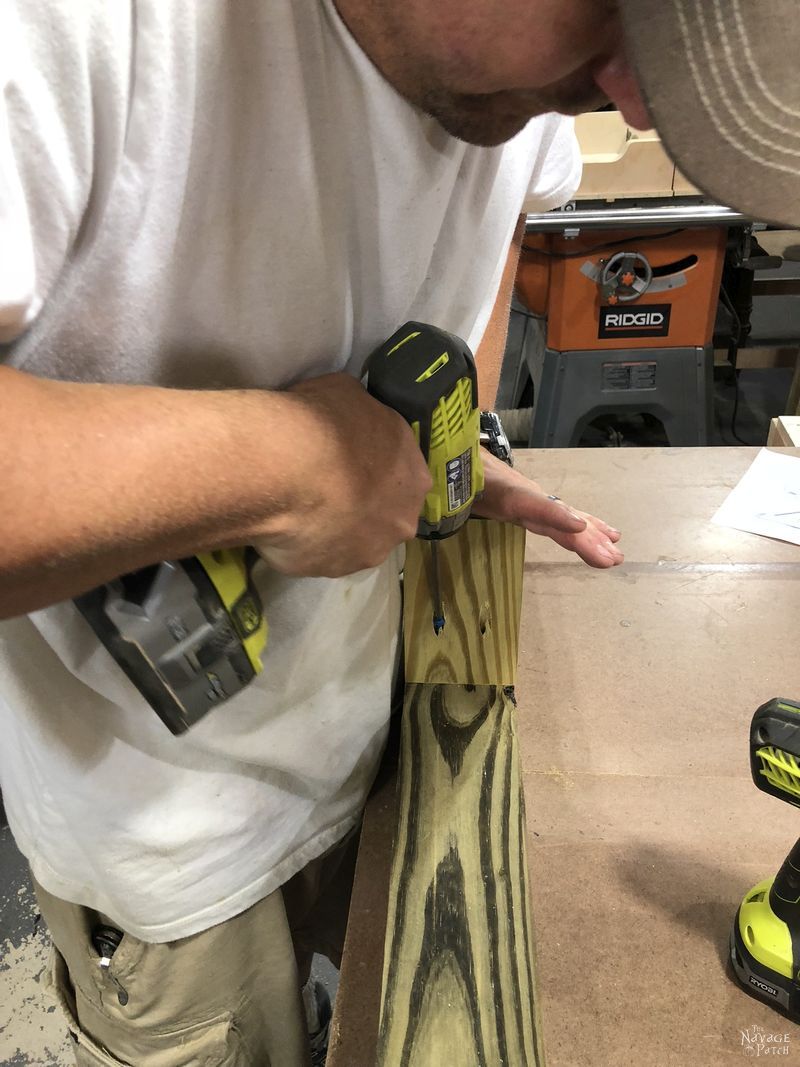
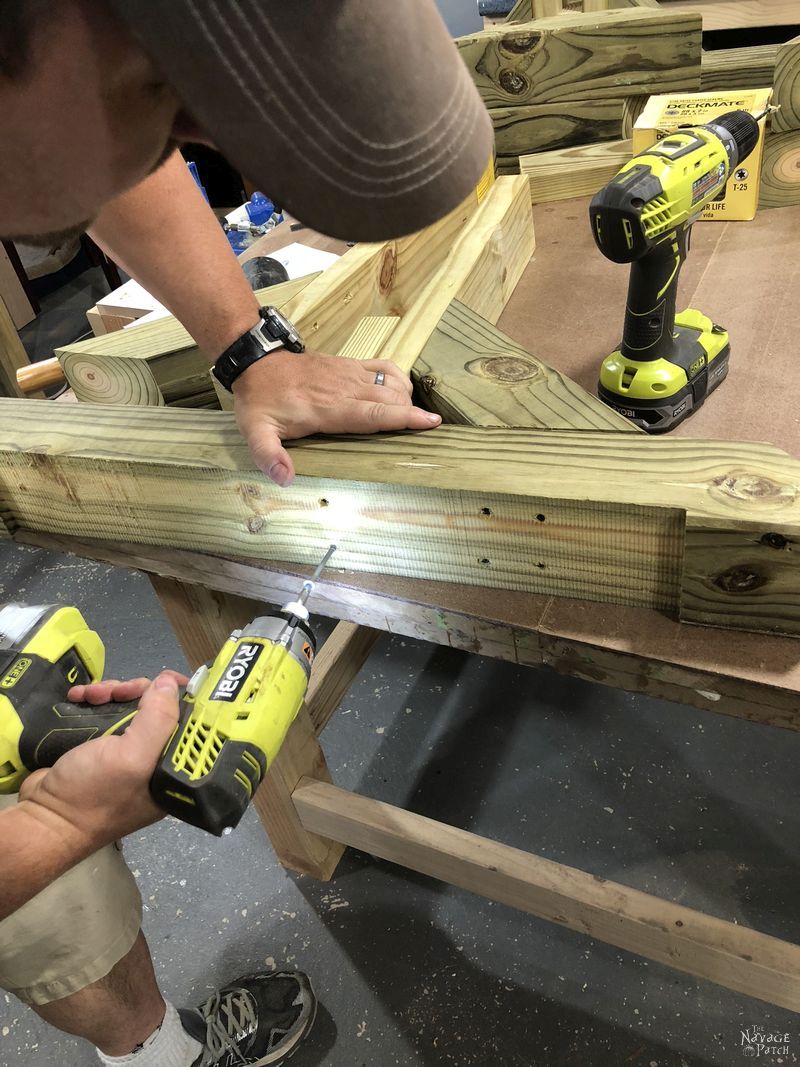
After cutting out the base notches, we started to screw together the table leg assemblies.
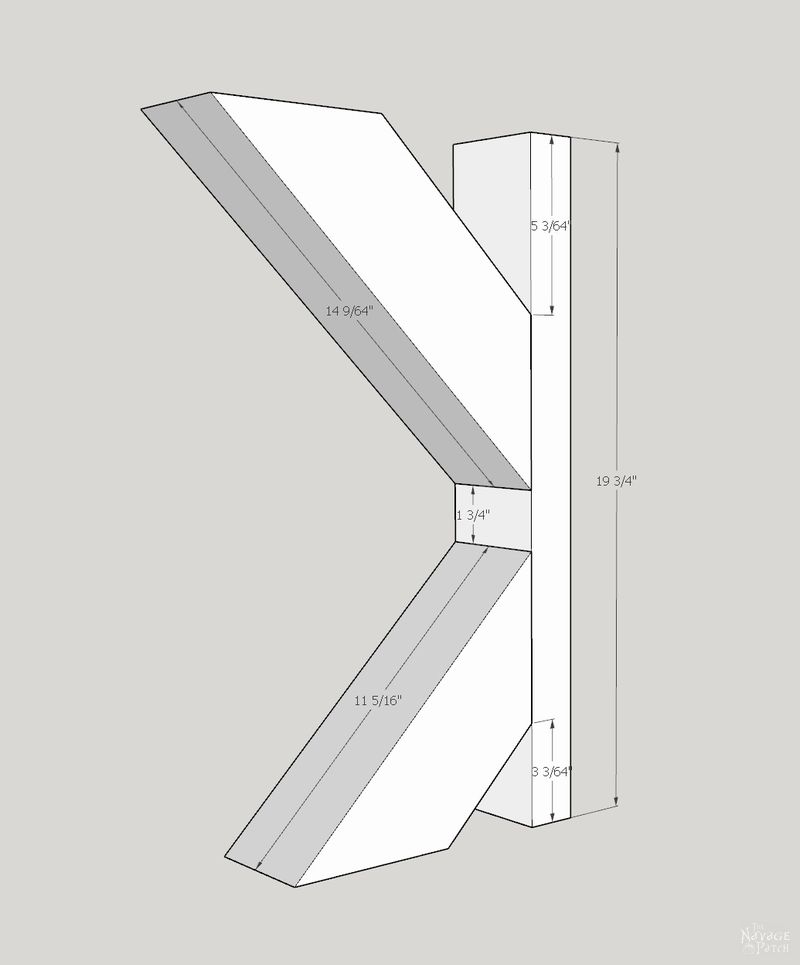
I used a combination of 4 inch deck screws inserted at an angle as shown below.
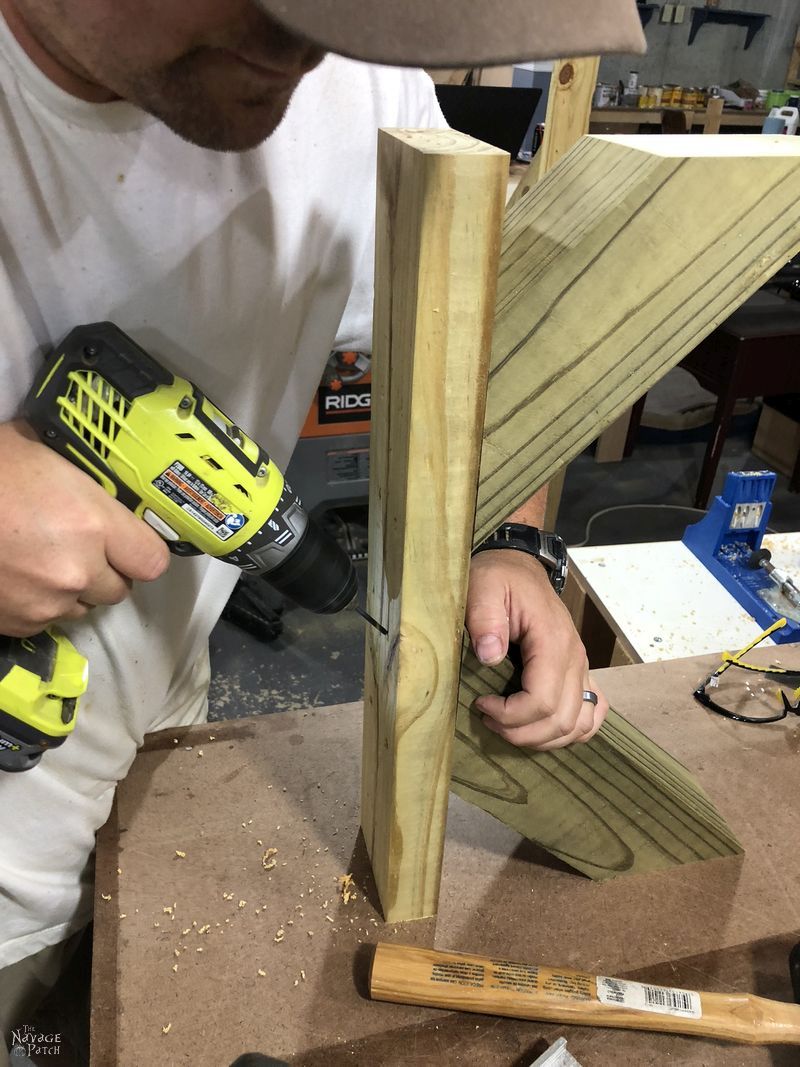
And 2 1/2 inch deck screws inserted straight.

Once those “K”-shaped pieces were built, I screwed them onto the base along with the small center piece.

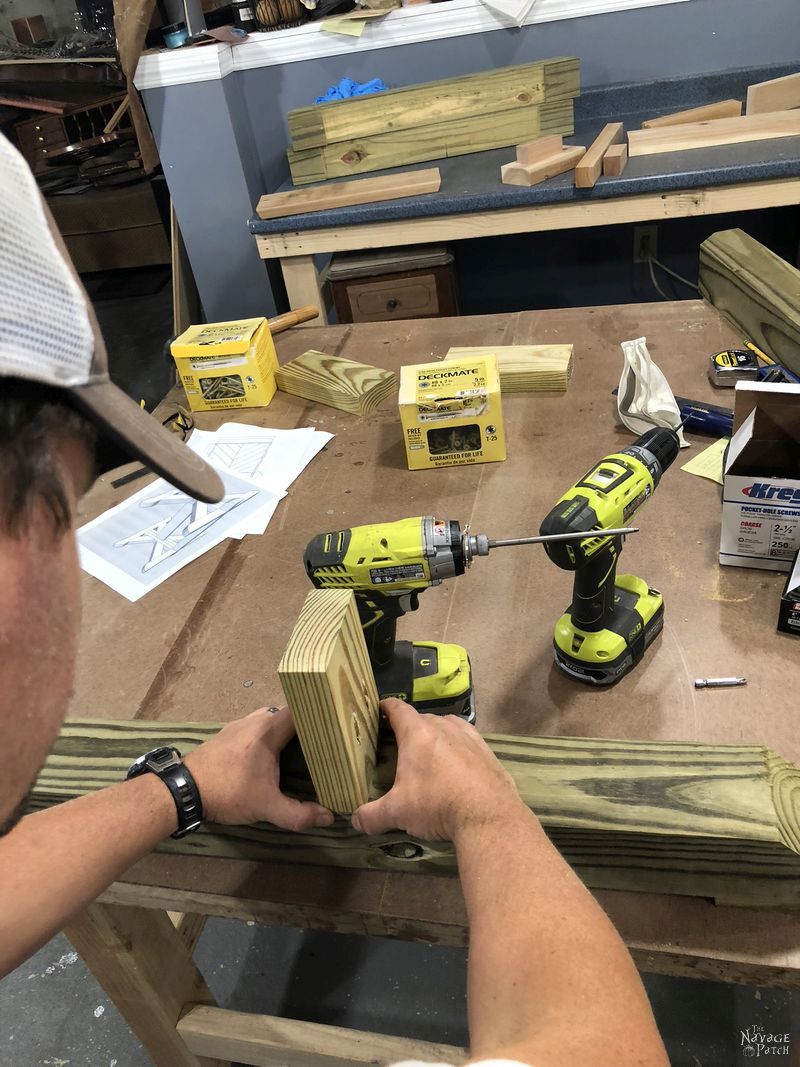
I used my Kreg Jig to make pocket holes for the small center piece.
I used 4 inch screws to attach the pieces from the bottom.
It felt good to get this far. The table was shaping up!

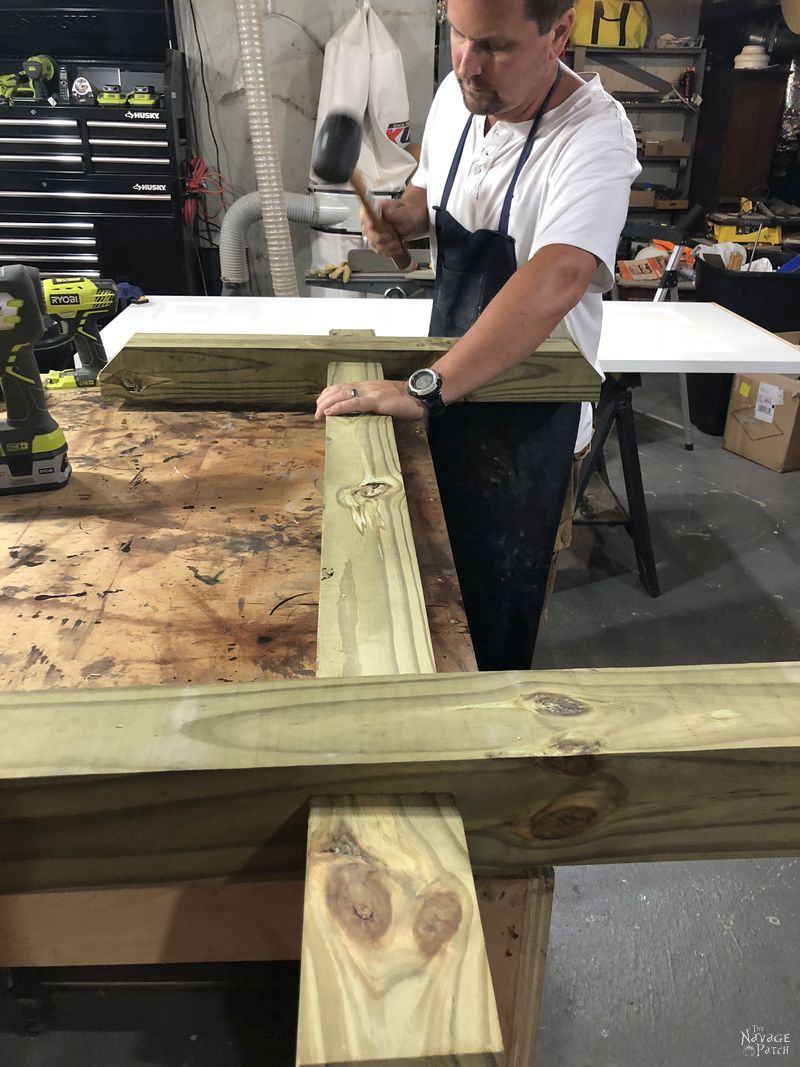
Next, we built the top part of the base. This required cutting more notches with the table saw (not pictured).
Pounding the pieces together…
Click on ‘Next’ to continue.
I love this table, and would love to own one. You guys are so lucky, because everything you make turns out fabulous. Thanks for sharing.
Thank you so much, Ivory! There’s a lot of sweat and determination mixed in with that luck, lol! 😀
Love the table! I can’t believe it there is someone in the world with a brain like mine – Handan! Don’t feel left out Greg, there is someone in the world with a brain like you – my Tony ,shame he doesn’t share your DIY skills.
LOL, I think a lot of guys have a brain like mine! 😀
Your blog writing, designing, building and geezering skills continually amaze me. I follow along your picture path shaking my head in wonder. My hubs has been planning to build a trestle table for a couple of years now. I am printing out your blog pages and bopping him on the head with them this afternoon. Thanks for sharing such great instructions!
Well thank you, Kay! I hope your husband makes an awesome table for you! (And I’m sure he’d love your help!). 😉
Love the table great workmanship, my only concern is usin pressure treated lumber, how safe is the treatment they use to treat the lumber?
Thank you, Bunny! The pressure-treated is only used for the base. The top is cedar, so it’s perfectly safe!
LOVE THIS!!! and i love your writing style!! that table looks like it came from restoration hardware!!
Thanks for the detailed instructions!
Thank you so much, Anne! 🙂
Beautiful you guys and did I perchance see a grinning somebody in one of those photos? That one where you’re owning the legs and selling us another awesome DIY story 😀
Lol, you might’ve!
Looks fantastic! Great job both of you!
Hi Aimee! Thank you so much! 🙂
ok put a potty in the shed i will pitch a tent in your back yard for the summer, please serve me all my meals on this gorgeous table and my martinis too please xx
Forget the tent, Chris – we have a guest room for you. Your martini will be waiting!
Great table! I just love you two!
Thank you so much, Marcia! 🙂
Just magnificent. That’s a table that should stay in the family, generation after generation!
Thank you, Suzanne! It’s too heavy to go anywhere else! 😀
Oh, I just love this! What work, but it was so worth it! I love the design. Do you use software to design your pieces? Great work, thanks for the inspiration. 🙂
Thank you, Maria! I use Sketchup to design the pieces. I don’t have an engineer’s mind, so there’s no way I’d be able to do something like this without Sketchup’s help!
Beautiful! Are there easily printable plans? Thanks!
Hi,
I am loving this design and the simplicity of it (because I own very few woodworking tools and while I have put together all sorts of furniture with pre-drilled holes and instructions, this would be my first time creating something of my own)! I intend to add legs to my husband’s grandmother’s table, and would love for you to let me know which pieces/steps I would be able to omit, if that is at all possible! I have looked thru it, but would love to be sure! THANK YOU!!
Are there printable plans for this table? I love it!!
Thank you, Jennifer! There are no printable plans for that table – you just have to scroll through the post for the instructions.
Can the table be made without The gaps? It will be an indoor table.. also is the cedar more durable? Then the pine ?
It certainly can be made without gaps. Cedar is more weather-resistant than pine, but indoor, there’s really no benefit to it.
Hi, thanks for the inspiration! I made a table similar with a few changes. Wish I could post pictures here to share with you. Took a good 5 1/2 days to build with some family distractions but that’s fine.. we love our new hand built table!
Hi Sean, that’s great! You can send pics to me at greg@thenavagepatch.com – we’d love to see your table!
Thanks for the post. I used your awesome post to inspire me to create a similarly designed table that will be on our covered porch. Just a quick few questions for you about the finish. How has it held up over the last 2 years in the weather? Have you had to sand and reapply the polyurethane? Has the Miniwax stain (which it states is for indoor use) caused any issues being outside? I’m debating between your approach with a simple stain/polyurethane combo vs a simple oil on the beautiful cedar.
Hi Mike, the finish held up well for 2 years in the 4 New England seasons and then began to peel. It’s an easy enough job to spot-sand and reapply another couple of coats. Oiled cedar would also look great, and it would require less maintenance. My wife didn’t want the grayed-cedar look though, so that’s why I went with the finish I did. I’m not sure if indoor stain makes a difference or not when also applying spar varnish, but it couldn’t hurt to use an outdoor variety. Since your porch is covered, you won’t have the damaging effects of sun, rain and snow, so whichever route you go, it’ll surely last longer than mine!
Love the table and will be sharing this with my husband, hoping he is up to start this project this weekend! Also I love the Wicker chairs that you have paired with your table, can you tell me where they are from?
Thank you, Celeste, I hope he’s up for it, too! We got those chairs at Walmart – they were pretty inexpensive. Good luck with the build!
Hey Guys!
Love this table and I already bought most of the materials, but I’m realizing I’d ultimately like it to be longer to accommodate 8 vs. 6. I’m going with a much simpler style for the base but the table top is what I’m concerned about. Any help you’d be able to provide with regard to measurements/additional cuts that would need to be made in order to do that? Was there a formula that you went by to dictate the length? Any help would be greatly appreciated!
Hi Jay, unfortunately I don’t have anything like a formula for you. I just laid out the design in Sketchup, plank by plank, until I filled up the available space. Adding a foot to each side shouldn’t be too complicated, but it may take a few extra trips to your saw to keep trimming down until everything fits just right. Try laying the design out on graph paper first to get an approximation of your cuts. Or if you’re handy with any sort of CAD program, you could try it out there. Good luck to you!
Ok, thanks for the help, Greg!
Thank you for sharing such detailed plans and instructions. My husband and I just finished building this table and it turned out great. The detailed step by step instructions and images/plans definitely made this a lot easier and the end product beautiful. My husband is very handy and loves woodworking, but he said this one was one of his favorite projects he worked on. I think this table will last for years to come. We also purchased a cover for it since it does rain alot here in Oregon 🙂 but it was all well worth it!
Oh, I’m so happy to hear that, Ellie, especially coming from a seasoned woodworker! Thank you so much for the feedback, and I hope you guys enjoy the table for years to come!
Wow in love with this table! Would you mind giving me rough estimates about how many hours of labor this took, also roughly how much did supplies cost? Lastly, have you or would you consider building and shipping for purchase?!
Thank you, Jenny! Okay, I’m afraid this reply won’t be very helpful to you because, 1) I don’t know how many hours it took – I built the table here and there over the course of many weeks, 2) I don’t have a number for the cost, but you can see the supplies list and figure an estimate from there, and 3) I don’t do custom builds for sale, as all of my free time is spent working on our house and this blog. I’m sorry! Your best bet would be to give the plans to a local builder or handyman and pay him or her to build it for you. That would also save you a bundle on shipping, as this thing is a beast! Good luck to you! 🙂
Omg, this table is amazing. Thank you for posting this DIY. I was searching for aN outdoor table That I loved and couldn’t find one and then I found this page! I immediate ran to the lumber yard and attempted this table. Although not perfect and most definitely my first attempt at building furniture, I love the outcome. Thanks again for sharing your talent!
Awesome! I’m so happy you gave it a shot! We’d love to see photos if you’re willing to share. Send them to greg@thenavagepatch.com. Thank you!
I’m building the table right now. I’m at a standstill looking for measurements on the top support. How far apart are the 16 3/4 braces?
Love the design! This is to replace a lightweight table that flew off the deck (umbrella and all) during a wind storm.
Just figured it ou! They’re to screw to the base!
Oh good! LOL, I didn’t see this comment, and I just spent the last few minutes pouring over the post and looking for my original plans! 🙂
Came across your design for the table and am currently making it. I modified the base to accept a center mounted umbrella and will extend the top length to 76 inches. I also drilled pocket holes in the top 4×4 supports so I can mount the top from underneath due to the weight. My question is on the staining and finish. You used interior stain and all my searching on the internet says “NO”. However, most of the reviews of exterior stain do not seem to suggest it would perform better. We also like the Kona color as perfect for our home. I would like to use the interior Kona with 3 or 4 coats of Helmsman Spar Urethane for protection and UV. The table will be in the sun for periods when in use, but we also will order a cover for extended times when the table is not in use. Looking for recommendations or opinions on how the interior stain with Helmsman will perform, particularly with fading.
Thanks for sharing a great design.
Hi Ron, I saw the pics you sent of your table – fantastic job!! As for the stain – we had no issues with fading, but as we’ve moved and no longer have the table, I honestly can’t say how it would have held up after two years. My guess is that a good UV protecting spar urethane will do a good job of protecting the color. As with most outdoor sealants that face the elements, you may have to reapply the urethane every few years.
Thats what I think as well. No different than if I used deck stain (from experience and reviews). I’m going with the Kona. Thanks for the reply. PS. I plan on using an 18 gauge nail gun to set and hold the top diagonal boards. Then I will flip over the top and secure with screws from below. Eliminates the screw heads.
That is a great idea to drive the screws from below!
Hello. I love your table! My husband and I just built it and love it ! However I have a question that maybe u can answer. I stained it and sanded it and then applied spar urethane on. When I woke up this morning I realized I hate the finished look and would like to start over. How would u recommend me doing that as I have applied one coat of spar urethane on the table thank u so much.
Hi Lori, do you mean you hate the urethane look or the stain look? Either way, your best bet is to sand down to raw wood and start over. I’ve done it many times on many projects!
This table turned out so beautifully! I am seriously in love with it! I would love to recreate it for my own kitchen here in Ames. This next week we are doing some kitchen cabinet door replacements so maybe once that is finished! Thanks for sharing all your tips and tricks. Can’t wait to give this a try.
Thank you so much, Jackie!
Hi, I am thinking of doing this build as well but have a few questions. I have made a few nice projects in the past but this would be one of the more complicated I have tried to handle and want to make sure I have thought everything out with the potential changes I am thinking of doing. Since composite decking boards are not flat on the underside, would there be any issues you can think of with regards to assembly or anything else if I used those instead of cedar? The only thing I can think of is making sure the screws go through the thickest part of the decking, which might be rather difficult since I would drill from the underside. The reason I would do composite decking is longevity and decreased of long term maintenance on the table top. I could then cut down composite cladding for the trim pieces. I have to decide if the beauty of natural wood outweighs the maintenance issue. I also wonder about how you had to sand down spots since everything is not always nice and flush…could not do that with composite.
Great post, and beautiful table! I’m considering attempting it, but wanted your thoughts on one modification: mine needs to fit a curved stone bench built alongside our pool, so the top will need to be a very specific ellipse or lens shape. I think the base should work just fine, and probably the tabletop support as well— but the table surface design might need to be a bit different, as the herringbone with the curves might drive me over the edge! Thoughts on how I might accomplish that tweak? I’m thinking longitudinal planks of cedar built wider-than-necessary, and then cut to shape carefully with a jigsaw and capped with a thinner, slightly bendable edge plate…? Am I biting off more than I can chew?
Hi Doug, I think that is the best solution. I’d love to see pics when you’re finished!
What is the over all HEIGHT of this table??
Hi John, I sold this table when we moved from CT a couple of years ago. While I don’t recall the exact height, it fall into the standard height range of a dining table.
Thanks … one thing … is there a way to get more detailed plans for this project? I tried signing up (for the PW) but i never received any emails (spam or otherwise). Thanks!
Hi John, unfortunately the plans and cut lists included with the post are as much as I have. I’ve had a lot of people email me pics of tables they completed with the plans, so I know it can be done! (and some were much better-looking than mine!)
Thanks … and you’re right … it’s moving along well .. the only thing i’d suggest, is to mention that the 16 3/4″ long 2x4s that make up the table top frame (the ones closes to the short sides), need to rest on top of the 4×4 arms… In the absence of a measurement, I didn’t realize that until after i’d already assembled things.
John, you are so right! Thank you for pointing it out to me – I will correct the post.
Very nice work, thank you for sharing. I am planning to build similar dining table for indoor purpose. What was the final dimension of your table?
Where can I find the plans for this beautiful farmhouse table?
Where can I find the plans for this beautiful farmhouse table?
Hi Mike, the plans are included in the post – unfortunately for this one, I don’t have separate downloadable plans.
Any chance I could get a copy of the sketch up files?
Thank you… got some good ideas from you.
Live in Boise – much wind so the base will be from ASH (Heavy and hard) but the topwwill be Cedar.
Hi Wayne, I’m glad to hear it. Just a word of caution – even with PT pine and cedar, this table was extremely heavy. With ash, it will be more so, so you may want to do final assembly in place or have access to some strong people to help move it into place. Good luck, and please send pics of the finished table to greg@thenavagepatch.com – I’d love to see it!
Thanks for documenting and sharing your build. I know that is a lot of work and it is greatly appreciated. Personally, I can’t unsee all those screws on top but understand it would have been a huge pain to do from the bottom.
I would have been a pain for sure! But I made that when I was younger and less experienced. I figured it was good enough for outdoors!