DIY Gilded Christmas Ornaments
Fancy Christmas tree ornaments can be pricey, but you can get a high-end look on the cheap by learning how to make these DIY Gilded Christmas Ornaments! The gilding techniques shown here can be applied to other crafts as well.
With Christmas just around the corner, I bet you’ve also started to see hundreds of sponsored posts floating around Blogland, and I hope you won’t mind reading one more. So before jumping into today’s tutorial, let’s quickly go through the disclaimer below and show our love to the wonderful sponsor of my DIY gilded Christmas ornaments, shall we? 😉
This post is sponsored by my awesome hubby! I want to thank him for driving me to all the craft stores (even during this crazy busy season), for always providing me with all the craft supplies that I oohhh-and-ahhh over, for taking all the progress and final pictures for my projects without bitching and complaining, for proofreading my posts and correcting my grammar mistakes so our readers can understand what the heck I am talking about, and basically helping me in every way to make this and all my other DIY posts possible. Oh, and before I forget: though this post is sponsored by my babes, of course all opinions are 100% mine, as he is currently too busy [being awesome] to comment. LOL.
Hahahaha – ok, ok…enough of me goofing around. Here is the material list for this easy-peasy Christmas ornament project.
DIY gilded christmas ornament SUPPLIES LIST
Affiliate links are provided below. Full disclosure here.
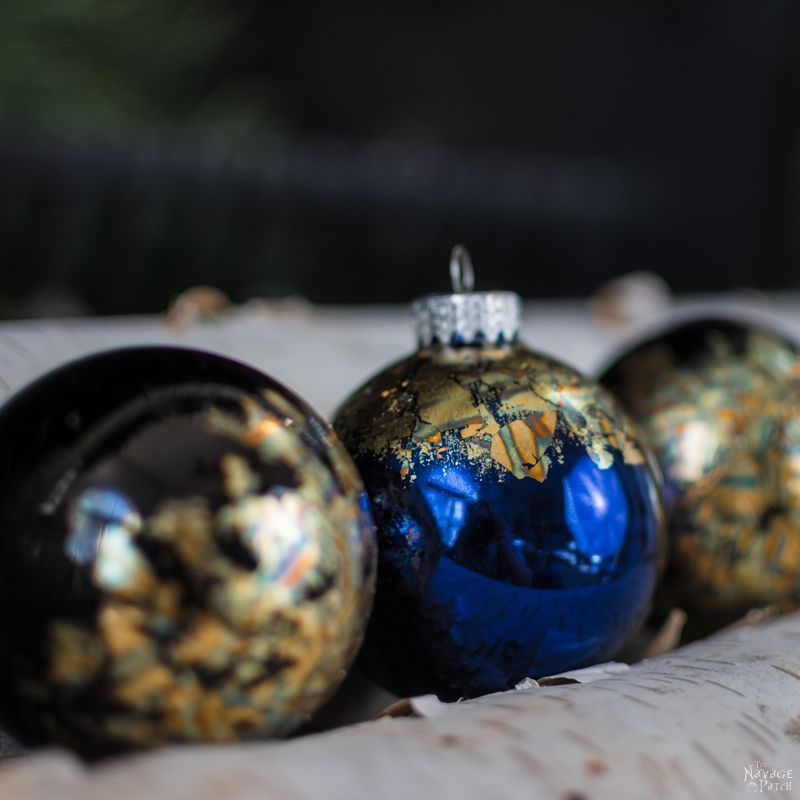
- Gilding sheets (metal leaf) – I used two different kinds: one had gold and copper mixed with blue patina and the other had gold and copper with a reddish patina
- Gilding adhesive (size)
- Ornaments – any plain color ornaments will do. I found mine at Michaels. By the way, Michaels currently has a terrific sale on these glass ornaments, so you might want to check them out.
- A pair of scissors (optional)
- A small paint brush – for applying the gilding adhesive
- A soft brush – for gently brushing out the creases and brushing off the excess gilding sheets or
- Rubbing alcohol and cotton swabs (optional)
Now that we have the supplies list out of the way, let’s start making some gilded ornaments, shall we?
How To Make Gilded Christmas Ornaments
First, I cleaned the glass ornaments with some rubbing alcohol and a lint free cloth, so they wouldn’t have any dust and lint on them.

Next, I cut the gilding sheets to smaller pieces. As you may guess, this step is optional. I did it to be able to use fewer gilding sheets, and also, the smaller sheets were easier to handle.

Once I had my ornaments and gilding sheets ready, I applied some gilding adhesive (called “size”) on the ornaments using a small paint brush. As you may see from the pictures, I brushed on the gilding adhesive (size) in a random way and only to the top or to the bottom of the ornaments. If you want to gild your ornaments entirely, then you need to apply the size all over the ornament.

When applying the size, it is important to avoid puddles, because the gilding sheet is so thin, it would show any imperfections on the surface below. You can either apply a little bit of size at a time, or you can do like I did: put a whole lot of size at once, then distribute it evenly with your brush until you have no puddles nor drip marks. Both ways will work perfectly.
Now here is an interesting thing about gilding size: while in the bottle (in its fluid form), it has a milky white color, and it’s not sticky at all. Once it starts drying, it gets transparent and tacky, and it just stays sticky until you glue something on it (which is the gilding sheet in our case). It’s almost the opposite of regular adhesives that start out tacky and then dry completely. You’ll see what I mean the first time you get some on your hands. More on that later.
Once the size turned transparent, I started gilding: with a gilding sheet in my hand, I touched the surface and pulled back. Touch and pull, touch and pull. It is that easy.
As I wanted a random, noncontinuous, crackled look, I applied the gilding sheets a little at a time and carried on until all the tacky areas were covered with gilding sheets.

During this process, if there is any loose gold leaf hanging off of your ornament’s surface, just brush it with a soft-smooth paint brush. Brushing helps those loose particles in two ways: they either smoothly stick to the ornament or fall off. Either result is good.

Oh, before I forget – here is an important hint about the size I used: rubbing alcohol is the best and the only mess-free cure for its tackiness. So let’s say you applied the gilding size to a spot where you didn’t want to gild, or even worse – let’s say you work so messy that you mistakenly tipped over the size bottle and ended up with size drips all over your hardwood floor…I know, sounds terrible, doesn’t it?…but no need to panic…really!…at least not until your hubby steps in it and carries it all over your house… LOL. No, of course that didn’t happen to us…why do you ask? hahahaha 😀
Anyway… in case you find yourself in that kind of scenario, I suggest cleaning the mess with rubbing alcohol. It is the easiest mess-free cleaner for the tacky gilding size. But also note that if you wipe your gold / copper gild with alcohol, it may degloss it a little. And if the gild is just newly done, it may even take the gild off. So try not to get it on the already nicely gilded area. 😉
Ok, now back to the tutorial…
As the last step, I did the final cleaning. While gilding, I mistakenly applied the size where I shouldn’t have, so to clean off those areas, I dipped a cotton swab into some rubbing alcohol.
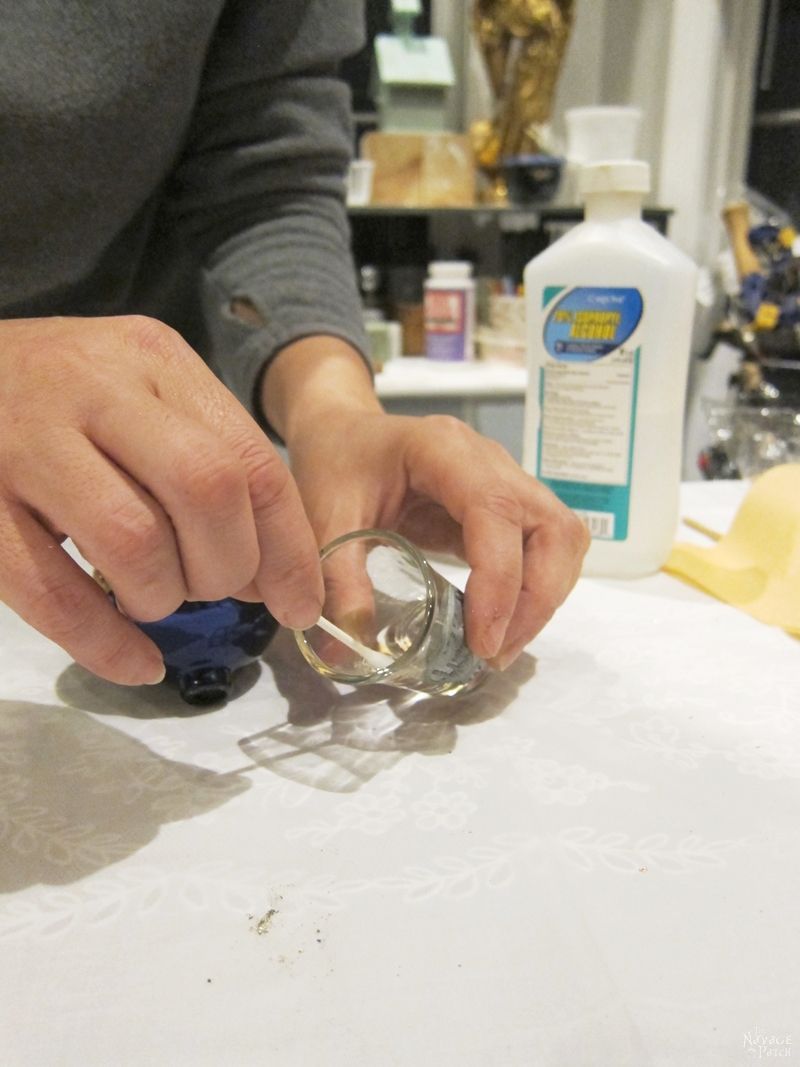
Then, I simply rubbed my mistakes off, and that was the end of this easy Christmas ornament project!

Before going into the beauty shots, I also want to mention that you can go for any pattern when gilding. I went for a random pattern, because it was easy and I liked the look, but you can easily do any pattern you like. All it takes is applying the size in the pattern of your choice.
Now for the beauty shots 😉
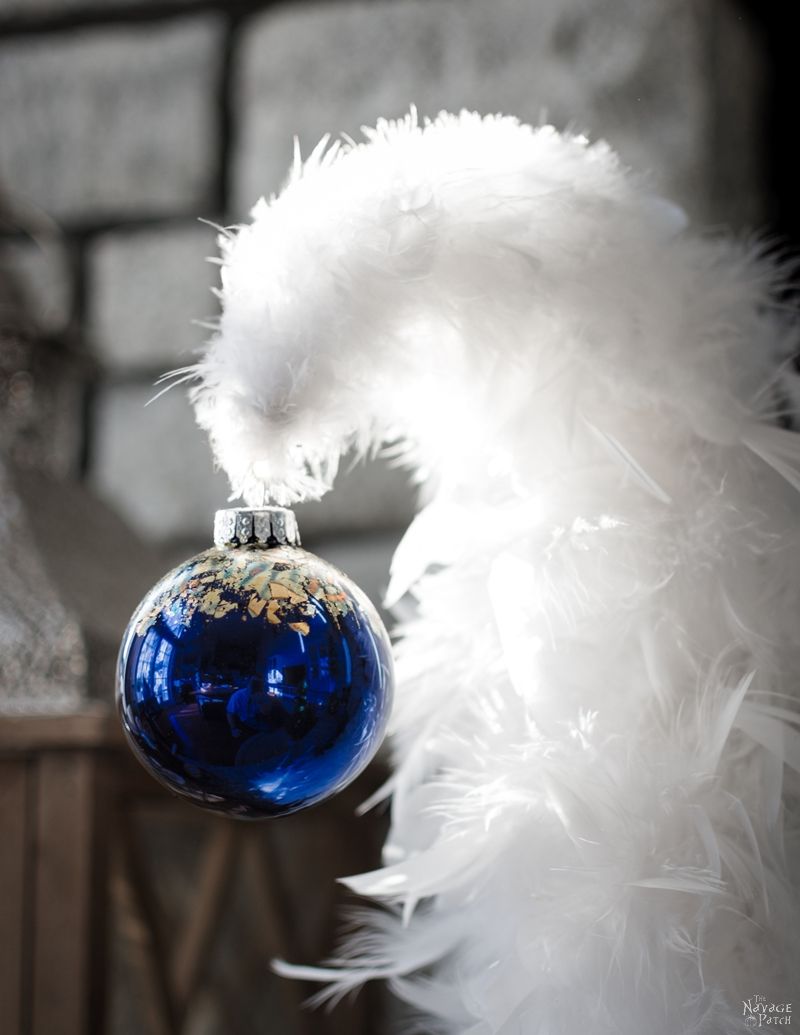
Do you remember this feather tree? My babes loves blue so much that he couldn’t wait to change the previous red ornament on it. Hahahaha 😀

I love how these ornaments turned out, and I’m loving this gilded look more and more. I wonder how it would be if I tried it on some fabric? I know it would look really nice, but I’m wondering if it would be washable or not. I guess we won’t know until I give it a try, right?

I have to say, between the two gilding sheets I listed in the supplies list, Martha Stewart’s gilding sheet was a bit easier to handle. As for the copperish reddish one, it needed a little more attention when applying it. But in terms of colors and the patina I love them both equally!

Hahahaha – don’t you love that thick cooking twine my awesome sponsor used to hang the ornament? 😀 He told me he couldn’t find my fancy-schmancy twines, so he thought it would be just as fine with his cooking twine. LOL. You just gotta love him, don’t you?!?


I know I said I’d be posting about gift wrapping ideas, but I was so excited about this quick and easy project, I couldn’t help myself sharing my gilded Christmas ornaments first. I hope you liked them.
Handan, xo
We love it when you share our posts on Facebook and Pinterest!


GORGEOUS!!!
Thank you so much, Carol! 🙂
These are gorgeous!
I like the idea of adding a pattern (maybe a star or a monogram). Does the material allow for filigree patterns?
Thank you so much for sharing.
Thank you so much, Maja! As long as you have a good detail brush to apply the size, then you should be able to do filigree or any other intricate pattern. The gilding adhesive (size) has a very thin consistency (almost like water), so if you work slow you could easily avoid any possible runs or drips. And once you have size on the ornament (or any surface) correctly, then the rest is easy –
gilding sheets will stick only to the area where you applied size 😉
So pretty! I’ll take a dozen! Lol!
Thank you so much, Giselle! LOL – Ok, I’ll make 9 more and get them ready for the next year then 😉
Very pretty! Aren’t hubbies the best? My projects are all that much better because of my hubby too; what would we do without them?!
Thank you so much, Sara! Yes indeed – they are the best!! 😀
I love the gilding! They’re gorgeous!
Thank you so much, Mom! 🙂
Love, love, love the look with the gilding addded and the ease of the method. Will definitely add these to My-Do-for-Next-Year-List! Thank you so much for the tutorial!!! ♥
Thank you so much for your lovely comment, Frani! It indeed made my day! 🙂
these are stunning handan almost as stunning as your hubs and yourself, i got a wonderful surprise today y’all are the best and i love you dearly, i am not gonna croak anytime soon but i have been a bit poorly and having to go the damn doctors too much xx
Oh Chris…don’t say – I knew something was up and was worrying about you as we didn’t hear from you for past couple of weeks. I hope you get better soon. Please take good care of yourself. xx
Oh and – Merry Christmas to you and to your lovely family! 🙂
This is perfectly timed! I just got some gold leaf and your blog has given me the perfect idea!!! When cleaning out my Mom’s house last year, I discovered that someone had put the antique blown glass ornaments, in their cardboard boxes, next to a stone wall in Mama’s cellar. They look a mess! But a little gold leaf should perk them right up! <3! I've thought about using some of the german glass glitter but I have the leaf already and you make it look easy and wonderful! Thank you! The Navages have really brightened my day, today!
I am so glad you liked these, Derry! German glitter would also look great! I will be making some glitter ornaments soon – let’s see if I can get them done before Christmas. If so I’ll share them here on the blog to give you even more ideas 😉
These are beautiful indeed! I’m not a huge sparkly gold or silver kind of gal, once in a while maybe just a little, (I do love the look of mercury glass) . . . these could probably make me change my mind. You did a great job explaining and demonstrating through your pictures. Bet your tree is lovely!
And kudos to your babes for all his support. You two make me smile, so good to “see” two people working on things together and putting (love) words into (love) action. 🙂 Oh, and the cooking twine made me feel right at home.
Oh thank you so much, Kathy! By the way, I am just like you – meaning that I love the mercury glass look, but I’m not really a fan of sparkly gold or silver. Only if gold is more on the copperish side, then I don’t mind, because I like copper. So I am not sure how I happen to love this variegated gild, but it is really so pretty and elegant, especially with dark colors, like black or navy. I guess the blue patina and the copper mix makes it really cool 🙂
Wow, you guys are great. I love these fabulous ornaments. You two nailed this project. I love it!
Thank you so much, Ivory! 🙂
THESE ARE ABSOLUTELY….WHAT I WANT!!! Truly makes a statement and your tutorial makes me want to DO THIS!!! KUDOS!! franki
Thank you so much, Franki! Oh you should definitely try making some – these ornaments are really so very easy to do! 🙂
Handan, your disclosure was as cute as the gilded ornaments! You two crack me up every single time I visit your awesome blog. Thanks for the chuckle this morning. xo
Hahaha – Thank you so much, Marie! I knew you’d like that. 🙂
Thanks for sharing this. I had no idea that gilding sheets came in variegated patterns/colors. Sadly the Martha Stewart one you used doesn’t seem to be available anywhere nowadays. I will have to hunt for a substitution as I love this look as opposed to just plain solid colors.
Thank you, Michelle, and thanks for the heads-up about the Martha Stewart gilding sheets. I’ve updated the post with a link to some blue/copper sheets on Amazon.
Hello,
I keep getting bare spots on mine as they dry. I am using glass bulbs and acrylic ornaments. The ornaments are stunning and I would definitely like to try it on a much smaller scale as my tree is quite tiny. They look well coated after drying upside down but then I turn them back right side up and some of the paint slides down, leaving bare spots.