How to Make a DIY Pendant Light With No Wires
Learn how to make a DIY pendant light with no wires and no electricity needed! This rattan pendant light is remote-controlled and color-changing!
Good ideas build upon themselves like a snowball rolling down a hill.
At a recent trip to Target, Handan found some Threshold “woven egg decor” on one of the clearance shelves.
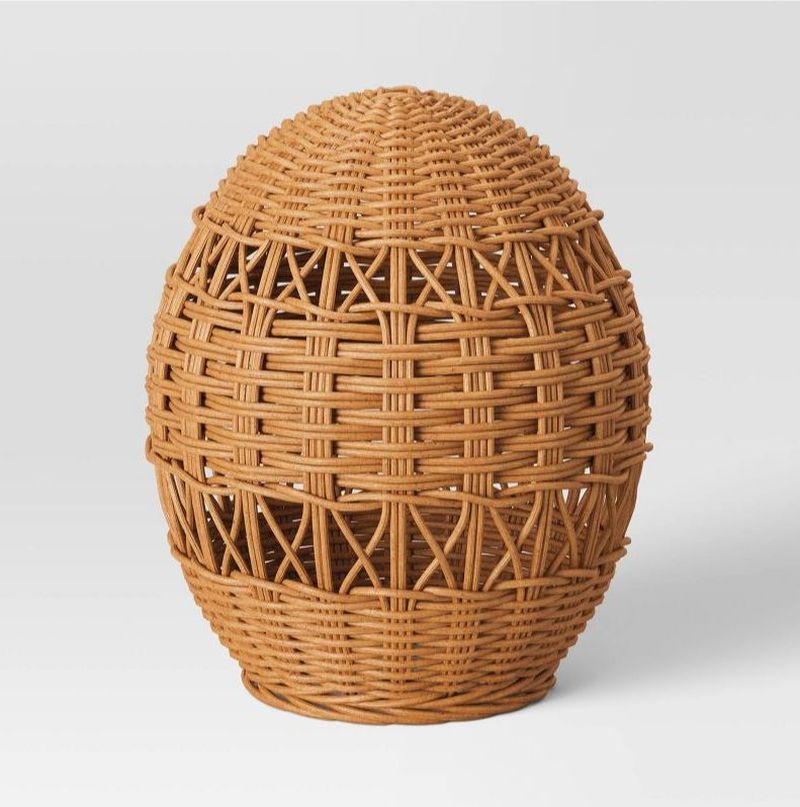
They were marked down to half their original price. Figuring 1) we could probably make something from them and 2) we surely don’t have enough woven rattan doodads (o_0), she bought two of them.
Two?
Who buys two of something for decor? The world of art and decor operates on the Rule of Odds!
She showed me the eggs, and I asked if there were more of them in the store. She said there were. Well then why did she only buy two, I asked. She didn’t know, she said. She thought two would work for…something. Let’s chalk it up to a brain fart, or to be more delicate, a brain leak.
I told her I’d go out the next morning and find some more. She described in great detail where in the Destin, FL Target I could find the rest of the woven eggs. What I heard was blah blah blah clearance shelf blah blah blah.
Whatever. How hard could it be to find a shelf full of rattan eggs on clearance?
Very hard, apparently – at least when the directions to their exact location went in one ear and out the other.
The Rule of Odds
The Rule of Odds has been around for centuries (if not longer), and it is a cornerstone of art and photography composition. Since interior design and home decor borrows heavily from the fine arts, it has become a common practice among professionals and DIYers alike. Why are we more drawn to threes than twos of fours? What is it about odd numbers that satisfies so much more than even ones? Whatever the reason, the Rule of Odds is one to follow when setting up a room or a vignette. We even subconsciously use it at the dinner table with our protein, vegetable and starch! 😀
After scouring the store from stem to stern, I Facetimed my babes to get to the bottom of this pickle. In my expert opinion on such matters, someone must have bought the remaining eggs the day before.
I dialed. She answered. I turned the phone so she could see what I was looking at. Like a seasoned mariner in a familiar stretch of sea, she started issuing commands. Go straight, turn right, walk forward, stop. Look to your right.
And there they were. Three woven eggs on a shelf clearly marked “CLEARANCE!” Huh, they must have restocked when I called my babes.
There was an older woman pushing a cart nearby who was having a great laugh watching the bald-legged doofus being led around the store by a woman’s face on his phone. Hey, I’m always here to please and entertain – on the blog or live in person!
Anyway, I snatched up the remaining woven eggs and made a beeline for the door.
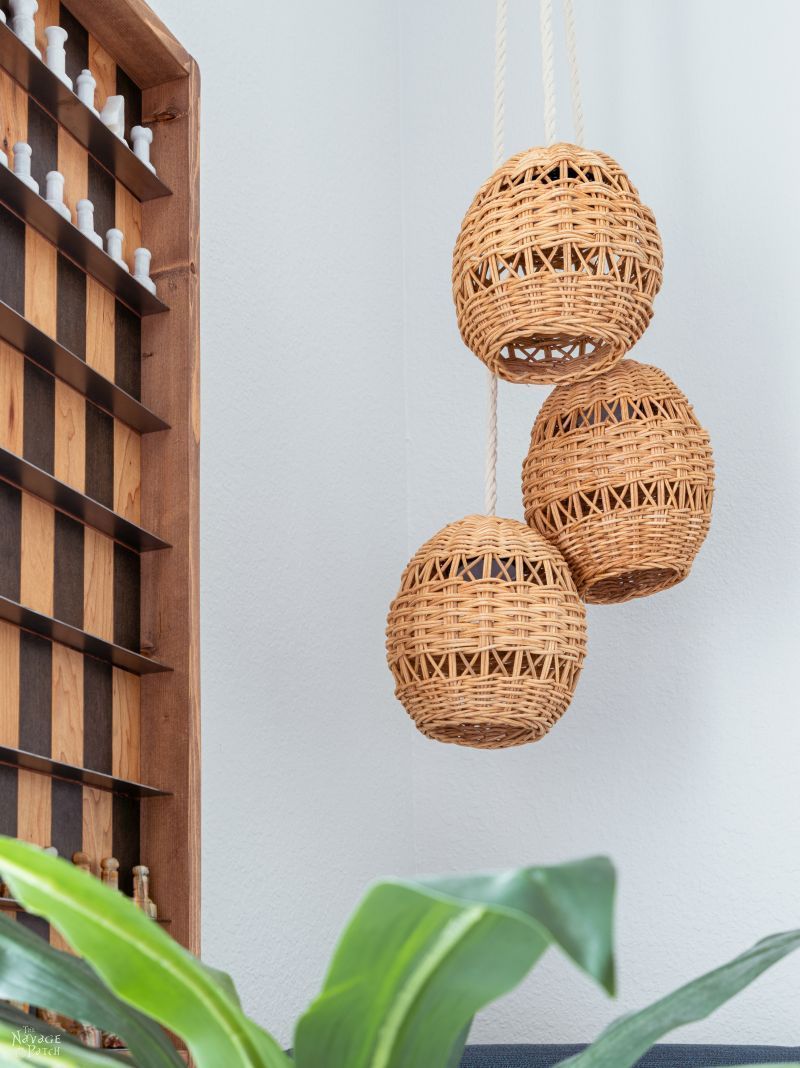
That night, we put our heads together and hatched a plan for the eggs.
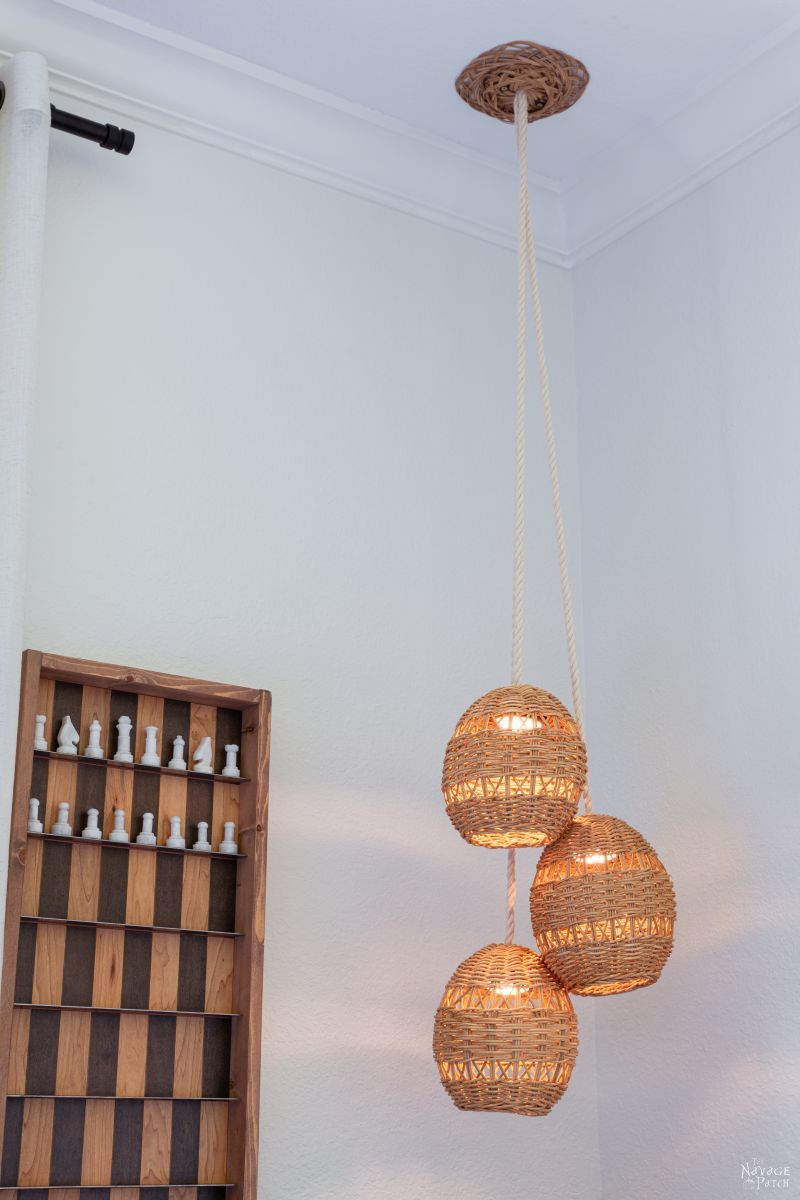
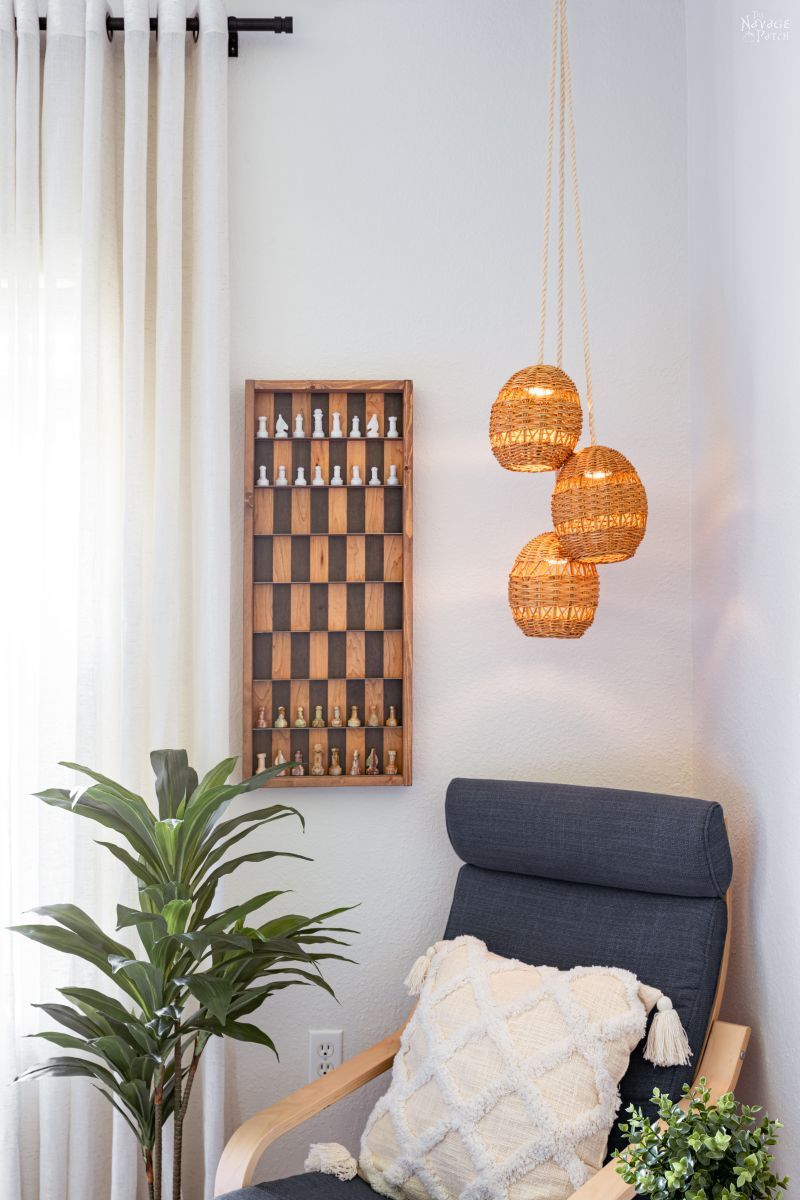
We’d make a DIY pendant light – pendant lights, to be more precise. Though one light would satisfy the Rule of Odds, three would look even better.
Did You Know?
Pendant lights are one of the most fun DIY projects, because you can use so many different materials and objects for the pendant! Don’t worry if you can’t find the same woven eggs that we used – any woven basket will do! And because we’re using battery power that doesn’t generate any heat for this ceiling light, you can use delicate fabrics, leather, cardboard, paper, or any other materials that tickle your fancy!
As Handan puzzled over how to run electricity to them from a wall socket, I said, “Electricity?” We don’t need no steenking electricity!”
Her original idea for a DIY pendant light in his room – the one I discussed in my young adult bedroom makeover post – was to be made from a straw hat and be battery-operated.
She beamed at me, and even though it was originally her idea, I got to enjoy the moment of reminding her.
Use a cord…or not!
This pendant light fixture can be hardwired from the ceiling and run on electricity using traditional light bulbs. If you have the wiring already in place, you can make this same design and have it light up in the traditional manner. If you prefer, you can also run a cord along the ceiling, down a wall and into an electrical outlet. This was how Handan was originally thinking of approaching this project. But for us, the cordless, wire-free approach is best, since this hanging light is meant to be an accent piece, and it won’t be used as much as a traditional pendant lamp that might hang in someone’s kitchen or over a dining table.
I then further dazzled her with my pulsating brain of pure excellence when I saw she was struggling to find a way to keep the puck light in the pendant. They’re battery-operated, and thus will need to be removed, opened and re-stocked with fresh batteries from time to time. I don’t know what it was about that day, but I not only had one, but TWO good ideas. I’ll fill you in on my solution when we get to that point in the tutorial.
I was rolling in good ideas, and I was liking it!
Okay, we had a plan. It was time to make it a reality.
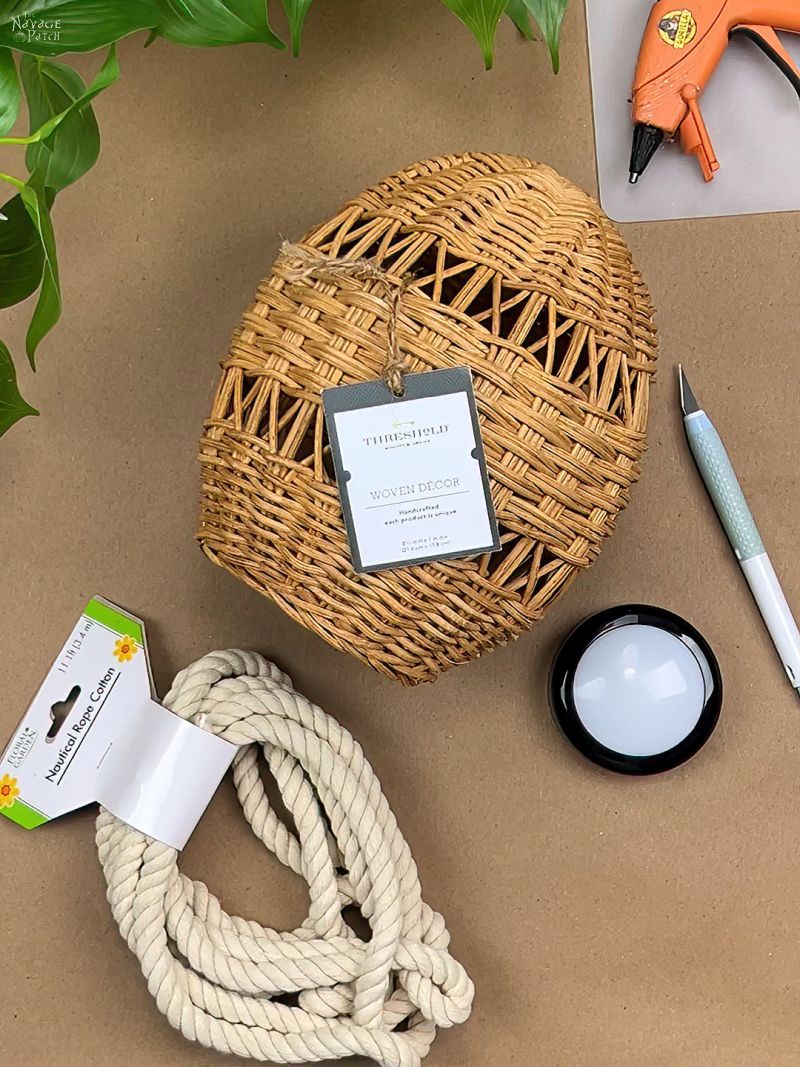
DIY Pendant Light SUPPLIES LIST
Affiliate links are provided below. Full disclosure here.
- Small rattan basket (we used these from Target)
- Twisted cotton rope (we got ours at Dollar Tree)
- Remote-controlled puck lights
- Hot glue gun
- X-Acto knife
- Small round woven tray (we got ours from thrift store)
- 2 Drywall anchors + screws
- Small washers

How to Make a DIY Pendant Light with no Wires
Step 1 – Cut the rope
The rope we got from Dollar Tree is 11 feet long, and we needed two of them for our DIY pendant lights. I cut each rope into 5 1/2-foot lengths, then set aside one of them, as I only needed three lengths.
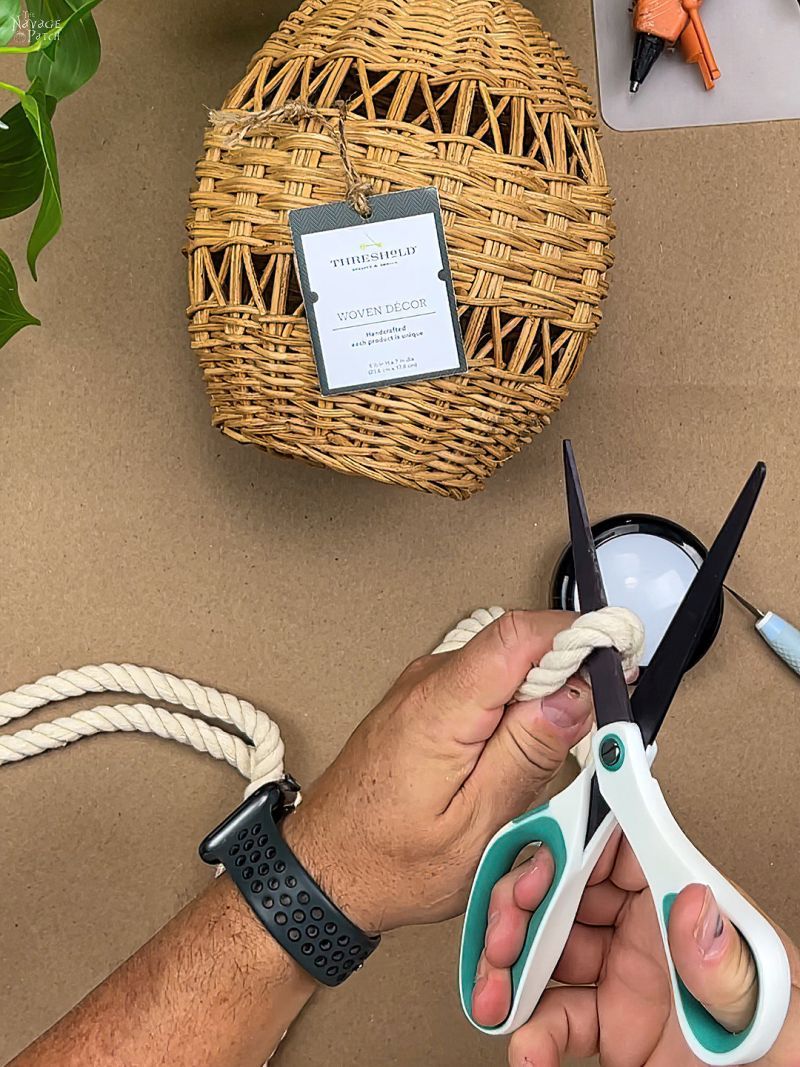
Step 2 – Tie it off
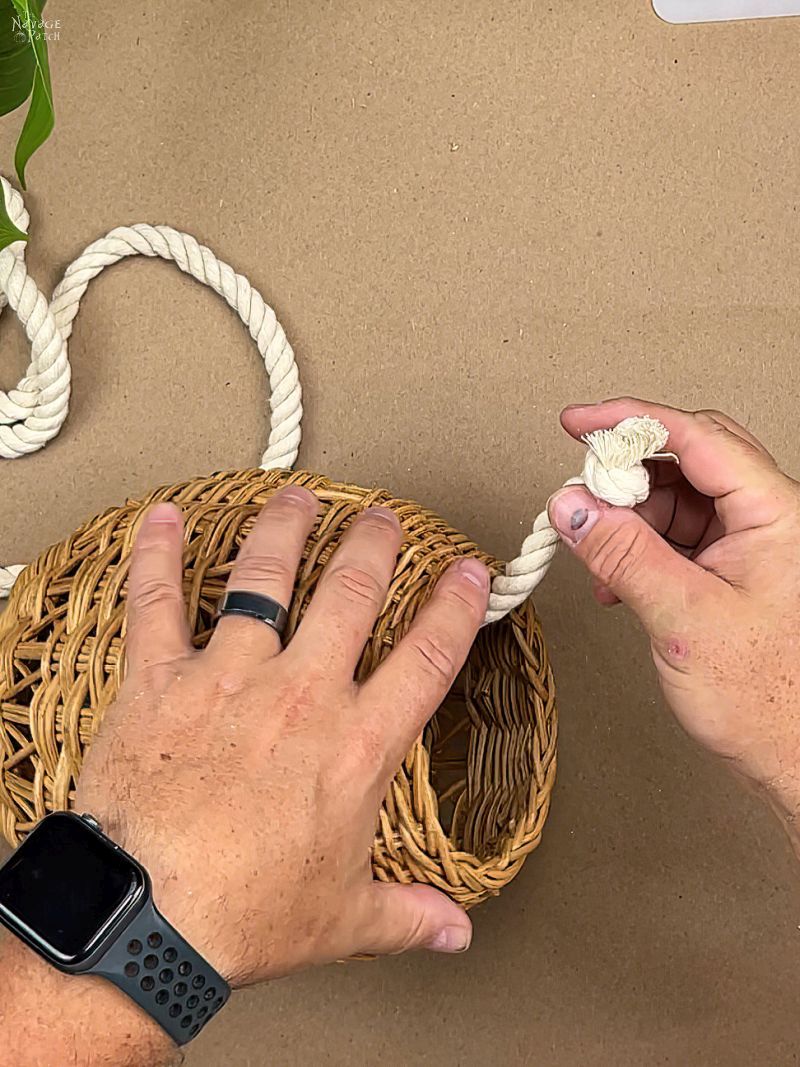
I knotted one end of my three lengths of rope. This knot will eventually be glued to the puck light.
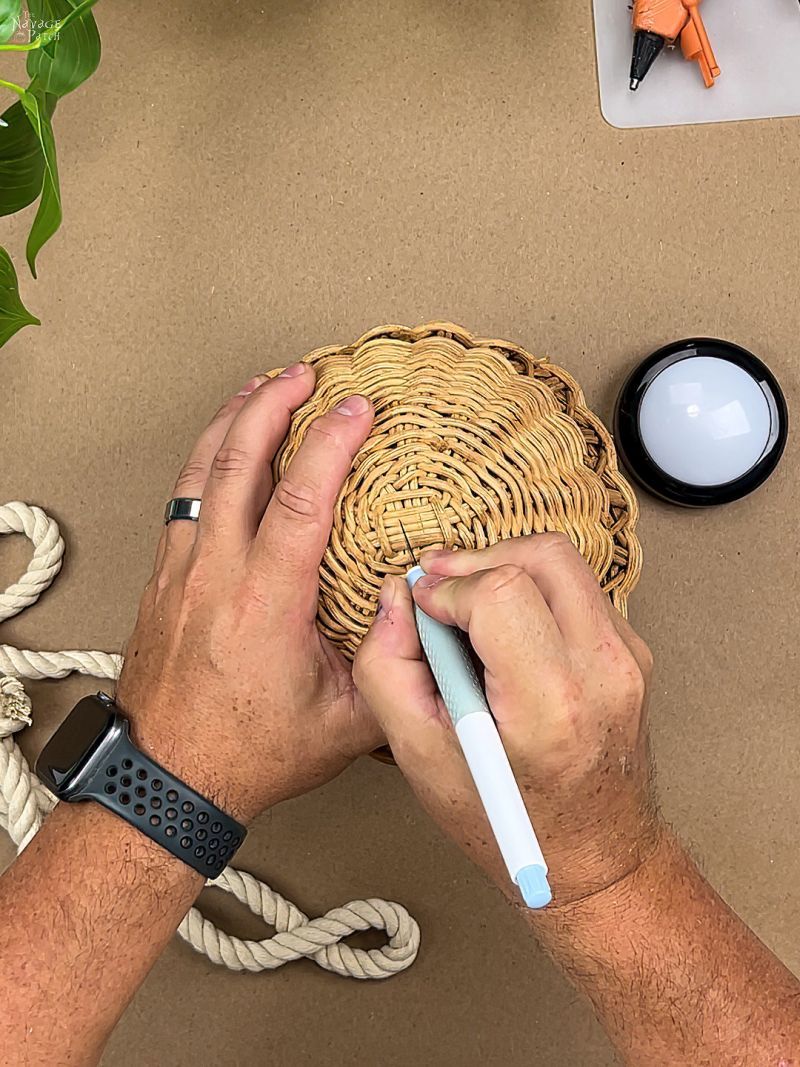
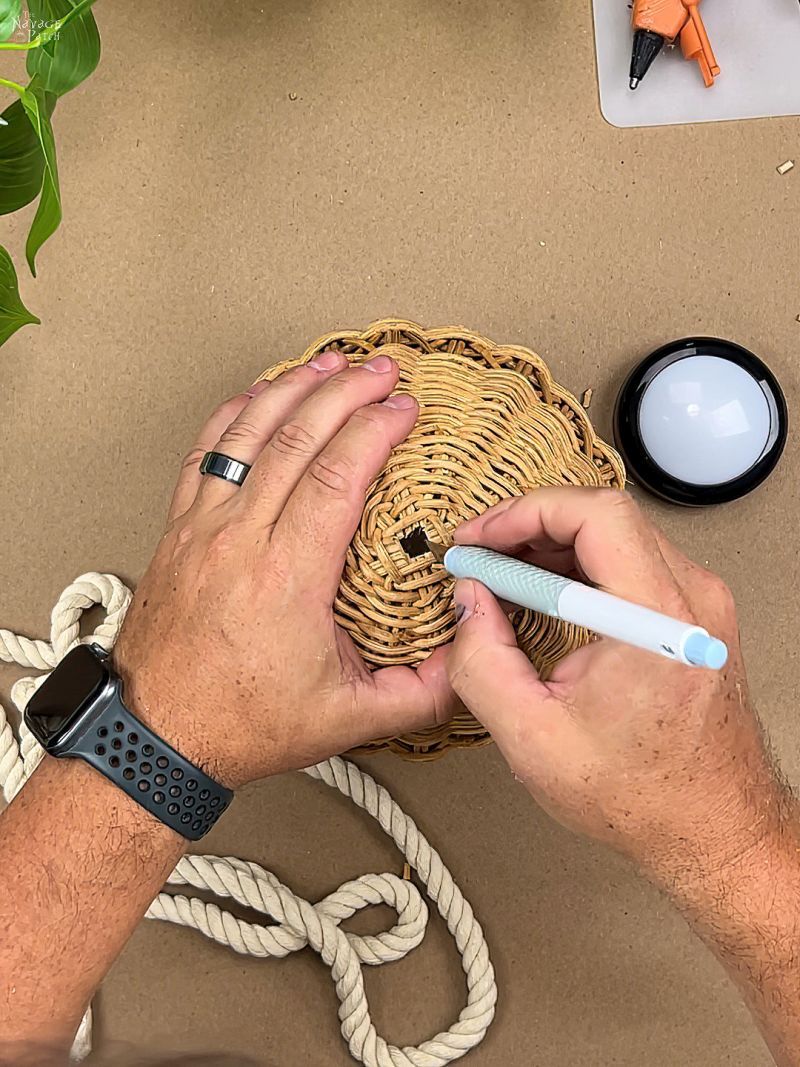
Step 3 – Cut a hole to hang the pendant
I needed to cut a hole big enough to accommodate the 1/2 inch rope.

I used an X-Acto knife for this – it cuts through the rattan cleanly and easily.
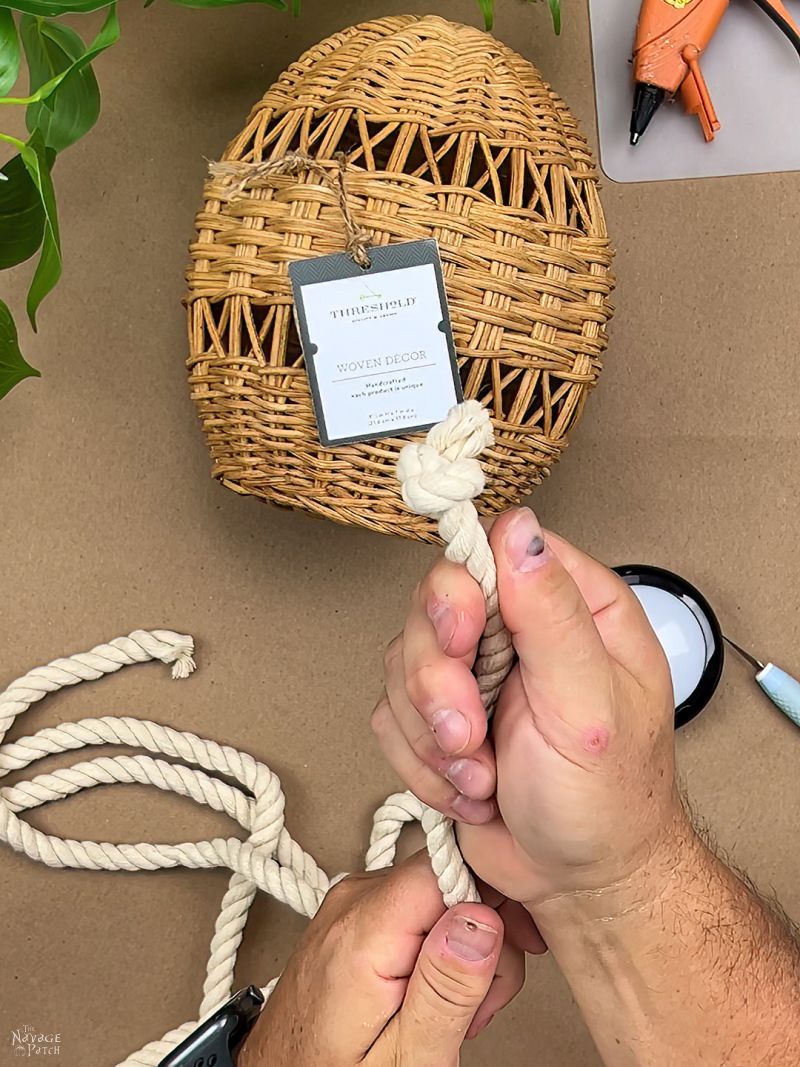
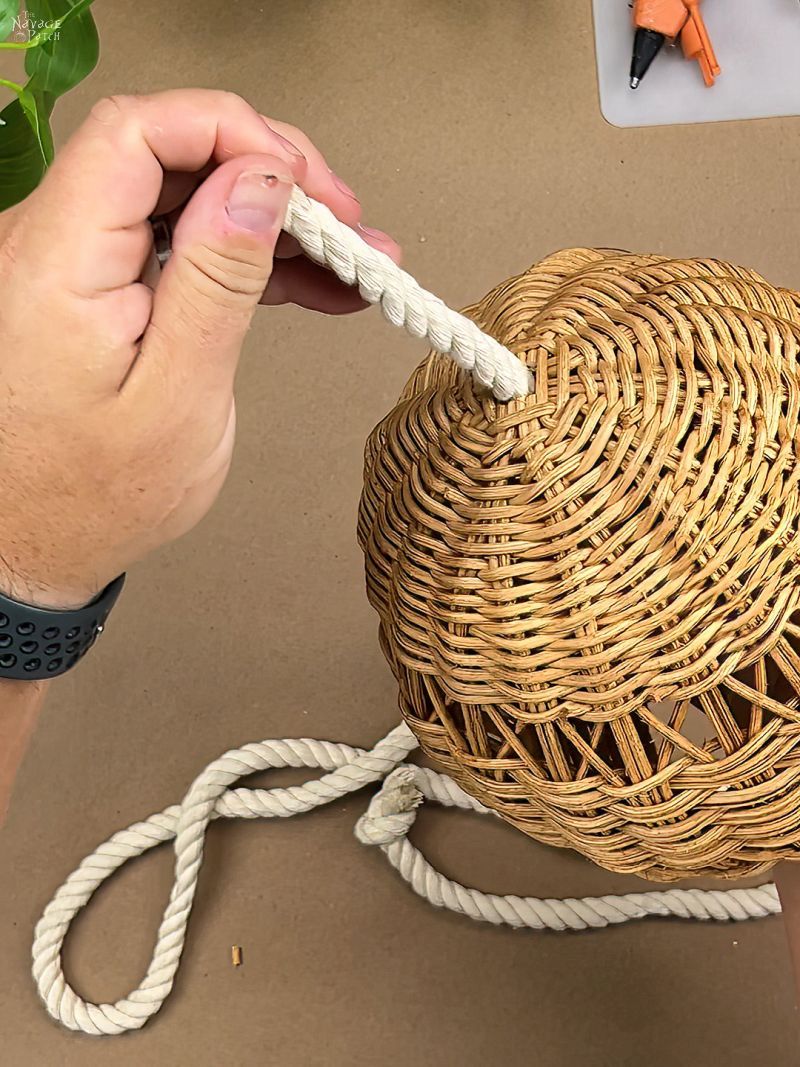
Step 4 – Thread the rope through
Thread the non-knotted end of the rope up through the hole from inside the bowl of the pendant.

Pro Tip!
The Dollar Tree rope comes with both ends wrapped in plastic. This prevents them from fraying. It also makes them easy to thread through the hole I cut in the pendant basket. If you are cutting lengths of rope from a larger spool, simply wrap the rope a few times where you intend to cut with scotch tape and then cut through the middle of the wrap. Presto! You have two neat and unfrayed ends! Your job will be much easier when it comes time to thread the rope through the hole in the rattan!
I pulled most of the slack through the pendant until the knotted end was sticking just below the opening.
Step 5 – Attach the light
Now, remember my other great idea I told you about in the beginning of the post? Well this was it – gluing the rope to the battery cover of the puck light. For some reason, Handan was overthinking how to seat the puck light inside the lamp but still have it removable to swap batteries. She’s an engineer, and engineers sometimes overthink things.
Me? I’ve never suffered from overthinking. “My babes,” I said, as she mumbled to herself in the kitchen trying to solve this conundrum, “Like this.” I grabbed the rope and pressed it against the battery cover. “See? The pendant will hang from the puck, but we can still pull it out to change the batteries. Simple!”
Score one for the man with the little brain!
Before gluing the rope to the puck light, I trimmed the frayed ends of the knot.
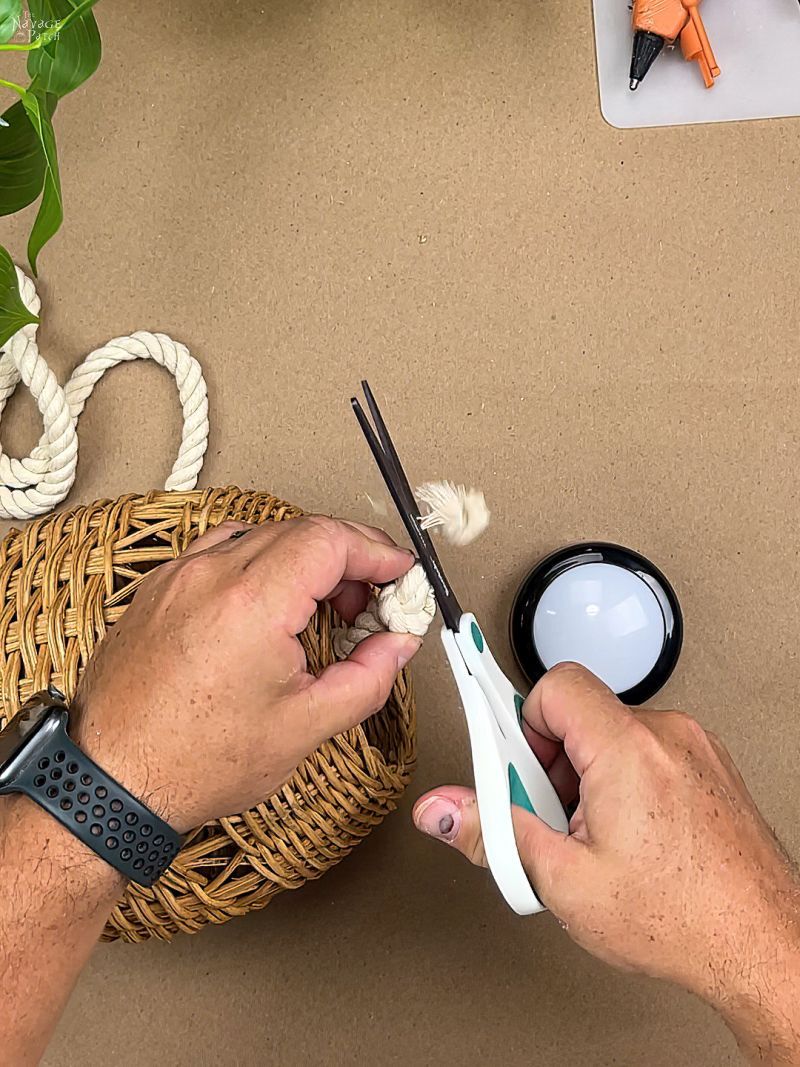
I then squeezed a big glop of hot glue all over the knot.
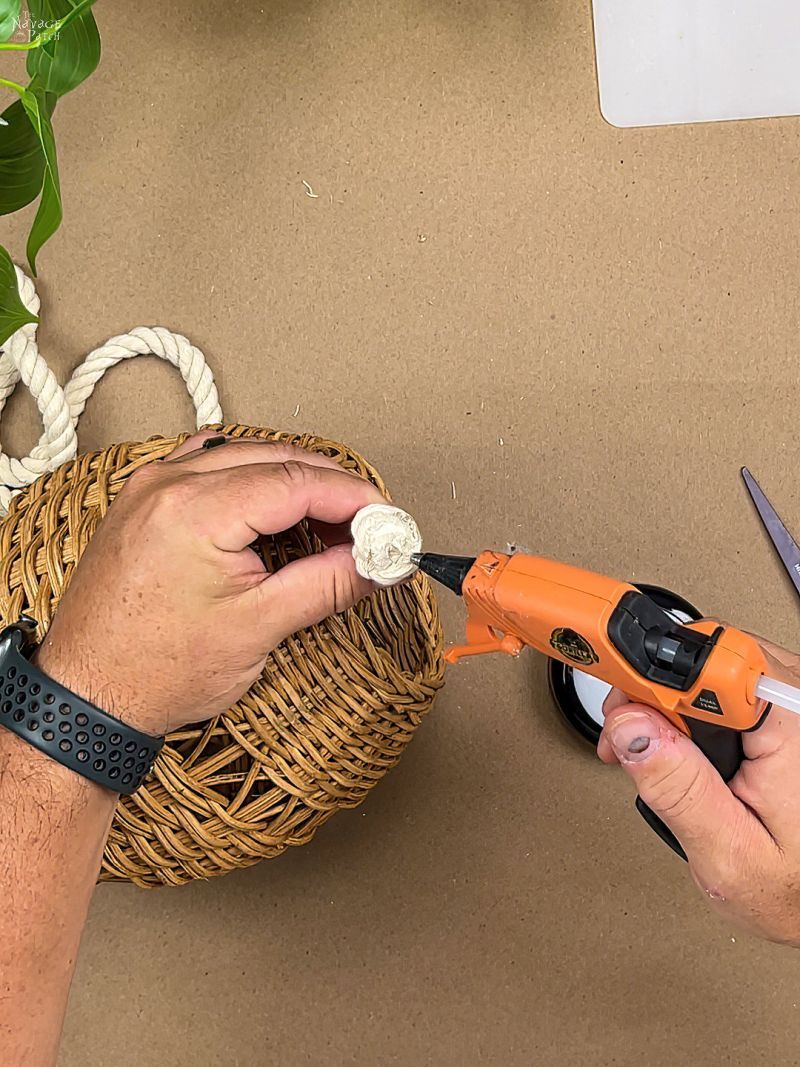
Then I pressed the knot onto the back of the puck light.
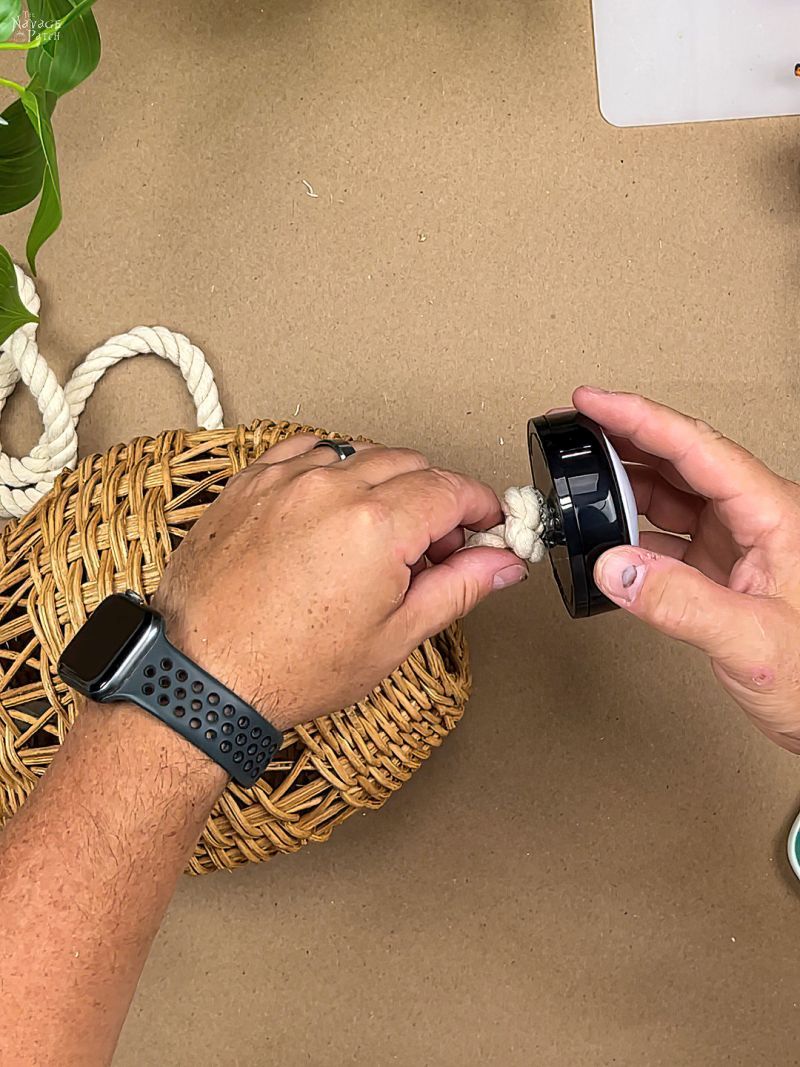
I held the rope in place until the glue cooled…
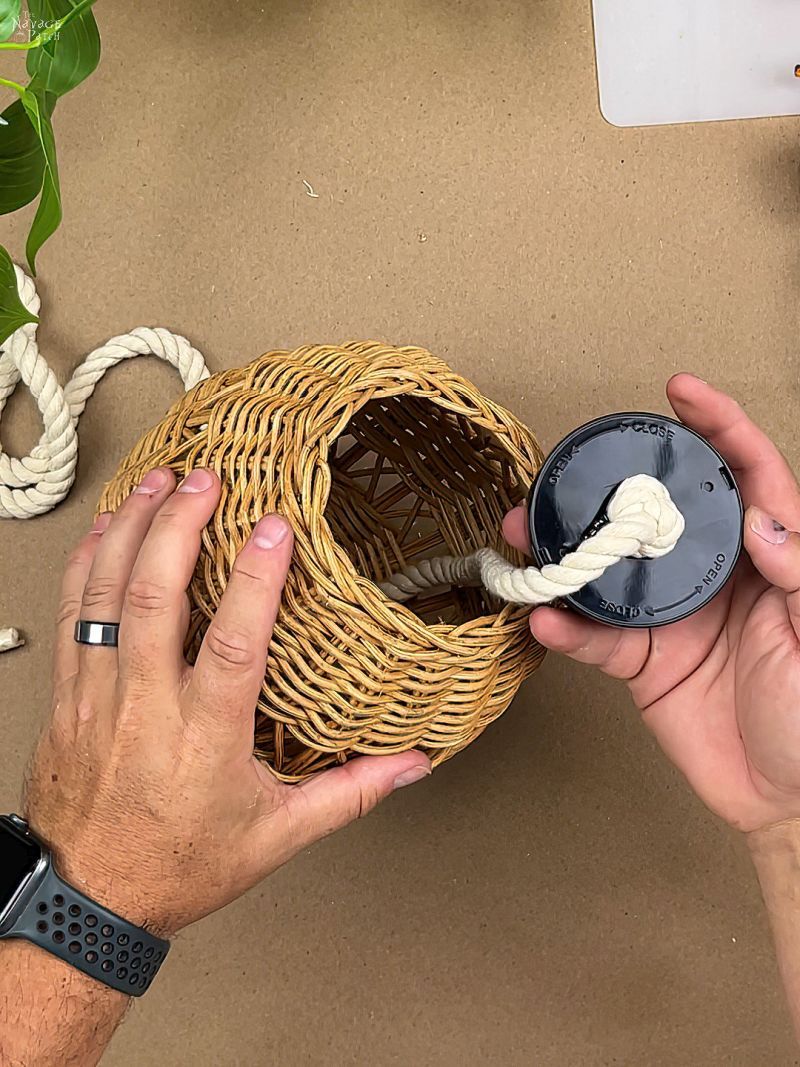
…and then I pulled the rest of the rope from the top of the pendant.


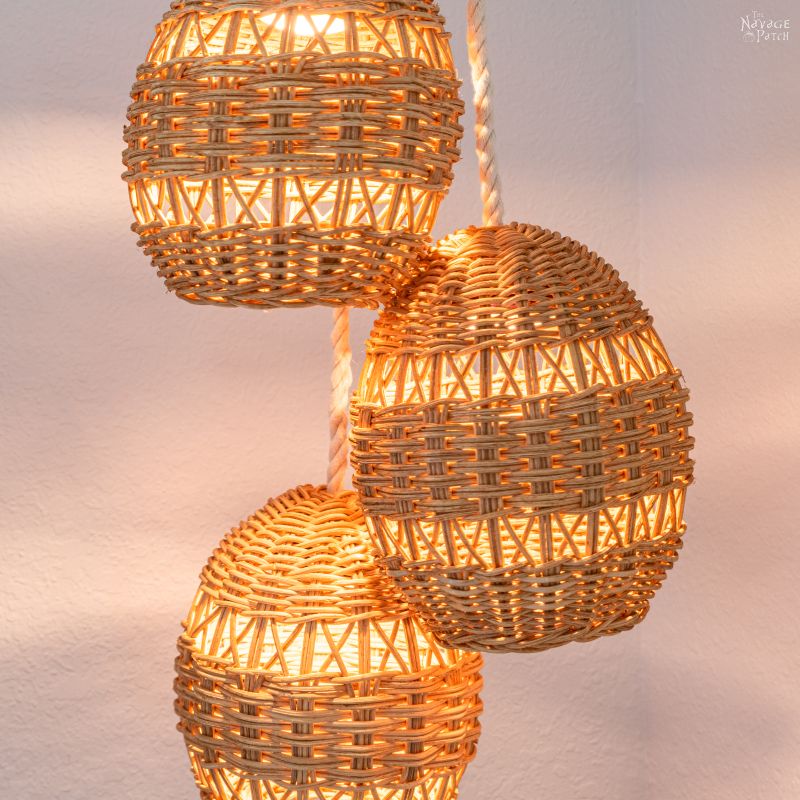
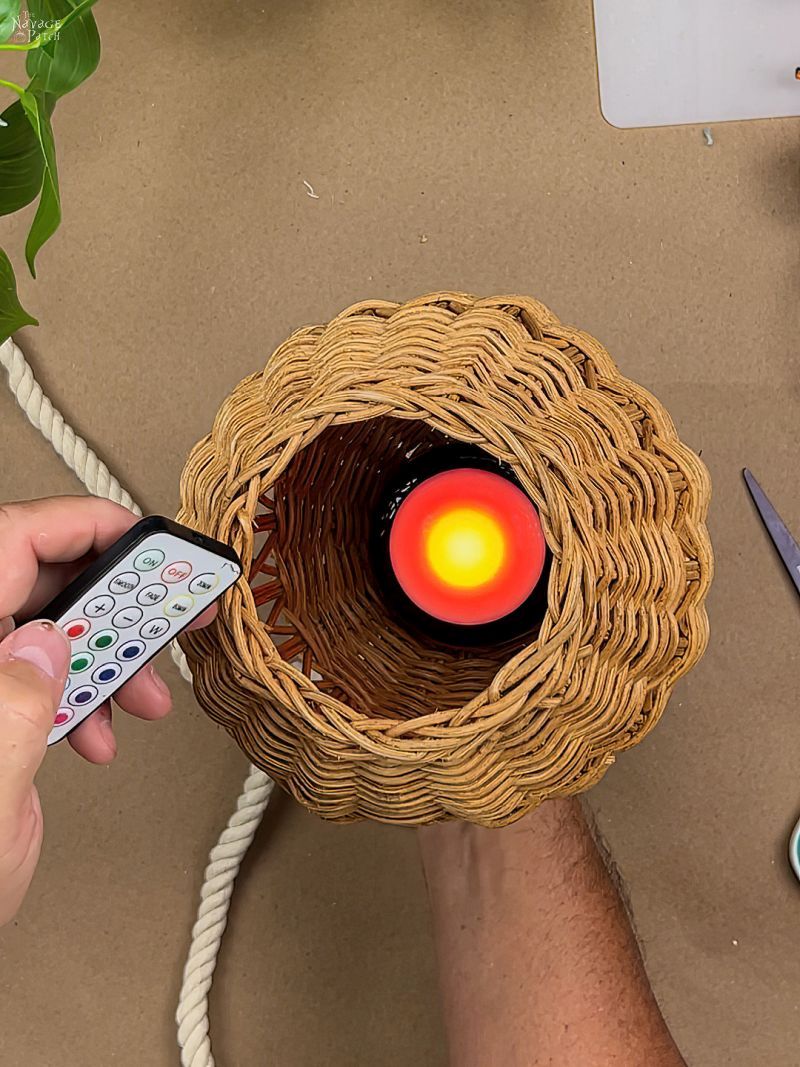
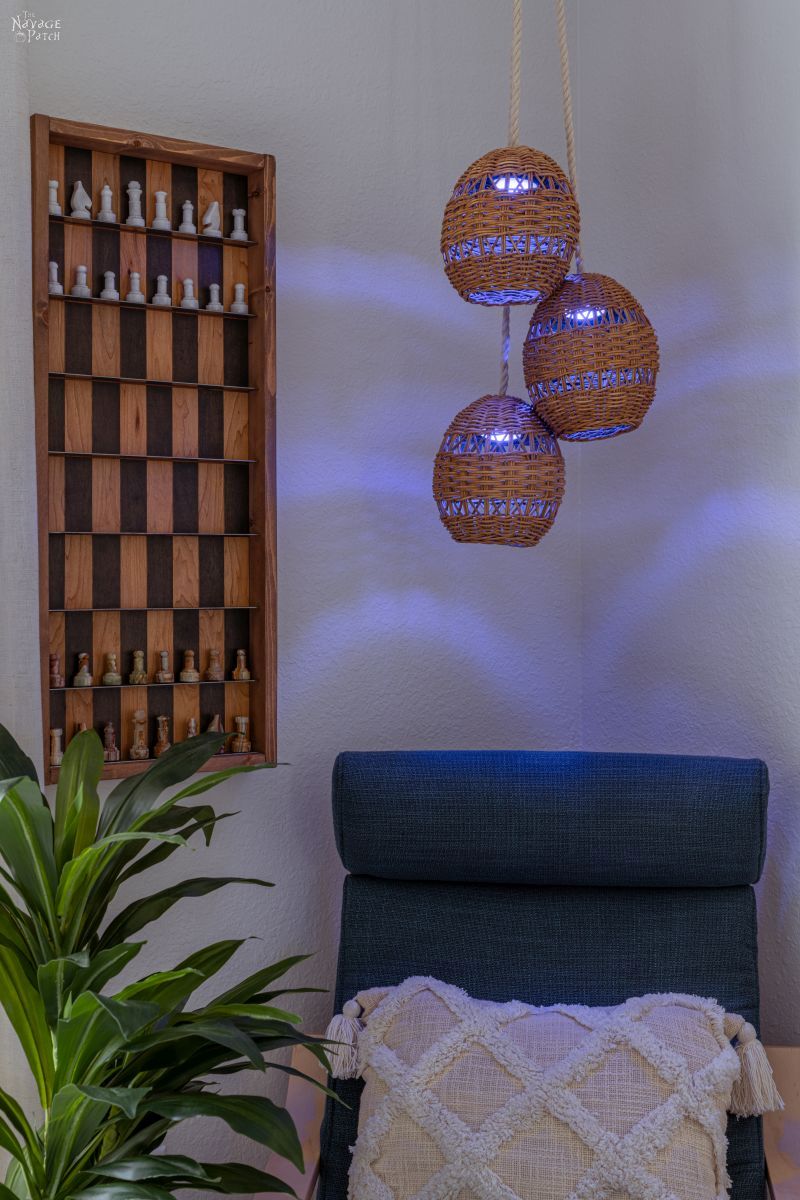
A little test to make sure all is working…
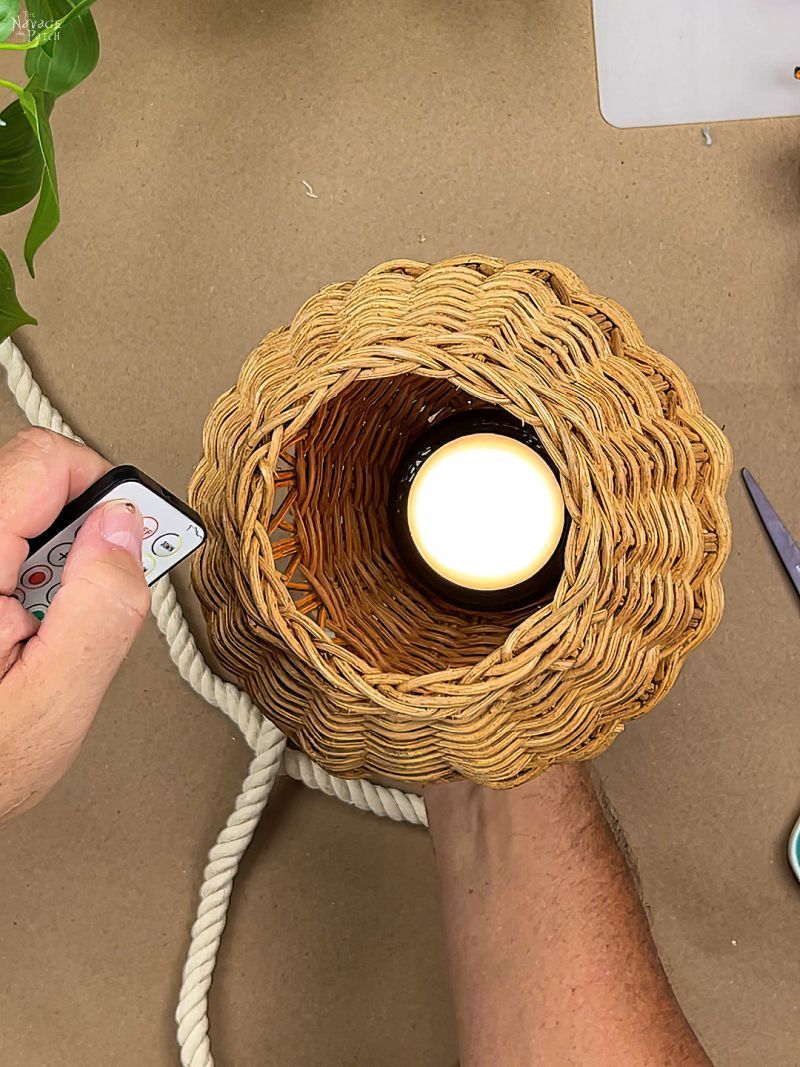
Baris is going to love that these puck lights can change colors!
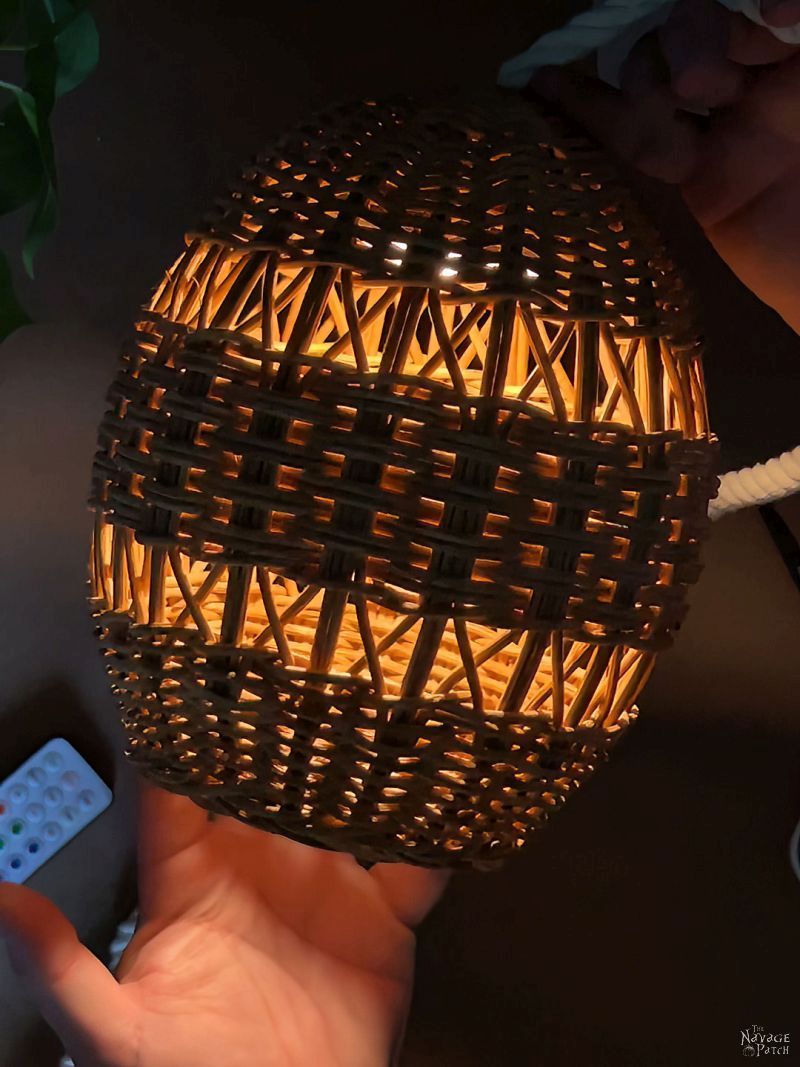
One more test with the lights out!
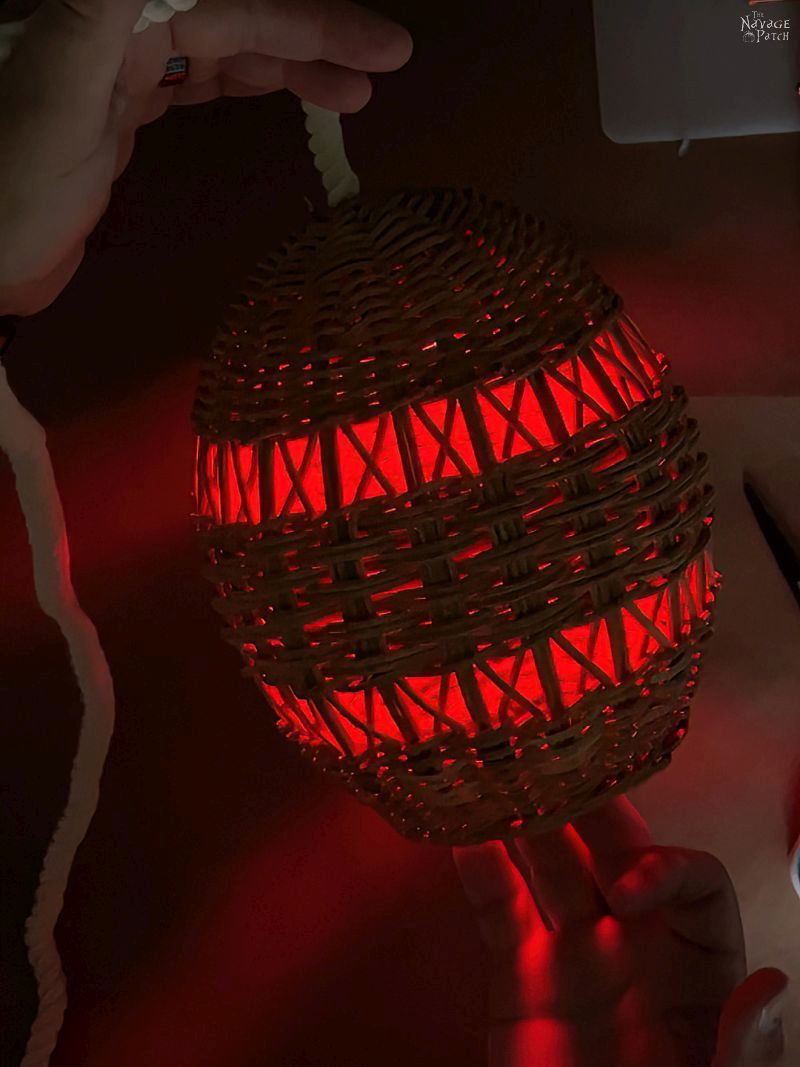
Beautiful!
Optional Steps
Depending on what you started with – maybe your baskets are a weird color – you may decide to spray paint them. If so, I think an aged brass or muted gold would work well, especially if sprayed on the inside for a beautiful warm glow.
Hanging Your DIY Pendant Light
We’ve basically got a rattan warehouse, so it wasn’t hard for my babes to find a suitable piece to serve as a ceiling plate. We opened a hole in the center of the small wicker plate and ran the three lengths of rope through the hole. We then adjusted how low each pendant would hang. When we were happy with the setup, we cut the excess rope from the top of the mounting plate. To secure the plate to the ceiling, I used two screws with corresponding drywall anchors.

To make sure the screw heads didn’t slip through the rattan weave, I used washers with the screws. This is way more than enough to hold up these DIY pendant lights. In person, from the floor, you don’t notice those screws at all unless you’re specifically looking for them.
You don’t have to take this route. If you want a simpler hanging solution, you could screw a hook into the ceiling, knot the three lengths of rope together at their ends and slide that knot over the hook. Whatever works for you!
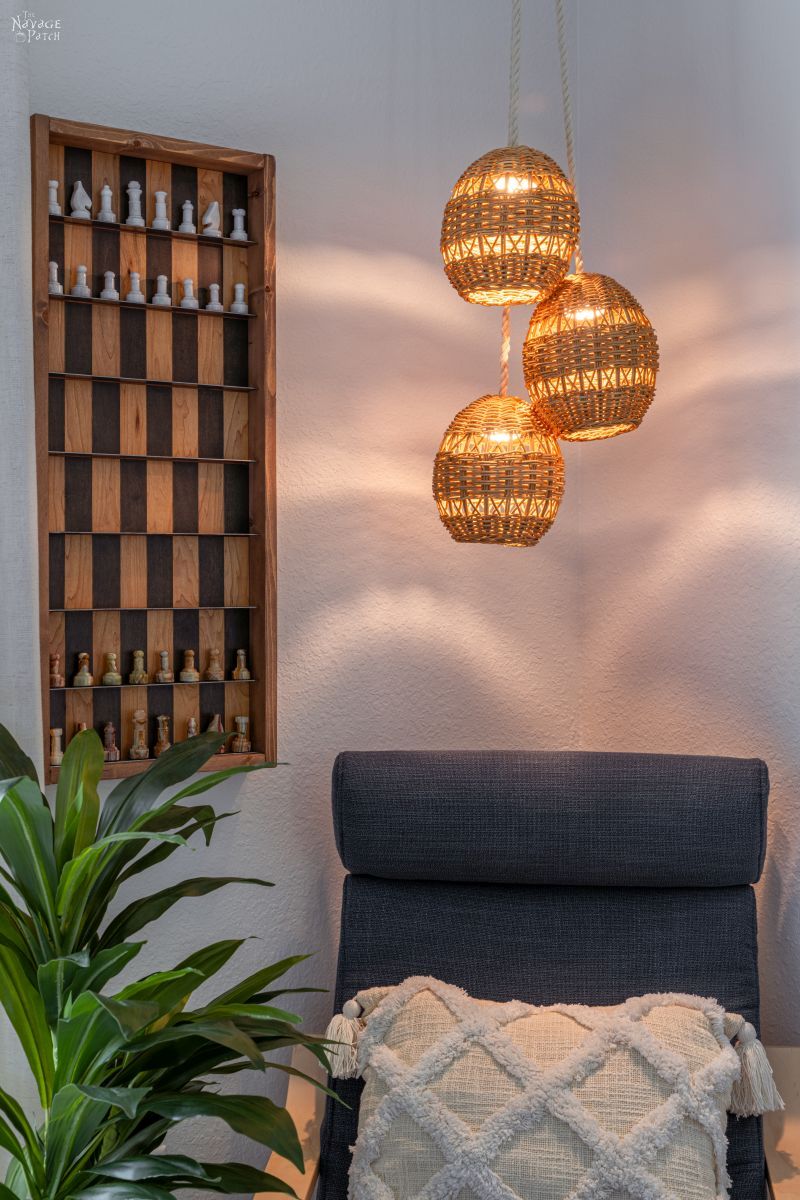
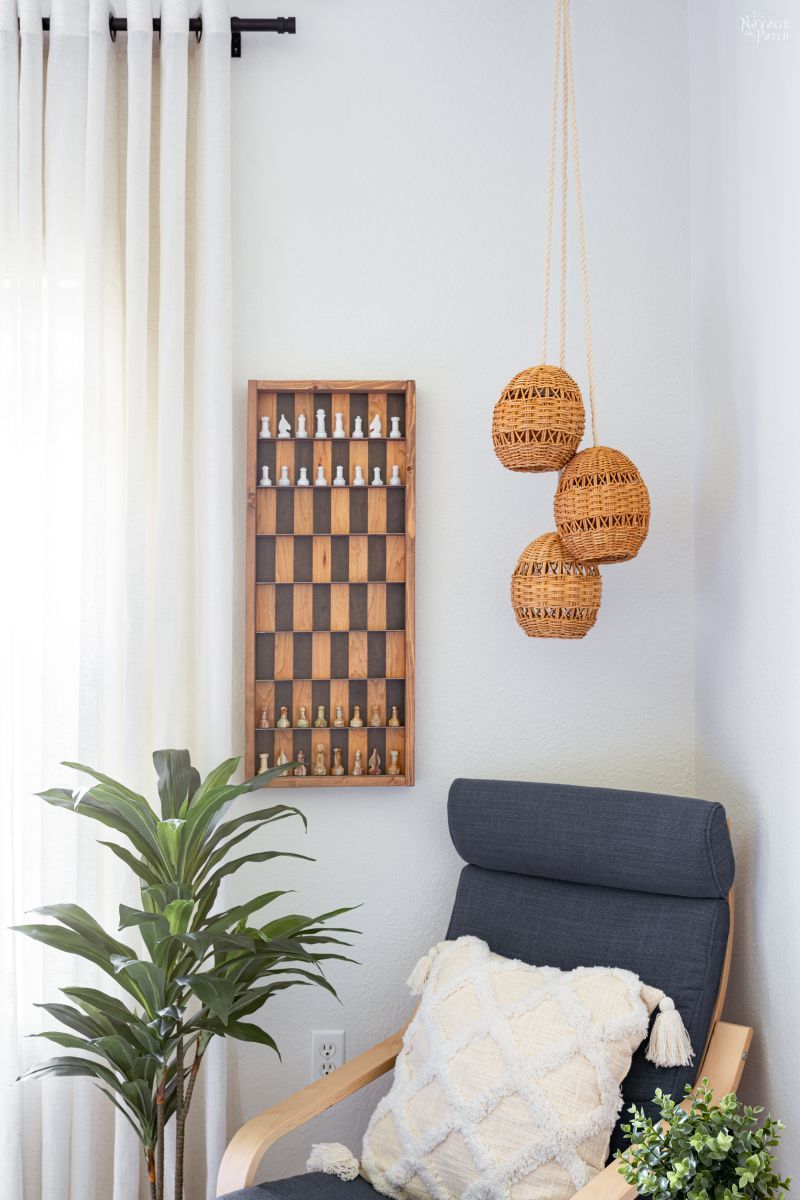
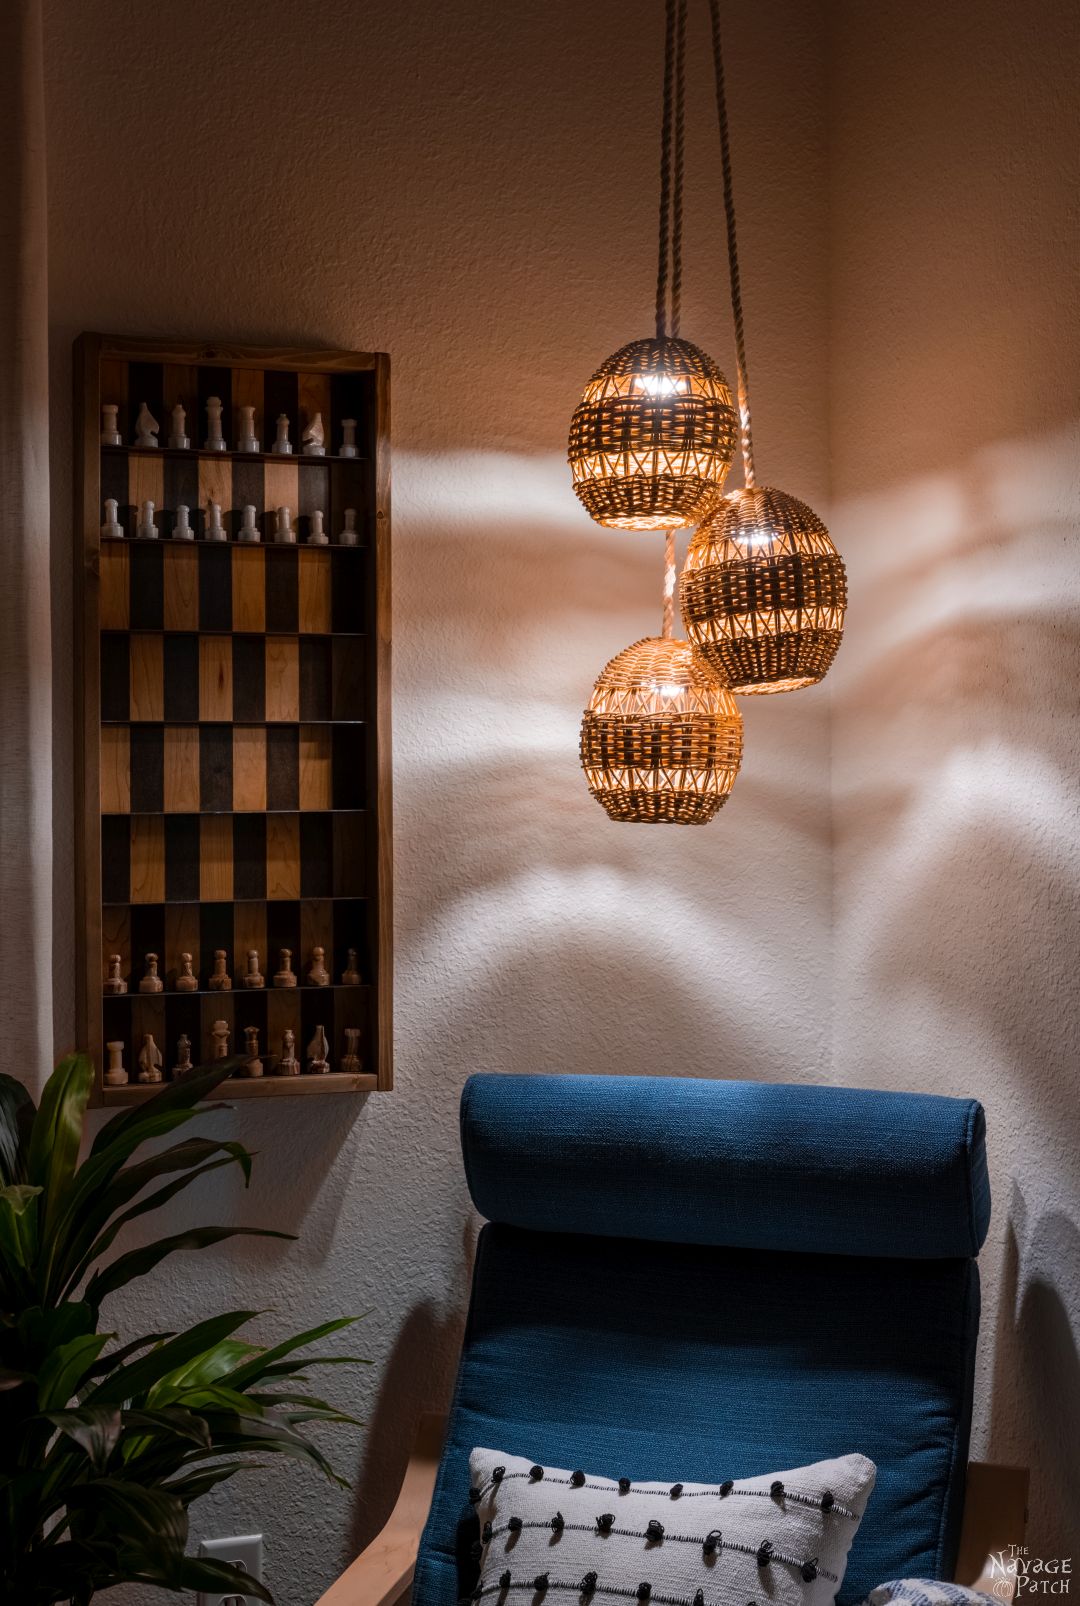
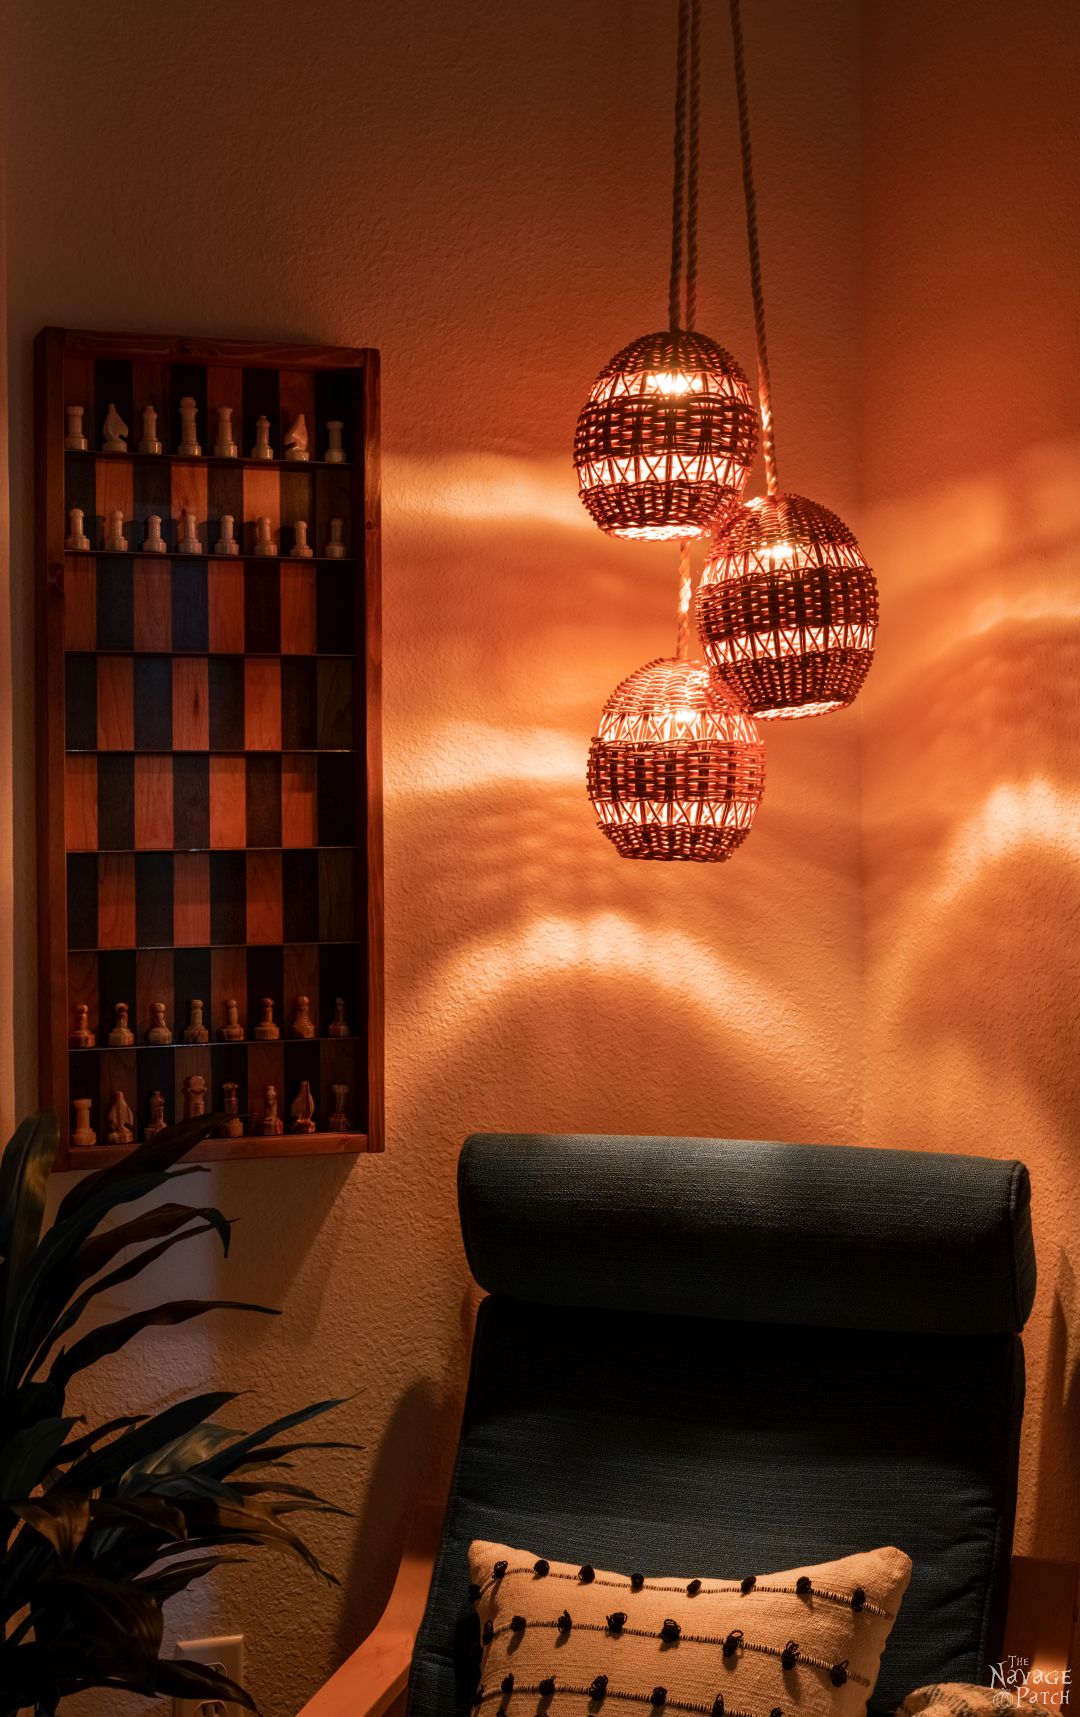
Let’s have a look at how they turned out.


I think they look fantastic in Baris’s room, and he really loves the fact that he can change colors on demand…
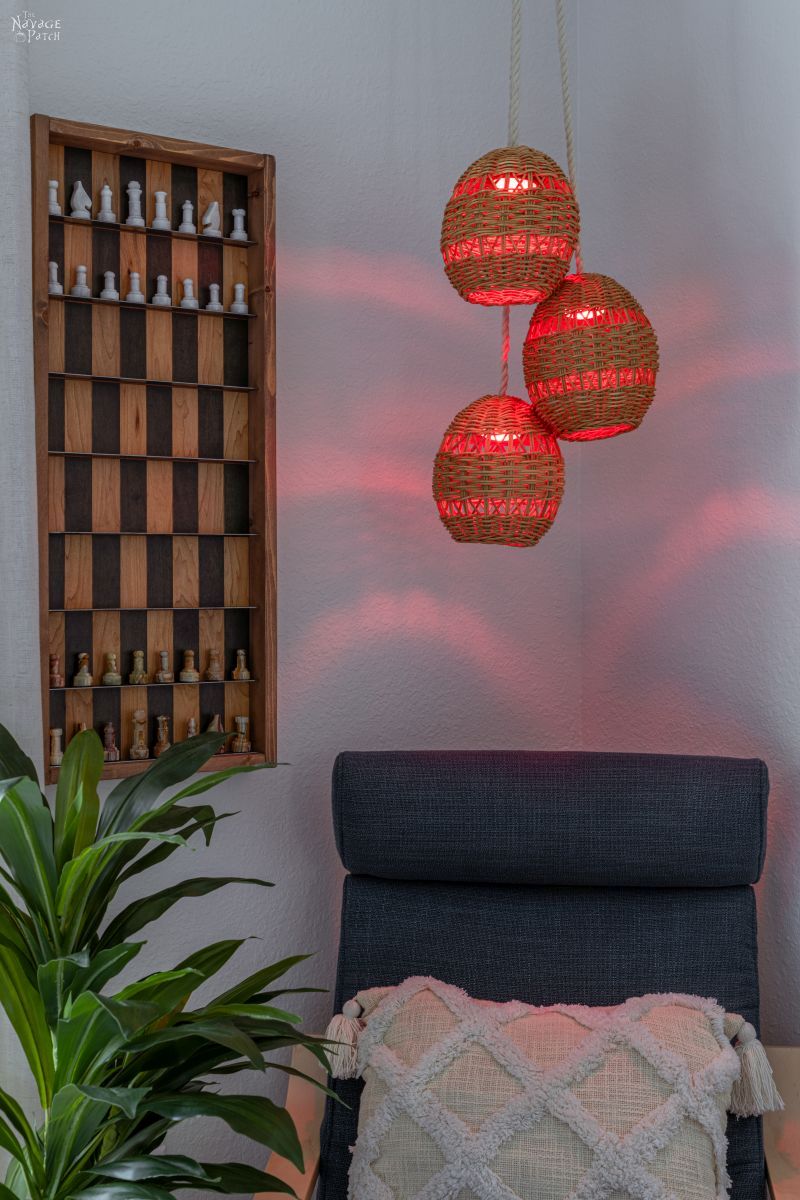
…or have the pendant lights smoothly cycle through them.
This was such an easy project, but what a payoff!

And in case you’re interested, you can find a tutorial for the vertical chess board here.
We love to see our DIY projects out in the wild! If you try this DIY project and take a picture and post it on Instagram, be sure to tag us – thenavagepatch
Great idea and I love how they look. I can never go into Threshold Land without coming out with something either. And as I am married to an engineer too, I definitely agree on them overthinking things sometimes. I’m all for the less complicated solutions.
Thanks, Laurie! To be fair, Handan comes up with solutions all the time where there seemingly are none. But sometimes…yeah, too much brainwork happening, lol!
Oh my stars, Samantha! This is the coolest post you have ever done! I already have a pre-existing hole (tee hee, sorry) so I can totally do this. Just the best project ever. Very nice for a dark corner and so easy. And many options for the light shades, too. Many thanks, Gladys Kravitz in Palm Springs
LOL, thank you so much, Laura! Send us a pic when you brighten up that corner!
I LOVE the vertical chessboard in the background. More info?
Thank you, Cheri! There’s a link in the post to that project! 🙂
I love this and so I just ordered my “Threshold woven egg decor”. Can’t wait to make them. Thanks for the awesome idea!
Thank you, Ronna! Enjoy your DIY pendant lights! 🙂
I love how you are giving The Boy a very special place at home.
He’s got a room fit for a king, and we’re still living surrounded by boxes, lol! 😀
I love the pendant lights!!!!!! I wish we had some of them at my Targets. They would be so cute in my office. Baris is a lucky guy to have you and Handan in his corner. You did a great job Greg!
Thank you Marian! You can use almost anything for the pendants, so if you can’t find them in Target, you have so many more options! 🙂
Clever thinking there Mr. Greg. Seriously though I enjoy reading your “thinking” process with all your snarky thoughts. Just feels like you’re in my head thinking the same sarcastic thoughts. Keep it up young man. It adds so much to your blog.
Oh, and how does Baris like VA Tech? Good place for engineers! Go Hokies!
Thank you, Sue! I’m always happy to hear when others think like I do. Makes me feel like less of a weirdo! Baris absolutely loves VT. He’s enjoying working a real job here in Florida this summer, but I know he can’t wait to get back to his friends!
Gorgeous! I love the ambiance it gives the room. I use similar puck lights for outside in features (I get waterproof ones) so they’re easy to turn on and off with the remote. Yknow, I think in another life where I understood math, I am probably an engineer. Mom always says I think too hard about things and overengineer things when it’s really a simple job. I definitely get it from my Dad. But that stickler for perfection to the point of madness is all her!
That’s a good idea to use them outside. I’m going to search Amazon for waterproof ones. Yeah, usually Handan’s engineering mind gets right to the best solution, but every once in a while…lol
Hi there,
I made them just as you explained (except I had to use Gorilla Glue to glue lights to the knots). They came out GREAT!! thank you so much for all your DIY’s and you make me laugh so much in the blog!
I wanted to post a pic of my pendants but I didn’t see the option. . .Also, the tip about taping the rope prior to cutting; WOW, wish I knew this 20 years ago! LOL!
That is awesome! I have been looking for something that did not require hard wiring for a dark corner in my bathroom. Thank you so much for posting.
I absolutely loved this DIY pendant light tutorial! It’s amazing how such a simple project can transform a space. I can’t wait to give it a try in my own home. Thanks for the detailed instructions and beautiful inspiration!
Absolutely loved this tutorial! It’s such a creative way to bring some unique lighting into my space without the hassle of wiring. Can’t wait to give this a try and customize it with my own style. Thanks for the inspiration!
So what if theres no Target eggs? How do you do this without the eggs?
This DIY pendant light project is amazing! I love how you’ve made it so simple to bring a trendy look to any space without the hassle of wiring. Can’t wait to try this out myself. Thanks for sharing your creativity and clear instructions!
This is such a creative idea! I love how easy you made it look to create a stylish pendant light without the hassle of wires. I can’t wait to try this project in my home. Thanks for the clear instructions and inspiration!