DIY Sliding Shelves
Sliding shelves are awesome, but the prices are crazy! These DIY pull out shelves are attractive, durable, and a fraction of the cost!
All supplies for this project can be found here.
In 2016 I wrote my first sliding shelves post, and it went viral! Seems everyone wants them, but not many are keen on the prices. Here’s my 2023 update with an easier way to build beautiful DIY pull-out shelves!
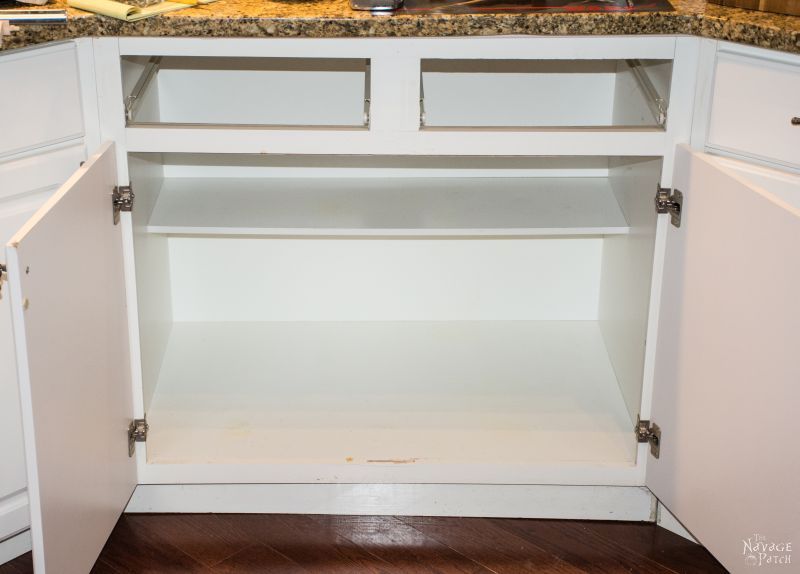
The Problem With Lower Cabinets
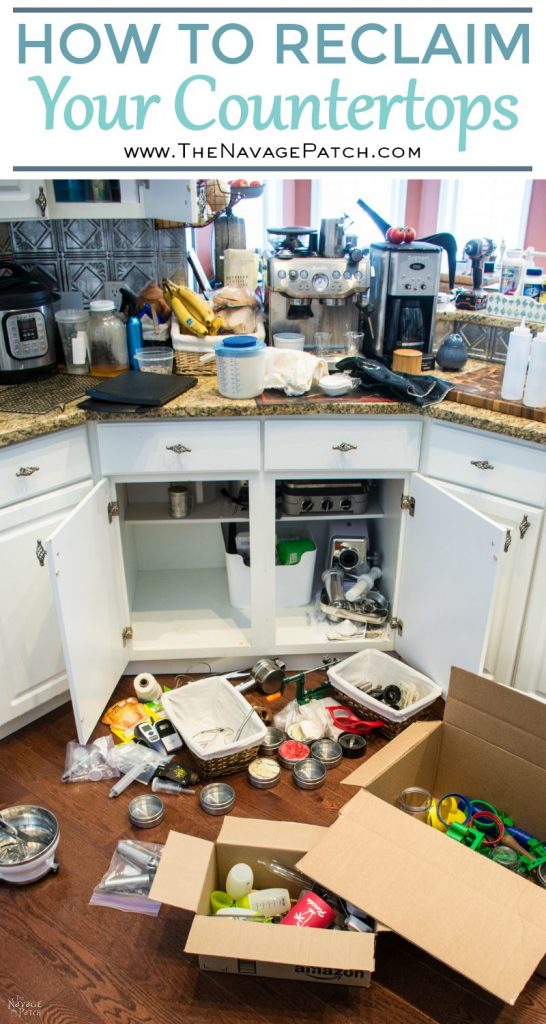
The problem with most lower cabinets in the kitchen or anywhere else is that they are just too deep, and we’re just too old and stiff. Stuff gets pushed to the back and forgotten, because the effort involved in excavating and mining kitchen paraphernalia or cleaning products from the depths of lower cabinetry far outweighs the reward. So we push, we pile, and we forget. This leads not only to wasted space but also to duplicate purchases, as we keep buying things we already have, simply because we can’t reach them, or we’ve forgotten we ever owned them in the first place.
The easiest way to reach the nether regions of a cabinet is not for you to go to the nether region (a simply barbaric notion) but for the nether region to come to you.
The solution – sliding shelves
Enter slide-out shelves, pull-out shelves, sliding shelves, roll out shelves – whatever the heck you want to call them.
When I first lit upon the idea of DIY pull out shelves for the kitchen (back in 2016), I went online to see how much they would cost. Amazon sells the following for $104 (in 2016 they were $85.)

$104.
For one.
My original kitchen in Connecticut called for 11 of them, so you can understand why I started this DIY slide-out shelf undertaking in the first place!
Well time rolls on, and here in our Florida home, I find myself once again in need of sliding shelves. Only this time, I know much better than I did back in 2016. I’ve stripped my design down to the essentials, made it much easier and streamlined the process of installing drawer slides.
Let’s have a look at my new-and-improved sliding shelves! You can still find the tutorial for my original design at the end of this post.
DIY Slide Out Shelves SUPPLIES LIST
Affiliate links are provided below. Full disclosure here.
- All supplies can be found here
- 3/4 inch plywood
- Drawer slides
- Wood glue
- Instant-set wood glue (optional)
- Brad nailer
- Watco Danish oil (optional)

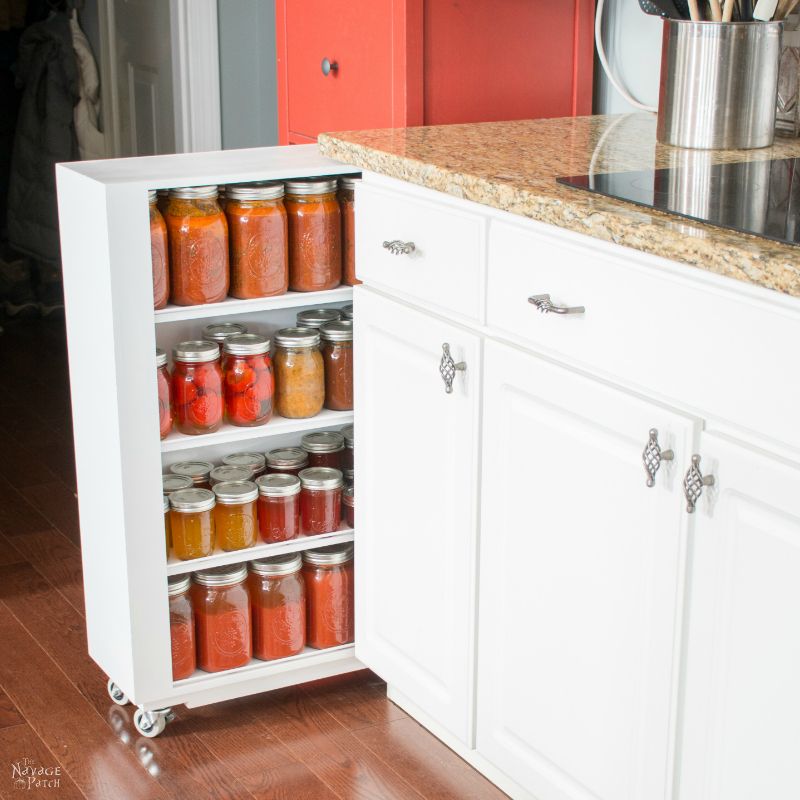
DIY Sliding Shelves Tutorial (The New & QUICK Method)
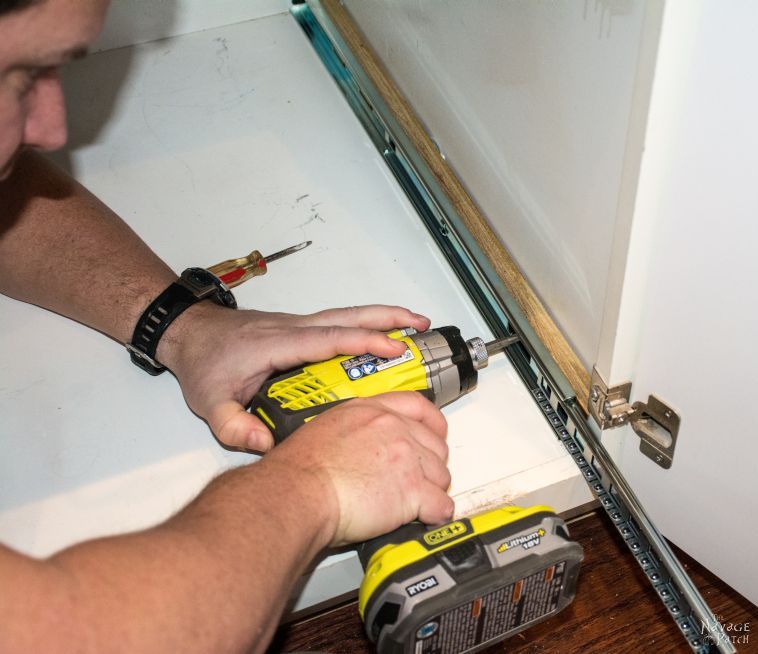
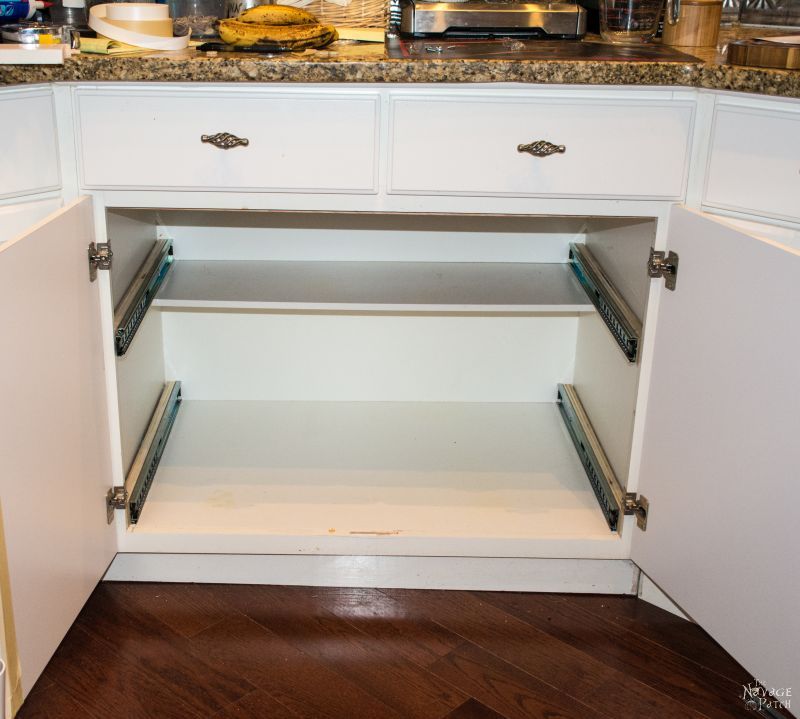
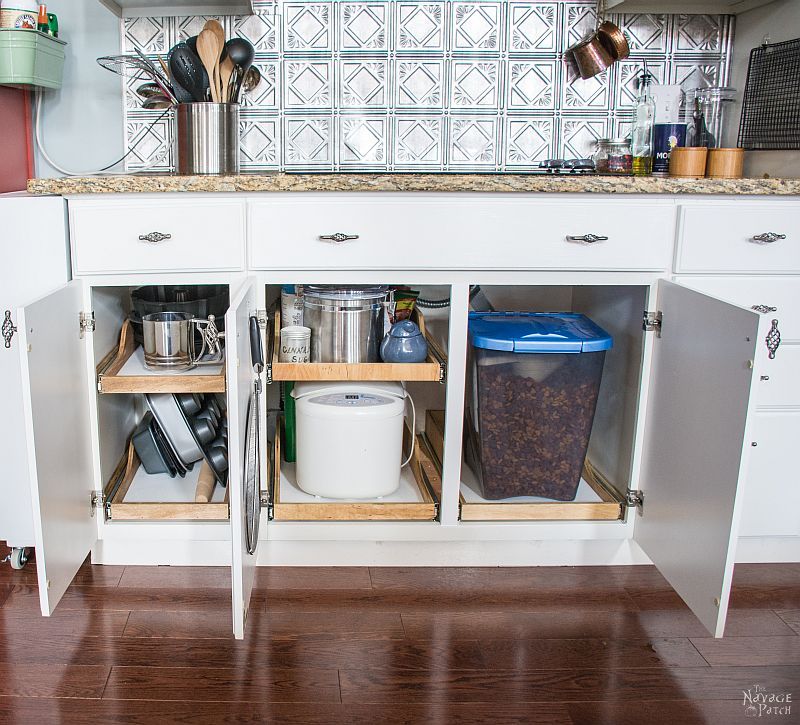
Step 1 – Cabinet drawer slides
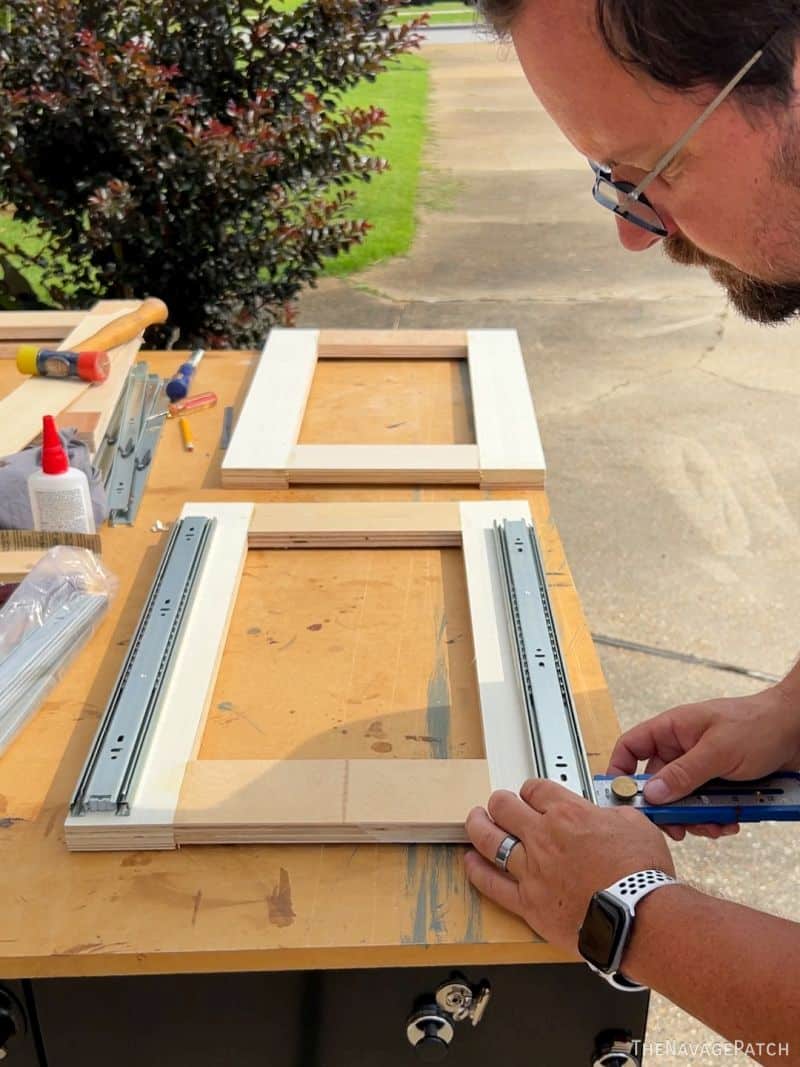
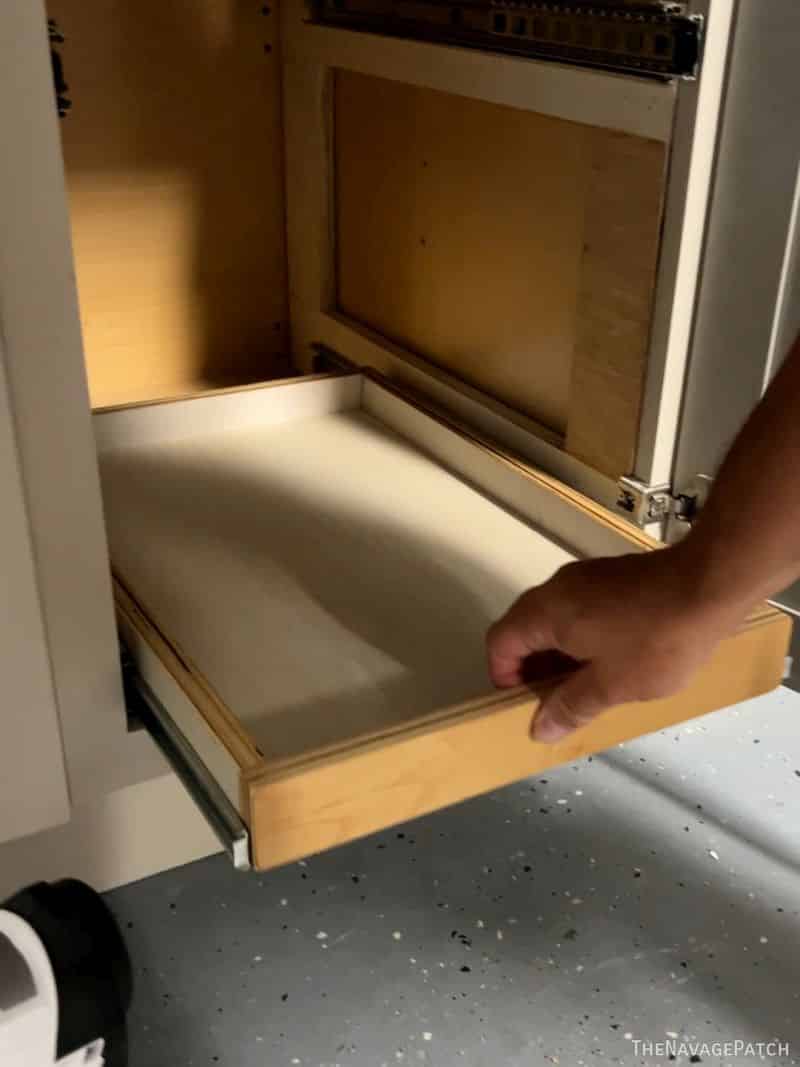
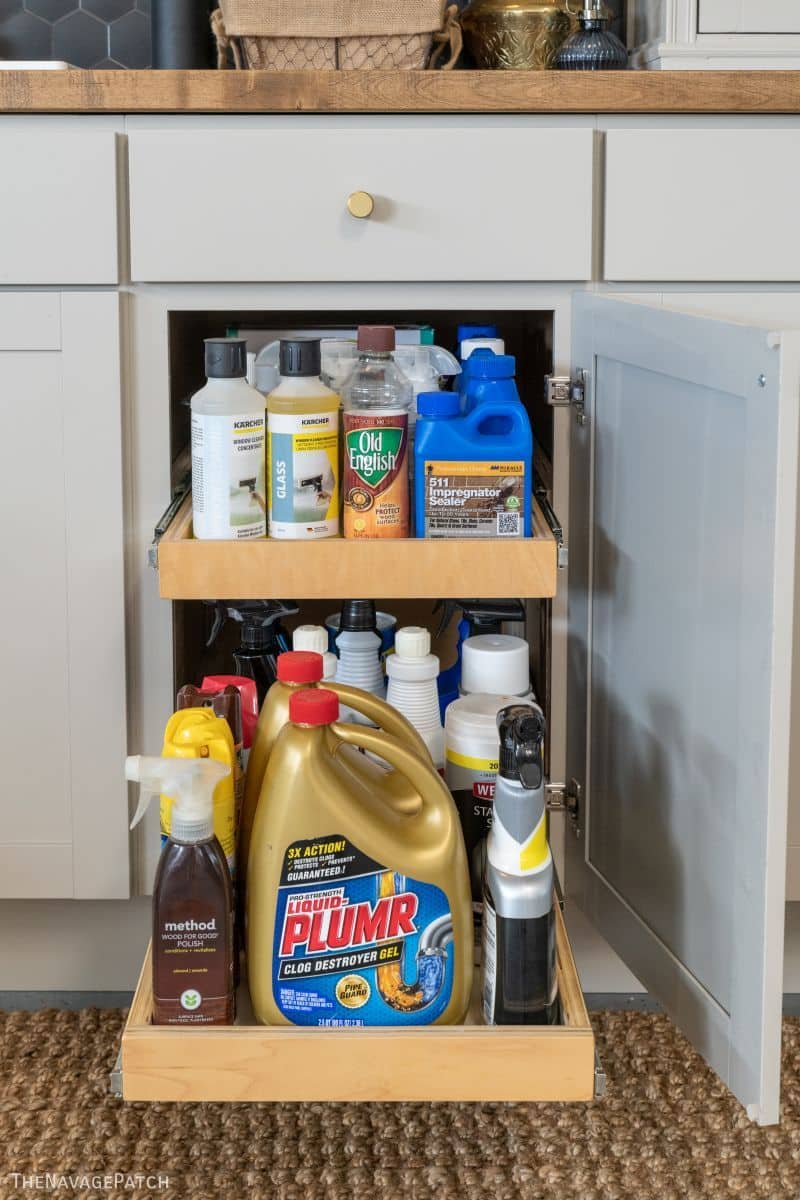
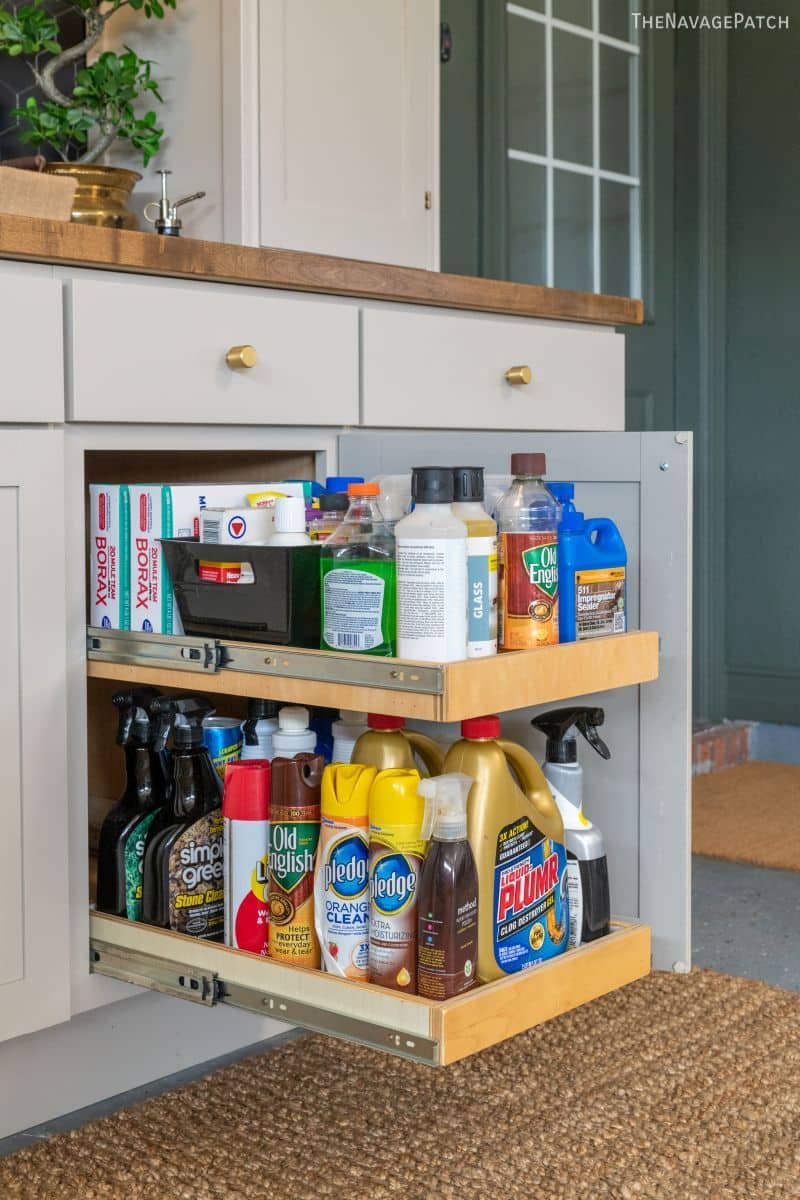
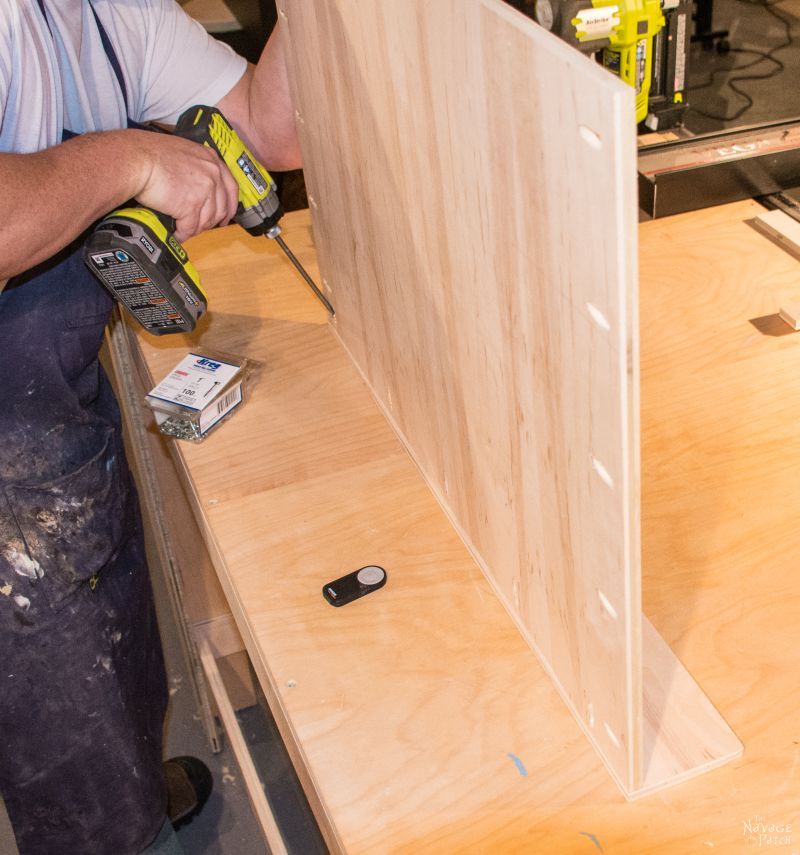
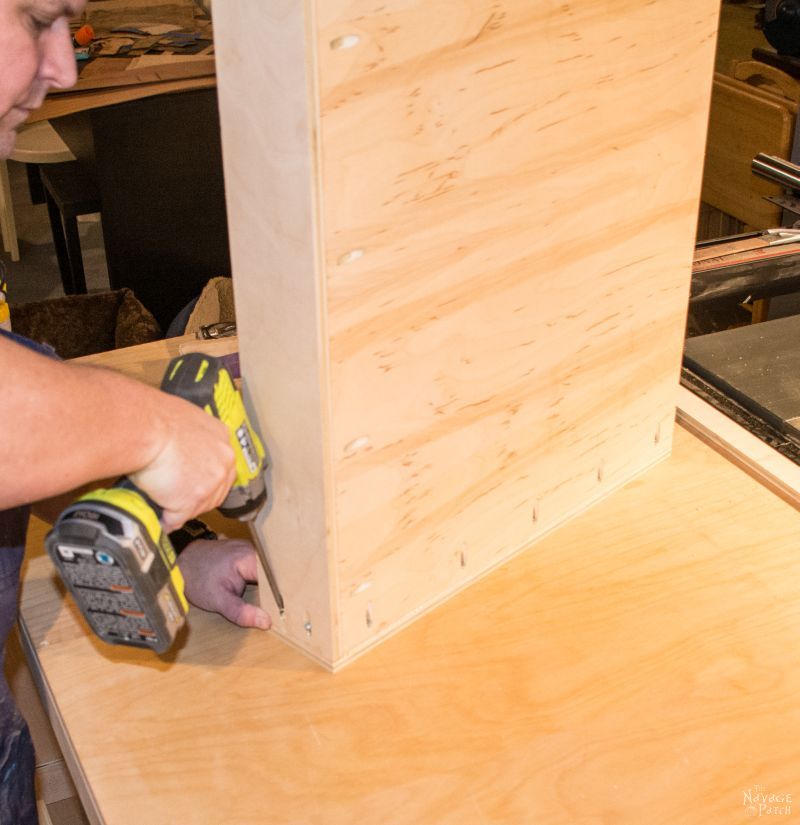
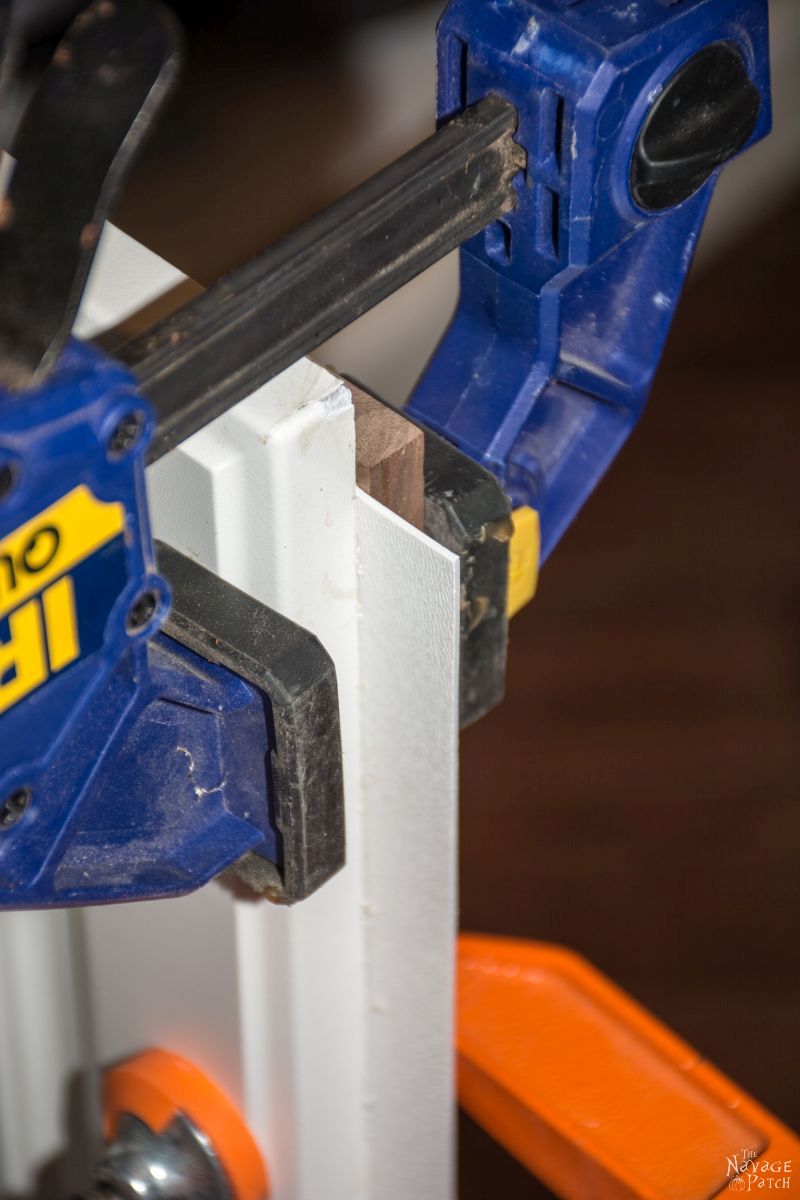
Consistency and repeatability are key when it comes to installing drawer slides for multiple base cabinets. To take the guesswork and repeat measuring out of the equation for my latest pull-out shelves in our garage laundry room, I built drawer slide framework that I could use for either side of any cabinet.
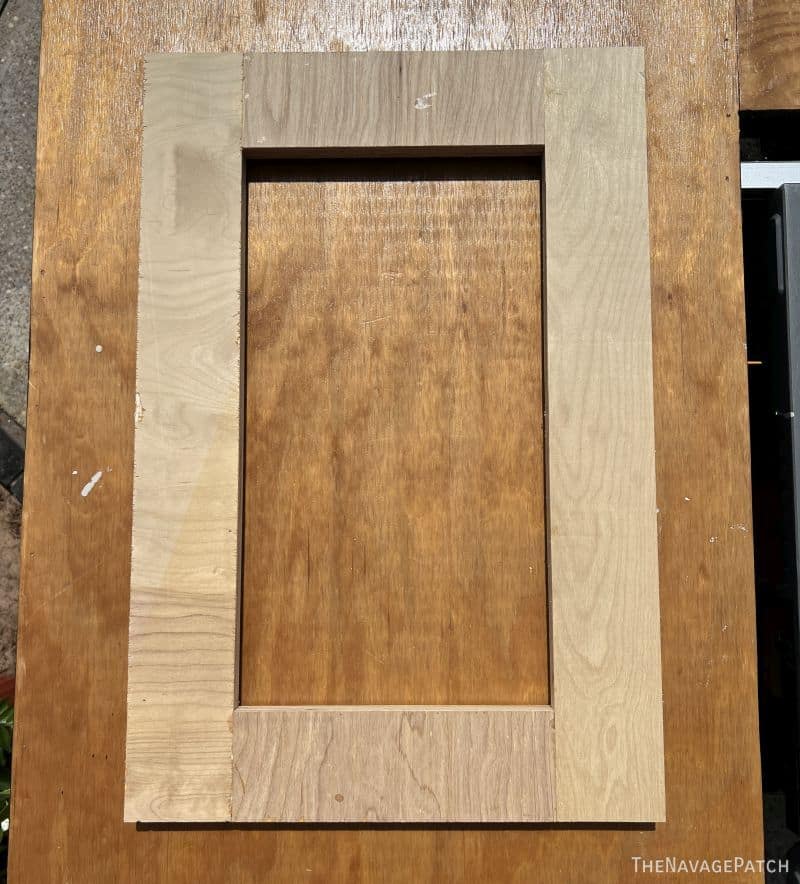
All of our cabinets have face frames that intrude 3/4″ into the cabinet opening on the sides and top. To have slide out shelves, you have to install a 3/4″ spacer before you can install the drawer slides anyway, so my new method just makes it easier and consistent.
This framework is the same depth as the cabinets as measured from the back wall to the interior side (back side) of the face frame. I picked a height that would give me more headroom for the lower pull-out shelf and a little less for the upper shelf.
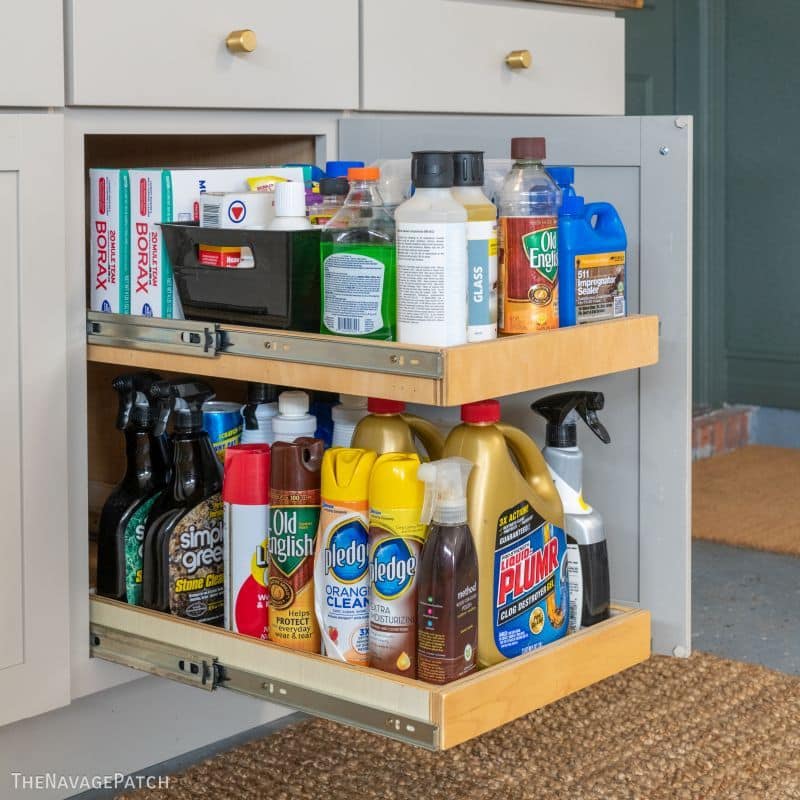
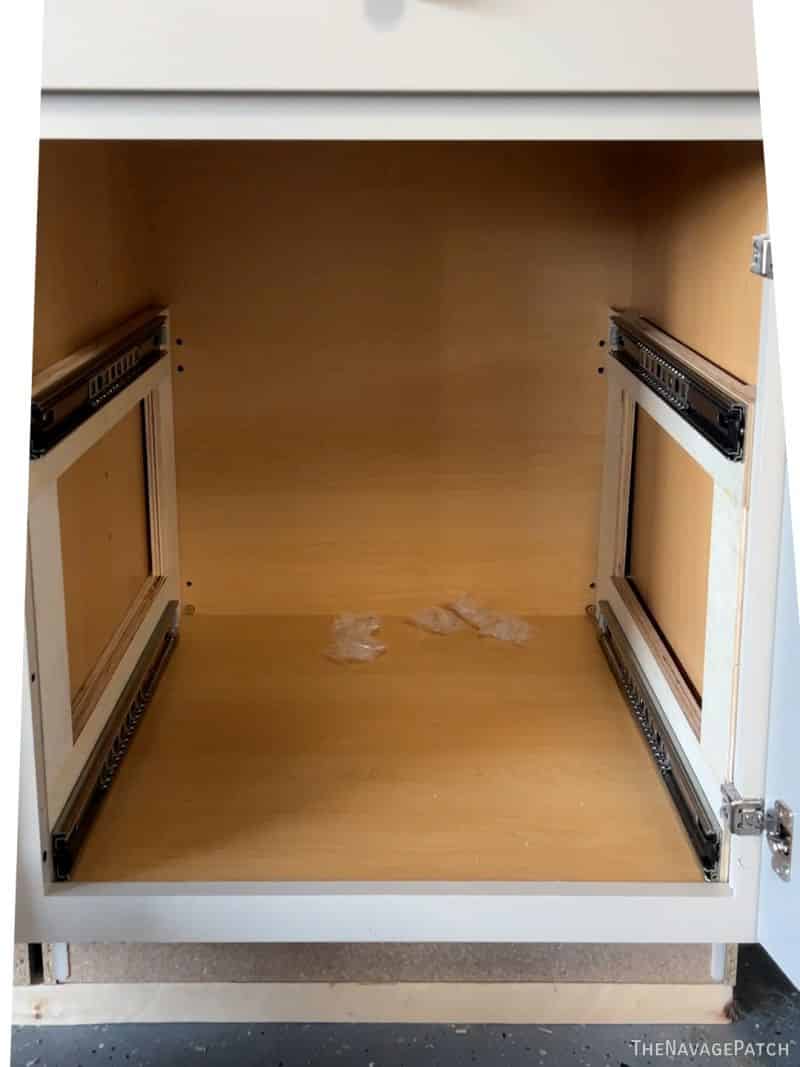
Next, I installed the cabinet-side slides. For the bottom shelves, I measured up 1/8″ from the bottom edge of the framework to make sure I had enough clearance. I initially installed the top sides flush with the top of the framework as shown below, but I later lowered them flush with the bottom edge of the top framework. This adjustment was so we could better accommodate the range of heights of our cleaning products.
I built 6 frameworks – enough for 3 cabinets and 6 shelves. I installed them using construction adhesive and a few brad nails.
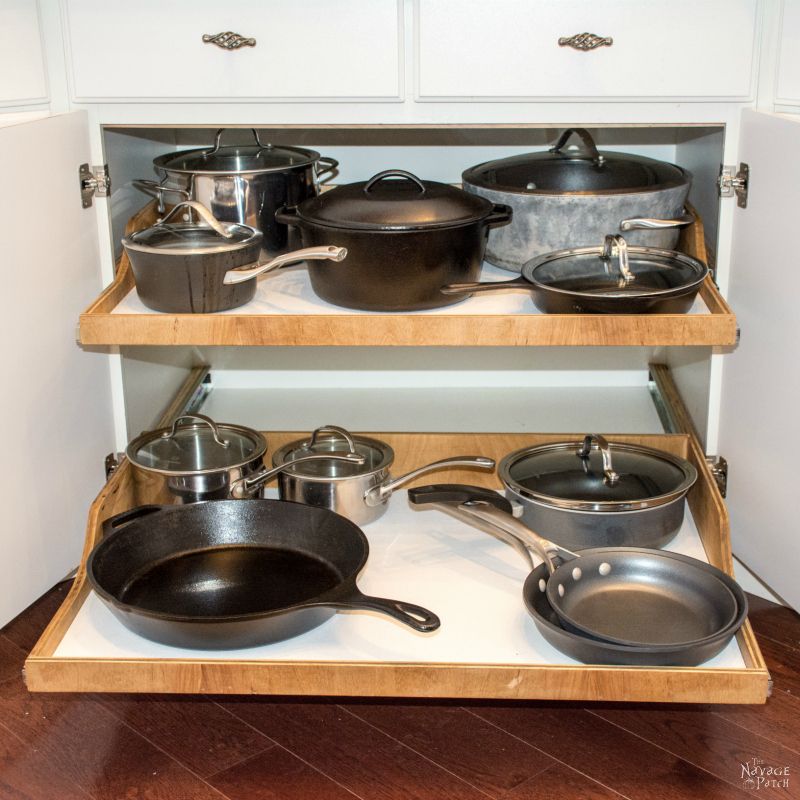
Step 2 – Build the sliding shelves
My original method used pocket screws, some fancy jigsaw work, and sheets of PolyWall. My new method ditches all that for simplicity.
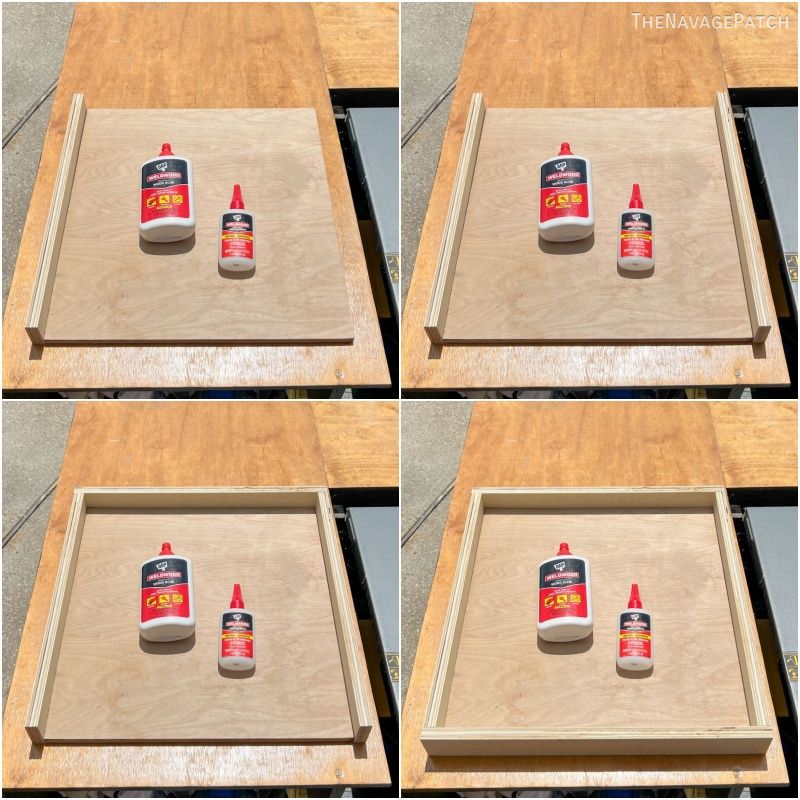
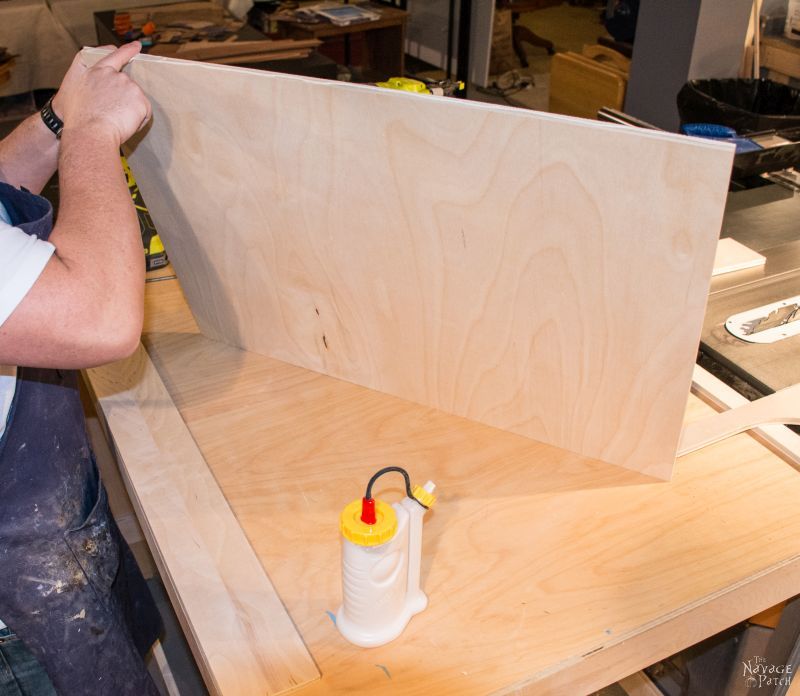
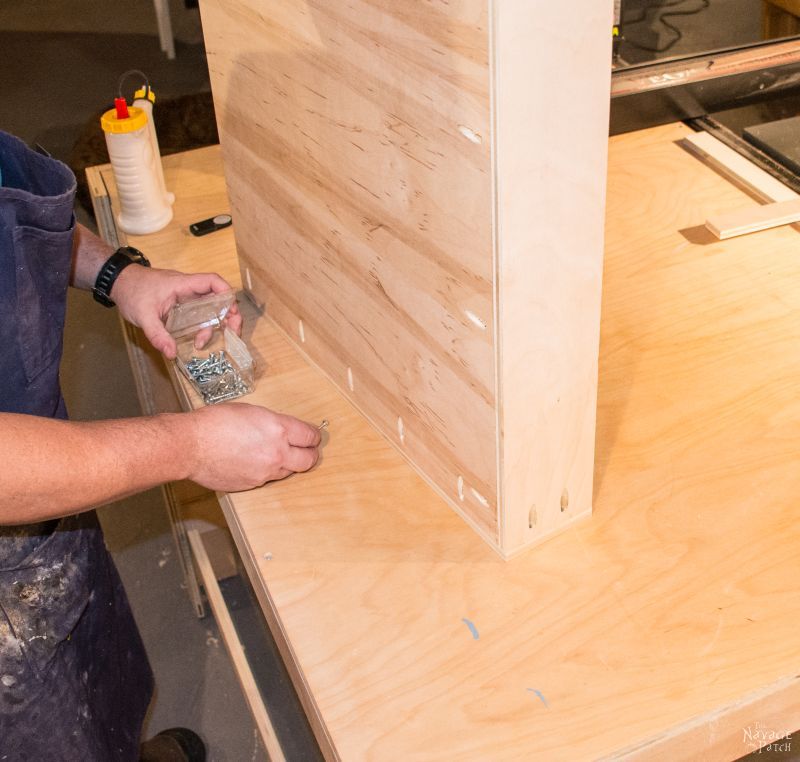
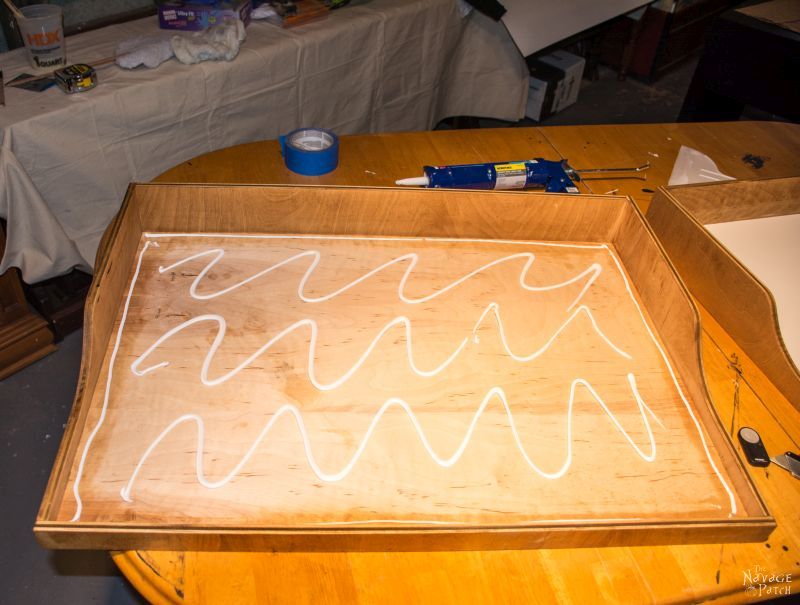
Instead of using 1/2″ plywood (which would necessitate using pocket screws), I used 3/4 inch plywood (all of it was scrap I had lying around), and I assembled the shelf with a combination of DAP Weldwood wood glue and DAP Weldwood instant wood adhesive.
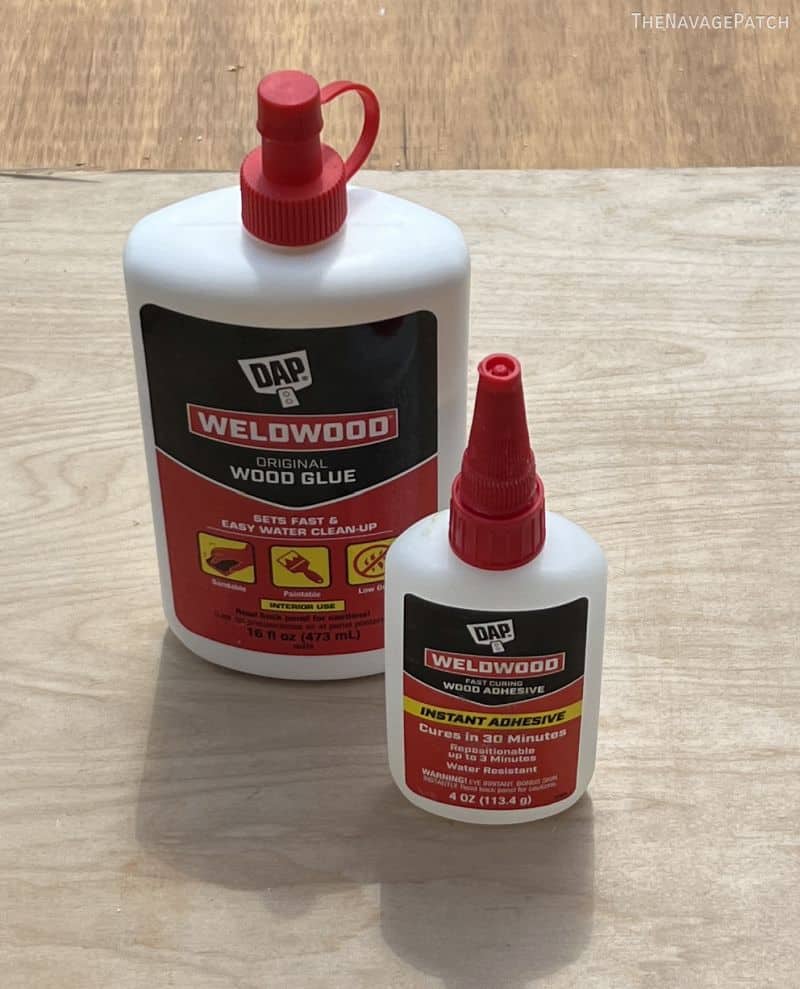
The instant adhesive creates a quick strong bond while the wood glue works to create an even more durable bond.
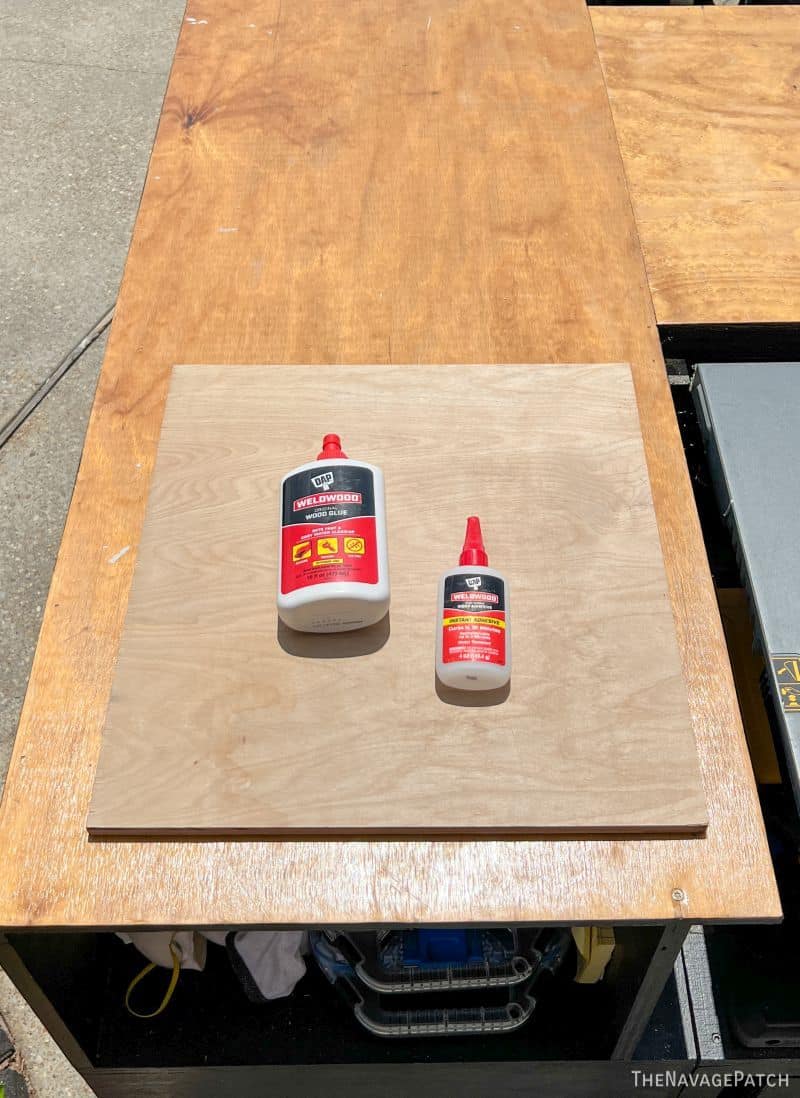
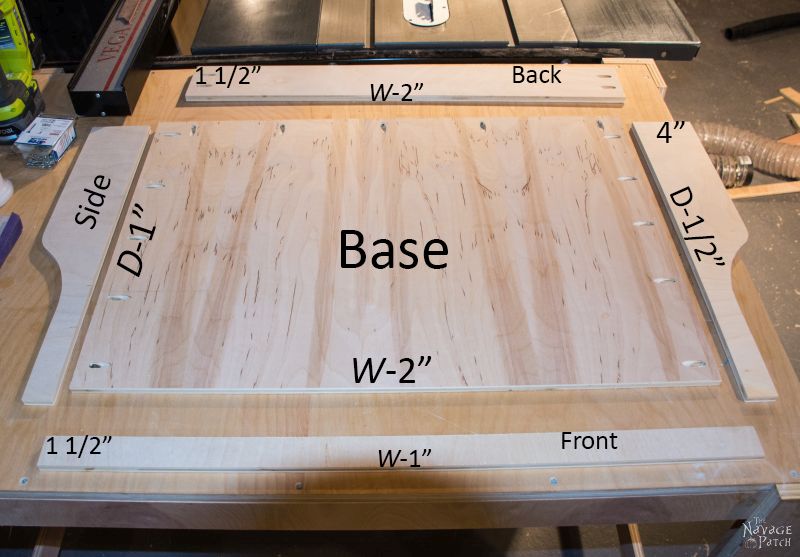
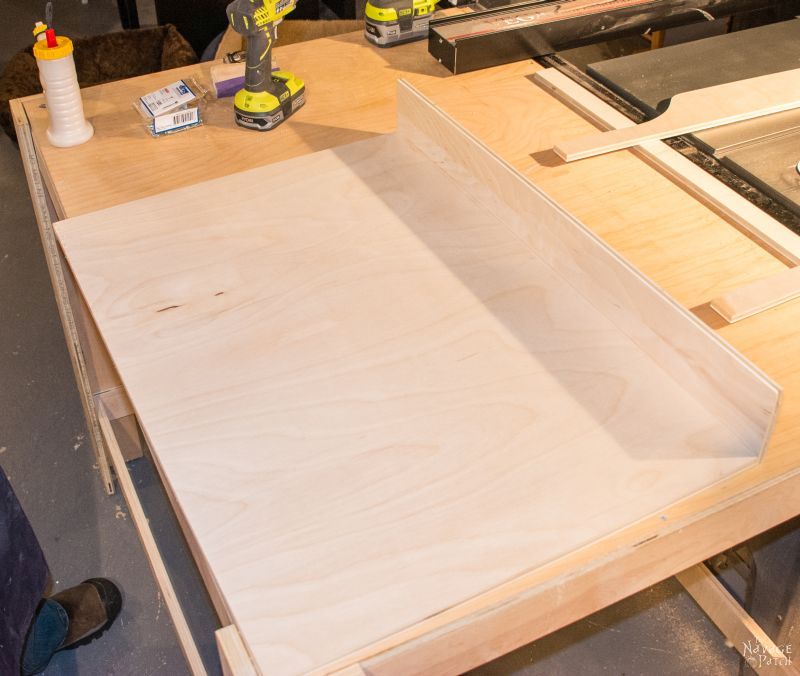
To make a sliding shelf, I first cut the bottom from 3/4″ plywood. The depth is equal to the measurement from the back wall to the inner part of the face frame (in my case 21 inches) minus double the thickness of a piece of plywood (1 1/2 inches) for a depth of 19 1/2 inches. The width of the base is equal to the measurement across from face frame to face frame minus double the thickness of a piece of plywood (1 1/2″) minus double the thickness of one drawer slide (1″).
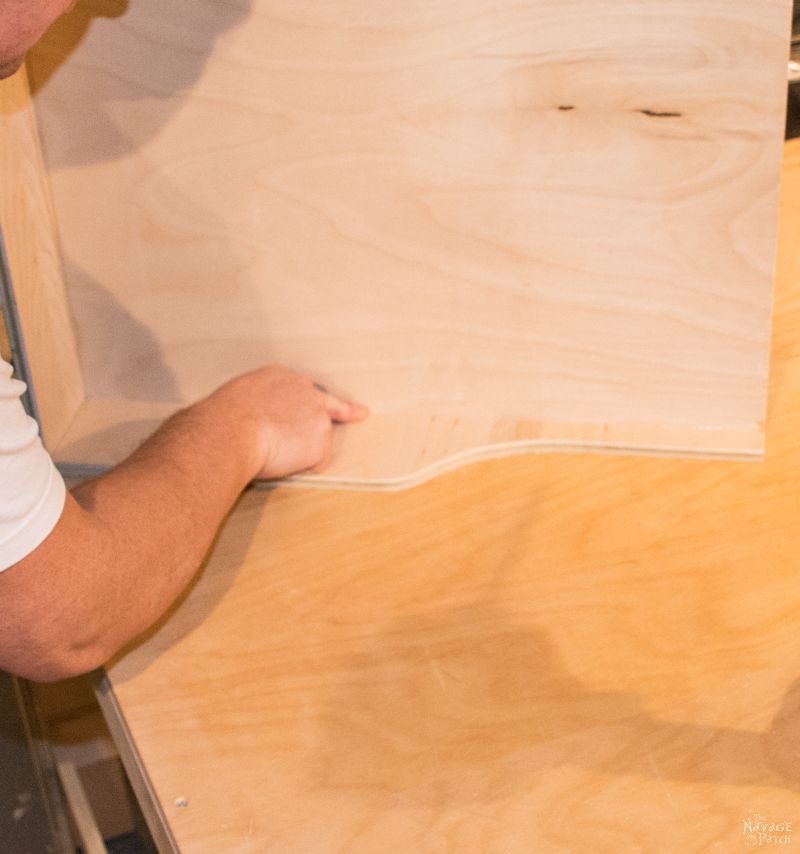
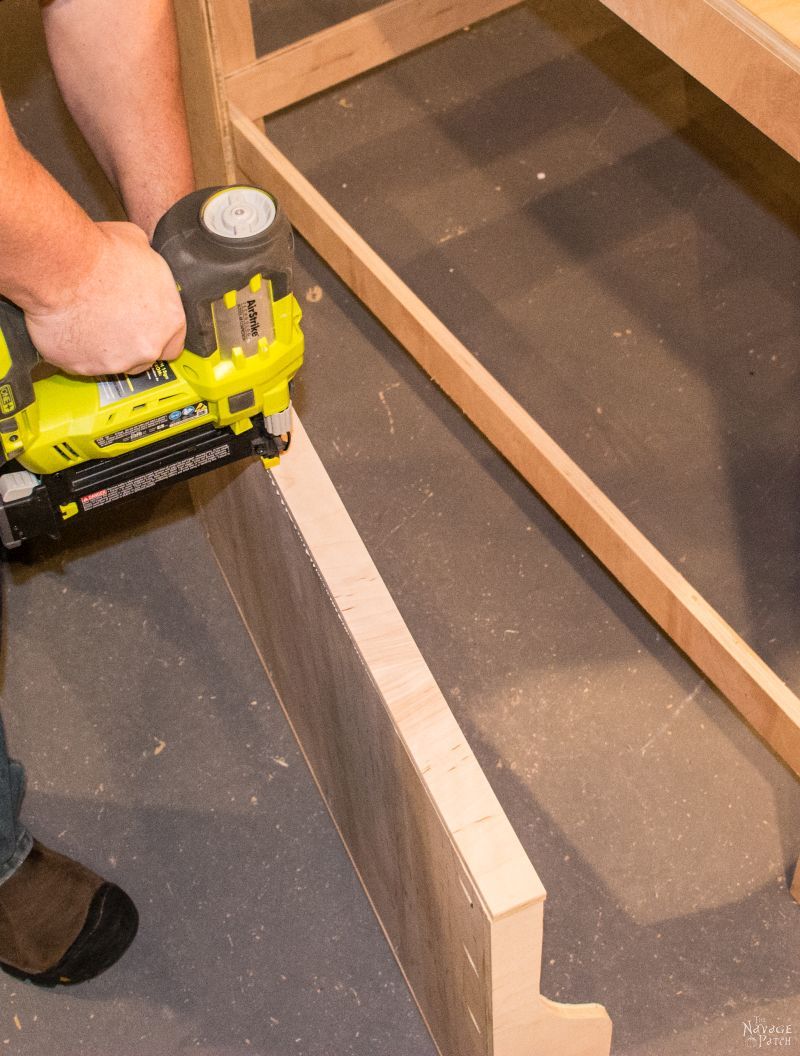
I then cut four 2-inch strips of plywood – the lengths of two them equal to the depth of the base (19 1/2″ in my case). The other two pieces were cut to the width of the base PLUS 1 1/2″. Assembly couldn’t be easier.
I first glued the two sides onto the base, and then I glued the back and front.
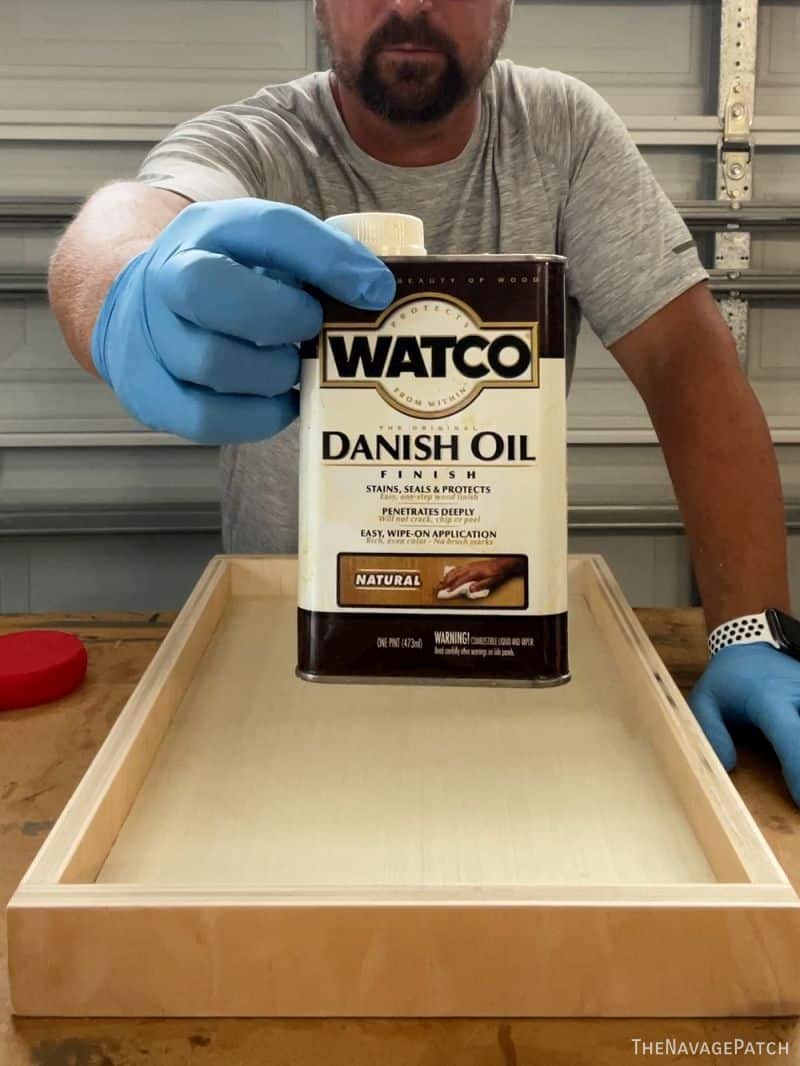
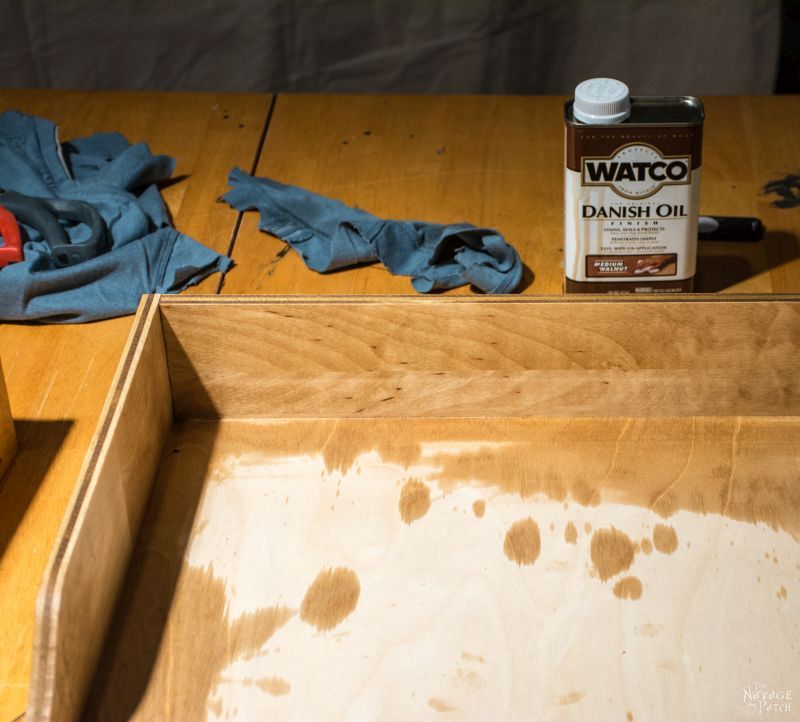
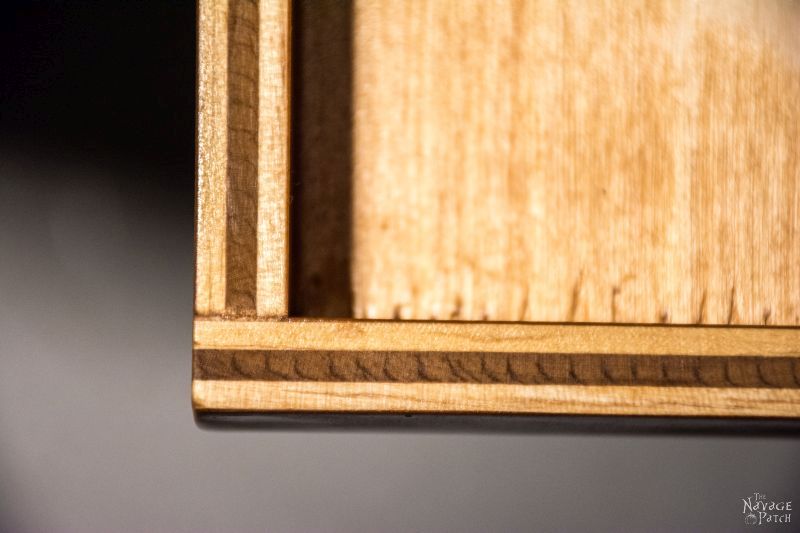
As I did with the original sliding shelves I made, I finished these with Danish oil – it gives a beautiful color and protects the wood.
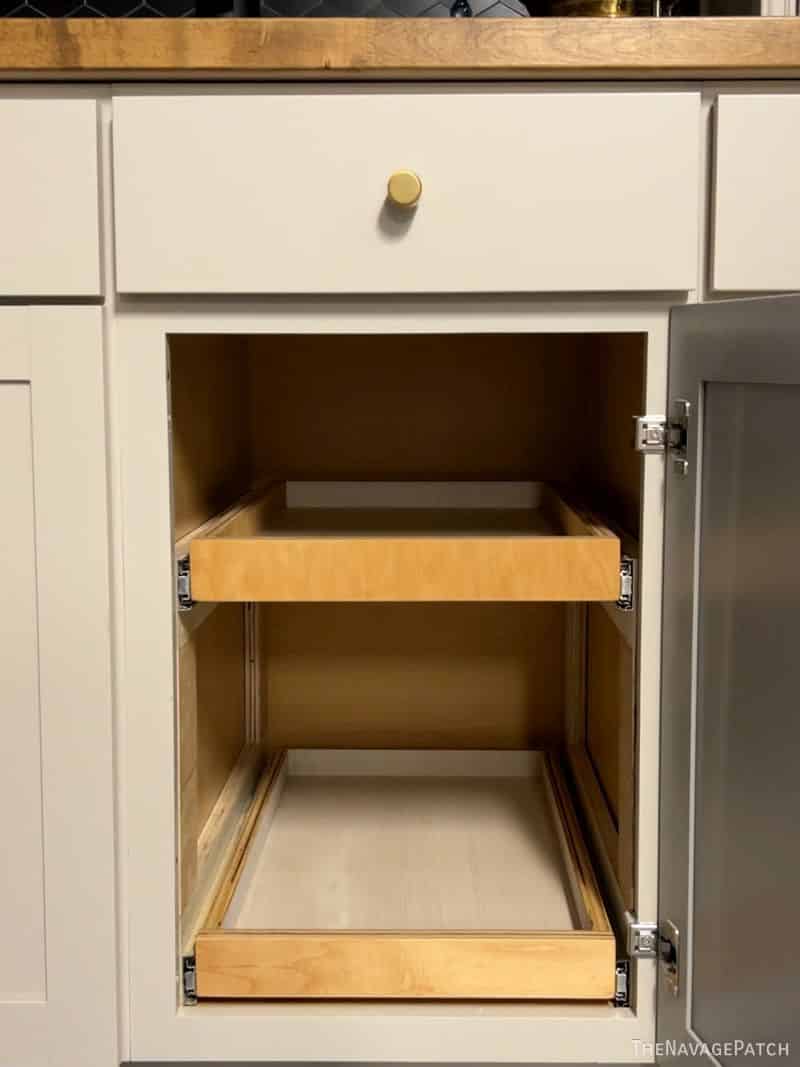
Finally, I installed slides to the sides of the shelves and installed them. With this method, I got a perfect install with each and every pull out shelf!
And since we all know hoe much you like to snoop around other peoples’ drawers…here ya go!
DIY Pull-Out ShelF TUTORIAL (The original Method)
Preparation
I wanted to start with the double cabinet pictured above. I wanted two big slide-out shelves, spanning the whole space. That would require knocking out that center support column.
Good.
I love breaking stuff!
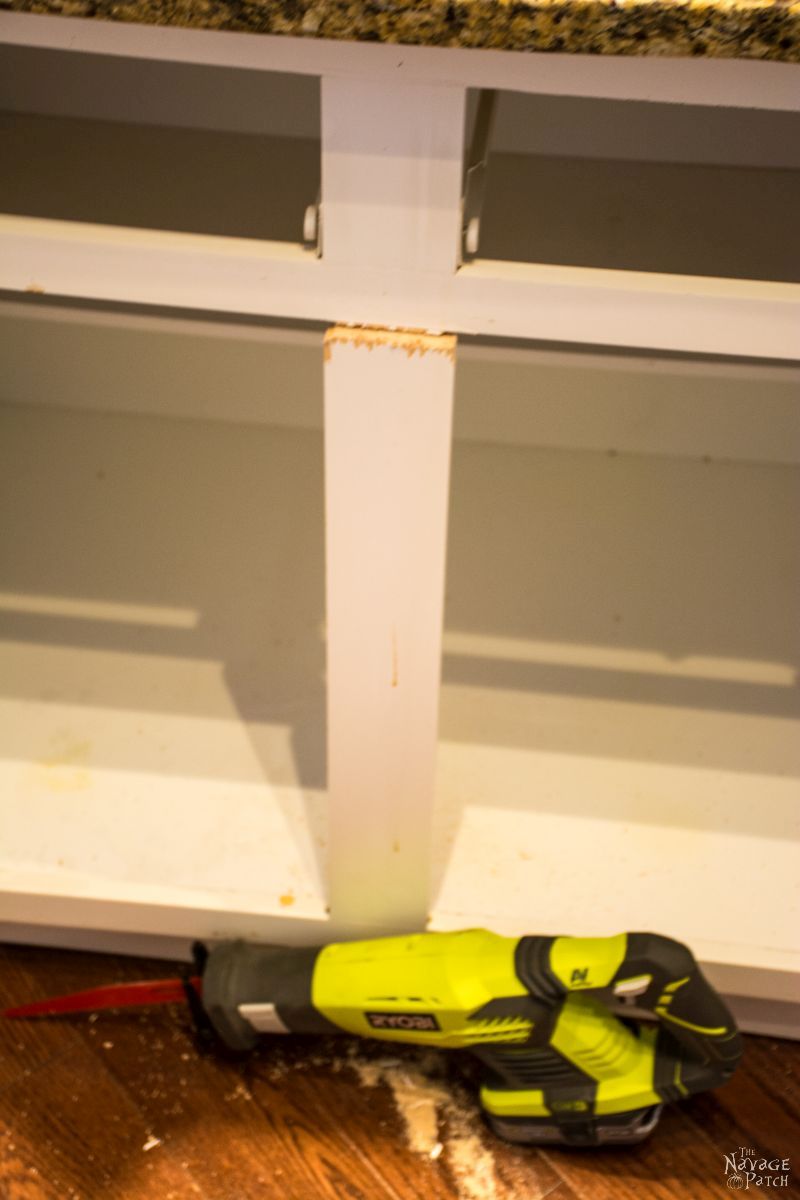
This left some pieces on the top and bottom that needed to be chiseled out.
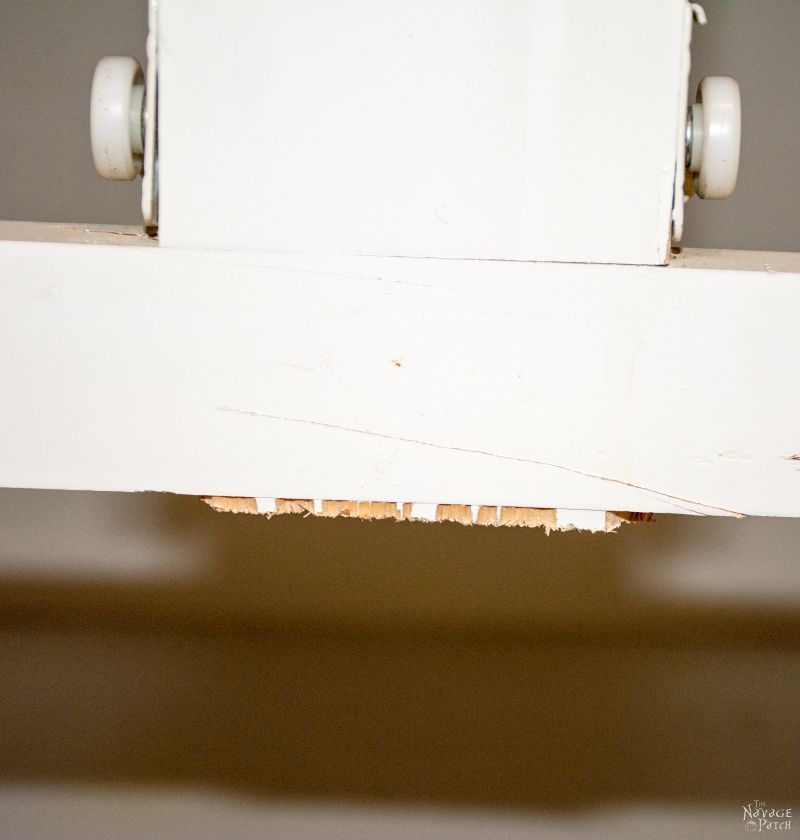
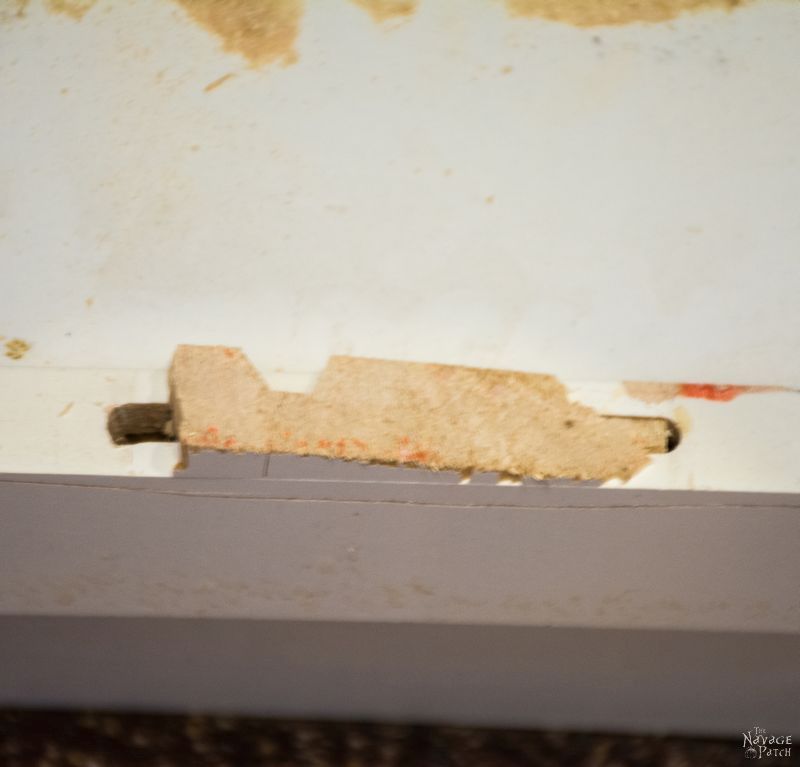
I then filled the hole in the bottom with drywall filler. You could also use Bondo wood filler, which has since become my go-to filler. There was no need to be fancy, as I would be covering this part later with adhesive melamine edging.

Don’t worry! That silly support was not load-bearing. The granite is fully supported by the other three sides of the carcass, and the drawer above is supported on the sides. However, just to be safe, I reinforced the crossbar below the drawer with a piece of 3/4″ plywood (not pictured).
Installing Drawer Slides for DIY Sliding Shelves
That shelf was not removable, at least not without destroying the sides of the cabinet. I left it in place and used it as a handy guide for placing the drawer slides for my DIY pull out shelves. I opted for quality ball-bearing drawer slides. They hold a hell of a lot more weight than the cheap ones with the wheels. They look better and feel better, too. For 22″ slides, they run about $16 for a pair at Home Depot. If you don’t have a Home Depot or Lowe’s in your area, Amazon carries them for about a dollar less than the Big Box stores.
Prepping for the Drawer Slides
Before I could install the slides, I had to install some gap-filler plywood strips on which to mount the slides. You can see that the face frame around the cabinet is not flush with the inner cabinet walls. The gap was 13/16″, so I filled it with strips of 3/4″ plywood and three washers at each of the three screws used to secure each strip. Now the mounting strips were flush with the edges of the frame. This was necessary so the sliding shelves could function unimpeded.

After installing all of the mounting strips, I installed the slides.
I finished prepping this cabinet.
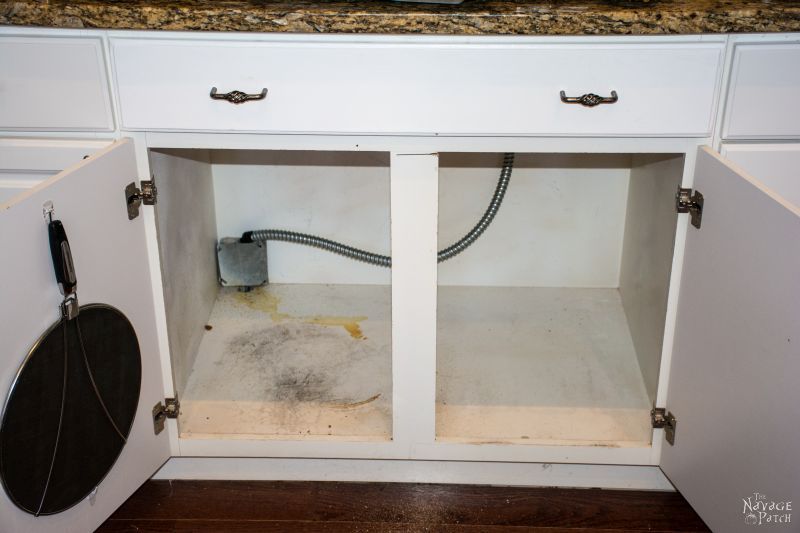
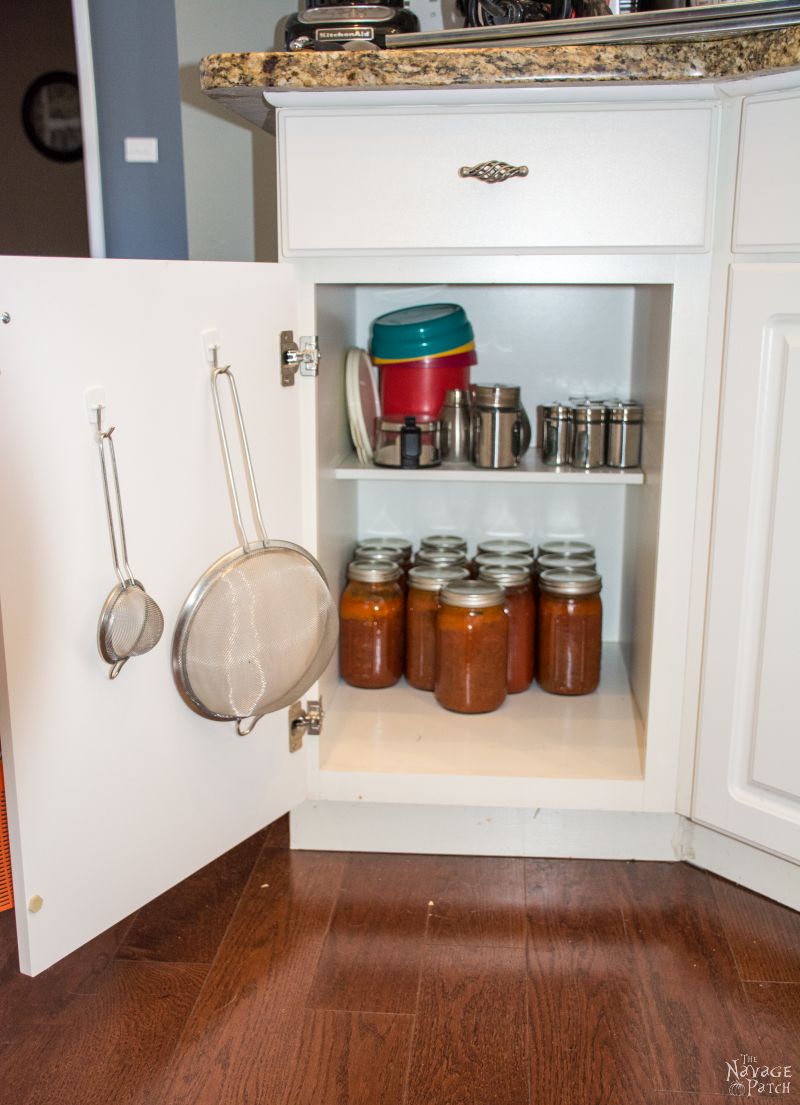
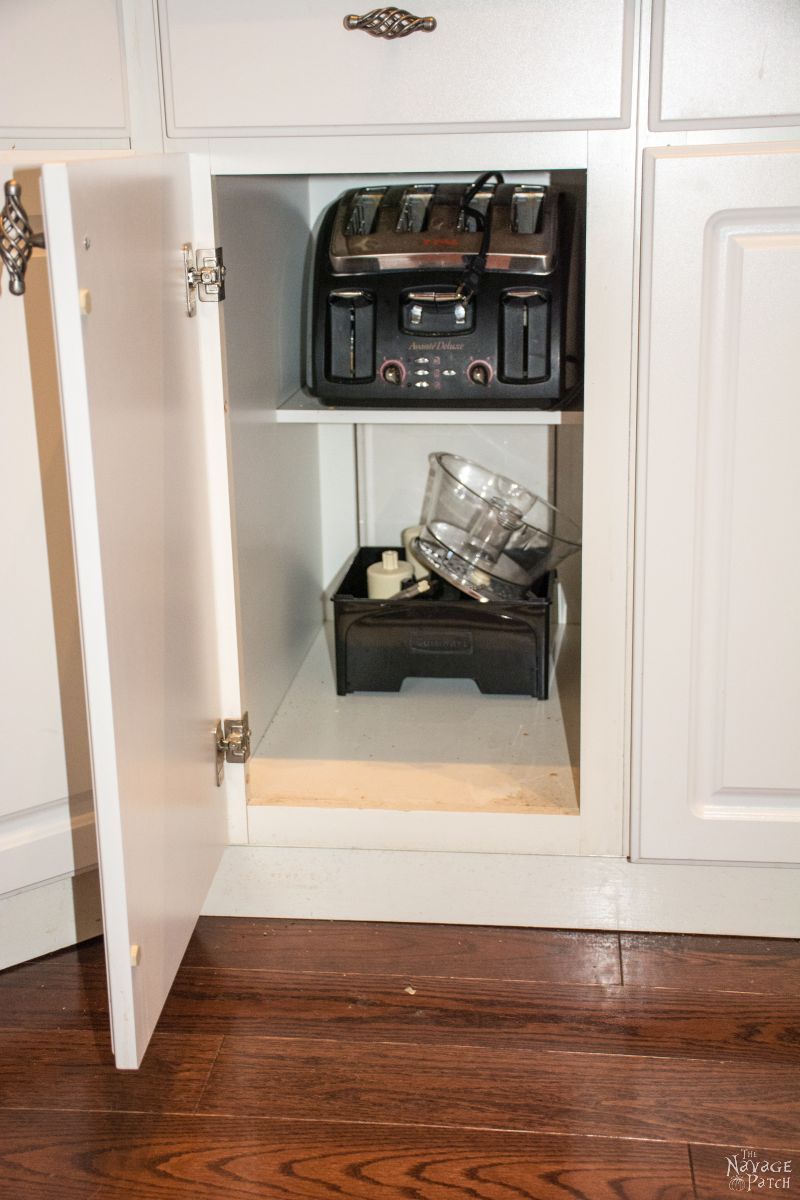
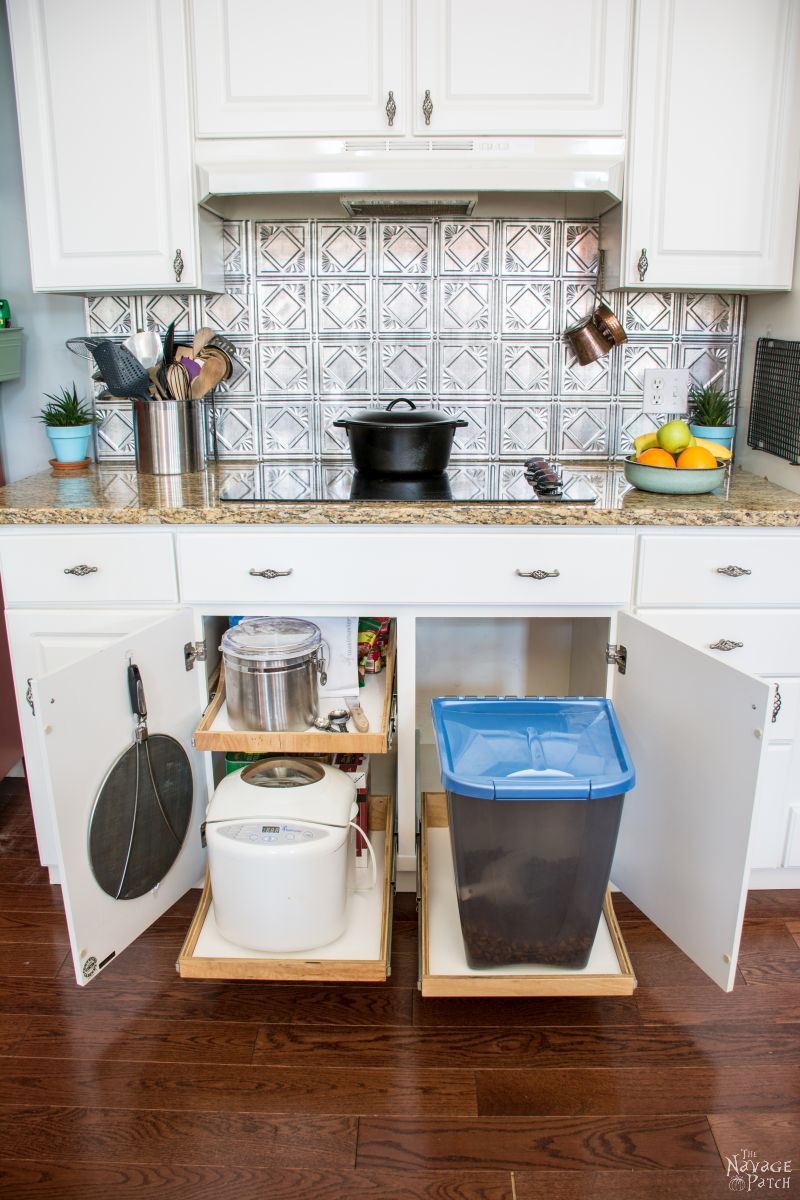
The only other cabinet that needed modification was the one under the stove. This is where I keep dog food and where I kept a few pots and pans (removed in the following picture). The plan here was to have one slide out shelf on the right side to hold the big dog food container and two pull out shelves on the left to hold the bread machine and some other stuff. Because of the stove’s power supply, I had to use 18″ slides on the lower left instead of the 22″ slides I used everywhere else.
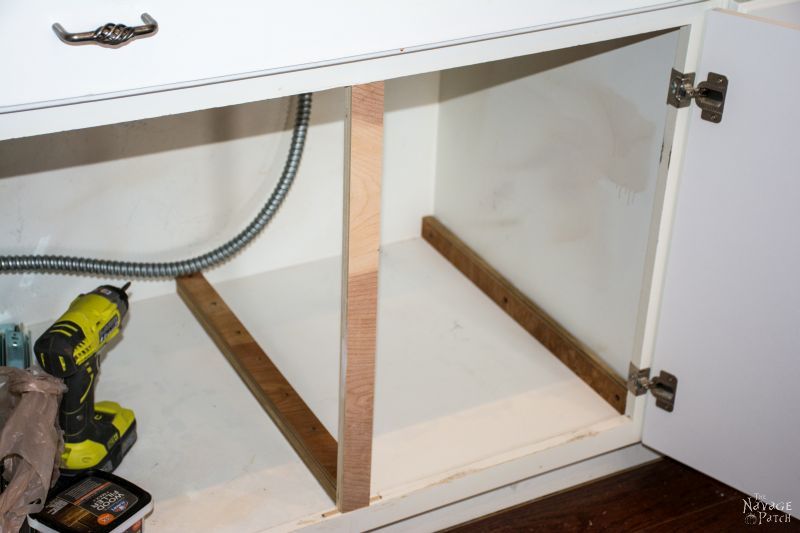
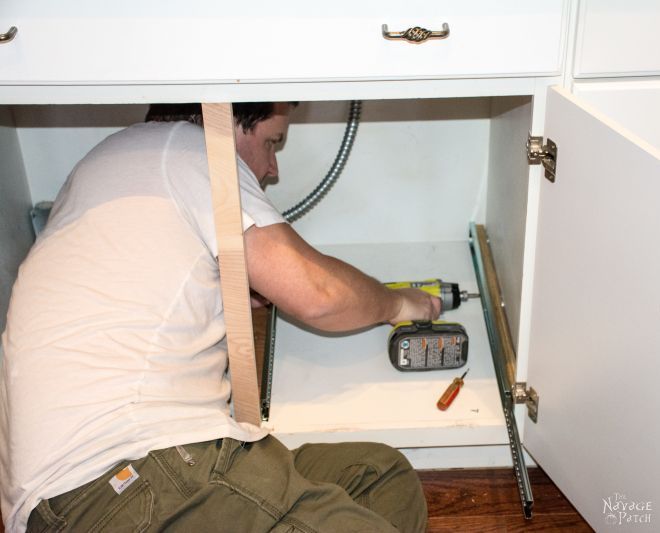
A slimmer center support
That center support was a big waste of space, so I took it out and built a smaller one out of 3/4″ plywood. I secured it in place with glue and pocket screws. I needed a center support here because I would be installing an upper sliding shelf on the left, and the slide’s support strip needed to be secured in the front and back. I’m not sure why I didn’t get a picture of that support strip, but this picture shows the bottom one.
Crawling around in these cabinets was difficult for a lumpy old turd like me.
The other three cabinets were singles and just needed to be emptied before I installed the DIY sliding shelves. I didn’t take pictures of the process, because it was repetitive, and images of a large middle-aged man squirming around in narrow cabinets shouting profanities might be upsetting to some. Here are the “before” shots of the remaining three cabinets.
Building the Sliding Shelves
Okay, with the slides installed, it was time to build my DIY pull out shelves based on my notebook scribblings. I’ll give dimensions as they relate to the width and depth of the cabinet, in case you are interested in building a few.
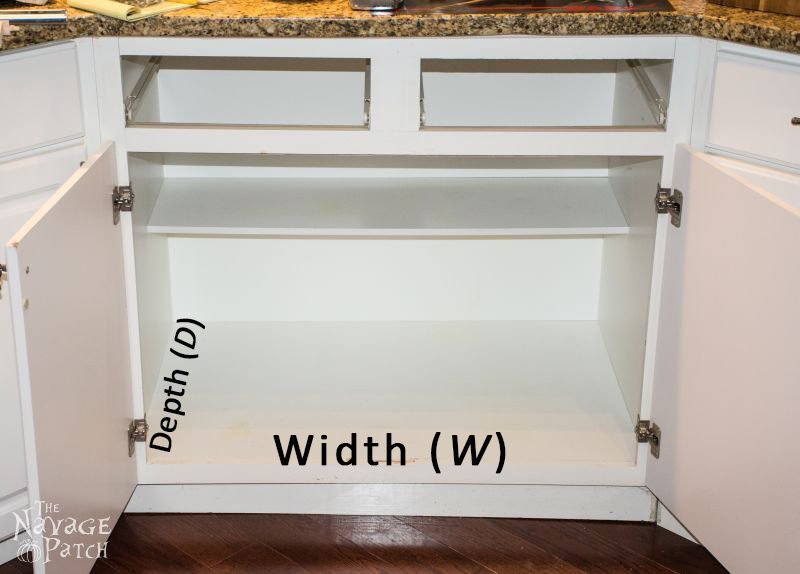
I used drawer slides that are each 1/2″ thick, so together that makes one inch. Here are my dimensions:
I used 1/2″ birch plywood. It is important to use high-quality plywood for a project like this. I drilled pocket holes around three sides of the base and on the short ends of the back piece using my Kreg Jig. This has been one of my most loved and used tools, and it is essential for any DIY cabinetry. Click here to find it on Amazon.
Cutting the Sides
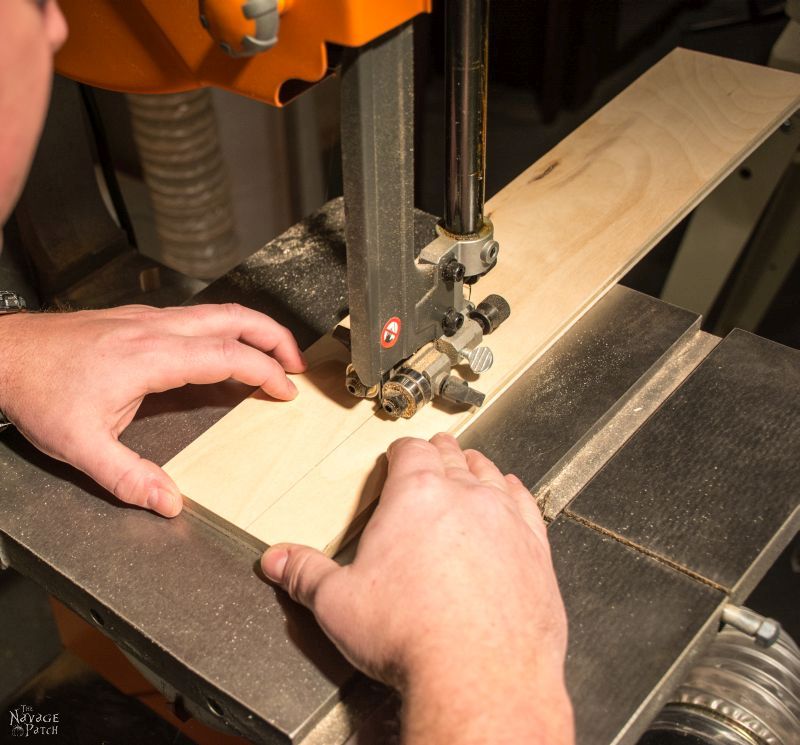
To make the sides of my DIY roll out shelves, I first drew the curve I wanted on one of the pieces then cut it out with a band saw. A jigsaw would work just as well.
I sanded the curve to get it as smooth as possible.
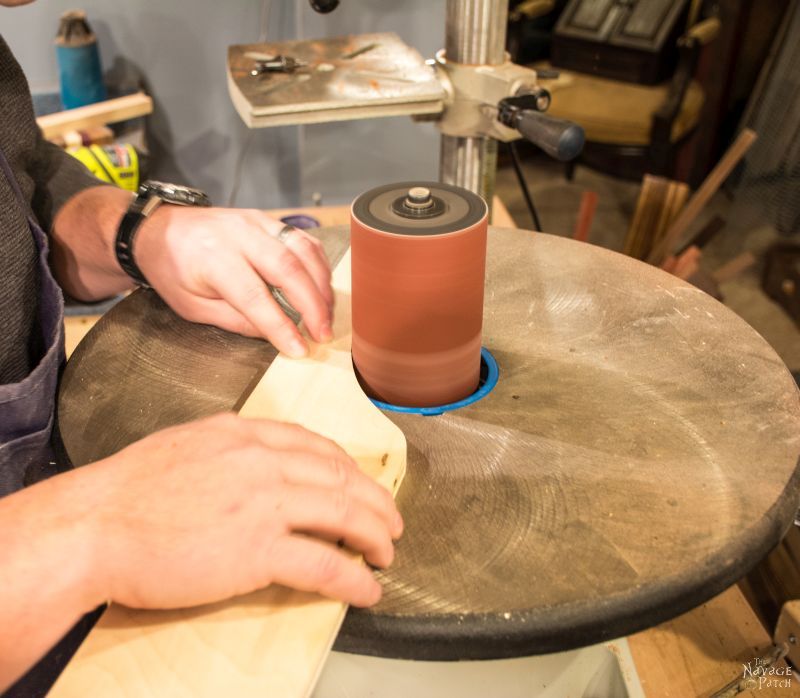
Then I used that piece as a template and traced the pattern on all my other side pieces.
Assembling the Pieces
I started constructing the roll out shelf by securing the back piece to the base. First, I ran a bead of glue along the back edge of the base.
Then I placed the glued edge onto the back piece and screwed it into place.
Here is the base and the back.
Next, I ran a bead of glue along one of the base’s sides and screwed it into the corresponding side piece.
After tightening the screws, I wiped away any excess glue that squeezed out on the inside.
Then I attached the other side, screwing it in place along the base and the back piece where I had drilled the pocket holes.
I secured the front piece to the base and sides using glue and brad nails.
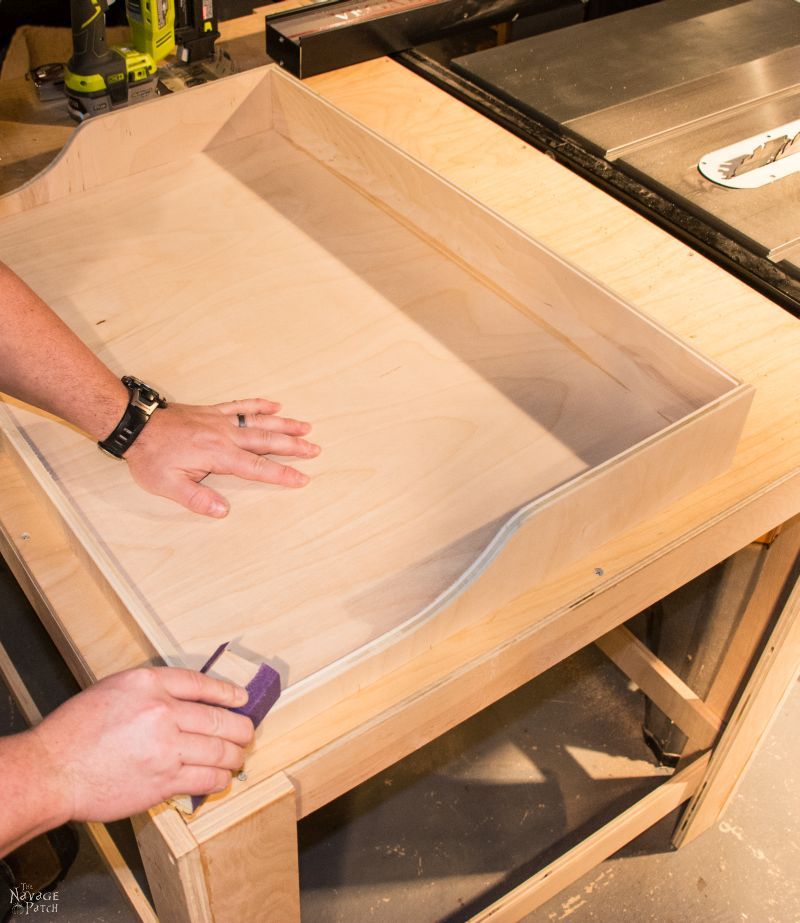
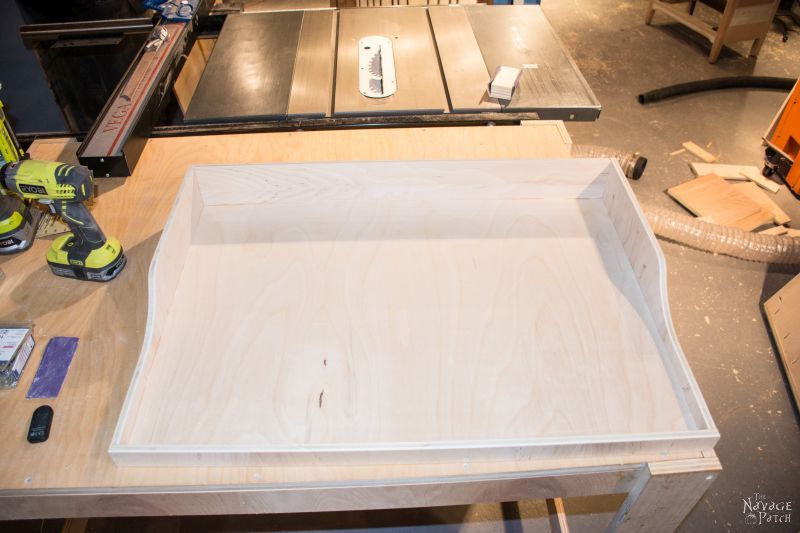
Sanding the Assembled Pull Out Shelves
When the glue was dry, I sanded the edges.
Finishing the DIY Slide Out Shelves
My DIY pull out shelf was now ready for finish.
I opted for Watco Danish Oil in medium walnut color.

This stuff is great for quick finishing. I especially like it on plywood. I didn’t put it on the base, as I would be covering that later.
Look how the Danish Oil makes the edges of the plywood pop.
Installing Polywall on the DIY Pull Out Shelves
To cover the bottoms of these sliding shelves, I used a product called Polywall. Polywall is like a shelf liner on steroids. It is much thicker and far more durable. You can find it at your local Home Depot or Lowe’s. It comes in 4’x8′ sheets and runs about $20.
Because of its size, thickness and floppiness, it is a bit difficult to work with when trying to cut the full sheet. It gets easier though as the pieces get smaller. I cut out the sizes I needed for all of my shelves then applied Loctite Power Grab construction adhesive to the shelf bases and smoothed it out with a plastic taping knife.
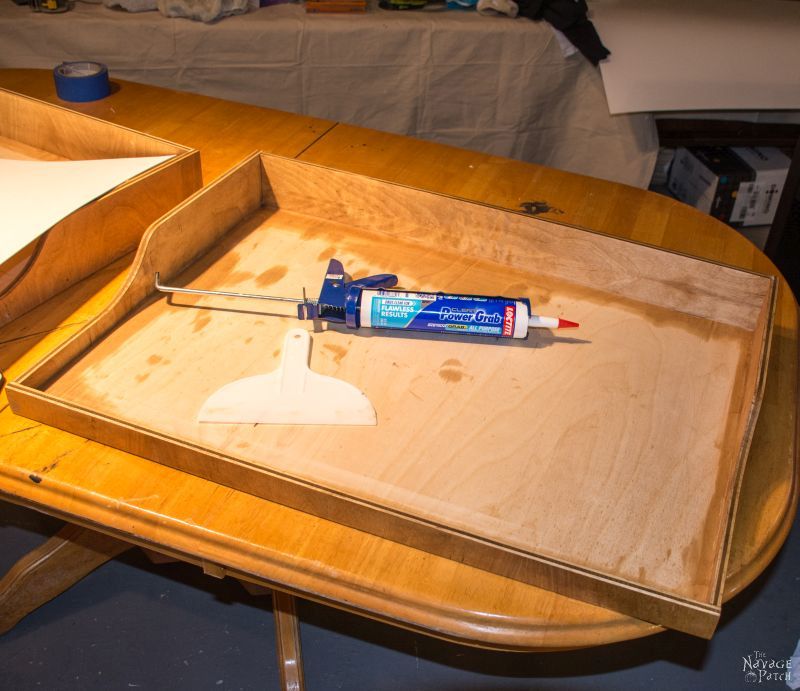
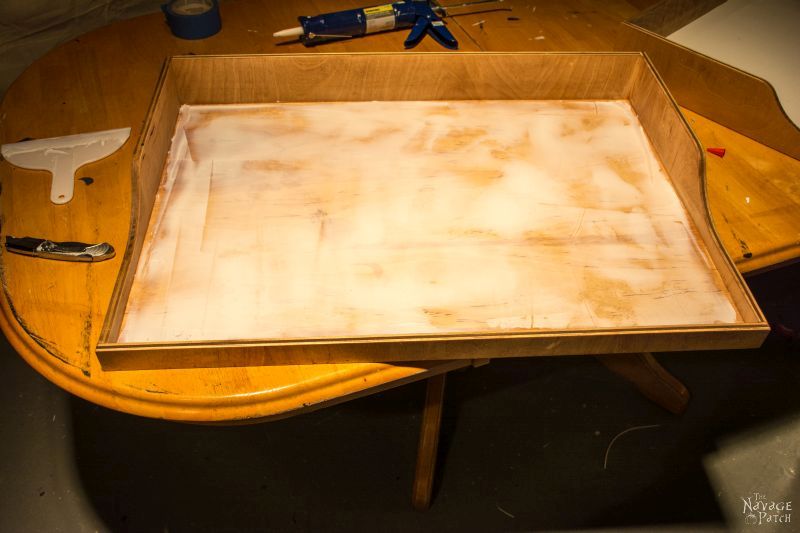
I then installed the Polywall and pressed it in place.
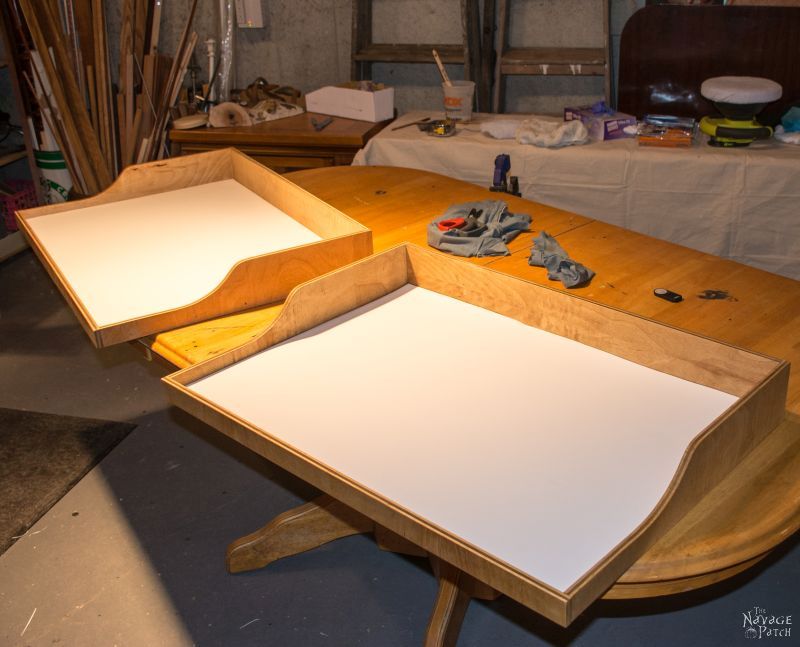
Installing the Sliding Shelves
With the shelves built and finished, it was time to head back upstairs. I screwed the slides onto the shelf sides and installed the pull-out shelves into the cabinet.

If I left it here, there would be a gap showing when both doors were closed, so I cut a thin strip of Polywall and glued it to the inside of the left door. Now when the doors are closed, only the white Polywall shows through the gap.
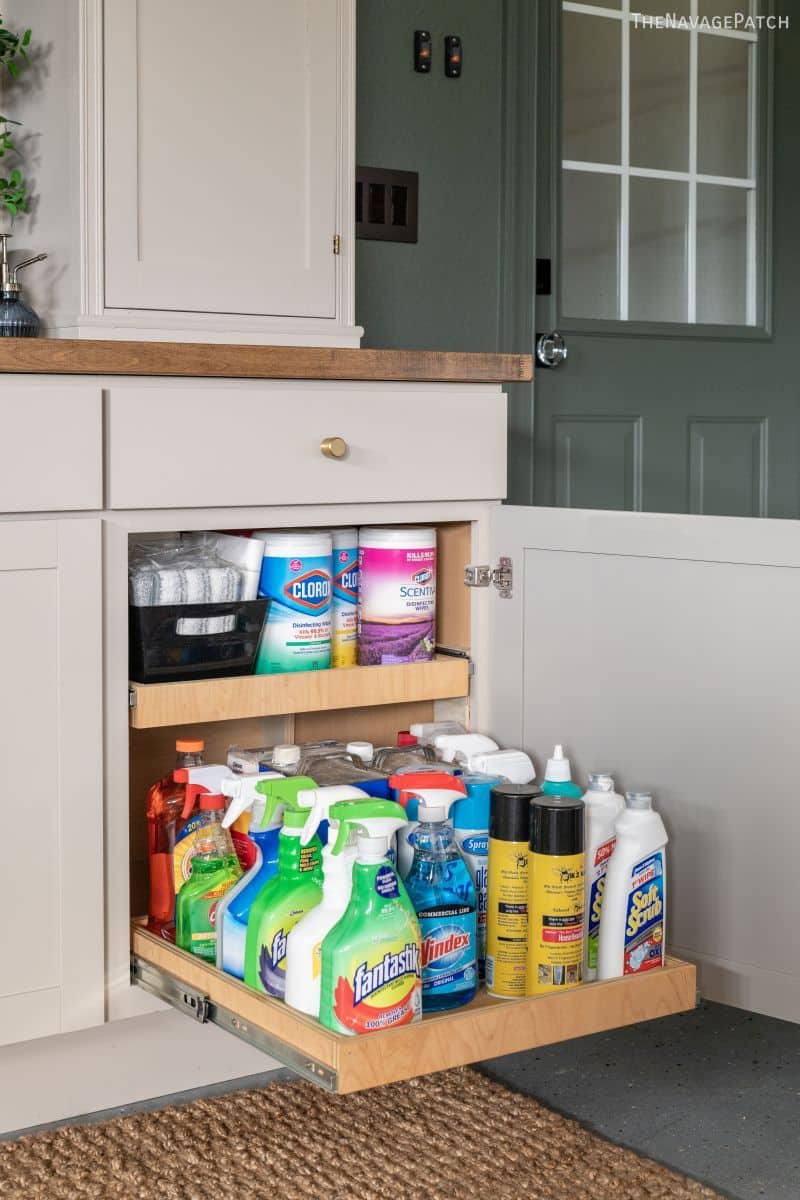
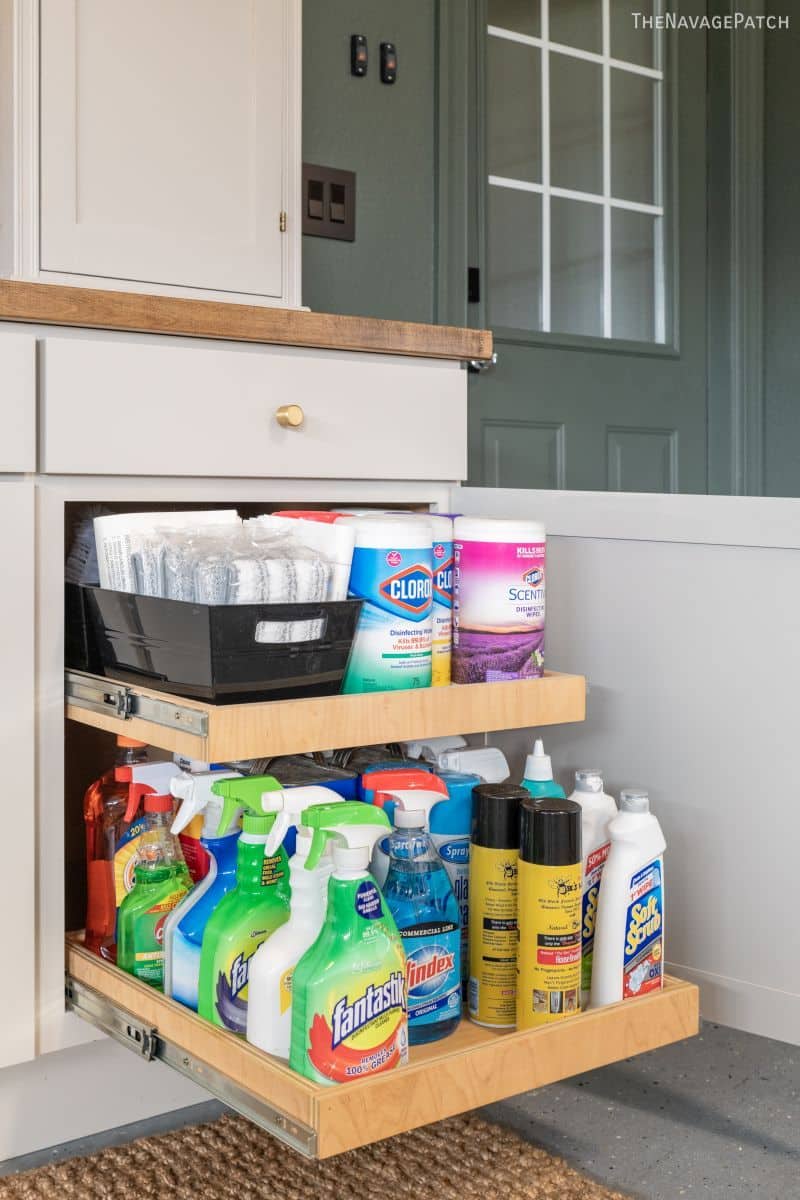
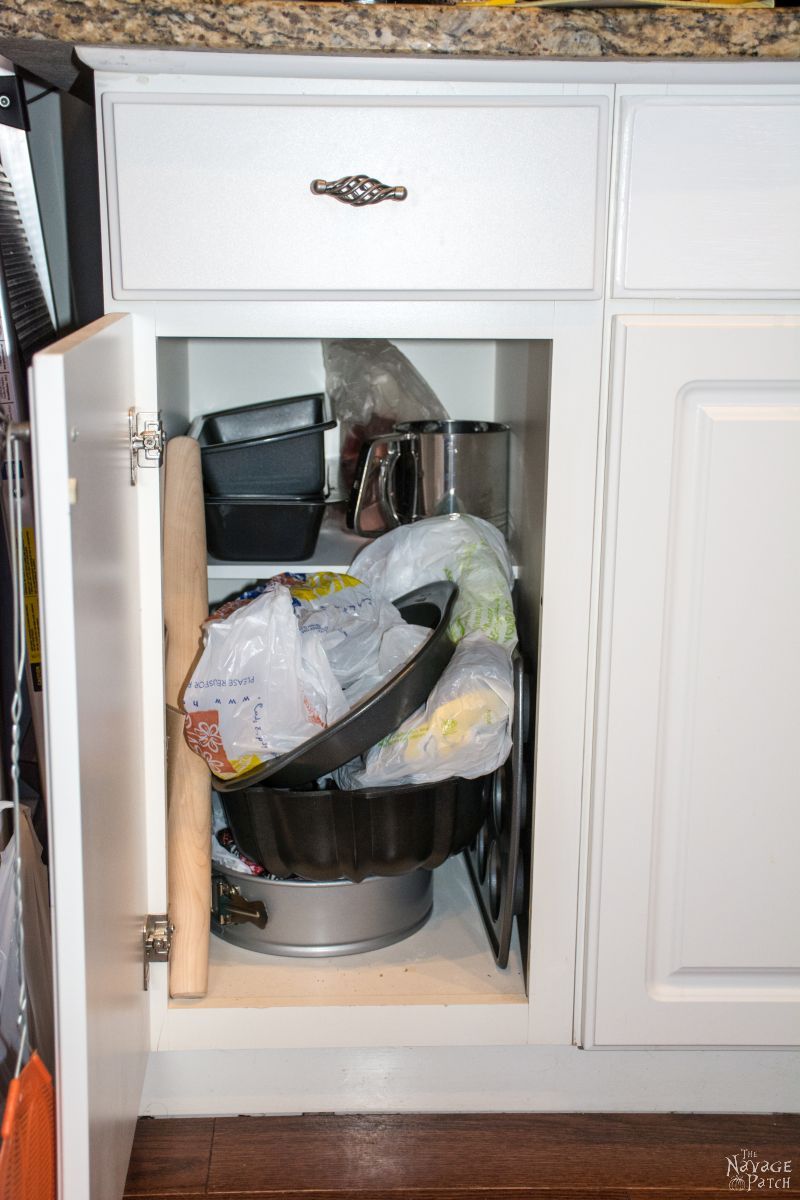
Moving around the kitchen, I installed the other shelves and filled them with all the appliances, pots and pans I could.
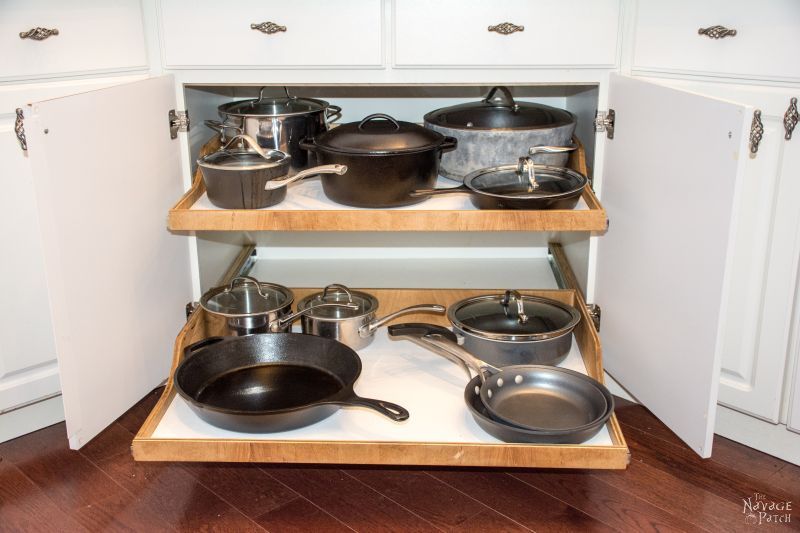
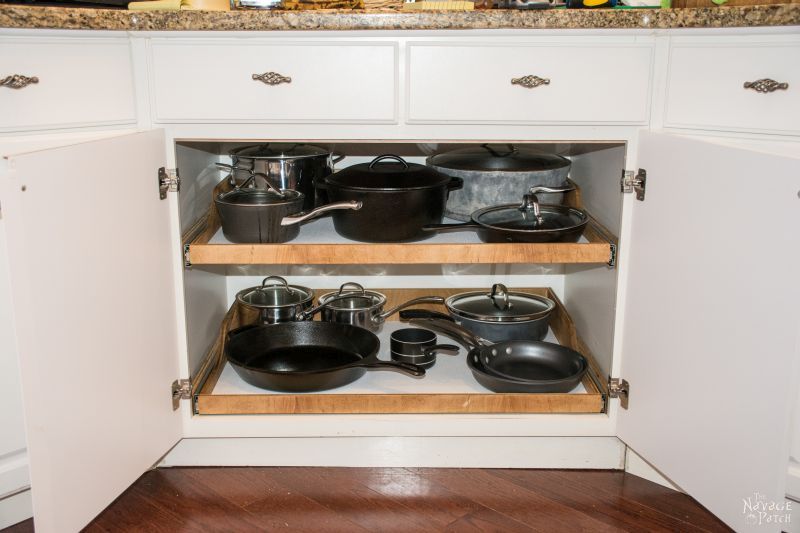

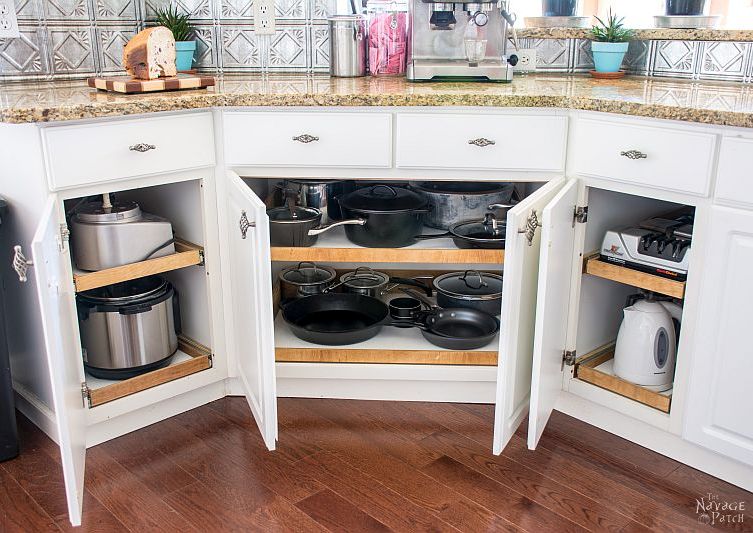
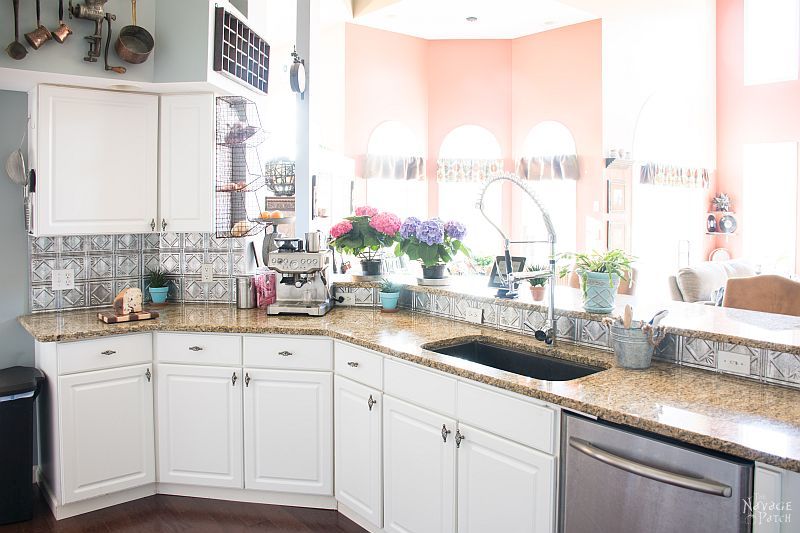
And now look at my gorgeous granite, barren and beautiful and shining in the morning sun.
Cost for these DIY sliding shelves: about $300
For the Less DIY-Inclined
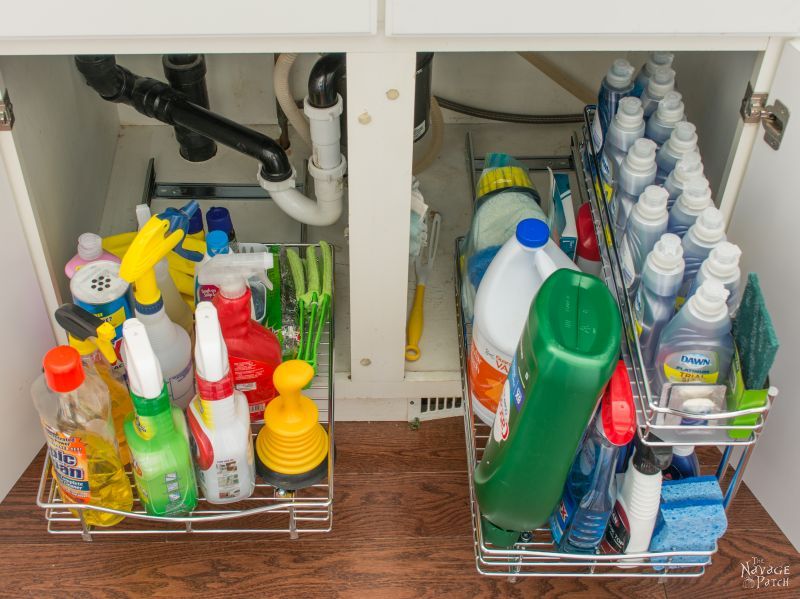
I understand that not everyone has the time, tools or energy to tackle this project, and that’s okay! Sometimes it’s easier or more practical to buy what you need. In fact, when Handan gave my pantry a makeover, in which she incorporated some wire roll out shelves, she ordered more of them for us to install under the sink and under the cabinet next to the fridge. I love them every bit as much as my own creations! Click the pictures to see the products.

For those who are more inclined to buy than to DIY, here are some of our favorite roll out shelves available for purchase.


For corner cabinets and blind corners, there are some awesome solutions from Rev-A-Shelf!


Here are some solutions for under-sink and trash.


And a couple for those tight spaces…


If you’d like to see how I made use of the little wasted spaces around the kitchen, then click on the picture below to see my DIY Rolling Jar Storage tutorial. You’ll be glad you did!
Share it on Pinterest & Facebook!

Oh Handan and Greg, I can hear Angels singing!! What a GORGEOUS job you did! I LOVE the sliding shelves and your details are completely phenomenal. Seriously. I imagine there are drawer slides rated for different loads. Your end result is …. goose-bumpy good! 😉
Thank you, Christina! 🙂
Pretty cool!
Thanks, Uncle Ray!
Crawling around in these cabinets was difficult for a lumpy old turd like me, lmao but so worth huh, greg and i bet handan loved it too nice nice job way above my pay grade xx
Thank you, Chris! Yes, we are all loving the liberated counter space. Though truth be told, it has gotten a bit cluttered these past few days with hydrangeas as we await the season’s last snow tonight.
i think it is so funny hometalk removed my remark about you being a he lmao xx
Oh no! I didn’t see that, lol!
Hey Greg, next time you have to work under a cabinet, lay a ironing board down and use it to lay on. Works much better than laying on that hard edge. Love you guys posts. Love your story about meeting/marrying. You both are awesome
Sherry, that is a brilliant suggestion! LOL, I wish I had heard of it earlier! Thank you so much for writing! 🙂
Great job! Plus explaining all of your work as you progressed! You are a very talented person!! Looks fab!
Thank you, Jackie!
Oh my gosh. I so need this, hope I can talk my guy into these. Just remodeled kitchen a few years ago and I’m having these same problems. So much in cupboards and “getting ” to it. Thank you so much.
Thank you, Christine! Here’s what you do: dump all the stuff from your cupboards on the floor, and tell him that it won’t be picked up until you have some nice slide-out shelves to put it back on!
🙂
G
?
? that’s a great idea!
If you could see MY kitchen right now ??♀️
It looks exactly like your pic of everything pulled out of the cabinets & in the floor.
As I’m reading this, Hubs just walked in the room & asked…
How’s that kitchen coming babe? ?
Maybe it’s time I give your suggestion a try. ?
My plan is to do the same with my double door cabinet, one side for a pullout rash can & the other for bowls, etc. but I’m trying to figure out how to get a double shelf on the other side since there’s not a center support.
I had one thing in mind and bought the sliders for the bottom of my cabinet where I want the trash can to go.
Now I’m wondering if I can use those slides for the sides instead or are they actually only able to be used on the bottom of the cabinet?
Any thoughts on this? ?
Hi Karyn, You can add a center support using 3/4 inch plywood and pocket screws. From there you can send supports running front to back. That would allow you to have the trash can as as single slide on one side and two slides on the other side. As for your bottom slides, I wouldn’t suggest using them on the sides. They are designed to bear a load when laid flat. If you turn them on their sides for side-mount, they may not be able to carry the weight properly. The same goes for mounting side-mounts underneath – they won’t carry as much, and they are prone to bending. Good luck with your project!
A chef and a wood-worker? Wow. I would love to make some sliding shelves too but I don’t have the tools or experience necessary. Nice job, though.
I didn’t see any final cost listing for materials used. How much do you think the initial double wide sliding shelf cost you to make?
Hi Rebecca,
I estimate the total cost for all 11 shelves to be about $300. That includes 2 sheets of plywood, 11 pairs of slides, 2 sheets of polywall and washers. I already had enough scraps of 3/4″ plywood, so I didn’t have to buy that. I also had all of the screws and glue and Danish Oil. I would estimate that it would cost about $100 just to make the two big ones, assuming you had to buy one sheet of 1/2″ plywood ($40), one sheet of Polywall ($20), 2 sets of slides ($32) and a pint of Danish Oil ($8). This doesn’t include the cost of glue and screws.
But this is the cost if you were to only make those two big slides. When factored into the larger project, the cost is much less since the leftover material would be used to make additional shelves.
G
What did you do about the space left between the doors where you took out the center support column?
I glued a strip of Polywall to the inside of the left door, so that about an inch or so was sticking out. When the doors are closed, left first, then right, the Polywall strip fills the gap. There are pictures of it above in the post.
I did the same except I used the center piece I cut out and glued/screwed it to one door for the filler.
That’s a great idea!
Thanks so much for these detailed instructions. I absolutely will be making these for my pantry and base cabinets as soon as possible!
Awesome! Send us some pics of the result!
What a great idea, I am going to use it for my kitchen. What is the benefit of covering the bottom with Polywall vs. leaving it as it is?
Thanks for the tutorial!
Hi Val, the polywall just serves to protect the bottom and make it easier to slide things around without scratching wood or paint. It is especially useful in the drawer with the pots and pans, as I keep my cast iron oiled. Much easier to clean a piece of plastic than wood! I also like the contrast between the stained wood and the white polywall.
Is anyone else shocked at the lack of common sense? I’m completely devastated that some of these people are also operating power tools!!! Great job!!! I appreciate the lengths you go to build, and protect the shelves so thoughtfully….. It would’ve been great to see you come up with a more “polished” way to “camouflage” the center gap in the cupboard doors….. I await a surprise!
That turned out fantastic Greg. I am going to have to look for the “Polywall” I have never seen it here in Canada. Is it 1/4 inch melamine or something different? I used melamine paint but it took forever to dry when I redid my baking cupboard. This would have been so much quicker. Again you did an amazing job! Cheers.
I just Googled it. Wow pretty cool product. I learned something new today. Thank you!
You’re very welcome! Thank you for reading!
Greg
Thanks for posting. Great idea.
Thank you, Evi!
Stove? You mean a person could cook food on that thing? I thought it was a seed-warmer!! (LOVED your instructional)
Ouch! Guess I need to upgrade to gas! 🙂
That will happen sooner or later…
I get the hint, I get the hint! 🙂
Hi! What size pocket screws did you use? Working on shelves for an in home office using 1/2 birch plywood. The Kregg chart tells me to use 1” screws but they just bust out!
Hi Eric, you may want to check the settings on your drill bit and on the jig itself. If either of those are set incorrectly, your screw can either go too deep and puncture through or not deep enough to hold. If the screw is puncturing just a bit, I’d first try adjusting the jig. Try moving it up so i’ts in between 1/2 and 3/4 and give that a test. Eventually you’ll find a setting that works properly. Good luck!
Can’t wait to show this to my husband. we were just looking at them on line and I was complaing about the cost. Thanks
Hi Robin, it’s a bit of work, but so worth it when finished!
Greg
Nice work!
Thank you, Pam!
Beautiful job! Are you the chef as well as the handyman? I love a man who cooks! However, as my mother would have said about spaces she couldn’t reach…that’s what I had kids for! I remember standing on the counters to get things off the top shelf of cabinets (mom was 5’3″ and dad built the cabinets up to the ceiling) and crawling into the lower cabinets to retrieve what mom needed. Keep up the good work, your tutorial was fabulous!
Thank you, Lisa! I am the chef, as well 🙂
Great post – and I love the tip about the Polywall. I’ll have to look for that!
Thank you, Sara! Polywall is great stuff for cabinets, shelves and drawers!
This is a wonderful tutorial. Pinning for later.
Thank you, Debra!
I love all your photos and great tutorial on this. Our cupboards have sliders on the top shelving, but nothing on the bottom and those bottom ones are hard to reach back into. I’ve been wanting these since we moved here 3 years ago.
Thank you, Carol! They have made my life sooooo much easier!
Wow, you guys make a great team! Ironically my husband just installed premade slider shelves under two of our cabinets. One for pots and pans and one for tupperware-like stuff. Don’t they make life so much easier? Thanks for sharing at Vinatge Charm! xoKathleen
Thank you, Kathleen! Yes, I can’t imagine life without them now…such a great improvement!
I Loved your project!!You have been Pinned, Tweeted and Posted to facebook! Your amazing post will be featured this week at the Friday Favorites Link Party. The party goes LIVE on Thursdays at 7PM at mustlovehome.com I hope to see your there! Hugs – Christine at Must Love Home
Hi Christine, thank you so much for the feature!
Awesome DIY! Sliding shelves are so useful; I’d love to add some to our bathroom cabinets. Thanks for linking up with Merry Monday.
Thank you, Emily!
Wow, I need to do this asap! My tupperware cupboard drives me crazy, this would help in organization so much. I wasn’t sure how to deal with the middle bar in my cupboards, so thanks for the ideas.
Thank you, Melissa, and good luck!
Fabulous! I’ve been dreaming of these for a long time. I think it’s time to finally break down and build them! I’ve got about 350+ full canning jars that need a place to live, so I need to check out your canning post too! Thanks for sharing!
Thank you, Victoria! Wow, that’s a lot of jars! You’ll need a better solution than my dinky little jar caddy!
So nicely done! Thanks for sharing! Pinned 🙂
Thank you, Laurie! 🙂
wow, how wonderful to be so handy…..draws are truly the best use of space in kitchen cabinets. I did that on most of my cabinets when I designed the kitchen 10 years ago, and that one cabinet that isn’t with drawers is just a huge hole for disaster! Thanks for sharing those before photos which shows me you are busy creating not just cleaning all the time, and for sharing on craft schooling Sunday!
Thank you so much, Sara! These are one of the few things I’ve made where I can honestly say my life is considerably better having built them! 🙂 a good week to you!
I want these so badly! And in my pantry too. Thanks for great step by step instructions. I’d love to save this on Pinterest.
Thank you, Allie!
Hi Greg, I LOVE what you did. It’s so functional. I have the same issue. Our kitchen has the “basic builder cabinets” – which is what I call them. They are the medium oak cabinets that look like they are from the ’80s. When we moved into this home 14 years ago, we had visions of gutting the kitchen. Well, as you can guess, that never happened. Because our cabinets are low-end, they have that vertical bar in the centre, which you had, and which you eliminated. I have a question. How do I know that the bar is not load bearing? And, although you included so many helpful pics, I would have loved to have seen the doors closed after you had glued on the Polywal, to see the finished effect. I hate the middle bar in my cabinets — both upper and lower. I thought I was stuck with that awful middle bar of wood. You have supplied me with an option to get around it. Thank you!
Hi Debbie. I’m on vacation this week, but when I’m back home next week, I’ll send you a picture of the closed doors (please remind me!)
Does your cabinet have a drawer over it? If so, the center spar won’t be load-bearing, except maybe for the drawer. If the drawer has an under mount slide, then the spar might be holding the weight of the drawer. If the drawer has side mounted slides, then the cabinet frame would be supporting the drawer, and the center spar would be cosmetic.
I remembered!

The timing was perfect to find your blog on diy kitchen shelves. Just bought a home with a new kitchen but no pull out shelves. I felt my heart sink as its back breaking to get those big heavy pots out of the back of a cabinet. Thank you for the solution to make life better & less expensive.
Thank you, Jo, and good luck!
I love what you did great talent I thought I would have liked the tin tile to be more of a brownish, color to compliment the counter though.
Thank you, Dierdre. The tin came with the house. One of these days, we’ll get around to replacing it.
Your house looks like mine except I don’t have a cooperative husband!!??. He put in the sliding drawers for me several years ago but boy! did I ever have to nag to get them done. He’s not a carpenter, he was an auto body repairman ( thus the grey spot of primer on the back of my otherwise blue van). He had no imagination for what I wanted and I still have stuff on my countertop. Caaba wait to see where u put the stuff that was IN the cabonets!
Linda
Lol, thank you so much, Linda!
This is something I’ve wanted since we moved into our home 4 years ago but like you I found the commercial products far to exspensive. You have inspired me I haven’t done much wood working but we have most of the tools so with your instructions in hand I am going to give it ago. Wish me luck!
Awesome! Good luck, Julie! Send us some pics when you finish!
What a great job! Any ideas for that dead space when you have corner cabinets?
Linda, I’m so sorry for this incredibly late reply. Somehow a bunch of comments on this post slipped by without my notice. My favorite solution for corner cabinets is the one my sister uses at her house: http://amzn.to/2mCyXun
Another interesting solution that I think might even be better is this one, though I’ve never seen it in person: http://amzn.to/2lg7Ow9
I need you in my kitchen
Okay, I’m only a half a year late with this reply, so….do you still need me? I’m free in a couple of months, I think! 😀
Hey Steve, First I would like to say that your cabinet redo is right up my alley. My kitchen cabinet space is very small. The one issue I have is my upper corner cabinet. There is so much wasted space. I have haunted several sights for ideas that I can make to use this cabinets space better. Have not found anything useful. Have any thoughts or ideas??
Kathy, I’m so sorry for this (half a year) late reply! Yes, I do have two recommendations for corner space. The first I’ve seen and used at my sister’s house, and I really like it: http://amzn.to/2l3F3HP
The second one I haven’t seen in person, but it looks like it might even be better than the first: http://amzn.to/2lg7Ow9
Good luck!
Definitely love your trays! I so need them! Years back I found 2 wire rack trays, 10″W. with runners on the “bottom” at the thrift store. Perfect, as my cupboards are built “around” this large unmovable shelf. Also, that side of the cupboard is at a right angle to the rest & goes way back into a dark abyss. (Never knew what was back there.) So I can relate to crawling in, except I needed a flashlight & a map! Later I found huge older Rubbermaid turntables made for corners & put them next to those wire racks. I’ll bet it’s possible to create custom turntables too. Anyways, you’ve awoken my creativity and since I never did the rest of the cupboards, I was thinking maybe I can adapt your idea to using “bottom” runners. Though needing some type of reinforcement underneath, I think it would work. Any suggestions or thoughts?
Forgot to mention that those were no dinky turntables like for condiments. These are 20″ or so across, with a smaller flat edge (12″ -!4″) on one side. I keep mixing bowls and lots of other stuff on them.
I’ve been wanting these for awhile now. Thanks for all the info. Also, if you are a chef, why do you store your pots and pans under the sink and not under the stove?
Good question! I have no idea why. Can I still be a chef, or does that get me demoted to line cook? 😀
I had pull out drawers put under my cabinets (hubby is an electrician, not finish carpenter). Had the cabinet guy cut the middle piece even with the top and bottom then screw it onto one of the doors. Looks fine!
Maybe I missed it, but other than screwing the middle piece to one of the doors how do you handle the gap after sawing off the middle piece? My cabinets are probably forty to fifty years old of solid oak, and I don’t think I could find any replacements of a bigger size to make up the gap. Thanks!
Great writeup on your process. I am just getting ready to do the same thing for my cabinets. You are right, the cost of the pre-made ones is crazy and I have about 14 to do. I love the suggestion on using the polywall and will do that in my project. After I finish my current project of dressing up some old metal file cabinets. And to all you ladies out there waiting for your hubby to do this, don’t. You are perfectly able to do this too 🙂 When you get the plywood, have the store cut it to size for you.
Hey Theresa! I was just reading through some old comments, and I see that I never answered yours. I’m so sorry I missed it! Well, I’m almost 2 years late, but I’m replying at last, LOL! Thank you so much for writing, and yes, you are correct – don’t ever wait for a man to do these for you, or you’ll be waiting a looooong time. 😀 Happy New Year to you and your family!
I ran into this while looking for something else to do in the kitchen and you inspired me to get with it and do something with that wasted space that is causing me problems. Your step by step descriptions really help! I’m almost done with my bedroom project and this just lit a fire under me to wrap it up! Thanks! Cant wait to get started.
Hi Mary, I’m so glad my post helped to inspire you! Send us a photo of the finished project!
Wow…will definitely put these plans to use in our kitchen. We have a very small kitchen and ideas such as yours are a must, thank you so much for sharing your ideas and plans.
Thank you, and good luck!
Hi–This is a great tutorial! The finished drawers look much better than what can be bought. I’m curious about the use of pocket screws…is is stronger to use them instead of just putting a screw along the outside edge? Or did you use the pocket screw because it looks better? Do you think glue and 16 ga nail gun would be sufficient? I’m just thinking it would take longer to do pocket screws, and I have a 10 minke list of projects.
This is the first time I’ve seen your blog, by the way. Looks great!
Thanks!
Cathy
Hi Cathy, pocket screws would be stronger than screwing into the edge of a piece. Any time you screw into the end grain (or laminate edge), you’re losing strength, compared to screwing across the grain (or through the laminate plane). Furthermore, in this case, the pocket screws are hidden, so the piece looks more professional. While edge screws and nails would probably be sufficient (as long as you are also using wood glue), my preference would be for pocket screws (again, in addition to wood glue) for the added strength and clean look. Thank you so much for writing, and I’m glad you found us!
My pantry is about 31” deep. I imagine the shelf would be recessed a couple inches. So a 29” shelf. Could you show me what tracks I need to be purchasing to go on a 29” deep shelf? Options I’m seeing are over $200 per pair.
Hi Mark, here’s a 28 inch slide on Amazon for $17.50 + $9 shipping: http://amzn.to/2ygHlbJ
You could also try a 30 inch, but then the price jumps to $42 + $17.50 shipping: http://amzn.to/2kFglOa
Good luck!
Great instructions. I am going to try thus on my kitchen. Is there a reason for the curved sides? I was thinking of making uniform 2 inch sides.
Thank you! I made the back half taller than the front so nothing would fall off the back – just a little more protection than the small lip in front. the curve is merely ornamental. good luck with yours!
Hi Greg,
Since this was my first time doing a woodwork project from scratch, I ran into some issues, but was able to get my first one done in 2 days (4 – 5 hours total). I picked the wrong cabinet (smallest size opening) as my first guinea pig. This led to a lot of access issues where I could not get in enough to push the back end with ease.
But all in all, worked out well. Tried to attach a picture but didn’t see a way to do that.
Your detailed post helped a great deal in getting me finished with the first one. Plan to do 6 more in the coming days.
Thanks,
Kedar
Hi Kedar, Thanks for writing – I’m so happy you tackled this project! Please send me a picture at greg@thenavagepatch.com. Handan and I would love to see your work!
Hi Greg,
Sent you an email with a couple of pictures.
Thanks
Kedar
So thrilled to stumble upon this great post! I’ve been a bit green with envy over my friends brand new kitchen with the slide-out shelves, but those are just not in our budget at the moment (or anytime soon, really). These look simple enough for my husband to make. Thanks for the thorough write-up!
Thank you, Ashley! I’m happy to be of service 🙂 Please send us pics if you tackle the project!
Did this about three years ago, and wife loved it. Then we sold and moved so now have to do again. Only difference was i brought the curve further forward towards front and raised the sides and back higher to just clear the bottom of shelf above, tjis gave ability to stack bowls higher without falling off back ou sides,
That is a good idea, Richard. I picked my heights and curves a bit randomly. A little extra height = a little extra protection.
Wow!!! Very inspiring and great detail, you answered a couple questions I had without even asking!! Thank you for sharing. I have I’ll let my husband check this out and see if he gets inspired.
Thank you, Judy, and good luck!
that’s awesome, and also why i hate woodworking. it seems like it can never be simple (to me).
we have pull out shelving in our cupboards too, but they came with the house, and they are now a must from here on out when we move. they aren’t as nice as yours, but i love them. they are like slats that pull out, and they don’t have the regular drawer roller slides like you have, but are built in/sandwiched in. they hold all my pots and pans tho, and appliances.
we also have counters similar to yours, lol. BEAUTIFUL. and the same clutter issue i guess. but with plants at the window, not appliances so much, lol.
Lol, it’s never simple to me either, Stephanie! Thank you so much for writing! 🙂
Am currently working on my kitchen. Have been pondering the lower cabinet issue. What great timing to see the pull out shelves you made. Made it into my list of improvements. Definitely will be the cherry on top of my cabinet refinishing project. Looking forward to it.
Happy to help, Kelly. Good luck with your project!
Great tutorial–I’ll use it for my kitchen/bathroom shelves. What is that embossed metal (looks like stainless steel) that is being used as a backsplash called? I’d like to get some that looks like copper for my best friend’s kitchen fix-up. Thanks!!! Christine
Thank you, Christine! For the tiles, start here and have fun! >>> https://amzn.to/2uRSHR8
I have lower cupboards into which I have literally stood and tossed unbreakable crap to the back? because I do not have pull-outs. Your comprehensive tutorial has inspired me to tackle one of those cupboards as a test of my potential to do the rest. What kept me reading until I got to the actual tutorial, though, was the parts of the intro where you wrote like most of us think but are rarely written about! As soon as I read “crap” I was hooked, and when I got to the part where you describe the ease with which you worked on the interior of the deep recesses of the lower cabinet I was laughing aloud. ?. Thanks for keeping it real, which is just what might get me the slides I’ve been so desperately wanting for 13 years in this house!! If my initial test is a fail, I’ll try the “Pull all the crap out onto the floor and leave it there (along with your tutorial) until my husband gets tired of wading through it and makes them for us” method. Although … I may get lucky and find that the “Do it myself until my husband sees that I’m doing it ‘wrong’ and takes over” method! Either way, your tutorial will be the starting point and blueprint for my new sluders. Thanks so much!
Hi Barbie, I love this comment! Thank you so much for writing! It is feedback and compliments like yours that keep me feeling charged-up and ready to write. Thank you again, and have a great week! 🙂
Hi Great Tutorial!!! What size pocket screws did you use for this?
Thank you, Jay! Since I used 1/2 inch plywood for the cabinets, I used 1″ pocket screws. Good luck!
You both are so talented!
Thank you so much, Valerie! 🙂
This was an amazing & helpful article. I was researching how to do roll out baskets or containers and somehow I ended up here. Now I just have to figure out what I really want to do, but you have inspired me!
Well thank you, Cynthia! I love to hear that I’ve been an inspiration! 🙂
Great job! Although I live in an apartment and couldn’t install anything like this even if I needed it, I found your post so well written that I read the entire thing! Well done.
Thank you so much, Jan! 🙂
Honestly Greg, I think the original post on these sliding shelves is how I found your blog! You’re writing is so entertaining, I proceeded to work my way through yours and Handan’s lovely story, and I’ve been hooked on your blog since. Its definitely a bright and entertaining spot these days! And your both so darn talented!
K
Karen, I’m so happy you found us and even happier you’ve stayed with us, LOL! Thank you for such a lovely comment! 🙂
How is it that you always know just what I need? I’ve been wanting sliding shelves in our kitchen for years but never did it because our house was built back when Australia still used Imperial measurements. Now, with everything metric, nothing off the shelf fits into our house. It’s a real pain in the…well, you can imagine where.
So I’ve been toying with the idea of just making them myself, maybe try to get Dad in on a little project with me. And these are GREAT instructions. So clear and precise and photos along the way. Once again, you amaze me.
Great job!
Jay, these shelves are game-changers. Once you have them, you’ll wonder how the hell you muddled through life without them.
I really enjoy all your projects and the stories that go with them. You two make quite a team. And so creative!!
No talent here and not a DIY person. Just a lot of wishful thinking.
I just want to adopt the pair of you and invite you over to redo my cabinets!
What do you actually do for a living??
From a Grandma in the Pacific Northwest.
Jennifer, if you leave a trail of red wine, martinis and cookies, we will follow it all the way to Oregon (or Washington), to re-do your cabinets, LoL! I’ll take payment in Pinot Noir. 😀
Handan is a civil engineer for her “real” job. She has the math mind – she can visualize projects incredibly well. I have taken on this blog as my full time job. We both love working on it, and who knows – maybe someday it will make enough money for us both to work on it full time!
I’ve got one word to say to you Greg – genius! oh, and happy new year.
Suzanne (Australia)
Awwww, thank you, Suzanne! Happy New Year to you and your family!
Ahhh my dream kitchen cabinets, unfortunately i’m stuck with the crappy ones the council put in when they refurbished our kitchen in 2016, i’m expecting the doors to fall off any day now. I have more cupboards yet less space i had to go out and buy a pine dresser and change my table to fit it in because they knocked out the pantry that held so much more than the cupboards You and Handan are so clever.
Catherine, your “council” sounds suspiciously like a government agency: they come in to make something better but only succeed in mucking it up even further. As Ronald Reagan once said, “The nine most terrifying words in the English language are ‘I’m from the Government, and I’m here to help.'” LOL 😀
How true those words are Greg, They refurbished our bathroom in 2015, soon after a damp patch appeared behind the door, it has now spread all the way around the base of the wall ,to start with the paint was bubbling off now the plaster is coming off. It will be four years this May since it was done and i’m still nagging them to sort it out. The council inspector took photos in 2016 and said ‘leave it with me’, i have heard that phrase so many times and nothing is done. Our M P is as much use as a tissue umbrella in a thunderstorm. New Year new tactics Cath’s going to get tough going to give them an ultimatum sort it or i’m going to the papers. It’s not good enough we pay full rent and full council rates both of which increase every year. Happy D I Ying and crafting both xx
Go get ’em, Cath!
Would love something like this in my kitchen, but have no clue about anything to do with “construction”. Despite the futility of reading your fascinating instructions (since I will NEVER do this), like Barbie I laughed heartily and loudly at your vivid and colorful writing. Enjoyed seeing the fruits of your labor, but mostly reading about it.
LOL, I aim to entertain! It’s way more fun to laugh than it is to build these slide-out shelves, I assure you :D:D:D
WOW!! & Bravo. Absolutely amazing. My area right now looks like your before pics. I’m really trying to come up with ideas to , ” de-clutterize'” Going to take your design and see what I can do. Being that said. I’m not a wood expert. I have basic wood working tools. skill saw, jig saw, rockwell mini saw, drill set. Also takes me an extremely long time due to my disability and live alone. All good. I have to at least try. Thank you x 1000000
laura 8)
Hi Laura, it sounds like you have everything needed to make these shelves. Just take it slow, build one at a time, and eventually, you’ll have some awesome slide-out shelves. they’ve totally transformed my kitchen, and I couldn’t imagine going back to the days of rooting around in the cabinets trying to find things! Good luck with yours, and email me some pictures if when you are finished! 🙂
Really nice!
I’ve never used the slides like this. When determining the width of your drawer bottoms, how do you account for the slides?
So if the drawer space side to side is say 25″, how wide would the drawer be? I’m just curious how much ‘wiggle room’ you have?
Thanks and great job!
Hi James – assuming the side to side space inside the cabinet is the same width as the cabinet opening (meaning there is no face frame), the drawer bottom would be 24 inches, as the slides I used are each 1/2 inch thick. If the opening of the cabinet is narrower than the inside width (as it would be with a face frame cabinet), I would build a spacer for the slides to bring them flush with the face frame, and again subtract an inch for the drawer bottom. Hope this helps, and good luck if you build some slides of your own!
Perfect! Just what I needed.
Thanks so much and I will be building a few of these!!
I’m a new homeowner and am dreaming of making these! How would you do it without a kreg jig? This is likely the only carpentry project I will ever attempt, so I don’t really want the expense.
Hi April, you can use wood glue and brad nails instead of using a Kreg and the shelves will still be very strong. If you plan to have a lot of heavy items on one of the selves, you could always reinforce the bottom piece with some elbow brackets in the front and back. Good luck!
Great article.
Here are a few suggestions.
If your cabinets are stained, and you are going to remove a center support:
Use narrow bled saw to carefully remove teh support. Reuse the support to mask openings as suggested previously. If you have the correct saw, you can cut to half thickness (3/8″) and use one support for 2 fillers. (This type filler is common on commercially produced cabinet doors.)
For a face frame cabinet, you need fillers to support the drawer glide, as you showed. Typically you will be using 3 screws to attach each glide. Rather than a horizonal filler at each shelf, consider 3 vertical fillers at front, back and center, where that mounting screws go. This way it is easy to move the upper drawer glide(s) up and down if necessary. (Oops! The new mixer is 2″ taller than the available space.) These fillers are visible, so painting or sting is a good idea.
Polywall looks like great product. How has it held up for you?
In addition to protecting the wood drawer bottom, the light color will make it easier to see the contents, especially on dark wood cabinets.
As you said, you want a good quality plywood. (Cabinet grade?)
That said, the drawer bottoms are mostly hidden by polywall, and can be of a lesser grade. This probably only matters on large projects where you need multiple sheets of plywood.
If you are doing a lot of drawers, 10 packs of glides are well priced on teh internet.
For timid woodworkers, please note that most of this work is hidden behind the cabinet doors. You are probably the only one that will notice a slight mismatch of paint or stain, or messy joint. Go for it.
Hi Chris, these are great suggestions – thank you! I especially like your idea for the vertical fillers. The Polywall has held up very well, and it is easy to clean if it gets too greasy. Fantastic product. I agree with what you said at the end of your comment – just go for it! Thanks for commenting!
Awesome post! I’m wondering what size pocket screws you used? I’ve got the Kreg jig but I’ve never used it for 1/2″ plywood. Thanks!!!
Thanks, Jared! I used the 1-inch coarse-thread screws. Good luck!
Our kitchen’s problem isn’t so much lower cabinets as pantries. When we gutted and rebuilt this kitchen, my husband managed to find reasonably priced ready to assemble cabinetry, including four floor to ceiling pantry cabinets. Lots of storage space BUT they’re 23 inches deep so everything bunches up in long lines like Department of Motor Vehicle patrons. Even items at eye level get lost. My husband has pretty much hung up his power tools so I’m not sure if I can talk him into tackling a project of this sort. But being able to find pantry goods without going on safari would be too wonderful. I’ll Pin and dream.
Hi Mandy, check out our Pantry Makeover post for some great solutions for over-stuffed pantries! https://www.thenavagepatch.com/pantry-makeover/
Consider moving your social media buttons. They take up too much room on the left margin, blocking a lot of your content. I got a paragraph in to the tutorial and decided the buttons were too much of a hindrance. Clicking off – going to a different site with a better user-experience.
Thanks for the heads-up, Lauren. We weren’t aware we had that issue – seems it was only happening with iPads and iPhones in landscape mode. We’ve fixed the issue. Sorry to see you go. Hope you find a site that will satisfy all of your UE desires. Here’s a good one.
Wonderful instructions and pictures! What would be the downsides of just putting the existing flat shelf on drawer slides? I’m wondering if I can get away with not making the awesome (and time-consuming) drawers that you built. Thanks so much
Thank you, John! I would have used them if I could have figured out a way to get those shelves out. They were doweled into the sides of the cabinet, and at the time, my only option seemed to be either destruction or build around them.
This was a great find. I just have a question, what size screws did you use. I want to try and make some for my cabinets.
Hi Judy, thank you! I used 1 inch coarse thread Kreg screws.
Hi, Thanks for the detailed instructions and photos! I may have missed it, but how did you secure the slide support strip to the back of the cabinet under the stove (where you have upper & lower shelves on the left & only lower on the right). Thanks in advance for your reply,
Hi Liz, I used pocket screws (Kreg Jig) to secure that support piece front and back.
Hello!!! I am using your installation instructions for your slide out shelves to do on my closet re-do shelving. I purchased the polywall as protection for the melamine TDL panel sheets that I am using for the shelves. The trouble I am having is the proper glue to use to adhere the polywall with. If you go to their website it recommends only three different adhesive to use. I am having trouble locating any of those. Apparently if you use the incorrect adhesive, it could melt the polywall. Could you share with me how you arrived at using loctite for your adhesive. Did you call the company to find out what they would recommend? According to the adhesive data sheets whether you are adhering the polywall to a non porous or a porous substrate will indicate what type of adhesive to use. The TDL panels that I am using for the shelves would be a non porous substrate (I think…) I just want to use the correct adhesive so that these shelves are made to last. I also read that using the incorrect adhesive could melt the polywall. Thank you for any advise you could share.
Hi Cyndee, as with most things in life, I just winged it! Really, I used Loctite because I had it on hand, and it’s good for bonding most things. I can assure you it didn’t melt the polywall, and it held it in place at least until we moved in April, 2020. Good luck to you! 🙂
I want to thank you for this tutorial. I have wanted and planned to have my cabinets done for years. I even bought supplies. Even though I am a retired older woman, I am not worried now. Although married… it’s safer I do them. Lol thanks again!
You’re welcome, and good luck Greta!
That was by far, the best tutorial I have read in a long time. I appreciate the detailed, step by step pics and captions. I particularly appreciate the pics of your real kitchen/living room, including the clutter and random things that everyday living brings. Currently, I personally have a camping propane bottle, fresh eggs, and pliers sitting at the end of my counter! :-). Thank you!
Thank you so much, Hilary! Yep, we don’t all live in perfect Instagram houses, right? Most of us are jut normal folks with messy counters, lol! 🙂
Such a timely post on your part. I will be moving soon to an older home with a lot of kitchen cabinets that don’t have slide outs from a home that does. I am very used to having slide outs, and this is on my list of “must haves shortly after we move in…thank you
They’re a life-saver, Deb! I can’t wait to re-do our kitchen here so I can build some new ones!
What length were the pocket hole screws that you used to assemble the shelves? tia
Nevermind. I just saw your answer to Judy’s post from 2021.
You did an amazing job with these slide out shelves! I, too, have been put off by how expensive they are on Amazon, so I appreciate this tutorial (although I’m definitely more of an amateur). I do have a question about the curved edge you gave the sides of the shelves: is that more for aesthetics, or is that purposeful
? If I can’t make a decent cut like that (no scroll saw), what’s the downside to having even straight sides? Thanks again for sharing your project!
Hi Eve, the curve is purely for aesthetics, but having the shelves taller in back is to prevent items from accidentally falling off the back in case the shelf is pulled out too quickly.
Awesome!! Such great ideas going through my mind right now! Thank you! But no thank you on that math back there…LOL…ow my head hurts!
😀 Thank you!
What a wonderful job you did and very professional looking. You made them match the existing cabinetry perfectly and you must be very pleased with both your creativity and changing the design to make it easier. I don’t have any fancy tools, but I could do the simple boxes. You have inspired me! Thanks!
I was dreading making more of these, Gwyn, because the first batch was such a paint in the butt back in 2016. But these are a total breeze!
Amazing article with great step by step details!
Also i believe that one needs to be very skilled to execute this makeover in the right way.
but over all, great read!
Cheers!
it’s seem so interesting and a great idea, it enhance the beauty of your kitchen. Great job!
What a great project! Do you happen to have a supply list of everything you used in one of the links? I am planning to shop at Lowe’s and would love to get a credit back to you through links.
I don’t Mirand, but I believe the drawer slides are linked through Amazon in case you can’t find what you need at Lowe’s!
Quick question – most of the slides that I see are 1.78″ high, and my hinges are the kind that you release to unhook the door. There seems to not be enough clearance to put a drawer extension. Any recommendations?
I’m not quite visualizing your cabinet, Heather, but would a spacer help? Maybe you could email me a pic. greg@thenavagepatch.com Thanks!
I’ve done this on a couple pantry shelves and one under the sink for all that stuff that gets shoved to the back but I like the evolution of your process. I am energized to take on some of the others now. Great job on the details and photos, some of the pros start to assume knowledge we don’t have until we screw up. Thanks!
Thank you, David! I have to say, I was hesitant to make new ones based on my original plans – they were too complicated. But with the new method, I have no issues, churning them out for all of our cabinets!
how are your glued shelves holding up after all these years? Do you think the first ones you made are better in the long run?
So far so good! Still just as the day i made them. I think this new technique is every bit as strong. The only situation I’d reinforce is if I were going to be storing very heavy cast iron pots and pans. Glue is more than sufficient for the laundry room!
Do you think I can reuse the shelf that my pantry came with and just build the “drawer” around it?
As long as it is sturdy, you should be able to do that.
Grate post, I have zero experience and I am going to try and make 10 of these for my pantry. The only question that I have is related to the glue. Am I meant to use both of them at the same time? Do I mix them or put one glue on the base and the other type on the edge and then bond them? Do I have to use clamps?
Thanks for your excellent tutorial.
Laura
Hi Laura, the instant wood glue takes the place of clamps, but there were times I did use clamps on longer pieces. I apply wood glue down the middle of the 3/4 inch edge and then I outline the wood glue with instant glue. The two glues give an almost instant and very strong bond – more than enough for this application. If I were storing very heavy objects like iron pots and pans, I’d reinforce the joints with pocket screws along with the glue.
What is the maximum width you would go on the double door cabinet that you cut the center support out of? I need to do this to my kitchen cabinet. It has a center support like that. But it is a bit over 36” wide, which I fear is too wide and the weight of the appliances would make the shelf buckle.
Depends on how well the cabinet carcass is built, Jeannette. I’ve done wide cabinets and reinforced the top cross piece, and it’s been just fine.
Hey! thanks for a great tutorial! I didn’t see the final cost of the new version. Buying them is stupid expensive!
They’re very cheap, Robin! I buy slides on Amazon in 6-packs and 10-packs, so they’re well under $10/pair.
Hi, any thoughts on how to create a sliding countertop shelf with a piece of stone using an undermount system? I can’t figure out how to attach the slide mechanism to the stone. It is a shelf between two pantry untis for a toater oven and coffee maker. Thanks!
It can be done, Kay, but you’ll need a drill bit strong enough to penetrate stone!
What a GREAT tutorial! The most thorough and follow-able ( 🙂 I have seen.
It makes me want to dig out my Kreg jig and learn to use it.
I’m envious of your completed kitchen, especially that double door corner cabinet.
Did you modify that one at all? I have those stupid Lazy Susans where the door circles around with shelves. I want doors that CLOSE.
Oh well, enough ranting.
Great job! Thanks for the inspiration.
Thanks, Jo! Take a look at this post for a good corner cabinet solution!
You did a fantastic job and got my juices flowing with Ideas for my shop and work bench
Thank you for sharing and giving a rookie some great Ideas
Randy
Happy to hear it, Randal!
Hi, i plan on building this for my pots and pans cabinets ( jusy the big wide one you made)
1. What size brad nails did you use?
2. Can you share the height of the second shelf? Our dimensions are pretty similar for the rest of the build
Thanks so much for these detailed instructions!
We purchased 5 custom pullouts for our kitchen that set me back thousands. I figured I could do the final 4 myself but I was afraid of my (in)ability to get the shelves level. Your solution was brilliant!
I wish I knew about this when you first posted it!
You’re welcome, Stephen!
How do you make those for the bottom when your cabinet has a lip?
Hi Cynthia, you just need to mount them high enough to clear the lip. You’ll lose the space below the lip, but you’ll have a sliding shelf!
Thank you X 3! I’m tearing out the micro in my little travel trailer to make more storage room and wanted sliding shelves, but almost fainted at the price. Your shelves rock, and I can’t wait to get started on them. Thanks again (X3).
Happy to hear it Chris!
I’ve been researching prices for 3 wood pot drawers for my kitchen, varying heights. I love how you’ve shared your ways around certain problems, such as, adjusting for width of the cabinet so as to avoid door hinges, etc. I am a 73 year old lady with all the tools to hand, and I now feel ready to handle the project myself. for probably one=third of the cost of purchasing ready made pot drawers and still having to find ways around obstacles anyway. Thank you so much for sharing your expertise.
Thank you, Thank you, Thank you!!! I needed to build this myself since I didn’t want to pay $200+ for each cabinet. I hated that I didn’t have the space for my pots and pans and it was a chore getting them out and putting them back.
I’ve never operated a saw (they scare me)or built anything. I was tired of waiting for my husband and decided to take matters into my own hands. I researched sliding drawers and found your tutorial which was so easy to follow! I researched a saw and found the dremel saw. I then followed your instructions and built my first sliding drawer. Then I built two more! I have so much more space and I don’t have to climb into the cabineet to get my kitchen cookware out of the cupboard! I’m finishing up the last two next year ( I have other summer projects to move onto).
Thank you, again! You’re a life saver!
So happy to hear it, Angela! 🙂