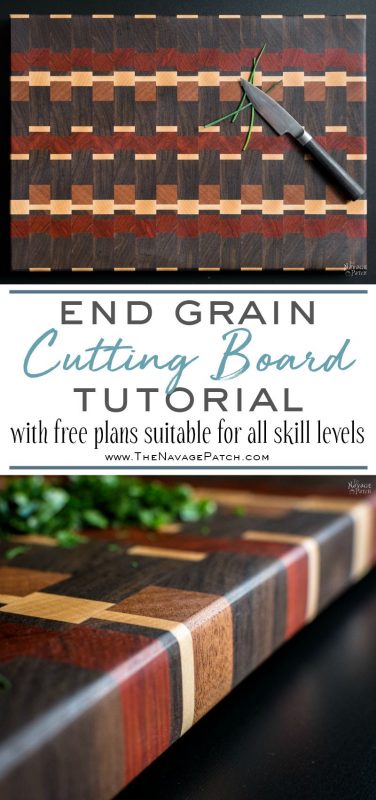
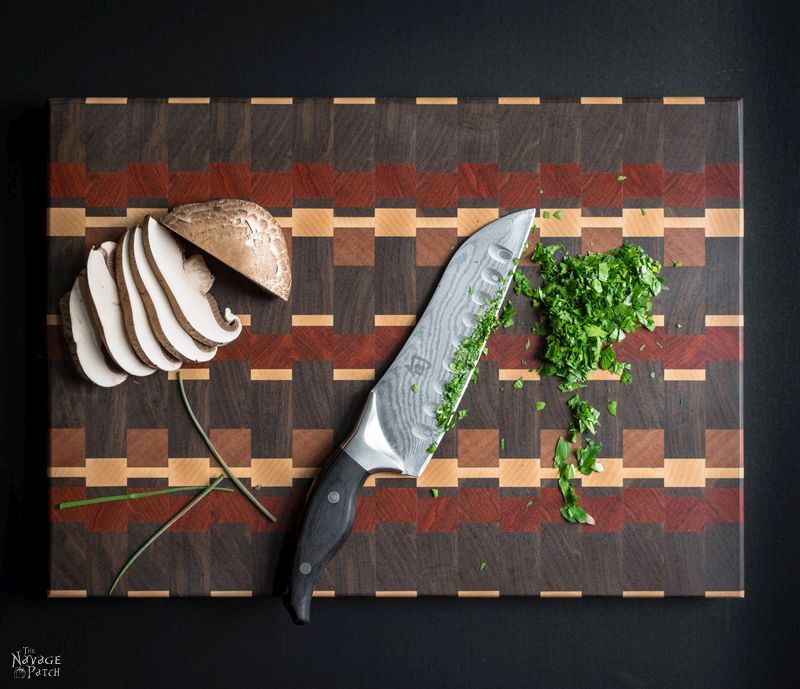
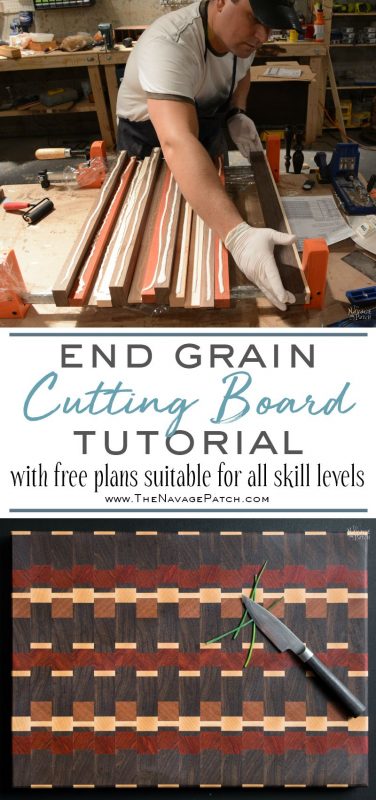
The Story of a Board: an End Grain Cutting Board Tutorial
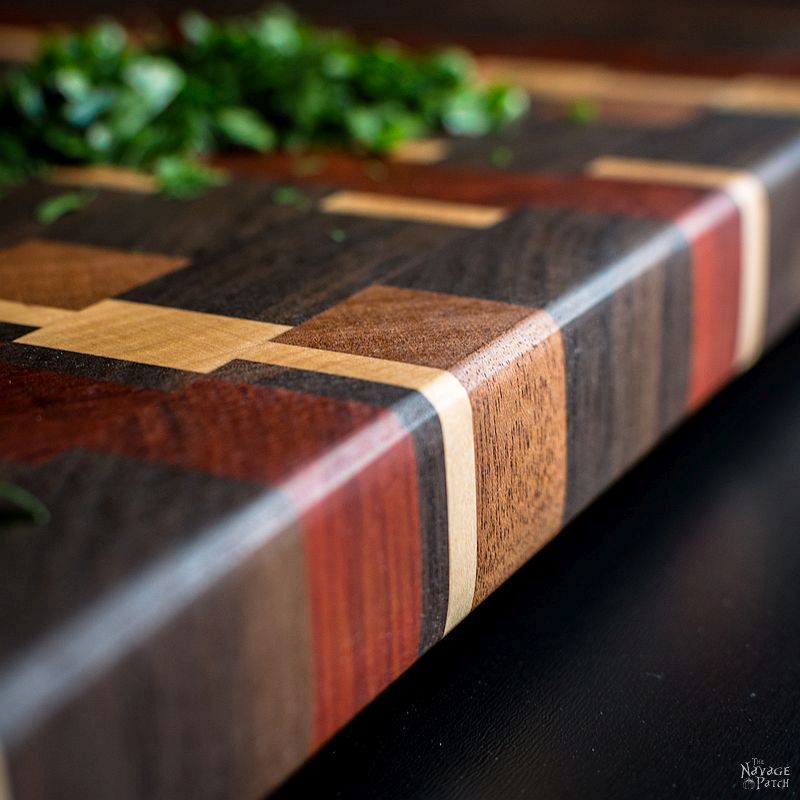
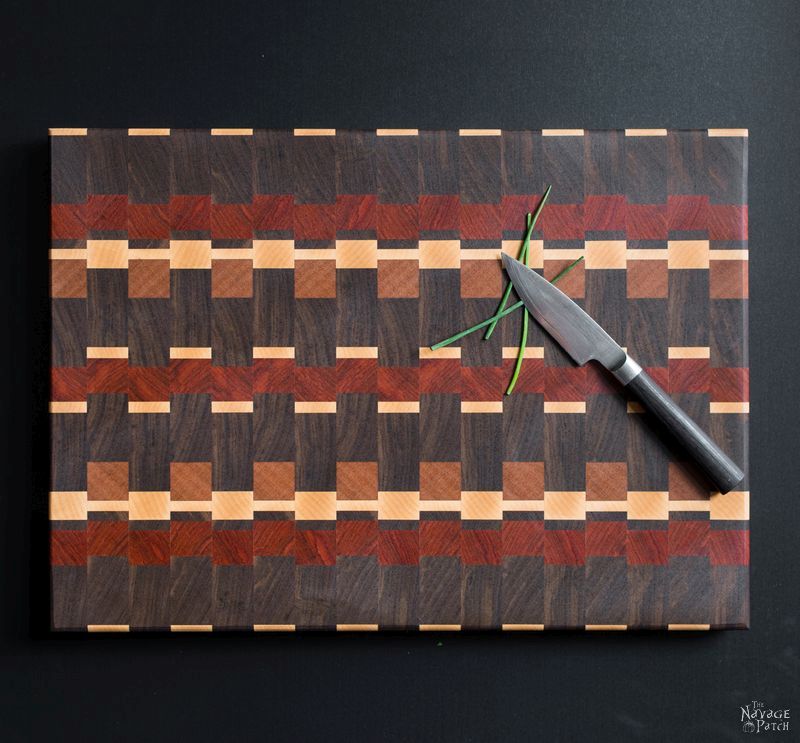
In this end grain cutting board tutorial, I’ll show you the steps involved in making a beautifully-patterned board with four species of wood. I’ve included a cut sheet at the end of the post, so you’ll be able to duplicate this exact DIY cutting board. You’ve probably seen a lot of sites showing how to make an and grain cutting board, but you won’t find a more beautiful pattern that is still within reach of the novice woodworker. But don’t let its simplicity fool you, this end grain cutting board will enhance the beauty of any kitchen and give years of chopping pleasure!
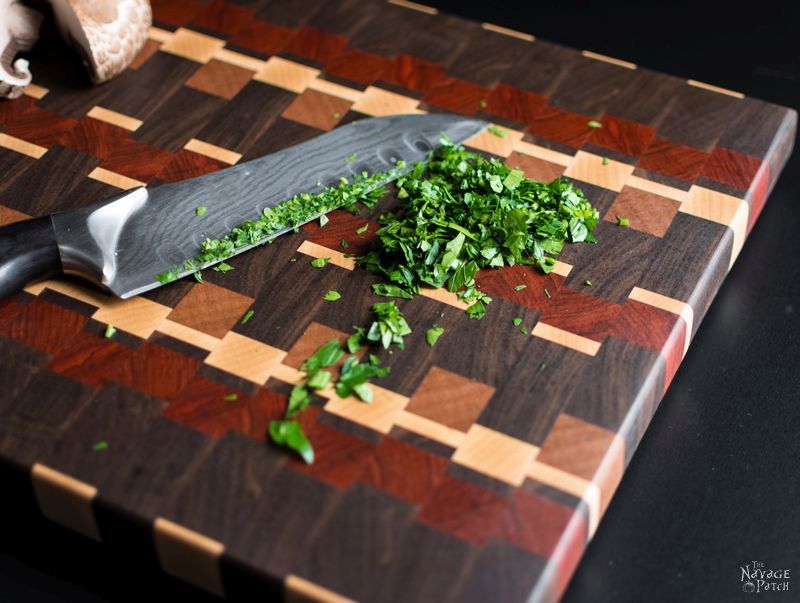
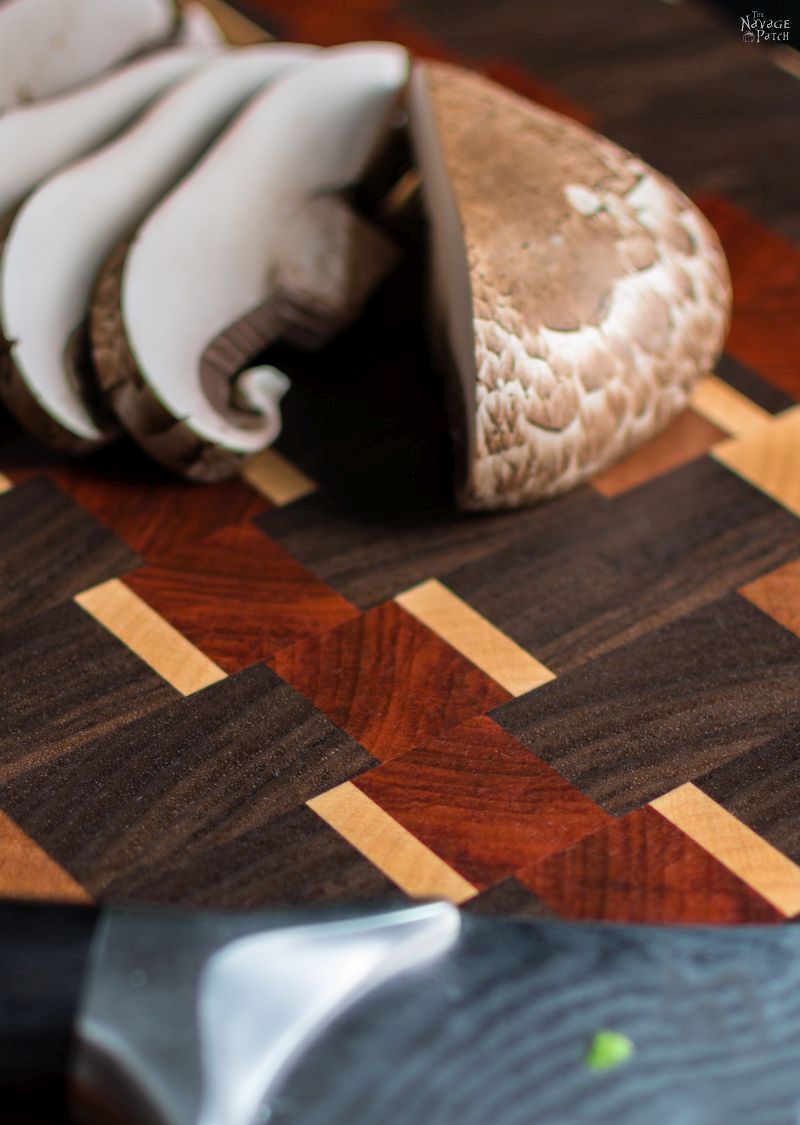
This DIY cutting board, like most that I make, is an end grain cutting board. The two main benefits of end grain cutting boards are board longevity (the end grain of the wood will not show slice marks as much as side grain or face grain) and knife longevity (the ends of the wood fibers are kinder and gentler to knife blades, thus reducing sharpening frequency and prolonging the blade’s life). The third benefit? It looks awesome! So let’s get to it, and I’ll show you how to make an end grain cutting board!
Here is what you’ll need to make this DIY cutting board:
End Grain Cutting Board Supplies List
Tools
- Miter Saw
- Table Saw
- Planer
- Random Orbital Sander
- Jointer (optional)
- Clamps (parallel clamps work best)
- Drill
- Router
- 1/4 inch Roundover Bit
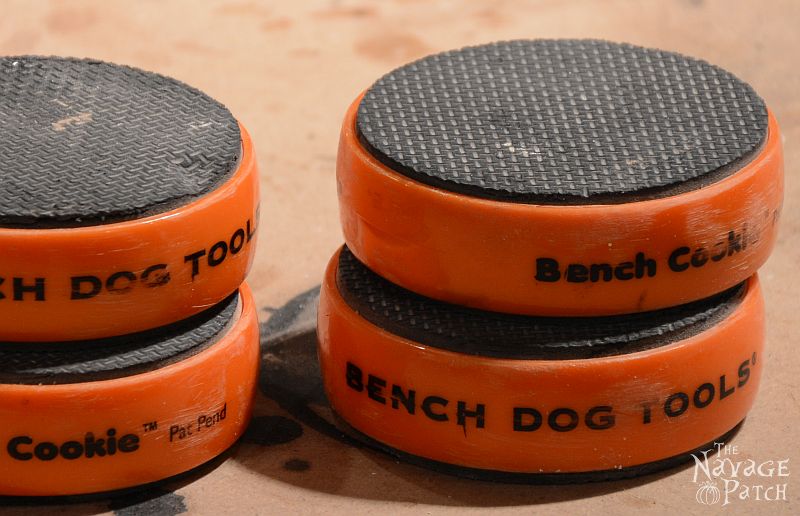
- Bench Cookies (optional, but they make life easy!)
Materials/Supplies
- 4 Types of Contrasting Wood (I used walnut, hard maple, redheart and jatoba)
- Wood Glue
- Gluebot
- 4-inch Hard Rubber Roller
- Sanding Discs (60, 80, 100, 120, 150 grit sanding discs)
- 2000 Grit Sandpaper
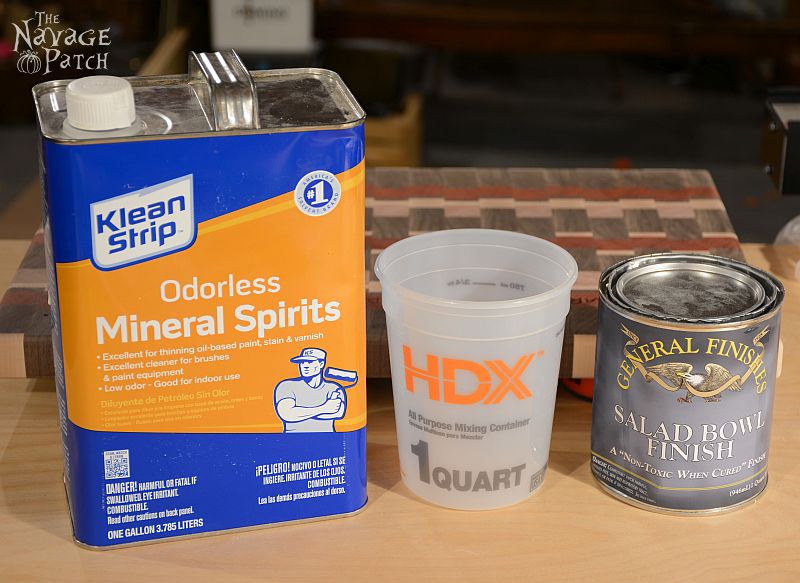
- Mineral Spirits
- Salad Bowl Finish
- Beeswax
- Walnut Oil
- 1 1/2 Inch Rubber Feet
How to make an end grain cutting board in 6 simple steps
- Select and prepare wood for the DIY cutting board
- Lay out and glue up the initial design
- Prep and cut for the second glue-up.
- Lay out and glue up the final end grain cutting board design
- Final shaping and sanding
- Finishing the DIY cutting Board
Step 1 – Select and Prepare Wood for the DIY Cutting Board
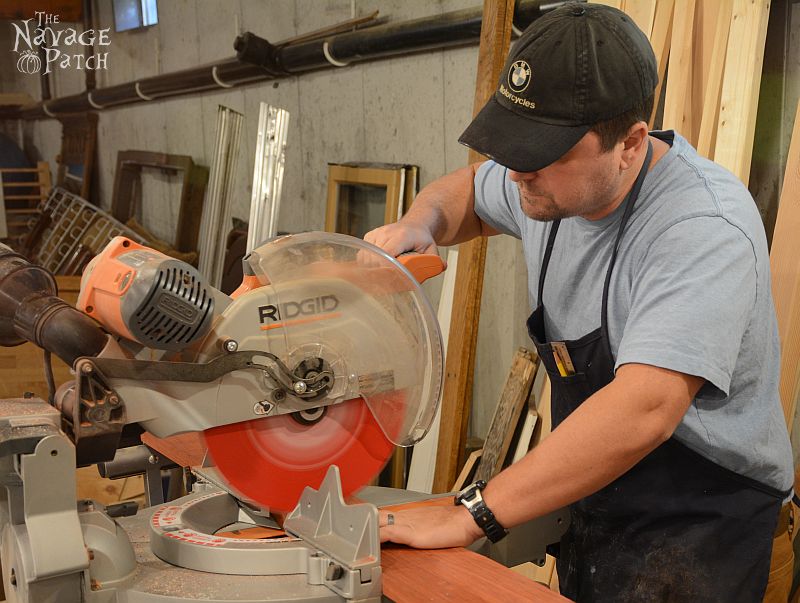
I made this end grain cutting board for a friend, and it measures about 20″ x 13.” I used walnut, hard maple, redheart and jatoba 5/4 boards. Board thickness is measured in quarter inches. Thus, a 5/4 board is 1 1/4″ thick. That is the thickness before milling. The actual thickness you end up purchasing is a little less. Just like a 2 x 4 is actually a 1 1/2 x 3 1/2. For a cutting board this size, I needed to cut my strips of wood to 27 inches. I did this with the radial arm saw. First I measured and marked with a pencil.
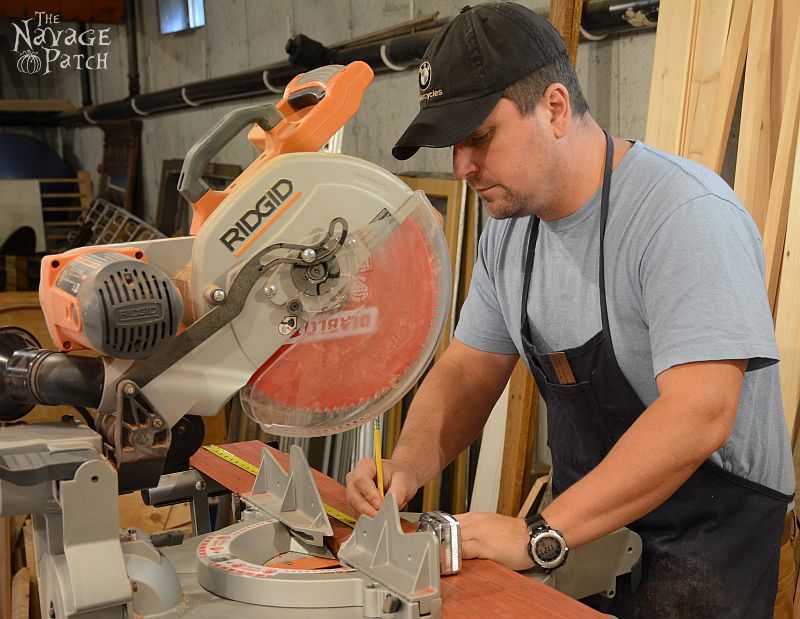
Then cut to size. This board is redheart. Yes, I know, I should be wearing safety glasses. I have them, and I use them. I think I forgot them here since I was so focused on photographing myself while working – something I usually don’t do.
Once the four boards were cut to size, I had to get rid of any milling marks with the planer. This also gets them to a uniform thickness. This is the hard maple going into the planer.
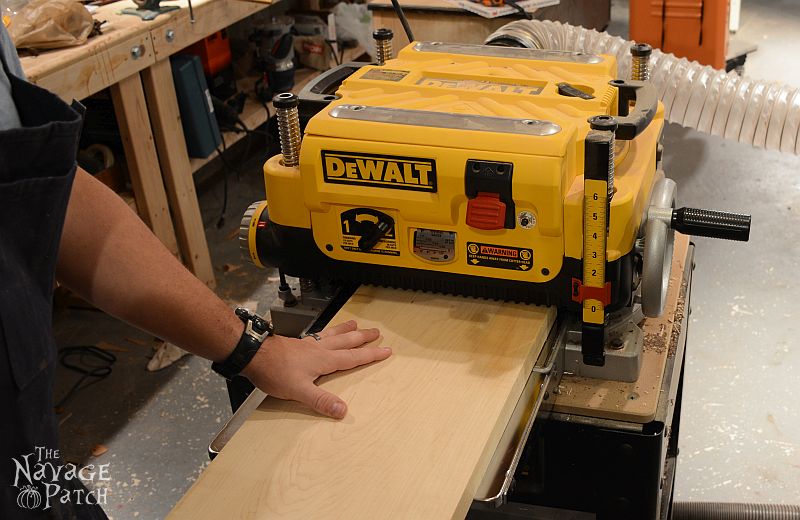
I then had my four boards cut to equal length and planed to equal thickness. Before I could cut them into strips, I first needed to run one edge of each through the jointer to ensure that I had a smooth and square surface to reference my cuts off of.
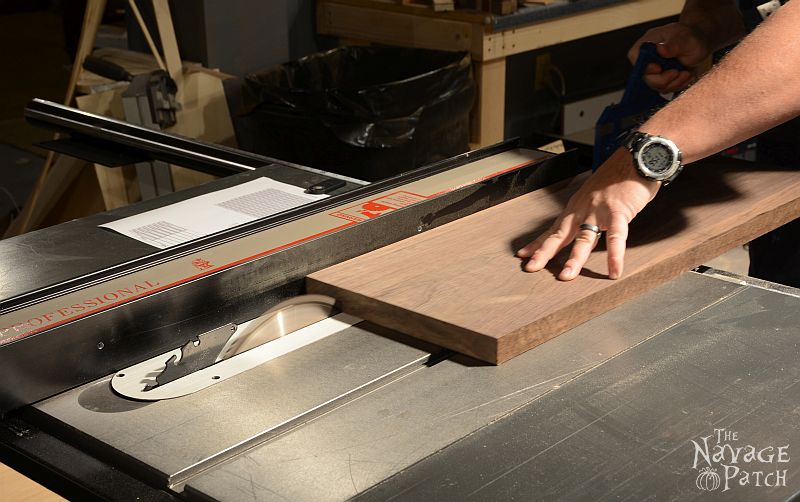
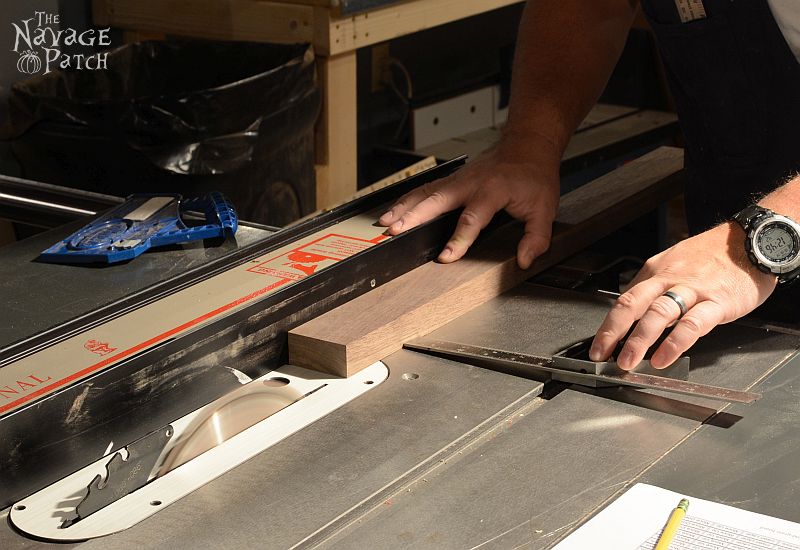
Then on to the table saw to cut strips ranging in size from 1/4″ to 2.” Again, I’ll have a cut list at the end of the post. Here is the walnut.
Here cutting the maple. I’m pushing it through with a Kreg Push Stick![]() . I recently got it, and I love it. It has a locking depth gauge and pencil holder – very handy!
. I recently got it, and I love it. It has a locking depth gauge and pencil holder – very handy!
For the 1/4″ pieces, I cut the piece on the outside of the blade, not against the fence. To get the spacing correct, I measured 1/4″ from the blade to a combination square resting in the miter slot.
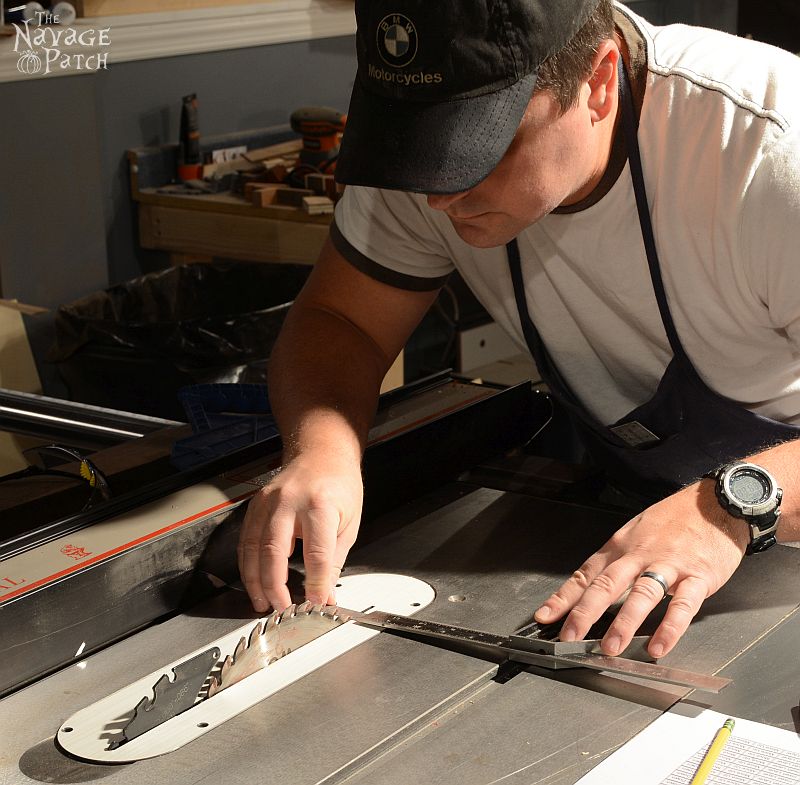
Once I had the proper spacing, I locked the combination square.
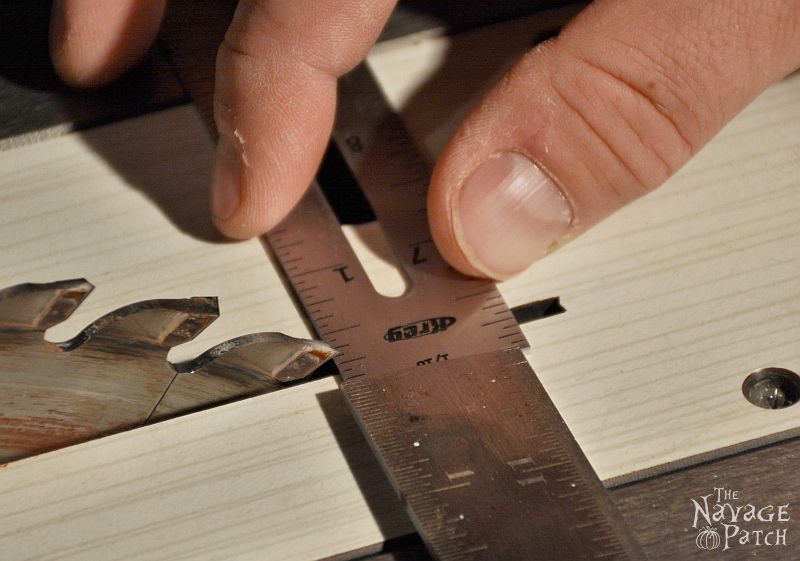
Then I slid the fence and the piece to be cut up to the combination square, locked the fence, removed the square, and made the cut.
Step 2 – Lay Out and Glue Up the Initial Design for the End Grain Cutting Board
With all of the strips cut, it was time for the first glue-up. Here are the players:
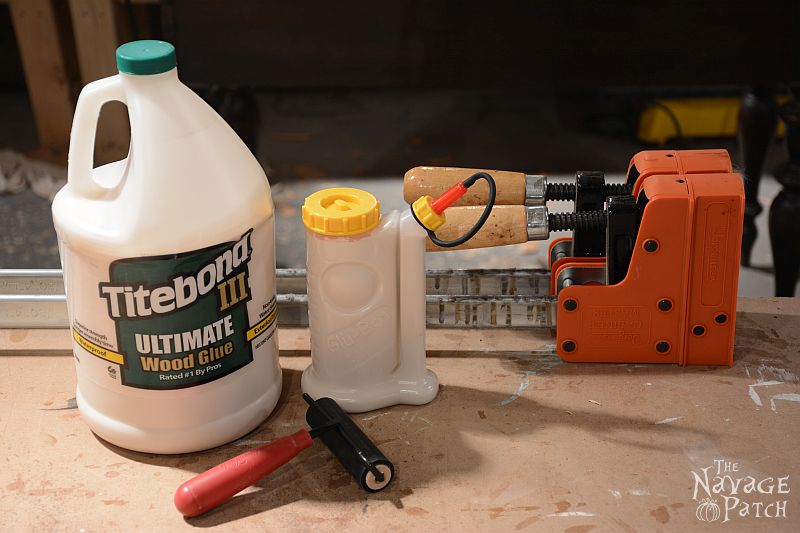
- Jorgensen 24 Inch Parallel Clamp

- Titebond-3 Ultimate Wood Glue (This is a food-safe glue)
- Glu-Bot Glue Bottle (a necessity when buying glue in bulk)
- 4-Inch Hard Rubber Roller
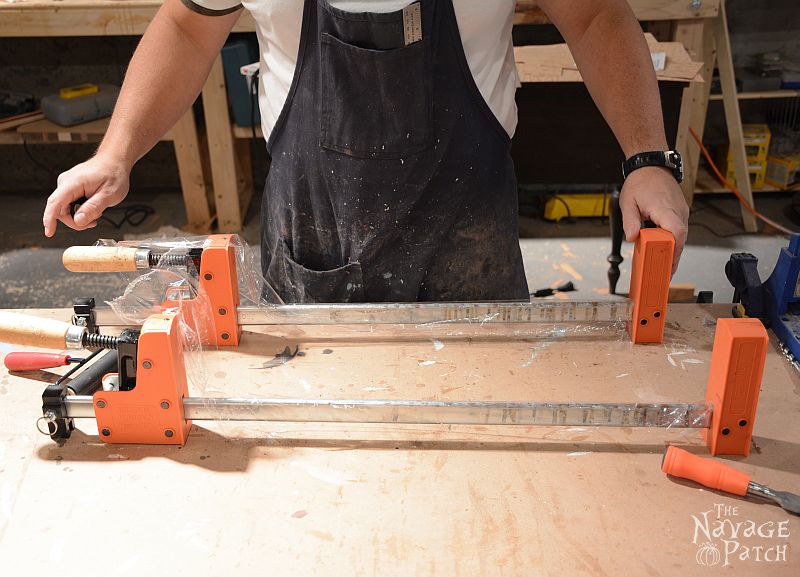
I laid some cling film on the bar clamps. This makes cleanup a lot easier. Scraping dried glue from the clamps is a real pain in the butt!
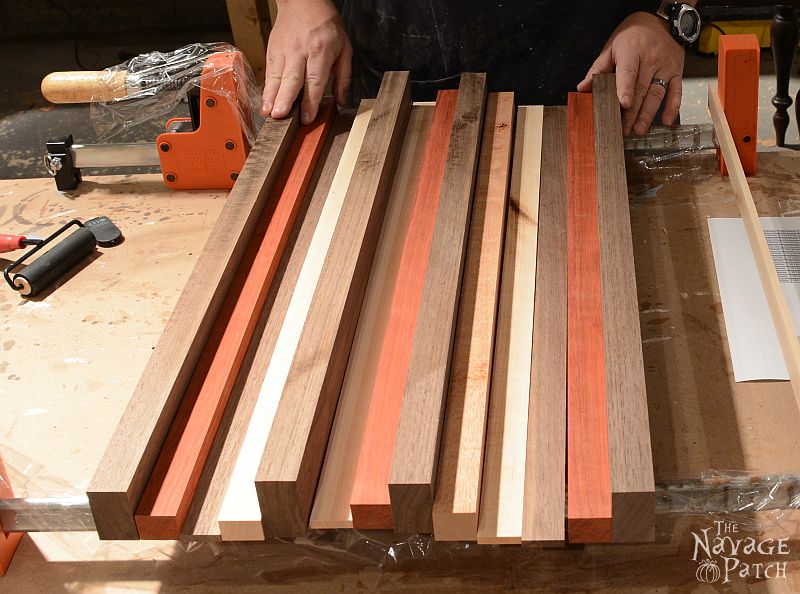
Here are all of the strips, arranged by species.
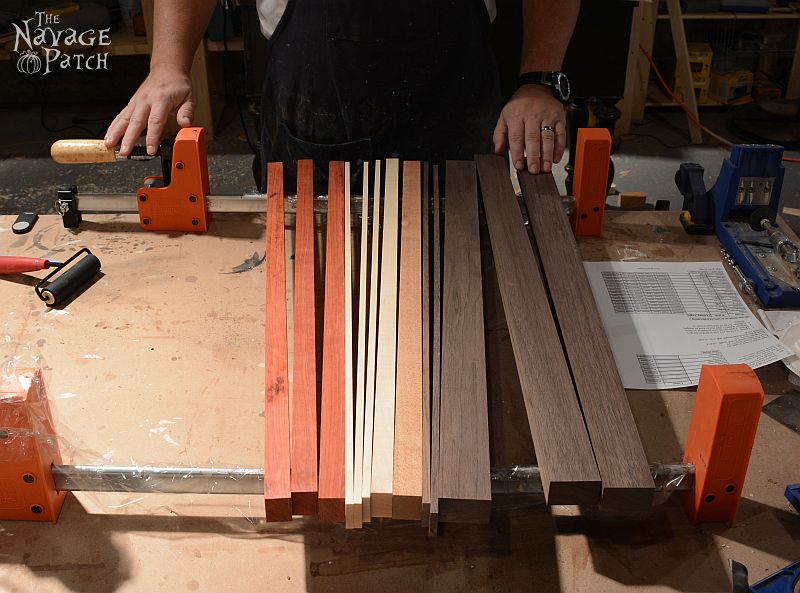
I arranged them in their proper order.
I then rolled each piece 90 degrees clockwise. This exposed the faces that I’d be gluing.
All the pieces except the very first piece were now rolled over and ready for glue.
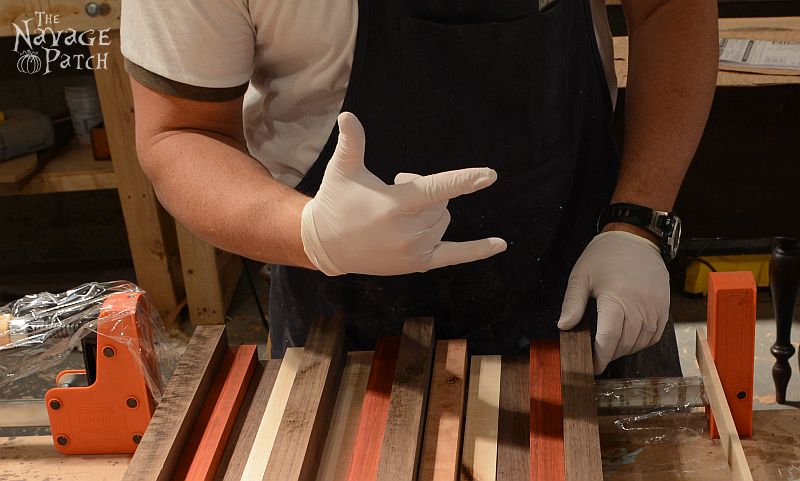
Some latex gloves to keep the glue off of my hands. Rock on.
I applied a bead of glue to each strip.
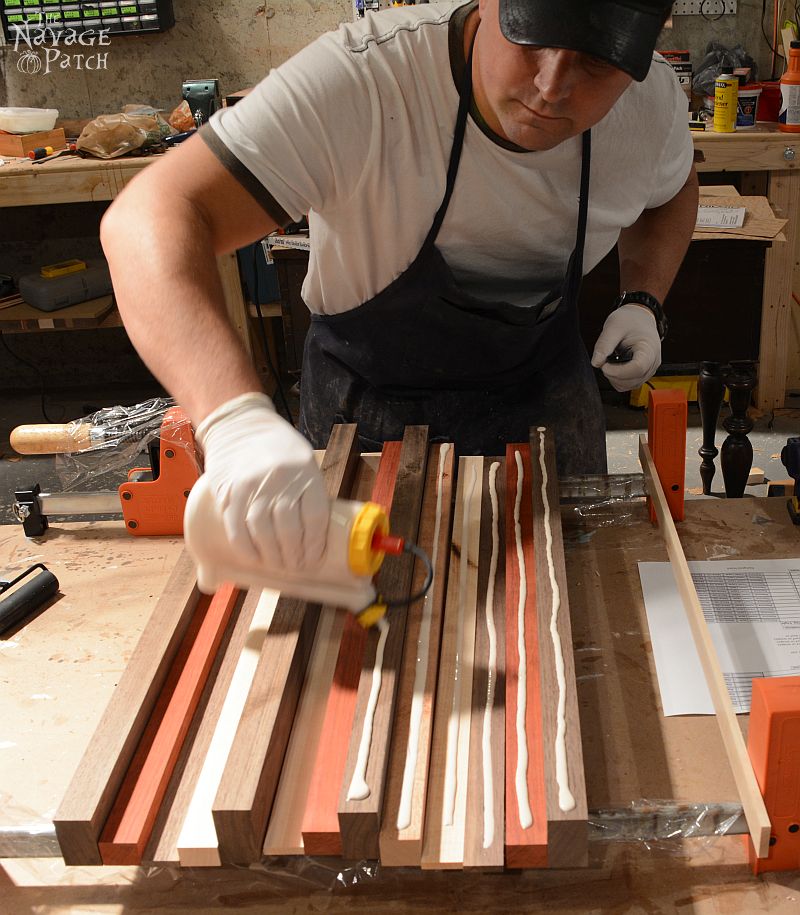
And spread it with my finger.
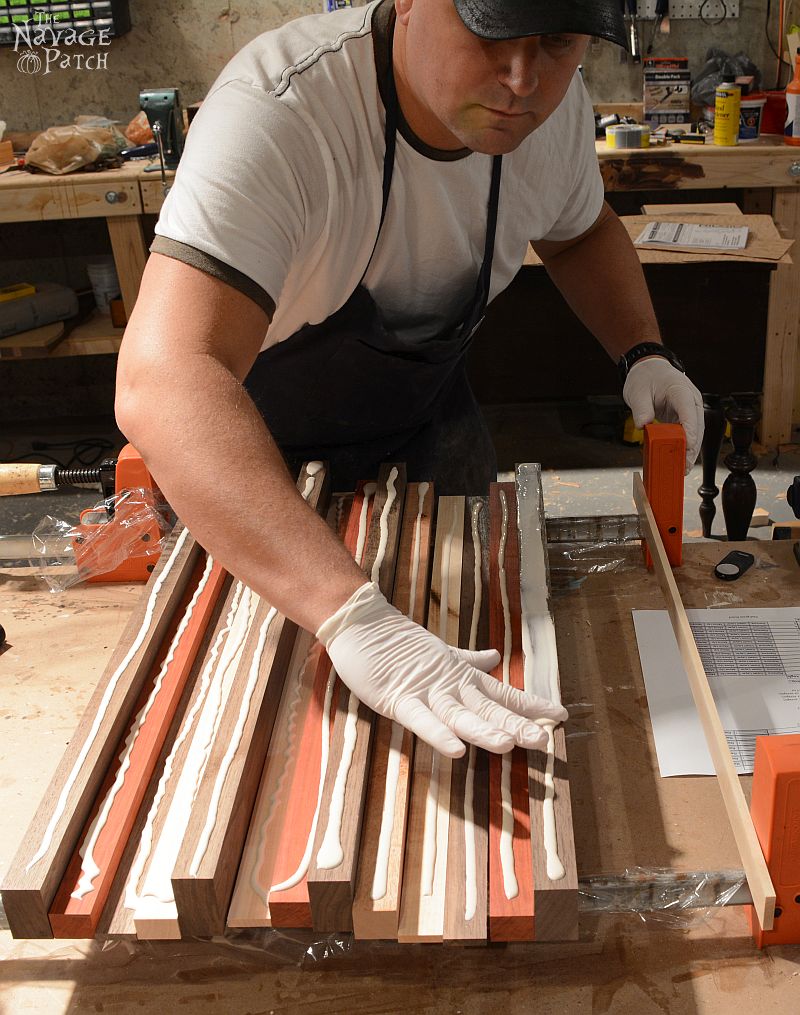
Then, one-by-one, I turned each piece back over and pressed it to the one preceding it.

And repeat…
…Until they were all glued. Then I tightened the bar clamps.
I added a few clamps between the bar clamps and let it dry.
Step 3 – Prep and Cut for the Second Glue-Up
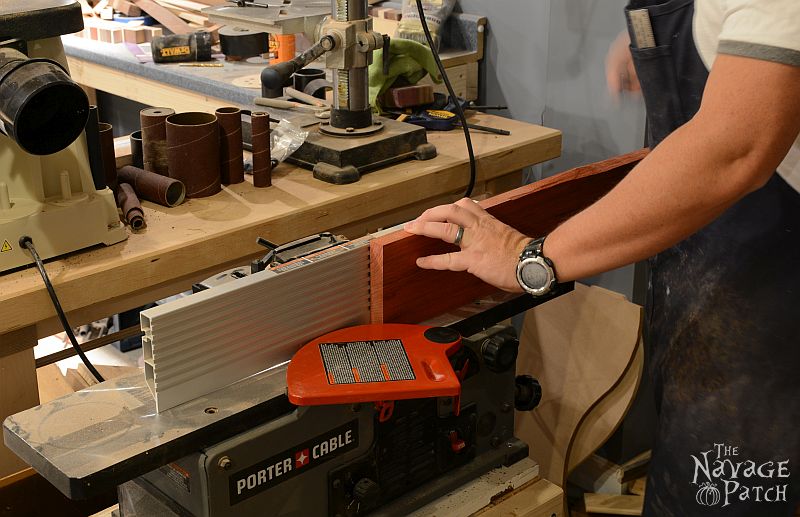
When the glue had fully hardened, I removed the clamps and scraped off the excess with an old chisel. A card scraper works, too, but only if the excess glue droplets have not fully hardened.

I ran my DIY cutting board through the planer to get everything smooth and even.
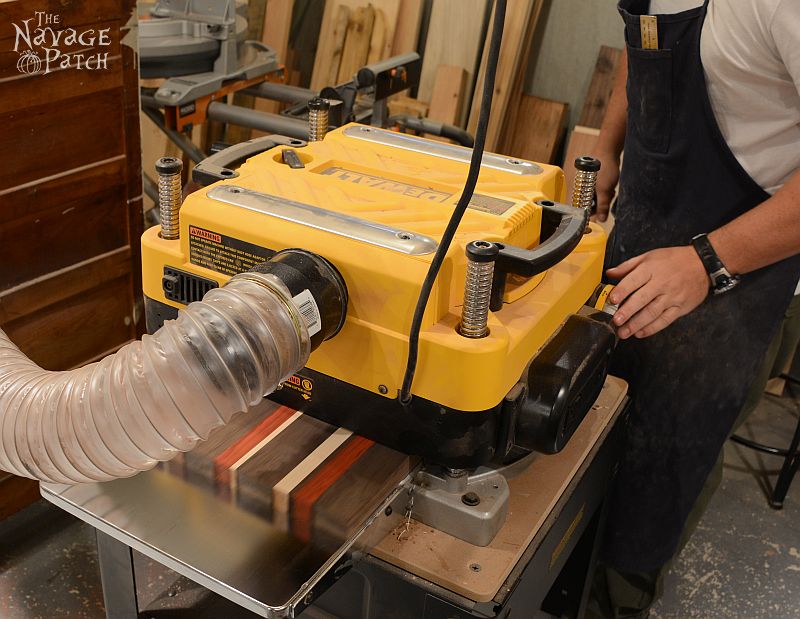
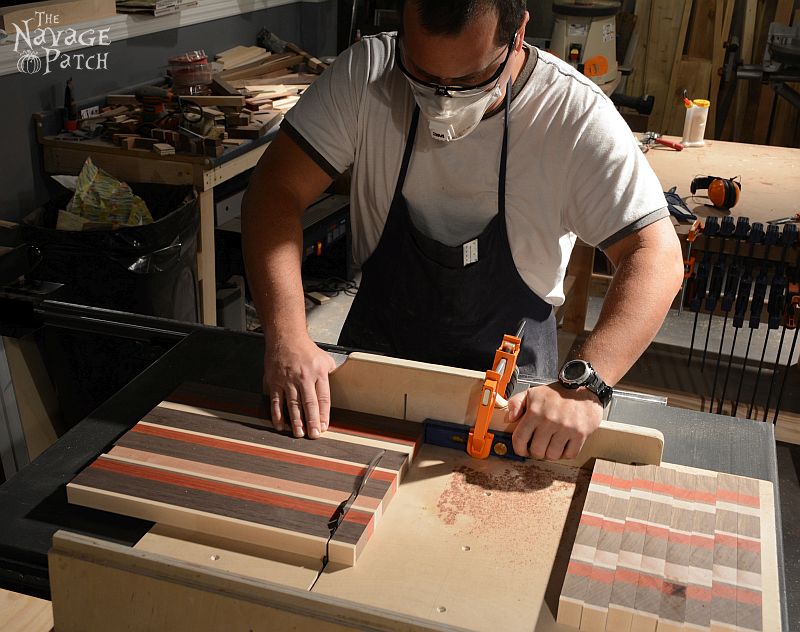
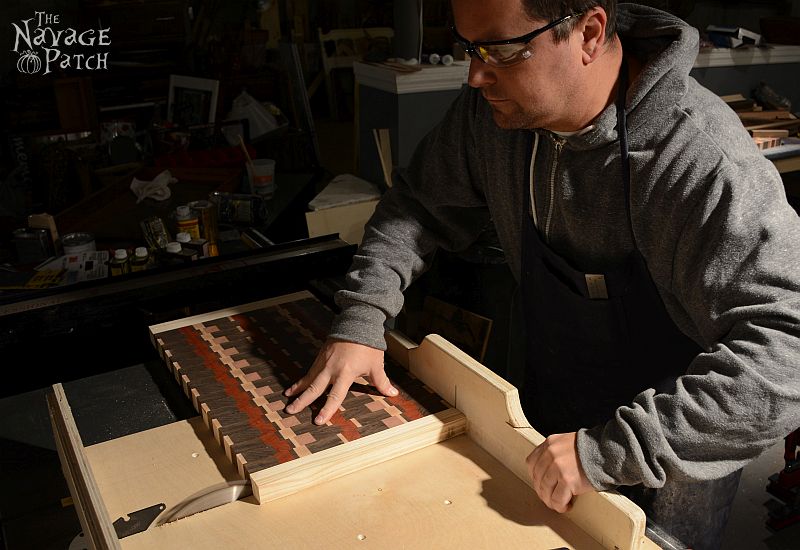
Next, it was time to cut the board into slices, so I could expose the end grain and achieve the final design. I started by squaring up one end. Walnut dust is toxic so it’s a good idea to wear a face mask.
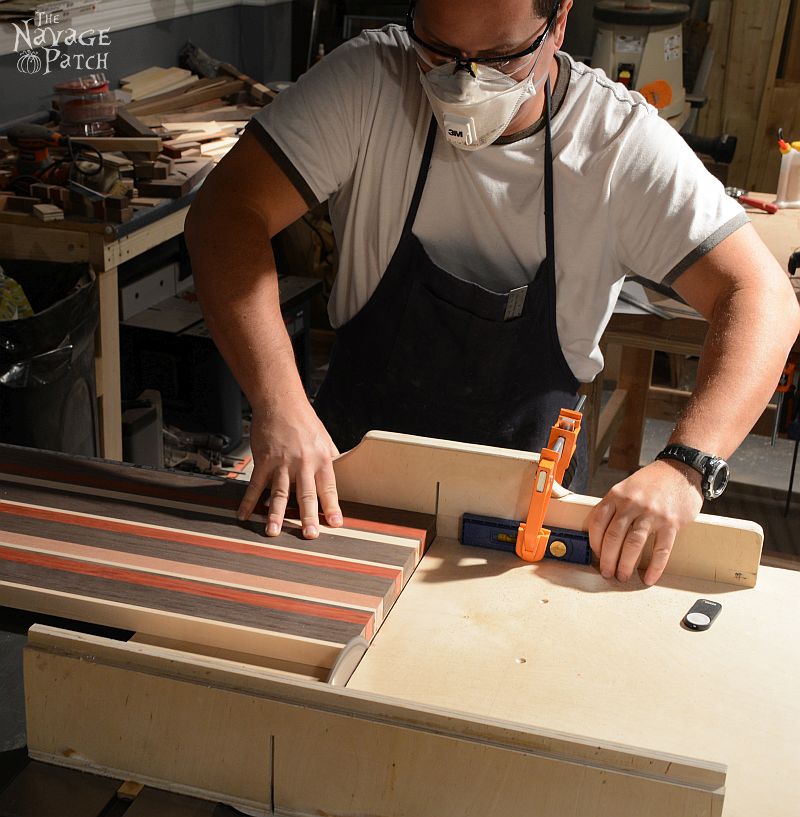
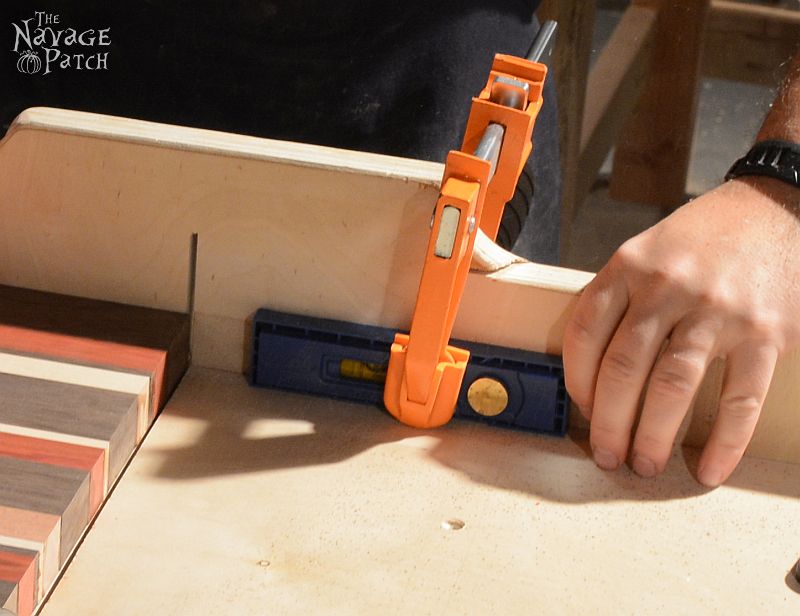
Since the final end grain cutting board would be 1 1/4″ thick, I set a stop block 1 1/4″ from the blade and clamped it in place.
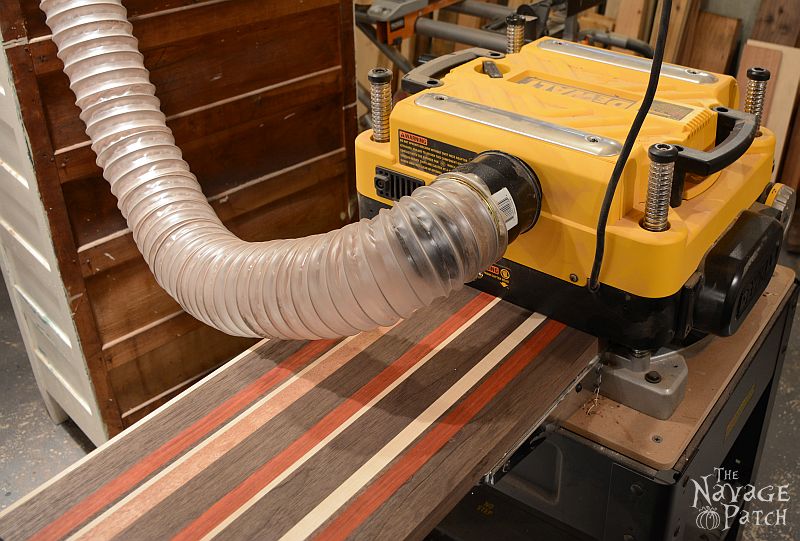
Cutting the slices for the DIY cutting board…
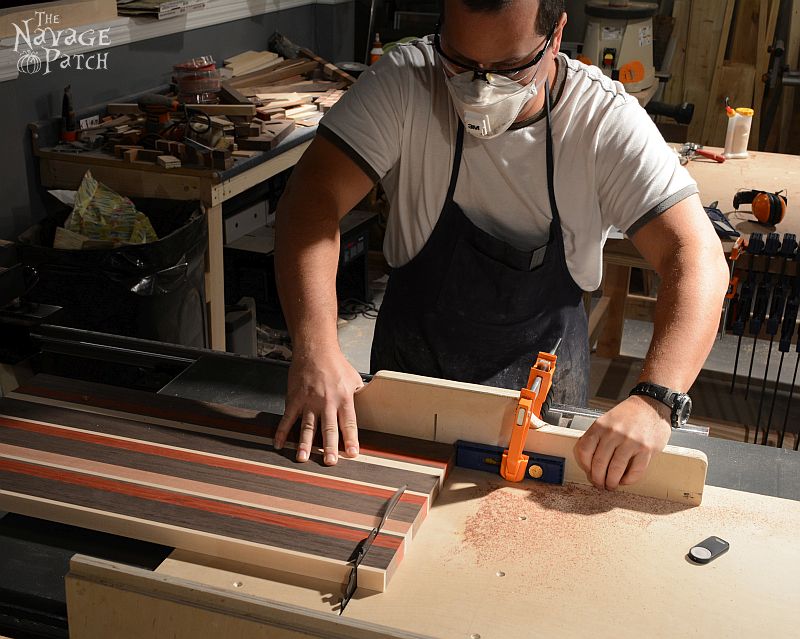
Cut, cut, cut.
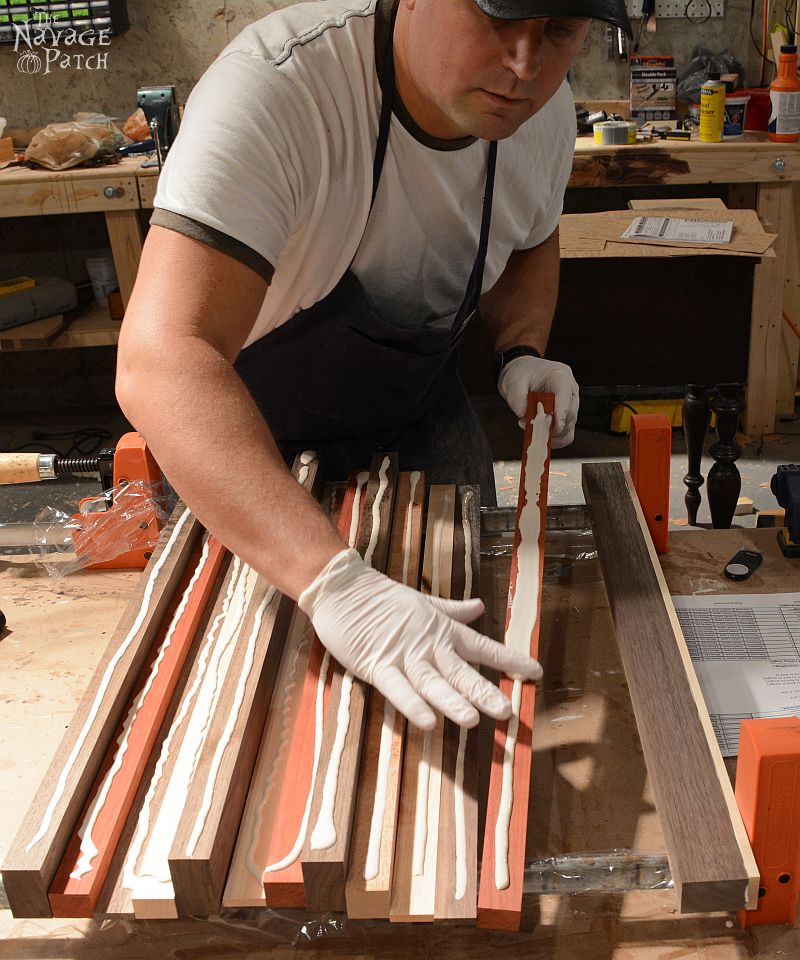
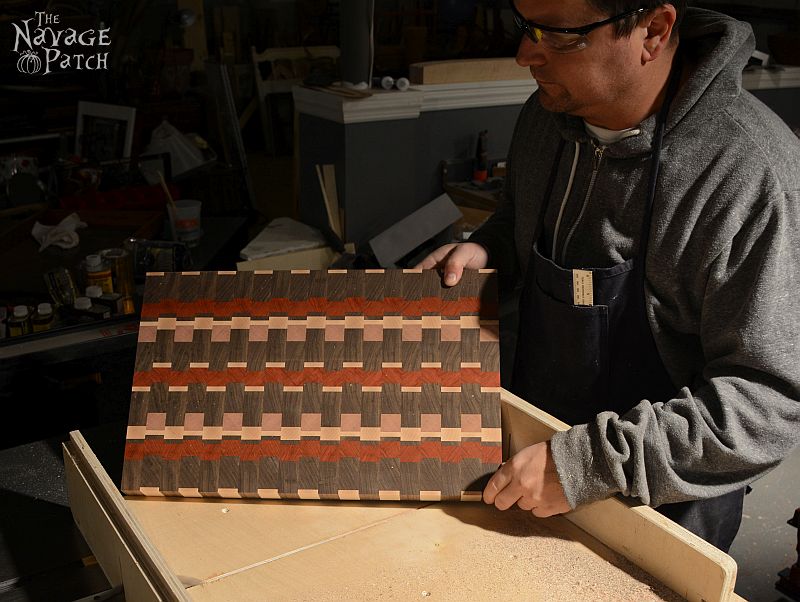
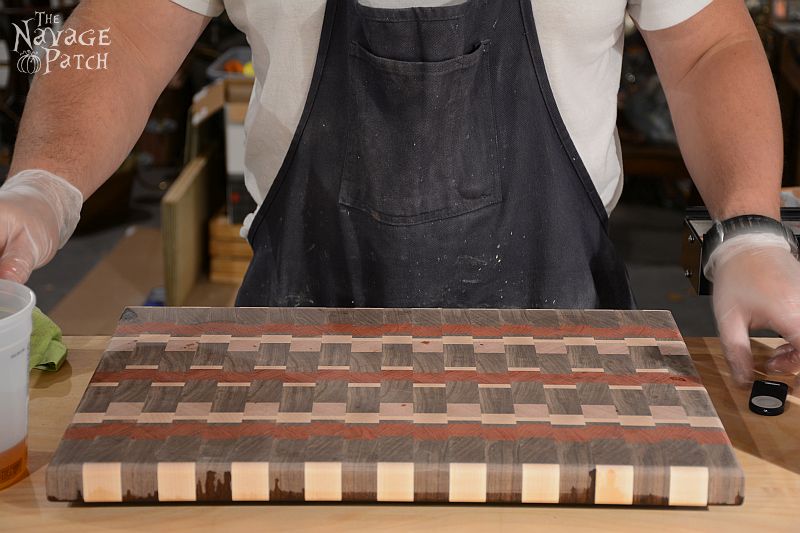
Step 4 – Lay Out and Glue Up the Final End Grain Cutting Board Design
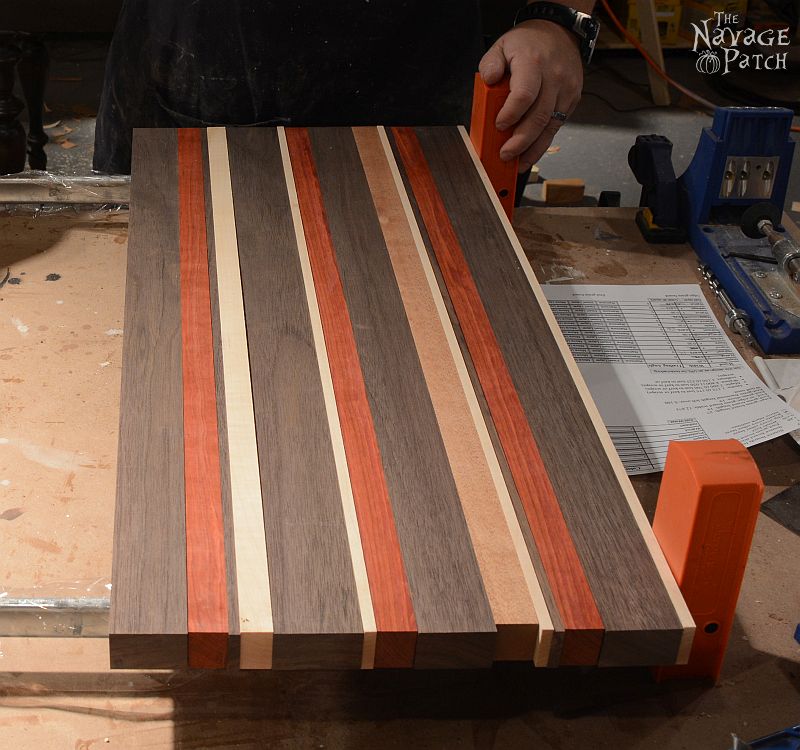
With all the slices cut, it was time for final assembly and glue-up of my DIY cutting board.
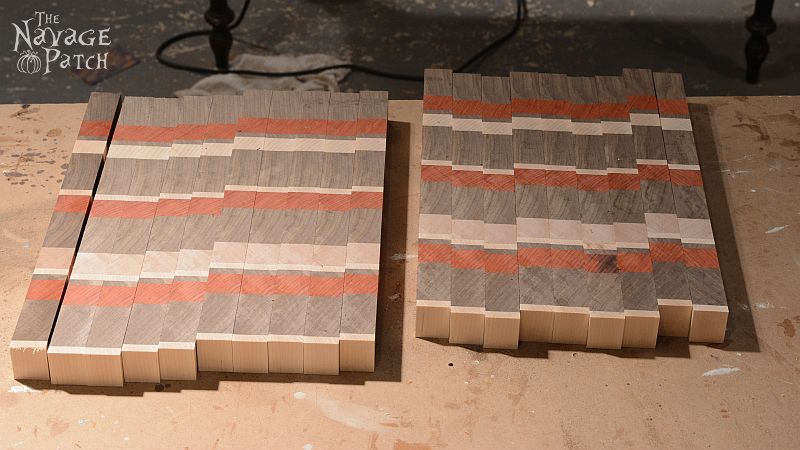
I put the pieces once again in the bar clamps. The two pieces of pine on the ends are sacrificial strips. They are glued to the board to protect the edges when I run the board through the planer for final leveling. Without the strips, the planer would tear out the back edges. This only applies when planing end grain – just one of the many tricks I developed after ruining so much wood!
To get the final design for this end grain cutting board, I flipped every other piece.
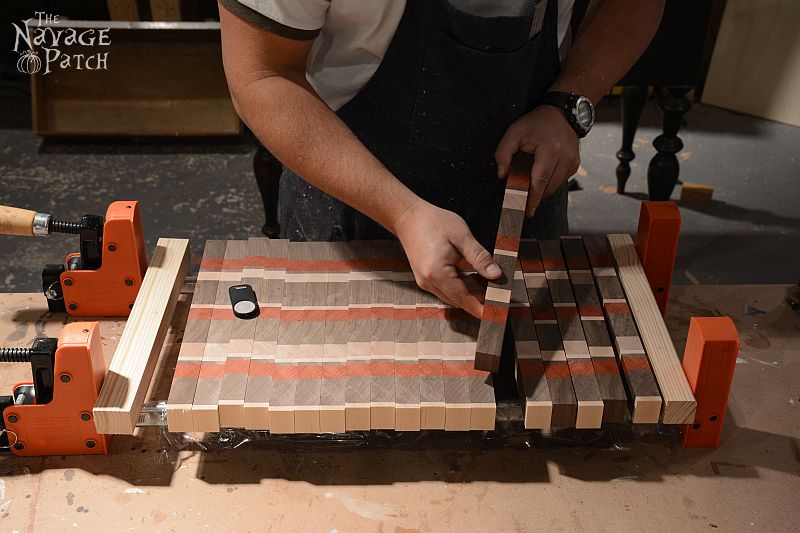
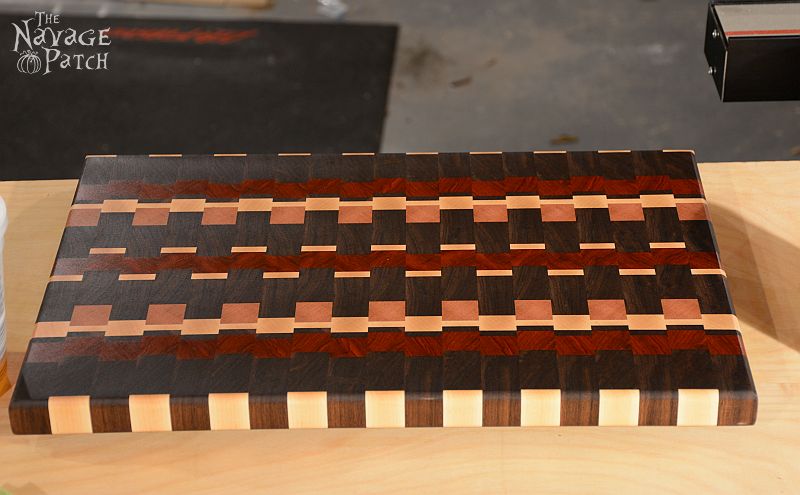
Now we start to see the final product!
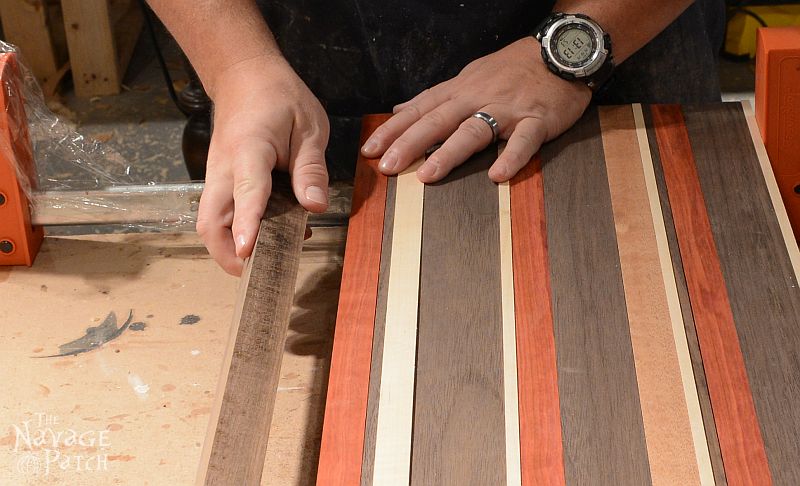
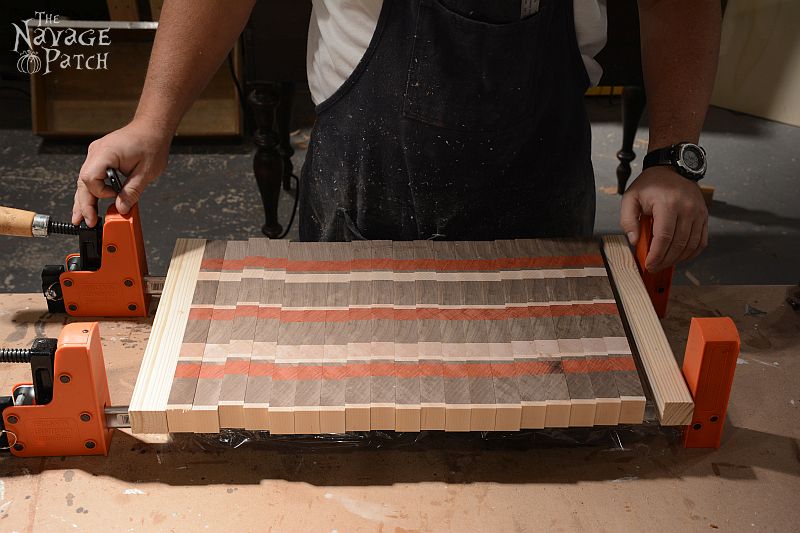
Once again I rolled each piece 90 degrees clockwise to expose the face to be glued. This board was so big that I had to make two layers.
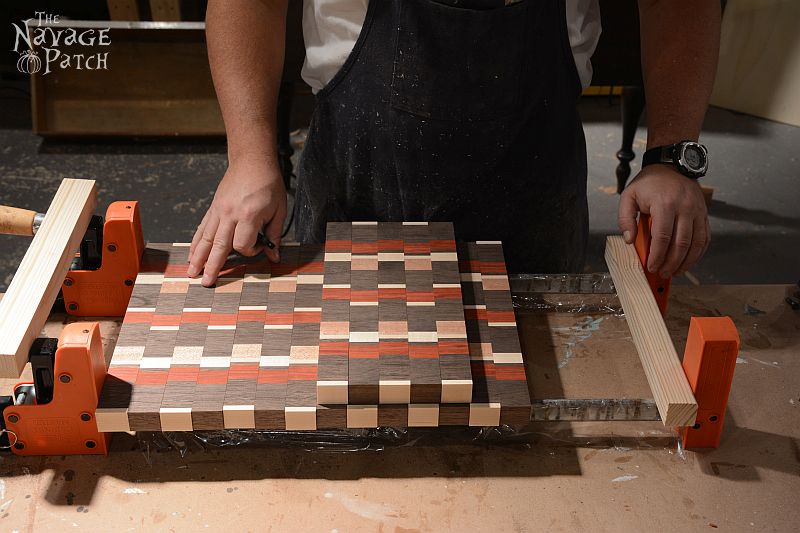
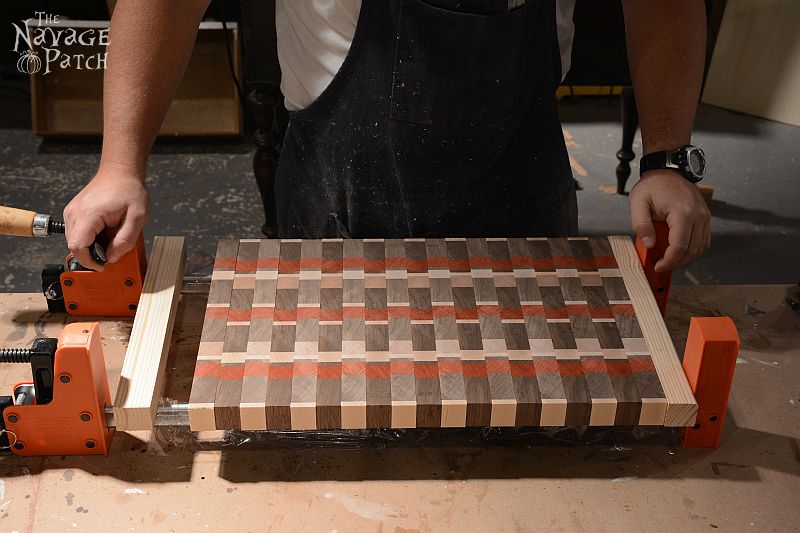
Next it was time to apply the glue. Since all the strips were of equal height, the roller made this job easier.
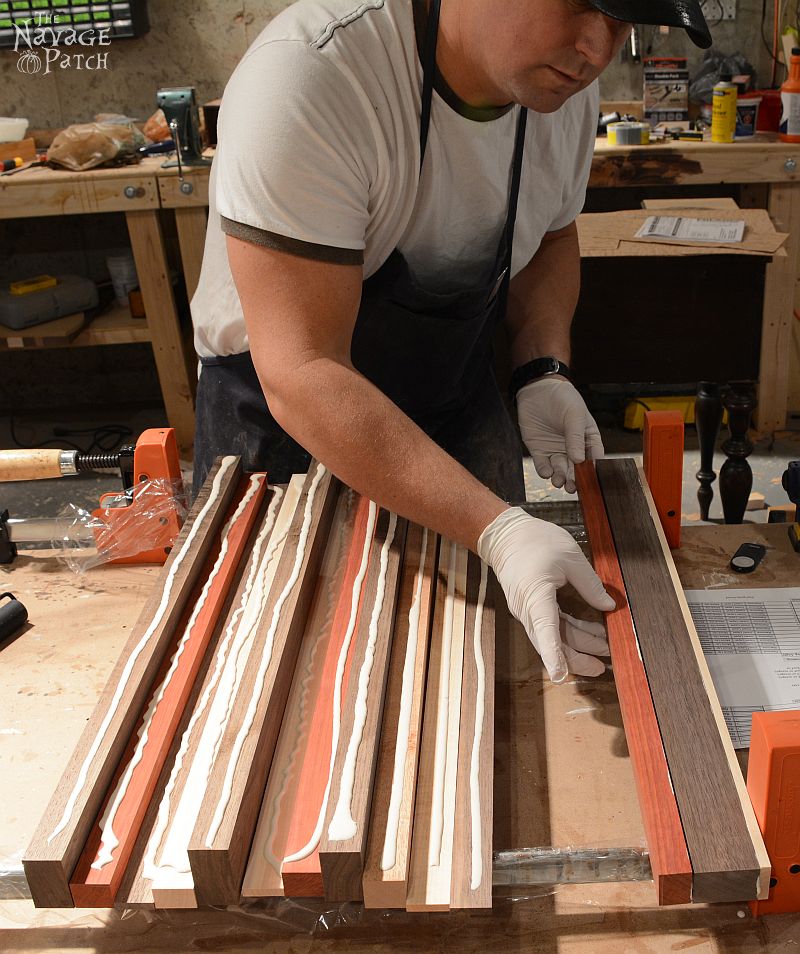
I then positioned them and rolled glue on the remaining strips.
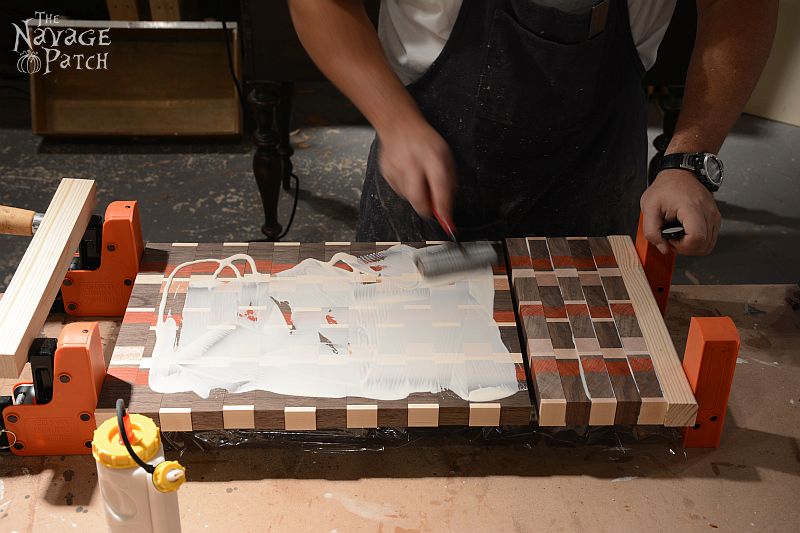
Ready for positioning.
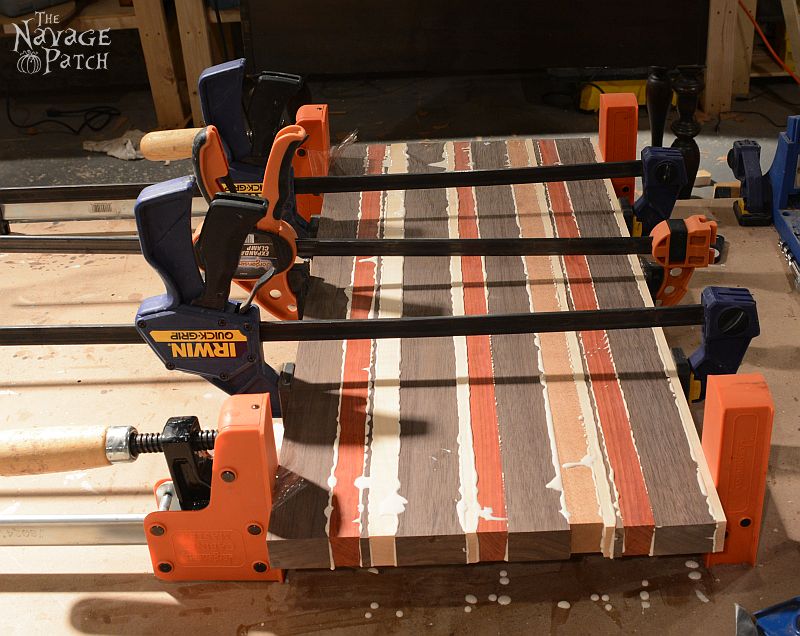
I tightened the clamps and added one more for good measure.

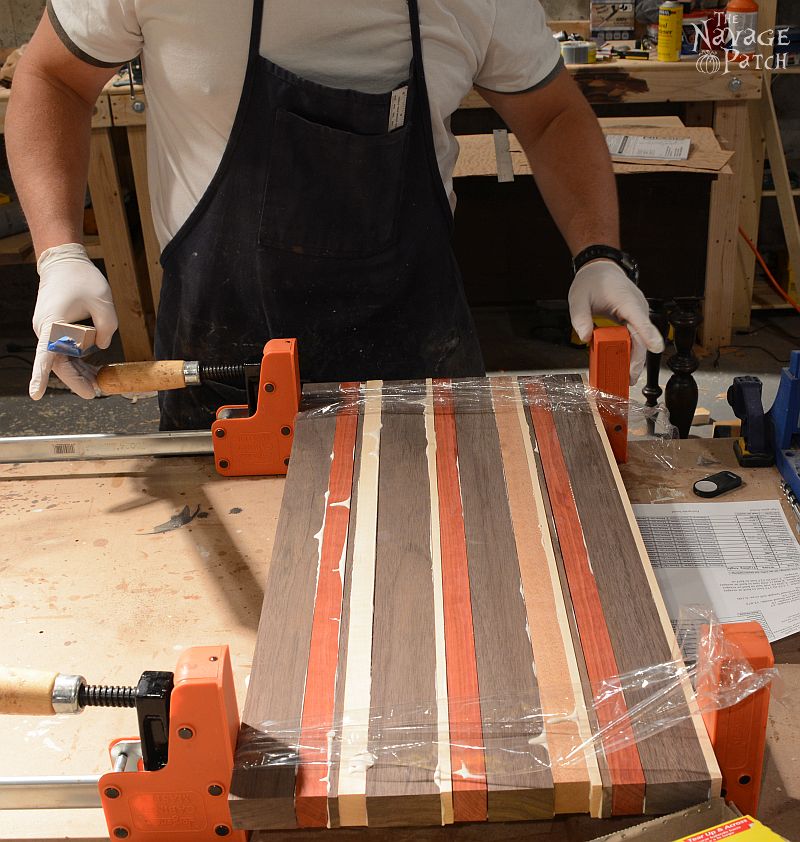
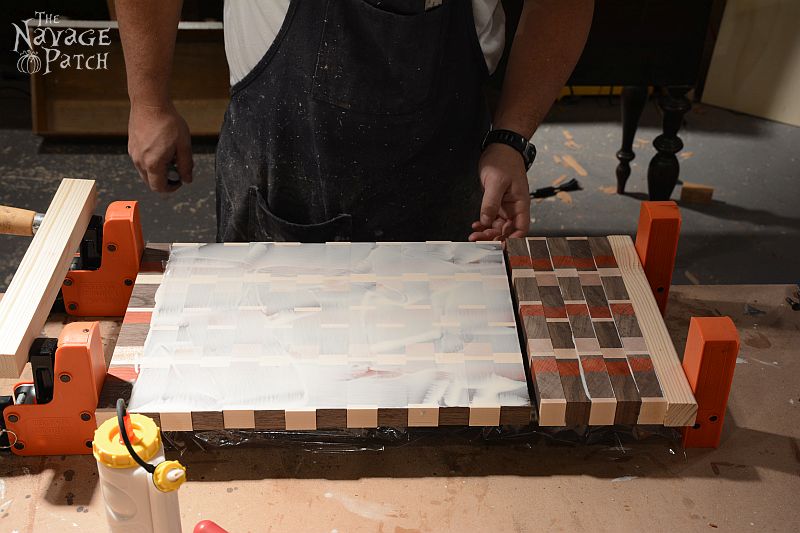
Step 5 – Final Shaping and Sanding of the DIY Cutting Board
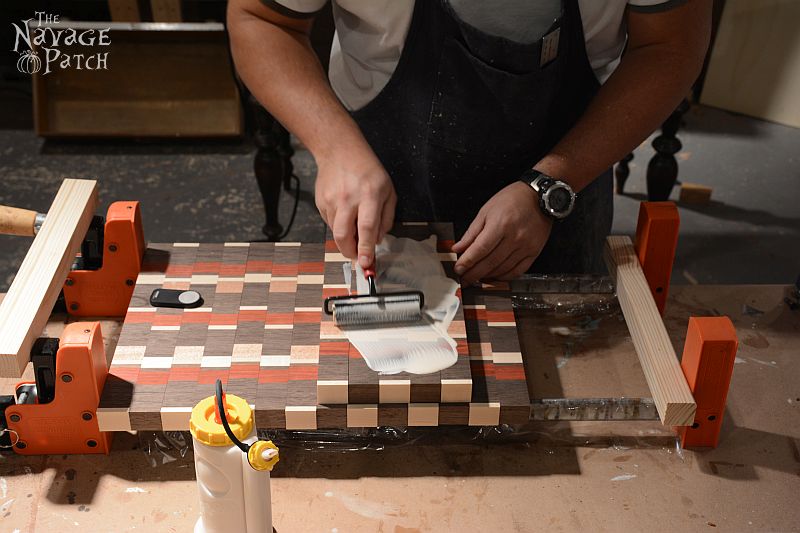
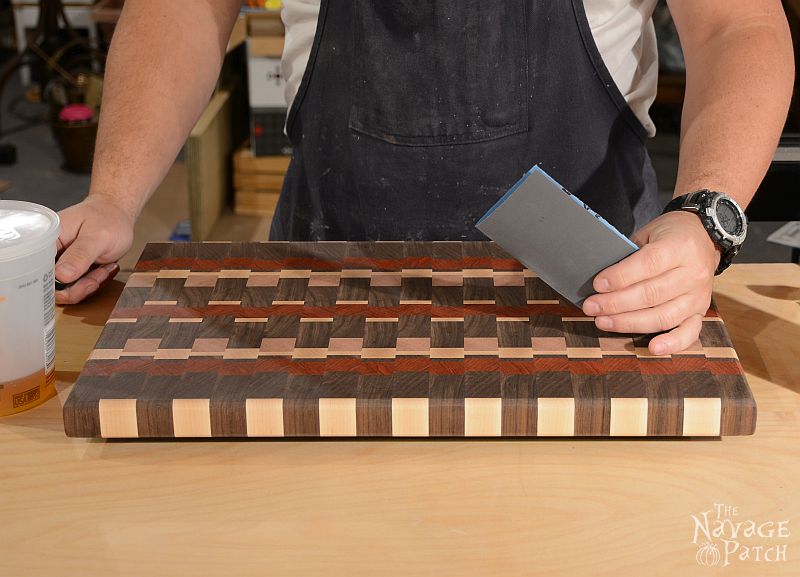
Once the glue was set, but not fully dry, I removed the extra clamp and scraped off the excess glue with a card scraper.
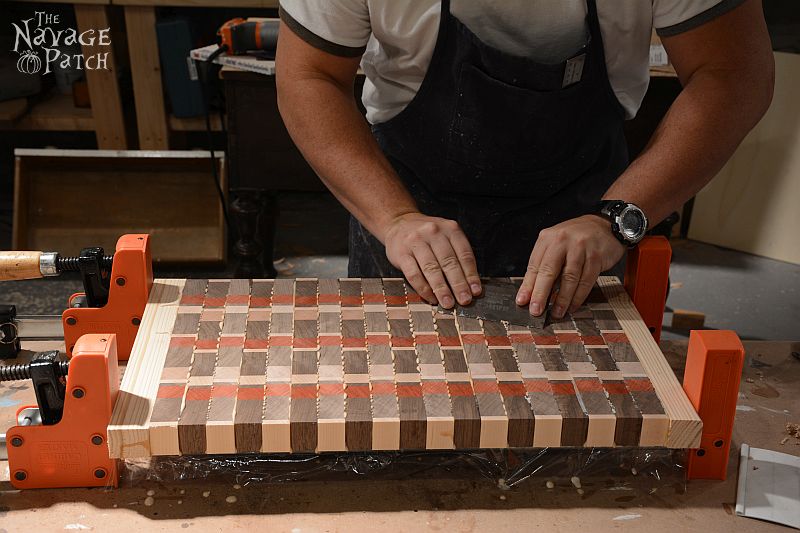
My DIY cutting board was now ready for final planing.
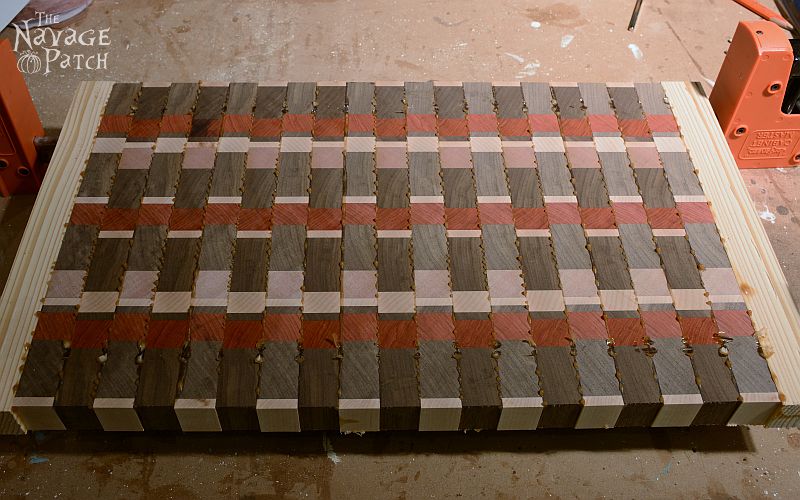
Next I cut off the sacrificial strips.
And trimmed up the sides.

So far, so good!
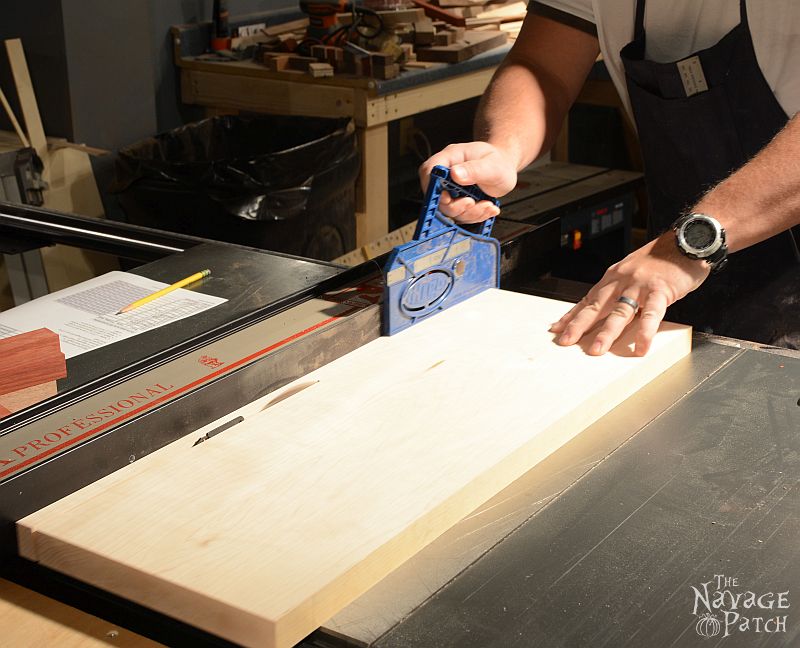
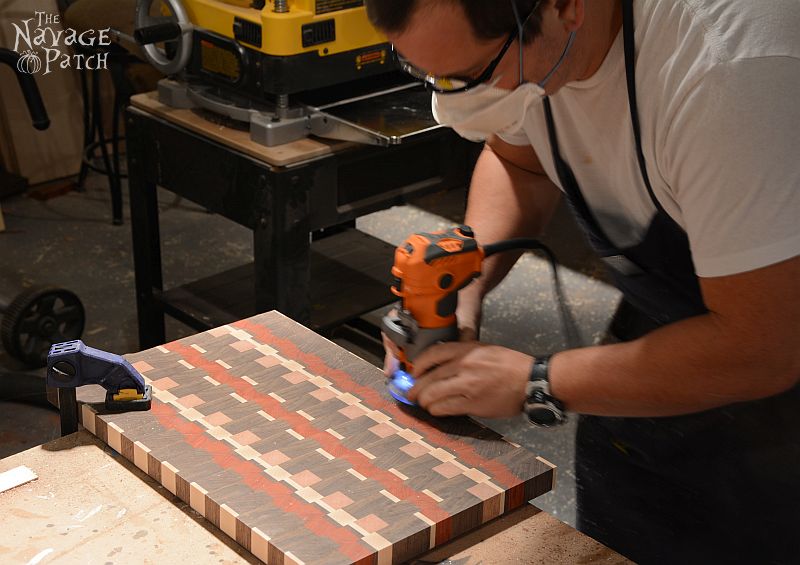
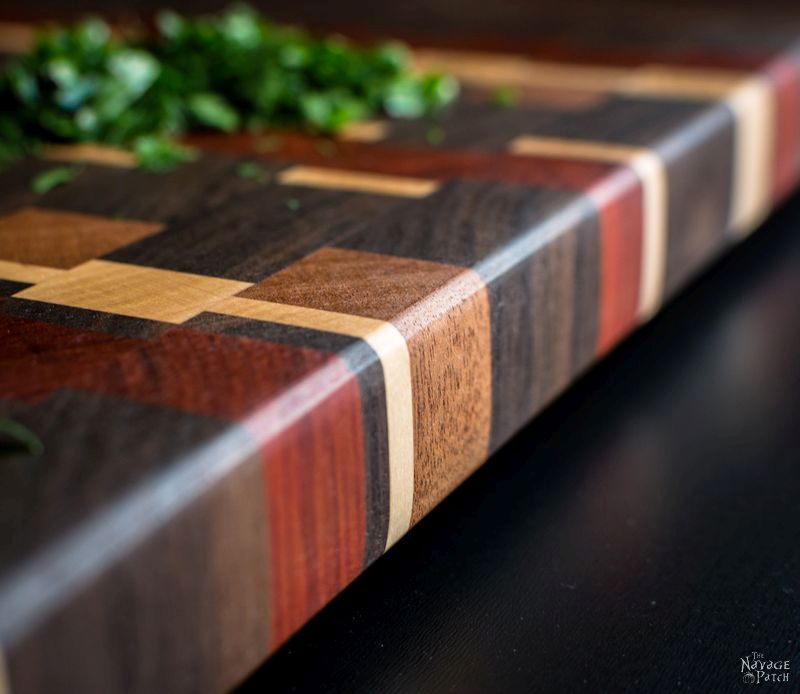
The next step was to rout the edges with a 1/4″ round-over bit.
Then on to the sanding station. I started with 60 grit, then go to 80, 100, 120, and finally 150. It is important not to skip grits if using a random orbital sander. No one likes swirly marks in their end grain cutting board!
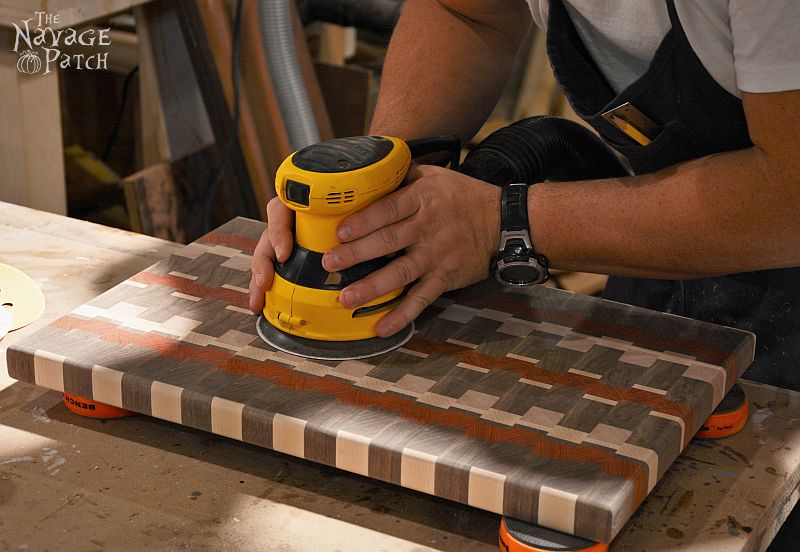
I have the board propped up on Bench Cookies ![]() . These guys are indispensable. If you don’t have them, get them!
. These guys are indispensable. If you don’t have them, get them!
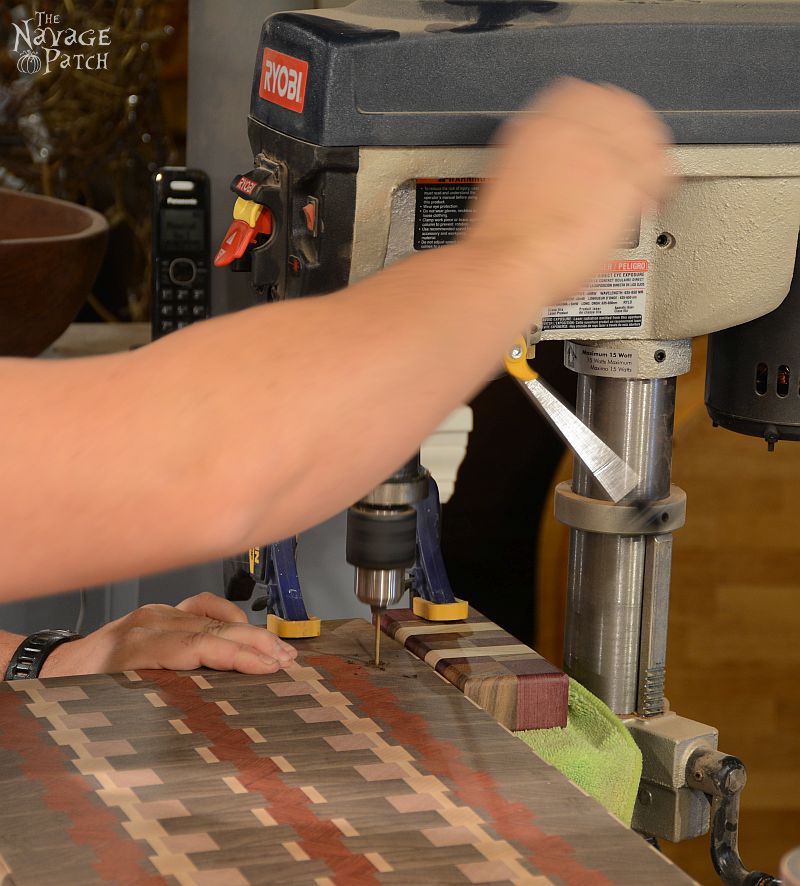
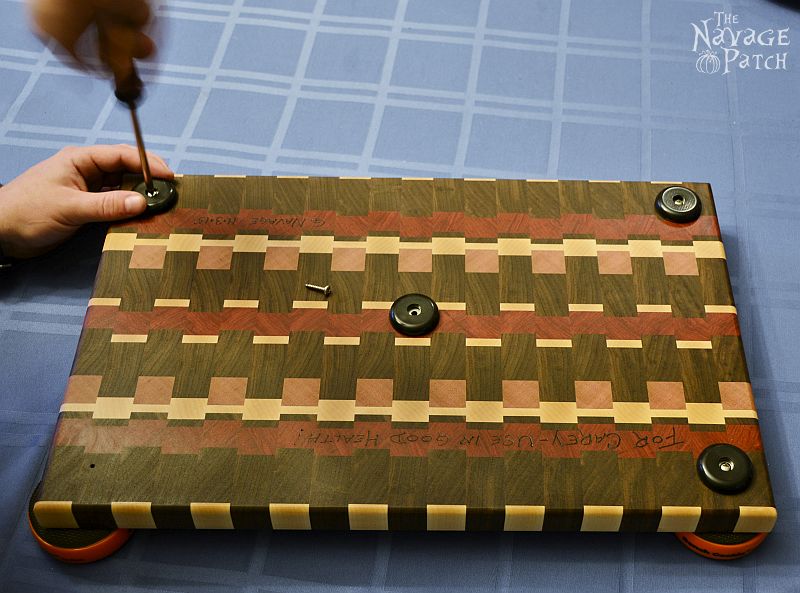
When the board was sanded, I marked holes for the rubber feet.
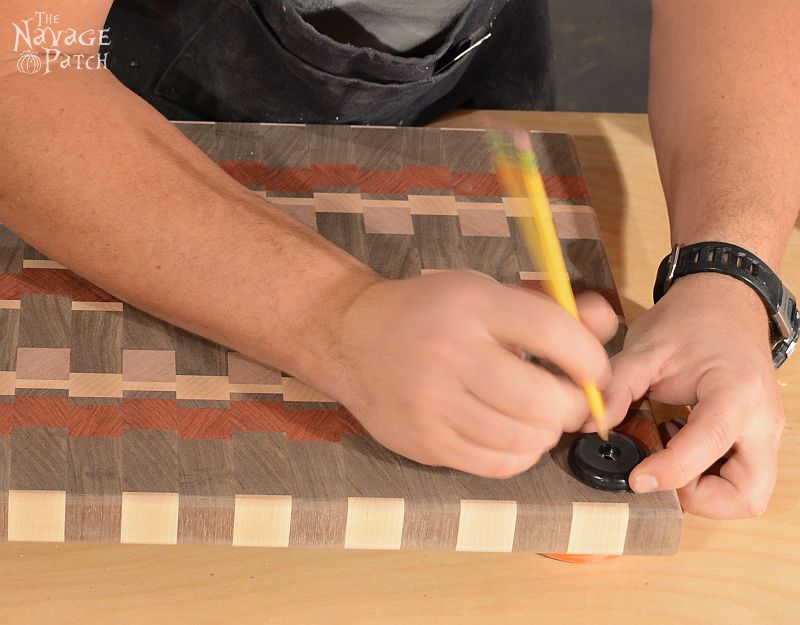
Then I pre-drilled the screw holes with the drill press, though a handheld drill would work fine.
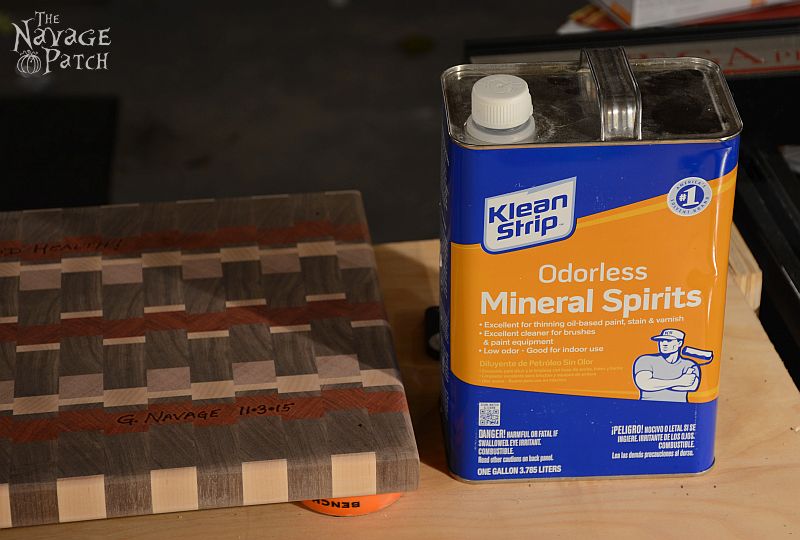
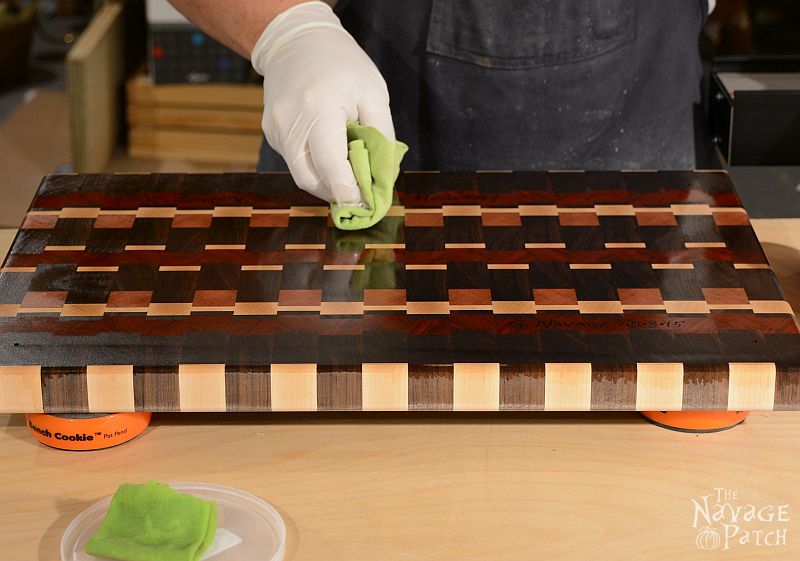
Before I got to finishing my DIY cutting board, I gave it a good cleaning with mineral spirits.
Step 6 – Finishing the DIY Cutting Board
To finish my end grain cutting board, I used a food-safe wipe-on varnish called salad bowl finish. My preferred brand is General Finishes. I mixed it with mineral spirits to about 60% mineral spirits and 40% varnish. You want it so thin so the wood will drink it all in and distribute the varnish throughout the board. I’m not trying to build up a finish on the surface like I would on a table. Rather, I want to seal the wood off from moisture throughout the board. Moisture harbors bacteria. Bacteria can be bad.
I cut and folded a small piece of cloth to use as an applicator. I wore a vinyl glove on the right hand (the hand touching the varnish) and latex on the left. The vinyl better resists the varnish, whereas the latex starts to stretch and will eventually disintegrate. I used latex on the left since it is thinner and has a tighter fit, allowing me to pick up and manipulate screws. I also use nitrile gloves, but I happened to have some extra vinyl on hand that I wanted to use up.
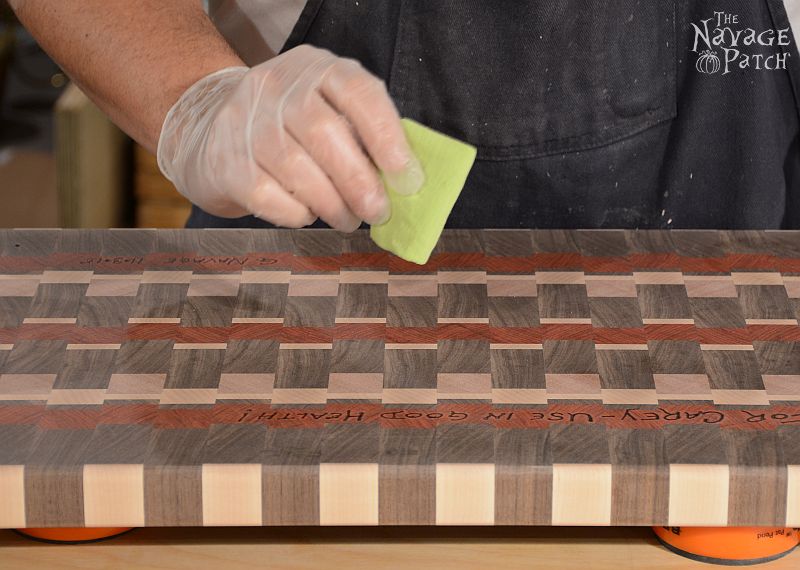
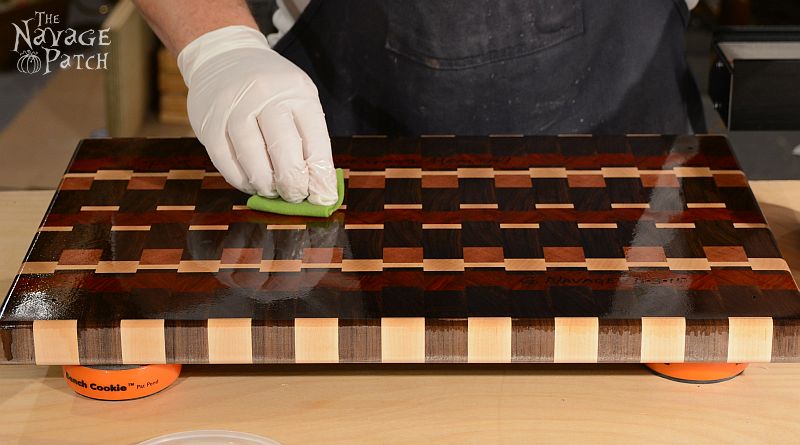
Starting with the back of the board, I liberally applied varnish, letting the wood drink up as much as it can. If the varnish is thin enough, it will run right through the board and spot the other side.
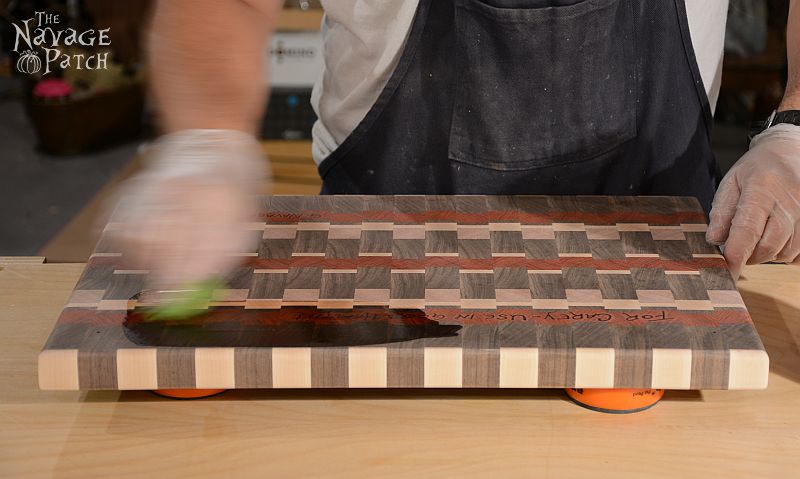
I then wiped off the excess and inserted four screws a few turns into the holes I previously drilled for the rubber feet. This kept the bottom of the board elevated while I worked on the top.
You can see a little spotting on the top.
And here was the board after the first coat of varnish (still wet). I again flooded the board with as much varnish as it could take and then wiped the excess off the board. Remember, we’re not trying to build a finish!
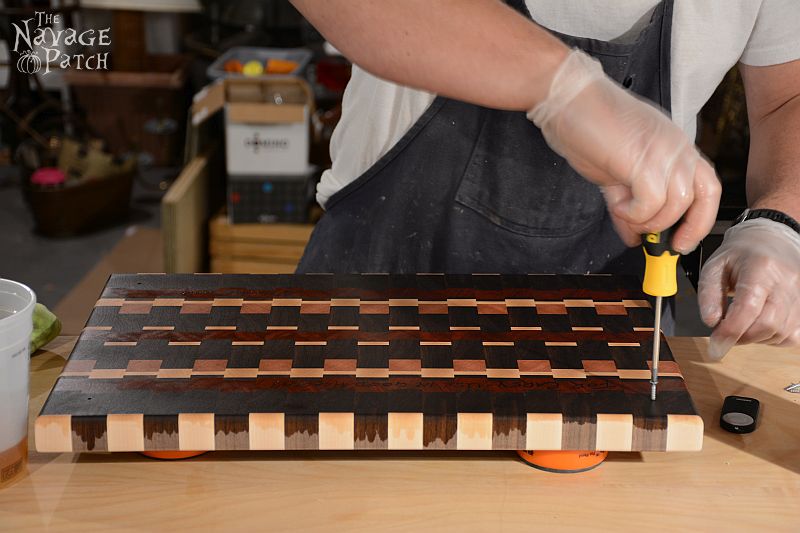
When dry, I lightly sanded with 2000 grit sandpaper (1500 also works), applying only the weight of my fingers for pressure. The goal here is to knock down any tiny surface imperfections. Most people (and the back of the can) say to sand lightly with 220 between coats. I’ve never been able to do this without messing up the piece with sanding marks. Unlike, say, lacquer or shellac, polyurethane doesn’t melt the coat underneath it, so any sanding marks on the previous coat (or on the wood) will show.
Then I repeated the process for the varnish. (Yeah, I know, I’m wearing latex on my right hand. Didn’t have a vinyl glove handy). I wiped it on…
…And wiped it off. Again, since I wasn’t trying to build a finish, I wiped all of the excess varnish from the board.
I gave my DIY cutting board four coats of varnish, and then I attached the 1 1/2 inch rubber feet. I also use 1 inch rubber feet for smaller boards. These feet come with zinc-plated screws. I throw those out and replace them with stainless steel screws of the same size. This keeps the screws from rusting after exposure to moisture.
And that’s it! Nothing left to do but take pictures and deliver it to my friend.
Update February 2018:
I want to talk a bit about end grain cutting board maintenance. I’ve found that, over time, my boards can get pretty chewed up and dried out, even with the salad bowl finish. My usual solution was to sand them down and refinish them. But if I’m giving a board out as a gift, that’s not always a feasible solution for the recipient. This led me to experiment with other finishes. After exhaustive research on countless blogs and forums, I came across a finish that I would consider as an alternative to polyurethane. But even better, I use it on my varnished boards to keep them from drying out!
There is a great debate online about which oil is the best for cutting boards. If you wish to torture yourself, you can go dive into the fracas. Don’t say I didn’t warn you. Lucky for you, I did all the legwork.
So here it is: the best oil for cutting boards is walnut oil.
Walnut oil never goes rancid, because it’s what is called a “drying oil” or a “polymerizing oil.” That means that the oil reacts with oxygen to dry out at room temperature and create a hard, protective film. Compare that to mineral oil (the most popular oil among the debaters, but usually not for proper scientific reasons) which stays oily at room temperature until it eventually evaporates. Now that said, walnut oil can go rancid in the bottle, and if that happens, you don’t want to put it on your board.
Unless! (There’s always an “unless.”) Unless you use a walnut oil specifically formulated for woodworking. These WOs have had a particular protein removed – the one responsible for rancidity. Here’s the one I like best.

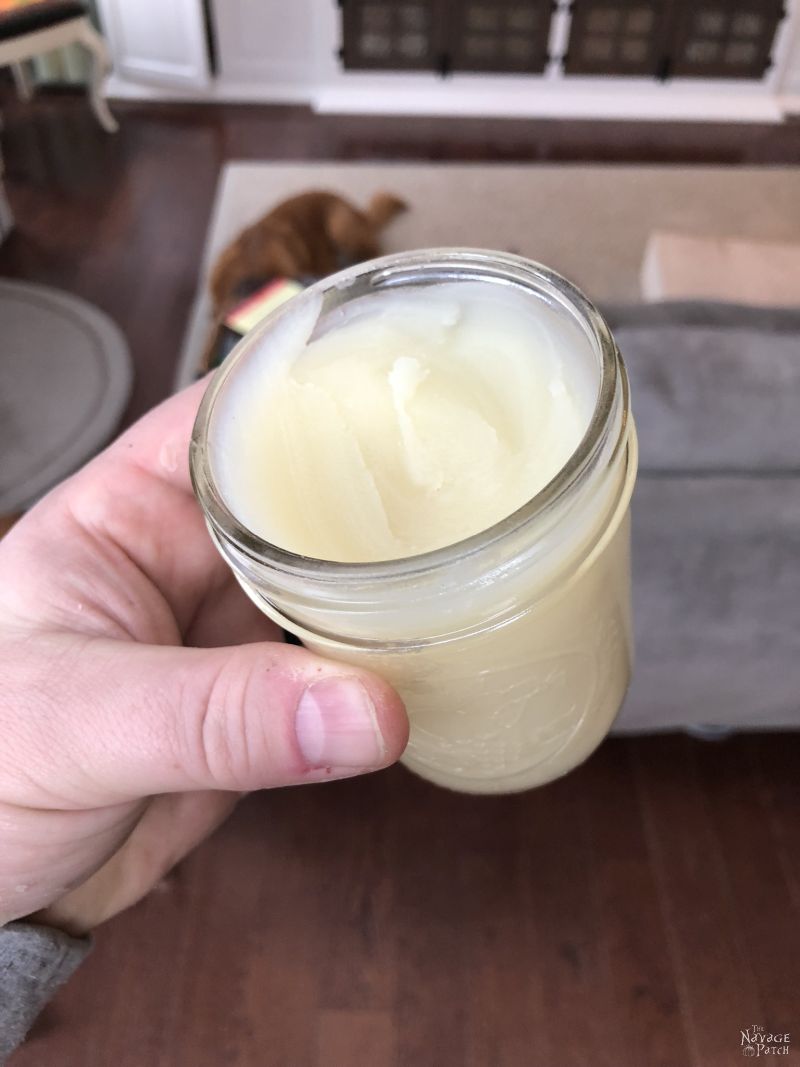
Now, just using walnut oil would be a great way to protect the board. In fact, I start by giving the board two hearty coats of walnut oil, waiting a day between coats. But then I make it even better by adding beeswax to the mix.
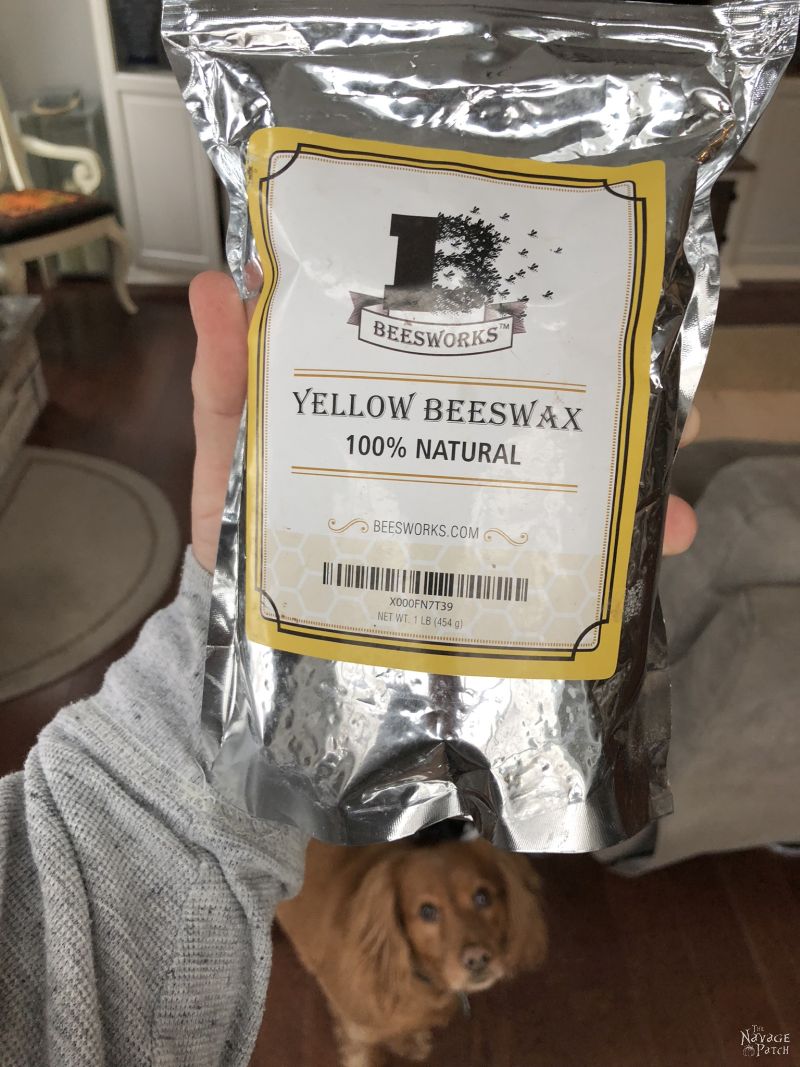
I add one part beeswax to four parts walnut oil in an old saucepan and heat it over low heat until the beeswax has melted. I then coat the board one last time with the walnut oil/beeswax mixture using a folded paper towel. When the mixture has cooled for a while, I wipe off the excess with a clean paper towel.
Before the oil mixture in the pot cools, I pour it into a glass container with a lid. I use an 8 ounce canning jar. Once the oil/wax mixture cools, it will have the consistency of shortening. I use it every couple of weeks to keep the board properly oiled and in good shape – just put a dab on a paper towel and wipe it all over the board. I store my board butter in a cabinet. Remember – if you use a woodworking walnut oil, it will never go rancid!
Recently, I’ve started using board butter on my varnished boards, and it has worked out brilliantly. The boards are still protected throughout, but the board butter adds another layer of waterproofing on the surface and combats the dry wood that results from heavy use. The combination of varnish and board butter is a winner, and I will be incorporating it into all of my future boards.
*Note about nut oils and nut woods: be advised that walnut oil is toxic to folks with certain nut allergies, as is walnut lumber for a smaller percentage. Know your audience, and use accordingly. Certain woodworking walnut oils have had the compound responsible for allergic reactions removed, but that is case-by-case, so know your oil!*
Okay, let’s get back to the beauty shots! Enjoy!

End Grain Cutting Board Plans
For those wishing to replicate this design, here is the cut list. Boards are 5/4 thickness:
Source board length: 27 inches
Source board thickness: 1 1/32 inch (This is smaller than the 5/4 source board thickness to account for initial planing and the planing after the first glue-up)
End grain slices: 19 (This number should always be odd in order to maintain design symmetry)
End grain cutting board thickness: 1 1/4 inch
This is the order in which you will place the boards in the clamps for the initial glue-up.
- Maple 5/16 inch
- Walnut 1 3/4 inches
- Redheart 7/8 inch
- Walnut 1/4 inch
- Maple 1/4 inch
- Jatoba 1 inch
- Walnut 1 3/4 inches
- Redheart 7/8 inch
- Maple 1/4 inch
- Walnut 2 inches
- Maple 3/4 inch
- Walnut 1/4 inch
- Redheart 7/8 inch
- Walnut 1 13/16 inches
Good Luck and thanks for reading this tutorial on how to make an end grain cutting board!
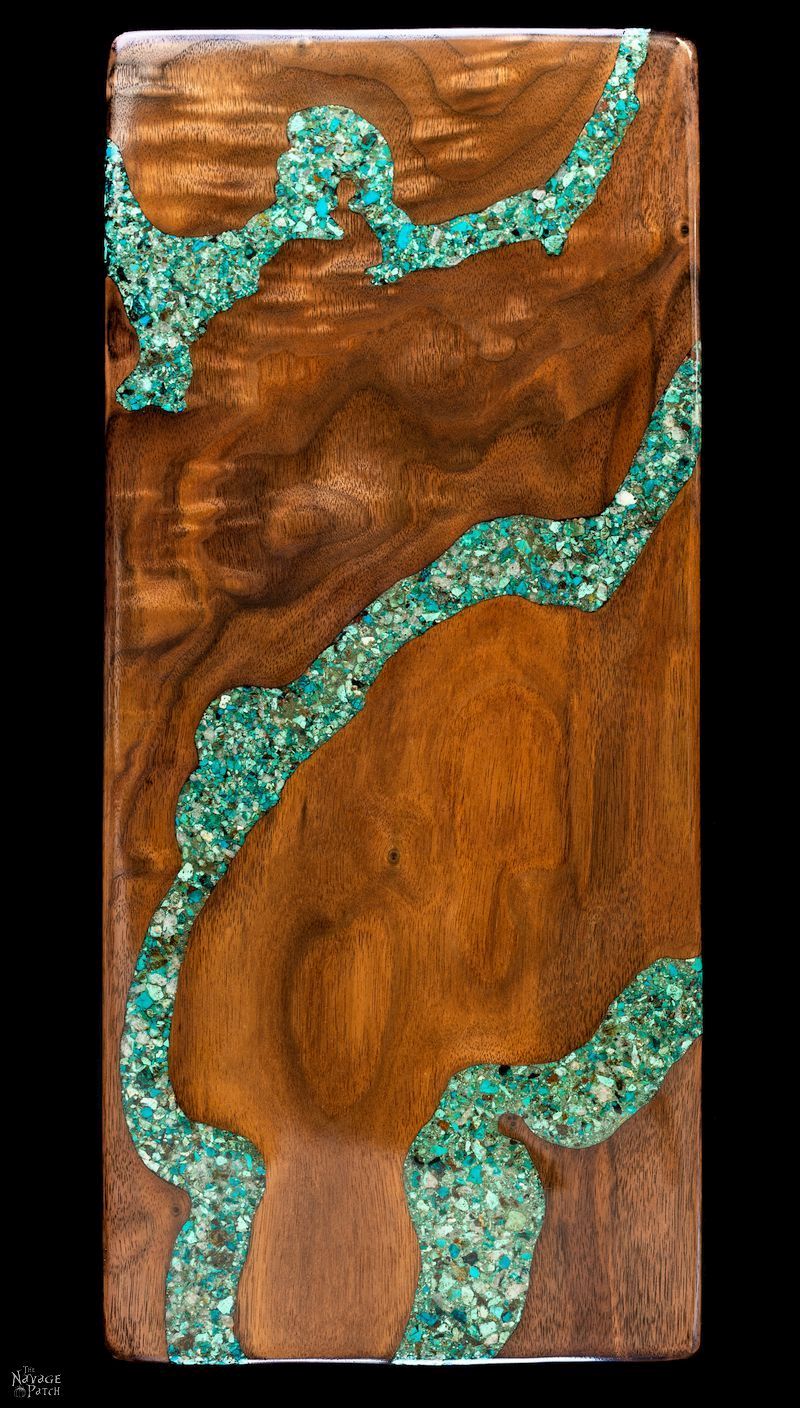
If you liked my DIY cutting board and you want to try a different challenge, head on over to my tutorial on how to make a cheese board with crushed turquoise inlay!
We love it when you share our posts on Facebook and Pinterest!
Greg your artwork is absolutely stunning! Lucky friend! Thank you for the education in this article too!
Thank you, Christina! I’m glad you enjoyed it.
Wow! I absolutely loved this. Beyond what I’m capable of with the tools I have, but one day….
Thank you, Nettie!
I would like to order cutting boards. Please advise prices. P.S. I volunteer with Sue at the SCS.
I would like to order cutting boards. Please advise prices. P.S. I volunteer with Sue at the SCS.
I, too, make cutting boards. Thank you for such a detailed “blog” as to what you used and how you did it. I know the mechanics, but having your lumber choices is quite helpful. I may well make this one in the near future.
Thanks again Greg and happy holidays to you,
Thank you, Steve! Good luck if you decide to make the board, and Happy Holidays to you and yours.
Greg, I have a question regarding your thickness planer. I have the Dewalt 735 (as you do). Mine currently has the “factory” 3 blade system in it. I am about to upgrade it to a Byrd Helical cutterhead. In the meantime, (there is a 4 to 6 week back-log for the Helical) are you using the sacrificial pine on the ends with the 3 blade system? I’ve never used the sacrificial boards since I thought the end grain would be too tough on the blades.
Thanks in advance for any help you may offer.
Hi Steve,
First – thank you! I’ve never heard of the Byrd Helical cutterhead, and now that I’ve read about it, I will definitely get it.
I use sacrificial pine when I remember to do so. Often, I’m thinking three steps ahead, and I totally forget. When that happens, I have to plane VERY slowly, micro-adjusting the cutter head each time. Otherwise, I’ll get pretty nasty tearout. I can usually just trim the end, and no one is the wiser, but once or twice I ended up with a smaller board, as I had to cut out the whole section.
Regarding end-grain being too tough on the blades…well it kind of is. The blades certainly don’t last as long as they would otherwise, but planing is certainly possible and definitely a time-saver.
Thanks again for the helical heads up!
-G
At one point in time I used to take my boards to a local cabinet shop and have them plane the end grain for me. What their technician always did first was take the board to the belt sander and “break the edges” of the board. That helped somewhat with chip-out, but not totally.
Here is the web site I ordered my Helical cutter from. They are located in Canada, but the cutter will ship directly from Kentucky where the Byrd facility is. And the price is THE BEST I’ve ever seen on the internet. https://shelixheads.com/SHELIX-heads_for_Planers/SHELIX_Heads_for_Planers_by_DEWALT/SHELIX_for_dewalt_13_inch_Planer_(DW-735)
Excellent. Thank you!
Writes the cutting board, which reads learned a lot about this. Your brewing process has been extraordinary and very beautiful. This is an important thing, quality, or cutting board, work is not helpful because the more one becomes. I liked it. If I want to write more. thank you.
Thank you, Winnie!
Where did you find 5/4 lumber in the exotics and domestics> At one Place? Would love to know.I can 4/4 or 8/4 but the rest hit and miss. Thanks
Hi Joe, I get my wood from Parkerville Wood Products in Manchester, CT. They sell 5/4 in everything I use except the redheart. For that I buy 4/4. The thickness of my redheart strips in the final board can never be greater than about 15/16″ (the thickness of the source board after planing). I cut the strips to the thickness of the cutting board (1 1/4″ to 1 1/2″), then turn them 90 degrees to use them in the glue up.
I used to use 8/4 when I first started making boards, but found the resulting patterns and boards to be a little too clunky. With 5/4, I can still make a thick board, and I can make a more intricate pattern. -Greg
This is awesome! I’d love to make one, but am having trouble finding the African Mahogany and Redheart woods you used. Can you tell me where you found yours? Thank you, and great job on a really cool (and beautiful!) project!
Thank you, Virginia! I used African Mahogany because I had it on hand, but you can also substitute jatoba. I buy my wood at a specialty wood store called Parkerville Wood Products in Manchester, CT. Search to see if you have a similar store in your area. If not, you can google “exotic wood online store” and you should find places that will ship. Good luck, and send me a picture of your project when finished!
A work of art! Thank you for sharing!
Thank you, Ginger!
You could sell these. Let me no if you ever do
Thank you, Pam!
BEAUTIFUL!! When will I be gettin’ mine? I’ll be waiting for the delivery guy (at which point, I shall TACKLE him!!)
LOL, thank you, Joanie!
This is beyond beautiful. Wish I could buy one
Thank you, Janell!
I seen this before by someone else and always with beautiful results. It’s always good to see that there are people out there that have excellent ideas working with wood.
Thank you, Ramón!
Very nice board and easy to do instructions! What can you tell us about the rubber feet you used with this board? Source of and why these over the standard high dome type? Thankyou
Hi Bryan, I get the feet used in this board (1 1/2 inch) and also 1 inch feet at Home Depot. If you scroll back up a bit to the part where I’m attaching the feet, you’ll see the two links. I use these particular feet because they are cheap and readily available at my local Home Depot store. The only modification I make is to throw away the screws that come with them and replace them with stainless steel screws of the same size.
A very good blog and a very pretty board. Look forward for more
Thank you, Fred!
This is fantastic! There are some great cooks in my family who would love this! Thank you so so much!
Thank you, Shirley! 🙂
Greg, Thank you for the invaluable information, step by step. I had my own lumber, some black walnut, maple and some Padauk. I planed my lumber and decided to create my first end grain cutting board. I thought that this might take me at least a week to finish and was shocked that I was able to complete the board in 3 days! The board will be a gift for my wifes parents who live in South Korea. The board turned out so good that my wife thought that I had gone out and purchased it! I have wanted to make one of these for some time, but really had no clue as to what to do. My next one, I hope, will be a 3D end grain board. Any suggestion surely would be appreciated.
Hi Matthew, I’m happy you found my post useful! I’d love to see a picture of your board. Can you send a pic or two to greg@thenavagepatch.com? I’ll post your board on our Facebook page. Regarding the 3D board, I’ve never made one, though I considered it a couple of years ago. I think what held me back at the time was my thought that I wouldn’t be able to get accurate angle cuts with my table saw, since it doesn’t have stop locks at certain crucial angles like my compound miter saw has. Someday, I’ll attempt one, as it seems like a good challenge, but right now, I’m working on a couple of turquoise inlay cheese boards. I’ll have a post about those when I get around to finishing them. Thanks again for reaching out, and good luck with your future projects!
Gorgeous! You really have talent, and you use it well. Thanks for the tutorial; I’ll never get one made, but I can certainly admire the quality of the workmanship of your cutting boards. Have you ever thought of making an inlaid jewelry box? Would be an excellent use of the small scraps you have left over after one of these projects.While living in Capetown, RSA, I was blessed to find a man in my neighborhood who made them, and I gladly paid about 150 bucks for the one I brought home. It’s worth far more. Keep up the excellent work. Your wife is truly blessed!
Cindy in GA
Thank you, Cindy! I like that idea – I have tons of scraps and plenty of stone. That might be a future project! 🙂
The cutting board is very nice,but do not use the Mineral Spirit at all.it is poisonous.Use the Mineral Oil’find it at Walmart Pharmacy
I was able to follow this and build the board successfully. I had some challenges on final glue up and had to go back and fill some gaps. Should have planed it once more before the final cut. Thanks
Hi Doug, I’m glad it worked out for you (mostly). Have you tuned your table saw and planer recently? If they’re even the slightest bit off square, it can leave gaps in the board. I know this from experience before I spent countless hours tuning my Ridgid table saw.
Absolutely stunning craftsmanship. Truly beautiful! Thank you for providing such detailed information too.
Thank you so much, Christine!
Thanks for this great tutorial! I will be making one in the near future. Also, your walnut oil/beeswax butter! Isn’t it great?! I use it on wooden spoons, etc. anything wooden in the kitchen gets “buttered”.
You’re welcome, Terri! Yes, board buttered is the best! Please send pics of your finished board – greg@thenavagepatch.com
Greg this is a wonderful tutorial! May I ask a favor. Would you put a warning in the tutorial about nut allergies. And some suggestions of alternate woods. Some folks are so sensitive to tree nuts that they even react when food is prepped on nut woods and walnut is a biggie. Also for the butter. I’m not speaking of rashes here, I’m talking anaphylaxes.
Okay, Derry 🙂
wow greg this is stunning i would be afraid of using it for fear i might mar it, i think i would put it so everyone just could admire it xx
LOL, I’ve made these for people in that past, and they don’t use them for that very reason! It is hard to make that first cut but after that, it’s no problem!
Did you just pat me on the head?
LOL! No! Well, maybe just a little. But I am going to change the post. I was aiming to do it last week – I even had the post editor open. But then something sidetracked me, and I forgot all about it. I’m getting old, Derry.
Now you’re making me laugh! Especially with the old business! You have no idea how much worse it gets! Ah, to be young again!
THAT IS a thing of beauty!!! WELL DONE!! franki
Thank you, Franki! 🙂
Everyone else has said it already, but….absolutely stunning! Talented artisan!!
Thank you so much, Linda!
Wow, this cutting board looks incredible! Man, your work is amazing. Thank you for sharing the details and congrats!
Thank you, Diana!
Just beautiful. Thank you for all of the information.
Thank you, Fran!
Hi GREG,I really like your board design,Your measurements are in decimals,are the sizes of pieces too critical to convert to nearest fraction?My cutting tools are hard to get super accurate. I don`t want to glue up and cut slices that won`t line up correctly.Thanks for any advice. Bob
Thank you, Bob! I’m so glad you wrote because when I published that post, those measurements were in fractions! Somehow the program I use to write these posts changed everything to decimals. I’ve changed them back to fractions, and hopefully now they’ll stay that way. Please have another look at the post, and you’ll see the measurements in units you can understand. Good luck, and send me some pics of your finished board.
GREAT!!! Thanks. Bob
I was most interested in your end grain board tutorial. However I was completely baffled when you got to the point where you were covering the entire surface of the board with glue. Surely it is not double thickness is it. I could not understand that bit. Could you clarify that to me please.
Thank you
Richard Blackburn
United Kingdom
Hi Richard, before covering all those pieces in glue, I had rotated them 90 degrees clockwise. I then took each piece one-by-one, rotated it counterclockwise 90 degrees and glued it to the piece preceding it. Put another way: once I had the pieces of the board laid out in their final pattern, I rotated each piece (except the very first) 90 degrees clockwise. The only reason for this is to speed up the application of glue for the glue up. All the pieces get glue applied at the same time, and then I position them one at a time. I hope I’ve cleared it up a bit for you, but if not, please let me know.
Cheers,
Greg
Greg, I’m from India , at 55 ,I like wood working, it’s good and easy to survive rest of life, I like your this job.
You start training institute for 55+ people’s, so they are busy and earn some money, if I got USA visa ,I will be your Frist student. I will pay all my expenses, and your fee .
Hello to Mam.
Best regards
Hello, Raju! I’m afraid I’m not skilled enough to teach woodworking, but I’m happy you think so! Thank you so much for writing!
Can you please tell me as an English woodworker what 5/4 8/4. Etc is in measurement terms. The board looks fantastic, I could probably work it out myself but it would be nice to know, thanks Andy.
Hi Andy, we measure wood thickness in 1/4 inch increments, so 5/4 would be 1 1/4 inches, 8/4 would be 2 inches, etc. Thanks for stopping in!
Once I had the initial glue up in place and was ready to run it through my 735 planer, which has a 13″ capacity, I realized that the total measurements of the pieces once glued was exactly 13″. Is this not correct? My board measured 13.025″, probably due to slightly oversized pieces, and would just not go through the planer. I didn’t know if the design would be compromised if I took a very small shaving off of the 1 & 13/16″ walnut strip so I ended up using my drum sander to flatten the board once glued.
Oh, that’s a bummer! Yeah, I think you would have been fine if you shaved off a couple hundredths of an inch. Good thing you had a drum sander! How did the board turn out?
This cutting board is just way to gorgeous to cut on! Love all the rich tones of the wood used. Excellent work. Lucky friend. I don’t do woodwork, but thoroughly enjoy your blog.
Thank you, Jennifer! I made another similar one for myself, and I use it every day! But yeah, that very first cut was a little difficult to make, lol!
I really appreciate the step-by-step directions you provide. I just had one question about the walnut oil/beeswax finish. Do you start with varnish and then do two coats of walnut oil or do you now completely skip the varnish? I like the idea of omitting varnish but want to make sure I have adequate protection.
Thanks.
Hi Kirk, I use the salad bowl finish (varnish) first. This is the base finish – the one that will seal the board throughout. But the surface finish will wear and dry out with use, so I use the beeswax/walnut oil for board maintenance. With my daily, heavy-use board, it may be a couple of months before I need to start with the wax/oil. After trying some boards with just varnish and others with just mineral oil and others still with just beeswax/walnut oil, I’ve found the best combination is the diluted varnish followed with the beesawax/walnut oil maintenance regime.
Hi Greg:
We absolutely love your cutting boards! Your work is beautiful. Thanks for sharing.
I’ve been making end grain cutting boards for years and have had excellent success with Mineral Oil as a finish. It’s very easily applied (just use a small piece of terry cloth). Slather it on, and let it soak in. If there’s any left on the surface after a couple hours, simply wipe it off. Mineral Oil is inexpensive, and readily available at Big Box pharmacies in the laxative section. It’s also food safe.
We have a board in our kitchen that I made 5 years ago, and it still looks terrific. It’s re-oiled approximately monthly when it begins to look “dry”.
Most of what I make is given as a gift, and I always include a bottle of Mineral Oil, along with written instructions for its’ use. The easier it is to care for any project, the more likely that care will be done.
Thanks again for your work!
Bob
Hi Bob, thank you so much! You’re right about mineral oil – it’s a classic finish that many swear by, and you can’t go wrong with it. Have you tried mixing the mineral oil with beeswax to make a board butter? it’s also an excellent finish, and it’s simple to apply!
Greg, i have been building cutting boards for a few years now and i found this cutting board sealer called ” good stuff, it is very easy to apply and wipe off and will last for several months before having to reapply. You can find it on Amazon.
Hi Gary, thanks for the tip! It looks like a great product. Here’s the link for those who may be interested: https://amzn.to/2QyQ4zj
Greg, I just stumbled across this thanks for sharing. You mention that walnut oil never goes rancid, I have read that it does go rancid. Where did you get this data? I would love to use walnut oil but have not based on what I have read previously.
Hi Chris, yeah WO is a tricky beast. Okay, so walnut oil in a bottle will go rancid in time (unless it is a special woodworking formulation that has had a certain protein removed). But since walnut oil is one of the few polymerizing oils (aka drying oils) like linseed and tung oil, it won’t ever go rancid on a board, because it will have polymerized/dried/hardened into a protective shell long before going rancid. That said, you’d want to steer clear of putting rancid oil on a board, as that may have negative health consequences even after polymerization. Also of note: certain store-bought food-grade WOs have been treated to retard polymerization (though I don’t think they explicitly say it on the bottle), so these would take longer to dry. Best bet (though not what I did for this board) is to buy a woodworking WO like Mahoney’s. Good luck!
Greg,
Really nice work! And excellent instructions and photos. I just finished a board with this design as a gift for my daughter (with different woods) and love the result. Thanks for sharing your knowledge.
Thank you so much, Blaine! I’m so happy to hear that yours turned out great!
Greg. I am relatively new to cutting boards. I have made a couple of simple end grain boards but nothing like this one. I not sure I read this correctly but the final thickness of your source boards (after planing) was 11/32-less than 1/2″?. The pictures look like this boards are much thicker.
Thanks
Hi Carey, the source boards were 1 1/32, not 11/32. sorry about the confusion – the font makes that space a little tricky to see!
A bit of an issue for a basic home planner. Mine is only 12 1/2″ wide and the boards measure well over that. So now I have to pay for a professional company who has an industrial size planner to take care of it. I’m sure will be beautiful when it done.
Oh shoot! My planer is 13″ so I made the board as wide as I could. I hope it doesn’t cost you an arm and a leg, John.
any chance you can upsize the plans for a 24×36 inch final piece?
Beautiful board and thanksfor the tutorial
Párese Magia….
Realmente preciosa
Te agradezco mucho
Tu claro tutorial.
Un abrazo 🫂.
When you cut the 27 inch pieces, do you sand the sawed edges or plane them? You just said you glued them, so one would assume not. Just curious. Great information. Thanks
Excellent tutorial! I just need to make it into a PDF.
Thanks, Glenn!
I followed your tutorial but because my planer is a 12.5′, I simply removed the second and last walnut strips and still ended up with an amazing product with lots of complements. Thanks a lot.
You mentioned you planed the final end up product as I did but took off very fine shavings. Subsequently I read that this is a no-no. The product can explode and harm someone or the planer. Do you buy into this advice?
I hadn’t read that before your comment – thanks for letting me know! Sanding is definitely safer.