Guest Bathroom Renovation | How to tile a floor like a pro | DIY floor tiling | How to cut tiles | How to repair broken ceramic tiles | How to lay subfloor | DIY subflooring | How to grout tiles | DIY tile grouting and sealing | How to seal your tiles and grouting | DIY bathroom flooring | When to use concrete board as subfloor | How to choose grout color | DIY tile spacers | How to lay tiles | DIY tile installation | How to install ceramic tiles | DIY porcelain tiling | Before & After | DIY Bathroom Renovation | TheNavagePatch.com

How to Lay Tile Flooring

· ·

In part 2 of our guest bathroom renovation, we’ll show you how to lay tile flooring – from sub-floor to sealant. Let’s have a look at how it’s done!
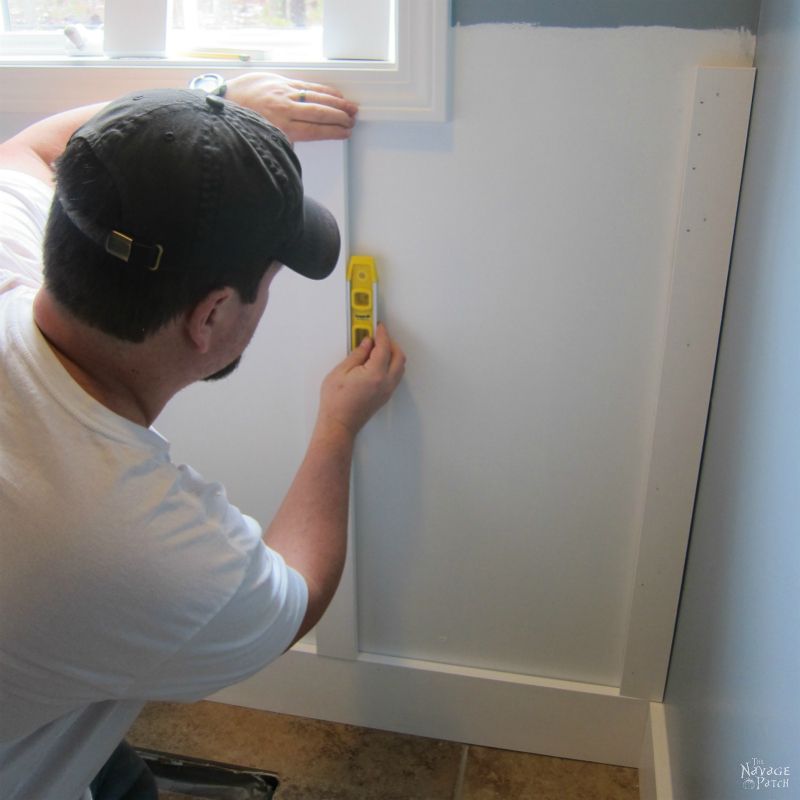
CONTINUED FROM>>

When we started this job on Saturday, we thought we’d be able to finish the tiling on Sunday. Though we’re steaming full-speed-ahead into middle age, we still plan projects like we’re in our 20s. But when the work starts, our bodies revolt and act their true age. [“We” as in “Greg and the mouse in his pocket.” I’m still a spring chicken! hahahaha. – Handan] [Clam it, Old Woman! -Greg]

Everything hurts more after forty.

Unless you’re one of those fitness nuts, in which case, good for you!

Now go away, and leave us unenlightened slobs in peace.

And take your Vitamin Water with you!

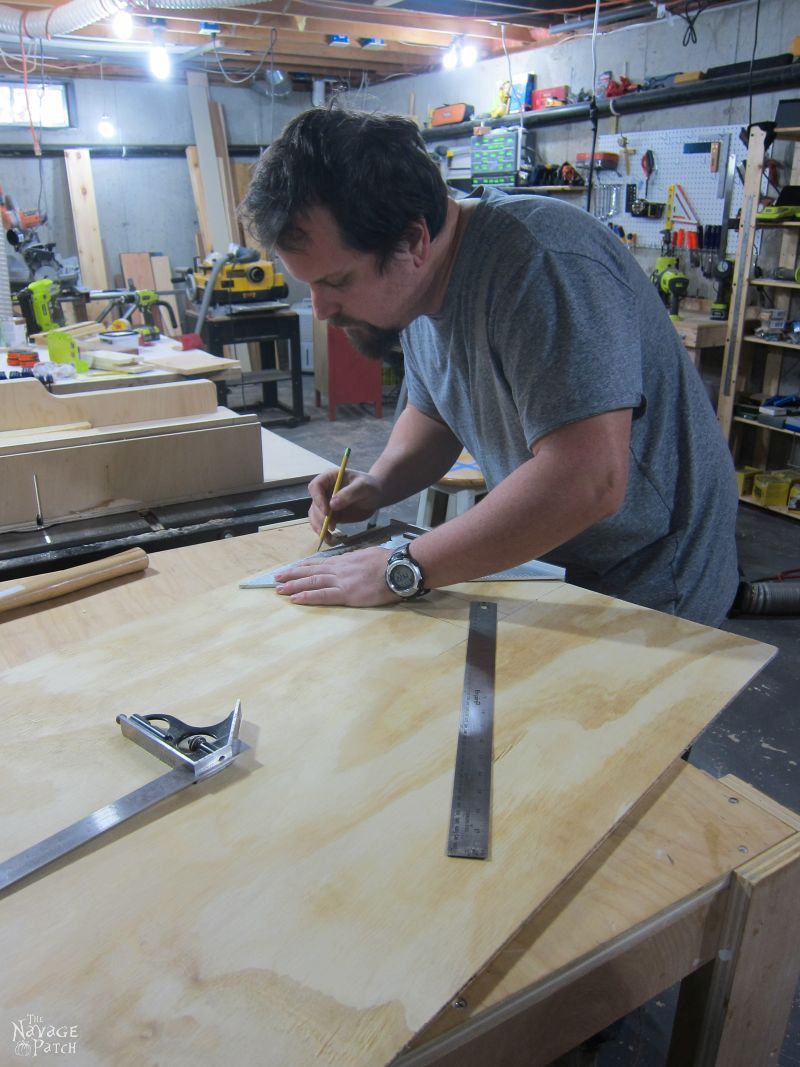
We started the morning with another trip to Home Depot to pick up some 1/4 plywood for the sub-floor. When we got back home, we measured where I’d need to make cutouts for the heating register and toilet hole (that’s probably not the correct term. Poop pipe? Yeah, that’s more like it.)

After measuring, I drew my register cutout on the plywood.

Guest Bathroom Renovation | How to tile a floor like a pro | DIY floor tiling | How to cut tiles | How to repair broken ceramic tiles | How to lay subfloor | DIY subflooring | How to grout tiles | DIY tile grouting and sealing | How to seal your tiles and grouting | DIY bathroom flooring | When to use concrete board as subfloor | How to choose grout color | DIY tile spacers | How to lay tiles | DIY tile installation | How to install ceramic tiles | DIY porcelain tiling | Before & After | DIY Bathroom Renovation | TheNavagePatch.com

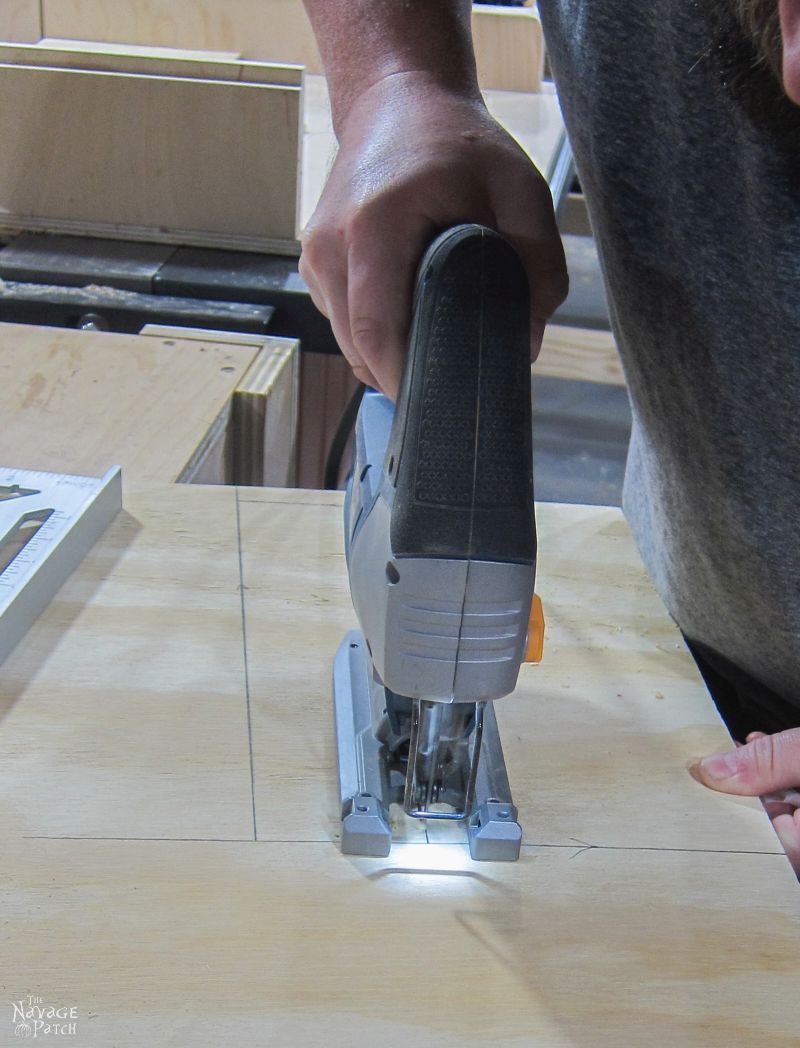
I drilled a hole inside the cutout area.

Guest Bathroom Renovation | How to tile a floor like a pro | DIY floor tiling | How to cut tiles | How to repair broken ceramic tiles | How to lay subfloor | DIY subflooring | How to grout tiles | DIY tile grouting and sealing | How to seal your tiles and grouting | DIY bathroom flooring | When to use concrete board as subfloor | How to choose grout color | DIY tile spacers | How to lay tiles | DIY tile installation | How to install ceramic tiles | DIY porcelain tiling | Before & After | DIY Bathroom Renovation | TheNavagePatch.com

I then inserted the jigsaw blade into the hole and proceeded with the cutout.

Guest Bathroom Renovation | How to tile a floor like a pro | DIY floor tiling | How to cut tiles | How to repair broken ceramic tiles | How to lay subfloor | DIY subflooring | How to grout tiles | DIY tile grouting and sealing | How to seal your tiles and grouting | DIY bathroom flooring | When to use concrete board as subfloor | How to choose grout color | DIY tile spacers | How to lay tiles | DIY tile installation | How to install ceramic tiles | DIY porcelain tiling | Before & After | DIY Bathroom Renovation | TheNavagePatch.com

When the cutouts were finished, I trimmed the boards to the length of the room and laid them into place. Then came the hard part: me on my knees, screwing the plywood into the slab. I thought life was supposed to get easier as you got older? Shouldn’t I be sunning my flab on a tropical beach somewhere, iced daiquiri in hand, instead of crawling around on all fours stabbing screws into a floor? [How about a dry martini, a steak and a movie, my babes? đŸ™‚ – Handan]

Guest Bathroom Renovation | How to tile a floor like a pro | DIY floor tiling | How to cut tiles | How to repair broken ceramic tiles | How to lay subfloor | DIY subflooring | How to grout tiles | DIY tile grouting and sealing | How to seal your tiles and grouting | DIY bathroom flooring | When to use concrete board as subfloor | How to choose grout color | DIY tile spacers | How to install ceramic tiles | DIY porcelain tiling | Before & After | TheNavagePatch.com

Eight groans, seventeen grunts and six curses later, I finished screwing in the sub-floor. Or so I thought…

Guest Bathroom Renovation | How to tile a floor like a pro | DIY floor tiling | How to cut tiles | How to repair broken ceramic tiles | How to lay subfloor | DIY subflooring | How to grout tiles | DIY tile grouting and sealing | How to seal your tiles and grouting | DIY bathroom flooring | When to use concrete board as subfloor | How to choose grout color | DIY tile spacers | How to install ceramic tiles | DIY porcelain tiling | Before & After | TheNavagePatch.com

…because I had tried to cheat. The original sub-floor had easily twice as many screws as I put in. Why so many screws? I wondered. Bah, not needed. But the sub-floor sprung under my feet when I walked on it. Ugh, that’s why so many screws. Okay, back on my knees, then. Have I mentioned I hate crawling around on my knees?

Guest Bathroom Renovation | How to tile a floor like a pro | DIY floor tiling | How to cut tiles | How to repair broken ceramic tiles | How to lay subfloor | DIY subflooring | How to grout tiles | DIY tile grouting and sealing | How to seal your tiles and grouting | DIY bathroom flooring | When to use concrete board as subfloor | How to choose grout color | DIY tile spacers | How to install ceramic tiles | DIY porcelain tiling | Before & After | TheNavagePatch.com

If you’re using plywood for a sub-floor, you’ll need a lot of screws. It was only after we had laid the tile and after my Part 1 post that we learned of the existence of WonderBoard – a cement backer board sub-flooring for use under tiling. Though it was too late to use it for this project, we took a look at it this past weekend in Home Depot. We weren’t thrilled with the way the concrete stuffing crumbled at the edges of the WonderBoard product, but there was another similar product called Hardie Backer that looked much better. For this guest bathroom that doesn’t see a lot of moisture, plywood is perfectly fine for the sub-floor, but if we were to re-tile our master bath or Barish’s bathroom, I’d go for the Hardie Backer. Since cement board needs to be adhered to the slab with thin set mortar, it alleviates the need for all that horrendous screwing – an added bonus in my book!

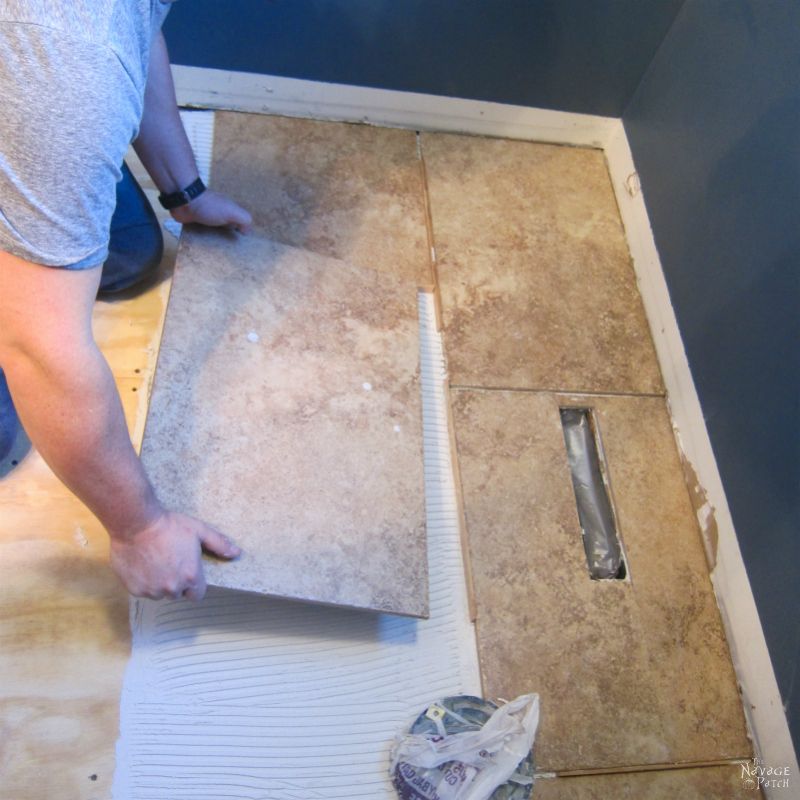
With the new sub-floor laid and vacuumed, Handan and I were ready for the main event. We brought the tiles in from the garage and laid them in their places. We were using a mix of 16×16 and 16×20 tiles. Handan arranged them into a pattern, and I measured the gap between tiles to be 3/16 inch.

Now, a smart man would have looked a little closer at the entire tile aisle at Home Depot when buying grout and mortar, as we did that weekend. A smart man would have then seen the cement board. A smart man would have also seen tile spacers that come in all different sizes, including 3/16 inch. I am not a smart man, at least when it comes to DiY. Daring? Yes. Foolhardy? Perhaps. Handsome? Damn straight. But not smart. Handan is the smart one. I just throw plaster against the wall and see what sticks. So instead of buying a bag of cheap plastic spacers, I went and made my own from a scrap piece of exotic hardwood. I can’t ever seem to do things the easy way. Perhaps if I planned more…? Yeah, screw that, I’ll keep doing things my way.

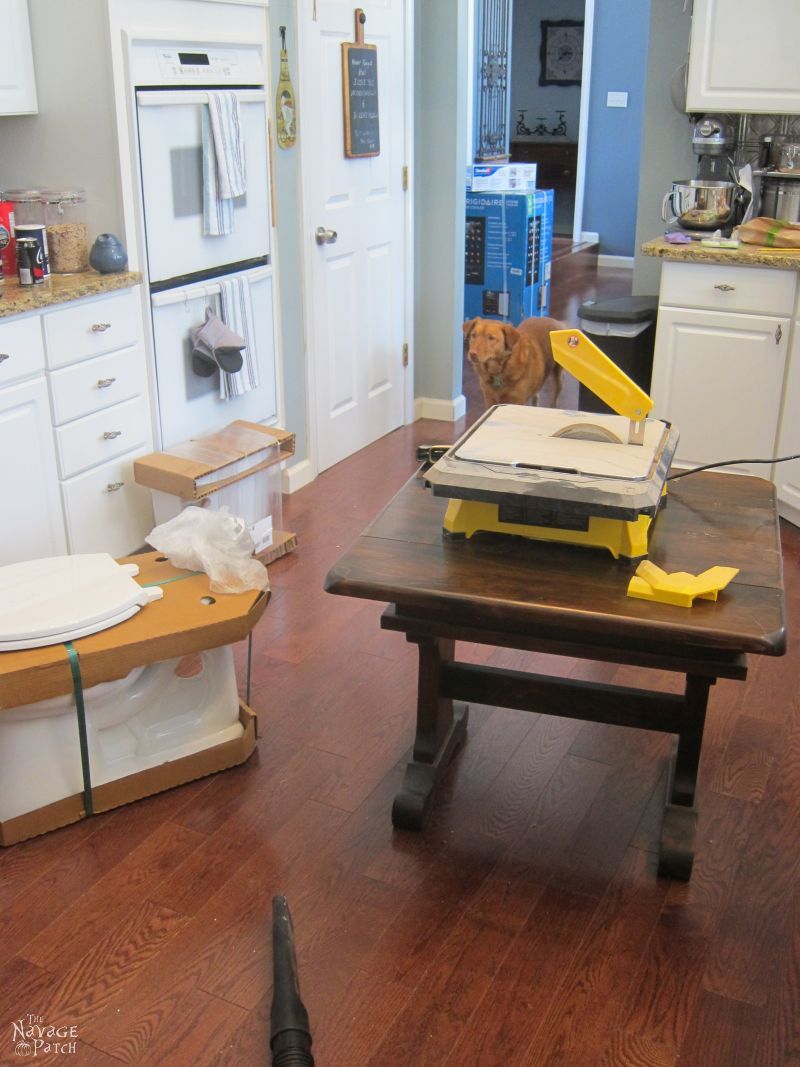
Before laying the tile, we needed to cut some of the them to fit around the register and the poop pipe. Others had to be trimmed to fit the room. Fortunately, we had a tile saw in the basement from a previous pre-blog wall-tiling project we did a few years back (and when I say “we,” I mean “Handan.” I only cut the tile. She did everything else for that project!)

We set up the tile saw on a small side table in the kitchen.

Guest Bathroom Renovation | How to tile a floor like a pro | DIY floor tiling | How to cut tiles | How to repair broken ceramic tiles | How to lay subfloor | DIY subflooring | How to grout tiles | DIY tile grouting and sealing | How to seal your tiles and grouting | DIY bathroom flooring | When to use concrete board as subfloor | How to choose grout color | DIY tile spacers | How to install ceramic tiles | DIY porcelain tiling | Before & After | TheNavagePatch.com

Hmmmm….that gave me an idea…

Guest Bathroom Renovation | How to tile a floor like a pro | DIY floor tiling | How to cut tiles | How to repair broken ceramic tiles | How to lay subfloor | DIY subflooring | How to grout tiles | DIY tile grouting and sealing | How to seal your tiles and grouting | DIY bathroom flooring | When to use concrete board as subfloor | How to choose grout color | DIY tile spacers | How to install ceramic tiles | DIY porcelain tiling | Before & After | TheNavagePatch.com

Yeah, that’s more like it!

I started cutting the required pieces.

Guest Bathroom Renovation | How to tile a floor like a pro | DIY floor tiling | How to cut tiles | How to repair broken ceramic tiles | How to lay subfloor | DIY subflooring | How to grout tiles | DIY tile grouting and sealing | How to seal your tiles and grouting | DIY bathroom flooring | When to use concrete board as subfloor | How to choose grout color | DIY tile spacers | How to install ceramic tiles | DIY porcelain tiling | Before & After | TheNavagePatch.com

The tile saw blade stayed cool by rotating through a small reservoir of water inside the saw housing.

Guest Bathroom Renovation | How to tile a floor like a pro | DIY floor tiling | How to cut tiles | How to repair broken ceramic tiles | How to lay subfloor | DIY subflooring | How to grout tiles | DIY tile grouting and sealing | How to seal your tiles and grouting | DIY bathroom flooring | When to use concrete board as subfloor | How to choose grout color | DIY tile spacers | How to install ceramic tiles | DIY porcelain tiling | Before & After | TheNavagePatch.com

This created a lot of spray, which is why they incorporated that combination safety guard/spray guard. But sometimes I would need to lift the guard a bit to get a better look at my cut, resulting in my shirt and face getting soaked with a gray slurry of water and tile dust. I found a solution to that problem and soldiered on.

Guest Bathroom Renovation | How to tile a floor like a pro | DIY floor tiling | How to cut tiles | How to repair broken ceramic tiles | How to lay subfloor | DIY subflooring | How to grout tiles | DIY tile grouting and sealing | How to seal your tiles and grouting | DIY bathroom flooring | When to use concrete board as subfloor | How to choose grout color | DIY tile spacers | How to install ceramic tiles | DIY porcelain tiling | Before & After | TheNavagePatch.com

When the cutting was finished, I took the toilet for a dry run.

Guest Bathroom Renovation | How to tile a floor like a pro | DIY floor tiling | How to cut tiles | How to repair broken ceramic tiles | How to lay subfloor | DIY subflooring | How to grout tiles | DIY tile grouting and sealing | How to seal your tiles and grouting | DIY bathroom flooring | When to use concrete board as subfloor | How to choose grout color | DIY tile spacers | How to install ceramic tiles | DIY porcelain tiling | Before & After | TheNavagePatch.com

Excellent!

For the tile that would wrap around the floor register, I made two parallel cuts with the tile saw. My plan was then to chip out the notch with a hammer and chisel. I took the tile to the basement, set it on a worktable and gave it a tentative hit with the hammer and chisel.

Nothing.

I hit a little harder.

Nothing.

I hit it harder still.

The notch cleaved off in two clean pieces.

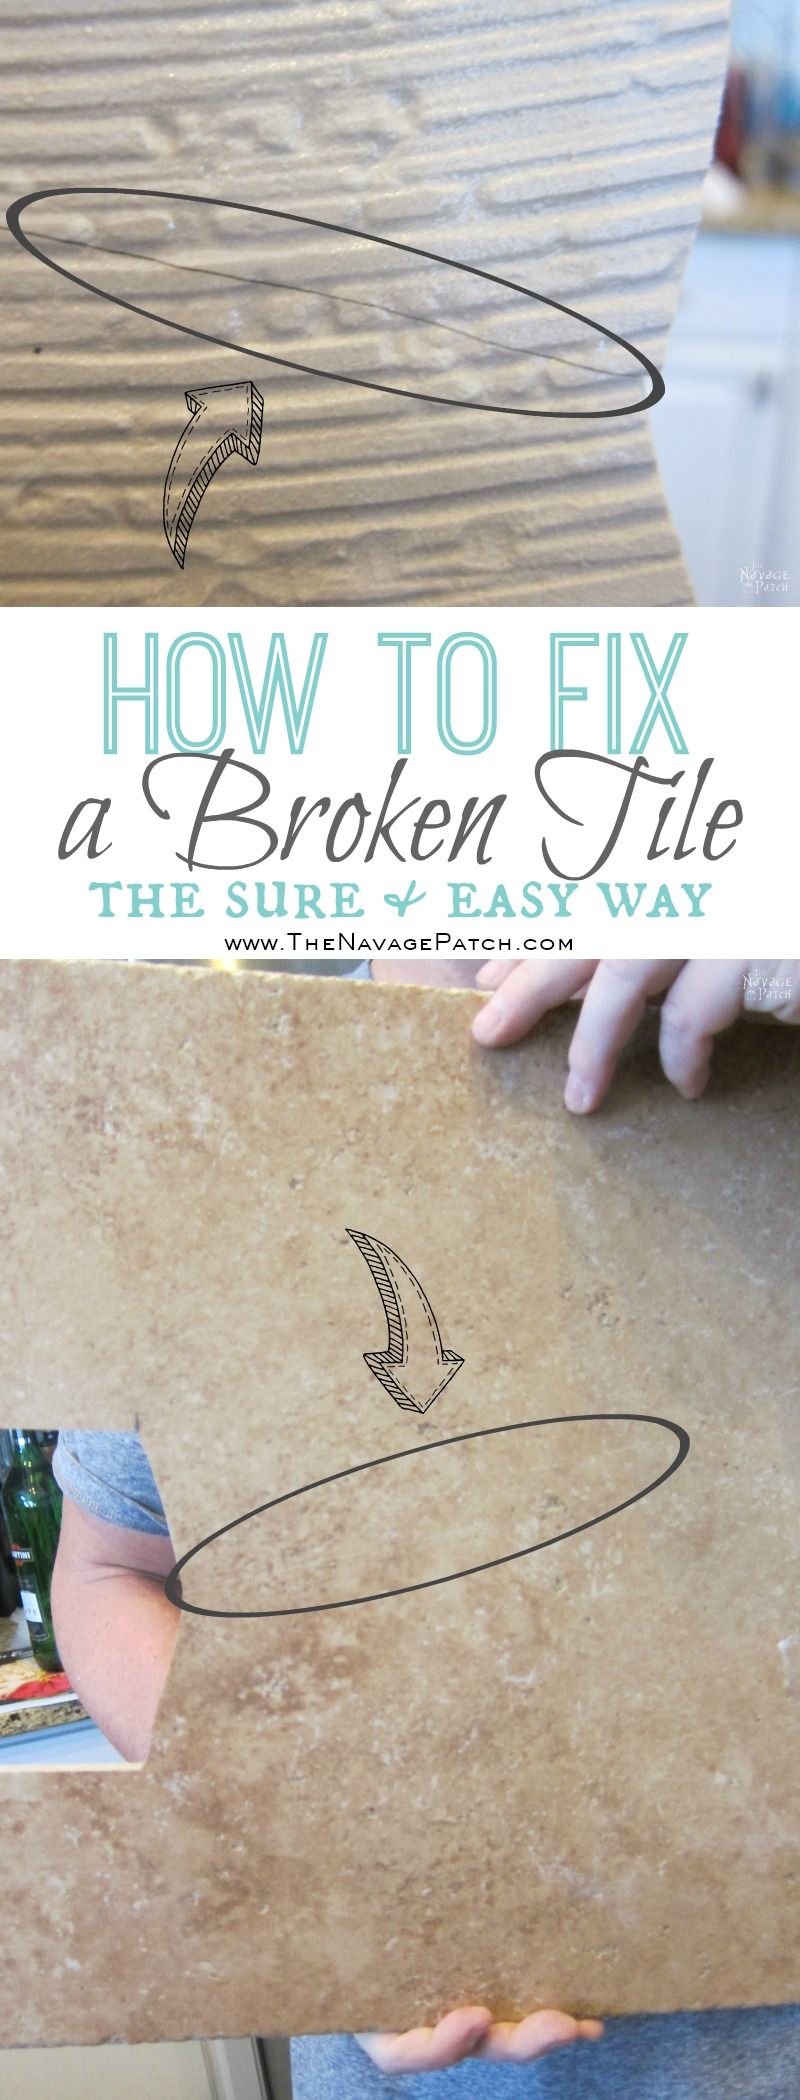
And the rest of the tile split in two. Damn.

If that technique wouldn’t work, how would I get the notch cut? I showed the broken piece to Handan, and she suggested we use CA glue (super glue) and insta-set spray. I told her that she was nuts, that it would never hold. The tile was too heavy, I informed her. The joint would break under the weight of the tile itself, I said.

She just looked at me.

“Fine!” I said. “We’ll glue the stupid thing! But it won’t work!”

We went to the basement, and I gathered my glue and insta-set spray. I put a bead of glue on each face and we both pressed the pieces together with as much force as we could muster. I didn’t want to spray the insta-set spray on the edges, because I needed a little time to get the pieces perfectly lined, and that spray works, well, instantly – just like the name implies. Once we had them aligned, the pressure we applied also helped set the glue. CA glue is crazy stuff. Water, alcohol and pressure all help set the glue. Once we had the pieces joined, I sprayed the accelerator on the bottom side of the tile. I didn’t take pics of the broken pieces, but here’s how everything looked after the gluing.

Front side. Can you see the crack?

Guest Bathroom Renovation | How to tile a floor like a pro | DIY floor tiling | How to cut tiles | How to repair broken ceramic tiles | How to lay subfloor | DIY subflooring | How to grout tiles | DIY tile grouting and sealing | How to seal your tiles and grouting | DIY bathroom flooring | When to use concrete board as subfloor | How to choose grout color | DIY tile spacers | How to install ceramic tiles | DIY porcelain tiling | Before & After | TheNavagePatch.com

Back side. How about now?

Guest Bathroom Renovation | How to tile a floor like a pro | DIY floor tiling | How to cut tiles | How to repair broken ceramic tiles | How to lay subfloor | DIY subflooring | How to grout tiles | DIY tile grouting and sealing | How to seal your tiles and grouting | DIY bathroom flooring | When to use concrete board as subfloor | How to choose grout color | DIY tile spacers | How to install ceramic tiles | DIY porcelain tiling | Before & After | TheNavagePatch.com

Here’s a closeup.

Guest Bathroom Renovation | How to tile a floor like a pro | DIY floor tiling | How to cut tiles | How to repair broken ceramic tiles | How to lay subfloor | DIY subflooring | How to grout tiles | DIY tile grouting and sealing | How to seal your tiles and grouting | DIY bathroom flooring | When to use concrete board as subfloor | How to choose grout color | DIY tile spacers | How to install ceramic tiles | DIY porcelain tiling | Before & After | TheNavagePatch.com

It seemed to be holding together just fine. So Handan was right. What else is new? Moving on…

Guest Bathroom Renovation | How to tile a floor like a pro | DIY floor tiling | How to cut tiles | How to repair broken ceramic tiles | How to lay subfloor | DIY subflooring | How to grout tiles | DIY tile grouting and sealing | How to seal your tiles and grouting | DIY bathroom flooring | When to use concrete board as subfloor | How to choose grout color | DIY tile spacers | How to lay tiles | DIY tile installation | How to install ceramic tiles | DIY porcelain tiling | Before & After | DIY Bathroom Renovation | TheNavagePatch.com

We assembled our tools and supplies and got ready to tile.

Guest Bathroom Renovation | How to tile a floor like a pro | DIY floor tiling | How to cut tiles | How to repair broken ceramic tiles | How to lay subfloor | DIY subflooring | How to grout tiles | DIY tile grouting and sealing | How to seal your tiles and grouting | DIY bathroom flooring | When to use concrete board as subfloor | How to choose grout color | DIY tile spacers | How to install ceramic tiles | DIY porcelain tiling | Before & After | TheNavagePatch.com

The tiling itself was a joint effort: Handan laid the mortar, and I laid the tile.

We’ve seen some DiYers who apply mortar to the back of the tile, and then put the tile on the floor. This method must work, since so many people do it that way, but we wanted to tile the way the pros and contractors do it – by smearing mortar on the floor with a notched trowel and then setting the tile into the mortar.

Guest Bathroom Renovation | How to tile a floor like a pro | DIY floor tiling | How to cut tiles | How to repair broken ceramic tiles | How to lay subfloor | DIY subflooring | How to grout tiles | DIY tile grouting and sealing | How to seal your tiles and grouting | DIY bathroom flooring | When to use concrete board as subfloor | How to choose grout color | DIY tile spacers | How to install ceramic tiles | DIY porcelain tiling | Before & After | TheNavagePatch.com
Handan Pajama Counter: 01

For the first row, we worked one tile at a time, since we had to contend with the floor register.

Guest Bathroom Renovation | How to tile a floor like a pro | DIY floor tiling | How to cut tiles | How to repair broken ceramic tiles | How to lay subfloor | DIY subflooring | How to grout tiles | DIY tile grouting and sealing | How to seal your tiles and grouting | DIY bathroom flooring | When to use concrete board as subfloor | How to choose grout color | DIY tile spacers | How to install ceramic tiles | DIY porcelain tiling | Before & After | TheNavagePatch.com

I used a rubber mallet to gently tap the tile into the mortar and to level it. I placed a wooden spacer next to the tile. Did I mention those spacers are made from Jatoba, aka Brazilian cherry, aka Stinktoe? Yep. Stinktoe spacers. Beat that, Home Depot!

Guest Bathroom Renovation | How to tile a floor like a pro | DIY floor tiling | How to cut tiles | How to repair broken ceramic tiles | How to lay subfloor | DIY subflooring | How to grout tiles | DIY tile grouting and sealing | How to seal your tiles and grouting | DIY bathroom flooring | When to use concrete board as subfloor | How to choose grout color | DIY tile spacers | How to install ceramic tiles | DIY porcelain tiling | Before & After | TheNavagePatch.com

Once that first row was done, we started working a row at a time.

Guest Bathroom Renovation | How to tile a floor like a pro | DIY floor tiling | How to cut tiles | How to repair broken ceramic tiles | How to lay subfloor | DIY subflooring | How to grout tiles | DIY tile grouting and sealing | How to seal your tiles and grouting | DIY bathroom flooring | When to use concrete board as subfloor | How to choose grout color | DIY tile spacers | How to install ceramic tiles | DIY porcelain tiling | Before & After | TheNavagePatch.com
Handan Pajama Counter: 02
Guest Bathroom Renovation | How to tile a floor like a pro | DIY floor tiling | How to cut tiles | How to repair broken ceramic tiles | How to lay subfloor | DIY subflooring | How to grout tiles | DIY tile grouting and sealing | How to seal your tiles and grouting | DIY bathroom flooring | When to use concrete board as subfloor | How to choose grout color | DIY tile spacers | How to install ceramic tiles | DIY porcelain tiling | Before & After | TheNavagePatch.com

We checked the level after each row.

Guest Bathroom Renovation | How to tile a floor like a pro | DIY floor tiling | How to cut tiles | How to repair broken ceramic tiles | How to lay subfloor | DIY subflooring | How to grout tiles | DIY tile grouting and sealing | How to seal your tiles and grouting | DIY bathroom flooring | When to use concrete board as subfloor | How to choose grout color | DIY tile spacers | How to install ceramic tiles | DIY porcelain tiling | Before & After | TheNavagePatch.com

Here’s another shot of Handan leveling the mortar with the notched trowel.

Guest Bathroom Renovation | How to tile a floor like a pro | DIY floor tiling | How to cut tiles | How to repair broken ceramic tiles | How to lay subfloor | DIY subflooring | How to grout tiles | DIY tile grouting and sealing | How to seal your tiles and grouting | DIY bathroom flooring | When to use concrete board as subfloor | How to choose grout color | DIY tile spacers | How to install ceramic tiles | DIY porcelain tiling | Before & After | TheNavagePatch.com

The notches on the trowel ensure a uniform depth of mortar: the teeth run along the sub-floor, while the notches level the mortar.

I gave Handan the honor of placing the last tile.

Guest Bathroom Renovation | How to tile a floor like a pro | DIY floor tiling | How to cut tiles | How to repair broken ceramic tiles | How to lay subfloor | DIY subflooring | How to grout tiles | DIY tile grouting and sealing | How to seal your tiles and grouting | DIY bathroom flooring | When to use concrete board as subfloor | How to choose grout color | DIY tile spacers | How to install ceramic tiles | DIY porcelain tiling | Before & After | TheNavagePatch.com
Handan Pajama Counter: 03
Guest Bathroom Renovation | How to tile a floor like a pro | DIY floor tiling | How to cut tiles | How to repair broken ceramic tiles | How to lay subfloor | DIY subflooring | How to grout tiles | DIY tile grouting and sealing | How to seal your tiles and grouting | DIY bathroom flooring | When to use concrete board as subfloor | How to choose grout color | DIY tile spacers | How to install ceramic tiles | DIY porcelain tiling | Before & After | TheNavagePatch.com
Handan Pajama Counter: 04

We then left the tile undisturbed for three days to allow the mortar to cure. When the tiles were safe to stand on, we (read: Handan) started applying the grout. We had bought a bucket of an off-white grout, thinking it would look nice with the tile and with the fixtures.

Handan started applying it…

Guest Bathroom Renovation | How to tile a floor like a pro | DIY floor tiling | How to cut tiles | How to repair broken ceramic tiles | How to lay subfloor | DIY subflooring | How to grout tiles | DIY tile grouting and sealing | How to seal your tiles and grouting | DIY bathroom flooring | When to use concrete board as subfloor | How to choose grout color | DIY tile spacers | How to install ceramic tiles | DIY porcelain tiling | Before & After | TheNavagePatch.com

She kept going, filling all of the gaps in the photo above plus several more.

Panic rose in my chest as I looked down on her work. I felt like I was staring at the porcelain equivalent of a 1970s man in a brown leisure suit accessorized with a white belt. It looked hideous.

Handan saw it, too.

“Does this look okay?” She said.

“I-I Don’t know.” I was terrified. Had we ruined it? All that work…

“Babes! I need to know…is this color okay?

“Maybe? No? I don’t know!” GAH! I was in a panic. My ears rang with the Bee Gees and I saw bell bottoms when I closed my eyes. “No! We have to remove it!”

I ran to the kitchen and soaked a few towels while Handan started scraping the grout with a putty knife. That stuff sets up fast, and we were minutes away from disaster. We flitted about the floor like headless chickens until we had most of the white grout removed. I took a drive to Home Depot to buy a new color while Handan stayed behind to finish cleaning the remains of the grout. We had averted disaster, yet again, but just barely this time. The perils of poorly planned projects…

I arrived back with a darker shade of grout.

Guest Bathroom Renovation | How to tile a floor like a pro | DIY floor tiling | How to cut tiles | How to repair broken ceramic tiles | How to lay subfloor | DIY subflooring | How to grout tiles | DIY tile grouting and sealing | How to seal your tiles and grouting | DIY bathroom flooring | When to use concrete board as subfloor | How to choose grout color | DIY tile spacers | How to install ceramic tiles | DIY porcelain tiling | Before & After | TheNavagePatch.com

The color was perfect, and the job was a breeze.

Handan figured out that she liked to spread the grout with a combination of fingers and small putty knife. This allowed her to really mush it into the gaps.

Guest Bathroom Renovation | How to tile a floor like a pro | DIY floor tiling | How to cut tiles | How to repair broken ceramic tiles | How to lay subfloor | DIY subflooring | How to grout tiles | DIY tile grouting and sealing | How to seal your tiles and grouting | DIY bathroom flooring | When to use concrete board as subfloor | How to choose grout color | DIY tile spacers | How to install ceramic tiles | DIY porcelain tiling | Before & After | TheNavagePatch.com

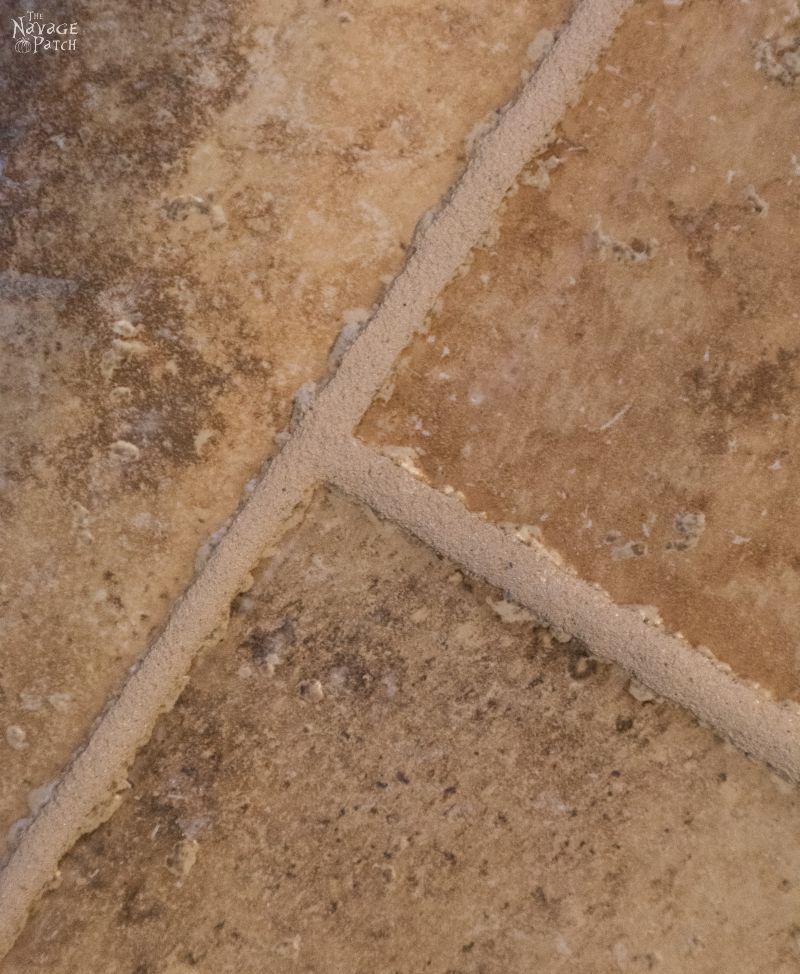
Next, she followed up with a grout float to level the grout.

Guest Bathroom Renovation | How to tile a floor like a pro | DIY floor tiling | How to cut tiles | How to repair broken ceramic tiles | How to lay subfloor | DIY subflooring | How to grout tiles | DIY tile grouting and sealing | How to seal your tiles and grouting | DIY bathroom flooring | When to use concrete board as subfloor | How to choose grout color | DIY tile spacers | How to install ceramic tiles | DIY porcelain tiling | Before & After | TheNavagePatch.com

This is how the joint would look after passing the float.

Guest Bathroom Renovation | How to tile a floor like a pro | DIY floor tiling | How to cut tiles | How to repair broken ceramic tiles | How to lay subfloor | DIY subflooring | How to grout tiles | DIY tile grouting and sealing | How to seal your tiles and grouting | DIY bathroom flooring | When to use concrete board as subfloor | How to choose grout color | DIY tile spacers | How to install ceramic tiles | DIY porcelain tiling | Before & After | TheNavagePatch.com

To smooth the grout, she first cleaned the sides of the tile with a damp sponge.

Guest Bathroom Renovation | How to tile a floor like a pro | DIY floor tiling | How to cut tiles | How to repair broken ceramic tiles | How to lay subfloor | DIY subflooring | How to grout tiles | DIY tile grouting and sealing | How to seal your tiles and grouting | DIY bathroom flooring | When to use concrete board as subfloor | How to choose grout color | DIY tile spacers | How to install ceramic tiles | DIY porcelain tiling | Before & After | TheNavagePatch.com

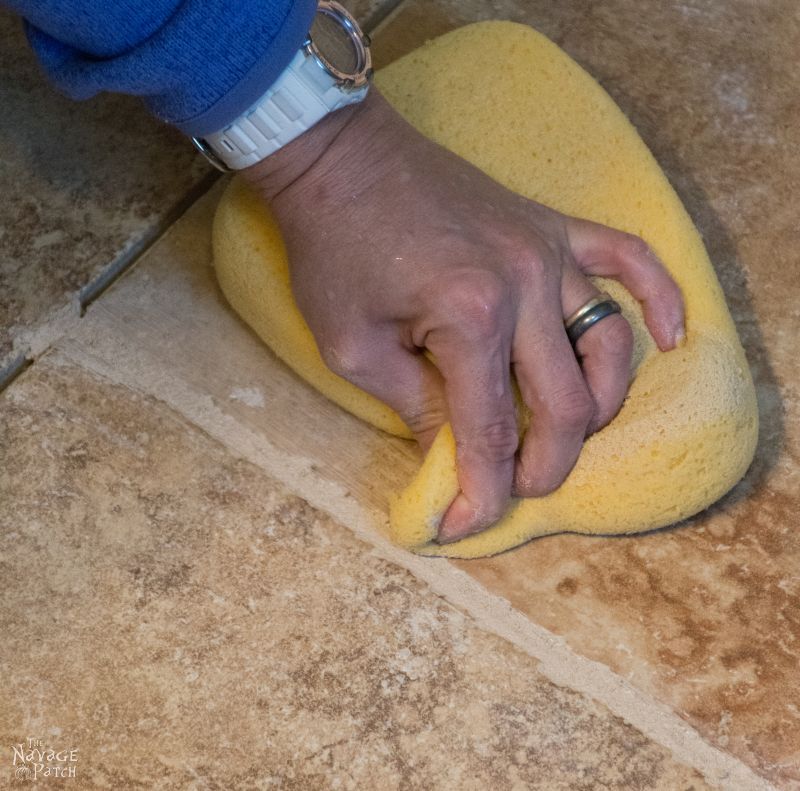
And then she lightly passed the sponge over the gap.

Guest Bathroom Renovation | How to tile a floor like a pro | DIY floor tiling | How to cut tiles | How to repair broken ceramic tiles | How to lay subfloor | DIY subflooring | How to grout tiles | DIY tile grouting and sealing | How to seal your tiles and grouting | DIY bathroom flooring | When to use concrete board as subfloor | How to choose grout color | DIY tile spacers | How to install ceramic tiles | DIY porcelain tiling | Before & After | TheNavagePatch.com

A woman who loves to grouse grout!

Guest Bathroom Renovation | How to tile a floor like a pro | DIY floor tiling | How to cut tiles | How to repair broken ceramic tiles | How to lay subfloor | DIY subflooring | How to grout tiles | DIY tile grouting and sealing | How to seal your tiles and grouting | DIY bathroom flooring | When to use concrete board as subfloor | How to choose grout color | DIY tile spacers | How to install ceramic tiles | DIY porcelain tiling | Before & After | TheNavagePatch.com

When she finished grouting, she left it to dry for a few hours and then returned to wipe off the rest of the haze with a green scrubber and a damp sponge.

Guest Bathroom Renovation | How to tile a floor like a pro | DIY floor tiling | How to cut tiles | How to repair broken ceramic tiles | How to lay subfloor | DIY subflooring | How to grout tiles | DIY tile grouting and sealing | How to seal your tiles and grouting | DIY bathroom flooring | When to use concrete board as subfloor | How to choose grout color | DIY tile spacers | How to install ceramic tiles | DIY porcelain tiling | Before & After | TheNavagePatch.com

We waited another two days and then I sealed the tiles. Yes, I used to be a professional fashion model. Now I’m mostly retired and only take the occasional safety equipment gig. Notice the haircut and beard trim.

Guest Bathroom Renovation | How to tile a floor like a pro | DIY floor tiling | How to cut tiles | How to repair broken ceramic tiles | How to lay subfloor | DIY subflooring | How to grout tiles | DIY tile grouting and sealing | How to seal your tiles and grouting | DIY bathroom flooring | When to use concrete board as subfloor | How to choose grout color | DIY tile spacers | How to install ceramic tiles | DIY porcelain tiling | Before & After | TheNavagePatch.com
Trust me – I’m a professional. Now…show me your refrigerator.

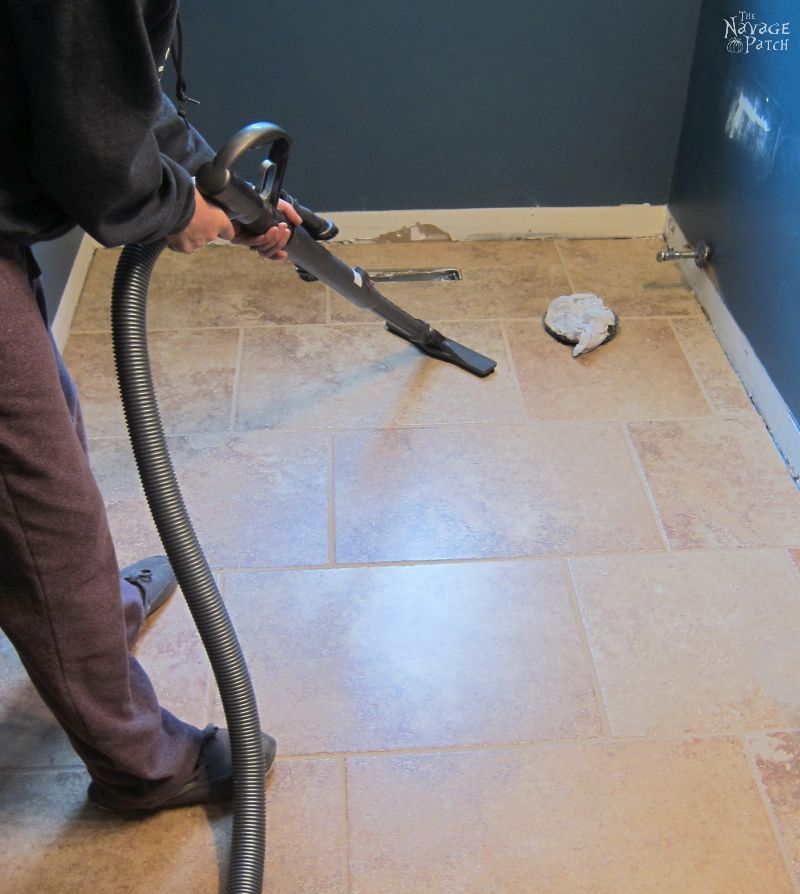
Handan vacuumed up the remaining bits of grout and mortar.

Guest Bathroom Renovation | How to tile a floor like a pro | DIY floor tiling | How to cut tiles | How to repair broken ceramic tiles | How to lay subfloor | DIY subflooring | How to grout tiles | DIY tile grouting and sealing | How to seal your tiles and grouting | DIY bathroom flooring | When to use concrete board as subfloor | How to choose grout color | DIY tile spacers | How to install ceramic tiles | DIY porcelain tiling | Before & After | TheNavagePatch.com

And then I again dropped to my hands and knees to apply the sealer. I wiped it on with a sponge.

Guest Bathroom Renovation | How to tile a floor like a pro | DIY floor tiling | How to cut tiles | How to repair broken ceramic tiles | How to lay subfloor | DIY subflooring | How to grout tiles | DIY tile grouting and sealing | How to seal your tiles and grouting | DIY bathroom flooring | When to use concrete board as subfloor | How to choose grout color | DIY tile spacers | How to install ceramic tiles | DIY porcelain tiling | Before & After | TheNavagePatch.com

And after a minute or so, I wiped off as much as I could with a dry cloth.

Guest Bathroom Renovation | How to tile a floor like a pro | DIY floor tiling | How to cut tiles | How to repair broken ceramic tiles | How to lay subfloor | DIY subflooring | How to grout tiles | DIY tile grouting and sealing | How to seal your tiles and grouting | DIY bathroom flooring | When to use concrete board as subfloor | How to choose grout color | DIY tile spacers | How to install ceramic tiles | DIY porcelain tiling | Before & After | TheNavagePatch.com

These photos have been carefully cropped to shield your delicate eyes from a severe case of plumber’s butt. Such is life for the chunky middle-aged handyman crawling around the floor like a milk-stuffed baby. Poor Handan, though. She had to endure the full fury of my crackstorm.

Exactly one week after this hare-brained plan was hatched, we finished Phase 1. We had a new floor.

Guest Bathroom Renovation | How to tile a floor like a pro | DIY floor tiling | How to cut tiles | How to repair broken ceramic tiles | How to lay subfloor | DIY subflooring | How to grout tiles | DIY tile grouting and sealing | How to seal your tiles and grouting | DIY bathroom flooring | When to use concrete board as subfloor | How to choose grout color | DIY tile spacers | How to install ceramic tiles | DIY porcelain tiling | Before & After | TheNavagePatch.com

Can you see the crack now? It’s way more visible to the camera than to the naked eye.

Guest Bathroom Renovation | How to tile a floor like a pro | DIY floor tiling | How to cut tiles | How to repair broken ceramic tiles | How to lay subfloor | DIY subflooring | How to grout tiles | DIY tile grouting and sealing | How to seal your tiles and grouting | DIY bathroom flooring | When to use concrete board as subfloor | How to choose grout color | DIY tile spacers | How to install ceramic tiles | DIY porcelain tiling | Before & After | TheNavagePatch.com

Here’s how things turned out around the register. Excuse the white flakes. That’s just stuff sanded off the walls that I missed with the vacuum. Don’t worry, you’ll get your flawless beauty shots at the very end of the project!

Guest Bathroom Renovation | How to tile a floor like a pro | DIY floor tiling | How to cut tiles | How to repair broken ceramic tiles | How to lay subfloor | DIY subflooring | How to grout tiles | DIY tile grouting and sealing | How to seal your tiles and grouting | DIY bathroom flooring | When to use concrete board as subfloor | How to choose grout color | DIY tile spacers | How to install ceramic tiles | DIY porcelain tiling | Before & After | TheNavagePatch.com

Once the floor was down and sealed, I started having doubts. All last week, my mind was sidetracked by doubt and uncertainty. Not about the tile. We both love the tile. But we hadn’t given proper thought to the colors that would go with this particular color tile. Our original plan was to have white wainscoting and light gray walls above. That wasn’t going to work, or at least it wasn’t working in my mind’s eye. We needed a new plan for the walls.

Guest Bathroom Renovation | How to tile a floor like a pro | DIY floor tiling | How to cut tiles | How to repair broken ceramic tiles | How to lay subfloor | DIY subflooring | How to grout tiles | DIY tile grouting and sealing | How to seal your tiles and grouting | DIY bathroom flooring | When to use concrete board as subfloor | How to choose grout color | DIY tile spacers | How to lay tiles | DIY tile installation | How to install ceramic tiles | DIY porcelain tiling | Before & After | DIY Bathroom Renovation | TheNavagePatch.com

CONTINUE ONTO>>


Leave a Reply

Your email address will not be published. Required fields are marked *

28 Comments

  1. once again the h&g team are victorious handan in pj’s and greg crack mooning, every time gregs’ head or butt got close to the bolts protruding from the wall i would hollar watch out! and handan just keeps showing off those pearly whites xx

    1. lol, we’re not victorious just yet, Chris…we still haven’t finished the project! đŸ™‚ Hopefully we’ll finish the bathroom part this weekend, and then i’ll get to work on the pocket door.

  2. I have never laughed so hard when reading a blog post! I look forward to the next setp of the adventure…

  3. Your post, and a glass of wine….who needs cable. ? The floor looks great. Can’t wait to see the finished project.

  4. I haven’t laughed so much for a long time đŸ™‚ You and Handan are a great team.

    Is your bathroom perfectly square? It is beyond my understanding how you managed to cut all the tiles that needed cutting beforehand. The rooms I have tiled practically don’t have right corners. So I had to start with a whole tile from a datum line (usually in the middle of the floor, or centered to something). When all the whole tiles are placed, then I can measure and cut the tiles that go next to the wall, and in 90% of the cases the cut is not parallel to the edge of the tile. Just can’t imagine doing it as you did.

    For the tile around the register an angle grinder would do a better job that a hammer and a chisel đŸ™‚

    xo

    1. Thank you, Val! I don’t think there’s a square corner in this house, but since the tiles were pretty big and the room was pretty small, it made the job of squaring things up much easier! Handan first laid out the tiles on the subfloor, and everything looked good. From there, we just started in a corner and never looked back! I’m sure a bit of luck spilled into the room as well đŸ™‚

      The angle grinder is a great tip! I never thought of it. I have one in the basement…next time, I’ll be sure to try it out.

  5. The floor looks great! I must have gone to the same design school as Handan because I am usually doing home improvements in my pyjamas too! I can’t wait to see the rest!

  6. What a team! I LOL sometimes (especially of you sitting on the “throne’ in your kitchen) when I read your posts….looking forward to more! Nice work, by the way!

  7. Umm…ok, so hubs and I have done plenty of home improvement projects over the years and never, NEVER, have our project area, or clothes stayed that clean. We are usually covered in whatever project supplies we are using. Sometimes even the dog!
    I have ruined lots of pajamas during our projects.
    Good job!

    1. Lol, we’re usually dirty, too! We must have gotten lucky with this project. I promise, we don’t stage the photos or try to look good while working! (one look at me, and that should be obvious, lol!) đŸ™‚

  8. Wow glad to know I’m not the only one with crazy home remodel hair. Also, here’s an easy way to save your knees. An old pillow. It easily slides around, provides just enough cushion, and oh boy saves your knees. I use it in the garden, garage and anywhere else I have to kneel.

  9. Looking good guys! Greg if the last pic is indicative of the grey you’re planning on using, I agree it’s not going to work. If you’re heart is set on grey, go with a lighter hue, less blue more to silver. It should give a better contrast to the brown of the tile and your white trim and porcelain fixtures will pop. Just my humble opinion. Good luck and invest in knee pads if you’re planning on doing things like this. My knees hurt just from seeing you??.

    1. Thank you, Patty! We picked a great color last weekend. You’ll be able to see it in some of the process pics of this week’s upcoming post, though it won’t be on full display until the reveal đŸ™‚

  10. Wow!!!! I just finished reading your stories of your travels and experiences and I feel like I’ve just met new friends and met Handan and Greg personally!! And to think I just wanted to save on Pinterest how to tile and bathroom floor!!

    1. Hi Liz, and welcome! I’m so happy you found us and read our story. We hope to see you back here in the comments section!

  11. You guys are crazy, I love to see you at work and the most important thing I enjoy is how you work together. It must be so much fun. I love how you show what can happen. I had to laugh. Keep up the good work. I found you and I’m going to follow so I can learn. GREAT JOB.

  12. Oh man you did an amazing job, and I must share I am smiling at this time you people really have skills to make things enjoyable, I wish I could work with you guys and have fun. This was my first time when I laugh in meanwhile reading a renovation blog. You guys are amazing. #bookmark would love to know more about your work.