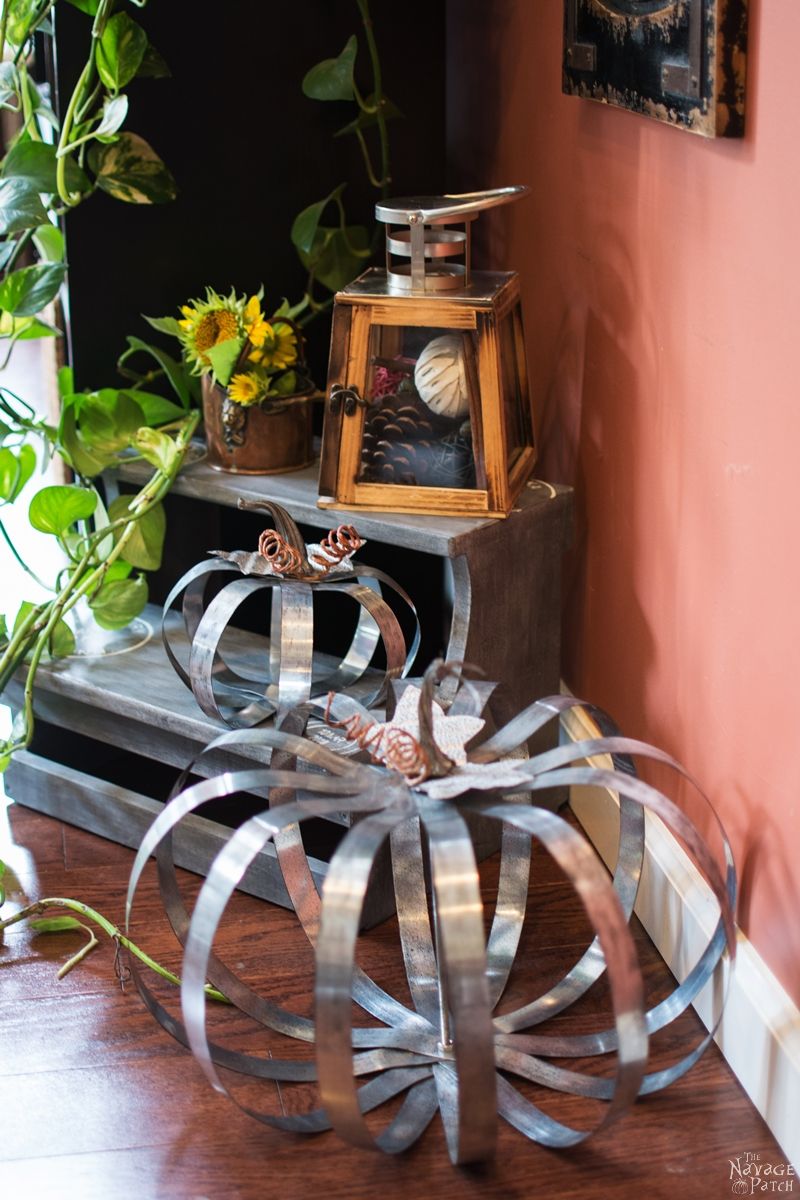
Pottery Barn Knockoff Metal Pumpkins
Our Pottery Barn Knockoff Metal Pumpkins are the perfect DIY fall decor for those looking for big style on a small budget!
Another year, another fall, and another opportunity to decorate for the season! This year, I asked Greg if I should buy some fall decoration instead of our usual DIY fall decor.
He nearly spit out his martini and asked if I was feeling ok, LOL! He was looking at me a little strange, but then he said something that sounded a tiny bit like a “yes.”
Good enough for me!
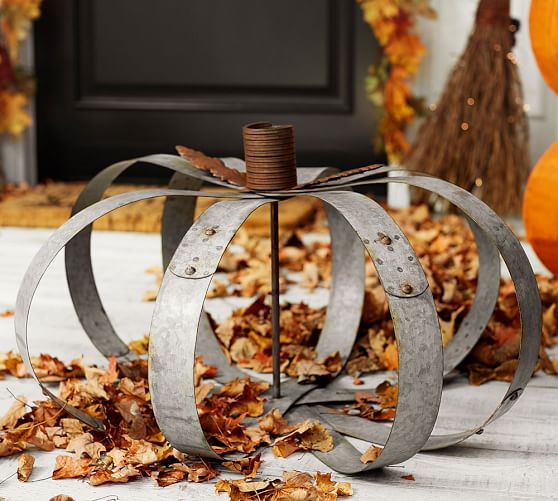
Before he could think about it any further, I went online to see what I could find. After a time, I finally found a beautiful pumpkin at Pottery Barn! It had all the qualities I wanted: it was interesting, it was big and it was galvanized metal, so I could use it both indoors and outdoors. But there was one teensy weensy problem with it: it was $99… yes $99! For this galvanized pumpkin!
Well, you can guess what happened next, right?
After contemplating whether I should buy 2 or 3 of these pumpkins, I added 2 of them to my cart. Then, thinking what a great find it was, I took a sip from my wine and decided to get the third one. You know…just for fun! After all, we have a big money tree in our back yard, and all I needed was to pick some $100 leaves from the tree to pay for these metal pumpkins…
LOL. I WISH! What a wonderful dream though, right?
Ok, here’s what really happened.
After trying to get over my sticker shock, I asked Greg to take me to Home Depot. I already had some galvanized metal strap on hand, so I only needed some 1/4 inch nuts and a 1/4 inch threaded metal rod to come up with something similar, and that is how my Pottery Barn knockoff Metal Pumpkins project started.

Metal Pumpkin SUPPLIES LIST
Affiliate links are provided below. Full disclosure here.
- Galvanized metal strap
- 1/4 inch galvanized hex nuts – I used 3 for each pumpkin.
- 1/4 inch threaded rod – I bought a 24 inch long threaded rod, because I wanted to make 2 pumpkins. But you can also find 12 inch long threaded rods, if you are planning to make only one.
- 1/4 inch T-nuts – I used 1 for each pumpkin.
- Aluminum lawn edging – I used this to make the pumpkin leaves. As I bought mine at a tag sale, I am not sure where you can find this. My best guess would be your local hardware store. But if you can’t find it, then even burlap would be a good substitute, since you will be making leaves out of it.
- Vine-wrapped craft wire.
- Power drill and a step drill bit.
- A pair of scissors – something strong enough to cut metal.
- A pair of pliers.
- Flat black spray paint.
Pottery Barn Knockoff Metal Pumpkins Tutorial
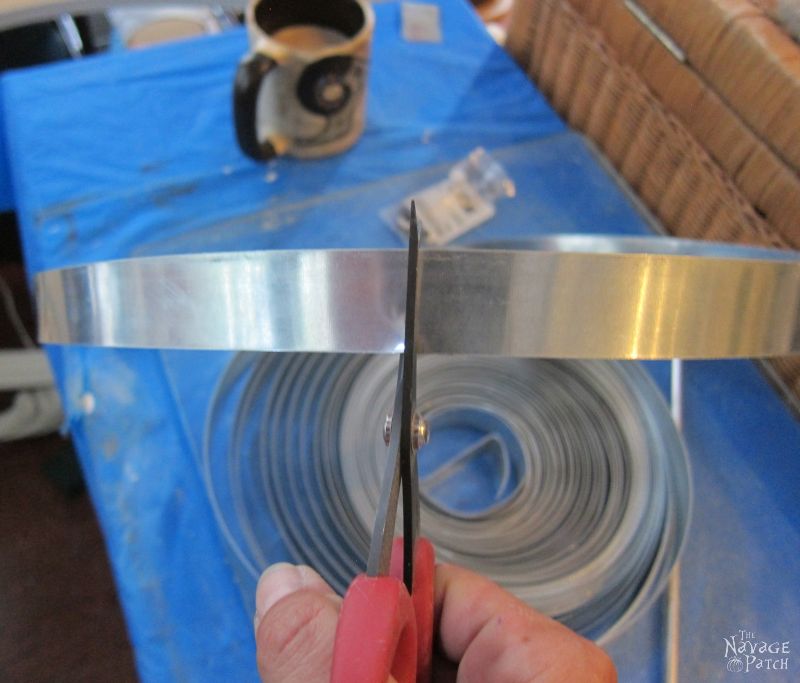
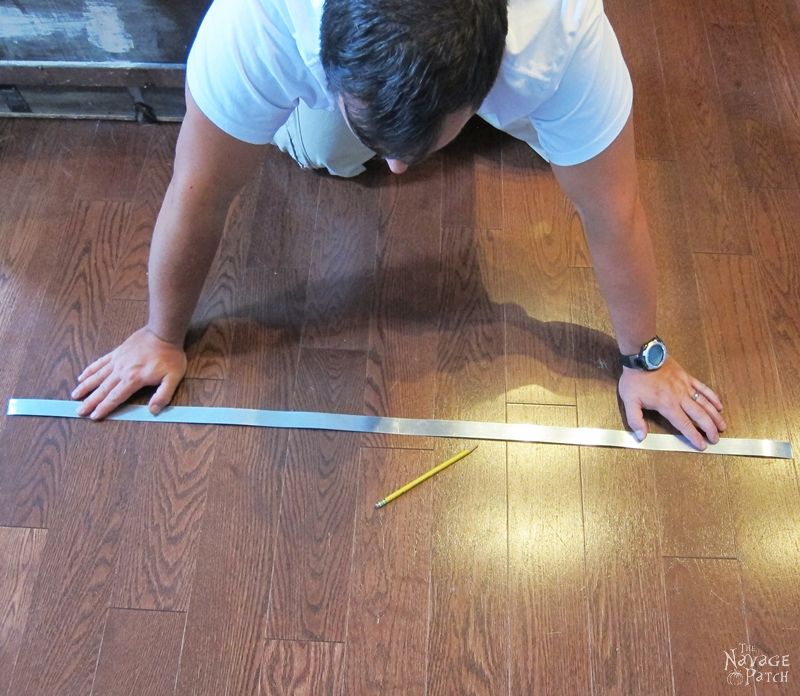
First, I prepared the metal straps. I cut 6 metal straps, each 42 inches long for the big pumpkin and 4 metal straps, each 22 inches long for the small pumpkin.
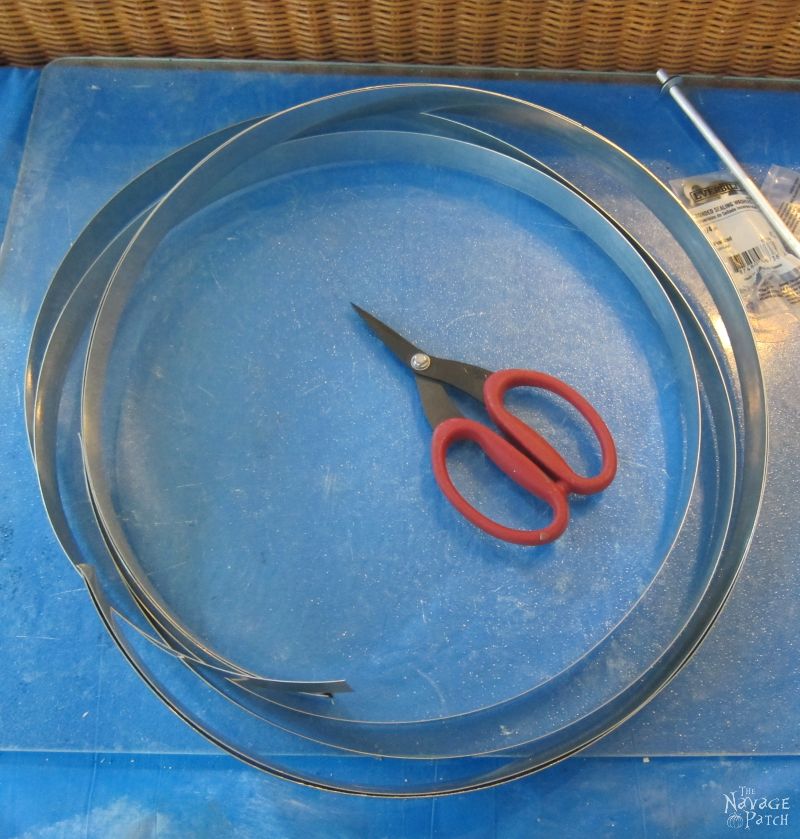
As the straps want to curl, you will need someone’s help with this step. After cutting 10 of them, I asked Greg to help me mark the mid point of the metal straps. He took his sweet old “man time,” but eventually he helped me mark the mid points of all 10 metal straps 🙂 Look at him though – isn’t he the cutest when kneeling before his queen?? LOL. Back to the tutorial…
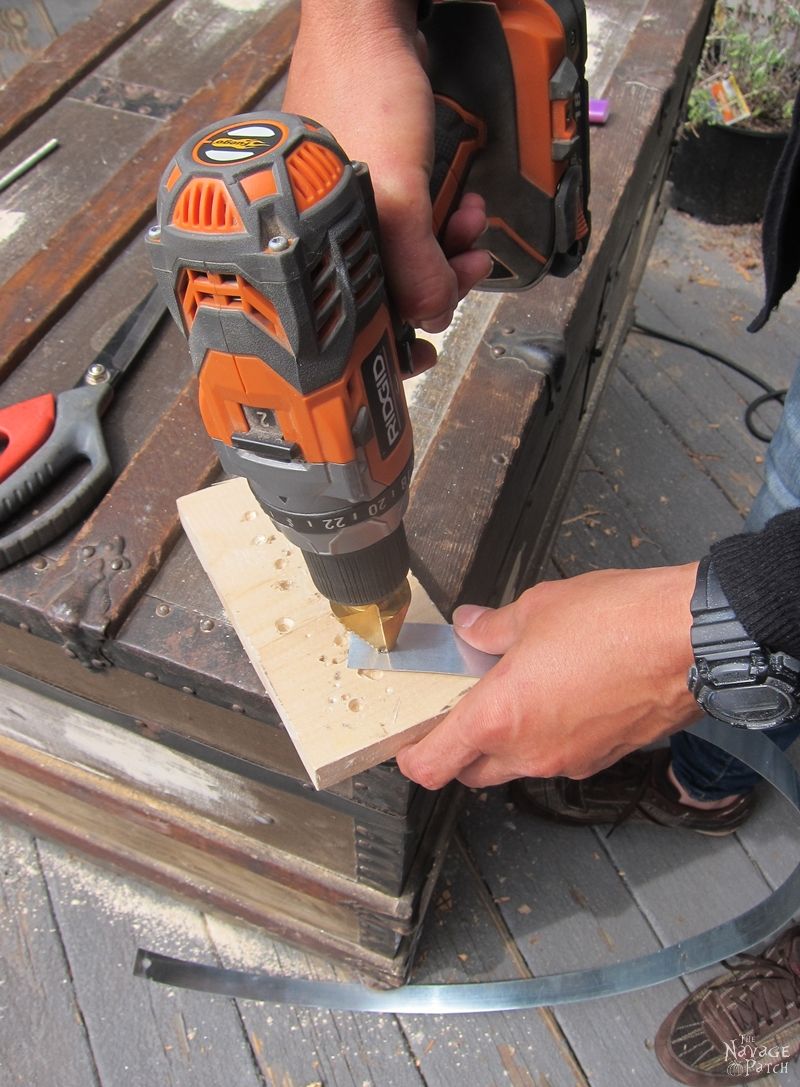
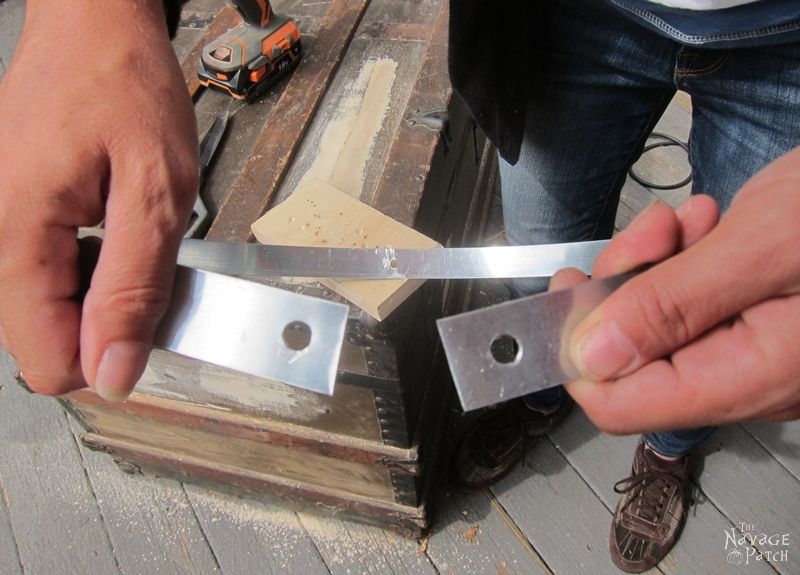
Once the mid-points were marked, I started drilling holes in both ends and in the mid-points of the straps. I drilled the holes slightly bigger than 1/4 inch, so they wouldn’t have a problem fitting the 1/4 inch rod.
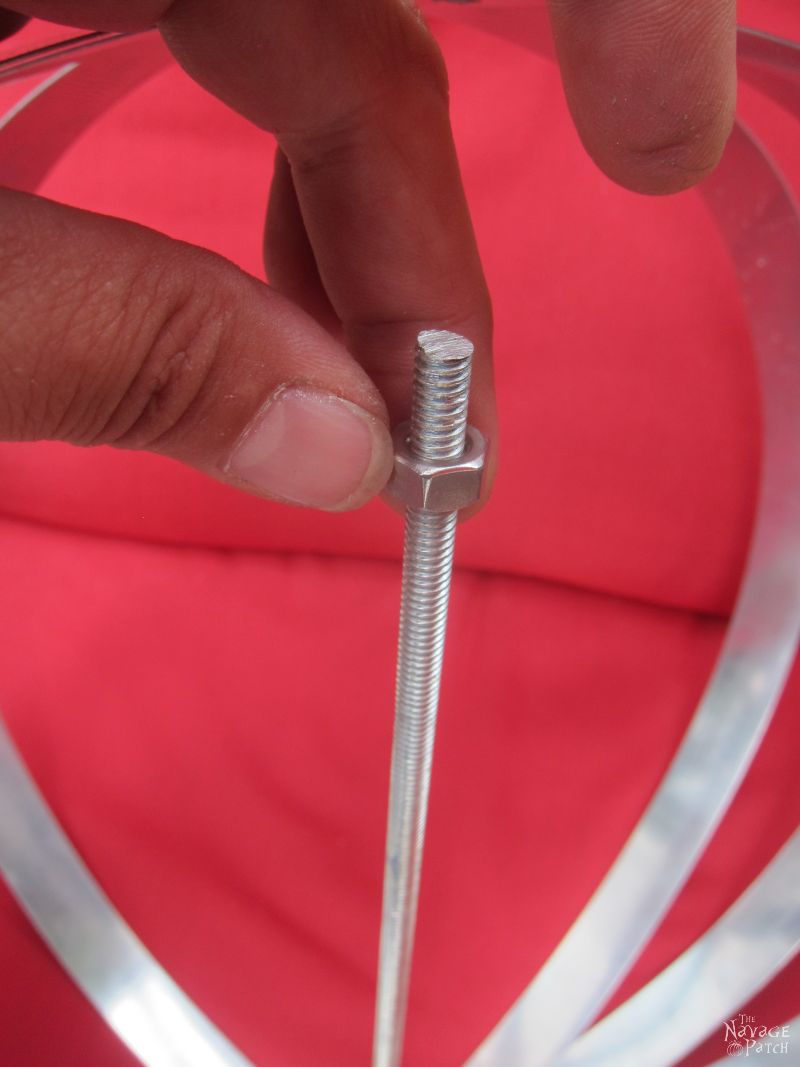
Next, I marked the threaded rod at 12 inches (and at 6 inches for the small pumpkin), and cut it with a hacksaw. [Excuse me – who cut it with a hacksaw? -Greg]
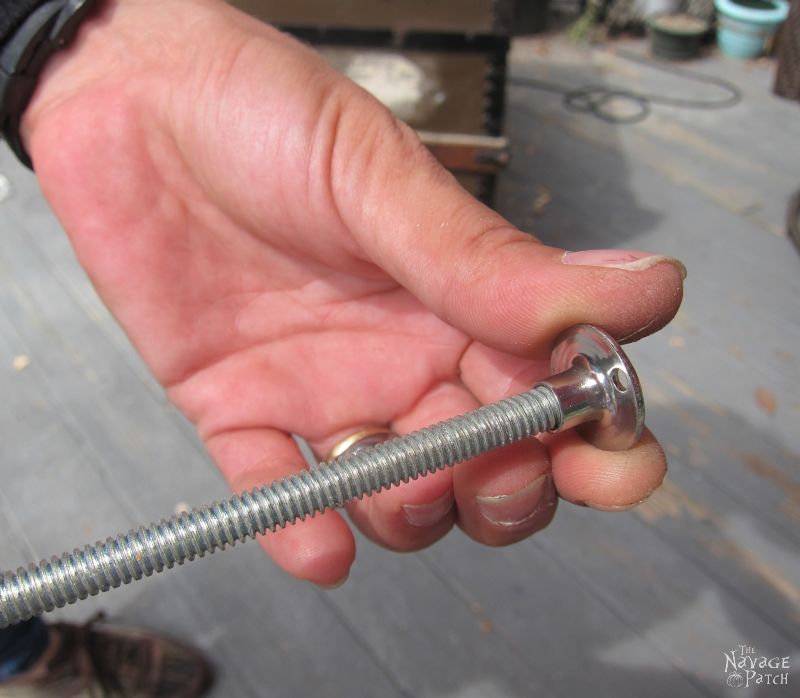
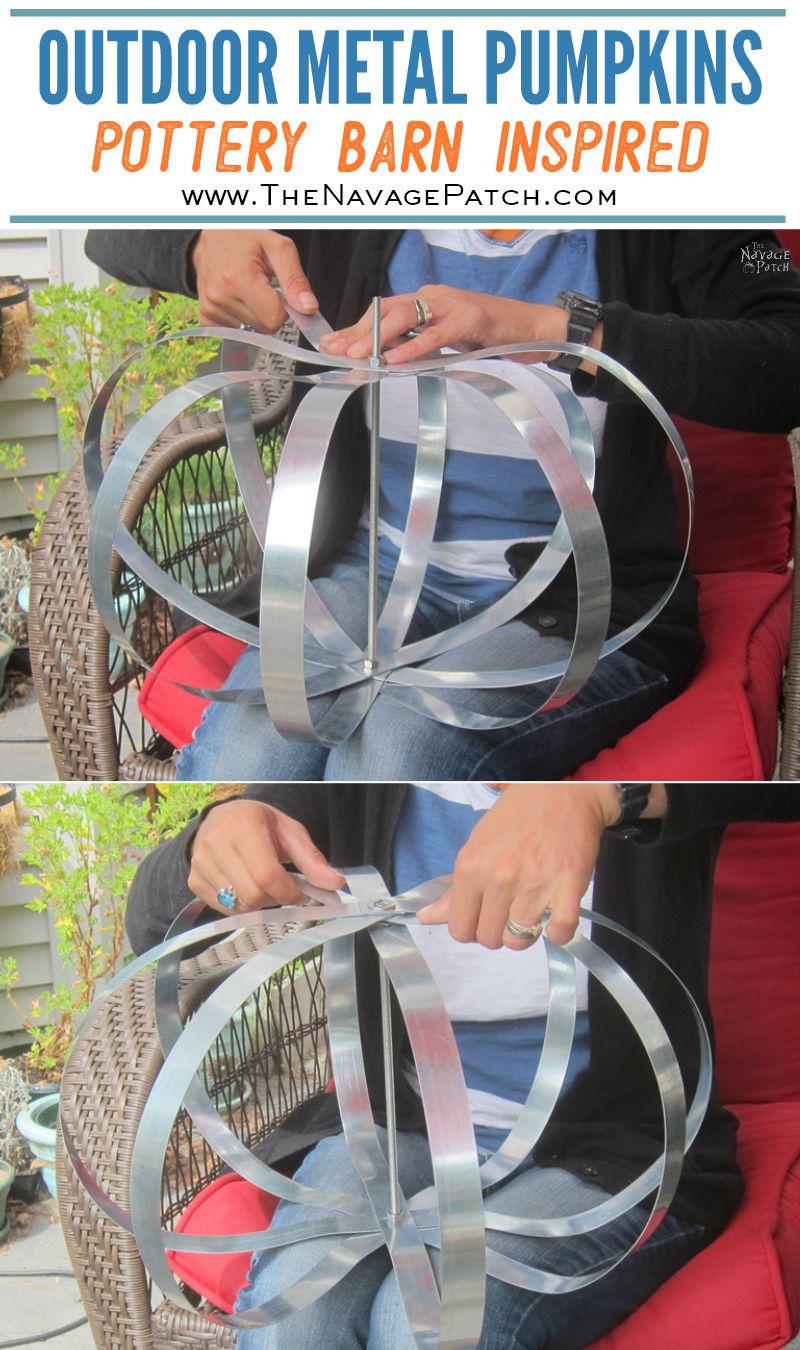
As all of the pieces for the metal pumpkin’s body were ready, I started putting it together. First, I screwed the bottom end-nut. I chose a T-nut for the bottom end, so the pumpkin would stay nice and balanced when I put it on the floor.
Next, I threaded the straps on the rod…
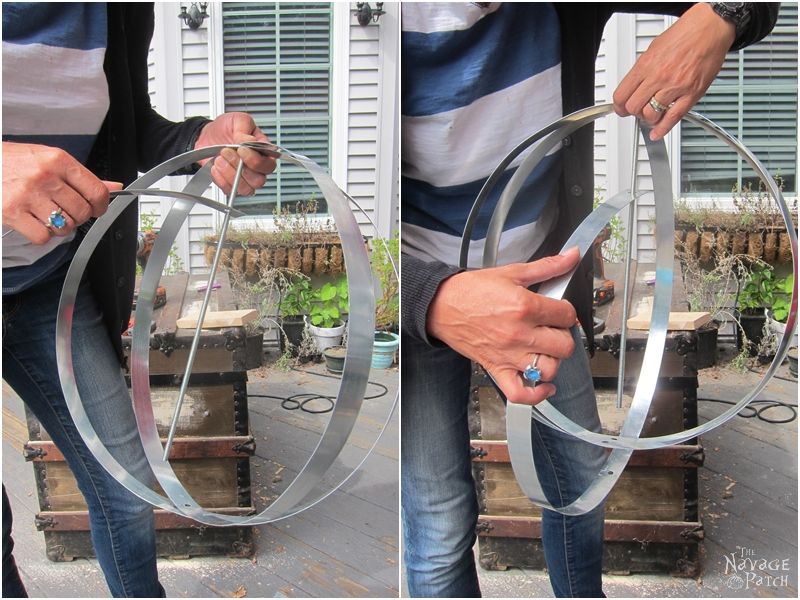
…and screwed on a hex nut to secure the straps in their places.
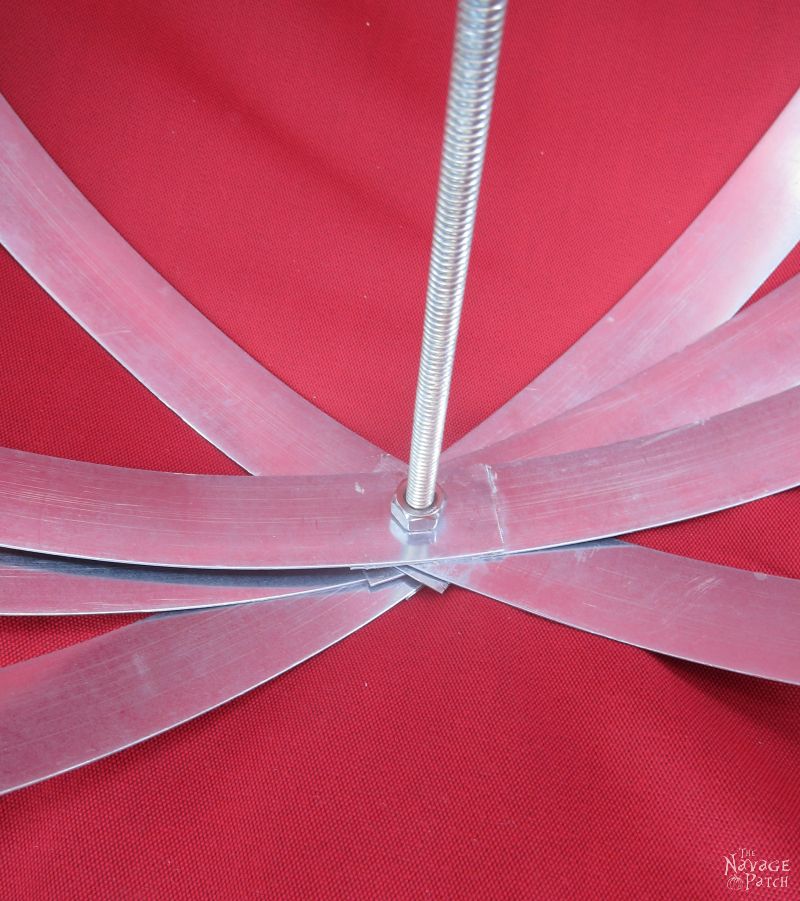
Once I was finished with the bottom part, I started working on the top. I screwed on another hex nut about 2-3 inches below the top of the rod.
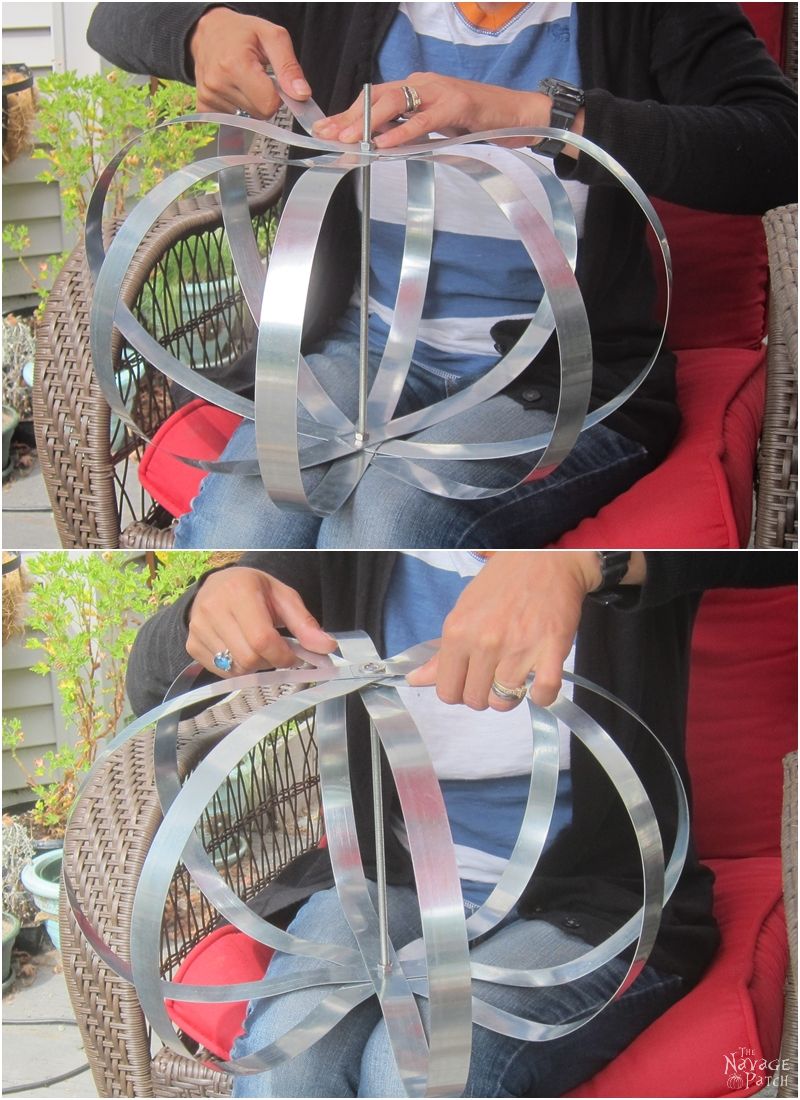
Then I started threading the straps to the top and then screwing another hex nut to secure them in their places.

Once the straps were all in, I started working on the shape of the metal pumpkin. I slightly bent the top and the bottom parts of the straps to make the whole thing resemble a pumpkin.
After I was done with the shape, I cut the excess top part of the rod with a hacksaw [*ahem!* Who cut it?? -Greg] as I had a great plan for the pumpkin’s stem. But before working on the stem, I wanted to lessen the shine of the galvanized straps. To do so, I lightly spray painted the metal pumpkin from a good distance…at least 18-20 inches away.
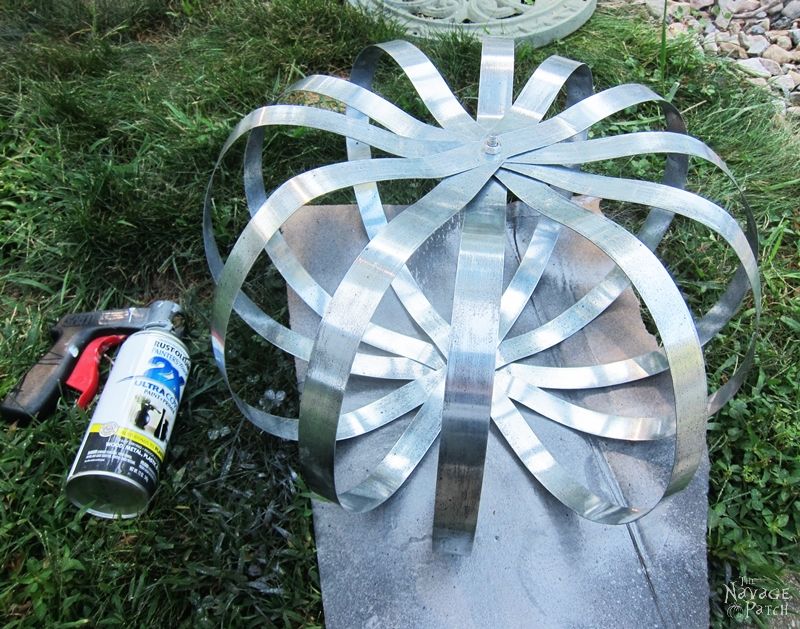
I only sprayed a very little bit, so only a little paint would find the metal straps. After all, I wasn’t trying to paint it entirely, but I was just trying to take the shine off by giving some black splotches here and there. Do you see the picture below? That is the effect I was going for.

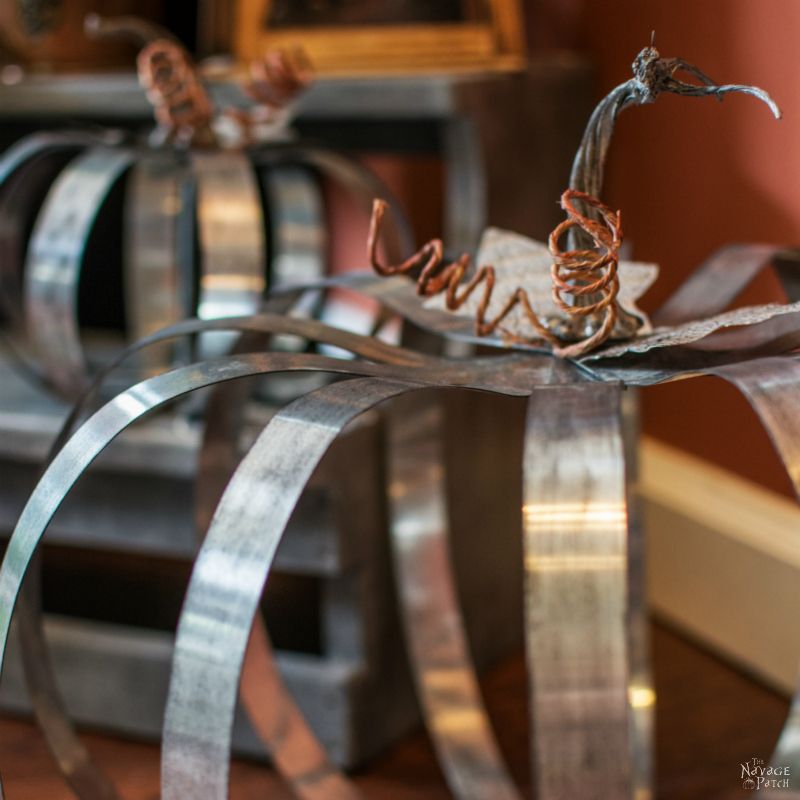
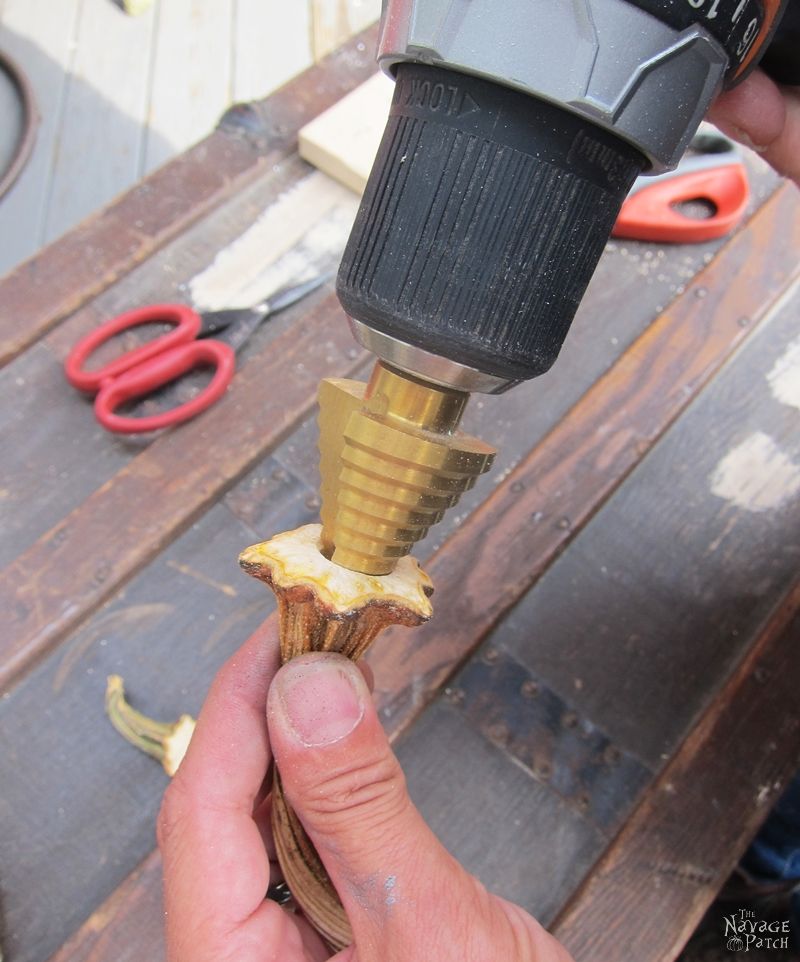
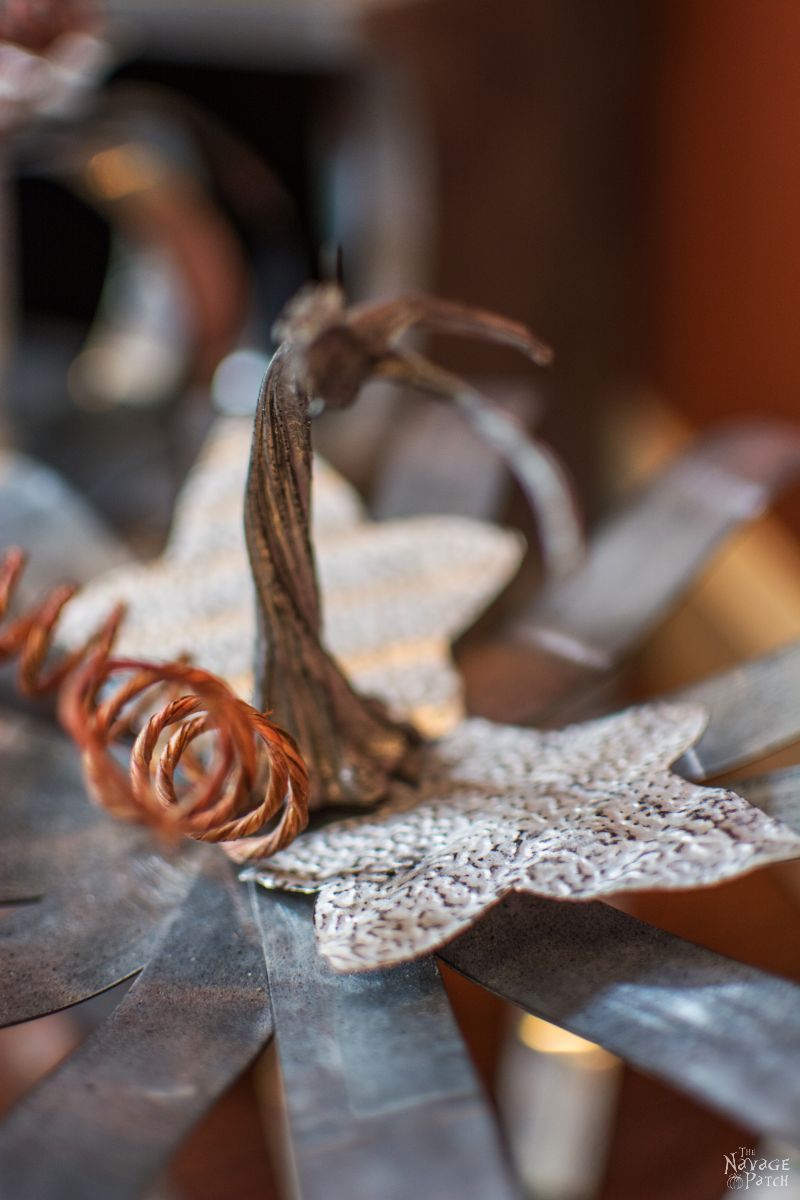
Once I finished spray painting, I focused on the stem and the pumpkin leaves. I found a pumpkin leaf clip art online and printed it out to use as a pattern. Then I cut the leaf shapes from the aluminum lawn edging I had.
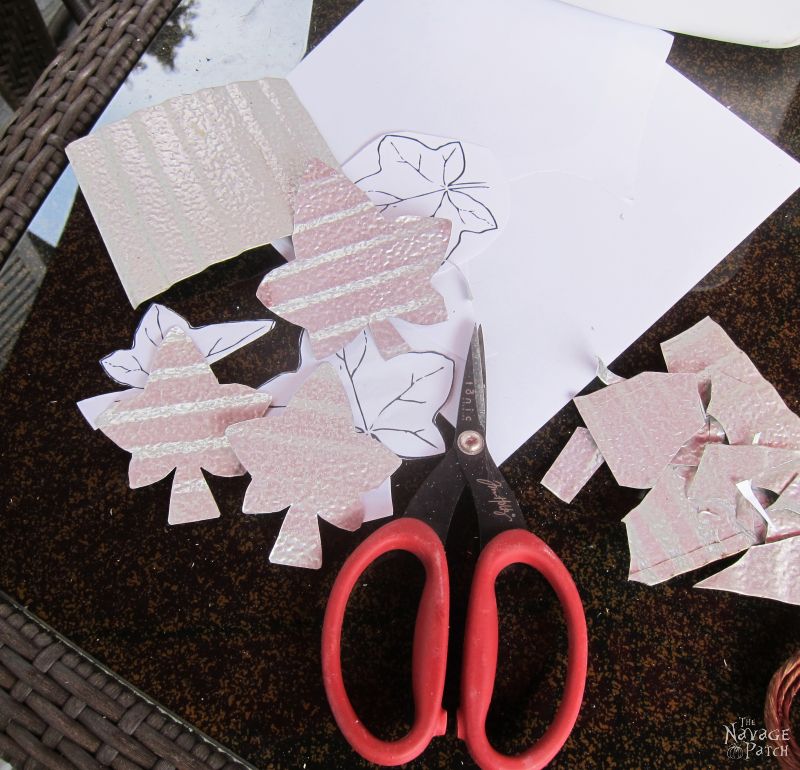
As I didn’t want the sharp metal to hurt anyone, I filed the edges a bit. Once I was done filing, I drilled 1/4 inch holes in the stems of the leaves.
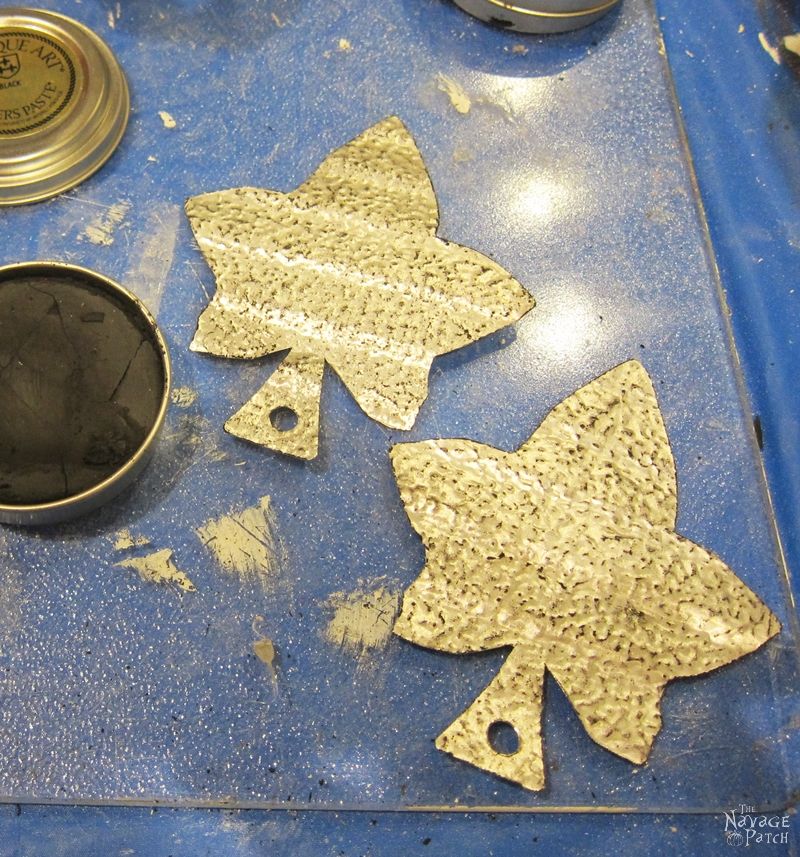
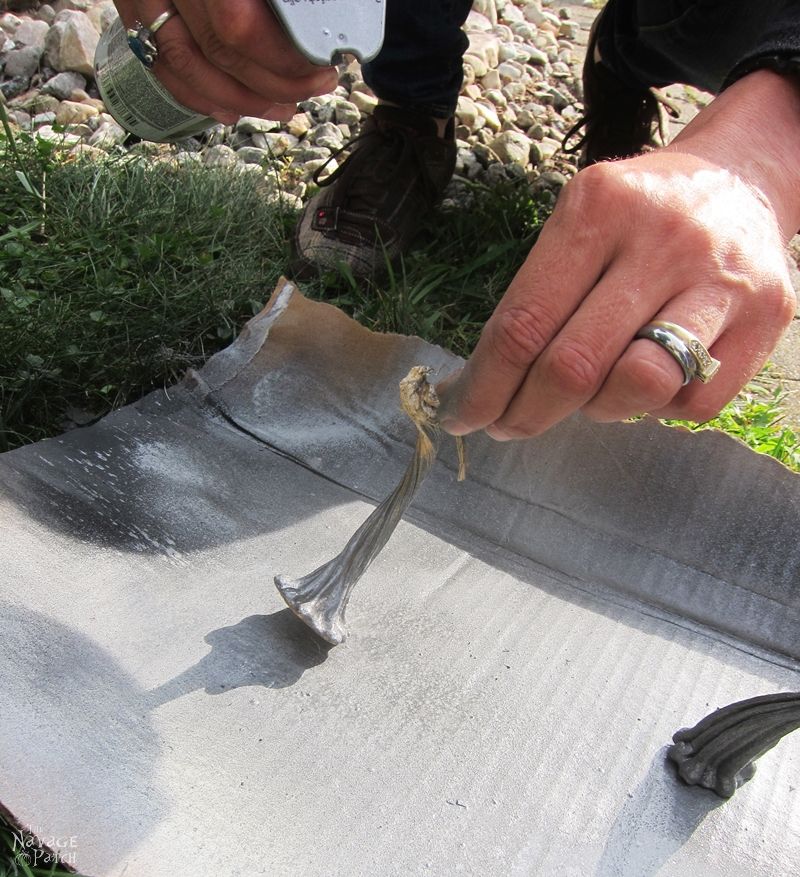
Next, I worked on taking some shine off the leaves. As the leaves were smaller, instead of spray painting them sparsely like I did with the pumpkin’s body, I used black gilders paste. This process is very simple. First you rub your finger on the black gilders paste, then you rub your finger on the surface you want to gild.
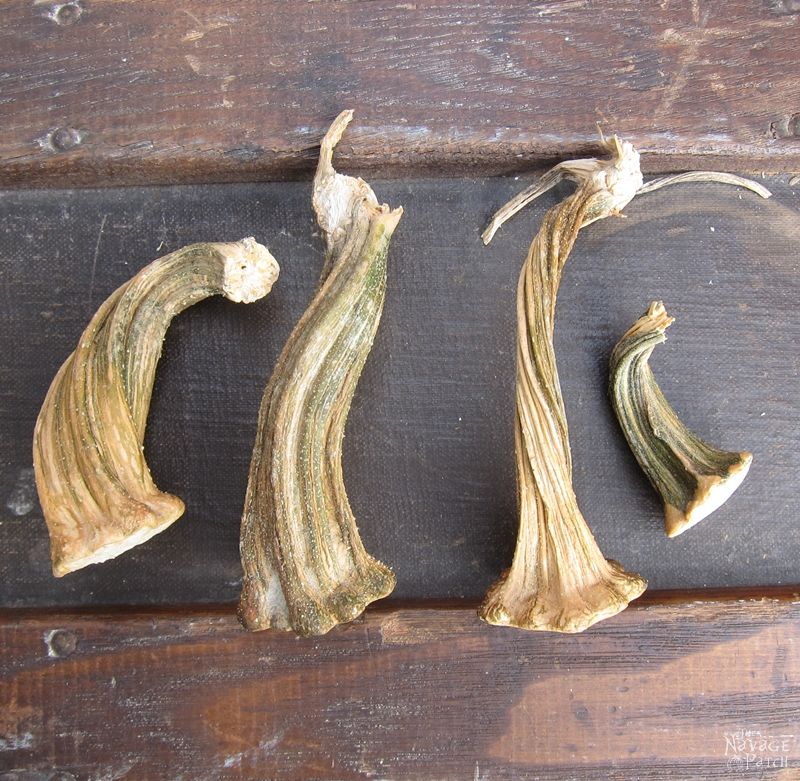
Once I was done with the leaves, I moved on to the stems. Now here is the surprise part: I used real pumpkin stems! Yes, real pumpkin stems! You see…I love pumpkins, so every year, I try to grow some in our vegetable garden. I use some of them for home decoration, and Greg uses the rest in his kitchen. We keep our entire pumpkin harvest in our garage until we use them, because pumpkins tend to last quite a long time in a cold and dry area. Put it this way, our harvest usually lasts until February, if not longer, because by February we usually finish them all 😀
Anyway…just before Greg uses them to make a pie, I make sure I harvest the stems. I cut the stems off, clean the pumpkin meat off them (if any), then I wash them with tap water and dry them with a paper towel. After all this washing and cleaning, I put them in a cardboard box without covering the top and let them be. Once they dry, I have my pumpkin stems in perfect condition to use in my crafts 😉
After this short sidetrack, let’s get back to our metal pumpkins, shall we?
Yes, so I used a real pumpkin stem, but you can use a plastic stem from a faux pumpkin to do what I did. I chose 2 pumpkin stems (I was making 2 pumpkins remember?) and drilled the bottom parts with my step drill bit.
Here is an important note: as I was so excited about my project I somehow forgot all the safety rules (which is big no-no) and drilled the stems while I was holding them with my hand. But you should NOT copy what I did. Please think of your safety first and use either a vice or something similar to hold your stem while drilling.
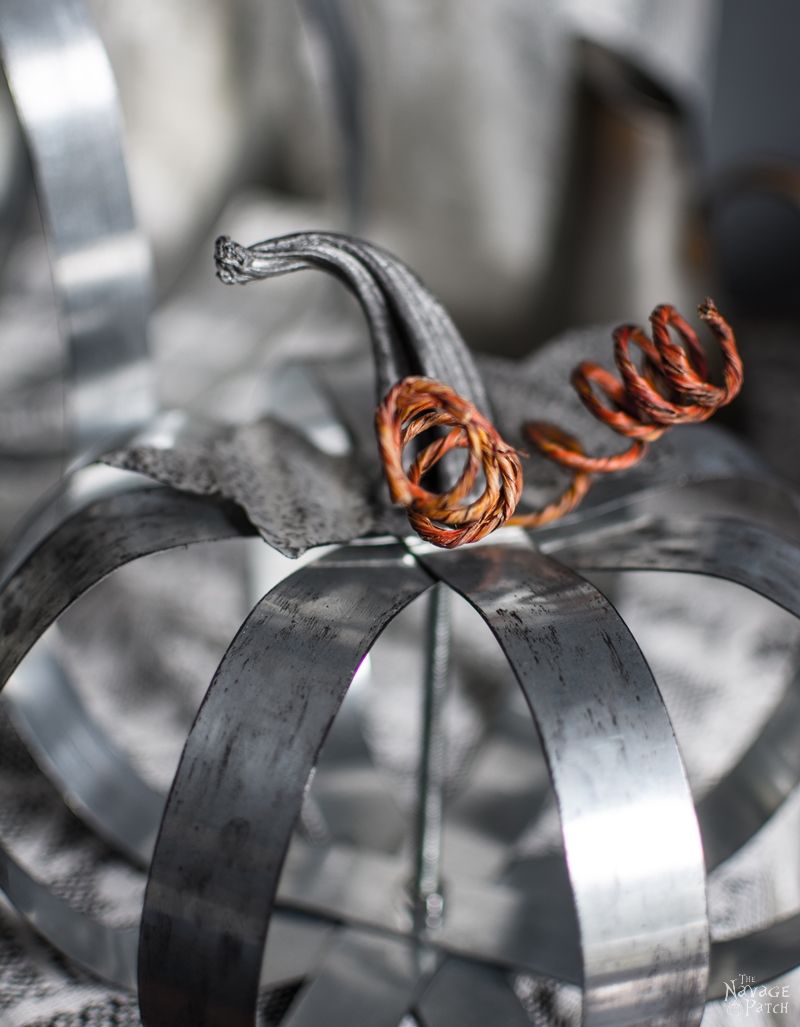
After drilling the bottoms, I spray painted the stems with Rust Oleum Aged Metallic Weathered Steel spray paint. I didn’t list this paint in the supplies list, because it is really an optional thing. You can get the same effect just by using a metallic gray craft paint.
Once the paint dried, I gilded them with black gilders paste to give the same effect that the rest of the pumpkin elements had.
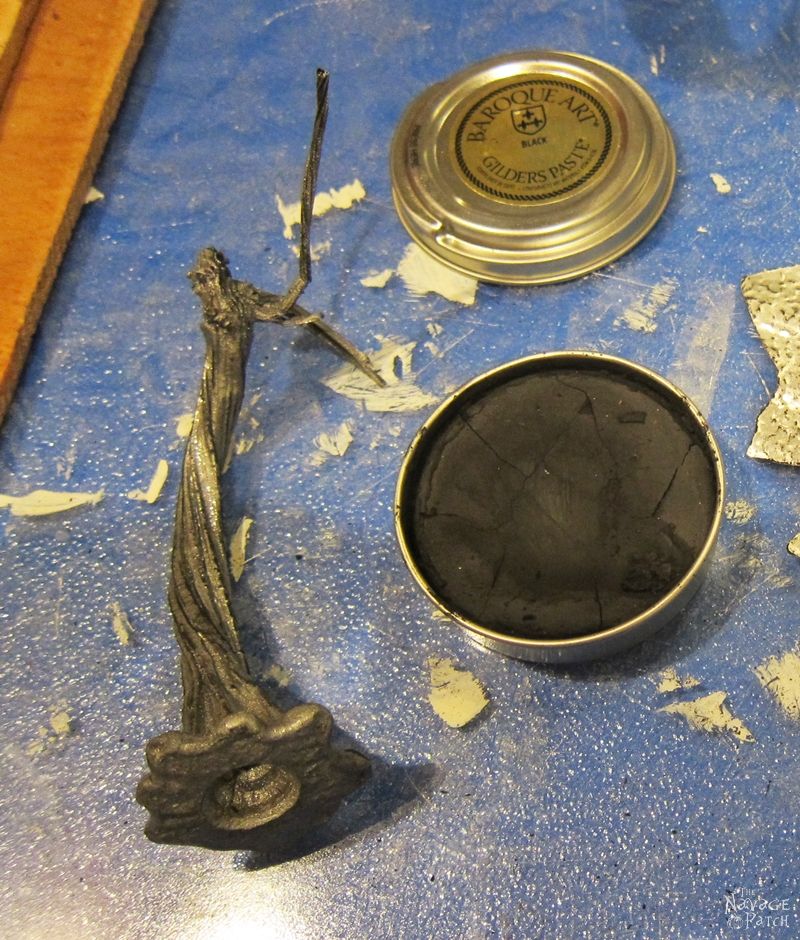
I also needed some vines to dramatize the whole thing, so I cut a piece of vine-wrapped craft wire and coiled it.
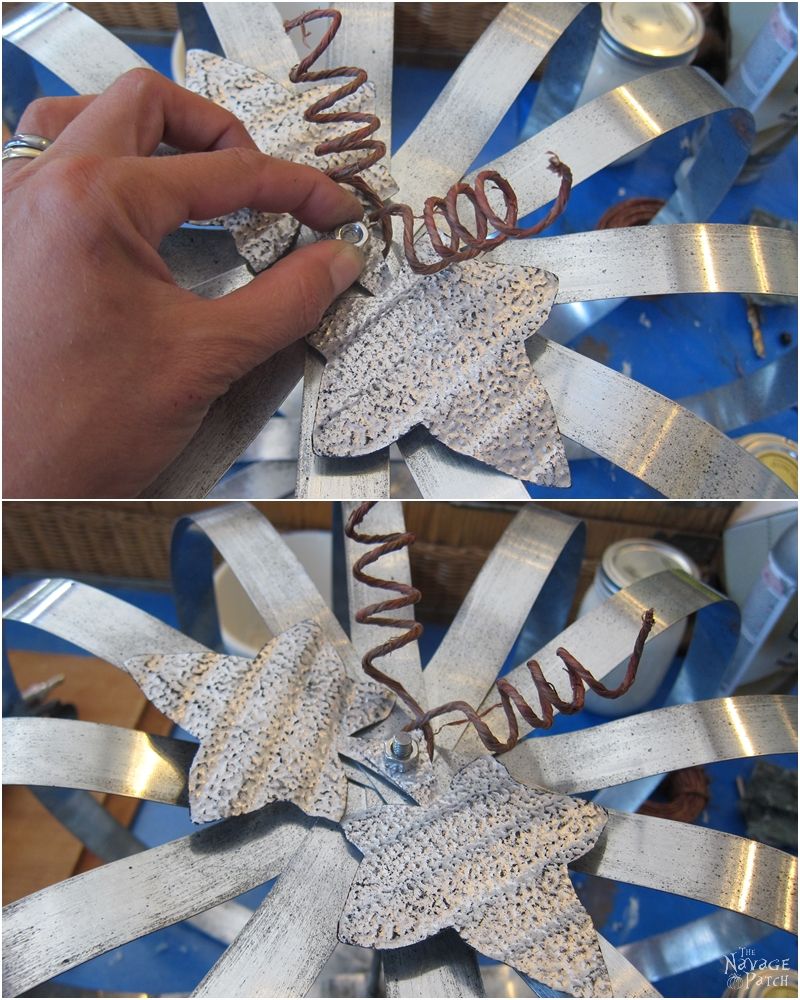
Now that all the elements were ready, I put the pumpkin together. To do so, I first unscrewed the last hex nut and placed the coiled vine on top of the straps.

Next, I placed the aluminum leaves, one-by-one, on top of the vine.

Then, I screwed the hex nut back in its place to secure the whole thing.
As the final step, I hot glued the painted and gilded stem on top of the rod and hex nut, and that was the end of my Pottery Barn Knockoff Metal Pumpkins project.

Not bad, eh? Looks like DIY fall decor wins again!

Considering that I made them for a fraction of the cost from Pottery Barn, I think I did a pretty good job with these 😀
Here are some close-up pictures for you.
This year, I again will be harvesting some pumpkin stems, because using real stems makes all the difference with these types of projects.


If you like pumpkins as much as I do, you will also love my sisal twine pumpkins.
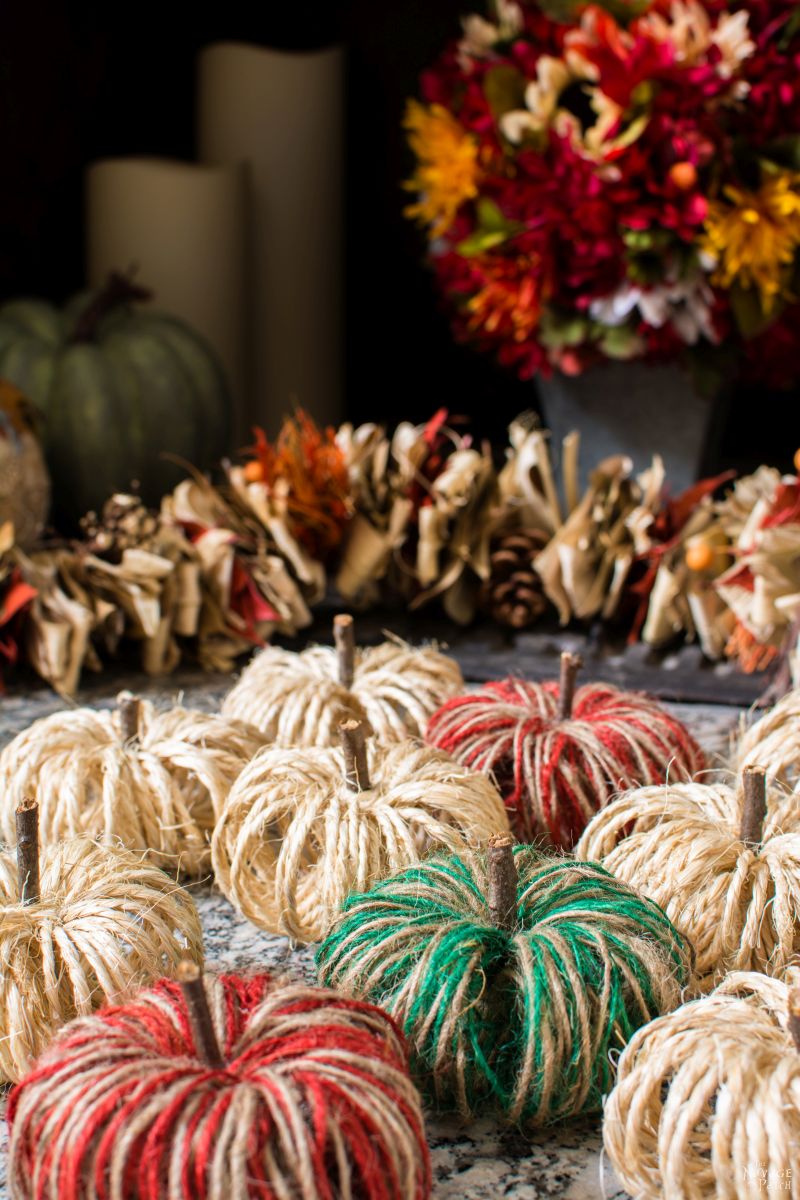
Aren’t they the cutest pumpkins ever? If you want to learn how I made them, click here or on the image above 🙂
Handan, xo
We love it when you share our posts on Facebook and Pinterest!

Oh, Handan, these pumpkins turned out wonderfully. They’re so charming, charming with a much more charming price than the inspirations.
Thank you so much, Susan! Oh yes, my cost was $6 as I had a coil of metal strap already on hand.
The best part is though, I still have more than enough metal strap to make some big decorative spheres for our backyard, and all I need for that is again a rod and some more nuts 😉
They’re absolutely incredible and look much more awesome than the Pottery Barn ones. Fantastic job! Pinning & sharing
Thank you so much, Angie! 🙂
Ha, I love it when someone makes a knock off from something expensive and it looks better than the pricey item…yours are wonderful! They turned out way better than the Pottery Barn ones. Just a quick question, what did you use to file the edges of the leaves?
Thank you so much, Cecilia! As the aluminum was so very thin (almost like a cardstock paper) I used normal nail filer. I have cheap ones (made in China) which I never use as they came with a set, so I just sacrificed one of those. But with thicker metal I use a hand file (something like these http://amzn.to/2bUYlJi).
This is about the cutest damn thing I have ever seen! I simply love the job you did. If I may ask, just what was the actual approximate cost of the project?? I know this number will vary. I just need a close approximation. Thanks is advance.
Thank you so much, Linda!
Let’s say you were to make these having nothing in hand: 18$ for the 100 feet of galvanized strap and 5$ for shipping, 5$ for the paint, 5$ for rod, 2-3$ for the nuts, 3$ for burlap leaves (I am not sure where to find aluminum lawn edging hence I went for the burlap in this calculation) – total would be 38$. But with this cost you can make two. And if you wanted to make more all you need would be another rod and some more nuts, that is it!
That said if you don’t have the drill bit that is another $8.50. But that thing will last a life time and very useful tool.
Also, with the supplies you have left on hand and using that drill bit you can make small or big decorative spheres for your home, which I am planning to make some in the future and will be posting about it.
Love them!!! Reading to hear more about y’all’s story too!!! Tell Greg to hurry & get to it!!! Lol ???
P.S. Sorry did not mean reading, meant to say Ready! ? Apparently fingers have not completely woke up ?
Thank you so much, Robyn! Oh Greg will be delighted when he reads your wonderful comment! And I will tell him to hurry 😉
Wow….what an amazing job! I love how they turned out! I might need to give this project a whirl myself. Thanks for sharing!
Thank you so much, Regi! It indeed is a very easy project if you have the step drill bit or a 1/4 inch drill bit for metal 🙂
Absolutely great. Thanks so much for sharing this awesome idea.
Thank you so much, Lynn! 🙂
Yep your pumpkins are much cuter and holy smokes 99 bucks! No way would I spend that. I think it has been about a decade since I have even stepped foot into a Pottery Barn 🙂 #happynowlinkup
Thank you so much, Jen! 🙂
You two have only been blogging less than a year – impressive!! So are your DIY Pumpkins, Handan. Personally, I like yours better because of the stem, leaves and tendrils. Beautiful pictures too btw, as always.
Thank you so much, Marie! Our goal is not to come in last place! LOL! But still, it is a great honor to be listed among such talent.
These are gorgeous!!
Thank you so much, Anne Marie!
That turned out absolutely amazing!
Thank you so much, Christine! 🙂
I love a good Pottery Barn inspired project and yours is truly incredible.
Thank you so much, Sharon! 🙂
OMG!!!! I am in love with these beautiful metal pumpkins. I usually don’t put out pumpkin decor until October but I need these in my life. Thank you so much for sharing at the Wednesday Showcase. Pinned!
Thank you so much, Kati! 🙂
Awesome project! I love how the pumpkins turned out, good job!
Oh thank you, Cristina!
I love your knock off! They are gorgeous! I think that I will try making a Christmas tree using the same general process. After I make the pumpkins of course. Thanks for such a great idea!
Thank you, Robin! Talking about Christmas, someone on Hometalk also gave me a good idea that we can do using this process: Snowman! Reading your comment, now I am planning to get some metal straps so I can put these two awesome ideas (yours and the snowman) into life 🙂
Brilliant! You did such a great job with this project! Just wanted to stop by to let you know that I’m featuring it at this week’s link party. http://www.thelifeofjenniferdawn.com/2016/09/creative-diy-projects-for-fall-weekly.html
Thank you so much, Jennifer! 🙂
Such a great idea. I’m pretty sure I’m never actually going to make them but i really love them! Does that make sense! In the UK we do minimal halloween and autumn decorating stuff but if we ever go mad and do a lot I’m thinking it would be something super cool like this!
Thank you so much Julie and it totally makes sense! If we weren’t currently living in the States, I wouldn’t even bother to do any seasonal decoration other than Christmas, because in the rest of world (or at least the countries I lived in) home decor doesn’t change much from season to season, unless it is Christmas/New Year’s eve.
My kids loved that you made it out of hardware supplies! They are all boys!!! Nice job. I featured this hack on A Little Bird Told Me this week.
Hahahaha… For the same reasons these pumpkins are also our son’s favorite fall decoration. He thinks it is cool and manly enough. LOL.
Oh my gosh, Handan, these are SO beautiful!! I want a few, or may ten–lol. I’ve never seen a step drill bit before. Is it for making holes in things? I think I need one of those! Thanks so much for sharing your awesome project with us at Vintage Charm 🙂 Pinned and Facebooked!
Thank you so much, Diana! They are really very easy to make. Yes, that is a step drill bit. It is normally for metal, but also works with wood and other things. So it is a pretty awesome little thing 😀
Once again thank you for visit and sharing the pumpkins on Social Media! Wishing you a great weekend!!
I think your pumpkins turned out great! I don’t think that I could of paid that expensive price for the other either. Always so much better when you can make things yourself. That way when someone makes a compliment, you can say “I made them meself”.
I think yours turned out way cuter, with the curly vine, leaves, and stem.
Thank you so much, Linda! 🙂
Awesome…I love them!
Thanks so much, Jane! 🙂
Oh My Goodness,
These are far more superior than the store ones, you have done a wonderful job,
and to your husband as well, you have so inspired me to get my lazy husband’s butt off the couch, Thank you so very much………lol
LOL. Thank you so much, Linda!
What were the dimensions of your smaller pumpkin? strap length, center length? LOVE these! Fabulous job.
Thank you so much, Marie! Strap length is 22 inches (center hole to be drilled at 11 inches) and the threaded rod length is 5 1/2 inches. As I didn’t want a crowded look I used only 4 straps for the small one. With the big one I used 6 straps.
Wow, they look amazing, you did a great job. I especially love that you used real stems. Thank you for sharing at The Really Crafty Link Party. Pinned!
Thank you, Teresa! 🙂
Just a quick note to add that this is one of this week’s featured posts (http://keepingitrreal.blogspot.com.es/2016/09/the-really-crafty-link-party-36-featured-posts.html). Thank you again for joining the party and have a wonderful weekend!
Oh wow! Thanks so much, Teresa! 😀
Great job! The pumpkins look fabulous!
Thanks so much, Linda!
Approximately what are the finished dimensions of the two pumpkins? I am wanting to make these but I want them as table decor. Thank you, I love this idea.
Hello Jessica,
The big one: width 17.5″, height without the stem 10.5″ and height with the stem 13.5″.
The small one: width 8.5″, height without the stem 5.5″ and height with the stem 7.5″.
I hope this helps. Happy crafting! 🙂
These are so cute. Hope to see you at Family Joy Blog Link Up Party this week. Check us out http://ow.ly/GgRU305TyOz
Thank you so much, Charlene! And thank you for the invite too!! 🙂
Love this, fabulous! Thanks for sharing on craft schooling Sunday!
Thank you so much, Sara! 🙂
Your pumpkins are fabulous! I’m always so impressed both by your creativity and your resourcefulness. Thanks for sharing this at Snickerdoodle I’ll be featuring this at tomorrow’s party. Hope to see you there!
Thank you so much, Beverly! I’ll definitely be there! 🙂
Wow, this by far the most beautiful DIY project I’ve seen this fall!! Very nice!
Liz, thank you so much!! 🙂
Genius diy project and you did a beautiful job!
Thank you so much, Christine! 🙂
So clever Handan. Who wants to spend so much money for strips of metal? I love the use of the pumpkin stems. I also do things like that, mix real and fake together. They turned out great and you didn’t have to empty the money tree in the back yard.
Thank you so much, Mary! 🙂
Love these! If I wanted to make some larger ones, say 18″ or 24″ tall, how long do you think the straps would need to be?
Hello Laci, I would add 20-22 inches per additional 6 inch height. My tall one was 11-12 inches tall and I had to use 42 inch long straps for it. Also when you make bigger ones, for it to look full, you might want to add 2 or 3 additional straps too.
Love these! You did a great job breaking down the process! Can’t wait to make a few.
Thank you so much, Aimee! I am so glad you liked the tutorial! 🙂
these are FANTASTIC! I cannot wait to make these for fall..
yours look WAY better than Pottery Barn too…just sayin!
love them..seriously..
Wow! These are amazing! Thanks for sharing. I’m excited to make some and I appreciate that you posted a cost analysis as well.
These are amazingly adorable. Now make a whole lot of them and sell on Etsy. I would rather buy from an individual than Pottery Barn.—AND am SO not making these myself!!!
Thank you so much , Marilyn! I wish you’d gave them a try as they are pretty easy 😉 As for me selling them on Etsy, I don’t have any time left to do anything like that 🙂
AH-mazing! Way better than the ones from Pottery Barn.
Thank you so much, Dyan! 🙂
Oh wow! These would make awesome DIY lights I think if I could just wrap my head around where to put a light thru.
Thank you so much, Jan! That’s a good idea – let me also think how we can incorporate lights to it in the best way 🙂
These pumpkins are an absolute treat!! “We” can do this!! Thanx! franki
YES that’s the spirit! You can totally do this! 😀
Handan, the pumpkins are beautiful! You did an awesome job! I happen to like your version so much more. Congrats!
Thank you so much, Melva! 🙂
I like yours better than the Pottery Barn version, Handan. They have a better shape and the real stems give them more character.
Thank you so much, Laurie! Yes, I agree – a real stems give them more character! 🙂
Can you tell me the width of the straps and the grade?
Hi Debbie, here’s the link to the specific product we used.
Awesome! I’ve been thinking about making these for years and just never got around to it, you make it easy and it looks like I might have pumpkins on my porch this year LOL.
Glad to hear it! Good luck!