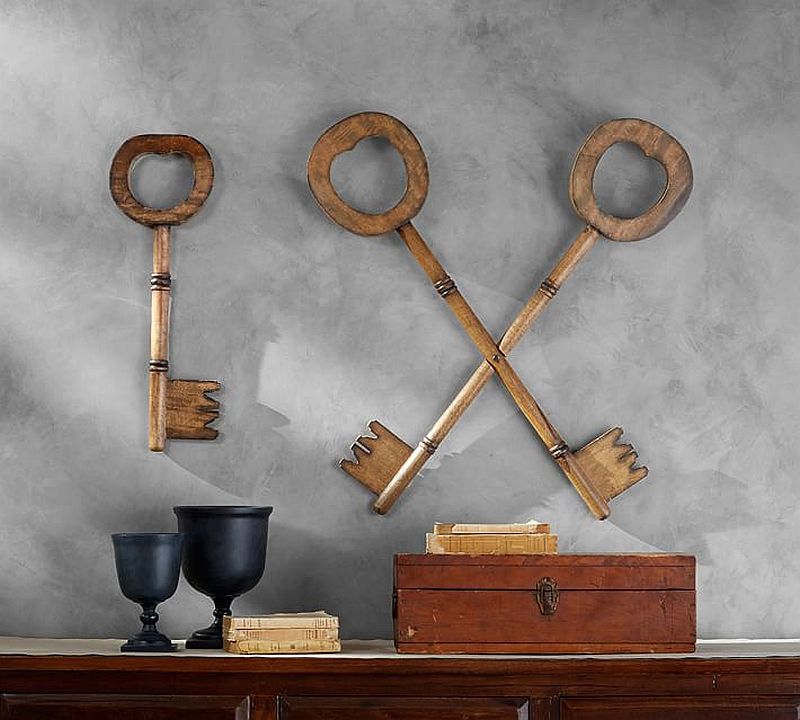
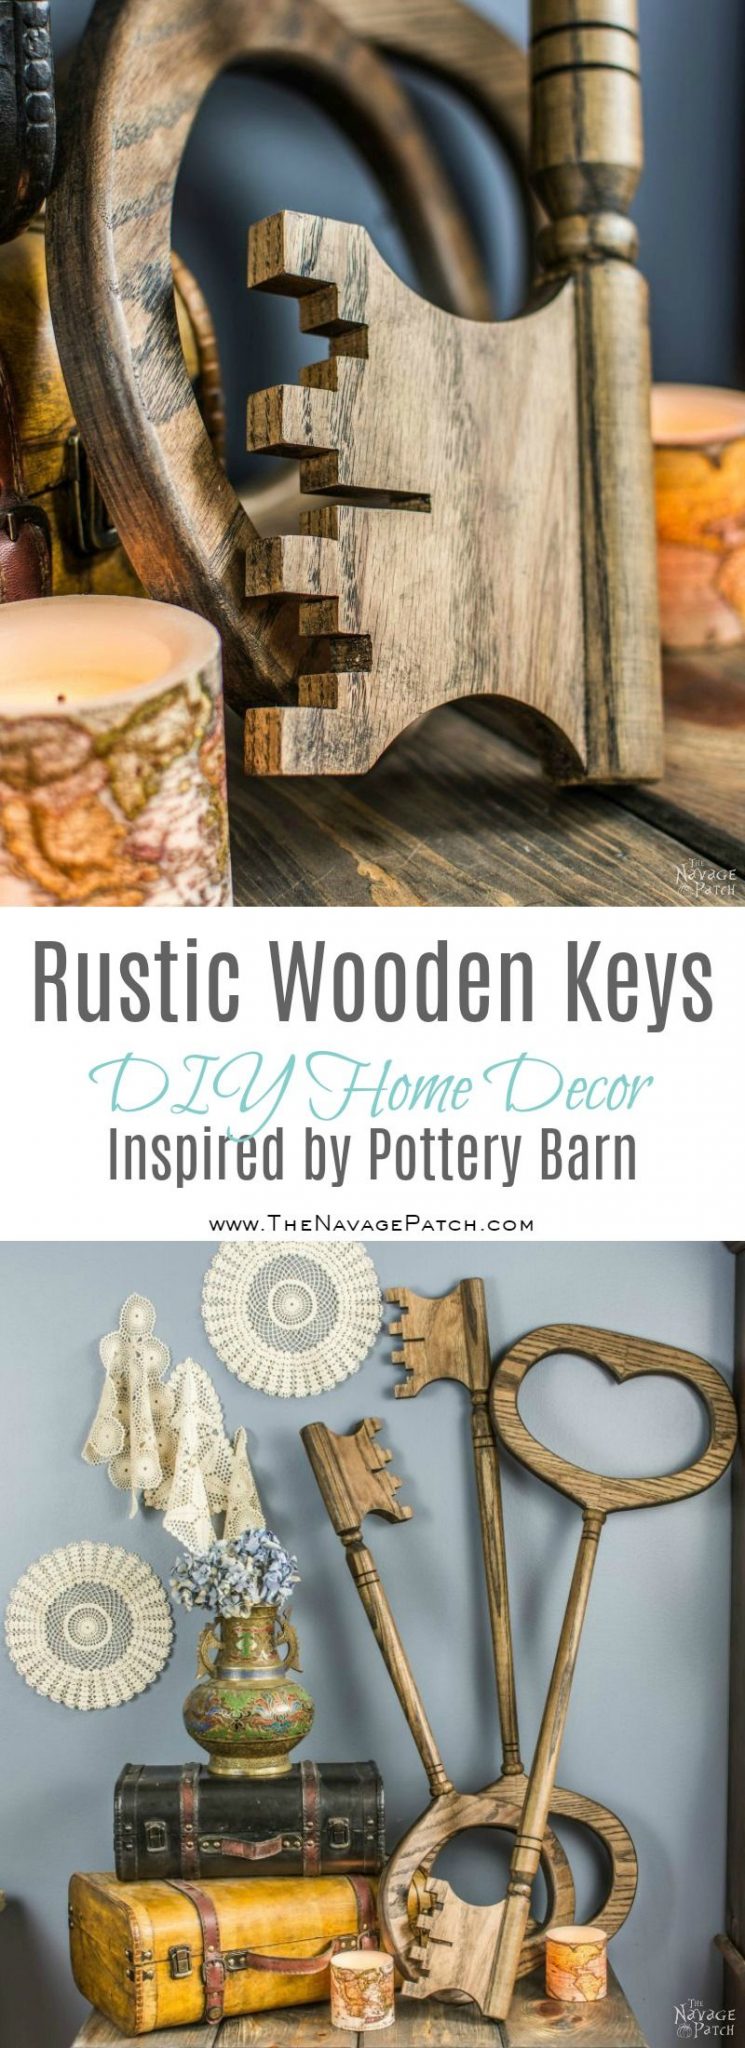
Rustic Wooden Keys (Inspired by Pottery Barn)
Back in September, Handan told me that she had a great project for me. She had just published a post about her knockoff Pottery Barn outdoor pumpkins, and she was riding a glorious wave of accolades and adulation. She had knockoffs on the brain, so what better way to capitalize than to make some more knockoffs? And who better to make them than me? She showed me a picture and pointed towards the basement.
I protested that there was a good movie on TV that required viewing.
She thrust the picture closer to my face. She pointed to the basement.
I informed her that my video game characters hadn’t seen me all day, so they were probably missing me. Even robots get the blues, I warned her.
She pointed at the picture, then stabbed her finger towards the basement.
I changed tactics and told her that I needed to mow the lawn. The grass couldn’t possibly survive another day without my immediate attention.
Picture. Basement.
I knew the fight was lost. The fix was in. It was over before it even began. I took the picture and gave it a closer look.
Where the hell did she get a Pottery Barn catalog, anyway? She’s never even been to a Pottery Barn! Meh, probably best not to ask.
I had learned long ago not to question her sources. Or her motives. Or her opinions. Or her wardrobe. It’s an unforgiving world, and a man must learn quickly if he is to survive.
*****
Yeah, so I could make those keys. But I wasn’t keen on the crossed ones, so I decided to make two big ones and one little one. We had some old, mismatched chair spindles in the basement, but they were a little too mismatched. I wouldn’t have been able to stain them to a uniform color, so I bought some table legs from Home Depot instead.
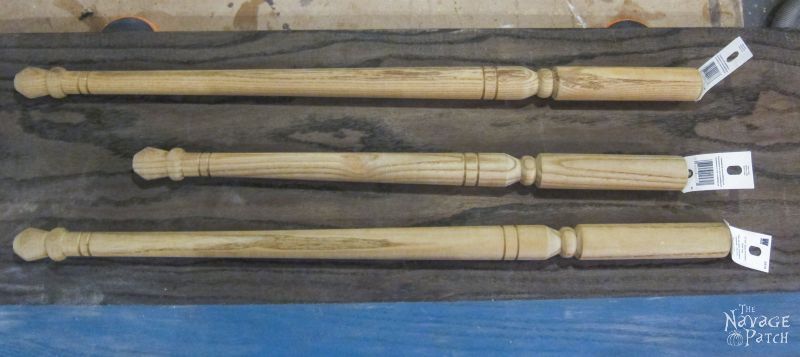
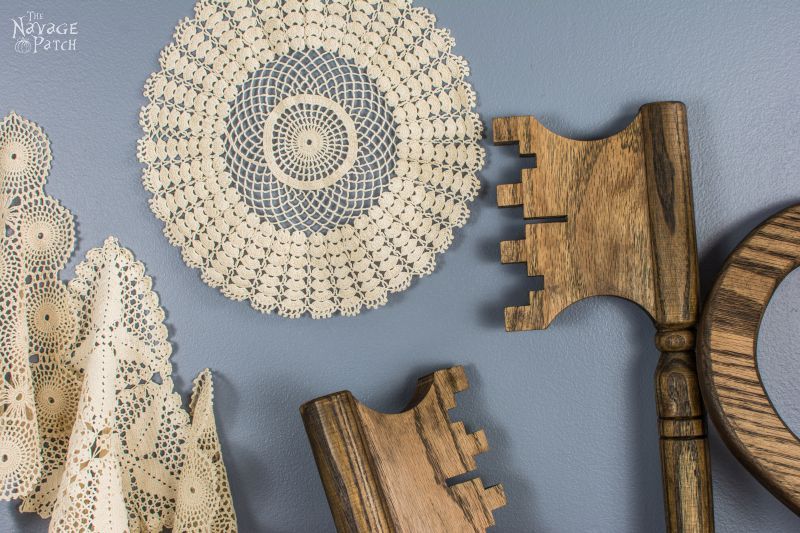
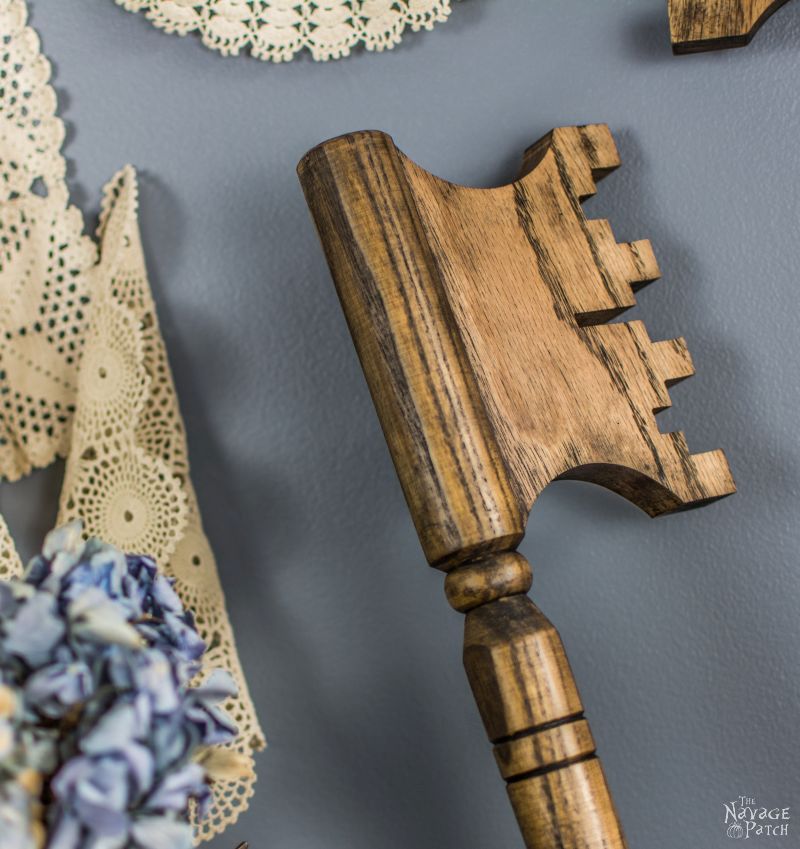
My original thought was to make the bow (that’s the part of the key you squeeze between your thumb and forefinger) at the thick end and the bit (that’s the business end of the key) at the tapered end. The problem with that idea was that it would be hard to attach the bit to a tapered cylinder. I waited for an idea to spark in my gray mush, but after a few sputters and backfires, I flip-flopped my original thought and decided to make the bow at the tapered end and the bit at the big end.
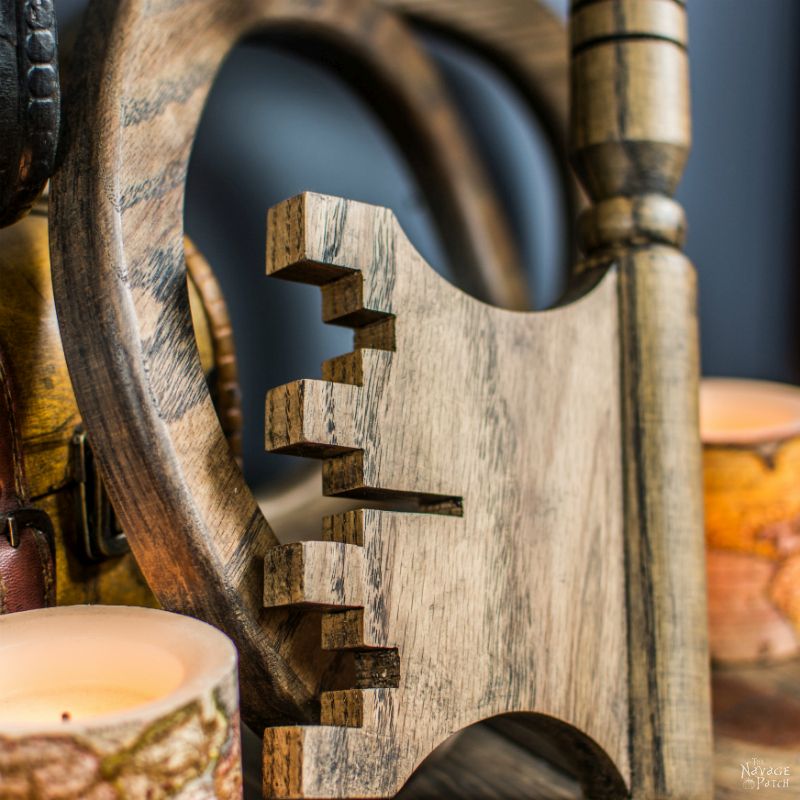
Since the table legs were some sort of hardwood (they looked and felt like oak, but they didn’t smell like it), I went with oak for the bit. Unless you have a bandsaw, I would recommend using a softer wood, like pine. It would be much easier to cut and shape using hand tools (jigsaw, sandpaper, etc) than oak. I had a lot of spare oak in the basement from a shelf that I had built for our son a few years back and recently disassembled. One of the planks is pictured above. I wanted the bit to be a little fancier than the Pottery Barn keys – something with curves and angles. I grabbed a pencil and a ruler and started to sketch out a design.
When I was satisfied, I cut out the design on the bandsaw and then used that piece as a template for the other two.


I sanded off the old stain so I could pick another color once the keys were built.

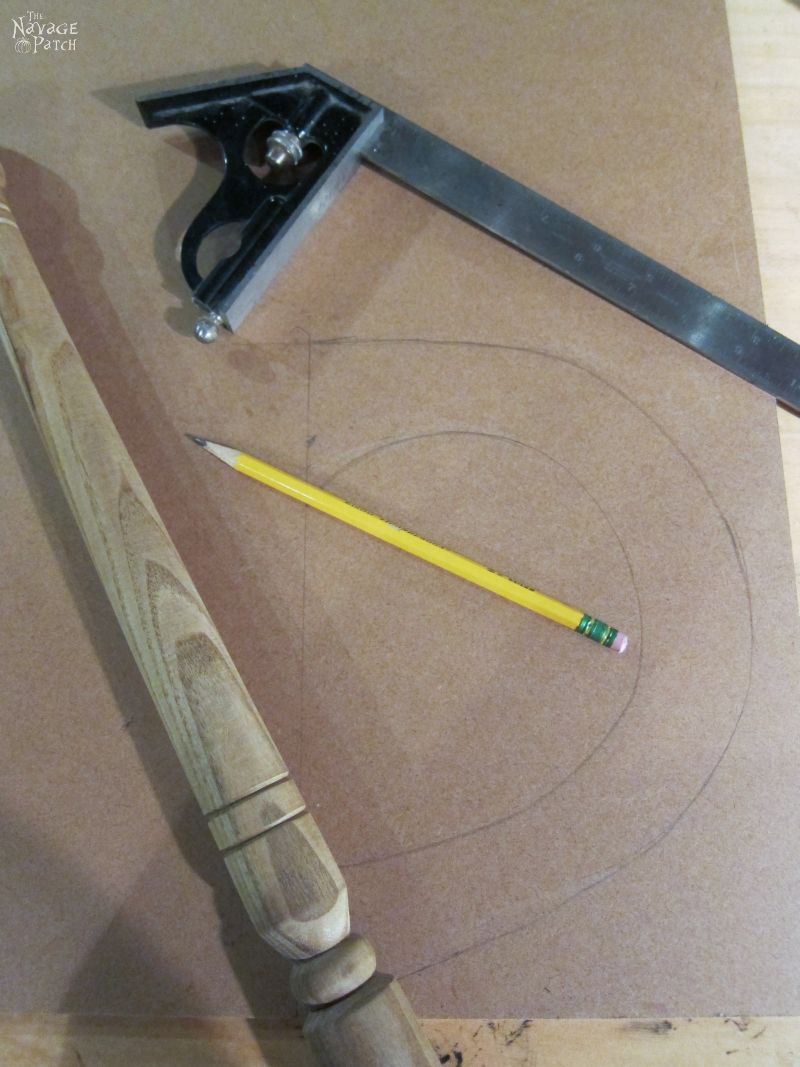
With the bits cut out, I turned my attention to the bows. The Pottery Barn keys had used the same shape bow for all of the keys, but the short key’s bow was smaller. I’m lazy. That would require additional work that I was just not willing to give. If the bits were all the same, the bows could be the same, too! I traced one half of a bow onto some scrap MDF. This would serve as the template from which I would make all of the bows.
I cut out my template on the bandsaw.

Then I traced the outline of the template onto a piece of oak. Again, if you’re not using big machines, don’t use oak.

I then ran the piece through my table saw.
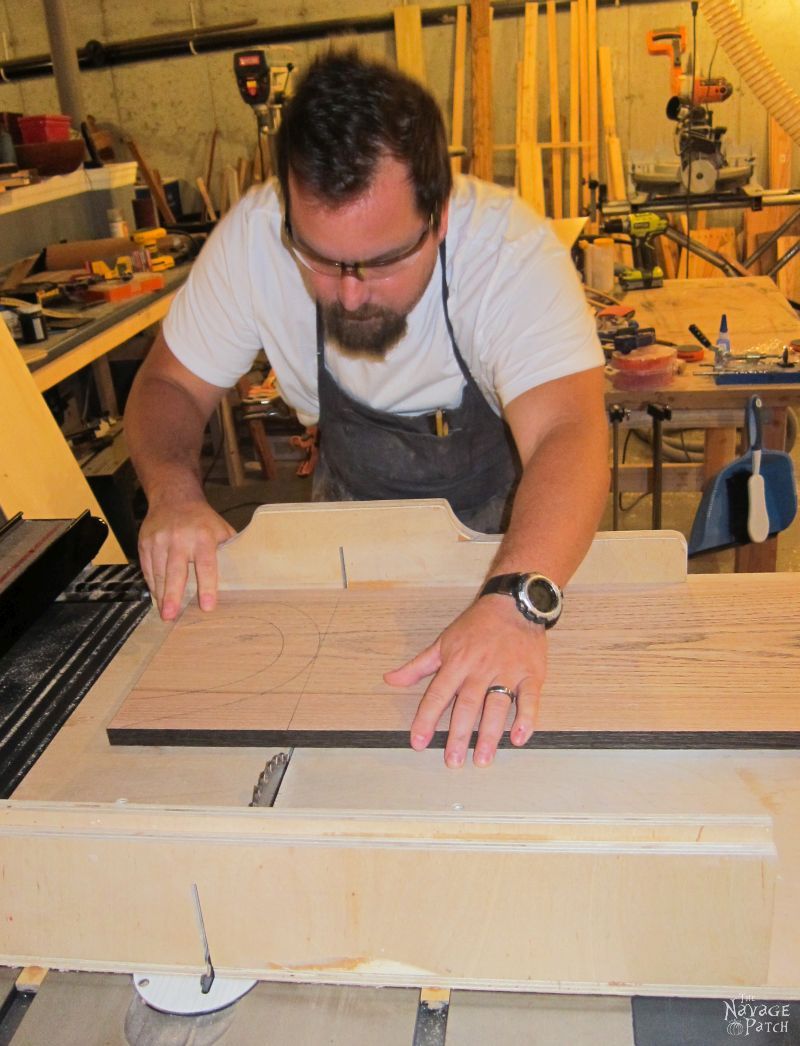
And then cut out the shape with my bandsaw.

I cut as close to the line as I was able.

It wasn’t perfect, but I smoothed everything down by sanding. I first hit the outside curve with a disc sander.

And then tackled the inside curve with a spindle sander.

Looking much better!

I glued two halves together and clamped them.

While the bows were drying, I attached the bits to the shaft. (o_0) First, I created a flat area on the shaft by pressing the table leg against a belt sander until I had a flat area sanded away with a width equal to the width of the bit.

I placed the shaft in a vice, flat side facing upwards, and glued and clamped the bit onto the area I had sanded with the belt sander.

When all the glue was dry, it was time to attach the shaft to the bow. I decided that the easiest way to accomplish this was to cut the head off of a screw…

…then drill a hole into the center of a shaft. Finding the center was easy – I used Handan’s method.

Drilling a straight hole was much harder. The best I could do was eyeball it and hope.

I put a bit of super glue gel into the hole and inserted the screw.

So I wouldn’t split the bow at the seam, I drilled a hole for the screw.

Before attaching the shaft, I routed the edges of the bow with a roundover bit.

Then I attached the shaft to the bow. I decided against gluing, in case I wanted to disassemble them in the future.

A word to the wise: don’t over-screw it, or you’ll split the bow. Totally didn’t happen to me, I swear :-/
And with that, a key was built, but not finished.

Since I wasn’t sure what wood the table leg was made from, and since hardwoods like oak can be finicky with stain, I decided to try something new with these: I would “stain” them with Annie Sloan’s Black Wax. Handan set me up at her crafting table upstairs. (Upstairs! I was actually working upstairs! No more basement lair for this guy! Woohoo!)


You get the picture.
After I finished waxing, I let the wax dry for a day, then I moved the keys to long-term storage in my office until such time as I could display and photograph them.
That day was yesterday.
It only took five months to get them into a display, but here are my rustic wooden keys, inspired by Pottery Barn.


Your bits are way better than Pottery Barn’s. The whole key is way better. The black wax finish is perfect too. Love these – great job as always.
Thank you, Kay! I thought that PBs bits were pretty generic, so I spent a lot of time designing and cutting these. I’m glad you think they are worth my effort! 🙂
A lot of work and they look great!
Thank you so much, Teddee! Yes, they were more work than I was expecting, but we love the results!
Oh that’s just sooo wrong, and beautiful and stunning. Wrong because we don’t have a bandsaw or a Pottery Barn or a Home Depot and I want these keys so badly. Brilliantly done Greg, I’m so glad Handan pushed you.
Thank you, Michelle, but you can make these! just use pine for the bits, and make them thinner than mine. A handheld jigsaw will make quick work of it. If you don’t have a home depot, you can find an old table and lop off its legs 🙂
Brilliant and so better than PB’s. What a pity we don’t have a bandsaw.
Thank you! See my comment above. Try using thinner pine for the bits, and you should have no problem cutting them with a handheld jigsaw.
This is FANTASTIC! And you’re hilarious! Also, you’re an excellent writer as well. Just had to point out the obvious. Keep up the good work!
Thank you, thank you and thank you! You made my day, Allison! 🙂
woohoo the patch is back, these keys are awesome but way above my pay grade, so glad to see y’all in my email this am xx
Thank you, Chris! Yes, a new year and a renewed Patch! 😀
Fabulous result. You are so talent
Thank you, Ivory 🙂
Greg, . . .an awesome project (great idea Handan!) with your added humor, which I always look forward too!! Thanks for sharing!
Thank you so much, Kaycee! Yep, Handan is the idea woman!
What, no biscuit joiner? Just kidding! What I’d do to have a workshop like that one and someone to delegate the use of all those fabulous tools. Great idea Handan – excellent execution Greg. Love those keys and they are way nicer than PB’s.
I just love your post. You do such beautiful work and nice ideas. Love how your brain thinks. Keep up the great work.
Hi Teri, thank you so much! More on the way! 🙂
Hi Marie! Yeah, no biscuit joiner…yet! LOL, That’s one tool I’ve haven’t thought of getting 🙂
You do know that you don’t have to lop the heads off screws? They sell doubled ended screws for that sort of thing.
Great job! Too bad I don’t have a basement, a band saw, a disc sander, a spindle sander, and…a babes who will build stuff. My mechanic-computer nerd, [also electrician, plumber, basic carpenter (in descending order of ability & desire)] doesn’t do finish work. Just really doesn’t like woodworking.
Great job Greg! Stupid question: how did you cut the head off the screw? xx
Thank you, Kate! I put the screw in a vise and used a hacksaw. I found that was quicker and easier than using a Dremel.
Hi Greg. Just stumbled across your beautiful key’s now and am going to look in my shop for some old legs to make some. Just a thought. If the bow was made with 2 unequal halves you would not see the joint and there would be no risk of the screw splitting the bow . Regards Michael
Hi Michael, that is an excellent suggestion – thank you! I’d love to see some pics if you make some.
Really great job! Very detailed tutorial! The keys look very professional! Thank you for sharing!
Thank you, Cat!
It’s a grey day in Wales, i had an urge to peruse ‘The Navage Patch’ and found this. I love those keys they are fabulous. Been intrigued by keys since i was a small child, We lived in a dilapidated rented farm house and the front door key was enormous ornate iron thing compared to modern keys. Well i really must shift my backside and do some house work, while wondering if i can get toolbox Tony to make me some wooden keys.
We love old keys, too! Good luck with Toolbox Tony – I hope he’ll make you some! 🙂
I like your keys better than Pottery Barn’s version. I just read your “about us” story, it’s very unusual and very wonderful ! Love does win. I read that you live in CT. I also live in CT. Do you sell your creations anywhere local ? On line ? I would love to purchase one ( or two ) of those keys. If you don’t already, consider it. They are lovely !
Hi Margi, I’m so happy you found us, and I’m thrilled to hear you like our keys better than the inspiration! We live in Georgia now – moved down last year during the height of the pandemic. That story is in the blog as well!