Ceramic Vase Makeover – Inspired by Pottery Barn
Who doesn’t like a good knock-off project? I know I do, because:
- There is no satisfaction like having the dreamy decor item you want, but without having to spend a lot of money for it.
- It is way more satisfying than just going and buying the real deal, as there is a challenge in trying to DIY it. And oh boy…do I love challenges like that!
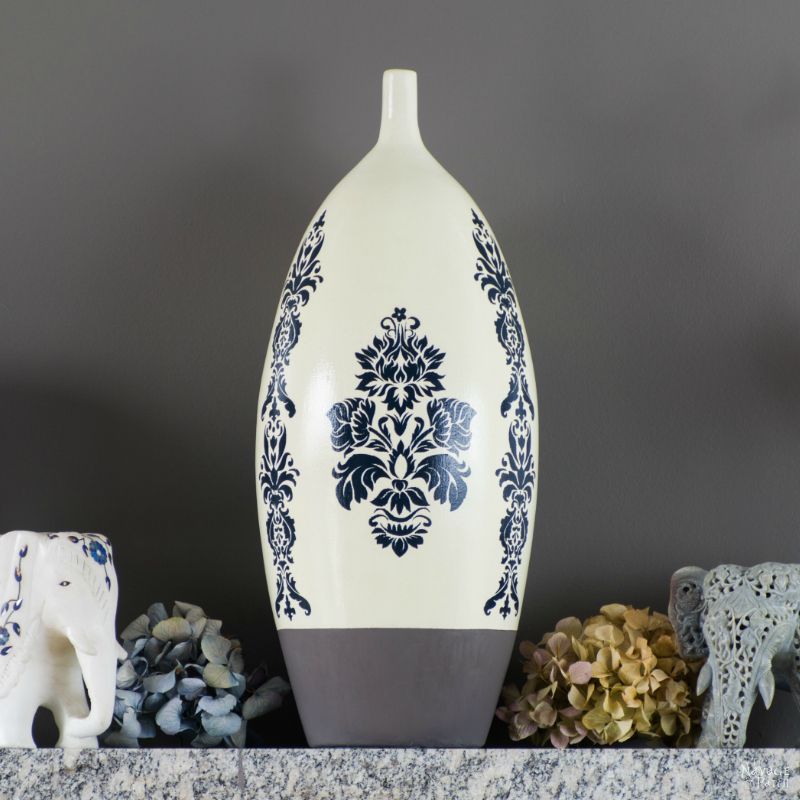
This is exactly why I was so excited when I came across Pottery Barn’s Lilian Vase the other day: it is beautiful and comes with a matching price tag! The vase has a Mediterranean feel to it which I love, and it silently screams for a knock-off challenge…which I readily accepted!

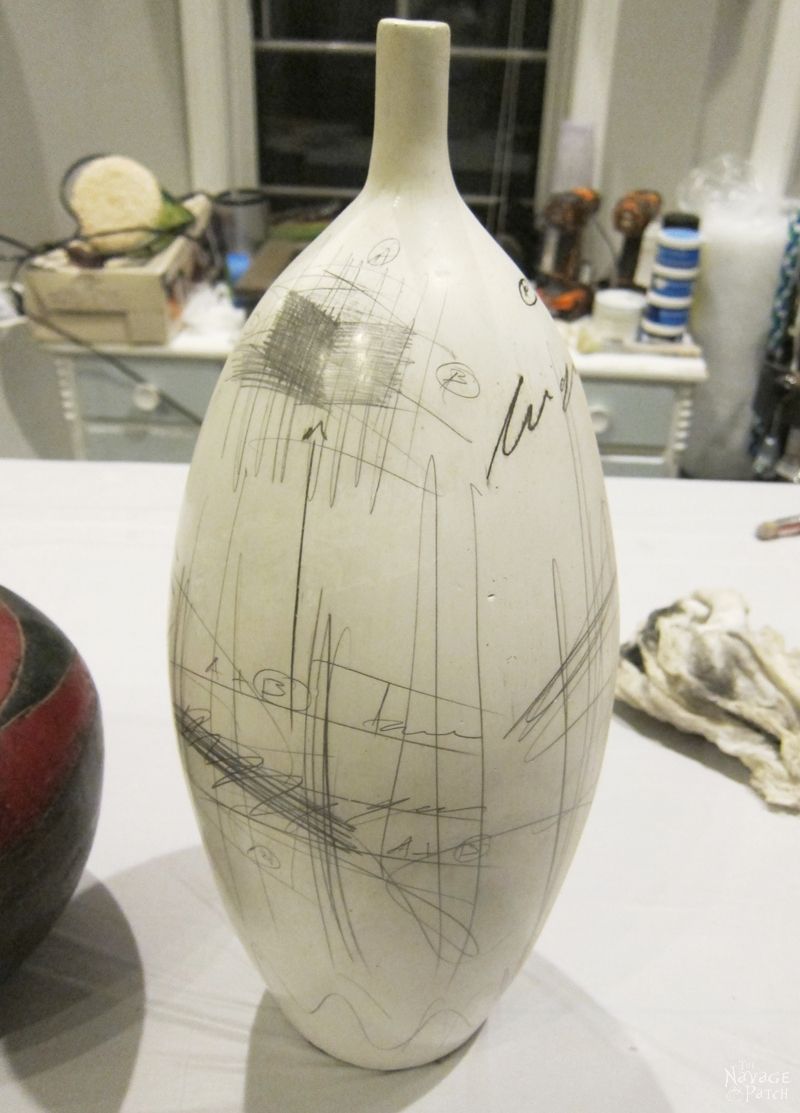
As usual, I went to our famous junk mall (aka basement) to see if I had something suitable. After a bit of rummaging, I discovered this ceramic vase I got from the Second Chance shop (our local thrift store) a long time ago. According to its price tag, I paid a dollar for it 😉 What a bargain, right? Well… maybe with its scribble-ish pattern, it wasn’t that much of a bargain. But at least it helped me not to have second thoughts about the makeover – even if I messed it up, it couldn’t look worse than it already was…hahahaha 😀
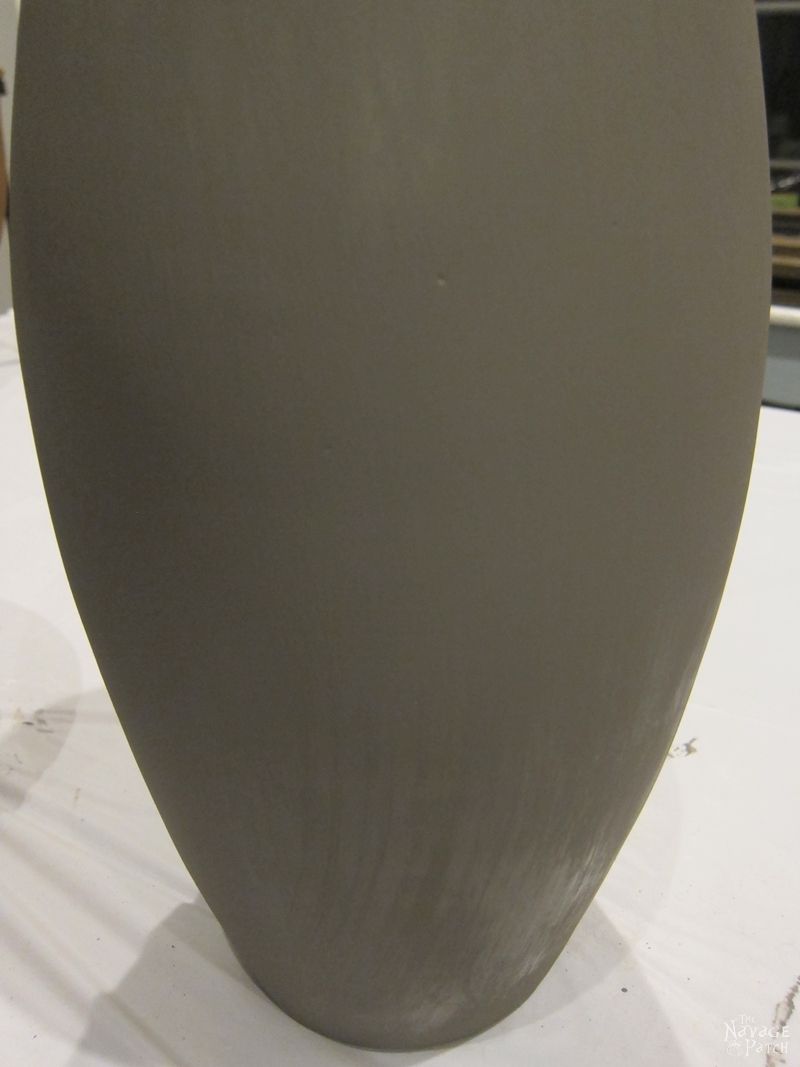
The Lilian vase had a taupish-grayish color block around the bottom, so to achieve a similar color, I mixed some chalk paint I had on hand. I really can’t remember how much of what I put in, but I used these three colors in that mixture: Maudi Sand, Castle and Java.

Using my favorite brush, I first painted the vase with 2 thin coats of that taupish-grayish mixture I prepared.
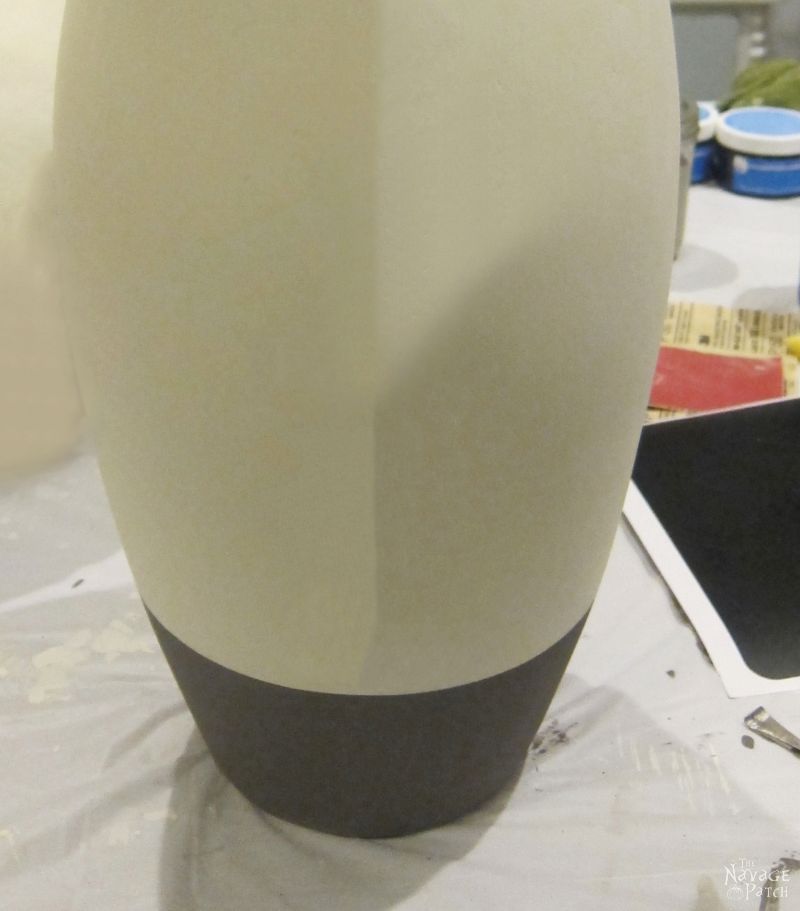
Next, I taped a thick band around the bottom of the vase and painted the rest of the vase with 3 thin coats of my homemade chalk paint in old white (custom matched) color.
While waiting for the paint to dry, I prepared my stencils. I converted two damask pattern pictures (which I’ll be sharing with you at the end of the post) into stencils. Then, using my Cricut, I cut them on repositionable vinyl.
I placed my first stencil on the vase with the help of transfer paper and started to prepare the paint I was going to stencil with. As I can’t ever distinguish dark navy blue from black, I wasn’t sure what color the pattern was on the Lilian vase. But Greg told me it looked like a very dark navy blue, so I mixed some blue and black chalk paint to end up with a very dark navy blue color.

As you can see from the picture above, I couldn’t get the stencil placed perfectly because the surface was spherical. With such a poorly placed stencil if I used a brush the paint could have bled, therefore, I used a sponge and dabbed only a little bit of paint at a time. I also made sure that I wouldn’t dab the sponge at an angle, but just straight on as shown in the picture below.
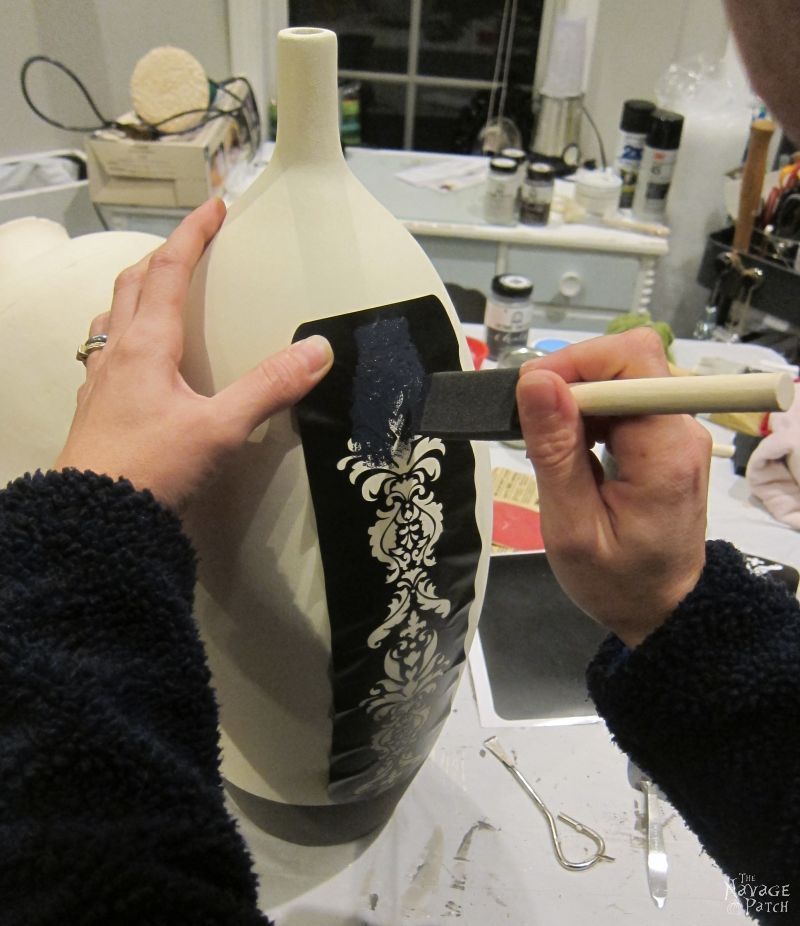
Right after I finished dabbing the paint, I quickly removed the stencil. Then I waited for the paint to dry before moving on to the second one.

One-by-one, I stenciled the same pattern three times with equal distance to each other. Once that was finished, I moved on to the second pattern I wanted to use.

Again, I stenciled the pattern with a slightly loaded sponge and by dabbing. As soon as I finished dabbing the paint, I removed the stencil and waited for the paint to dry before moving onto the next one.
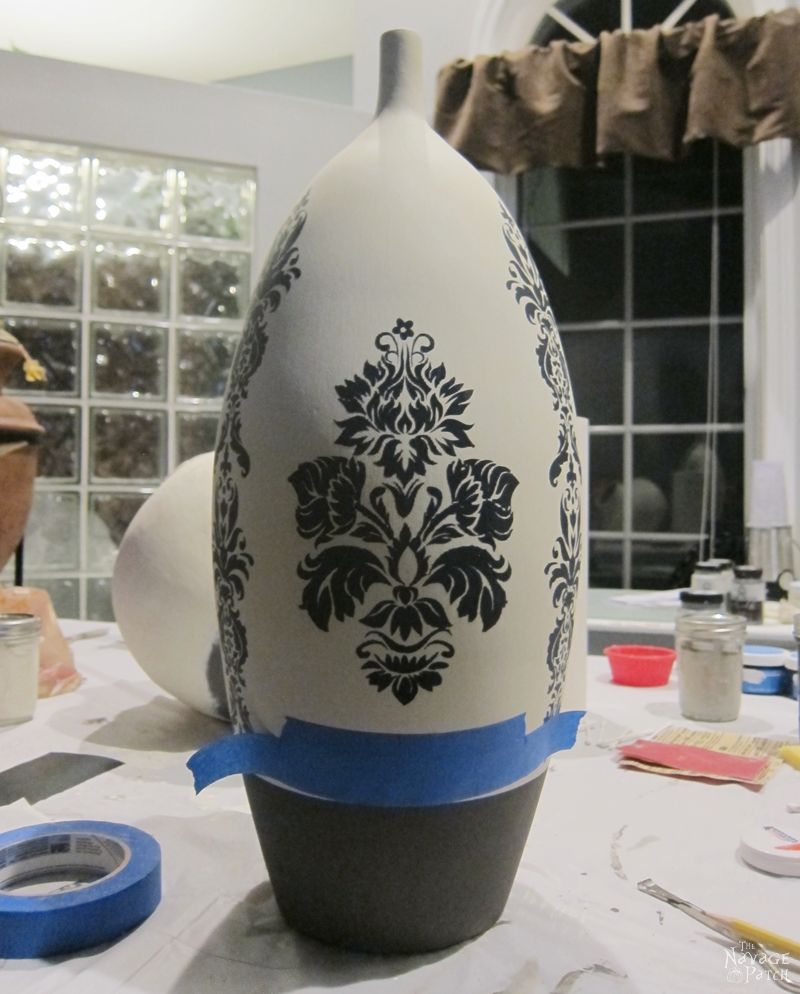
Although the Lilian vase had a distressed look, I didn’t want to distress my vase. I wasn’t going for the exact look, I just wanted to make my own version that was influenced by the Lilian vase.
Once I finished stenciling, I grabbed a can of Rust-Oleum Triple Thick Glaze and sprayed 6 very thin coats – to give you a better idea, those 6 thin coats would be equivalent to 2-3 normal coats (shown in the picture below). When spraying glaze or any type of protective coat, I prefer building up slowly with thin coats rather than spraying thick coats which could lead to running and dripping.
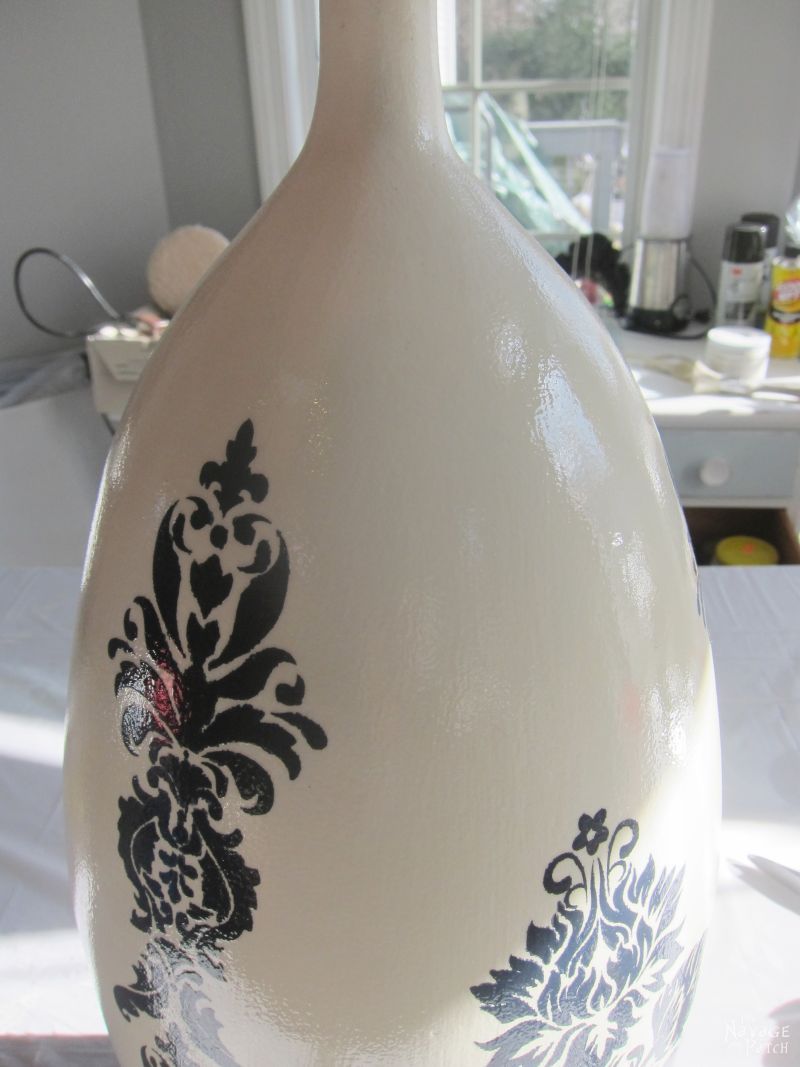
While spraying the vase with Triple Thick Glaze, I forgot to tape the bottom part (the taupish-grayish color block) and of course some glaze went on it and made it shiny. So once the glaze dried entirely, I gave one last thin coat of taupish-grayish paint to the bottom part of the vase.

Now that I was finished with the main work, it was time to deal with the bottom of the vase, as it was in terrible shape. If I left it as is, it would scratch any furniture it would be placed on. Therefore, I cut a circle from a piece of gray felt I had on hand and spread some E6000 on the felt.

Then, I glued it to the bottom of the vase.

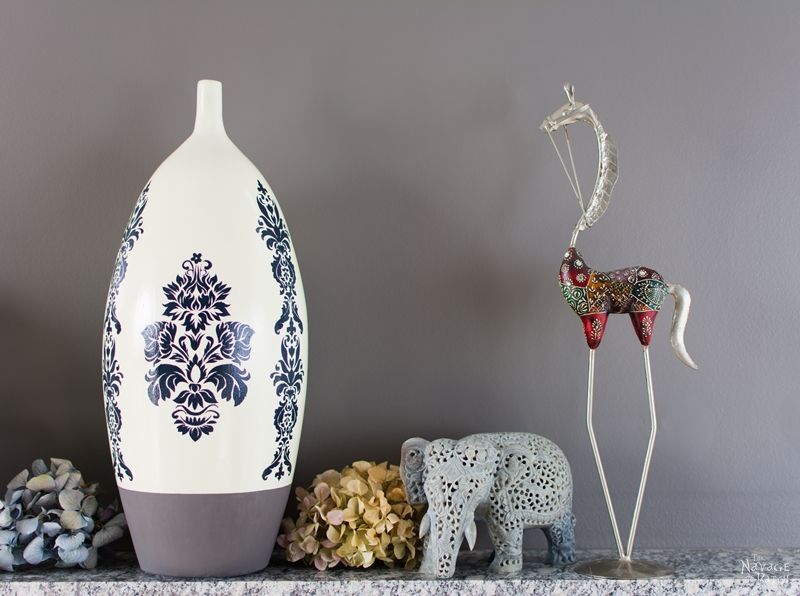
And with that, my Pottery Barn inspired ceramic vase makeover was complete.
Ladies and gentlemen!..(drum roll)… I present to you my version of the Lilian vase! 😀

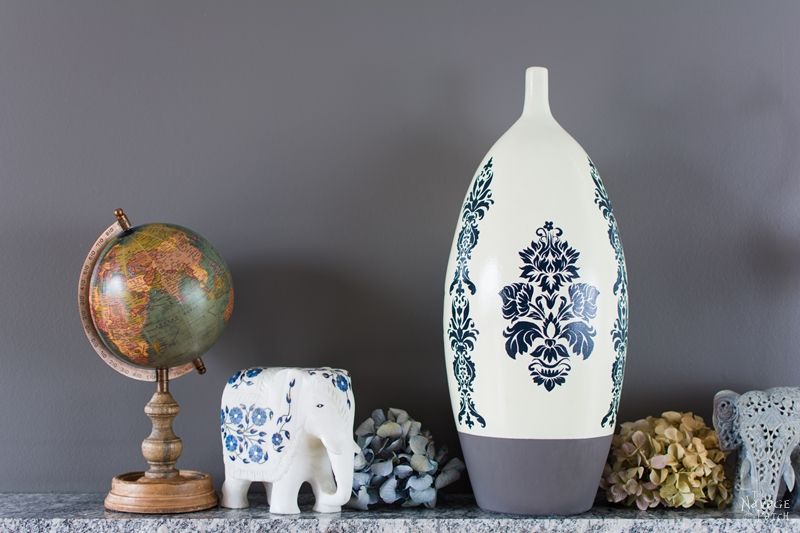

What do you think? Not bad at all, is it? I have to say I was worried about messing up during stenciling, but all went so nice and smooth.


Seeing the amount of beauty shots, I bet you can tell how happy I am with this one, hahahaha 😀 Only 3 more left, I promise! 😉

We love to see our DIY projects out in the wild! If you try this DIY project and take a picture and post it on Instagram, be sure to tag us – thenavagepatch


As promised here are the stencil patterns that I used in this ceramic vase makeover project. If you have a die-cut machine, such as Silhouette or Cricut, you can convert these pictures to stencils and use them on your projects. Just click on the button below and download them from the “SVGs – Stencils” section of The VIP Patch.
take me to your
amazing freebies library
If you’re not a Navage Patch VIP, you won’t be able to access our Freebies Library. But that can be easily fixed! Subscribe for free on the form below and become a Navage Patch VIP. Once you subscribe, a password will be sent to you in our Welcome email, and that will give you access to The VIP Patch [Freebies Library].
Handan, xo
Wow! You did good! I think I’d like to try this. I don’t have a silhouette, but I bet I can find something. Thanks for sharing.
Thank you so much, Sally! Let me know how yours turned out 😉
handan i wore my finger out scrolling back and forth on this post, i didn’t care for the stores vases at all, i thought they looked like rejects from a factory, so i didn’t think i was going to like this project, but as usual you did a fantastic job on yours, it’s not so busy and sloppy as tne original, i love yours xx
Hahahaha 😀 Oh Chris, thank you so much for your awesome comment! Greg and I burst into laughter reading it 😀
Handan, do you ever “mess up” a project? 🙂 I have been following you for several months now and have yet to see one. On another subject, the mini globe is so mine! Mine as in you accessed my brain one night and took the image I had stored there (so I would know when I found it, it was the one). So bottom line here, I want my globe. I will pay the shipping charges to get it back only because I am nice like that. I really shouldn’t be so nice because it is, after all, my globe! 🙂 🙂 🙂
Shirley, thank you so much! Back in the day I really used mess up a lot, because I always tried to rush things. But now I know that patience is the key.
Hahahaha 😀 I actually bought that one for Greg (for Christmas), but I love it so much that I keep stealing it from his desk. LOL. Do you have Michael’s close by? I hope you do, because that is where I got it from. But even if you don’t have it close-by no worries, they are selling it also on their online store. Here is the link:
http://fave.co/2kWCsyk
Don’t forget to use their coupons when buying anything from Micheals (whether online or in store.) To make it easy on you below is the link to their coupons:
http://fave.co/2kWwXPZ😀
Handan, I think your version is much nicer!
Thank you so much, Melva! 🙂
Really pretty…and I like the fact that it’s your own take on the original.
Thank you very much, Teddee! 🙂
As usual, you did a marvelous job!!!???
Thank you so much, Cindy! 😀
Wow, this looks great and goes so well on your mantle!
Oh thank you so much, Tammy! It does look so good on the mantle, doesn’t it? 😀 I really am loving that wall color as almost anything looks good next to it.
Lovely job. Thanks!
Thank you so much, Ivory! 🙂
Absolutely beautiful. Not sure I could do as well though. Thank you for posting!
Thank you so much, Nancy! 🙂
Hi ,I love your vase ! All your ideas are brilliant ,i want to make them all. Unfortunately i live in a small two bedroom bungalow in Wales (council rented) so not much i can do. You are both so clever with wonderful imaginations i love reading your blog. Do you have any ideas for what i could make with surplus curtain tie backs, the curved fabric kind?
Thank you so much, Catherine!
Maybe you can use those curtain tie backs to make a pillow cover like this one: http://www.thelatinanextdoor.com/2016/01/26/repurpose-those-unused-curtain-tie-backs/
or you can make small fabric flowers / rosettes and use them to decorate a mirror or a small stool like this one: http://www.confessionsofaserialdiyer.com/mini-drop-cloth-rosette-stool-makeover-a-5-yard-sale-find/
If anything else comes to my mind I’ll list them again here 😉
Thanks for replying so quickly Handan,i will take a look at the ideas. I searched on line but could not find anything, should have known to ask you first.:-)
I don’t blame you for all the beauty shots, that is gorgeous! I think it is better than the original that you took inspiration from.
Thank you so much, Kileen! 🙂
Very pretty makeover!
Thanks so much, Vanessa! 🙂
Beautiful job it looks gorgeous. Thanks for sharing with us at #OvertheMoon. I’ve pinned and shared. 🙂
Thank you very much, Sue!
This looks so so good! You nailed it!
Thank you so much, Lindsay! 🙂
Wow!
These are gorgeous!
Cheers,
Emily
http://www.fortuitousfoodies.com
Thank you so much, Emily! 🙂
I LOVE your version. It’s so pretty. And how can you beat $1!
Thanks so much, Leslie! 🙂
Wow, I love that price tag and it looks amazing! What a sweet makeover!!
Thank you so much, Katrin! 🙂
I think this post was written just for me. 😀 I saw some great vases at a furniture shop here in town but they were priced as a set and well over $300! After my kitchen remodel I am in recovery mode but I love a DIY paint project. Why didn’t I think of this. I have done this with other things, why not jugs and vases? Love how yours turned out and your design is perfect. I am visiting via the Pieced Pastimes link party. So glad I visited your blog.
Thank you so much for visiting us, Pamela! I am so glad you liked the stenciled vase idea 🙂
Beautiful job! Pinning to share. #Snickerdoodle
Thank you so much, Laurie! 🙂
Beautiful! And you make it look so easy! Thanks for sharing on the Pleasures of the NW’s DIY party!
Thank you so much, Helen! 🙂
Wow, great makeover! Love a good hack and you did an amazing replication. Visiting from DIY Linky Party.
Thank you so much!! 🙂
You did a fantastic job! I love it. Thanks for sharing your project at the Family Joy Blog Link Party this week! We hope you will join us again next week.
Thank you so much, Melissa! I am so glad you liked it 🙂
Beautiful! Really pretty transformation
Thanks so much!! 🙂
Absolute genius! Looks so pricey! Good job!
Thank you so much, Christina! Your comment made my day 🙂
Great job thanks for sharing on craft schooling Sunday!
Thanks so much, Sara!
This is absolutely STUNNING and frankly, I love yours so much more than the original. Featuring when my party opens up tonight. Just gorgeous!
Oh wow! Thank you very much, Carol! That’s great news 🙂
Really lovely! Thank you for the stencils! Also, the long-legged horse on the right in the final photo is really cool.
Thank you so much, Natasha! I am so glad you liked it 🙂
I love this update!! Thanks for linking up with Wednesday Showcase!
Thanks so much!! 🙂
These turned out so cute! I love your color choices. Thanks for sharing this at the #HappyNowLinkUp
Thank you so much, Jen! 🙂
Your vase is beautiful! Such talent! It’s so great to find items like that to give beautiful makeovers to. Thanks for sharing at Snickerdoodle.
Thank you so much for your lovely comment, Beverly! 🙂
Yours is even more gorgeous than the inspiration piece to me! Love it. This project is Featured at this week’s Merry Monday party. So glad you share with us. Pinned.
Oh my! Thank you so very much! What an awesome news!! 😀
It’s gorgeous! I’m a huge fan of Pottery Barn knock-offs and you hit this one right out of the ballpark! Thanks for sharing at Vintage Charm! xoKathleen Our Hopeful Home
Thank you so much, Kathleen! 🙂
That vase is magazine worth Handan!! Love how classy it looks, especially seeing how it started… My first thought was Greg or you had sketched your ideas on it but reading again made me realize you bought it like that, omg!
Awesome job, you are my feature on today’s party, congrats!! Enjoy the weekend!
Thank you so much, Pili! I knooowwww…I was so excited to see it being featured! Thank you once again 🙂
I can’t find my drum Handan, but will a violin concerto in C-minor do as a way to say this is awesome? It looks sooooo gorgeous.
Lol! Thank you so much, Michelle! You are always so kind to leave such awesome comment 🙂 It made my day!
Hey, Handan! Just wanted to let you know that we loved your Ceramic Vase Makeover so much when you shared it at the #HomeMattersParty last week, we’ve FEATURED it THIS WEEK! Hope you can check it out when you get a sec. Happy Friday!!!
http://lifewithlorelai.com/2017/03/09/home-matters-linky-party-126
~Lorelai
Life With Lorelai / Home Matters Linky Party
Oh that is such fantastic news! Thank you very much, Lorelai! I will definitely be there to link up our new projects 😀
I can’t tell you enough about how much I love this vase! The shape, the colors, the damask! So beautiful! Thanks for sharing! #HomeMattersParty
Jeannee
Thank you very much, Jeannee! 🙂
I’m trying to remember if I kept the box of random vases when we moved, if not I need to start looking at yard sales for something to makeover. Yours turned out beautiful. Pinning and sharing #HomeMattersParty
Thank you so much, Emily 🙂
What a great knockoff. It is beautiful. I like it better than the originals. Can I use that paint on a clear glassvase? I have an abundance of florist vases too good to throwout but not good enough to use as is. I would love to customize them as you did. Thank you
Thank you so much, Maureen! I never used my home made chalk paint on glass surface but I don’t see why it wouldn’t work. By the way, you gave me a great idea now: stenciling a picture frame glass with a mirror look spray paint to create a stenciled antiqued mirror look. I think it would look awesome 😉
Great make over! Thank you for sharing at Support Your Fellow Crafter!
Thank you so much, Ginger! 🙂
That turned out BEAUTIFULLY!! And you have explained it well enough that even DIY-challenged (such as myself) could give it a go. Thank you.
I came to visit from the AIM link party; I hope you’ll make time one day to stop by the 4Shoes & let me know you’ve been.
Oh thank you so much for your visit and the lovely comment! It must be awesome to live in a real farm. And those horses you got…just beautiful…very beautiful animals indeed! 🙂
WOW! Looks awesome, great job. Thanks from Grammy Dee, #WednesdayAIMLinkParty, social media shared.
Thank you so much! 🙂
This is a beautiful makeover. That vase is a real statement piece, even my hubs liked it when I showed him. Pinning and thank you for sharing.
Thank you so much, Leanna! Your comment made my day 😀
Your vase make-over is lovely , your stenciling is so good !
Thank you so much, Amber! 🙂
I just wanted you to know that I’ve chosen your beautiful PB knock-off vase as one of my features for this week on Share Your Style. Congratulations!
Oh that is such a great news! Thank you so much, Carol! 🙂
This is so pretty. Once again, you took a Pottery Barn design and made something like it but even better. Your knockoff looks so much fresher and cheery compared to their. Good call on not distressing yours.
Thank you so much, Laurie! This vase is still one of my favorite knock-offs I did.
Handan that vase is beautiful! Nice work!
Thank you so much, Susan! 🙂