
DIY Accent Wall
This stunning DIY accent wall is going to be the gorgeous backdrop to a beautiful guest bedroom makeover. Let’s see how I did it!
This is week 4 of the Fall 2022 One Room Challenge. For those unfamiliar, ORC is a biannual challenge for interior designers, decorators and stylists to finish one room in their house in 8 weeks. The challenge is also open to guest participants like us. Every week we’ll be posting an update on our blog and on Instagram as we take you along with us as we transform a mundane guest bedroom into something stunning.
Okay, it’s been a while since I updated you here about my progress on our guest bedroom makeover, so we’ve got two weeks of work to cover! Though this post is going to focus on the DIY accent wall, I’ll also tell you about the work I put in leading up to it.
Now that Halloween is finally winding down, I’m hoping to get into a more regular weekly posting habit with the guest bedroom makeover. I’m hoping, madam. But for the past two nights I’ve been pressed into chauffeur duty by my wife, as she’s panicking we’re already too late to find Christmas supplies, so she has me drag-racing around the Florida Panhandle hitting every Dollar Tree, Hobby Lobby and 5 Below we find.
Swapping one mess for another, it seems. Well, such is life, I suppose. Or more accurately, life is what happens between shopping trips and holidays.
Enough yapping. Let’s get to the DIY accent wall!

Welcome to The Navage Patch!
If you’re joining us from the ORC website – welcome! I’m Greg, this is The Navage Patch, and my wife Handan and I are giving a makeover to one of the guest bedrooms in our new Florida home. This is our first One Room Challenge, and we can’t wait to show you what we have in store for this room!
DIY Accent Wall
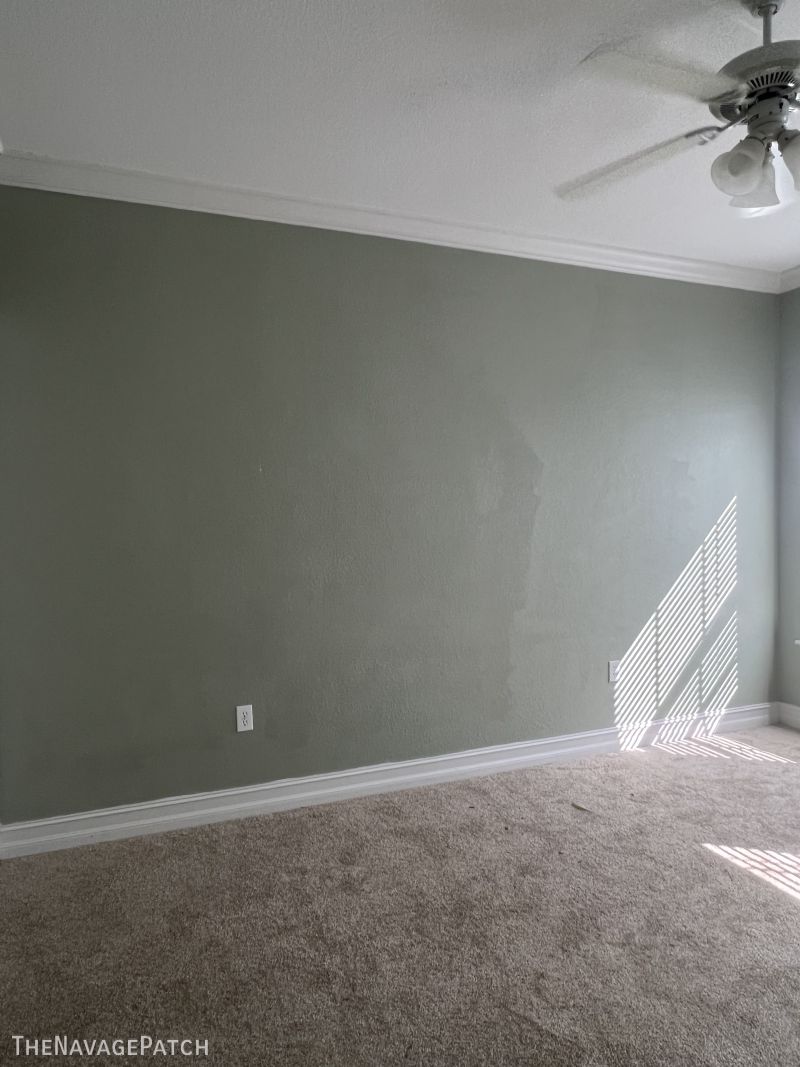
As you may recall, the “guest bedroom” was really a high-rent storeroom for random crap decor and a flop house for spiders and their unlucky prey.

We redistributed the contents of the room – mostly into the garage – and the result was an empty bedroom with…would you look at that? Room!

Here is the wall that will soon be accented.
DIY ACCENT WALL VIDEO Tutorial
On Tiktok
On Tiktok
We love to see our DIY projects out in the wild! If you try this DIY project and take a picture and post it on Instagram, be sure to tag us – thenavagepatch
DIY Accent Wall Design
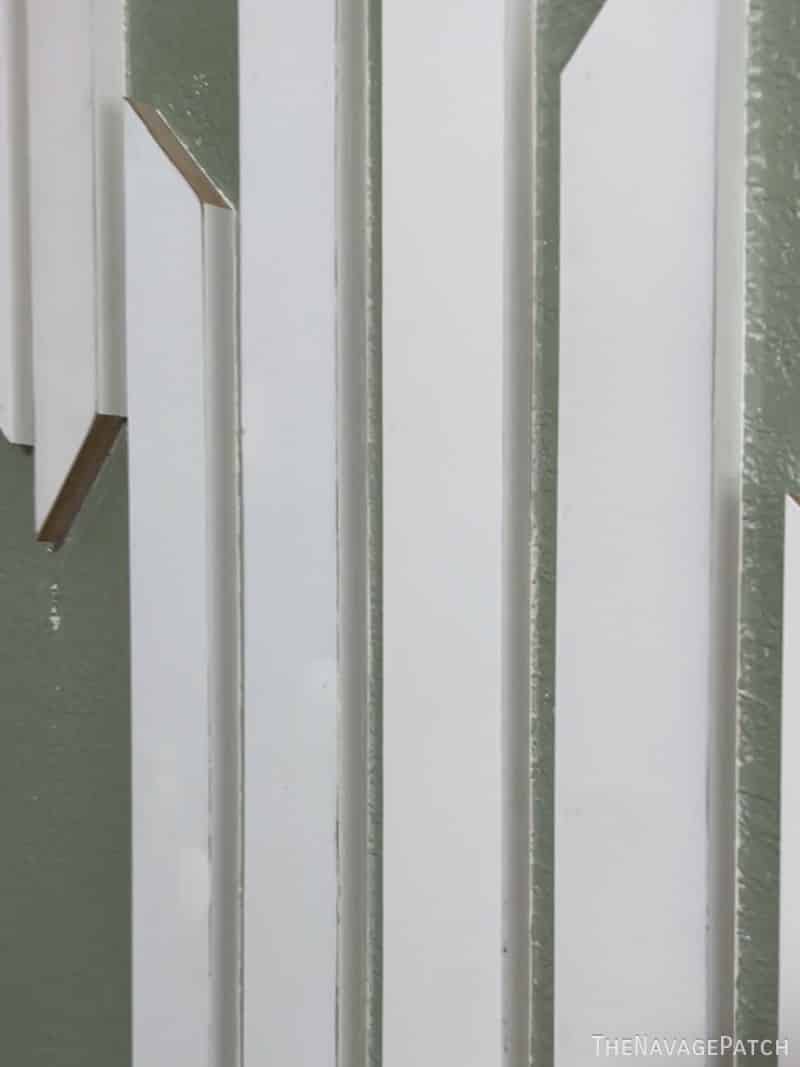
I wanted to use 1×3 MDF boards for the accent wall, so I made a mockup in Sketchup. The wall is 167.75 inches long (that’s a quarter inch less than 14 feet), the boards are 2.5 inches wide, 0.6875 inches thick, and 8 feet long. The pattern I came up with leaves a 1-inch space between the boards, and that results in a 48-row pattern with just a tiny bit left over. Here’s how it looks (click pic for bigger version).

The wall is 9 feet floor-to-ceiling. The strip on the bottom is the baseboard and the strip on top represents the crown moulding. This leaves about 8 feet 4 inches of usable wall space. The horizontal lines above are just guidelines I put every 12 inches, starting from the top and working down.
When I laid out the design, I didn’t measure any boards with Sketchup – I just went with what looked good to my eye. And when I cut the pieces, I referred to the drawing above and estimated each board’s length.
Now, there is a pattern up there. There are 48 rows or columns or whatever you want to call them, but there is a 24-row repeating pattern that is made up of a 12-row inverted flip. Still with me? I didn’t think so. Doesn’t matter!
Cutting the Boards
This pattern made it easier when it was time to cut, as I started by cutting all the boards in the first 12 rows…
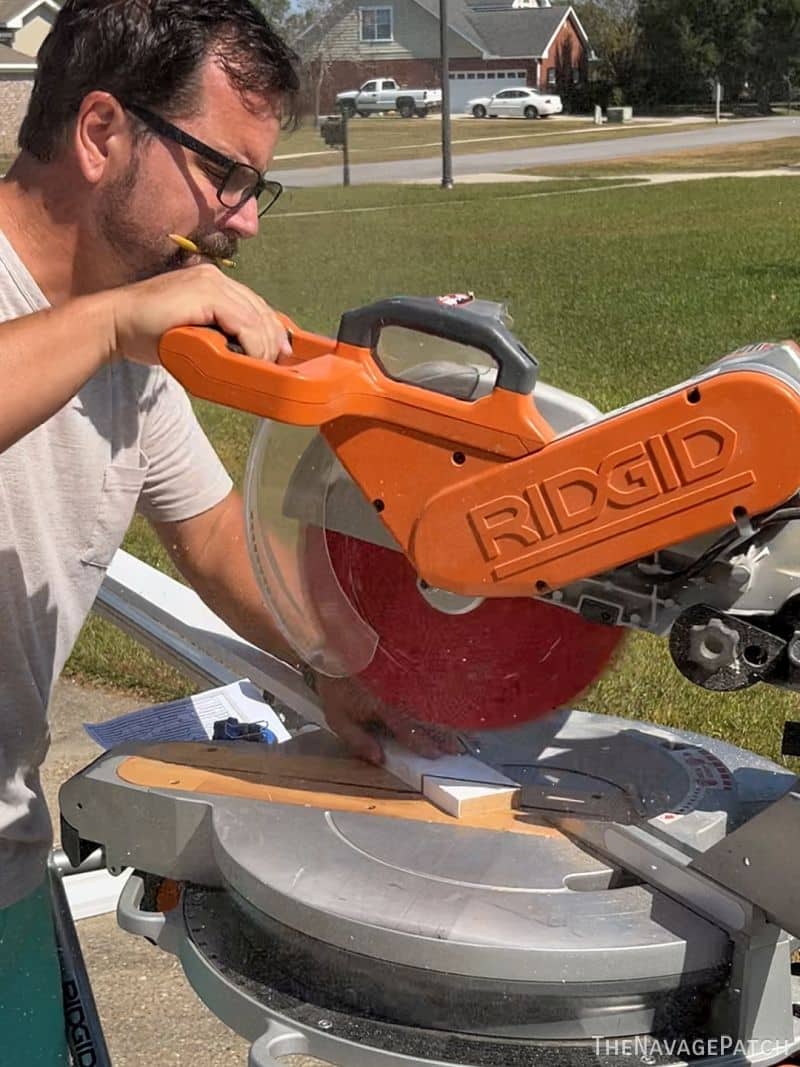
…and then I used them as templates to make 3 more copies.

If I didn’t have crown moulding to contend with, I could have started installing the boards at this point, but since the boards were thicker then the lip of the crown moulding, I chamfered the tops of the boards that would abut the crown to feather that transition.

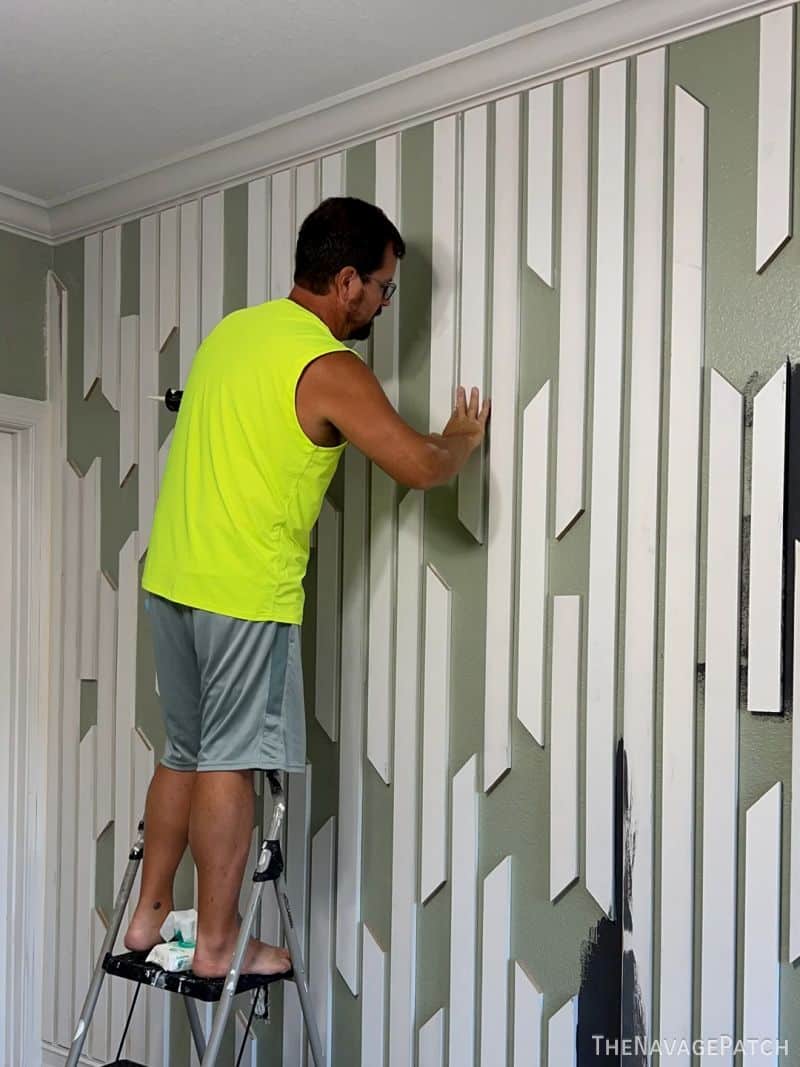
DIY Accent Wall Installation
When it came time to install the boards, I first tried keeping things straight with a laser level. But then I remembered how it had betrayed me during our pantry makeover, so I was forced to cast it aside and use old-fashioned levels.
And wouldn’t you know it – my two beam levels gave wildly different readings. I was tempted to trust the expensive and fancy wood and brass one I bought at a barn sale over the el cheaparino one I bought at Home Depot 10 years ago, but after verifying their readings with two small torpedo levels, it turns out that my fancy wood-and-brass beam level is nothing more than a brass turd with some glass in it. Sometimes simple really is better.
By this point, I wasn’t fully trusting anything with a liquid-filled bubble, so I fell back on simple math and a tape measure to keep things straight.
Installation was simple:
Run a line of cheap construction adhesive down the middle of a board.

Stick the board on the wall, eyeballing the 1-inch space.

Use a tape measure to get the top of the board lined up properly.

Check the bottom and adjust if necessary.

Shoot one brad into the top of the slat.
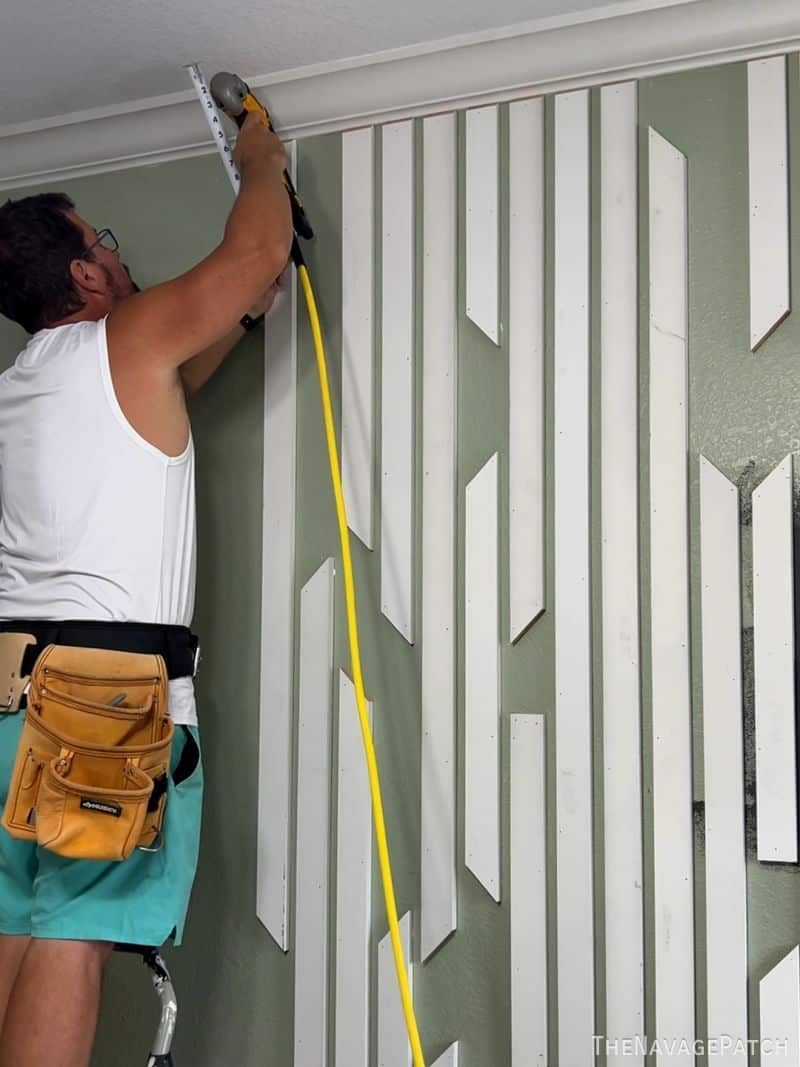
Check the level and re-check the spacing.

Shoot a brad in the bottom and then a few more brads throughout the board.

Pro tip: angle the brads
The adhesive will hold these boards just fine, but let’s say you want to do this in a rental, and you want the boards to be removable. Instead of using strong adhesive, you can angle your brad nails up and down on each slat, and create a much stronger bond that won’t separate unless you pry the board off. This technique will keep your walls damage-free and ensure your landlord doesn’t freak!
The closet door frame intrudes into the accent wall, so I had to cut the final board to fit around it.

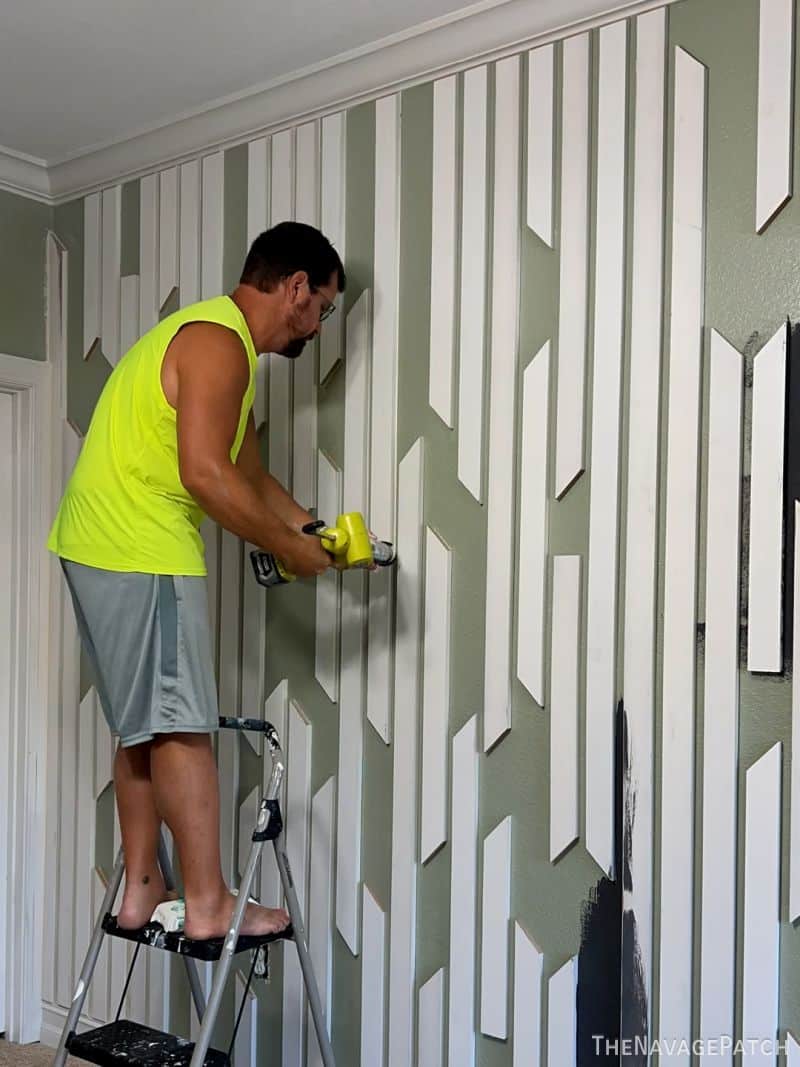
Filling and Caulking
There were hundreds of brad nail holes in those MDF boards, and each one had to be filled and sanded.


That was the easy part. Next up was caulking, and Jeezum Crow, that took longer than I anticipated!
Caulk on!
Caulk off!
Since I’m a member of the Church of Caulk Finger, my two index fingers were raw like sushi after rubbing along all those miles of knockdown textured wall! It’s the price I pay – I just don’t trust any other tool, especially when such fine control and precision is needed.
But the pain and suffering (poor me) were worth it. This here is the difference between rookie DIY and professional results. Wait, what I’m I saying? This is far better than what you’d get from a professional.
Remember this ultimate truth about home improvement:
Wisdom
No professional on Earth cares as much about your house as you do, therefore no professional on Earth can do as perfect a job as you can do when you set your mind to it.
Interlude to Accomplish Some Things Before Painting
There were a few things I wanted to do before painting the DIY accent wall. Since the carpet was slated for termination, I decided to get it over with. Besides, with the carpet removed, painting the baseboard would be even easier.

Once I removed the carpet and padding, I pried up the carpet tack strips that were nailed into the foundation.

And then I crawled around the floor like a toddler with a tool belt chiseling up dried blobs of joint compound, construction adhesive and resin. Construction workers may be a lot of things, but “neat” ain’t one of them.

Since I’d be painting the ceiling the same color as the walls (yes, you read that right), I took down the BGS (builder grade special) ceiling fan.

Now, I was ready to paint!
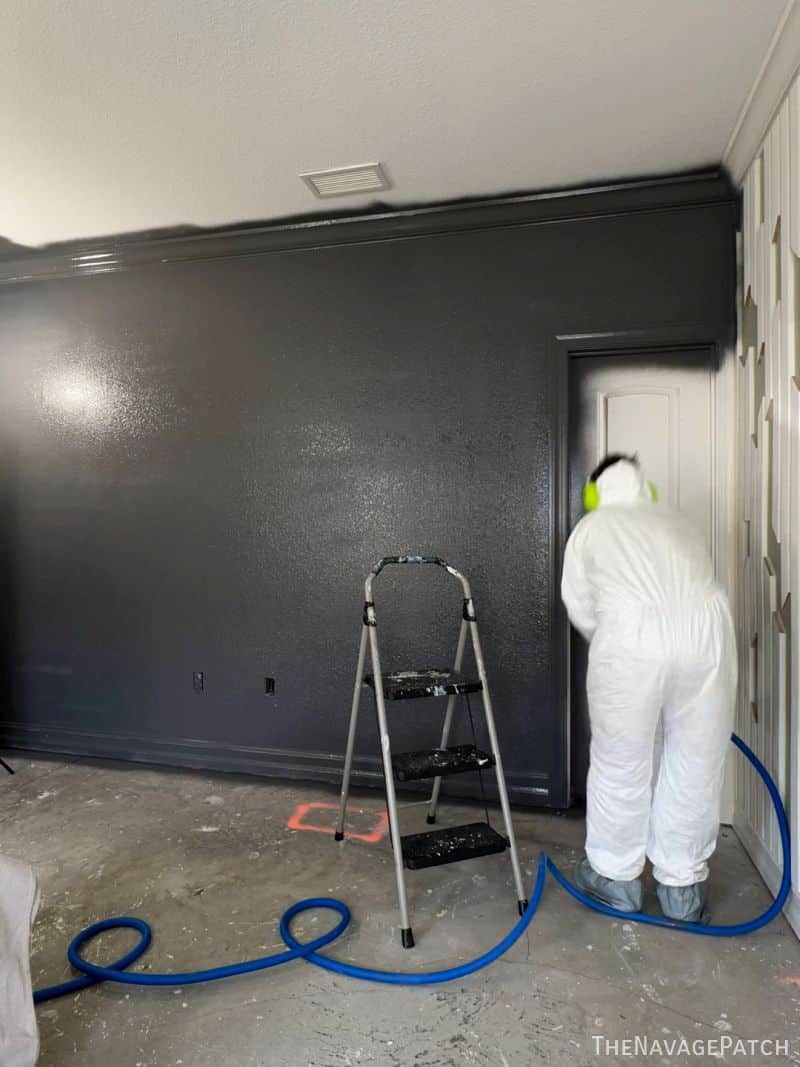
DIY Accent Wall Painting
Since I’d be spraying 3 walls and the ceiling, I’d have to suit up with some PPE. Not shown – the hearing protection I put on after remembering how loud the sprayer fan is in an enclosed space.
I’m painting with Sherwin-Williams Emerald – Peppercorn color in a flat sheen.

I gotta tell you though – spraying walls is incredible! What a finish! What speed! But I’d only want to do it in a closed room that’s been stripped of everything. It creates a fine layer of paint dust that settles on everything, kinda like joint compound dust from drywall sanding.

And yes, I’m painting the trim and doors the same color as the walls and ceiling. I’m breaking the mold here, madam. Things are getting nutty!
The sprayer was a life-saver on the accent wall. I can’t imagine painting it any other way!
I know, I know – I’m not wearing my respirator. Well, it was either take it and the goggles off or die of heat exhaustion. I chose a few minutes of paint dust inhalation over death.

The walls took two coats for full coverage. The accent wall took a few coats from different angles to get all the surfaces covered.


The wall color is amazing, the sheen is perfect, and the room is looking fantastic. In the next post, you’ll see it with the far wall painted and LVP installed. But for now, just have a look at this stunning accent wall.
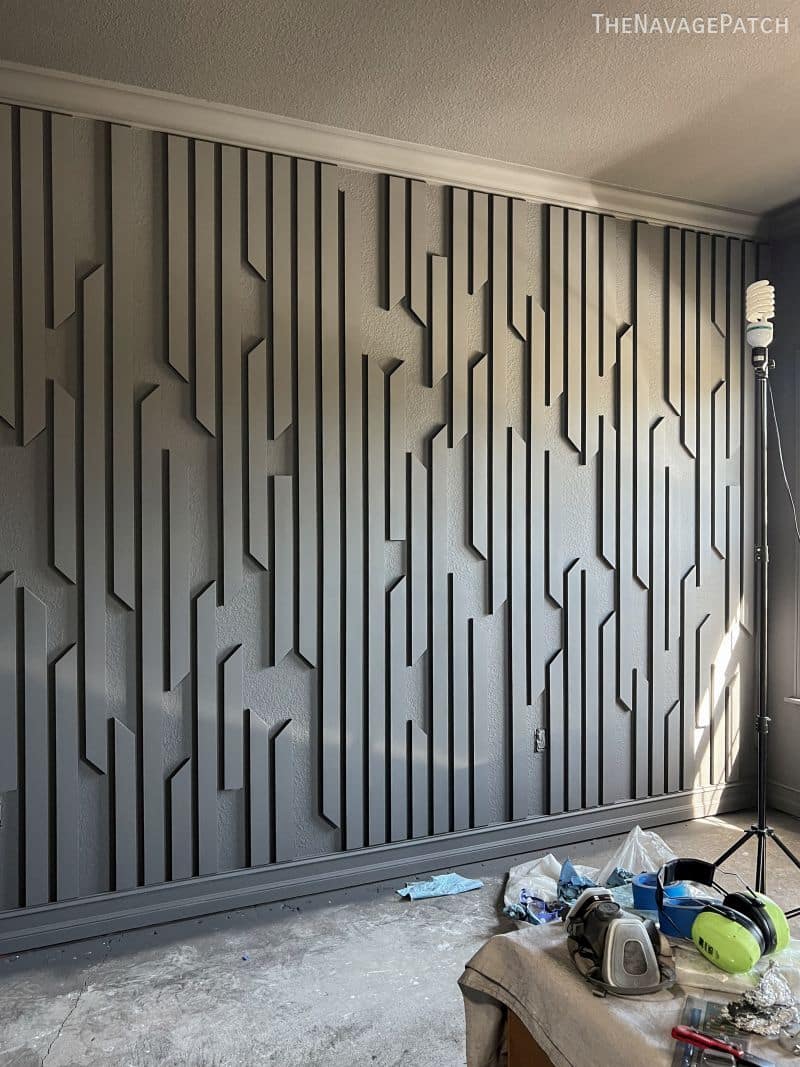
The lighting is horrible, the room is a mess and you may not yet understand our vision, but I assure you this room and the accent wall that defines it are going to be epic!

Let’s see the sketch and the reality.

Once I get blinds on the windows and have better control of the light, you’ll see these walls as the eye sees them. Next week, I’ll have the floor installed, the painting finished, and then the decor elements of this guest bedroom makeover will come into play.
I can’t wait to show you!
Click the ORC logo below to check out the other participants!

Wow! That makes a dramatic statement! Very cool!
Thanks, Audra!
looks fantastic !!! waiting impatiently for next phase !
Coming next week! 🙂
As always…WOW!! Great job!!! You guys always amaze me with your creativity and talent!!
Thank you so much, Patti! 🙂
That’s a very cool wall. I also “eyeball” distances and sometimes it just works so much better. Can’t wait to see the finished product!
Thank you so much, Ellen! 🙂
That’s looking amazing! The one thing I wonder about with dimensional accent walls is – how do you dust them? I know that’s pretty mundane, but just wondering.
I guess the regular way? There actually aren’t too many upward-facing surfaces, so I don’t think it will be an issue.
That is surprisingly awesome Greg… a huge hug saw puzzle and I still can’t figure out how you got it so perfect.
Color is very cool with the design… casts light so you get the dimension in the slats. That’s a great job done there!
You really like texture and I never would have thought of putting that many sticks on my wall. 🙌💯👏👏👏😎
I know, right? After Baris’s bedroom wall, the possibilities seem endless! 🙂
That looks amazing!!
Thanks, Renee! 🙂
That’s impressive. Wow!
Thank you, Betty!
Spectacular! I have no words better than that to describe that wall! Wow!
Thank you so much, Karen! 🙂
very impressive….
Thanks, Rosa!
Wow, it looks awesome!
I’m loving the room so far! It looks quite impressive. But I need to know about your very spiffy looking shop vac. What’s that brand? And the bucket looking thing looks very cool too.
Also!!! Please tell me you’ll replace that ceiling fan with a spectacular (spooktacular?) fan. Florida is absolutely no joke with humidity/swampy weather.
Can’t wait to see the rest. Great job.
Thanks, Noelle! That shop vac is from Home Depot – it’s a Ridgid 16 gallon. The bucket looking thing comes with the vac and holds attachments. Yes, we’re replacing the ceiling fan with a fandelier – yes, I spelled that right. 😀
That looks REALLY nice! Love it so much. I’m not sure I could live with such a dark room, but it’s still beautiful.
It’ll be great as a guest bedroom. It gets bathed in direct morning sunshine, and the dark is going to be great for taking pictures! 🙂
That wall is amazing! It kind of makes me dizzy, and I love it. 😁 Great paint color. ❤️
Thank you, Patty! 🙂
This is EPIC!
You too are always posting your beautiful work and personalities, it really draws me in.
This is much needed inspiration for my open-plan manufactured home. It has plenty of wall space but now has the “stuff“ of two households (my daughter was murdered last year 😔). It’s very difficult to maneuver let alone the space to accomplish something like this but I’m not giving up hope for it, just waiting for some outrageous organizing ideas to reveal itself to me.
It’s just me here but occasionally visitors come calling and it’s embarrassing for my type a side. I can’t wait until it’s something I can be proud of again! . As an artist, quality and beauty both excite me.
Thank you both so much for your amazing content and work, it’s like catching up with family.
Thank you, Cassie! I’m sorry for this late reply, and I’m so sorry for your tragic loss. I’m happy to read that our blog is like catching up with family. I hope you find some laughter and joy here – as well as some good inspiration! I won’t let your comments go unanswered this long in the future. It’s been a busy few weeks! 🙂
Love it! The color is fantastic and that layout of the slats looks great. From concept to reality is perfection. I do wonder what our grandkids will think of us one day when they have to repaint all the green furniture, remove all the wood slatting, and tear off the rattan. But we can just turn to them and utter the two most horrible words in the English language: Popcorn Ceilings.
LOLOL, oh man popcorn ceilings! My parents still have them in every room! 😀
WOW!! Can’t believe we’ll actually be in that room in a few more months! What a creation!
It’s getting there! 🙂
Amazing pattern on that wall, Greg! Looking forward to the final reveal next. I never would’ve considered painting door and trim work the same color as the wall, but I’m eager to see the result. Having seen your previous makeovers, I am sure the room will be breathtaking when you’re finished.
It’s coming along so nice, Rebecca – new update soon!
Your accent wall is absolutely stunning!
Thank you, Felicia! 🙂