Guest Bedroom LVP Flooring (ORC Fall 2022 Week 5)
I finished painting, hung a fandelier and installed LVP in our guest bedroom, and things are really starting to shape up!
This is week 5 of the Fall 2022 One Room Challenge. For those unfamiliar, ORC is a biannual challenge for interior designers, decorators and stylists to finish one room in their house in 8 weeks. The challenge is also open to guest participants like us. Every week we’ll be posting an update on our blog and on Instagram as we take you along with us as we transform a mundane guest bedroom into something stunning.
This was the week I transitioned the room from “dirty construction site” to “promising guest bedroom.” Gone are all traces of hideous green walls and concrete slab floor. They’ve been covered by stunning colors and beautiful LVP. Let’s walk through the week and see where we stand.

Welcome to The Navage Patch!
If you’re joining us from the ORC website – welcome! I’m Greg, this is The Navage Patch, and my wife Handan and I are giving a makeover to one of the guest bedrooms in our new Florida home. This is our first One Room Challenge, and we can’t wait to show you what we have in store for this room!
But first, Painting
After week 4, I had 3 walls and the ceiling painted with Sherwin-Williams Peppercorn. That left one wall that still wore the hideous cloak of cheap green paint found throughout the house.
Though I painted the previous walls and ceiling with a sprayer, this last wall would require too much prep for a sprayer – I’d have to seal off the rest of the room. It would be much quicker to roll it and be done with the painting.
There was just one issue: since the walls have knockdown texture, there is no way to get a clean transition line in the corner where the two wall of different color meet. On normal walls, I’d either tape it or freehand paint it, and I’d get a straight and clean line.
But on knockdown texture walls? Yeah, good luck with that! I didn’t bother taping – paint can seep under tape even on smooth walls – So I tried my steady(ish) hand with a brush and no tape.
No dice. It doesn’t matter how stone cold and steady your hand is, the wall itself will make your line look like a drunken field sobriety test gone horribly wrong.
As I toyed with idea of tossing the wet brush in favor of a dry martini, a thought percolated up through the molasses between my ears: caulk.
I remembered facing a similar dilemma in our Georgia home when painting the stair risers. No matter how well I taped off the stained oak treads, paint would seep right under the tape. The culprit was the wood grain. I could have pressed the tape until my fingers snapped off at the knuckle, and it wouldn’t have made a difference, because the paint would creep along the grain lines.
My solution to that problem was to run a thin line of caulk along the tape line – just enough to seal off the edge of the tape. When the caulk was dry enough to touch, I painted over it. After the second coat, I peeled the tape leaving a perfect, straight and laser-clean line.
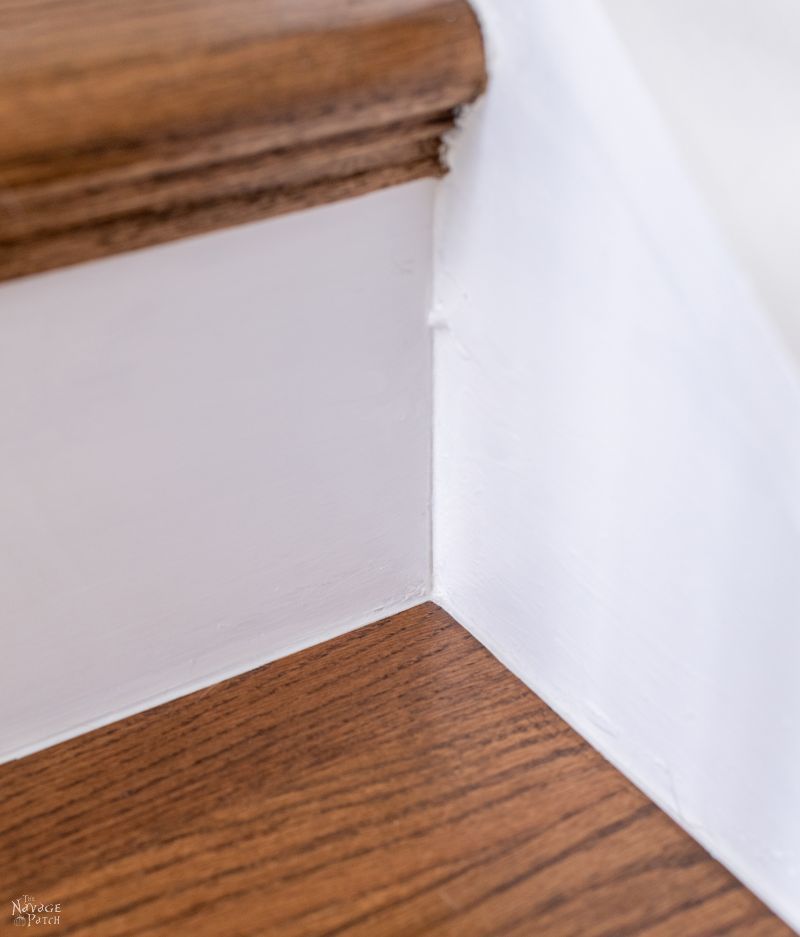
But would it work on a knockdown texture wall?
I taped the corner, top to bottom and pressed the tape as well as I could. Though caulk is much thicker than paint, it can still squeeze under the tape if the tape is not tight enough.

Next I ran a thin line of caulk down the corner.

I smoothed the line with my finger, feathering the right side into the wall and making sure there was only enough caulk left on the tape edge to seal off the edge. Too much caulk would leave a visible caulk cliff when removing the tape.

I let the caulk dry for about 20 minutes and then painted it with two coats of SW Fawn Brindle

Before the second coat dried, I removed the tape, revealing an almost-perfect line.

There were 3 small spots where a tiny bit of caulk got under the tape. It took no more than 30 seconds with a small touch-up brush to cover them with SW Peppercorn, and then the transition was perfect!
This a great technique for difficult paint transitions. As soon as I published it two years ago, hey, waddaya know – other bloggers started using it and claiming it as their own! But you know where you saw it first. 😉
Once that transition was mastered, the rest of the wall was easy and took only a few minutes with a roller. As always, I use a 3/4-inch nap wool roller cover.

I tried it on a whim in Georgia, and I’ll never go back to puny 3/8-inch again. And if you’ve never used a wool roller cover, you’re in for a treat (and huge savings). Though the cover is more expensive initially, it can be used over and over and over. I’m still using the same roller cover I used to paint the entire Georgia house! And if you’re worried about cleaning – a fully-saturated 3/4-inch nap wool roller cover cleans off 100% in only a few minutes. I think you could spend an hour cleaning a microfiber roller and still never get the water running clear.
Fandelier Install
Yes, you read that right. Fandelier.
Look there, up on the ceiling!
It’s a fan!
It’s a chandelier!
It’s FANDELIER!

This is one of those don’t-know-you-need-it-until-you-see-it deals. Handan chose a beauty – good looks, warm light and a little fan that outperforms – for less money than most traditional lighted ceiling fans.

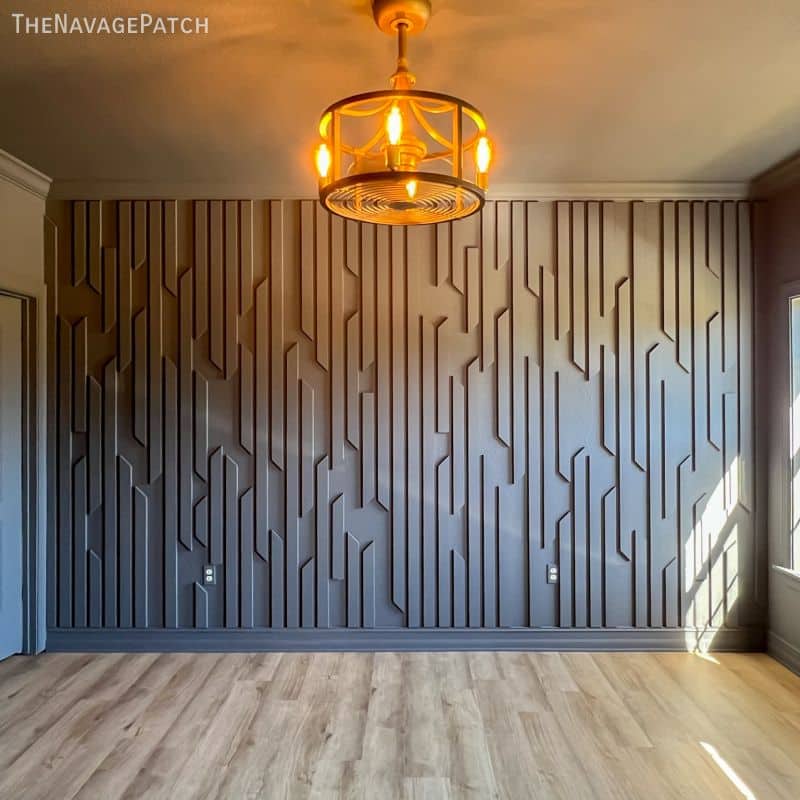
LVP Flooring
This was the moment we’d been waiting for. Well, one of them – the accent wall was pretty exciting, too!
The walls were painted, and now all we needed for this room to look like a room again was a proper floor.
It didn’t take much deliberation for Handan and I to decide on using the same flooring that we used for our son’s bedroom makeover. At $3.99 sq/ft, it’s one of the nicest for the price we’ve seen. For those interested, we installed Shaw Floorte Pro 5 Series in Marina color.
For a full tutorial on all aspects of LVP Flooring, please see my How to Install Luxury Vinyl Plank Flooring post.
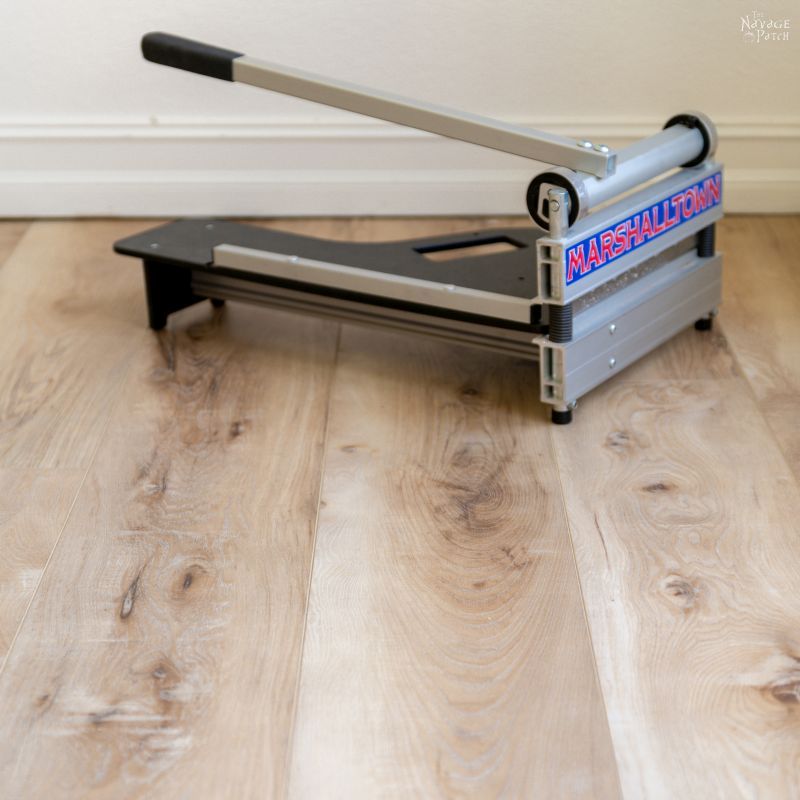
My babes and I started laying the LVP on a Sunday evening after working all day on other aspects of this project. We were tired, and that’s no way to start a project like this.

We made it this far when we discovered an issue with one section of boards not locking properly.

We removed and re-laid a few rows, but the problem persisted, meaning its source was much further back.
Ugh.
There was only one viable solution to this, so I sent my babes off to the bathtub while I stayed behind to rip up all that we had done and start over.
I felt like one of those “Save yourself!” guys in action movies that sends everyone away while he dives on a grenade or holds off the bad guys to buy some time for the ones who ran.
In the end, Go Now Guy always eats it, and that’s what it felt like staring at that slab of flooring as the sun set on a long and painful Sunday.
But needs must, so I re-laid the floor back to the point we stopped plus one row. Then it was Advil and martini time. Lots and lots of both.
After 8 hours of sleep, I felt like a spring chicken again and was able to knock out the rest of the floor in just a couple of hours.


When I finished installed the LVP, I measured and cut shoe moulding, and then I pre-painted the pieces before installing them. This saved a ton of time – no need to tape off the floor and paint in place!

And here’s where we stand going into week 6!


The next time you see this room, it’s going to look so much better! This coming week, we’ll be building a bed, installing blinds and building and installing an antiqued mirror sliding door for the bathroom!

Click the ORC logo below to check out the other participants!

You guys do such great work!! I love your posts and ideas!!
Thank you so much, Wendy!
That accent wall and flooring are gorgeous together!!
I have steamed off so much texturing and now I learn you can just use caulk to tape off! It’s a great tip! Where were you 20 years ago?!
Much love from the Buckeye state!
LOL, thanks, Lisa! Never too late to learn a new trick! 🙂
That floor is so beautiful and I love the accent wall. I see a small dresser or nightstand in that room and wonder if you are doing some upcycle job on it and showing how you did it.
Yes I will be, Angelika! I’m not exactly sure what yet, but I’ll be giving it a makeover. 🙂
Soooo pretty! I love a moody bedroom, I’m sure your guests will too. The wall detail is very original and the floors are gorgeous. I initially had concerns about lvp but my daughter has it on her entire lower level, my sister has it in her entire house and it holds up beautifully with kids and dogs!
Oh we’re LVP converts now! So much easier than hardwood!
Looks awesome. Painting the door to match the walls is brilliiant! It is visually appealing and greatly reduces the door chopping up the rooms flow. I might need to use this in my next room redo!
Yes, it’s a first for us, too (besides in white rooms!)
I love that peppercorn color. I’m glad that when everyone else is painting everything green, you’ve gone and painted over it instead! I’m sick of seeing green everything already. I’m also intrigued by that fandelier. I’m looking at getting a fan/light combo for my bedroom and they’re all so ugly and boring unless I want to pay over a $1000. I also love that flooring so much. How is it so cheap?! LVP here is so damn expensive. We have been putting down vinyl floor tiles as it’s all we could afford. I’d love some real flooring! Can’t wait to see what’s next in your ORC.
We’re big fans of the fandelier and the peppercorn! Regarding the LVP – it runs the gamut here as far as price. The stuff we put here (and in Baris’s room) is more than adequate for those lesser-traveled spaces, but the flooring we put in the main area is much sturdier and thicker. It cost about 50% more per square foot, if I’m remembering correctly – but even that was a great deal for what it was. Some LVP can get to be much more expensive than hardwood. Like all things, you have to shop around to find the deals (and make sure you’re not buying crap).
Would you mind telling me more about your accent wall. I have never seen anything like it!
Can you expound why you didn’t select a ceramic, or porcelain, tile ? Being able to
steam clean the germs would be my priority.
Anyway, nice work
Hi Ross, you can find more info about that accent wall here. As to your other question, are you talking about the LVP flooring?