DIY Dollar Tree Light-Up Snowflake Wall Art
This cheap & easy light-up snowflake wall art can be made entirely from Dollar Tree materials or you can upgrade the lights for another buck!
It’s all right there just staring you in the face each and every time you set foot in the store.
They’re not hiding it. They’re not playing tricks on you.
Yep, it’s all right there, plain as day.
The trick is to see it.
And look, I’m not sitting here lecturing you on how to see it, because lord knows I can’t 99% of the time. I’m just lucky enough to have a babes who sees in X-ray FutureVision.
Seriously, though – how else to explain Handan’s knack for looking at ordinary Dollar Tree items and thinking, yeah those’ll go well together!
I wander the aisles of Dollar Tree aimlessly, thinking about what I’m going to make for dinner.
My babes reconnoiters each aisle with military precision and studies the shelves like a hawk scanning a field for rabbits.

I imagine her vision is somewhat like that of the Terminator – a constant stream of text and numbers scrolling by, as she performs calculations on the fly, and instead of threats highlighting in red, potential craft materials are highlighted along with relevant stats and potential complementary products.
It’s the only explanation that makes any sense.
While I’m mentally making a better Bolognese, she’s crafting wall art with robotic efficiency.
Well, I’m not complaining! That brain of hers keeps us in business. I’m just here to look pretty and yap at you here in writing and verbally over at our socials!
Okay, enough preamble, let’s have a look at my babes’ latest Dollar Tree Christmas craft idea – light-up snowflake wall art!
Light-Up Snowflake Wall Art SUPPLIES LIST
Affiliate links are provided below. Full disclosure here.
- 16×20 stretched canvas (Dollar Tree Plus sells a 2-pack for $5, or Michaels sells a 5-pack for $12.99 and if bought with a coupon each canvas would be cheaper than the Dollar Tree ones.)
- Black paint
- A pack of pine picks (Dollar Tree) for each art
- Small pine cone
- 10-foot strand of LED fairy lights (see note in post)
- Hot glue gun
We love to see our craft projects out in the wild! If you try this seasonal craft project, take a picture and post it on Instagram, be sure to tag us – thenavagepatch
Dollar Tree light-up Snowflake Wall Art VIDEO Tutorial
Watch our short and fun video below for an overview of our Dollar Tree light-up snowflake wall art before you read the detailed step-by-step tutorial.
On Tiktok
DIY Dollar Tree Light-Up Snowflake Wall Art Tutorial
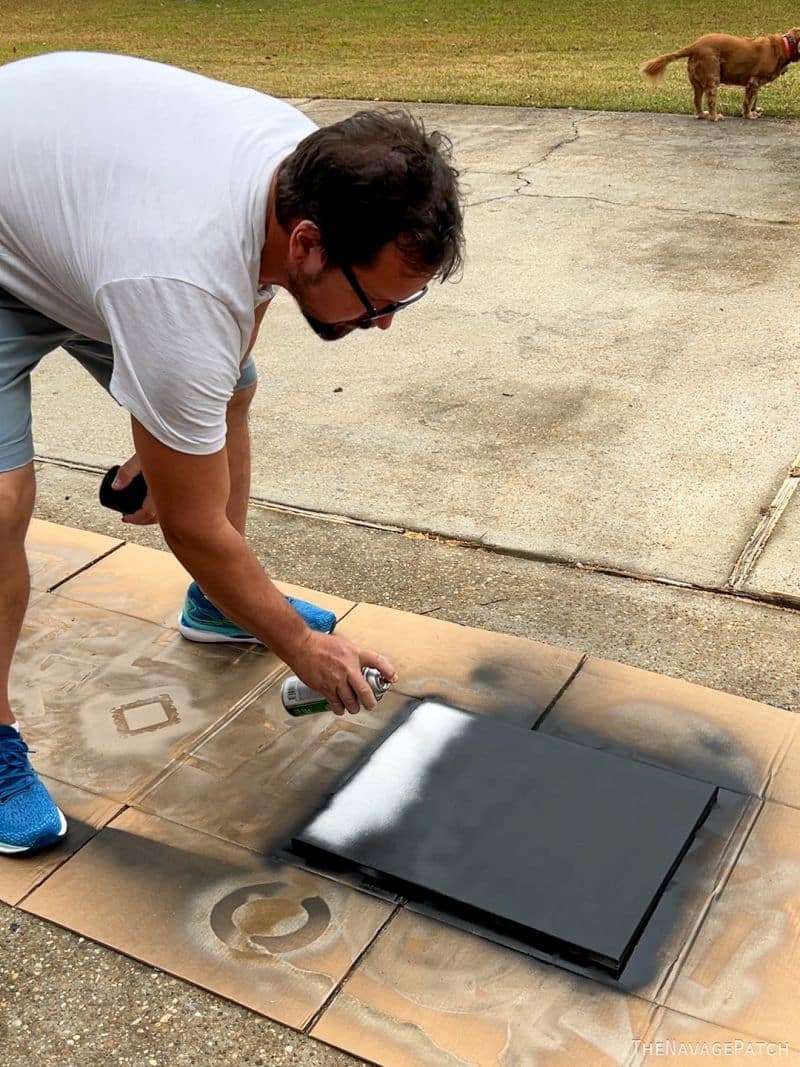
Step 1 – Paint the canvas
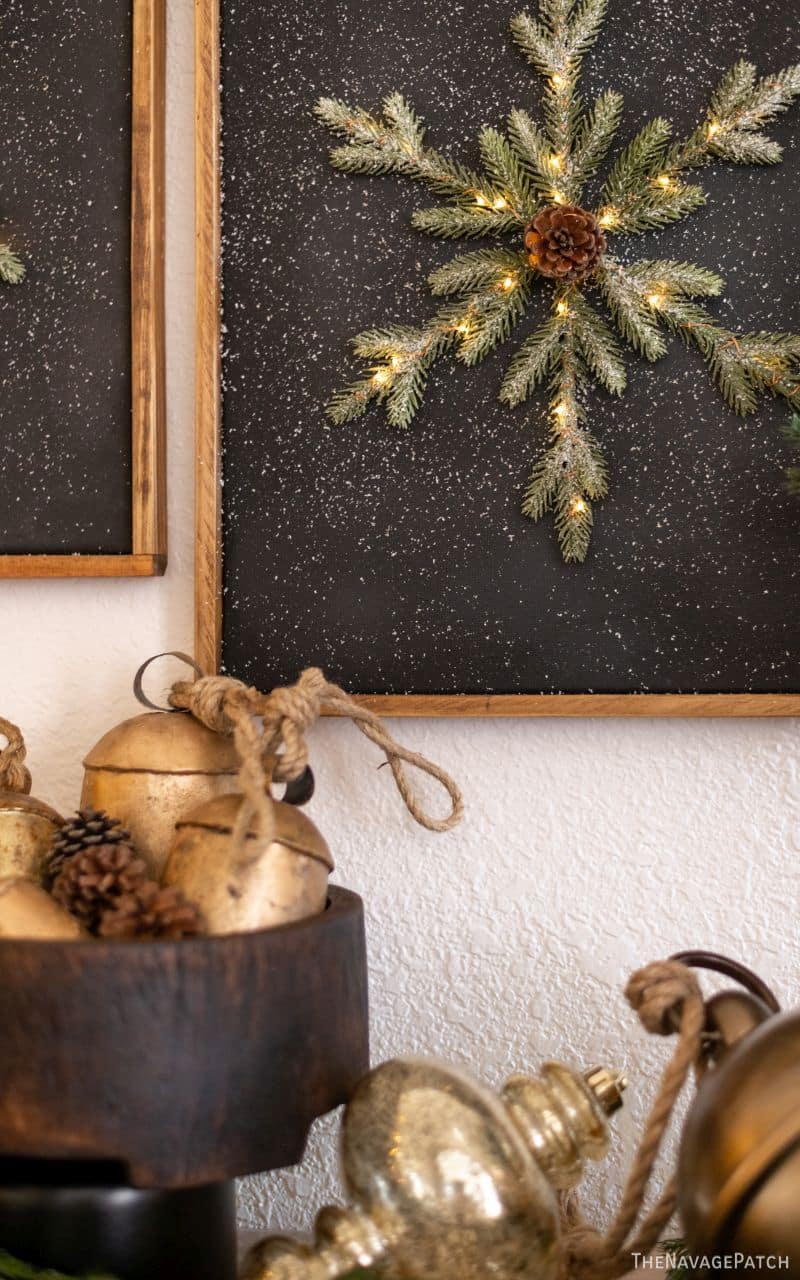
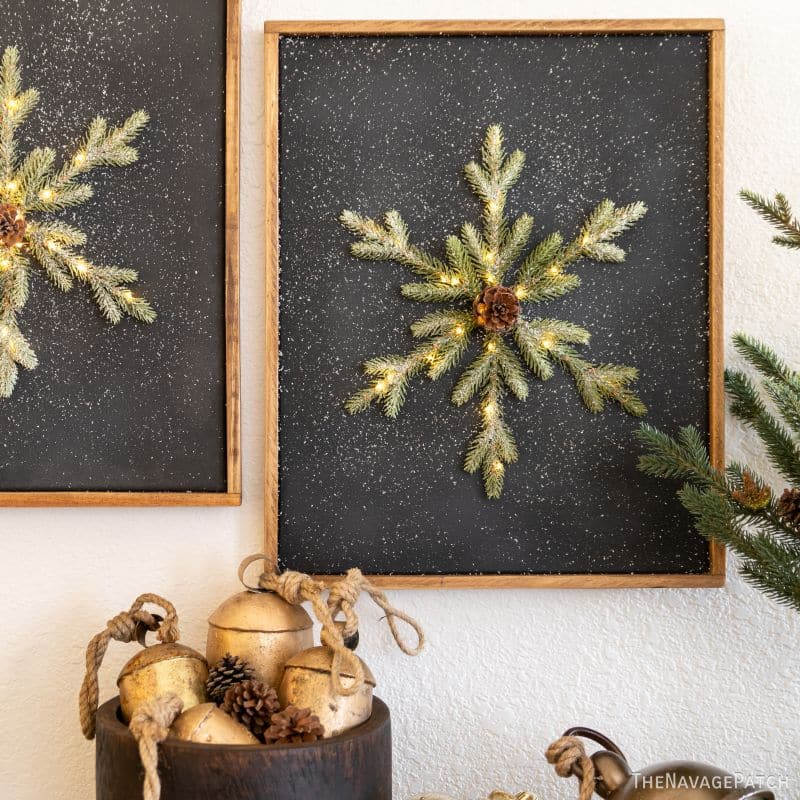
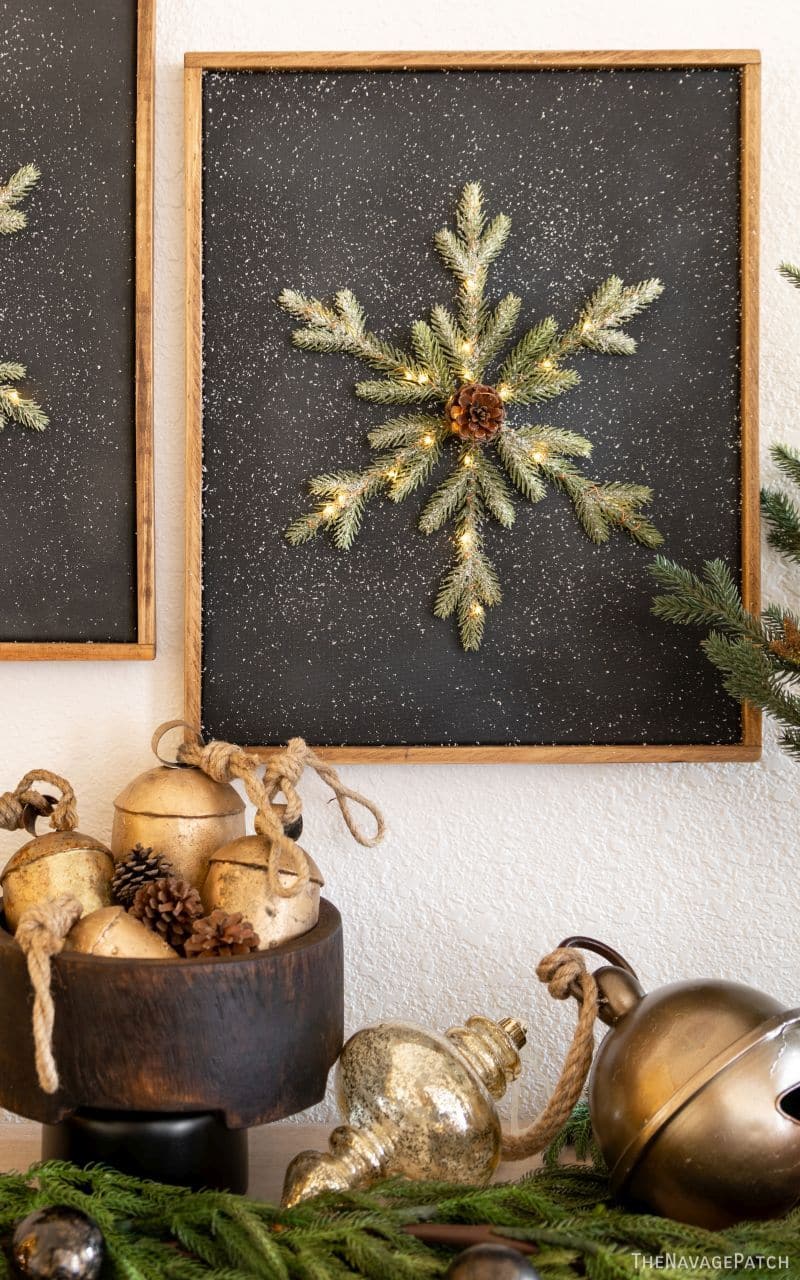
The beauty of this project comes from the greenery and lights being on a black background. But look, no one is stopping you from doing it on a white background, so if you want the snowy look, keep it white. If you want a darker look, paint it black! I used chalkboard spray paint, but any black paint will work, though I’d recommend keeping the sheen flat.
Step 2 – Feed the lights
Poke a small hole in the middle of the canvas, just large enough to feed through a strand of fairy lights.

Then pull the strand through until you get to the plastic section before the battery pack.


Step 3 – Prepare the picks
Dollar Tree pine picks come in two flavors: flocked and glittered. The choice is obvious, because everyone knows that glitter and greenery go about as well together as peanuts and bubble gum.

Cut the stems off the pine picks with wire cutters.

Step 4 – Wrap the lights
First, it helps to coil the fairy lights around your hand. Then start wrapping the coil around the first pick. With a 10-foot strand, you don’t want to wrap too tightly or with too many wraps – just a few wraps (4-5) going up and a few wraps coming back down the pick.

When you reach the base, leave about an inch of wire and then wrap the next pick.

If you do this with a 10-foot strand, you should have a foot or so of excess wire after wrapping the last pick. This is good, so don’t try to wrap it all!
Know your fairy lights!
Just like the humans who use them, fairy lights come in all shapes, sizes and colors. We found a 10-foot strand is great length for this snowflake wall art, but there’s just one catch – remote-controlled LED battery-operated fairy lights only come in 6.5-foot and 16-foot lengths. Fortunately, we’re practiced at splicing, so we merely swapped out the non-remote battery pack of a 10-foot strand for a remote-controlled battery pack of a 6.5-foot strand. If you want these just as ours, you’ll have to do a little splicing, or you can use a longer or shorter strand and adjust your wrapping accordingly.
Step 5 – Glue the snowflake
Arrange your 6 picks into a snowflake shape.

Then hot glue each pick onto the canvas.


Do this for all 6 picks and then…
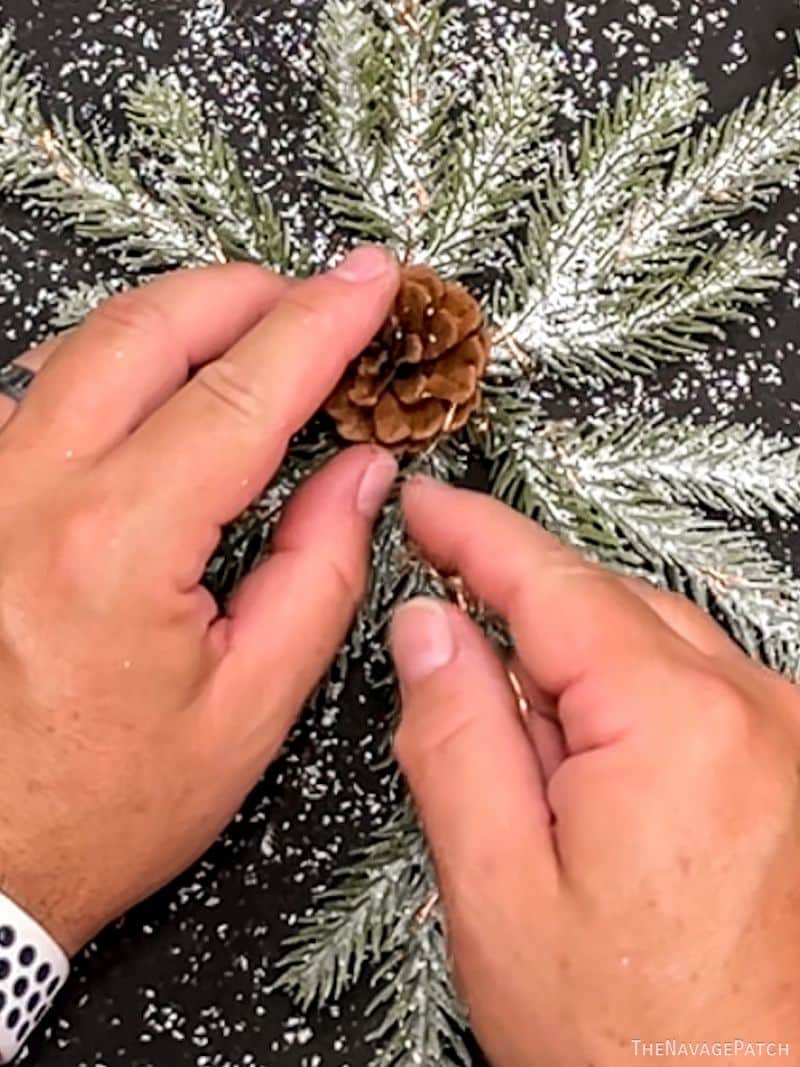
Step 6 – Add a pinecone
Hot glue a small pinecone in the center of the snowflake.


Step 7 – Wrap the rest of the lights
Wrap the rest of the lights around the pinecone, and you’re almost there!
Step 8 – Flock the canvas (optional)
While making this project, the pine picks shed a lot of their flocking onto the canvas. We decided we liked it, so to keep it locked in, I sprayed the whole canvas with clear coat while Handan shook more pine picks from a second pack onto the wet clear coat. We think it looks great, but it’s totally up to you. As a bonus, the clear coat on the chalkboard paint gave a slightly cloudy look when it dried – almost like erased chalk on a chalkboard – we love it!
Step 9 – Frame it (optional)
You can frame your masterpiece with any frame you may have on hand, or you can DIY one like I did. I used one 8-foot cedar fence board and cut it down to size to make two simple frames using wood glue and brad nails – no miters, just a simple rustic frame.
And here they are – beautiful Christmas snowflake wall art with Dollar Tree materials!


These turned out so pretty!! Love how simple they are. Kinda think you could use the picks to make a tree shape as well 🤔
This is one of the reasons we love your site – you guys inspire the rest of us 💕
Absolutely, Mo! That’s a great idea! 🙂
LOVE LOVE LOVE it!
Thank you, Debbie!
Time and money saver: do reverse canvas!!
Cut the canvas off the frame from the back. Stain the frame. Cut the canvas to the outside edge of the frame. Paint black. Staple black canvas to back of frame with black facing forward. Proceed with all of your other directions.
Enjoy!
That’s a great tip, Denise! 🙂
Glad I read through the comments, I was going to mention the same as Denise.
Perfect timing Greg, I have everything on hand.
I just happen to have 2 canvases painted black (was going to use them for spooky Halloween decoration) already & just bought the same picks a DT, hell I think I still have some flocking spray too!!
Looks like I’ll be doing some more crafting!!
Awesome! Have fun with it, Danni! 🙂
These are Exceptional! I usually really appreciate the things you and Handan create- but for the cost- and time involved, these are a winner! The simplicity is part of the beauty here! Excellent Job!
Thank you so much, Laura! 🙂
These really did turn out beautifully.
Thank you, Teddee, we love them!
These are stunning and something that I am going to try and make this year. You guys are so talented and funny. I love reading your blogs. They always brighten my day. 😊
I’m so happy to hear that, Delma! Good luck with yours! 🙂
This is brilliant! I like that it is not just for Christmas and can stay up all winter.
Well done!
Absolutely! Thank you, Lyn! 🙂
Are you reading my mind?? This almost exactly what follows through my mind on a hourly basis. When my brother waved the plastic holder for two containers of juice, I immediately thought of three things I could make with it!
“I imagine her vision is somewhat like that of the Terminator – a constant stream of text and numbers scrolling by, as she performs calculations on the fly, and instead of threats highlighting in red, potential craft materials are highlighted along with relevant stats and potential complementary products.”
😂😂😂
Ooohhh these are so pretty!!!!!
Thank you, Karen! 🙂
I both admire and envy Handan’s brain. This is simply beautiful
You and me both, Debi! 😂
These look amazing!! So happy I could find all the supplies up here in Canada. Greg can you please remind me the post where you first described making your frames? I like Denise and Danni’s time saver idea but don’t know how you’d hide the battery pack or hang the piece with canvass flush to wall. 🤔
Thanks for another amazing inspiration!
Thanks, Meagan! That post is here. You can skip the whole routing bit though and just glue/brad nail the frames together.
I love this! Very unique and creative!
Thanks, Dawn! 🙂