
DIY Faux Antique Brass Bells
These DIY faux antique brass bells are absolutely amazing! We’ll show you how to get this look on any metal bell, and you’ll love how easy it is!
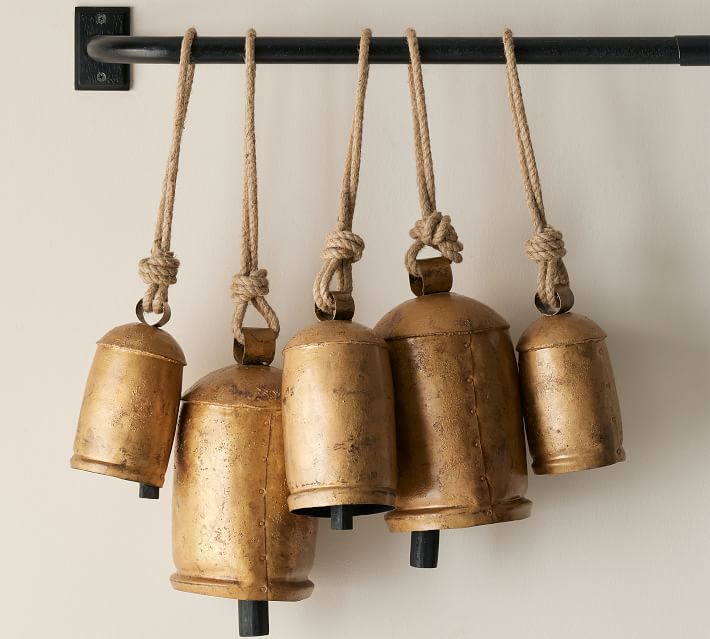
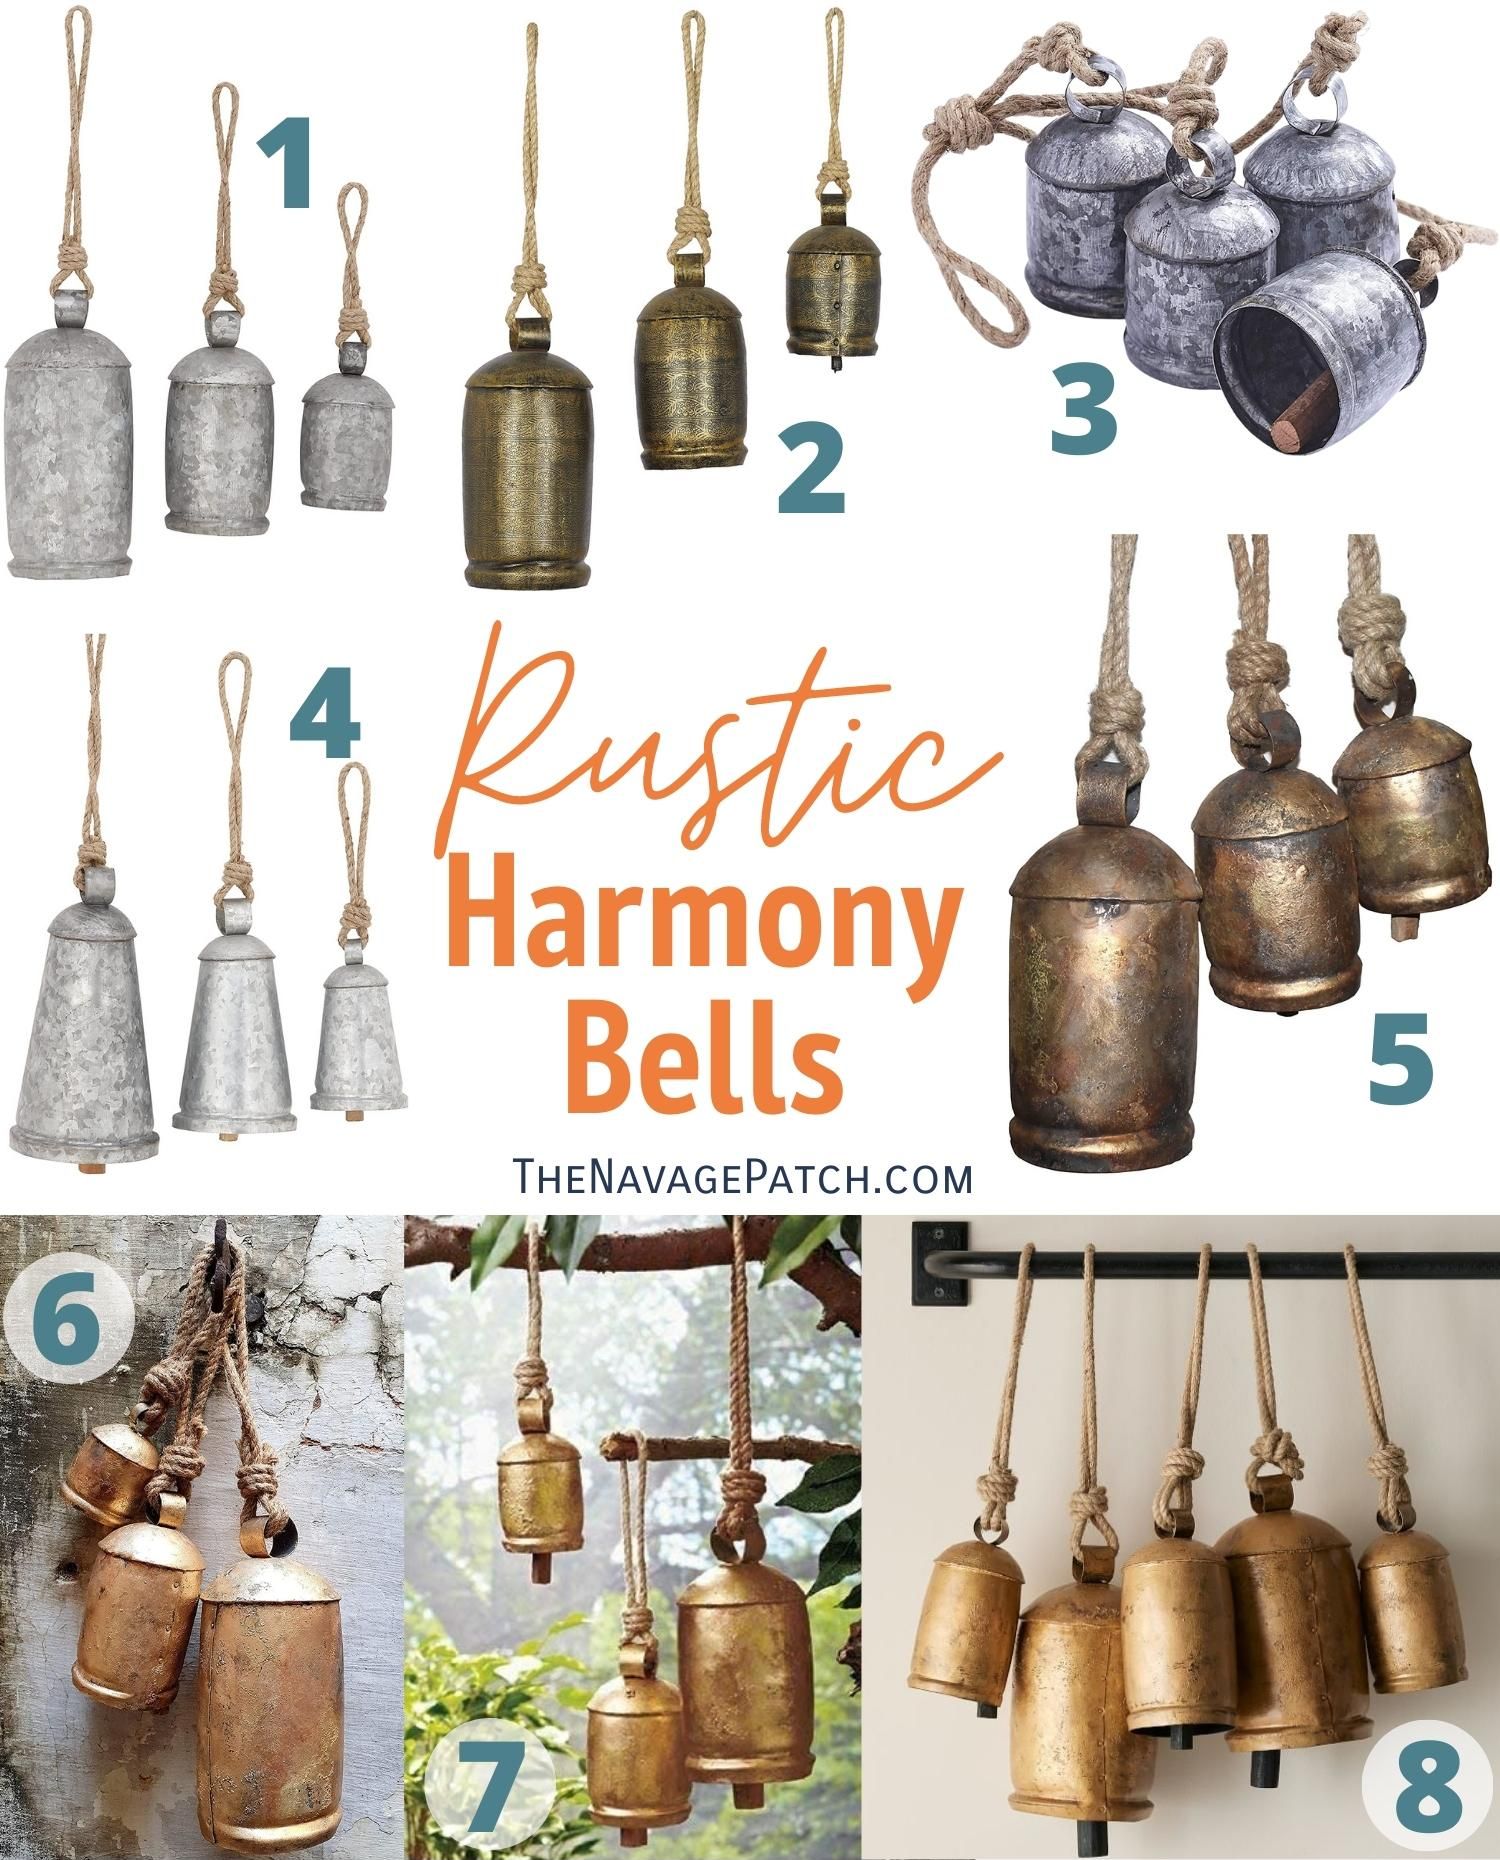
A very strange thing happened in November: in the first two weeks of November we received quite a few requests for a tutorial on making faux antique brass bells. Three requests (Lori, Karen and Ina) were for us to find a way to DIY the following bells sold by Pottery Barn.
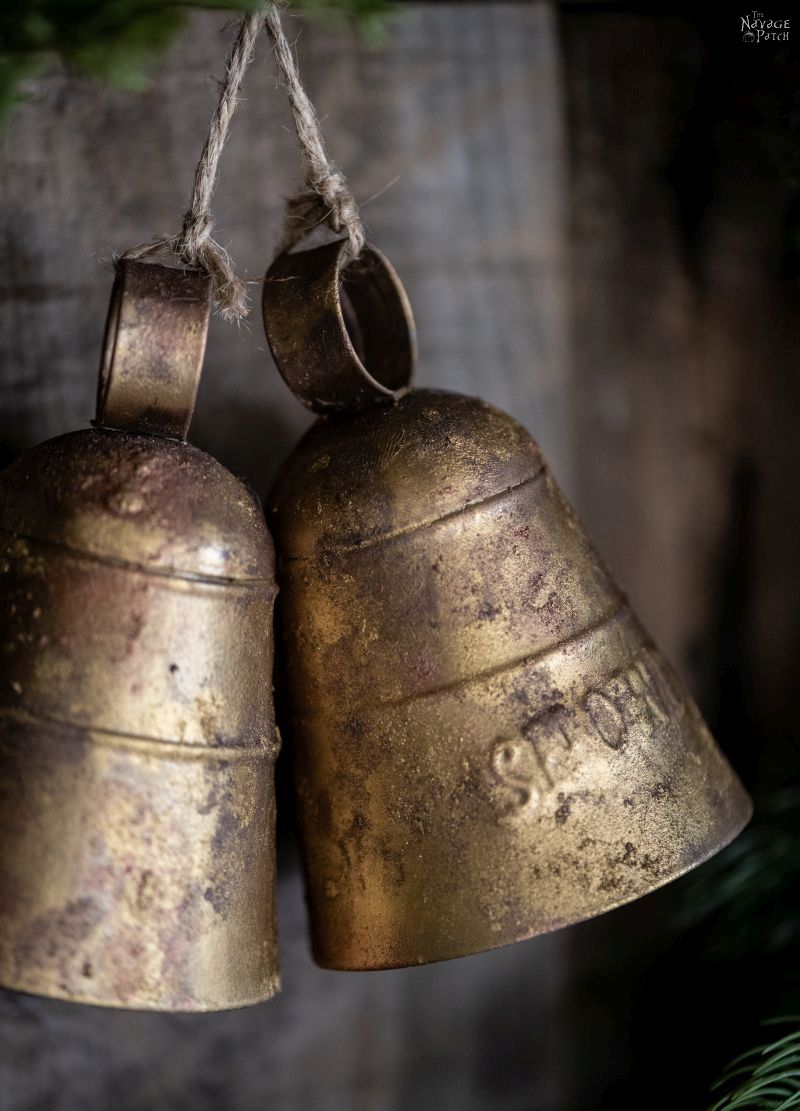
Two of the requests (Debbie and Rebekah) were for a tutorial to DIY the bells pictured in one of our old posts…
…and the rest of the emails were general requests for any sort of DIY brass bell.
Well this was something! All those requests for basically the same thing in a two week period in November! That’s the universe trying to tell us something, and it didn’t take big ears to hear it. Antique brass bells are hot, but their prices are even hotter, so folks are looking for a way to get the look without selling limbs and taking out reverse mortgages.

One of our many aims here at The Navage Patch is to give you guys what you ask for (within reason and within our capabilities), and these antique brass bell requests were right up our alley.
So let’s get right into it, because there’s a lot of cool stuff I’m going to show you!
DIY Faux Antique Brass Bells – The Inside Scoop
Ok, before jumping right into the supplies list and then the tutorial, I want to go over some key points. First, a word about those Pottery Barn bells that’ll set you back $100 for a single one and almost $300 for a set of six: those bells, as good as they look, have a faux antique finish on them! Imagine that! $300 for a fake! But what would you expect – that Pottery Barn wait 100 years before selling them with a true antique finish?
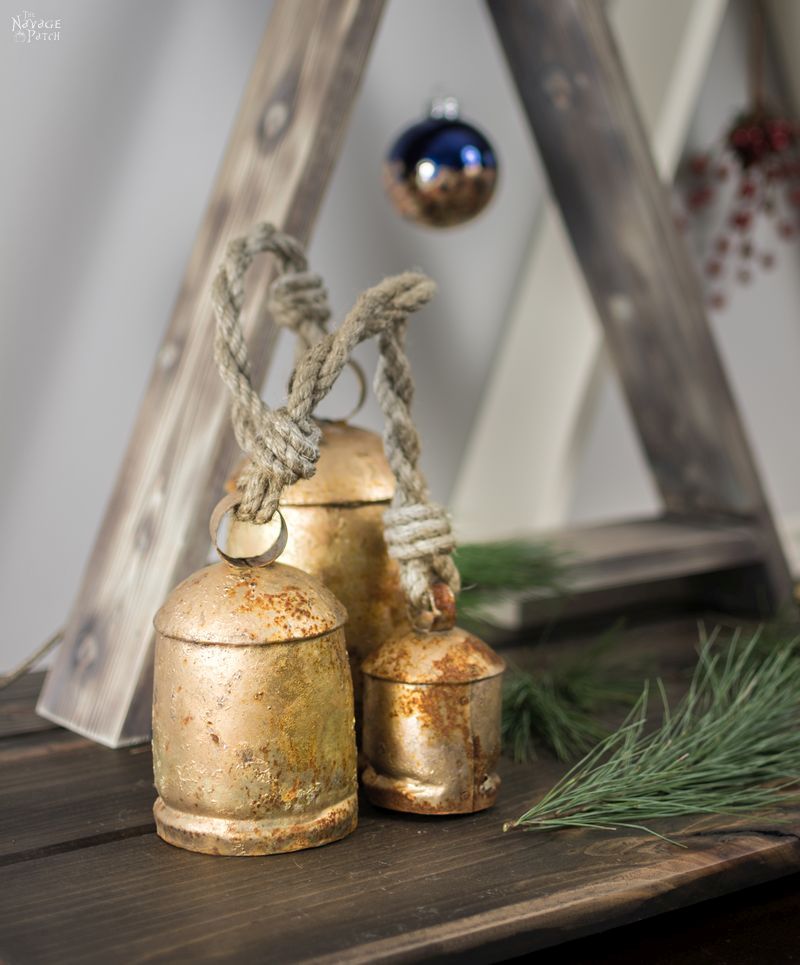
Now look at our bells in the picture above. Do you see that rust? That is real. Of course, that tells you that ours are not real brass either (brass doesn’t rust) – likely iron finished to look like brass. But they are honest-to-goodness aged and weathered faux brass bells, and they got that way because my babes inadvertently left them outside for a few years at the Fortress of Desolation, aka The Connecticut House. And here is where we’re going to bend reality a little bit. Even though real brass doesn’t rust, Handan and I agree that the rust on those bells above makes them look even better, even more…rustic.
Rustic!
Get it? Get it?
Hello?
taptaptap
Is this thing on?
Yeesh, tough crowd. All that holiday cheer just turned to holiday jeer.
Anyway…even though rust has no natural place on brass bells, we like the look, and I incorporated a little faux rust on our faux antique brass bells.
Also, please note the overall finish on our bells. The surface is not smooth because rust and oxidation are not smooth processes. They are destructive and disruptive. On your car, it looks like crap. On your faux brass bells, it’s art.
Go figure.
So with this in mind – that antique brass bells (faux ones, at least) should have texture – we’re going to recreate some of that texture on our faux antique brass bells, and I’ll explain how when we get to that part.

The other key point I want to discuss is how we’re going to achieve the look – with what products. The major player in this process is Rub ‘n Buff. The four colors I used are the basis of all that beautiful faux antique effect.
But Rub ‘n Buff has some quirks. It is a wax, and therefore behaves as a wax.
- A wax will stick better to paint than it will to smooth finished metal.
- A wax can be removed by the application of another wax.
With those two points in mind, we will first spray paint the galvanized bells with a similar color. This achieves two goals – it keeps costs down, as Rub ‘n Buff is more expensive than paint, and the paint gives the Rub ‘n Buff something to grab onto.

To the second point above, as we will be building up layers of wax to create our effect, we will need to wait a little bit between layers to allow for the preceding layer to dry. However, if we feel we’ve buggered up, there’ll be no need for tears or tequila – we can just rub some clear wax on the botched area to remove our error.
As a final note, the bells we started with are from Target, and they’re $3 each. They are not nearly as big as those from Pottery Barn, nor even our “real” brass bells pictured above. But the faux antique effect makes them look incredible, and they are still big enough to hang from wreaths or display on tables or mantels. With this technique, should you ever come across big metal bells (I gotta be careful to keep spelling “bells” correctly, lest I write a sentence with an entirely different meaning), you’ll have the tools to turn them into faux antique brass beauties! Imagine the fun you’ll have turning these bells into those ones from Pottery Barn!
Enough lecturing! Grab your bells and let’s start antiquing!

DIY FAUX ANTIQUE BRASS BELLS SUPPLIES LIST
Affiliate links are provided below. Full disclosure here.
- Galvanized bells – we got ours from Target’s Christmas Ornaments section. At the end of the post I will link to bigger iron bells that you can age with this technique for antique brass bells that will rival those from Pottery Barn.
- Metallic Warm Gold (or similar) spray paint
- Rub ‘n Buff – I used Gold Leaf, Grecian Gold, Spanish Copper and Ruby (seems to be discontinued – Autumn Gold can sub). This assortment has all the colors needed.


We love to see our craft projects out in the wild! If you try this seasonal craft project, take a picture and post it on Instagram, be sure to tag us – thenavagepatch
DIY FAUX ANTIQUE BRASS BELLS VIDEO TUTORIAL
DIY FAUX ANTIQUE BRASS BELLS TUTORIAL
Step 1 – Spray Paint
I sprayed the bells inside and out with Rustoleum Metallic Warm Gold. It’s a brassy-looking color that makes a great base coat. Once the paint had dried, I started in with the Rub ‘n Buff.
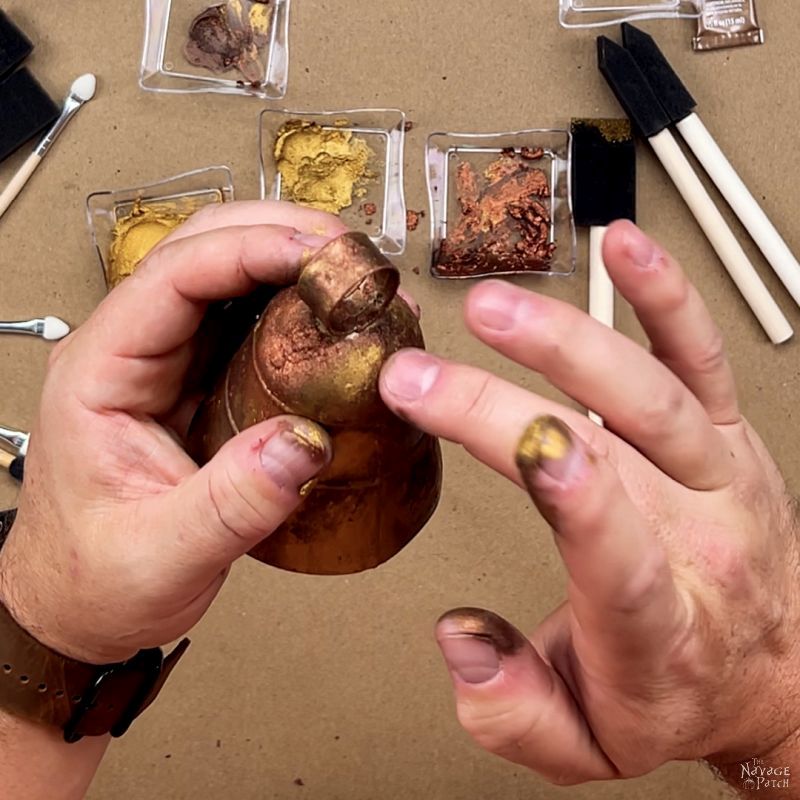
I started off using gloves and trying to apply the Rub ‘n Buff with various foam brushes.

After a time, I gave up on the brushes and just used my glove finger to apply the wax.
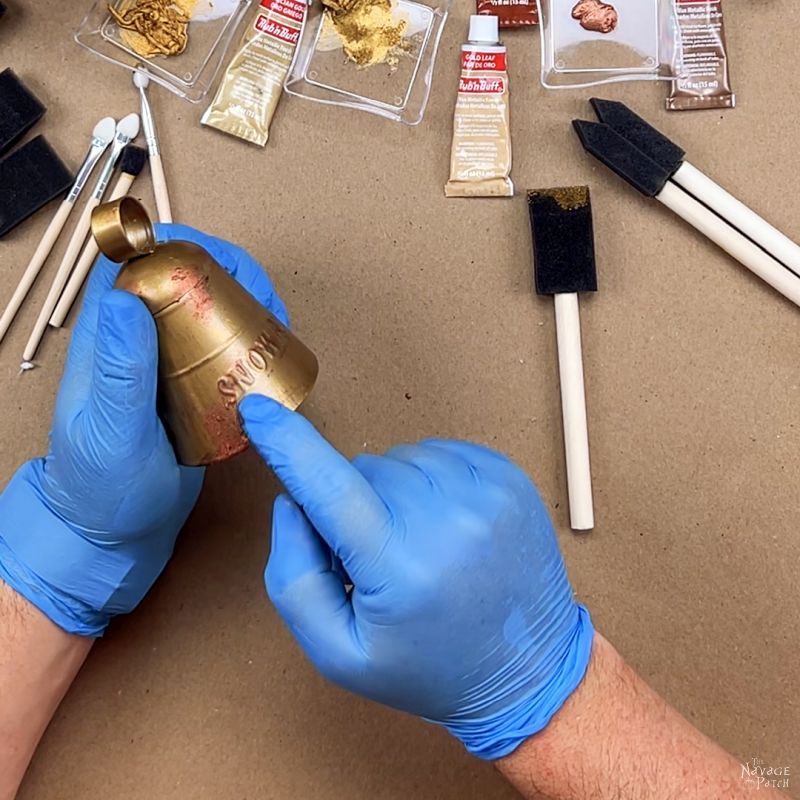
And not long after that, I realized that the glove was just getting in the way. This is a project that requires bare naked fingers. It’s all about the feel… Don’t worry – warm water and a squirt of Dawn are all you need to clean your hands.
So here’s the gist of how this works. My first bell was a bit of trial-and-error. By the second one, I’d nailed the process.

I started off by rubbing on Gold Leaf and Grecian Gold. For the base coat, I mostly rubbed the color around. Later, you’ll learn that I dabbed some other colors on. Rubbing is…well, rubbing. Dabbing is up and down, like tapping your finger. For the base coat of Gold Leaf and Grecian Gold, there was no need to cover every square inch of the bell – that’s what the base coat of spray paint was for. The two Rub ‘n Buffs start to add interest – fluctuations in color and tone – and even though I rubbed on those first two colors (not dabbed), the wax starts to build texture.
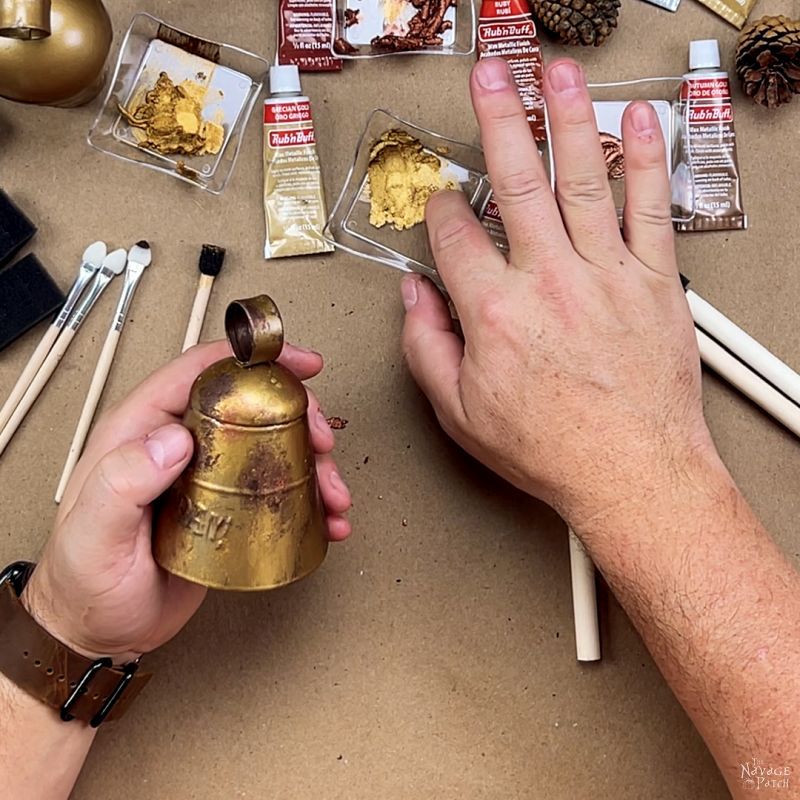
Immediately after the golden basecoat of wax, I dabbed (not rubbed!) Spanish Copper in random places all over the bell – some big areas, some small. When dabbing, you’ll get a ton of texture. You may think it’s too much texture (it’s not), and you may be tempted to smooth it out (don’t) – all that texture will look amazing in the end.
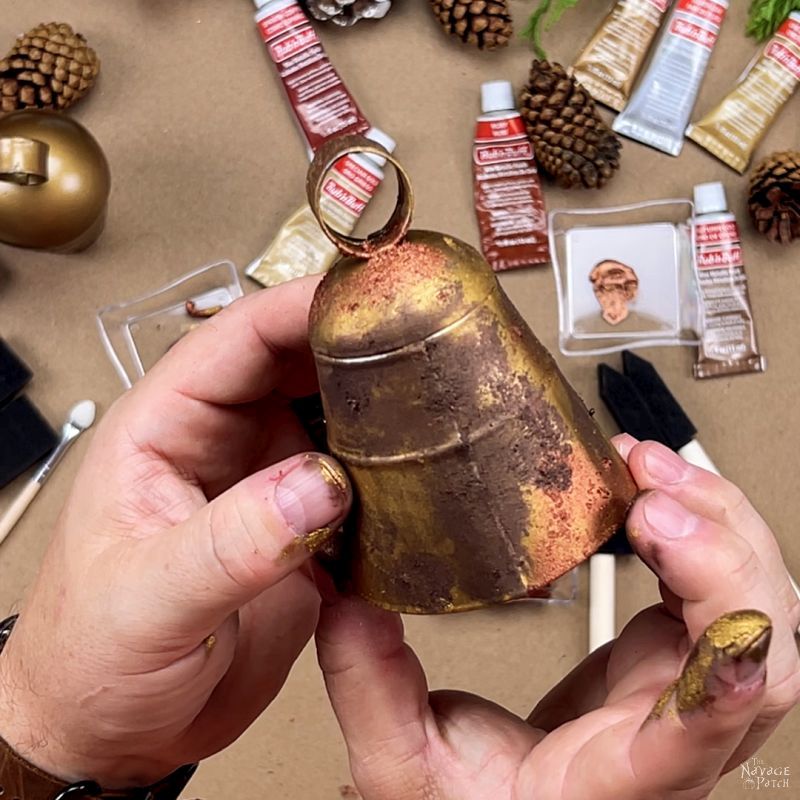
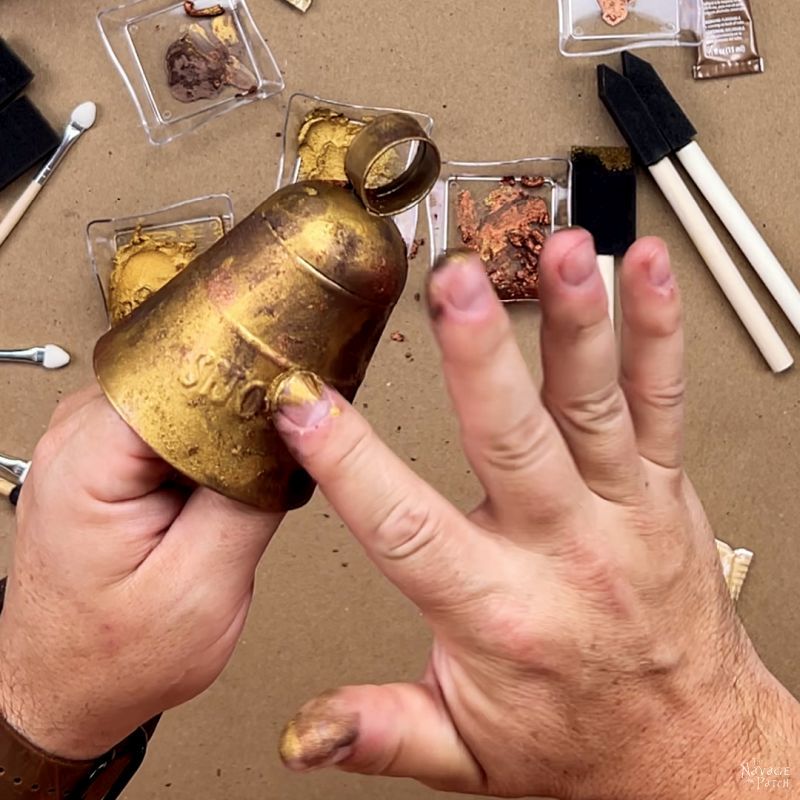
After the Spanish Copper, I went around with Ruby (I also used Autumn Gold). This is to simulate rust. Like the previous color, I dabbed it on by tapping my finger all around the bell. When I had finished applying the dark waxes, the bell looked like this:


It looks as if its way overdone with darks and reds, but you’ll see how I will blend most of that away. But first, I set this one aside for those dark waxes to dry. While that bell dried, I started in on another. With this one, I went even more heavy-handed with the dark waxes. Check it out.
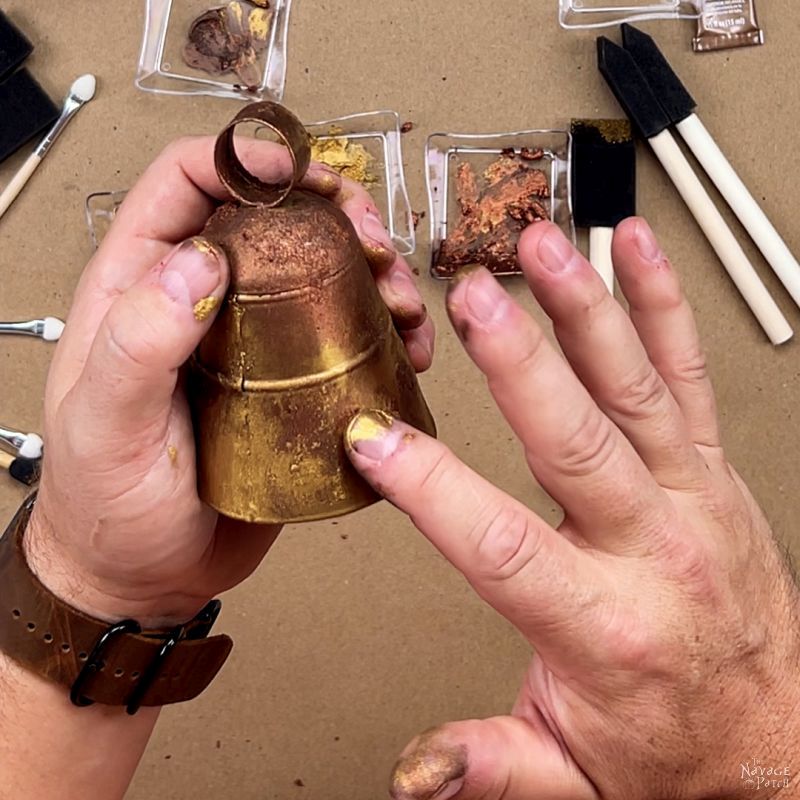
I set that one aside and picked up the previous one. The wax had dried, and it was ready for more wax on top. As I mentioned at the beginning of the post, wax removes wax (and wax will remove the spray paint if you rub too hard), so additional layers must be applied by dabbing, or if you must, very light rubbing.
Using Gold Leaf and Grecian Gold, I worked around the bell, dabbing around the dark areas and sometime lightly on top of them. I would occasionally dab a bit right on top of a dark area and very gently rub it around – just trying to spread color without disrupting texture.

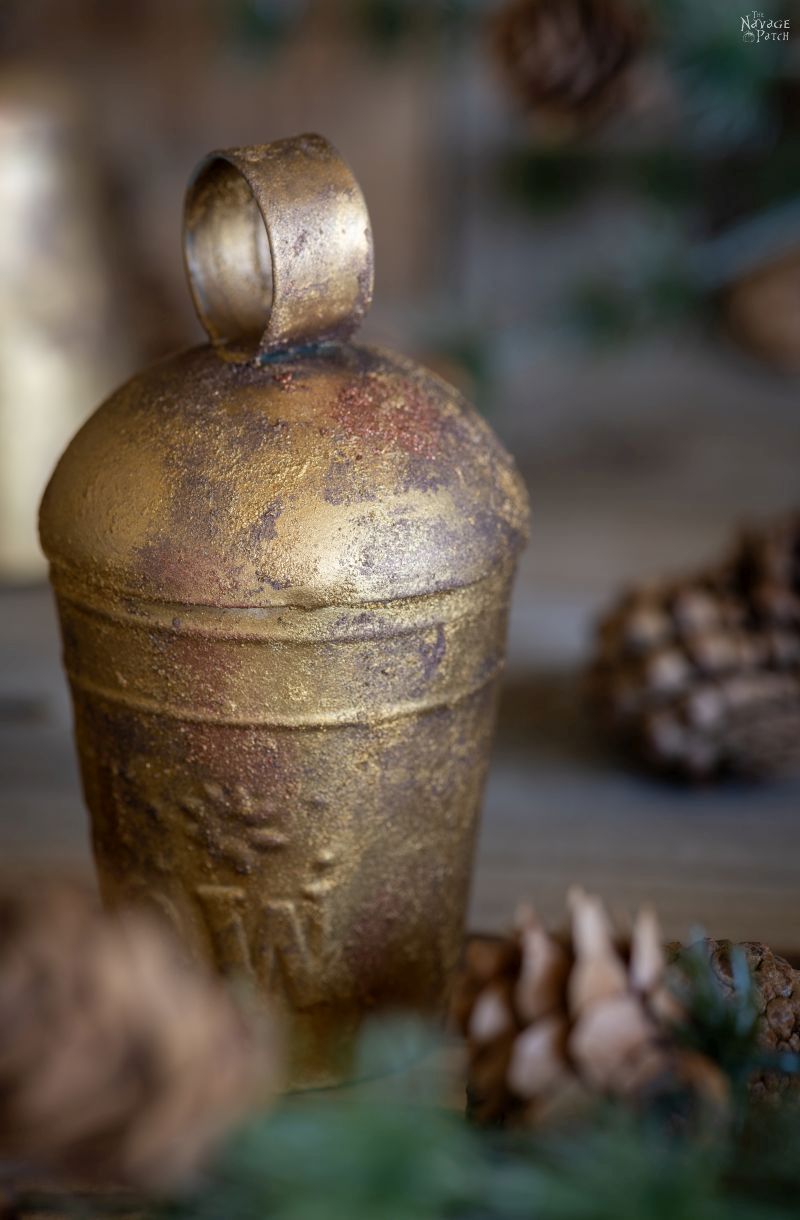
This process is an art, not a science, but even if you’re not artistic (I’m not), you can achieve excellent results by following the steps and hints set forth in this post. As you can see below, I’m eating away at the rust and dark areas with the lighter gold waxes. As an aside – the bells are not nearly as gold-looking in real life as they look in these process pictures. These pics are captured from a video I made, and they don’t have the best color accuracy. You’ll see in the beauty shots just how gorgeous and brassy they look.

You can choose how dark or how brassy you want your faux antique brass bells to look. And remember, if you think you added back too much gold, you can always dab more dark later on. It’s actually what I did for all of them.

After this round of cover-up, I went back with the dark stuff another time – though much more sparingly – and then followed up with tiny touches of gold.

Here is when I discovered that it’s much better to hold the bell from the inside. I found that I was leaving fingerprints when holding from the outside!

And finished! I set it aside to dry and picked up the other one.

I repeated the process with this bell. I’ll just run through a few pics so you can watch it come to life.


Okay, I think you get the process now. It’s easy – it really is! And no two bells will look the same – all your faux antique brass bells will be unique. Check out the following Instagram Reel to see the process in motion!
Let’s have a look at how they turned out!


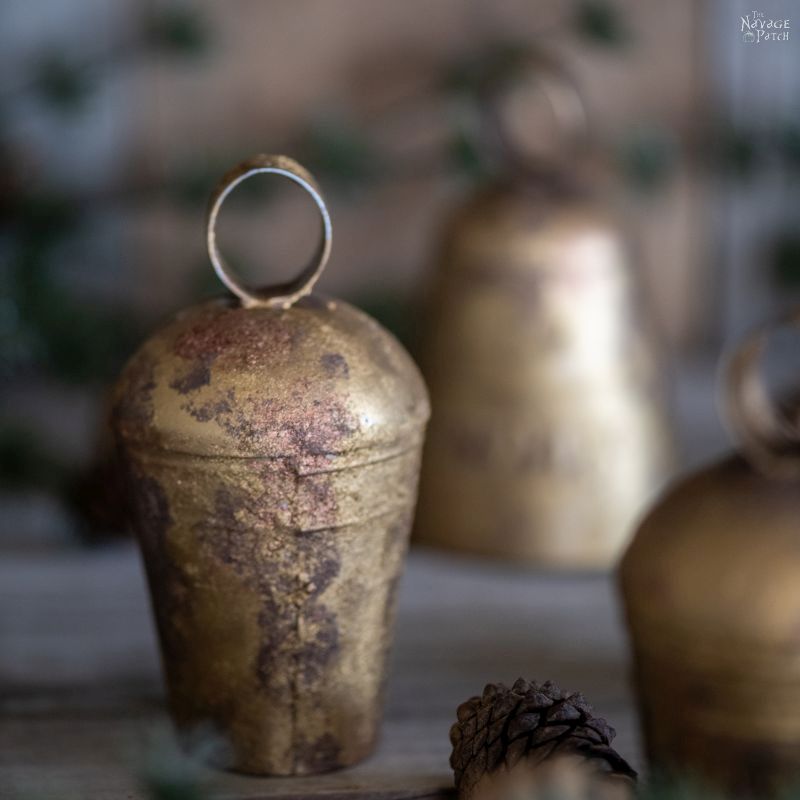
Check out the texture and the colors on this bell. It’s stunning!

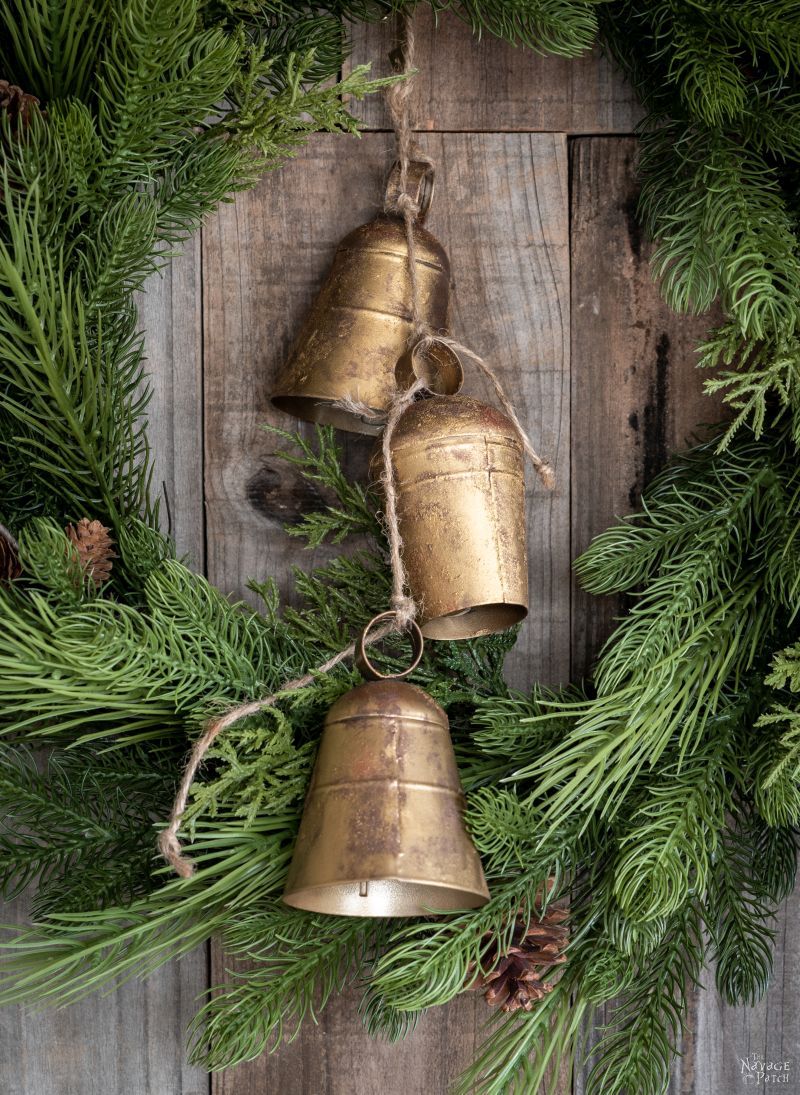


Now that you know how it’s done, you can pick up a set of bells from Amazon and turn them into beautiful faux antique brass bells!
Have fun with this technique – you’re going to love it!

And if you are not the DIYing kind, we found a few sets for you ranging in price from $19 to $68 (except number eight – Pottery Barn’s set).
Share it on Pinterest & Facebook!

These look terrific. I’m tempted to send this post to my brother, who inherited our parents’ antique sleigh bells purchased in Hannibal, Missouri, and immediately set about “fixing” them by burnishing the bells so they looked new. You are Pinned.
Thank you so much, Teddee! Oh, that must have made your face flush red, lol! 😀
You guys are the best! This is exactly what I was hoping for when I made my request. Brilliant, fun and easy. Can’t wait to get started on my own bells.
Have fun with them, Lori!
Rub and Buff is great stuff. I used it to change some Christmas bells from the plain steel they were originally to an antique brass too a couple of years ago when I changed my holiday color scheme from hunter green and burgundy to silver, white, and gold.
I don’t live as dangerously as you though. I wear latex gloves when I add buff to avoid having gold fingernails–that stuff is hard to scrub off.
It’s the best! I love working with it. We found that Dawn and a scrubby sponge took the wax right off my fingers. 🙂
Oh my gosh, thank you! I was one of the ones who asked! Thank you very much for this it is just what I wanted! 😍🙌
You’re so very welcome, Janet! 🙂
After the wax dries do you have to put anything on them to seal them?
You can, Michelle, but we didn’t. The wax is itself a sealant, so there’s no need for another coat of anything else.
Looks terrific!!! Thanks for the effort you put in to add many layers of texture!! It make those look so expensive!!
Thank you so much, Anne! 🙂
Thanks Greg. This looks so easy, and I’m wondering if I could use this on my corrugated dragonflies I make to give them an antique look. I would have to seal them somehow after since they are hug outside in the elements.
Hi Valerie, yes you could! Sealing them for outside is probably a good idea. Send me some pics – I’d love to see how they turn out! greg@thenavagepatch.com
Such a cool tutorial! Thanks for sharing!
It is our pleasure, Glenda! 🙂
Love your detailed DIY’s. Thanks so much for all that you do for us!
It’s our pleasure, Lisa!
I don’t see where to enter the Circuit Joy giveaway contest. Please advise
I also cannot see where to enter! That is probably why you haven’t had as many entrants! It isn’t clear, if you did say, and honestly, after reading through your awesomely detailed instructions for the bells – I forgot there was another giveaway!! 😂 This got pinned! I loved it! Thank you.
There is no link to click on for the raffle for the Cricut Joy
Hi Lisa, so sorry about the mixup! I sent the wrong link in the email. You can enter the drawing here.
I love this tutorial!! I’m always amazed with everything you guys do. I really enjoy your blog. I was wondering if this could be done to plastic bells. I purchased some large inexpensive ones for outdoors. While I’m okay with how they look “antiquing” them would be even better. Thanks in advance. Keep the DIYing coming!!
Thanks for the fantastic tutorial. A perfect present for my (mumble, mumble) birthday! I can’t wait to get everything together and start! I am going to be so busy after the holidays! lol
Which birthday was that? 29 and holding? 😀
I wish you could do a tutorial on how to string the bells up once the finish has been done. Thank you.
Hmmm, I never thought of that! Good tip for next season, Diana!
Thank you so much for continuing to inspire us with your diy’s. Is it possible for you to link the bells at target. When I click on the link that says transform these bells into this… it takes me to Amazon ones that you also have posted below.
Thank you!
It is our pleasure, Alison! We found those bells last year in-store at Target. I don’t think they sell them online though.
You need to have Savage Patch on each picture. I have seen your work on other sites that are not giving you credit for the original ideas of y’alls. Many sites now have logo on them. Enjoy your ideas.
Hi Frances, we do. Unfortunately, those who steal just crop them out. Can you email me with links, so I can file copyright notifications against them? Thank you!