DIY Indian Bone Inlay Living Room Cabinet
This DIY Indian bone inlay cabinet is perfect for our new living room. It’s an easy effect to create on any furniture, and we have free bone inlay stencils for you in TNP VIP Lounge!

I wish I knew then what I know now.
As some of you know from the collected stories of Our Adventures, we lived in India for 6 months back in 2012. India is so many things and so many extremes – I encourage you to read about our time there, starting here. Though our stay there was short, I do wish I had a better understanding of certain design elements that I am well-versed in now.
Case in point – Indian bone inlay furniture. When India was home, I had no idea of its existence, even though we once stayed in a hotel in Jaipur that had a beautiful bone inlay console staring us right in the face!
Ah, what a shame! I could have appreciated so much more if only I’d known a few more things. Alas, when I finally did learn about the Indian bone inlay technique, we were living halfway around the globe.
But that’s the way of the world, isn’t it? It goes hand-in-hand with “youth is wasted on the young.”
Handan was the first one to open my eyes to the technique. Not that she or I have ever done it, mind you – but she showed me as a prelude to teaching me the art of faux bone inlay, which we applied to a simple wooden serving tray.

Now, as you can imagine, something as intricate as real bone inlay is absurdly expensive – especially when incorporated into actual pieces of furniture instead of more decorative items like trays.
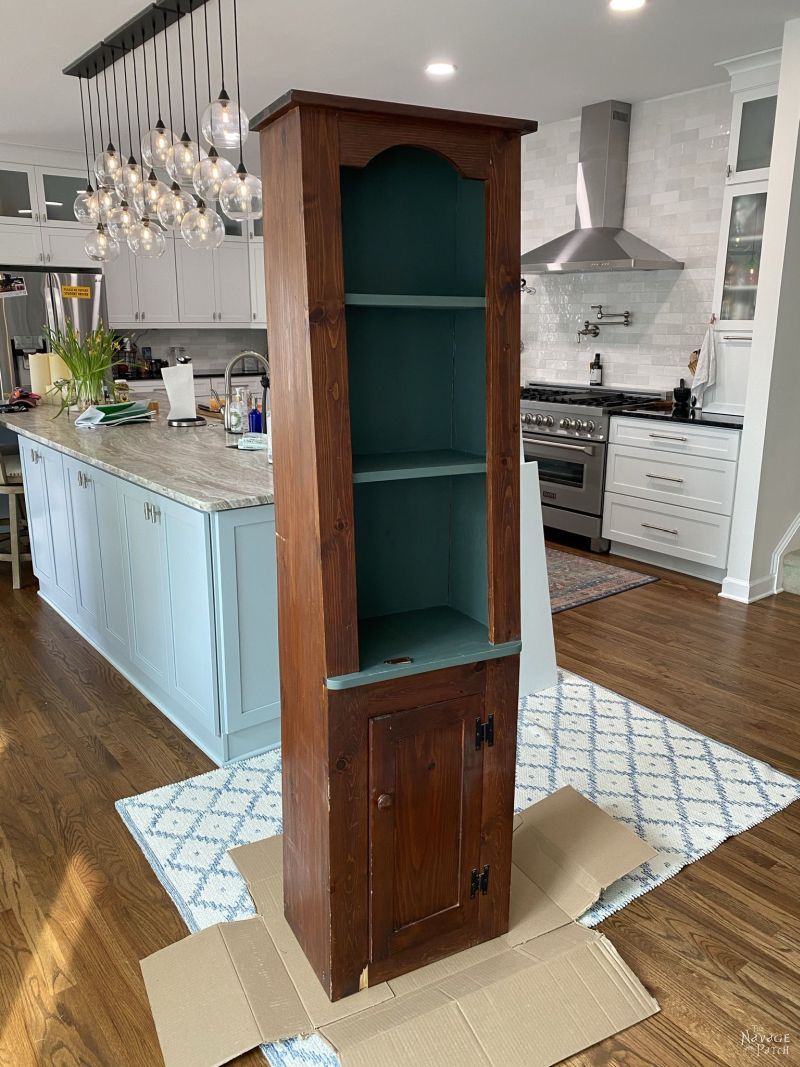
Handan has been itching to create a DIY Indian bone inlay piece of furniture, and the only room left with…well, room, is our living room. We first toyed with the idea of me building a bookshelf-ish cabinet next to our tv console (well to be more precise, my babes toyed with that idea – I toyed with the idea of a dry martini and a horror movie on Netflix).
To my great fortune, Handan had a change of heart and instead decided to press into service one of the many rogue pieces of furniture we’ve collected from tag sales over the years.
The cabinet in question came from a tag sale years ago in Glastonbury, Connecticut.
Of course, Rain Man my wife remembers every detail of the transaction. Though she never learned the roads when we lived there, she can give accurate directions to the house using either our old house or my parents house as a starting point. She can also describe the yard, the contents of the tag sale, of course, the exact sum we paid for it, and her thought process at the time of the transaction (in this case, apprehensive over the seemingly-high price).
I’m sure you can imagine how many arguments I win against a memory like hers!

Anyway, the cabinet (for which she reluctantly paid $80) sat in the far corner of the kitchen in our old house and served as the overflow receptacle for my bulk spices and oddly large salt collection (I had two kinds of kosher salt – the indispensable Diamond Crystal and the vastly inferior Morton’s, iodized table salt, un-iodized table salt, coarse sea salt, fine sea salt, Maldon sea salt flakes, pink Himalayan rock salt, pink Himalayan salt powder, smoked gray rock salt, and regular clear rock salt).
What? I like salt, okay? Yeesh, what a bunch of Judging Judies!
Before its stint as a glorified salt cellar on steroids, it served (at various times) as a bathroom cabinet to hold toilet paper, a bathroom hallway cabinet to hold tchotchkes, a not-yet-the-craft-room cabinet to hold possible crafting supplies, and a garage cabinet full of dead bugs, dust and promise.
As I was saying, Handan wanted a faux bone inlay piece of furniture to give a little Indian flair to our living room, and she thought the $80 tag-sale cabinet was the perfect candidate.
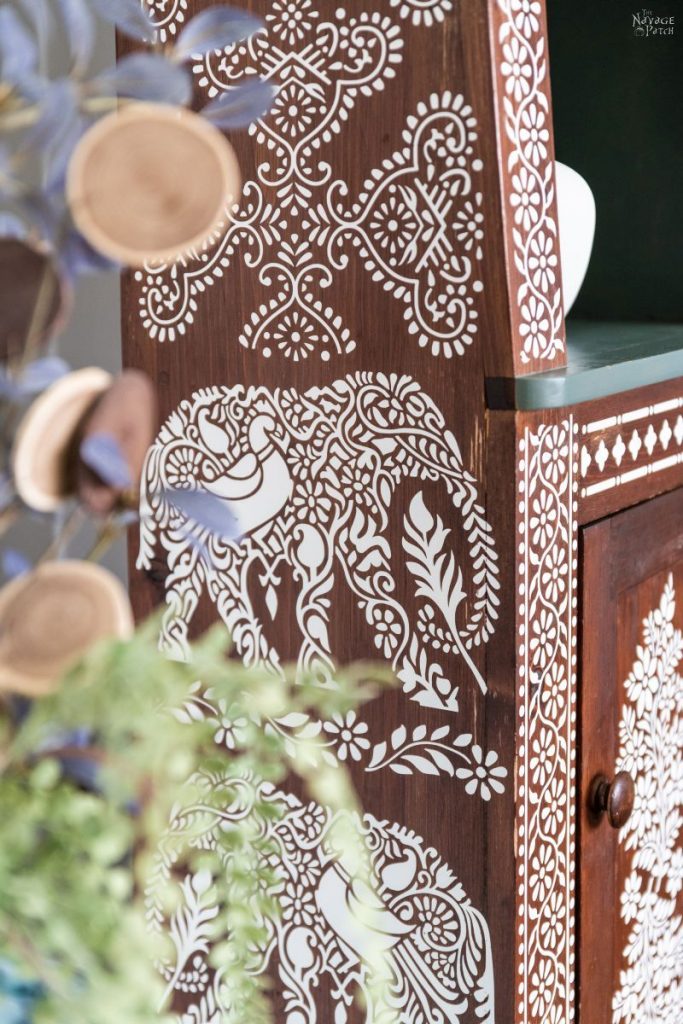
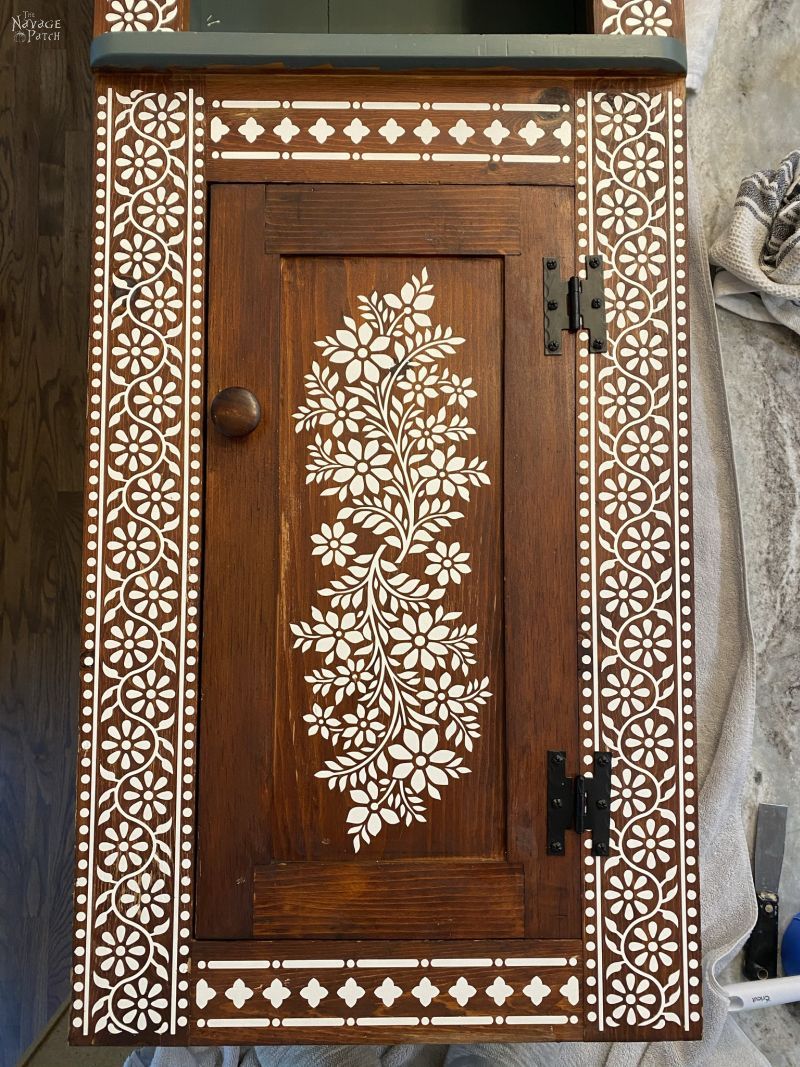
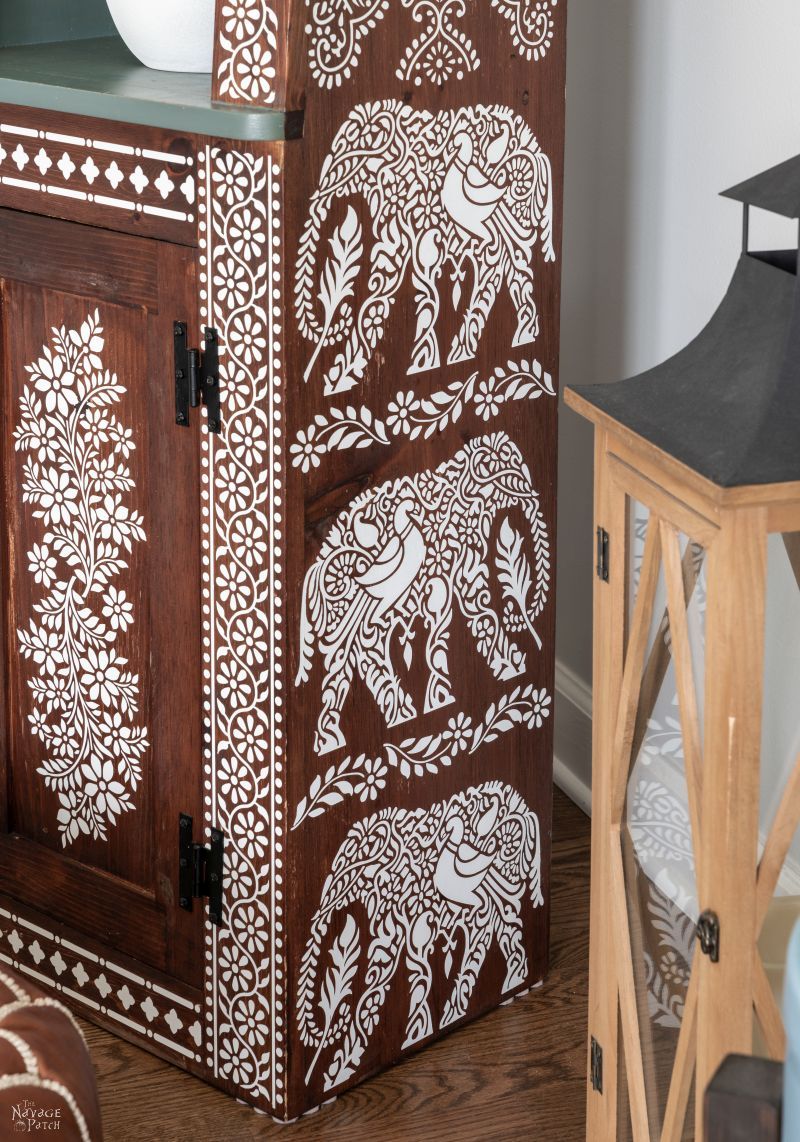
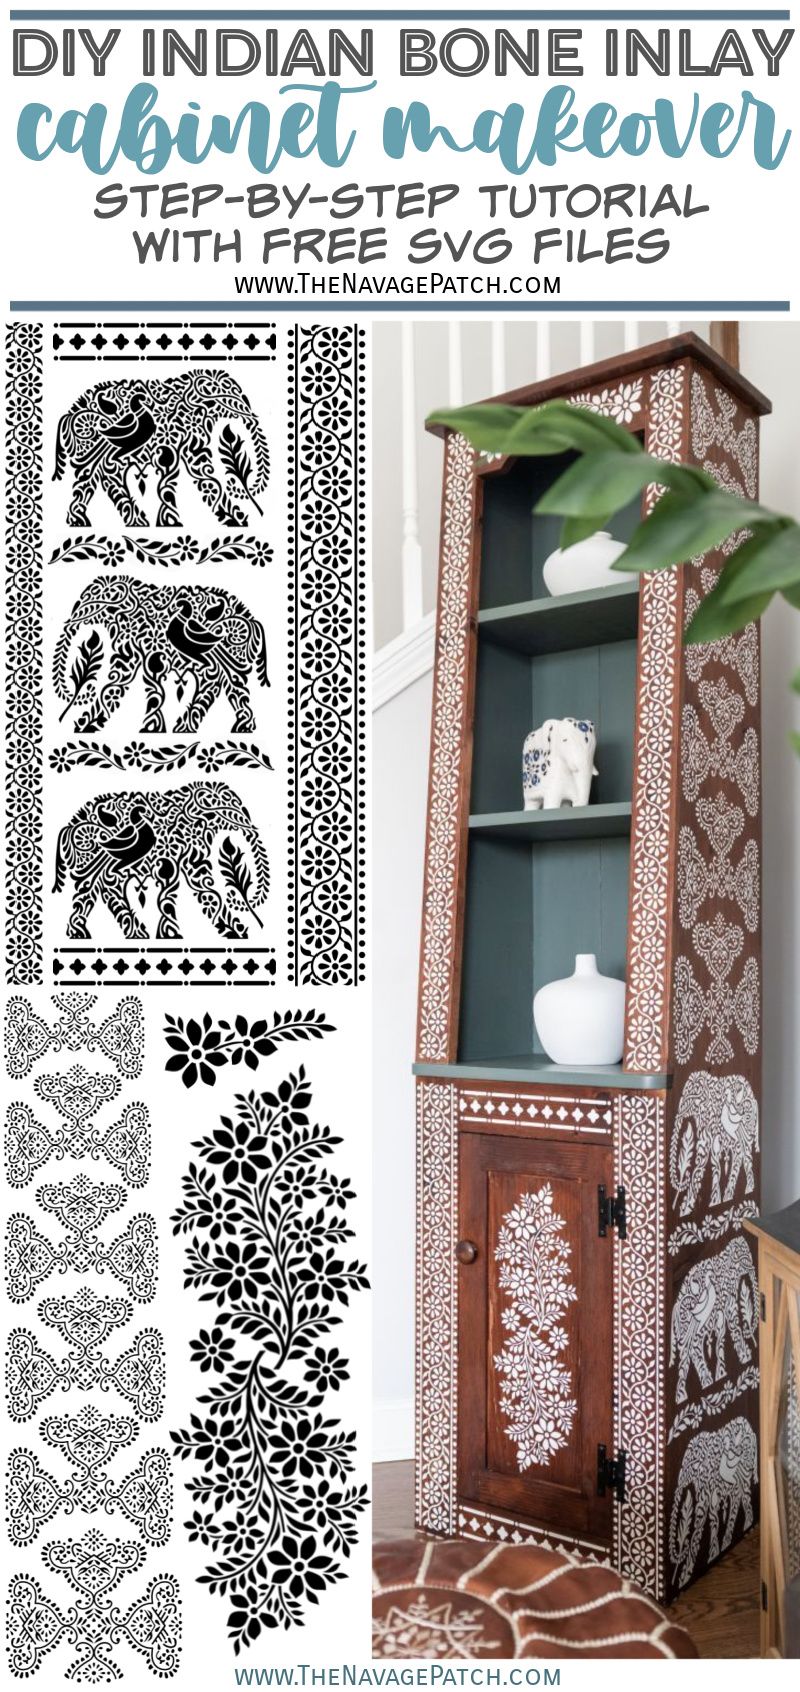
And here’s the thing: my babes wanted to make a DIY bone inlay cabinet, especially so we could use some really long Indian bone inlay stencils she designed. Look at the vertical real estate on that cabinet!

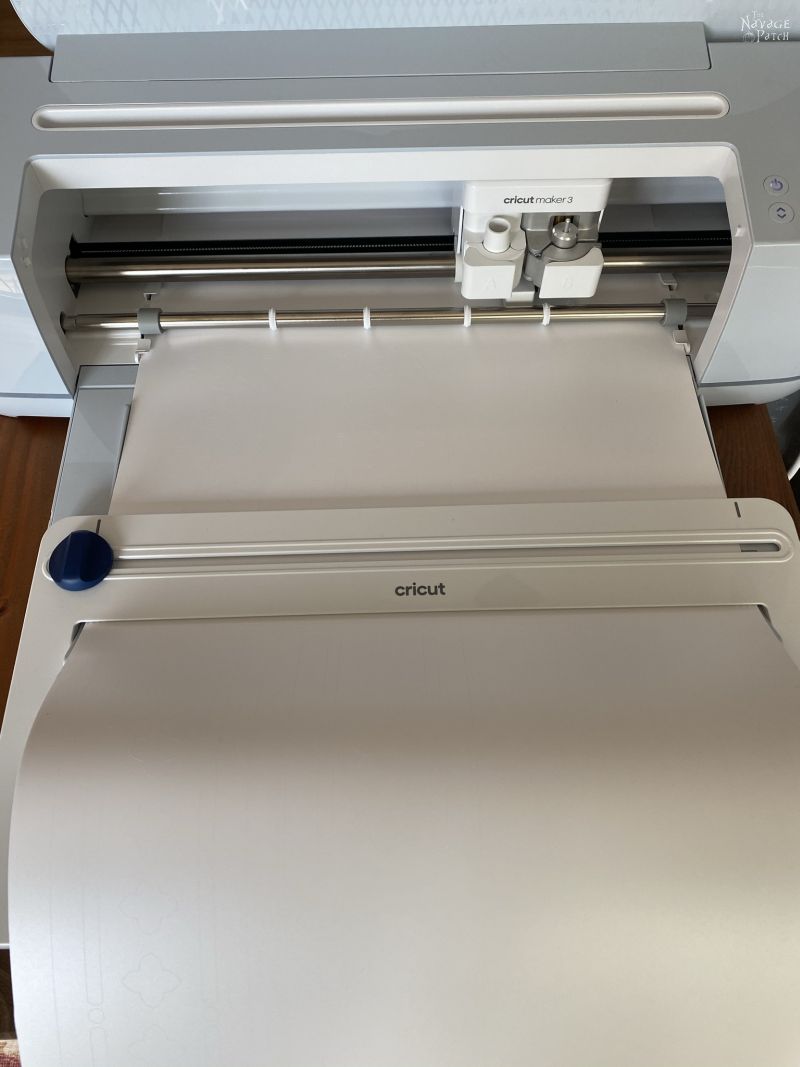
Gone are the days of dinky little stencils that need to be removed and repositioned. Now that Cricut Maker 3 is on the scene, we can make a unique stencil 12 feet long!
Handan was so excited. And thus, by the transitive property of marriage, so was I!
DIY Indian Bone Inlay Living Room Cabinet
This is a sponsored conversation written by me on behalf of Cricut. The opinions and text are all mine [unless they are mine! – Handan].
SUPPLIES LIST
Affiliate links are provided below. Full disclosure here.
- Cricut Maker 3 or Explore 3
- Removable Smart Vinyl
- Free Indian Bone Inlay Stencil Designs (available in TNP VIP Lounge)
- Weeding tools
- Transfer tape
- Cabinet or bookcase
- Masking tape
- Foam paint roller
- Extra foam roller covers
- Primer (use oil-based if stenciling over stain or an old oil-based finish)
- White or off-white paint of your choice
- Pearlescent mixing medium (optional)
Prepping the cabinet
After announcing that we’d be using the tag sale cabinet, Handan told me the most marvelous thing I’ve heard in a long time. Instead of me laboring away painting the thing white or blue or re-staining it, my babes said she wanted to use it as-is.
I couldn’t believe this fortuitous turn of events! I considered a run to the store for some Lotto tickets and scratchers to capitalize on my good luck!
“As-is” was music to my ears. Still, there were a few cosmetic touch-ups to do. Besides having the expected scuffs and scratches from decades of use, our cabinet suffered a little chip when I was moving it into the moving pod back in CT.
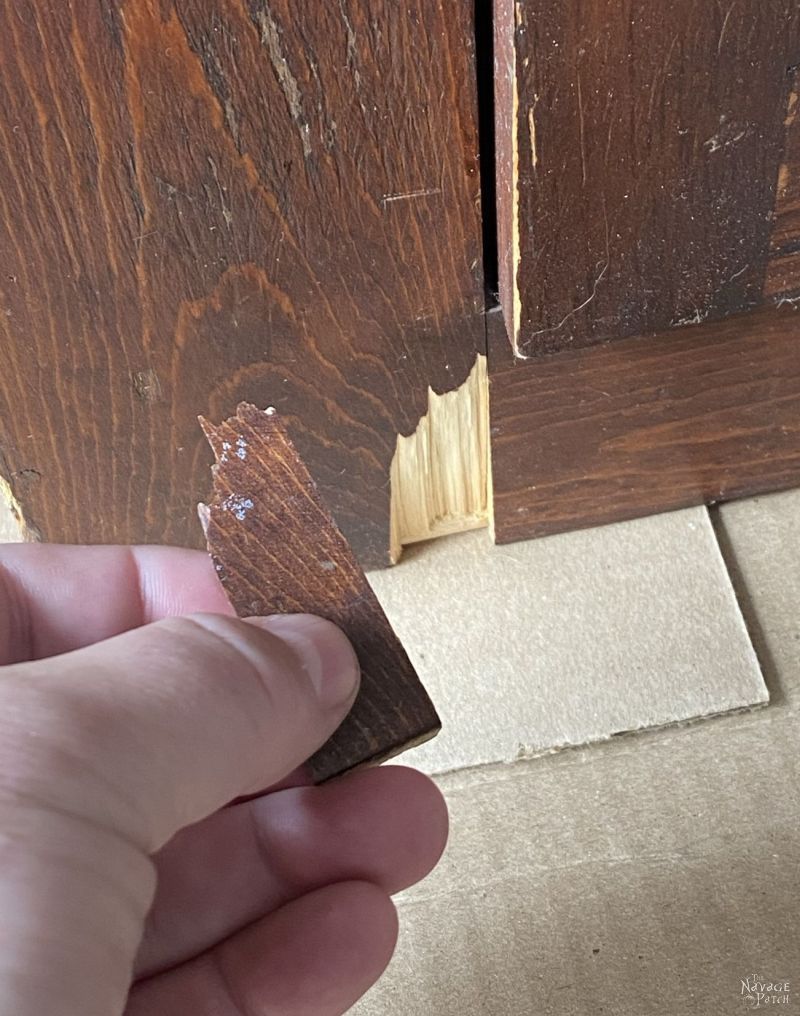
Fortunately, I had the sense to tape that piece onto the cabinet and haul it 1000 miles to Georgia. I didn’t know it then, but saving that piece saved my butt!
A little super glue, and it was good as new…sorta.

For the dings and scratches, I wiped on some Restor-A-Finish. It does a good job of hiding the minor stuff. Good enough, anyway – I wasn’t trying to bring this piece back to its original glory.

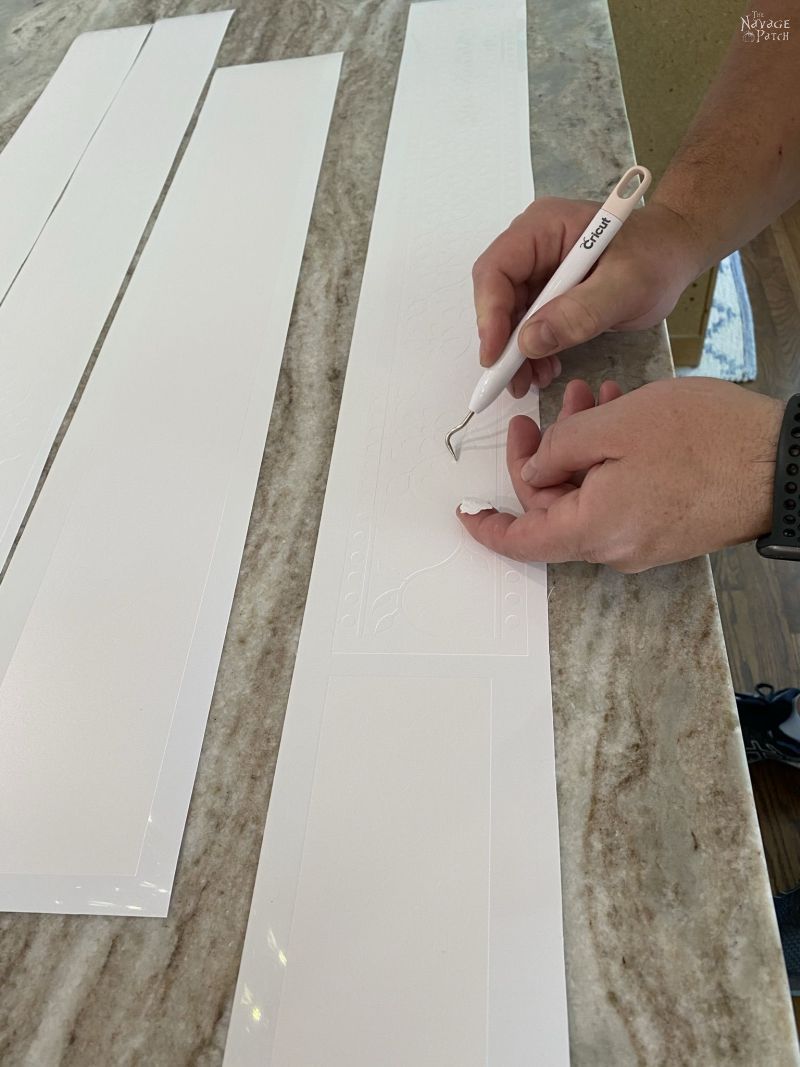
Preparing the DIY bone inlay stencils
Handan uploaded her Indian bone inlay stencil SVGs to Design Space, and I cut the stencils with our Cricut Maker 3.
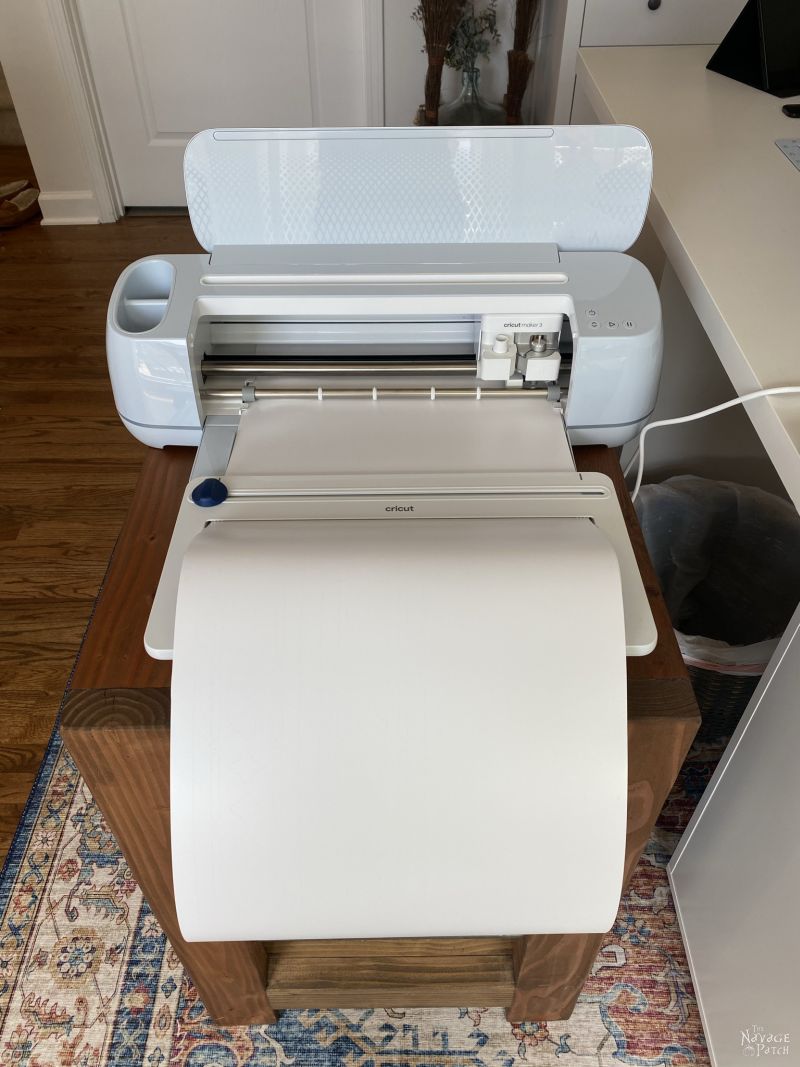
Cricut’s Smart Vinyl and Maker 3’s ability to cut long lengths of it make cutting stencils like this an absolute joy. We’re still putting Maker 3 through its paces, and we’ll have a full review and project coming out soon, but this is just a little peek at what it can do.
For those who enjoy moving pictures and music, here’s a little video I made.
[embedyt] https://www.youtube.com/watch?v=PqfV2oUBsak[/embedyt]
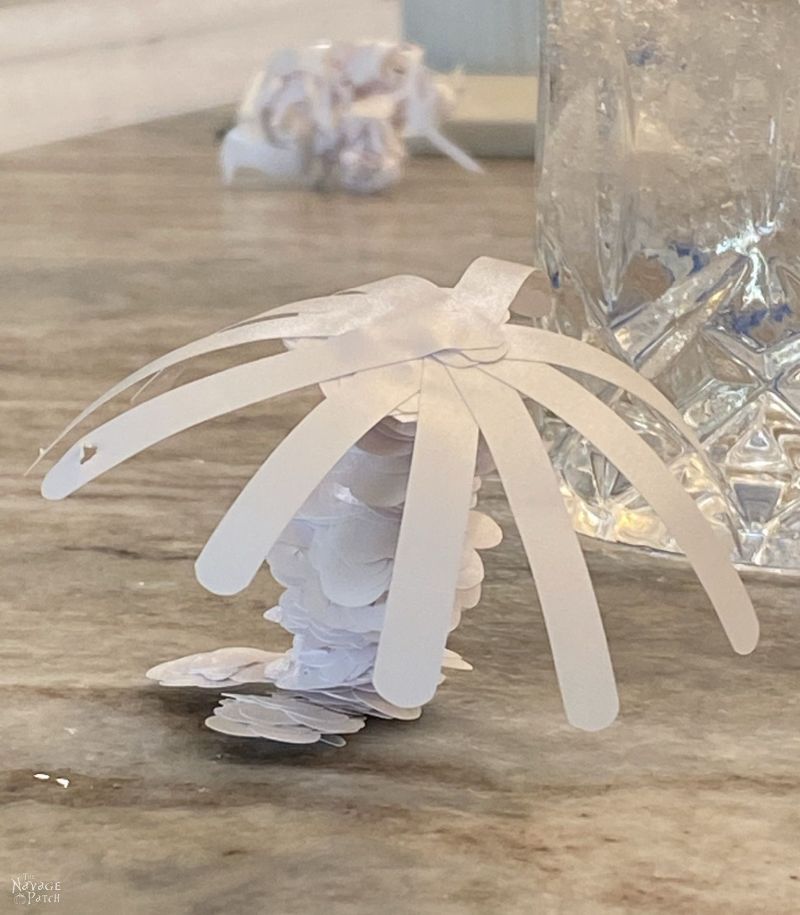
Next came weeding, and what better thing to do with weeding scraps…
…than make a vinyl palm tree!
Long stencils require long transfer tape. I used a full-sized sheet, so I could cover two stencil strips with one sheet of transfer tape.

Braying makes the transfer easier.

I applied the transfer tape and stencils to the cabinet.

Stenciling the DIY Indian bone inlay living room cabinet
Since this cabinet was stained and had an old oil-based finish (and since I refreshed it with Restor-A-Finish), I needed to prime with an oil-based primer, or not only would the finish bleed through the water-based latex paint, but the paint likely wouldn’t even stick to the cabinet. When it comes to primers, my two favorites are Zinsser BIN shellac-based and Kilz oil-based. Zinsser BIN is way more expensive and I didn’t have any on hand, so I went with the Kilz I already had in the basement. It’s more than adequate for the job.

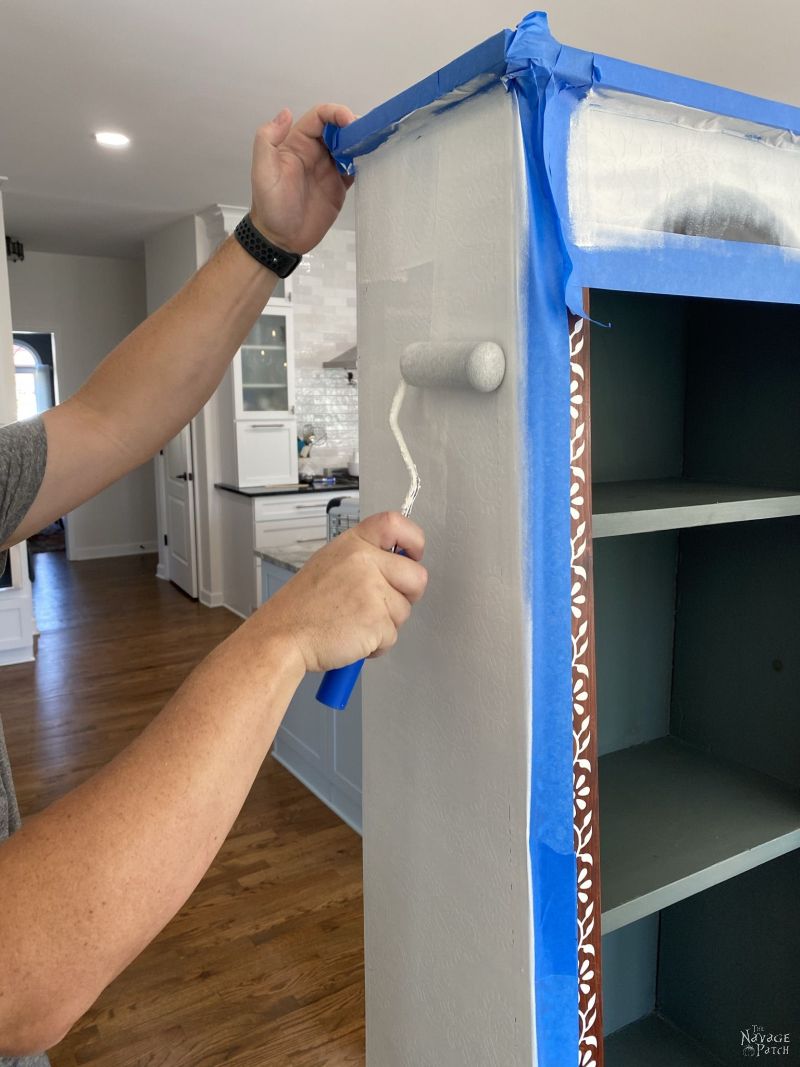
I only put a very small amount of primer on the roller.
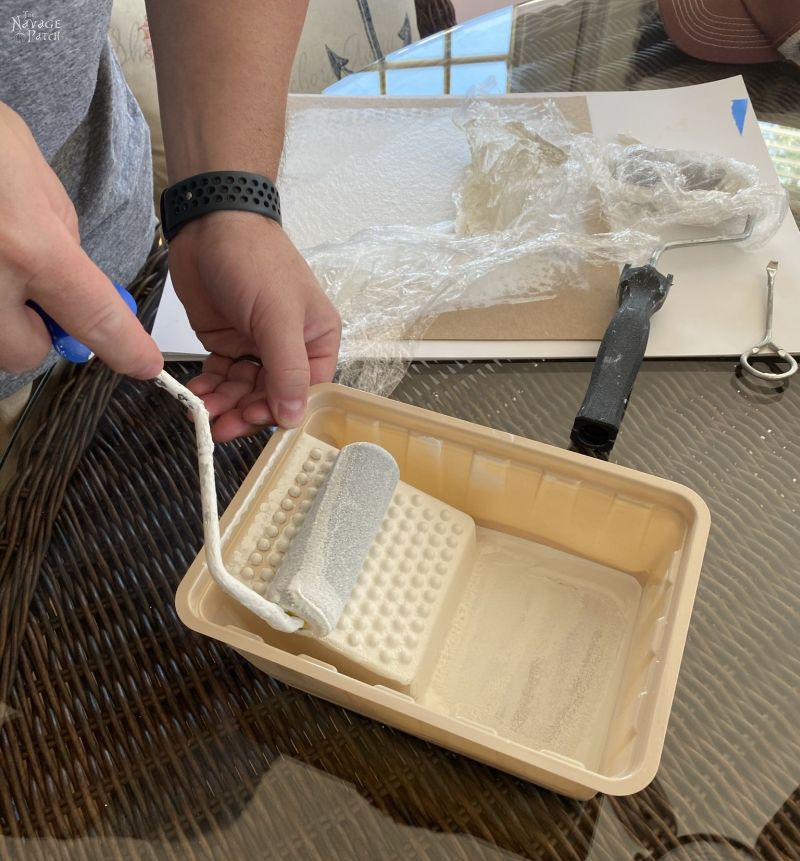
Before priming (and painting), I first rolled a piece of cardboard to make sure I got any excess off. I wanted just the barest coating of primer – just enough to cover the existing finish.
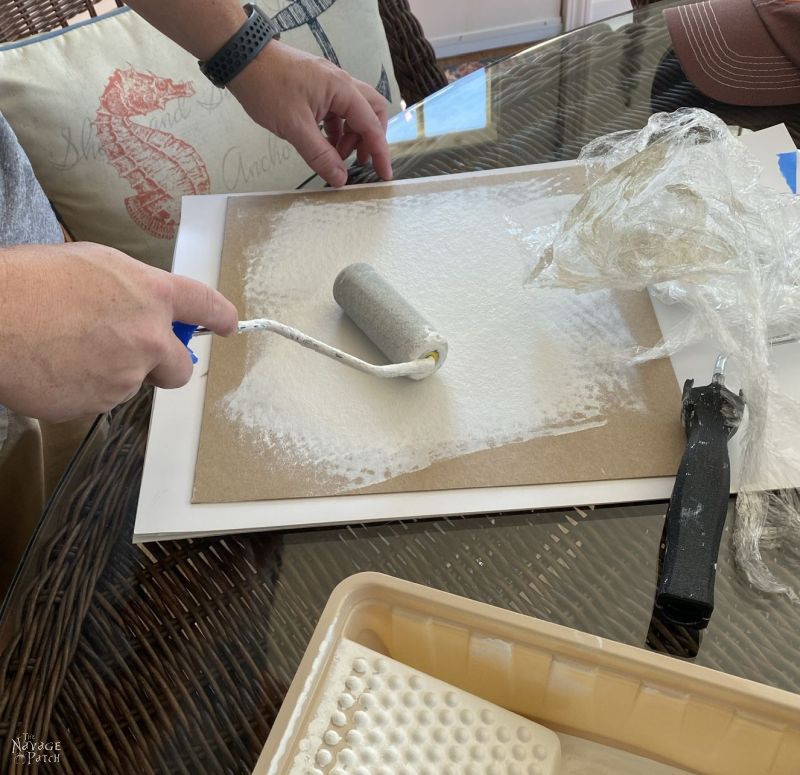
An ultra-thin coat is all that’s needed or wanted for a stencil project like this. With so many intricacies, bleed-under is big risk.
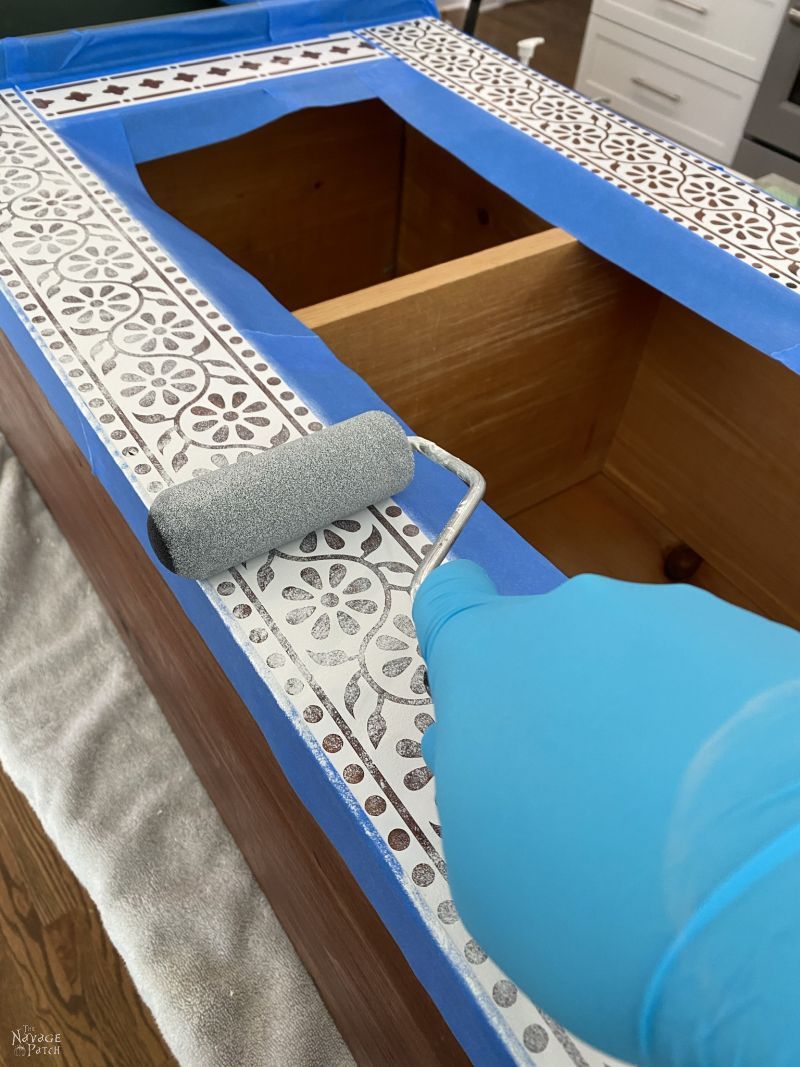
But by sticking to one very thin coat of primer and 3-4 thin coats of paint, you can entirely avoid bleed-under.


Here’s the top of the cabinet, primed and ready to paint.

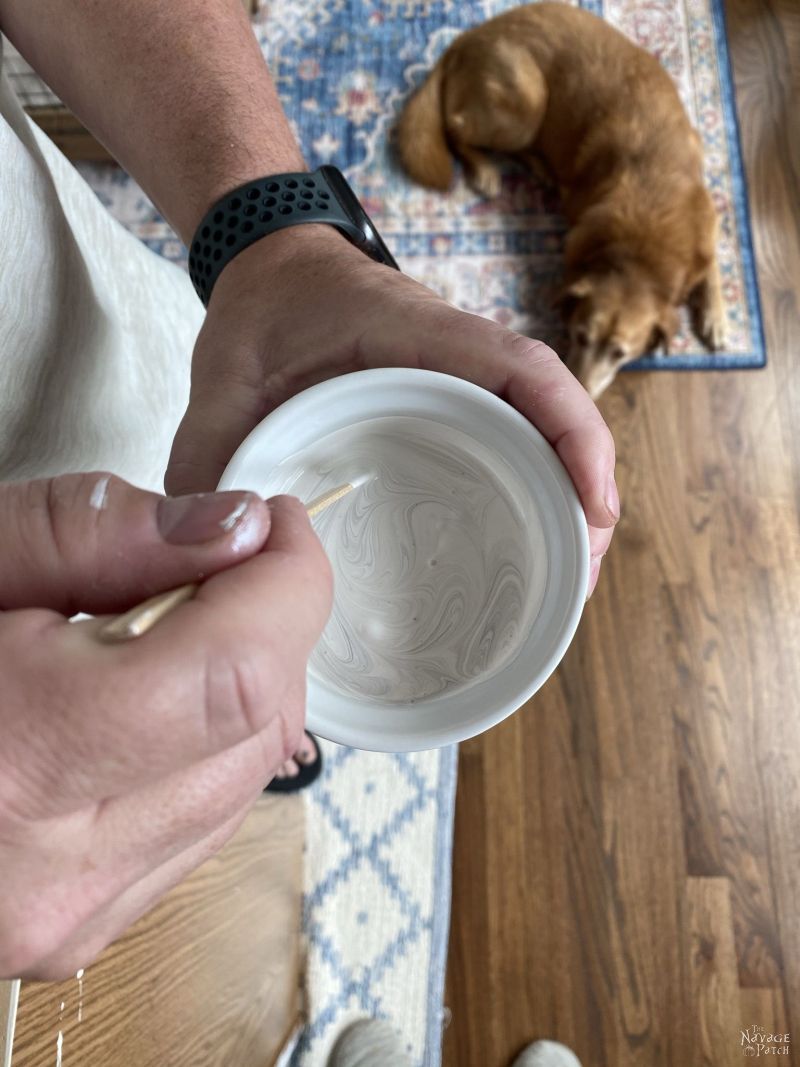
To give a little interest to the bone inlay effect, I added some pearlescent medium to the paint.


Like with the primer, I used only a small amount of paint on the roller and made sure to remove any excess on the cardboard.
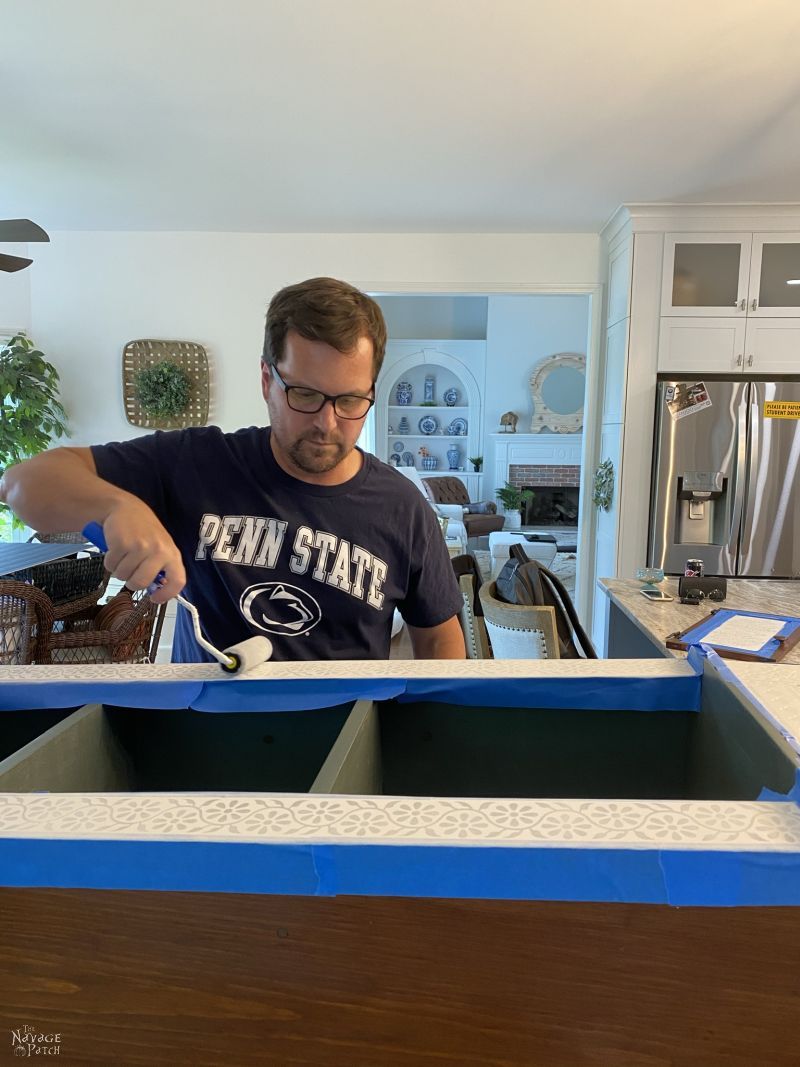
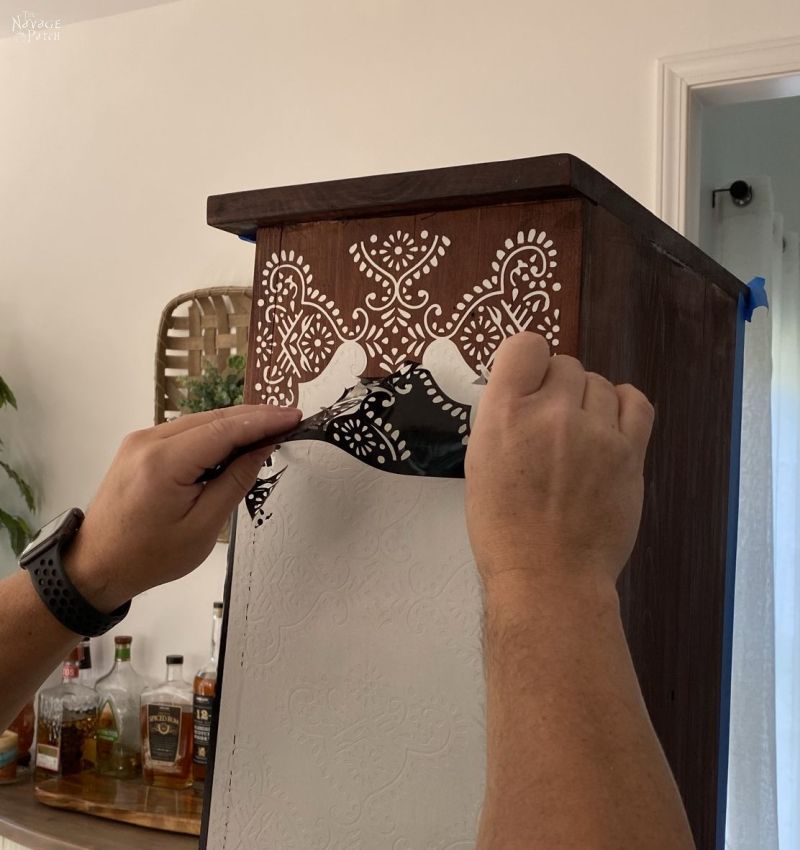
I applied 4 very thin coats of paint. The beauty of thin coats like that is that once I finished painting, I was able to start right in on the next coat.

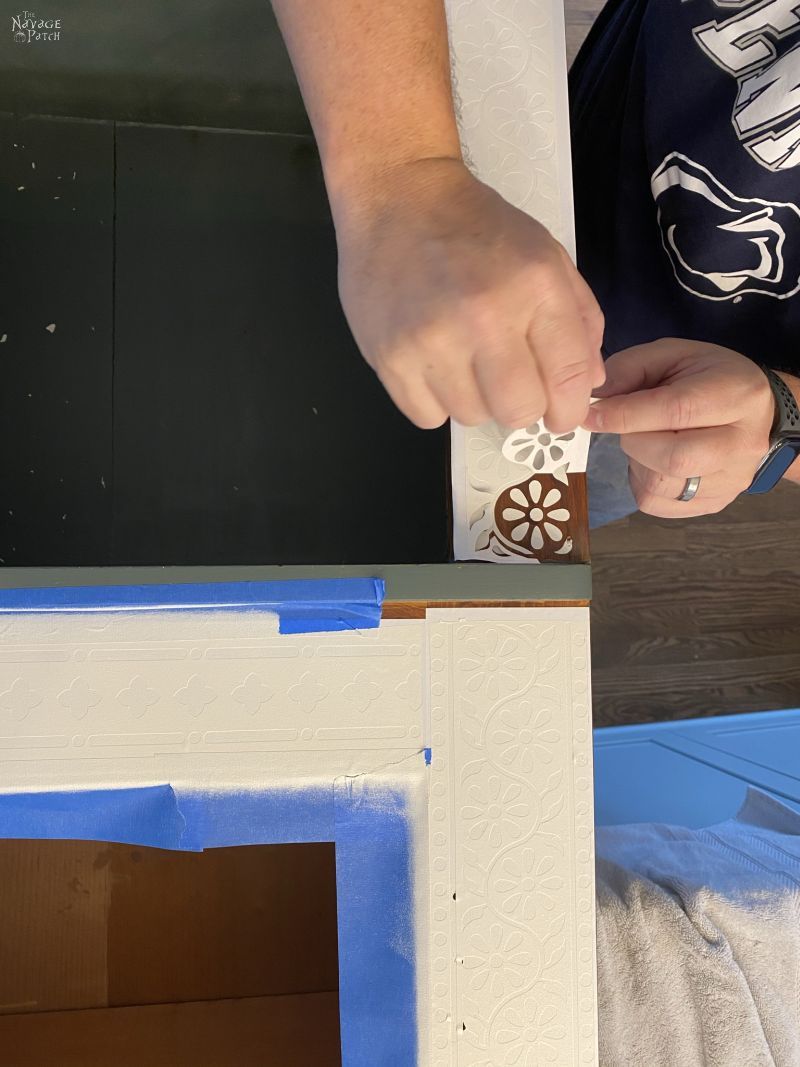
As soon as I finished the 4th coat, I started peeling the stencil vinyl.
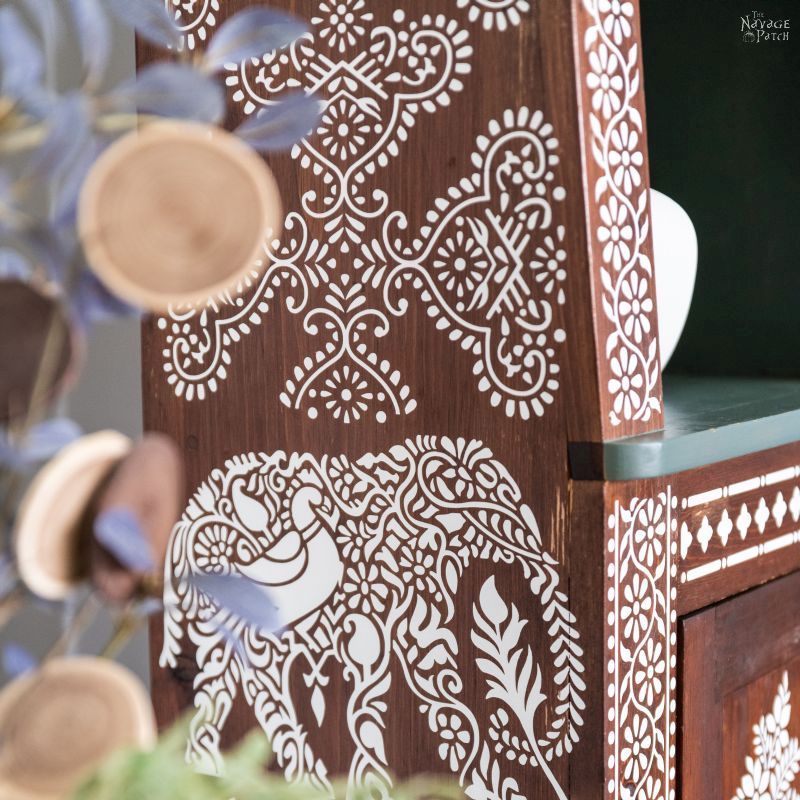
The stencil is perfect!


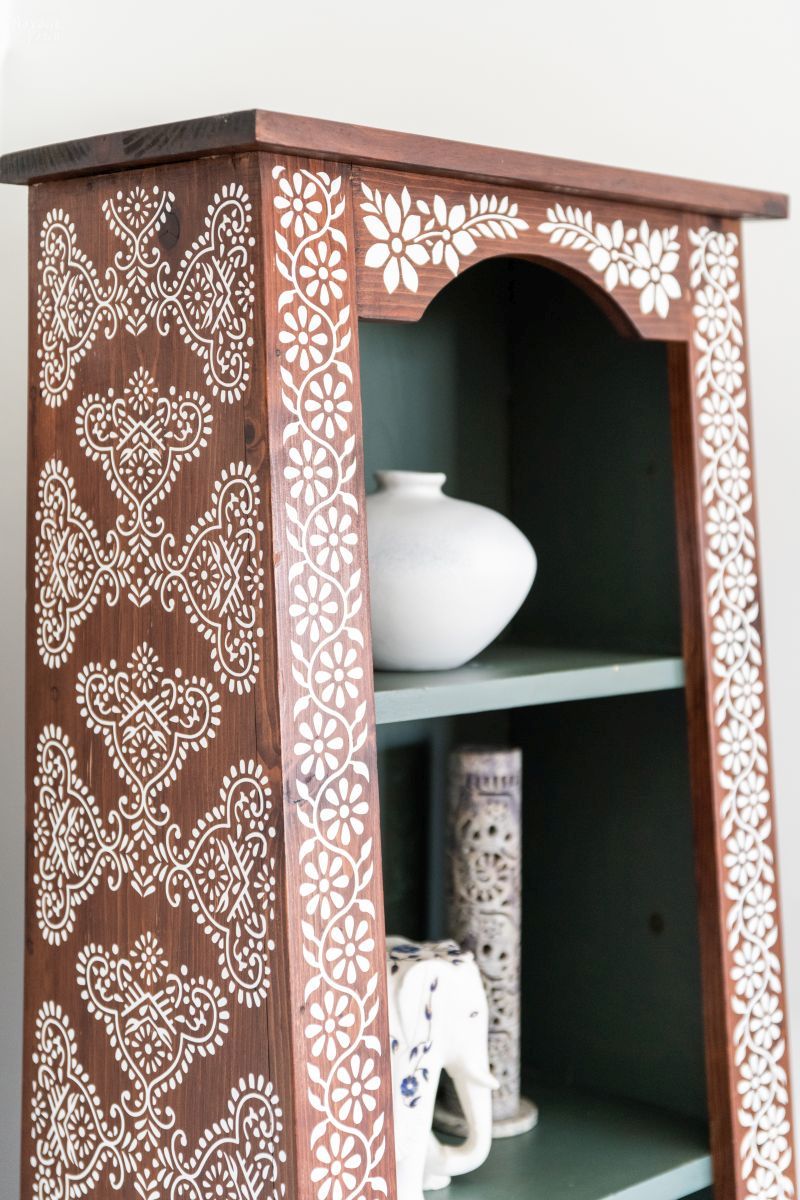
We still had stencils to apply to the sides, but this is how it looked after the first round.

Beautiful!
Here are the side stencils after priming.
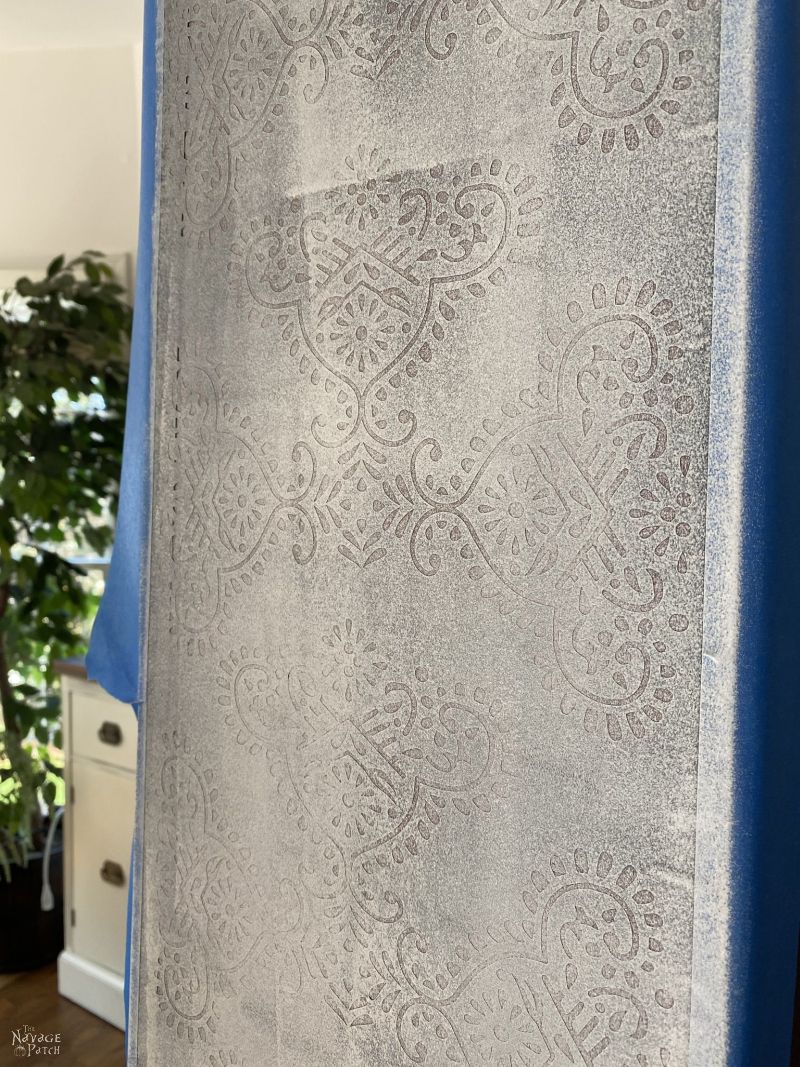
I followed the primer with 4 thin coats of paint, just like I did with the front stencils.

Peeling off the stencil – it looks amazing!
Though there was a lot of weeding, the stencils were made possible because of Cricut Maker 3’s ability to cut long swaths of Smart Vinyl. This machine is a game-changer for crafters and DIYers. So many awesome possibilities!
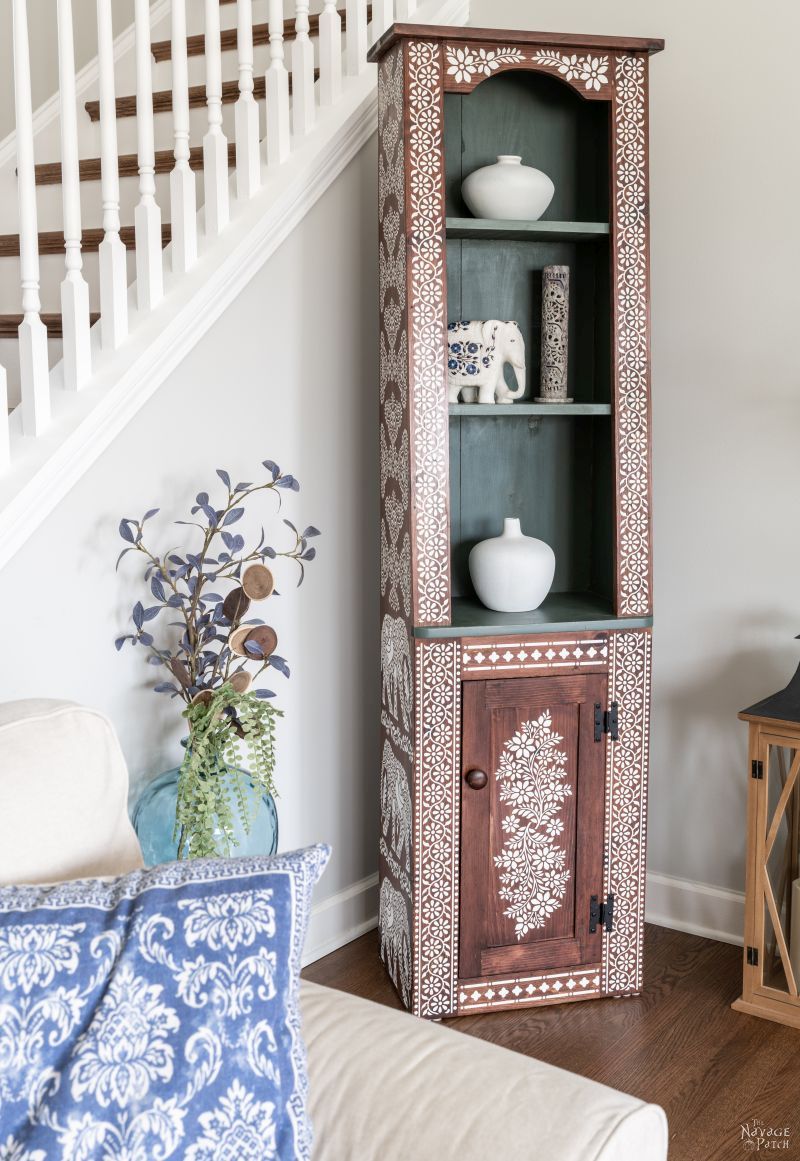
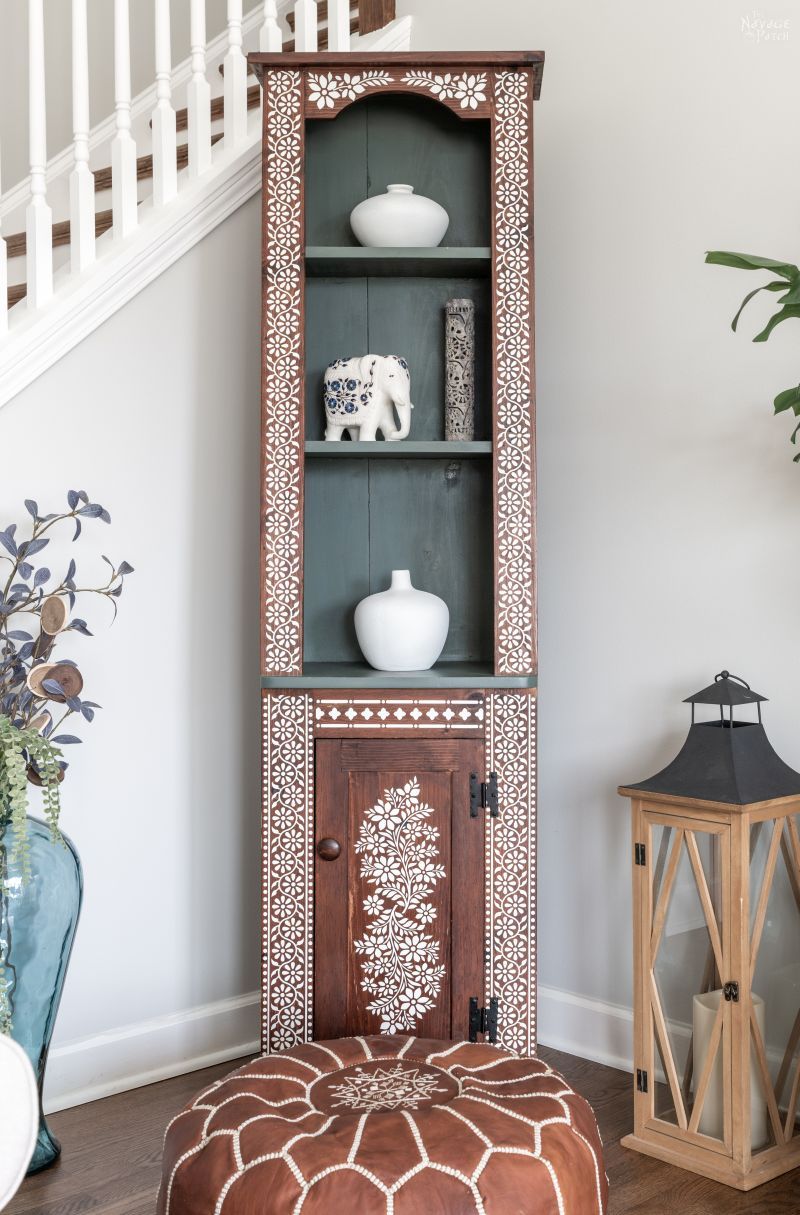
As soon as I pulled the last bit of vinyl from the cabinet, Handan and I carried it to its new home in the living room.

I love the elephants, and Handan is totally gaga over them!


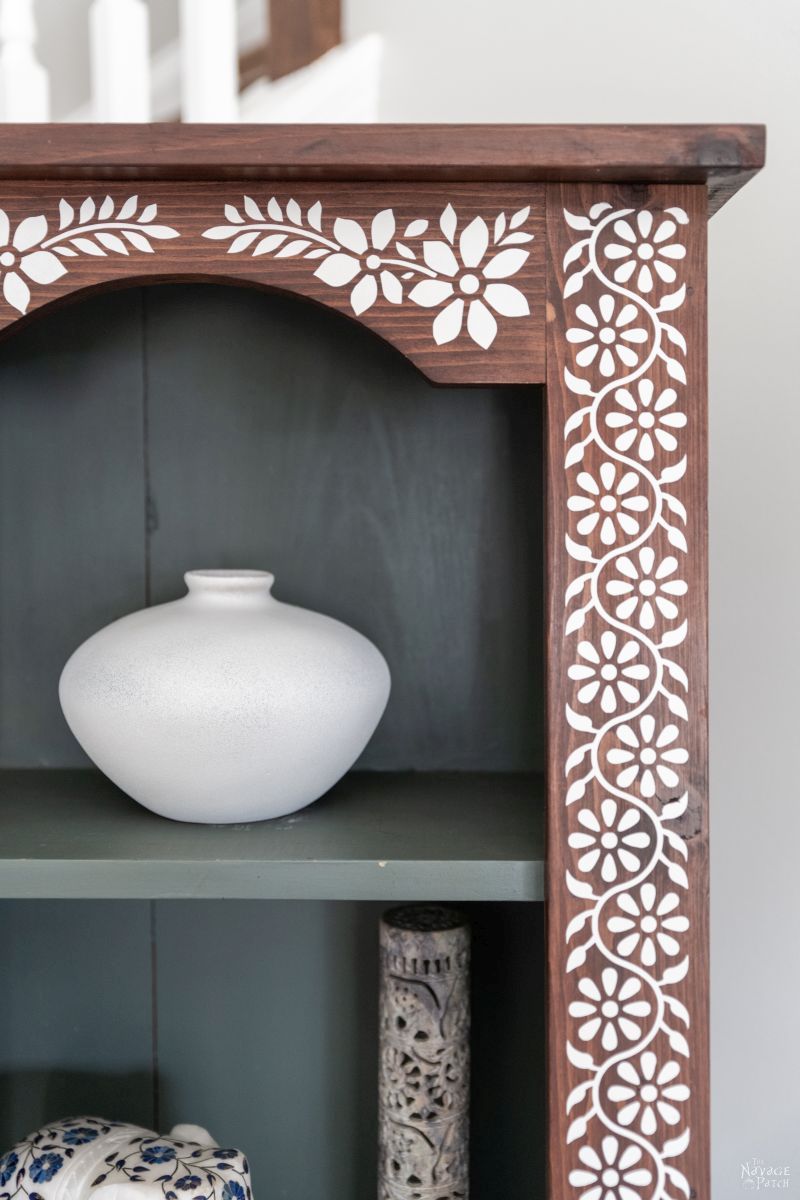

Such an incredible change! It’s like an entirely different piece of furniture now.


What do you think about this DIY bone inlay technique? Is it something you’d like to try in your home?
We love to see our printables out in the wild! If you display our free printables in your home or use our free SVGs in your projects, and take a picture and post it on Instagram, be sure to tag us – thenavagepatch
FREE INDIAN BONE INLAY SVG FILES
We created today’s FREE Indian Bone Inlay SVG designs as PNG and SVG files which are resizable and compatible with Cricut and all other cutting machines.
Now go ahead and click on the button below to download today’s freebies – they are all in the “SVGs – Stencils” and “Home Decor” section of TNP VIP Lounge.
take me to your
amazing freebies library
If you’re not a Navage Patch VIP, you won’t be able to access our Freebies Library. But that can be easily fixed! Subscribe for free on the form below and become a Navage Patch VIP. Once you subscribe, a password will be sent to you in our Welcome email, and that will give you access to TNP VIP Lounge [Freebies Library].
Share it on Pinterest & Facebook!

Absolutely beautiful .
Thank you, Lynn!
Beautiful!!
Thank you, MonaLisa! 🙂
You do beautiful work. I hope Handan knows that you’re a “Keeper”.
Of course I do! He is the best! 😀
Love it. How can one purchase just the stencils? I don’t have a machine and cannot afford one at this time.
Hi Lisa, thank you so much! Unfortunately, we don’t have physical stencils for sale – we just give away the stencil files. I’m so sorry!
Wow! Beautiful❣️ You did it again, Greg.
Thank you, Phyllis! I couldn’t have done it without Handan’s stencils!
Beautiful!
Thank you, Madeline!
Oh that’s stunningly beautiful Greg, you and Handan are so clever. I was scrolling down and being a bit sleepy, for a moment I thought good grief Greg has a topknot, then I realised it was a plant on the shelf behind you 🙂
LOLOLOL! The moment I wear a man bun, I give you full authority to call the police and have me hauled off to jail! :D:D:D
Holy mackerel! THAT! That is freaking gorgeous! You guys are SO darn talented! Handan, your design skills are out of this world, as are you skills to carry out said designs, Greg! Also, that little commercial you made for Cricut? Why aren’t they employing your skills! ?
Anyway, whew! Amazing!
Oh, and your ability to spin the tale of your daily adventures… hilarious!
Wow, thank you, K! I was slouched over my keyboard when I started to read this comment, but now my chest is puffed out with pride! 😀 Have a great one!
I can’t stand reading blogs or tutorials However, yours are absolutely hilarious. The salt part had me cracking up. Thsnk you for the awesome inspo, this gave me an idea on what to do with the bookshelf I had to buy from IKEA but its purpose now is holding 2 dead plants and reusable grocery plants. The bookshelf thanks you!
Thank you so much, Ashley! Good luck with your IKEA stenciling! 🙂
Wow! That looks amazing!
Thank you, Audra! 🙂
Please tell me you and Handan are available for hire! South Carolina is just a stone’s throw away from Georgia 🙂 Your design aesthetic is beautiful and it’s a joy to watch and learn from your talents. And, I’m never not smiling (or laughing) when I read your posts! Kudos to you both and keep up the amazing work!
Thank you, neighbor Erica! 🙂
This is so cool!!! I don’t have the Cricut (I did buy one for my daughter), but I had to download the elephant so I could try to translate it into quilting!
It is a beautiful design and would look amazing quilted, I’m sure!
Wow! I am also amazed that you are allowed to paint in your beautiful new kitchen and not in the basement or outside! You must be a really tidy painter!
I can be the messiest or the neatest, Janice – depends on the situation! 🙂
I have always been a fan of inlay furniture and you did a fantastic job! It has never dawned on me to use primer! Just bought a Maker (1) so I will be using slice and dice if I ever need long lengths. Btw, my husband would drop dead if I told him we were going to leave a piece of furniture “as is” LOL.
Thank you so much, Jean! Yep, you can absolutely make these stencils with a Maker 1 – just need to do a little taping. Good luck with your new toy – may it bring you much joy! ps – your husband and I are on the same page!
Drop dead gorgeous! I am of Indian Heritage and have pinned away such projects for a while (starting with the little tray of course to test my skills lol) but you’ve taken this to a whole new level! Just when I think I don’t want to buy new gadgets that are pricey, you’re making me drool over that cricut! I have the silhoutette Portrait which can work with long viny perhaps? It can do long but only 9″ wide….so hoping I can put that to good use. I keep thinking one of these days, you and Handan will have your own HGTV show like the Gaines! Anyone with this much talent should! I am blown away by Handan’s design talent, Photoshop guru I take it? something in my to do list to get better at. Last but not least, I am gonna steal that SC lady’s idea and as that you come over and do our home when we move to a bigger home. Bcoz we are much closer than SC, like 20 mins away from you talented folks!! Every time we pass by Suwanee, I squeal “Handan and Greg live here” – like my husband hasn’t heard that a 1000 times by now. If we were to hire your talent, we would even thrown in some great Indian food as we are foodies! Anyhooo, your project is outta this world!! Keep inspiring me.
Thank you, Rupa! Your Silhouette should work just fine for this 0 you can just scale the stencils down to fit. So where so you guys live? You may have told me once before. Where are you looking to move? Suwanee is a great town! 🙂
ummmm…. like my 1st comment wasn’t long enough, I was just gonna say don’t feel bad you didn’t bring the inlay work furniture from India. Inlay work furniture items tend to have warping and inlay pops up in dry weather like CT or other northern states. I have eyed/drooled over them and brought very small items while my friends imported a whole dining table with 8 chairs! Holy cow I say. But something to keep in mind 1) Ivory inlay (from tusks) is no longer used (that’s a good thing) and people cannot export any ivory items outside of India, period. 2) Camel bone inlay is more popular too although most can’t tell the difference.
We almost bought a marble dining table and chairs and had them sipped to the US. Thank god we didn’t do that, lol!
I know you’re gonna charge me now for this 3rd comment! Sheesh, look what you’ve done to me, crawling out of the hiding space to comment thrice! THANK YOU SOOOO MUCH FOR THE GORGEOUS DESIGNS BEING SHARED SO GENEROUSLY! Anyone else would’ve charged us an arm and a leg. Again, I think you guys should start marketing/branding which will probably happen right after you star in the HGTV episodes 🙂
You’re so very welcome, Rupa – it is our pleasure!
Greg,
Your entire project turned out amazing, and I love, love, love the elephants.
Thank you, Marian! 🙂
Fantastic. I love your Diy’s. You never stop amazing us. Thanks for sharing such talent. I would love have your beautiful work in our home
Love this!! I finally broke down and bought an Explore Air 2 when they went on sale for $169 a few months back! What vinyl should I use for stenciling? Permanent or removable? Is permanent really permanent and would it be better for avoiding paint bleed?
We like removable better, and for use in the Maker 1 and Explore Air 2, our favorite stencil vinyl is Oramask.
Thank you so much, Ivory! 🙂
Wow, I always love to see what you are both up too. I have a dark China Hutch that we are about to move all the way to Florida Gulf Coast from the snowy Midwest. I keep thinking it to dark for our new beach home we are building. I hate to sell it as you just can’t buy good furniture now day’s. We use it as our bar area in our family room here.
This idea will be perfect once settled and I can see in our new home and find a design for the beach life.
I need to find your pod moving story again. I have to figure our a van line or pod.
Thanks for all your fantastic blogs.
Your welcome, Teresa! Ooooh, I’m so jealous…the Gulf Coast sounds awesome! Enjoy your new home – I think you’re going to love it there! 🙂
Absolutely beautiful, thank you so much for sharing your process!
Thanks, Leslie! 🙂