DIY Lighted Christmas Stars
These DIY lighted Christmas stars are easy to make, and they look great indoors or outdoors. Put one inside near the tree, and see how the room glows!
Ahhh…the first snow of the season! Although I’m not much of a winter person (too cold!), I love the first snow. For me, it is magical. It lifts me up, and I forget all about my dislike for winter. It also puts me into a Christmas mood. It’s like what they sing in the movie Elf: “the best way to spread Christmas cheer, signing loud for all to hear.” That’s how the first snow makes me feel!
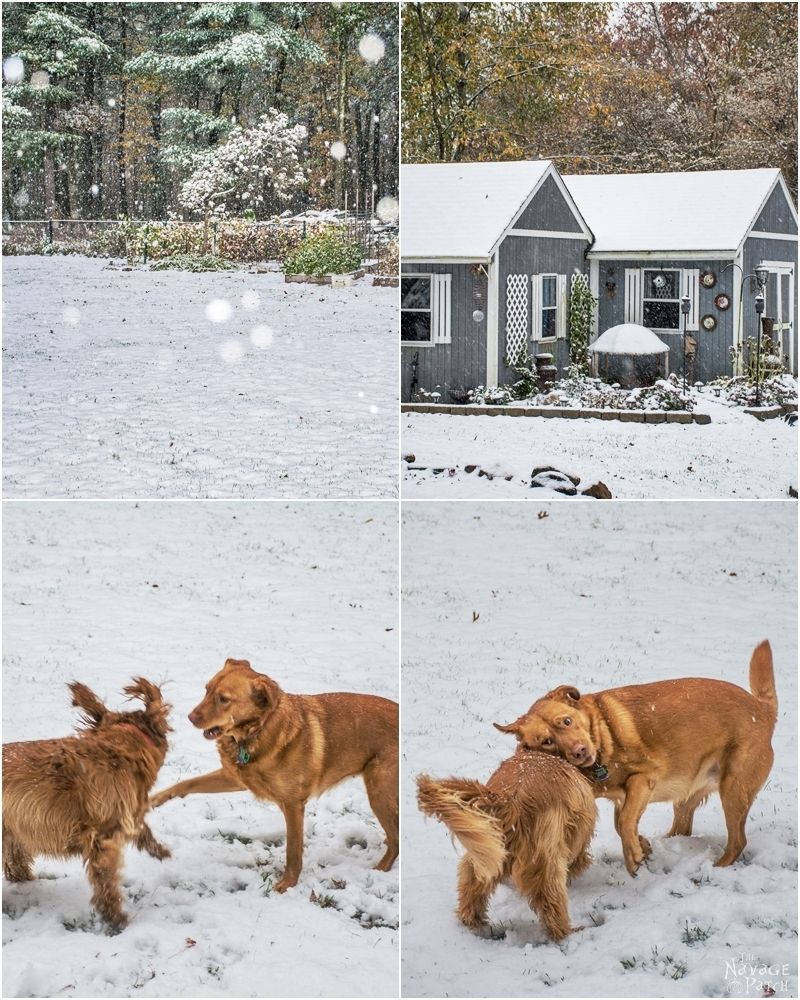
Are you wondering why I am yapping about the snow and Christmas when we haven’t even celebrated Halloween? Well…we just had our first snowfall! The photo above was taken two days ago! It only snowed for about four hours, but it was indeed so beautiful…and believe it or not, that was more than enough to put the Christmas bug in me!
Now that all I see is red, white and green, and I can’t stop singing (which, by the way, annoys the heck out of Greg, as it drains all the Halloween hype out of him…hahahaha!), I thought I should share my DIY Lighted Christmas Stars with you.
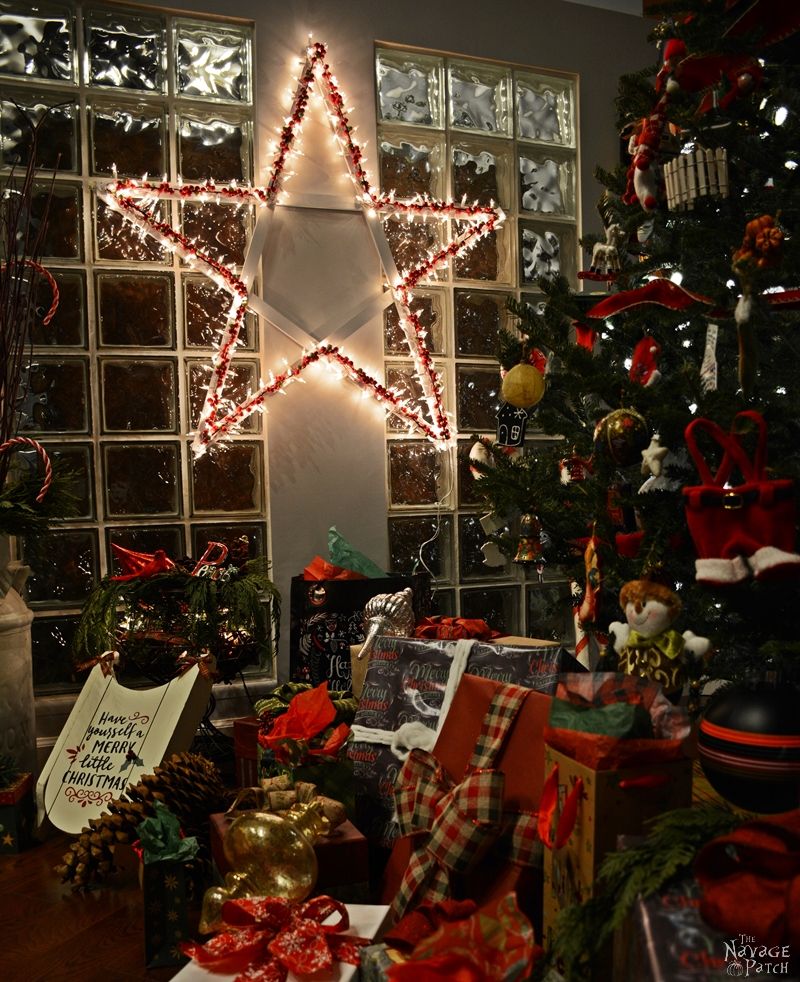
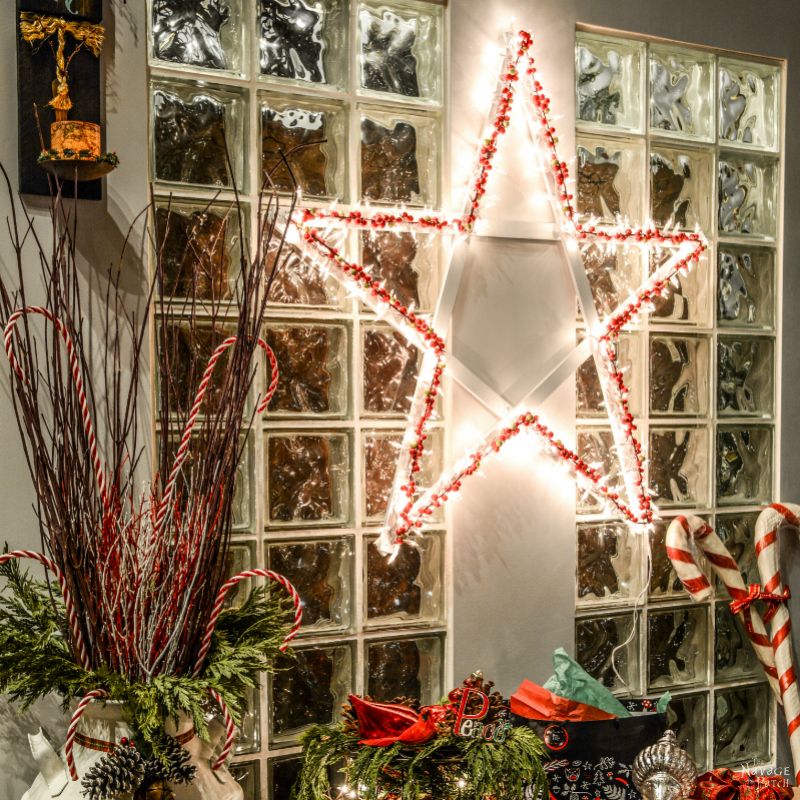
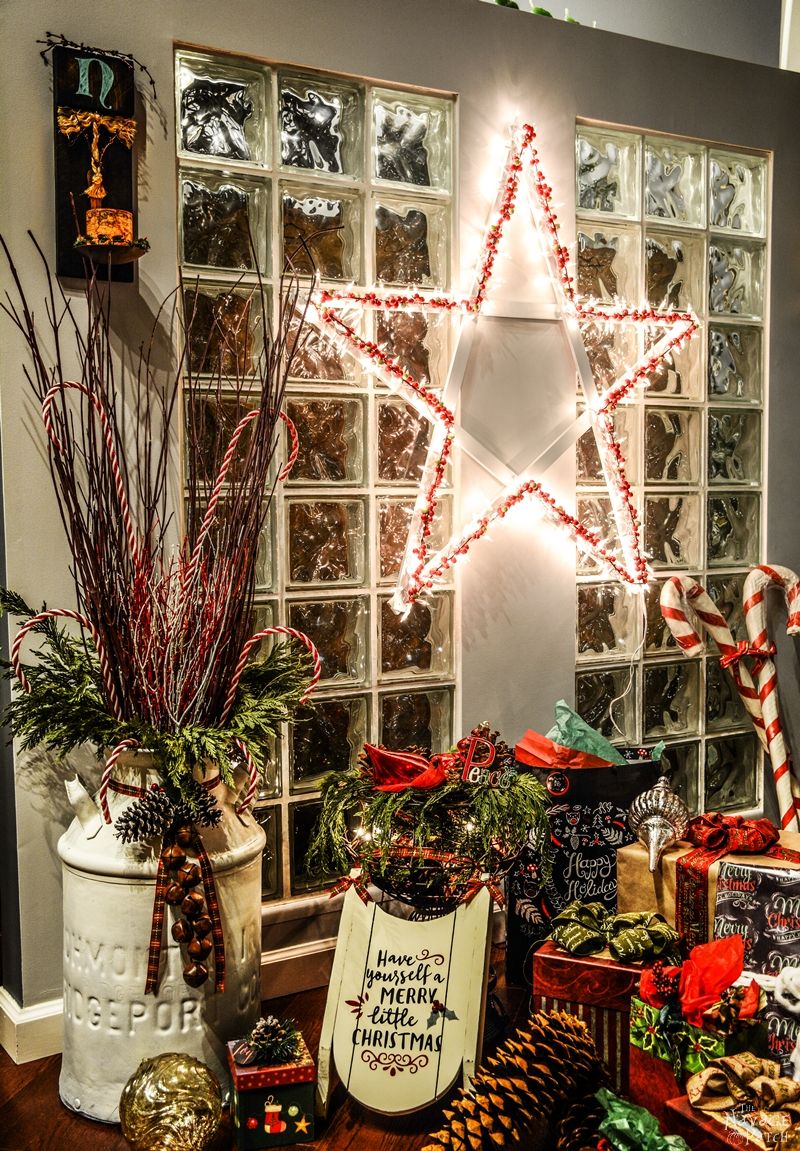
As we are yet to put any Christmas decorations up, I had to use the pictures from last Christmas.

I hope these pictures are good enough to inspire you, because this one really is an easy-peasy project. And when I say it is easy, I mean it is as easy as hammering some nails into wood.
Ok, ok…I am done with my yapping, so let’s get on with the tutorial, shall we?
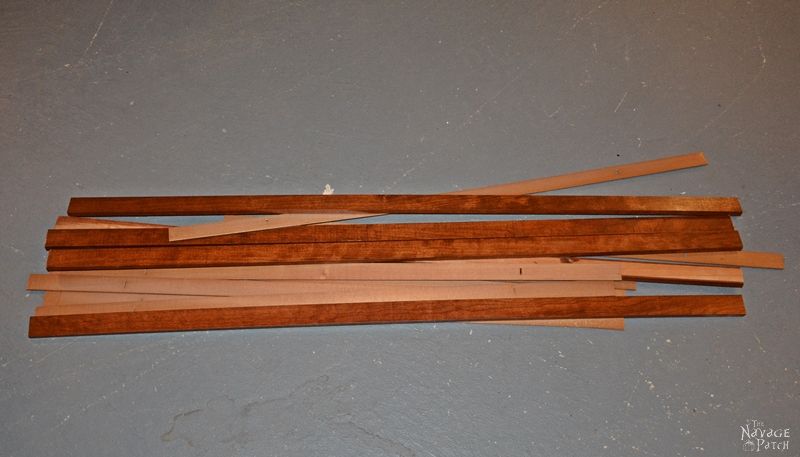
You will need 5 thin wooden slats cut to whatever length and width you desire. I used 4 feet long and 1 1/4 inch wide wooden slats, as I wanted my star to be pretty big but not very bulky. The thickness of the slats can vary from 1/4 inch to 1 inch. But you don’t want any thicker than 1 inch, because the thicker the wood is, the harder it becomes to work with. Besides, the star would look pretty bulky with thick wood. My slats were 3/8 inch thick.
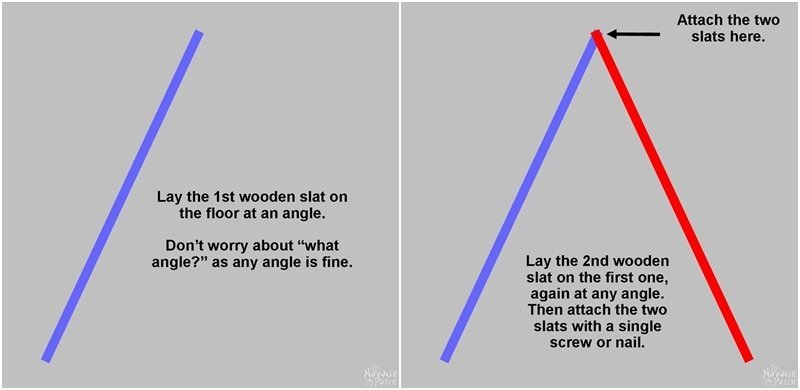
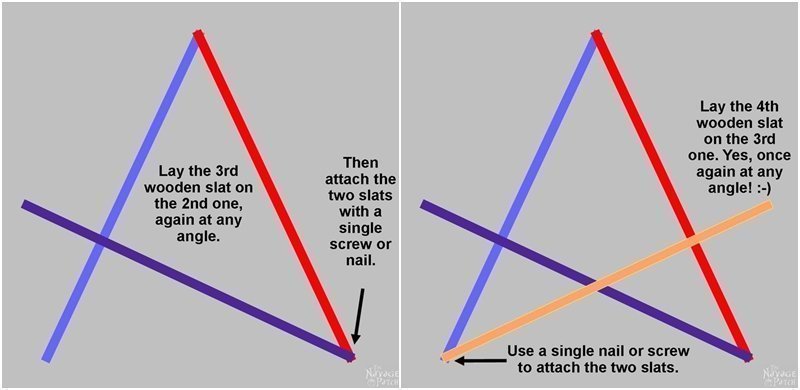
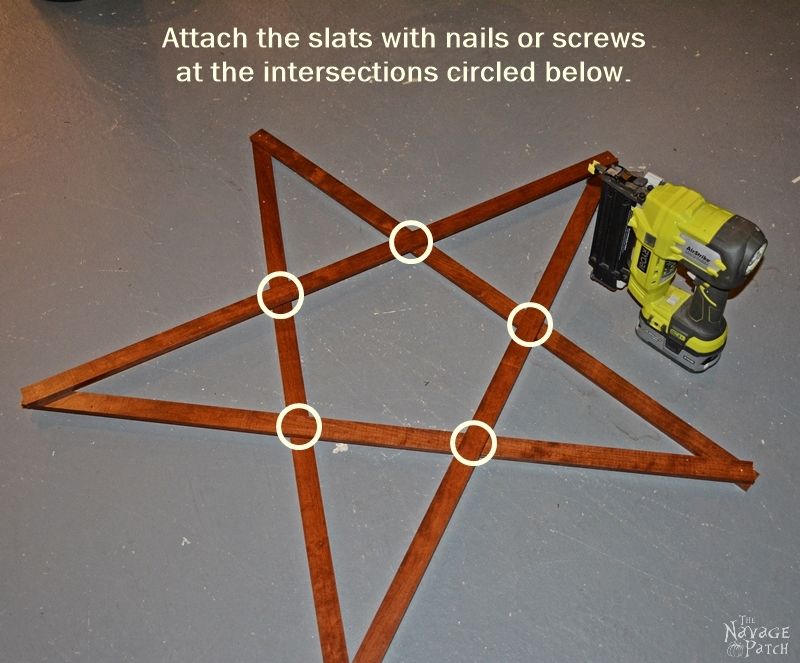
Once I had my slats ready, I laid them on the floor to create the star shape. Now here are some hints for you not to sweat too much when trying to achieve the perfect star shape:
- Work slat-by-slat, and don’t worry about getting the shape or angles right when you lay your slats on top of each other. That is something you’ll be able to correct at the very end. I promise!
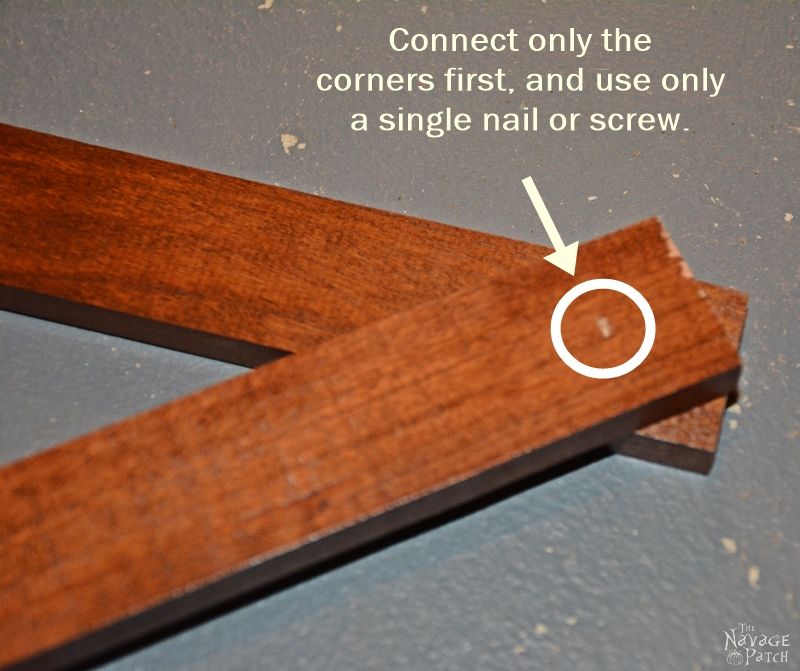
- First, start with securing the corners. Do not secure the inner intersections until the very end, because that will make the slats rigid and will not allow you to correct the angles at the end.
- When securing the corners, use only a single nail or screw. By doing so, you are allowing the two slats move so you can correct the angles at the end.
- If you have a brad nailer, it makes everything even easier and quicker. If not, just use normal nails or screws.
Now that we have the hints out of the way, let’s create the star shape. As it is easier to explain with colorful drawings, I prepared the steps for you shown below:
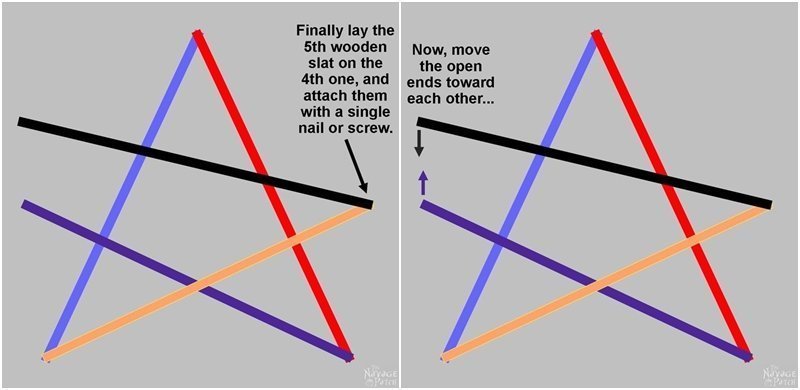

Did you get your star as perfect as possible? Good! Now, you need to secure your star at the intersections so it won’t deviate from it’s perfect state.
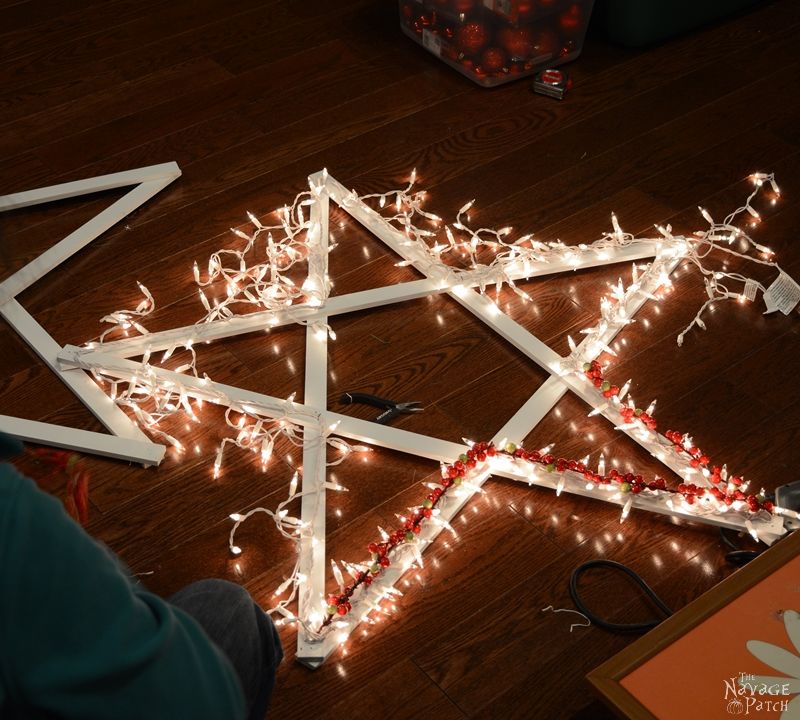
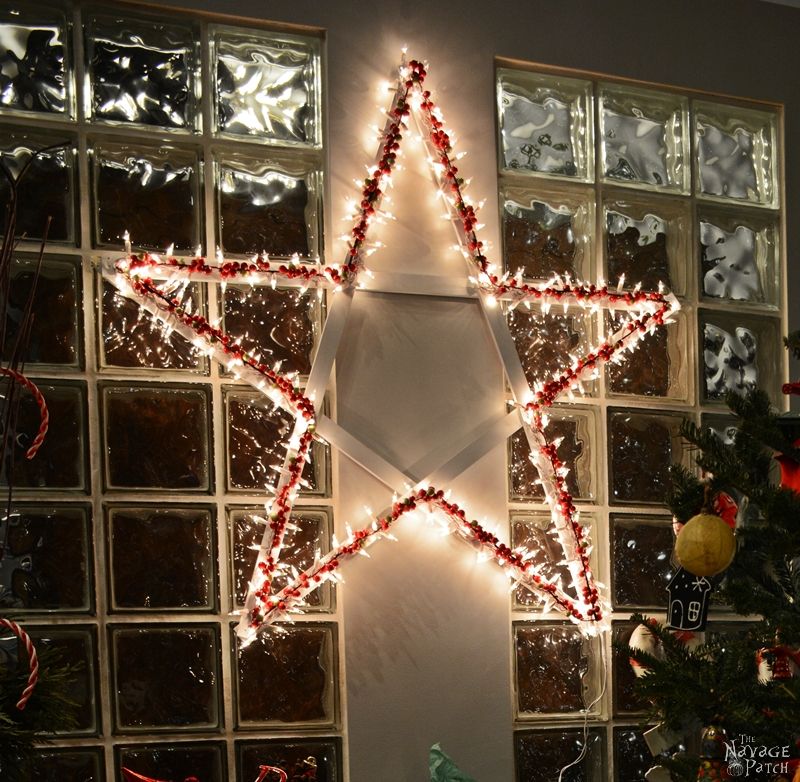
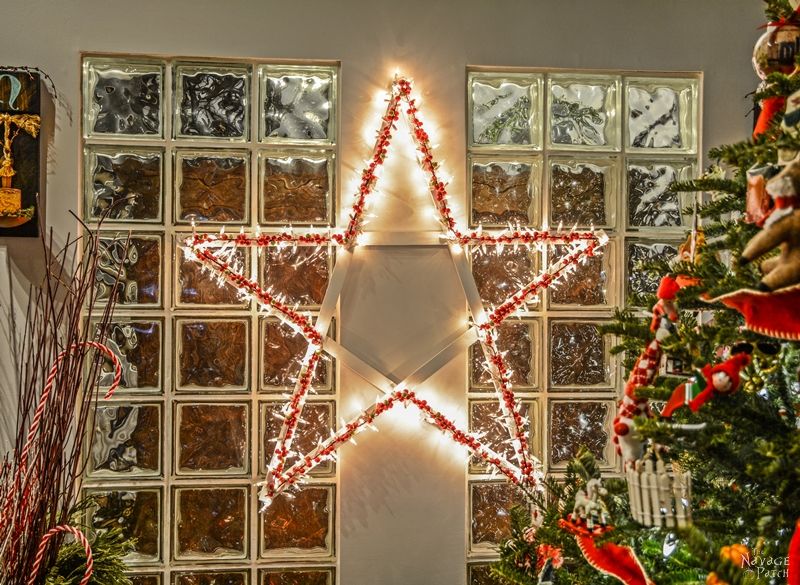
There you go! You see how easy it was creating that perfect star? Now, let’s carry on with the next steps: painting, adding lights and some berries or other embellishments on our star.

I wanted to use some colorful embellishments on my star like berries or colorful Christmas ribbons, therefore I painted mine with 2 coats of Rust Oleum’s flat white spray paint. But as you can guess, the color and embellishment choice is up to your desire. You can go with red, green or any other color you like to paint your star. Or you can even leave your star bare wood as all will look awesome in their own way.
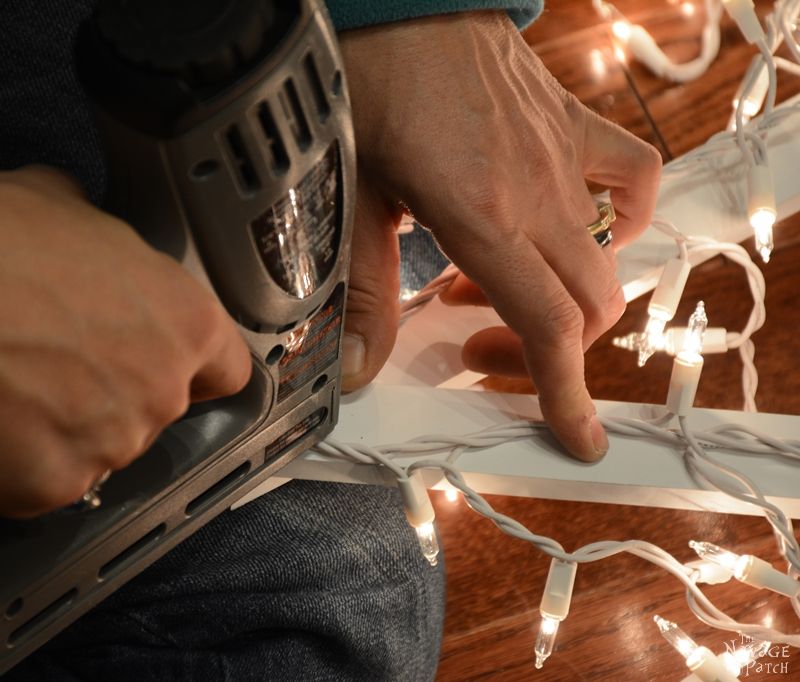
Once the paint dried, I started attaching Christmas lights on it. As I was going to use some embellishments I preferred using lights with white cables. This is also because I wanted the embellishments to stand out more than the cables. But again this is totally up to your desire – you can go with green cabled lights or whatever you have on hand.

I had two options when attaching the lights: either I was to wrap them around the slats or directly attach them on the face of the slats. I chose latter, because I wanted the back to be nice and flat as I was planning to hang it on the walls. But I have to say wrapping the lights around is the easiest way to go.
To attach the lights, I used my stapler gun and stapled the lights on. Before stapling them, I wrapped white electrical tape around the cable at the parts I wanted to staple. This was an extra measure to make sure I wouldn’t harm the cables by any means. You see…I know first-hand that you don’t take chances with electricity! When I was 9, I got severely shocked by 220 volt live air conditioner cables. Where do you think all my energy comes from? Hahahaha 😀 Joke aside, please always remember that electricity is not to be trifled with!
While I was working with the lights, I also started embellishing my stars. Using wires, I attached red berries on one and Christmas ribbons on the other.
What do you think? That was easy enough, wasn’t it?

I hope you give these lighted Christmas stars a try, because they make really great Christmas decor for indoors or outdoors, and they give a beautiful warm glow to any room you put them in. Perfect for the season!

Wishing you starry nights this holiday season!
Handan, xo
Looks & sounds easy enough that maybe I could even accomplish this! Thanks for the great idea and straight forward instructions.
It is indeed very easy! I hope you give it a try, because it looks awesome indoors or outdoors 🙂
How many strands of lights did you use. I’ve made 2 stars this evening and painted them gold. I will get the lights tomorrow. I’m going to do a 3 foot and 2 foot then use some thin pieces of wood to make it look like it’s shining out into the sky. Thank you so much for you pattern. Will do the crosses next week.
Hello Danni,
As I mentioned in the post, I made two stars: one with berries and one with ribbons. For the one with berries, I used icicle lights. It was only one strand, but because icicle lights have branches, I had to wrap all the branches onto the main line of cable. For the one with ribbons, I used 2 strands of normal Christmas lights (not icicle lights this time), which I then wrapped to each other so attaching it to the star would be easy.
This is so beautiful, vibrant and lively! Thanks for sharing with us at Funtastic Friday!
Thank you, Angie! 🙂
Hi Handan, What a beautiful star! I love how you used it last year – it all looks fantastic! Thanks for sharing! Blessings, Janet
Thank you so much, Janet! 🙂
LOVE this idea, Handan! I
Have the perfect spot for one between two windows on the front of my house! Pinning to share and bookmark – thanks for a great idea??
Oh thank you so much, Marie! They look really so lovely outdoors! 🙂
Wow, it is really beautiful
Thank you, Jasmine! 🙂
What a wonderfully simple project – had to pin it! Thanks for sharing on the Pleasures of the NW’s DIY party!
Thank you so much, Helen! It is indeed a very simple project 🙂
Lovely project. You did a great job of the tutorial as well. Its so well explained I can make it on my own. Pinning
Thank you so much, Leanna! 🙂
I enjoyed your snowy picture. Here I am in Florida trying to take pictures of some DIY swags I made and the lawn is green behind it! The star is beautiful! I might have to add one of these to our outdoor decor!
Thank you so much, Chloe! These lighted stars look indeed very pretty outdoors or indoors. 🙂
This is such a great idea. Thanks for sharing with us at Family Joy Blog Link Up Party this week.
Thank you, Charlene!
What a fabulous DIY project. I was scrolling through the photos at the party hosted by Vintage Charm and had to click your link. Your star certainly makes a big statement on the wall. I appreciate the instructions you provided — clear and doable. Thanks for sharing. Also, great photos of your dogs!
Thank you so much, Ann Marie! 🙂
Great tutorial Handan! The final product looks awesome 🙂
Thank you, Amanda!
This is both beautiful and creative! It’s one of our features at this week’s Funtastic Friday.
Oh wow! Thank you so much, Sherry!
How cute is that! We need some more decorations for our front yard and this definitely has me thinking. Thanks so much for sharing at the #happynowlinkup!
Thank you so much, Leslie! 🙂
This sure is a good idea! I am glad you shared the tutorial!
Thank you for linking up at our Home Matters Link Party!
Have a lovely evening,
Randi 🙂
#HomeMattersParty
Thank you so much for visiting, Randi! You too have a great weekend!!
Congratulations. You’ve been featured on this week’s Do it Yourself link up at the Pleasures of the NW! Stop by tomorrow when it’s live and grab your “I’ve been Featured” button!
http://www.pleasuresofthenw.com/do-it-yourself-craft-projects-link-up-31/
Thanks for sharing!
Oh thank you so much, Helen! 🙂
Beautiful! Looks like the Mr.s’ to-do list just got a little longer. Thank you for sharing with us this week at Celebrate Your Story, have a great weekend.
Lol. Thank you so much, Sandra! 🙂
Beautiful!! I want to make one too!! Thanks for sharing at What to do Weekends! Look for your Feature next Thursday night! Congratulations!
Happy Weekend!
Theresa.
Oh wow! Thank you so much, Theresa! Wishing you a fantastic week! 🙂
Love it!! I cam over from Dishing it and digging it at Linda’s. Congrats on the feature!!! I love the picture!!!
Thank you so much, Pinky! 🙂
This is so gorgeous! Thank you so much for sharing with us at Dishing It & Digging It & congratulations on being featured this week!
Thank you so much, Angie! Wishing you a wonderful week! 🙂
I love this but do you have pics of the one with ribbons?
Hello Michelle, sorry for the delay on the response. Greg just posted his DiY Outdoor Christmas Gifts post and I was waiting for that so I could refer to that picture.
If you check that post (https://www.thenavagepatch.com/diy-outdoor-christmas-gifts/) you can see the one with ribbons in the last two pictures.
I love your star! And am so jealous you have snow already. It’s been too hot for me to get in the spirit.
Thank you so much, Kati! 🙂
Wow, snow already, looks you weren’t the only one enjoying it, your fur babies are having a ball 😉 Love the star you made Handan and the instruction were super easy to follow. Such a neat trick to straighten out the star when everything’s been done. That’s going to make life so much easier.
Thank you so much, Michelle! I learned that trick during my first star as I couldn’t get it in the perfect shape. What can I say, frustration teaches me to find the shortcuts and easy ways quicker than anything else 😀
Hey, Handan! Just wanted to let you know that we loved your lighted Christmas Star so much when you shared it at the #HomeMattersParty last week, we’ve HIGHLIGHTED it THIS WEEK! Hope you can check it out when you get a sec. Happy Friday!!!
http://ourcraftymom.com/home-matters-linky-party-113/
Oh WOW! Thank you so much, Michelle! I will definitely be there!! 🙂
This is so pretty I would NEVER take it down! But I love stars and they are all over my house anyways. Great tutorial. 🙂
Thank you so much, Audra! 🙂 Happy New Year!!
So nice, beautiful piece of art………..
Ugh, I see that this is a few years old, but hoping you can answer my question. Where do you get the wooden slats? I’ve googled, looked at Lowe’s, etc and can’t find them. Can you provide a link or give me a hint about what I should look for at Lowe’s or Home Depot?
Hi Joyce, we found the slats we used at a tag sale, but you could try yard sticks. They’re cheap and easy to find! That’s what we used for our lighted pine cone star –> https://www.thenavagepatch.com/diy-lighted-pine-cone-star/
thank you. I am planning on making both stars. I will continue to hunt for the right size slats.