DIY Moroccan Candle Holders
These DIY Moroccan Candle Holders are a fantastic Cricut Maker project, and you won’t believe how gorgeous and exotic they look!
Since I was small, I’ve been fascinated by the exotic beauty and mystery of Northern Africa and the Middle East. As a boy, I only saw in movies and cartoons the romanticized version of the region: flowing deserts, winding camel caravans, robed nomads, bustling spice markets on dusty yellow streets and intricate and beguiling architecture.
When I grew older, I got the chance to live in the Middle East and experience some of those romanticized elements first-hand. And though reality never aligns perfectly with fantasy, much of Qatar was as I imagined.
Of all the elements of the Middle East and North Africa, architecture and interior design are most dear to me. The style is unparalleled in the West.
I love the use of privacy screens to define interior spaces. The screens are traditionally carved from wood, often with incredibly intricate patterns and repeating geometric motifs.
In the West, we’ve come to associate these screens with Morocco, a country on the northwestern coast of Africa that has shorelines on the Atlantic Ocean and the Mediterranean Sea.
From the cultural crossroads of Marrakesh, to the bustling port of Casablanca to Tangier, the gateway to the Mediterranean, Morocco has influenced and been influenced by the countries and cultures around it for millennia.
When I think of MENA (Middle East/North Africa) style, I’m generally thinking of Moroccan style.
Handan and I both love the Moroccan look. She’s been bugging me since we got our new deck to build a couple of Moroccan side tables.
I haven’t started that project yet, but I’ve been keeping an eye out for an opportunity to make something with a Moroccan influence.
That opportunity presented itself when I got my hands on a Cricut Maker.
When I learned that the Maker could cut thin basswood sheets, my mind straight away jumped to making something with light, specifically with LED candles.
I saw it immediately.
A Moroccan carved wood screen.
But smaller.
Much smaller.
I told my idea to Handan, and she jumped right on the Marrakesh Express with me.
She created the cut patterns for me to use with my Cricut Maker. Once cut, I would assemble a small base and frame and attach the Moroccan panels.
This project pushed the boundaries of my Maker’s wood-cutting capabilities, and in the process, I learned a lot about the ins and outs of cutting basswood.
Let’s have a look at how we made our beautiful DIY Moroccan Candle Holders.

DIY Moroccan Candle Holders
This is a sponsored conversation written by me on behalf of Cricut. The opinions and text are all mine.
DIY Moroccan Candle Holders SUPPLIES LIST
Affiliate links are provided below. Full disclosure here.
- Cricut Maker
- Knife blade
- 1/16 inch basswood
- Strong grip cutting mat
- Masking tape
- Free cut files available at the VIP Patch
- 3/8 inch square dowels
- 1/2 inch plywood or scrap wood for bases
- Super glue
- Wood glue
- Small paint brush
- Small clamps
- 220 grit sandpaper
- Spray shellac (clear or amber – your choice)
DIY Moroccan Candle Holders Cut List
- Bases: I used some scrap 1/2 inch plywood for the bases, though any scrap wood 1/2 – 3/4 inch thick would do. Since the small Moroccan candle holder faces are 5 inches wide, I cut the base to be 5 inches on one side and 4 7/8 inches on the other. For the larger Moroccan candle holder, I cut the base to be 5 3/4 inches by 5 5/8 inches. The reason for this will become apparent in a bit.
- Pillars: I used 3/8 inch square dowels for the pillars. Since I used 1/2 inch plywood for the base, I made the pillars 5 5/16 inches tall for the small candle holder and 7 5/16 inches tall for the large candle holder. This is the height of the basswood face minus 1/2 inch for the base minus 1/16 inch to keep the top of the pillars just under the top of the candle holders.
- Top support pieces: I originally made my Moroccan candle holders without any top support. But we discovered the morning after shellacking them that the thin basswood had warped along the top edges. To solve this problem, I cut some more dowels to fit between the pillars along the top edge. The lengths will vary depending on the actual thickness of your dowel. I found it was easiest to hold a piece of dowel next to the pillars and mark where to cut.
DIY Moroccan Candle Holders – Cutting the Faces with Cricut Maker
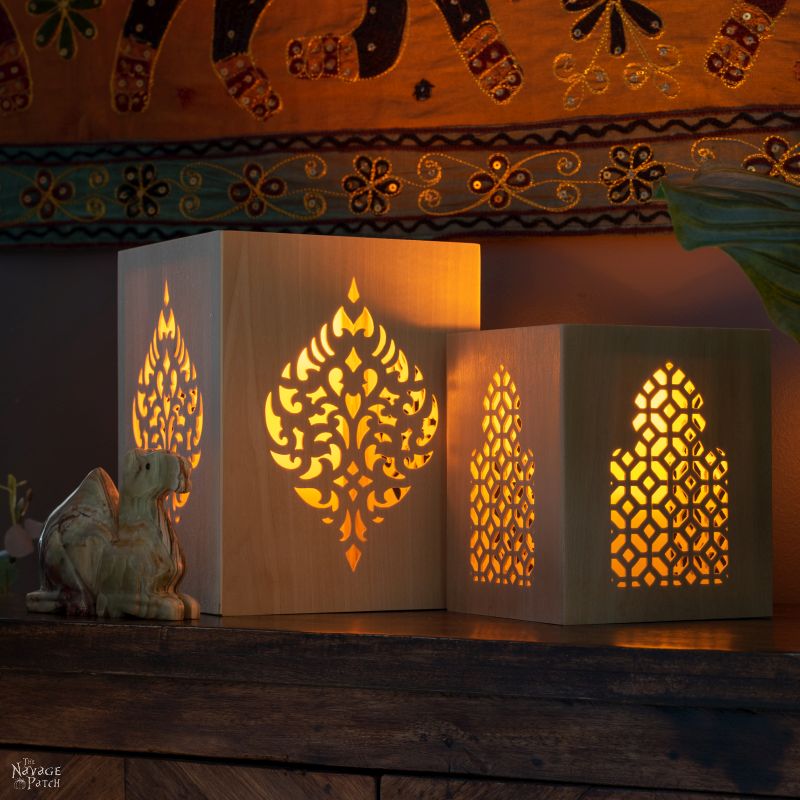
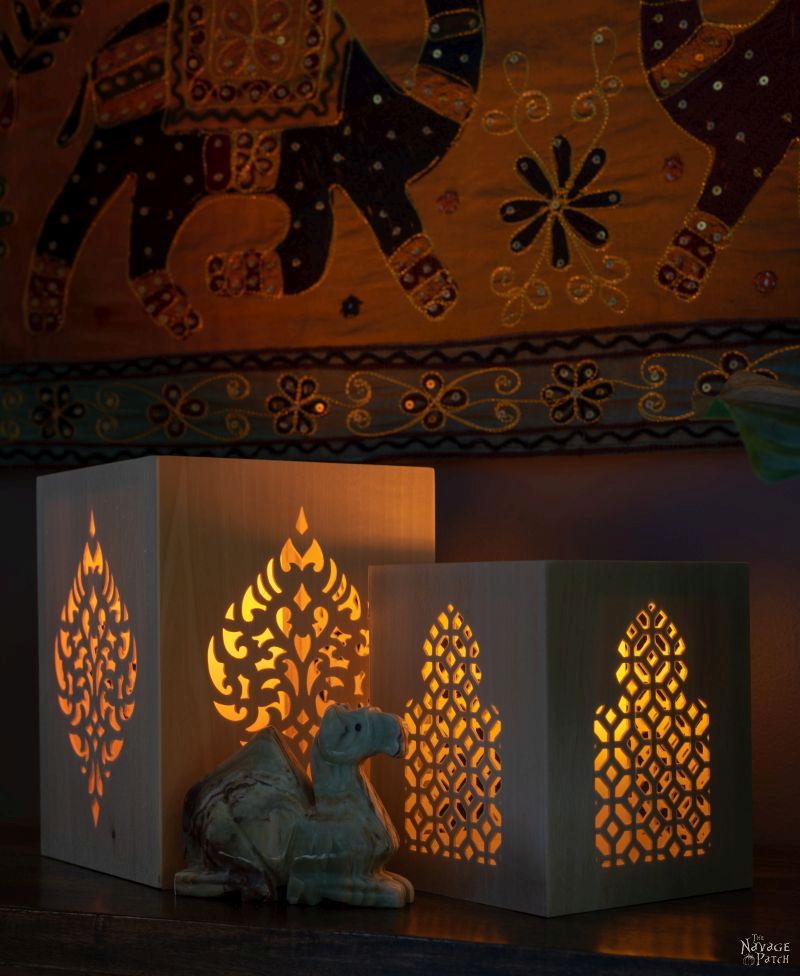
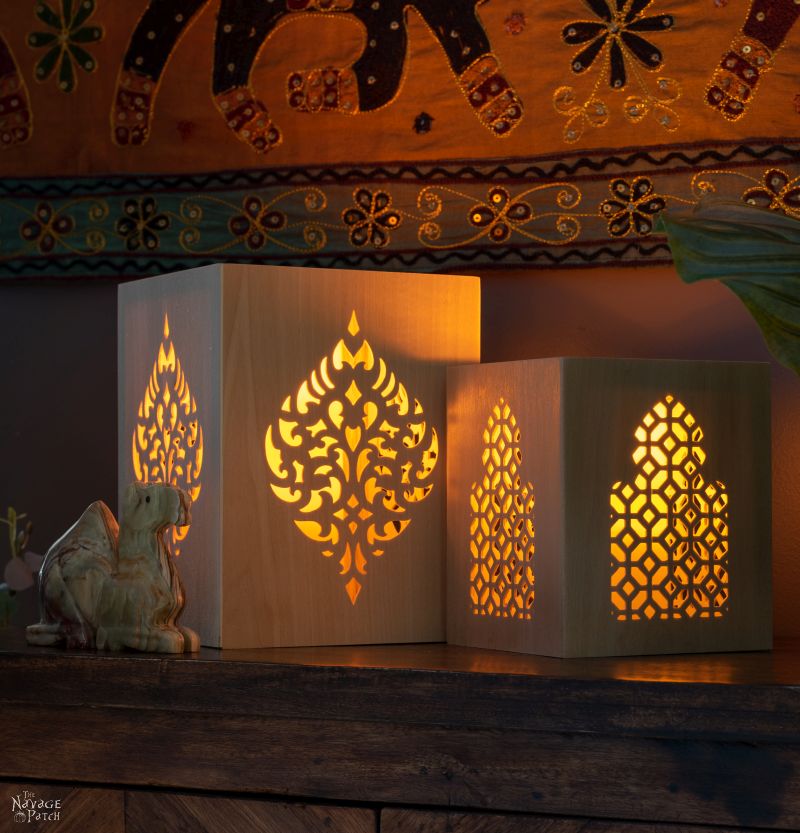
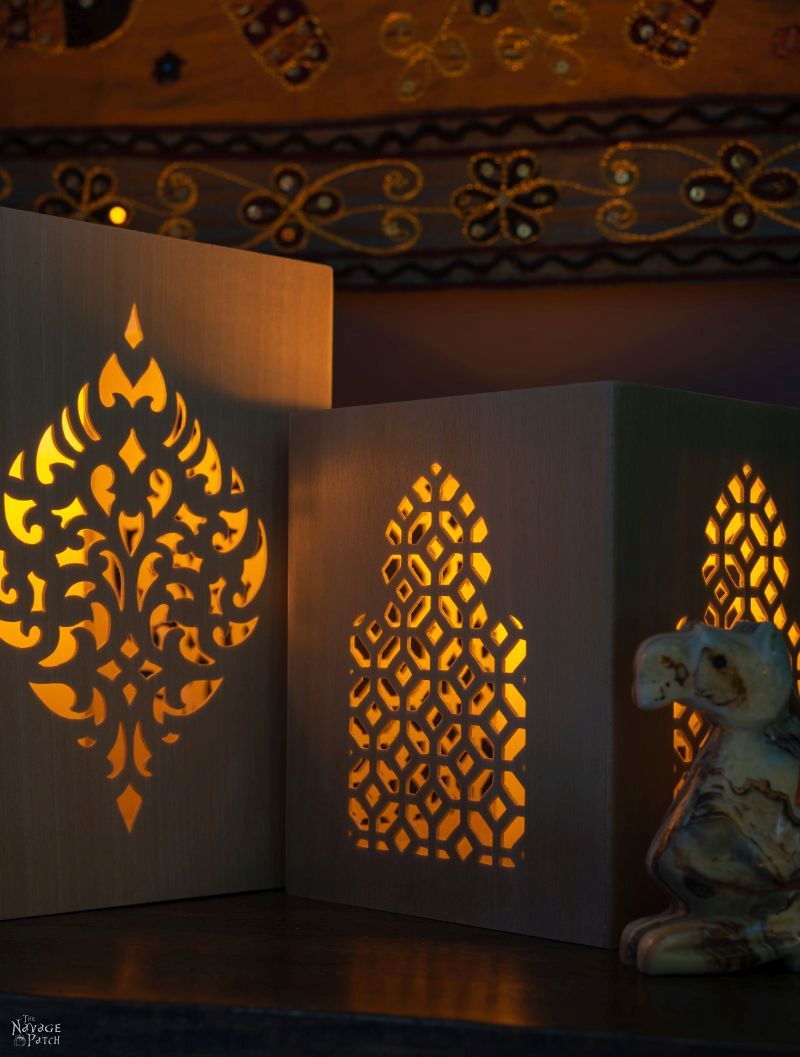
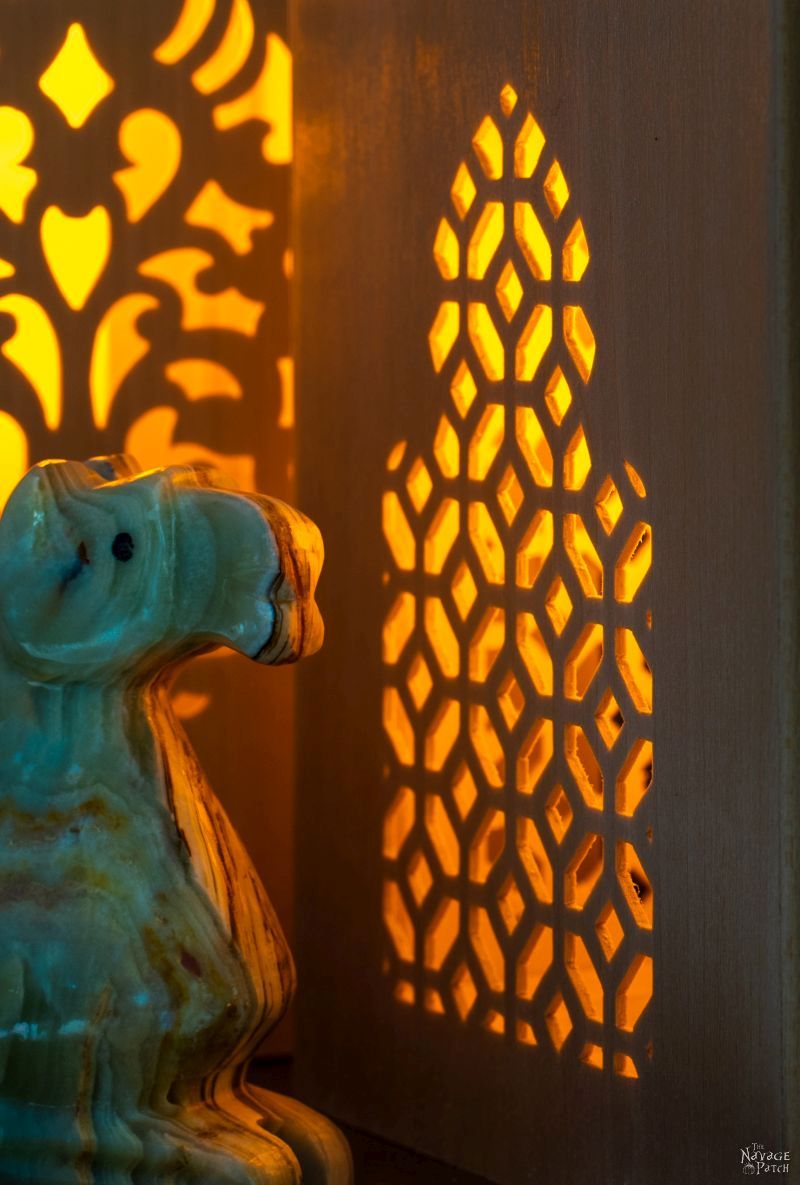
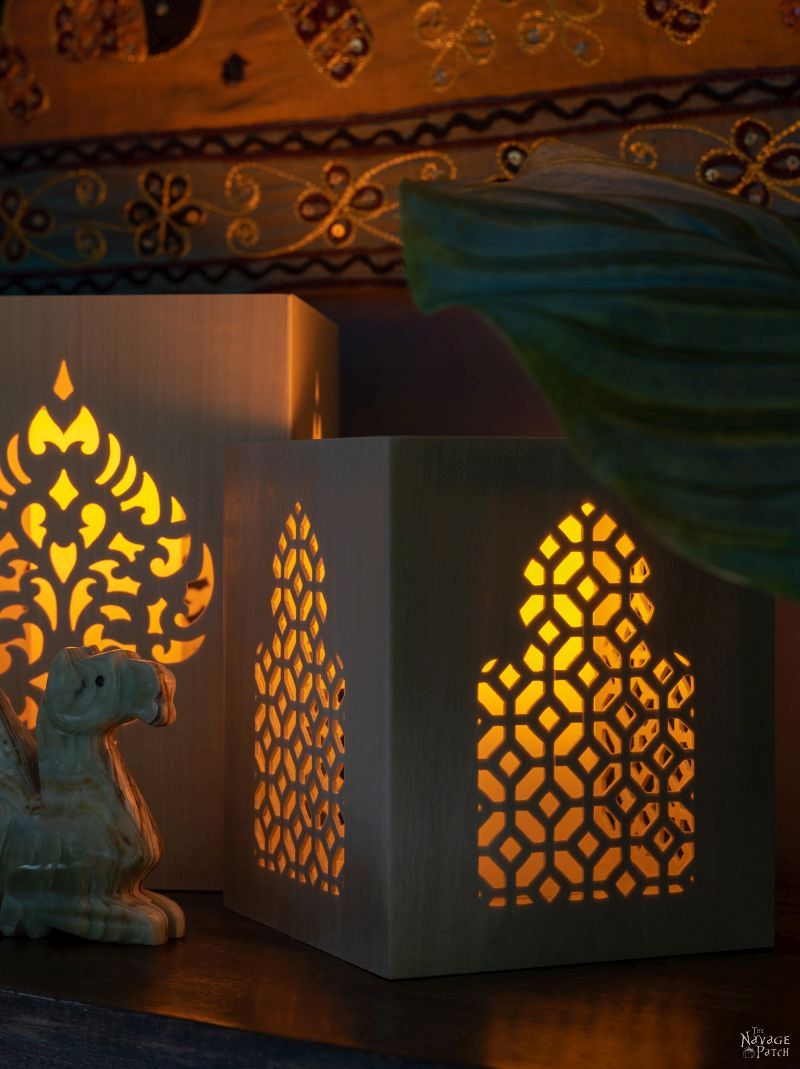
We’re giving you 4 cut files today. One of them makes a candle holder that is 7 3/4 inches tall by 5 3/4 inches wide. The other 3 make candles holders that are 5 3/4 inches high and 5 inches wide.
The bigger candle holder design can’t be made any smaller. Believe me, we tried!
Cricut states that the knife blade should not be used to make cuts smaller than 3/4 inch, and this is good advice! They’ve arrived at that number through rigorous testing of their machines.
But c’mon. You didn’t think we’d just take their word for it, did you?
Of course not!
We had to push the envelope to see for ourselves!
Turns out, they’re mostly right.
We were able to successfully cut the 3 smaller images (which contain a few cuts smaller than 3/4 inch) with no problems. I think this is because those designs are mostly geometric.
But my Cricut Maker had big issues when trying to cut the intricate pattern on the smaller scale of the other design.
I broke one blade and got it repeatedly stuck and jammed when trying to make those cuts.
After a time, we decided to make that one design bigger and try again.
We were still technically skirting Cricut’s guidelines, as some of the cuts were below their minimum recommended width, but we were able to successfully complete 4 panels with two caveats:
- Instead of the pre-programmed 14 passes the Maker would make with the knife blade, we found that only 8-11 were needed to fully cut out the design. Any more than that risked tearing apart delicate sections of the design.
- After about 6 passes or so, we would frequently check the piece and remove any loose wood debris with the pick tool.
Okay, let’s on with the tutorial.
When using the knife blade to cut basswood, you should always use the strong grip mat.
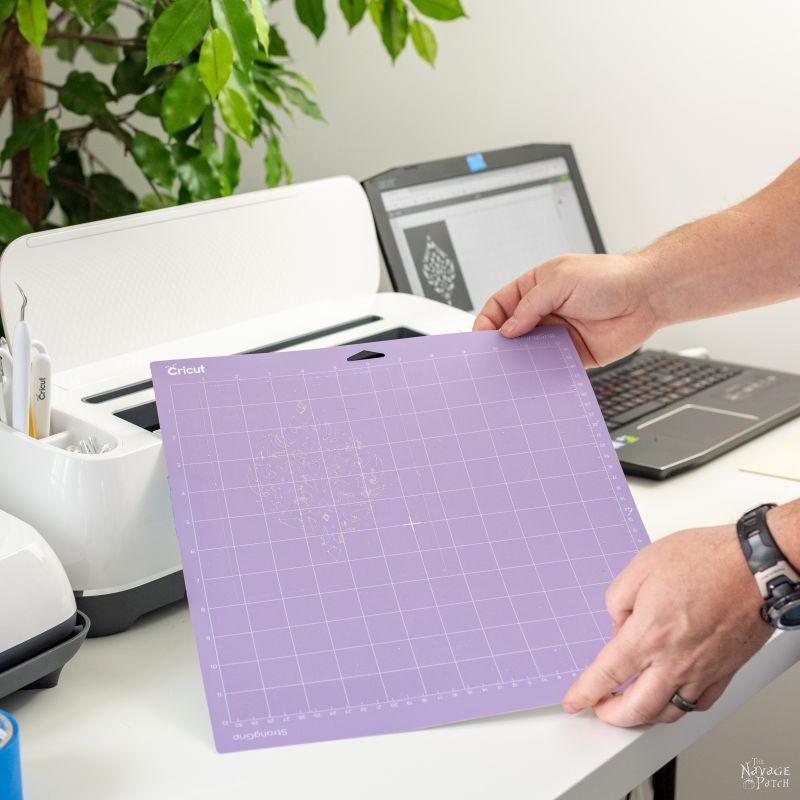
That blade will be making up to 14 passes, and you don’t want your workpiece moving around – not even the barest millimeter!
We used both 11 x 11 and 6 x 12 basswood for our candle holders. The 6 x 12 was perfect for cutting two faces at a time of the smaller designs or one face of the larger design. Here I’m using an 11 x 11 sheet for the larger design. Because of the delicate and intricate nature of the larger candle holder design, I only cut one face at a time.
I positioned the basswood on the strong grip cutting mat.

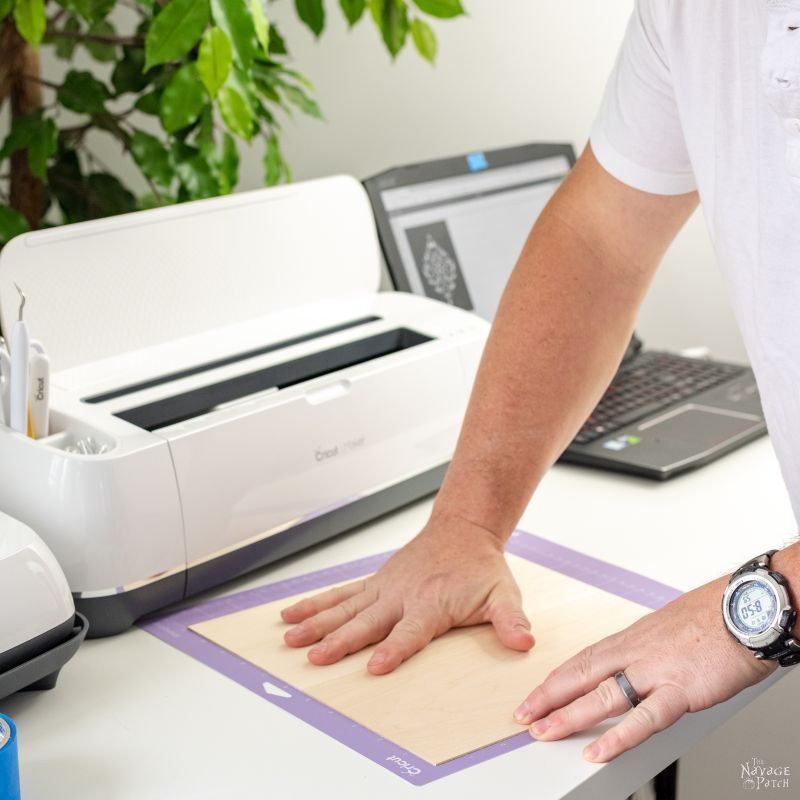
Okay, the strong grip mat may be pretty strong, but it is not nearly strong enough for the kind of work I was about to put it through. Cricut understands this as well. It is why they advise reinforcing all 4 sides of the workpiece with masking tape.
Trust me, you don’t want to skip this step!


Once all 4 sides were reinforced with masking tape, I loaded the mat into my Cricut Maker and commanded it to make me some beautiful Moroccan candle holders.

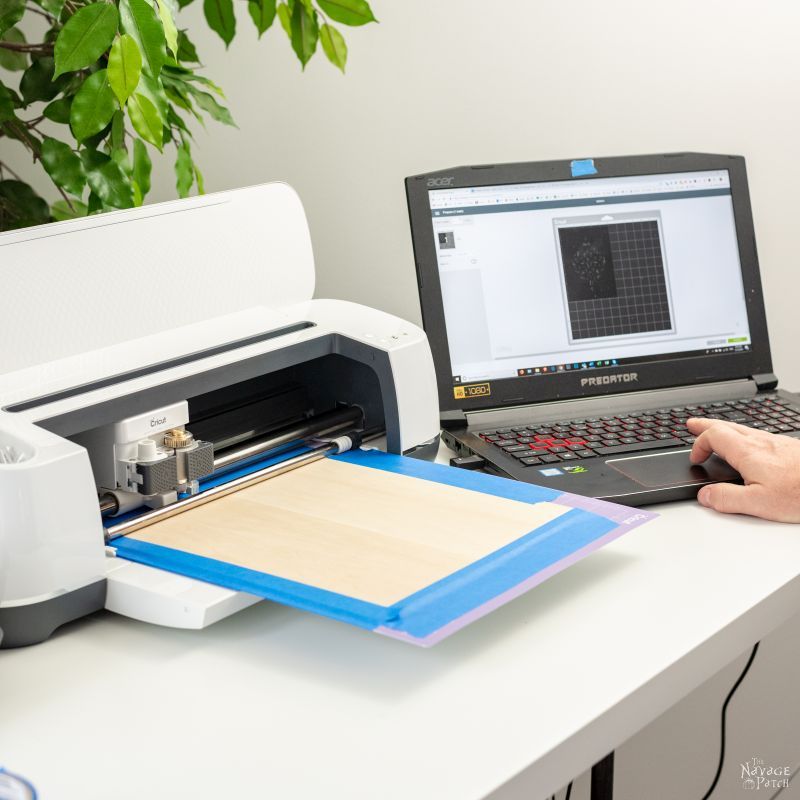
Cutting complicated basswood designs on a Cricut is not a speedy process – there’s no getting around this. To ensure smooth operation for these extended cuts (you can expect to wait for almost two hours for it to cut two faces of our designs at once), it is imperative that you disable your computer’s power-saving or sleep modes. We weren’t aware of this on our first try, and the cutting operation shut down about a quarter of the way through when my laptop decided it was an awesome time to take a nap. That piece had to be scrapped.
DIY Moroccan Candle Holders – Assembling the Frame
Once our faces were cut and weeded, I brought everything to the basement, where I would assemble the frames.
I started by gluing the pillars to the bases with super glue.
Why not wood glue?
Simple.
Time. I wanted to move on to the next step right away. I used those metal blocks to help align the pillar with the base. Any two square pieces of scrap wood would also work.
Okay, but why not super glue for the whole project, then?
Simple.
Super glue can absorb deep into certain woods, and since the basswood is so thin, too much glue would seep through and mar the outer surface. This would be especially bad if you were planning to stain, as the glue would prevent stain absorption.

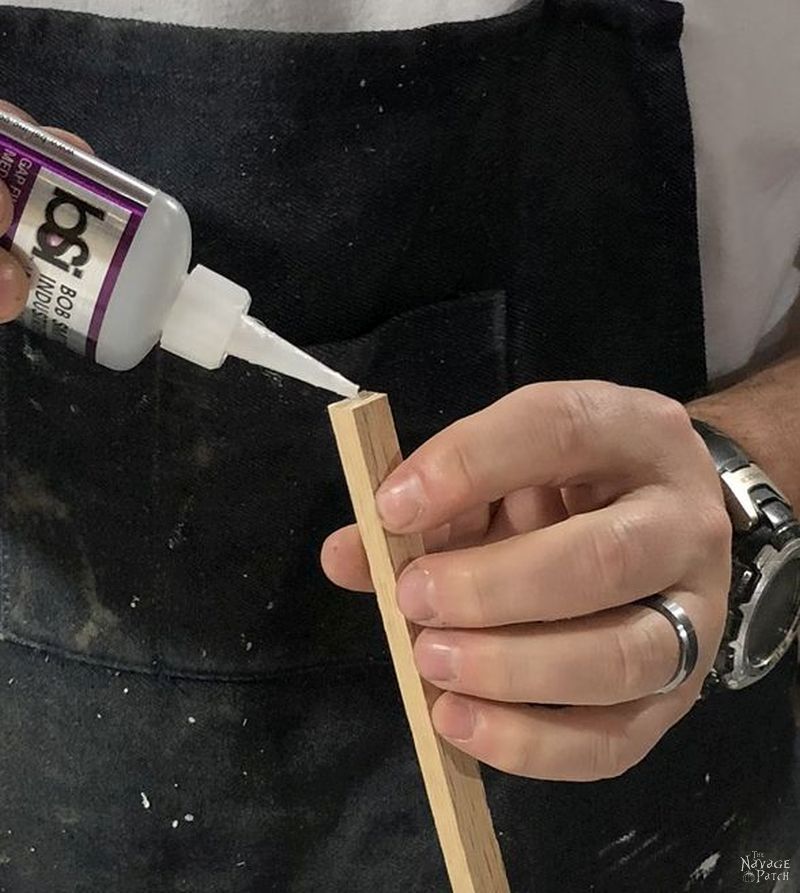
Spread it out…
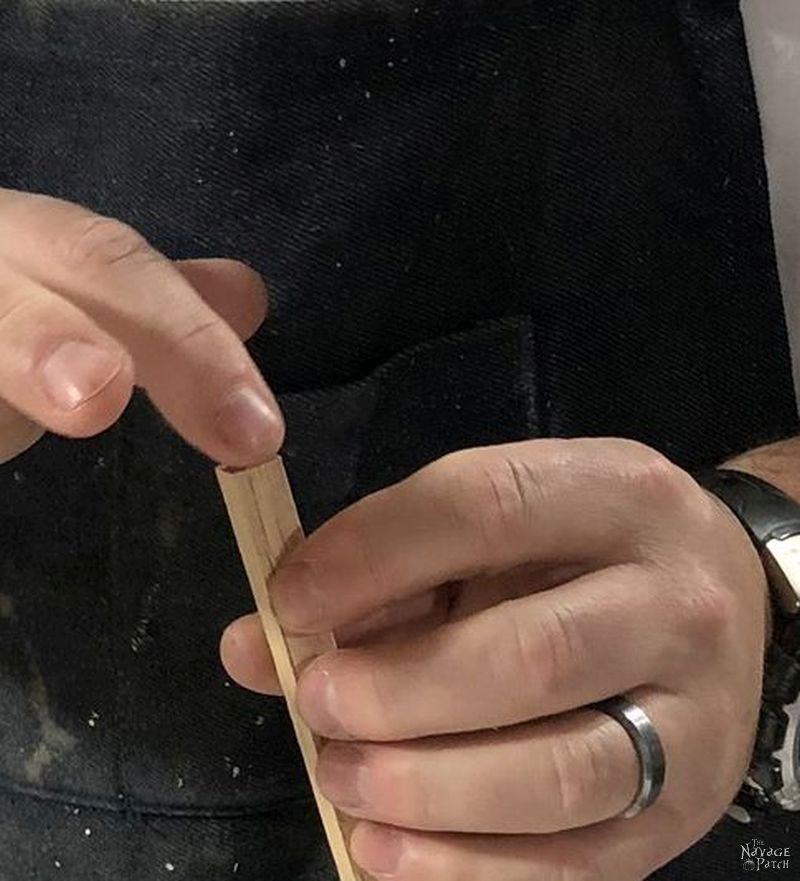
I then guided the dowel exactly to the corner of the base using the two metal blocks as guides.


I repeated this process with the remaining pillars. Here’s a prime example of Handan’s photos making me look like Skullator from the planet Cranium.

And the last pillar…

It was sometime during this process that I heard my dear wife sniggling. I also noticed she was taking more pictures than usual. I know my work is interesting. But is it that interesting?
She couldn’t contain her laughter any longer.
So it wasn’t my super-interesting work, then?
Nope, what gave Handan the giggles was the sight of King RBF (Resting Bitch Face) working on his little Moroccan candle holders!

I informed her that anyone who smiles while DIYing is selling something and shouldn’t be trusted.
But if she wanted Guy Smiley, I’d give her Guy Smiley.

Would you trust that idiot?
Me neither.
Next thing you know, he’d be telling you that super glue makes great eye drops.1

1 My team of overpriced lawyers2 has informed me that I need to tell you in no uncertain terms that you should never (ever!) put super glue in your eye! I tried to tell them that you guys weren’t like those other blog readers. You know, the dummies who read those other blogs? Yeah, you know the ones! But they just smacked me upside the head with their leather briefcases and thrust their fingers at my keyboard.
2 Ahh, who am I kidding? I couldn’t even afford a pair of underpriced lawyers.
So where was I?
Oh, yeah! I was peacefully building the frame for my Moroccan candle holders with my resting bitch face…
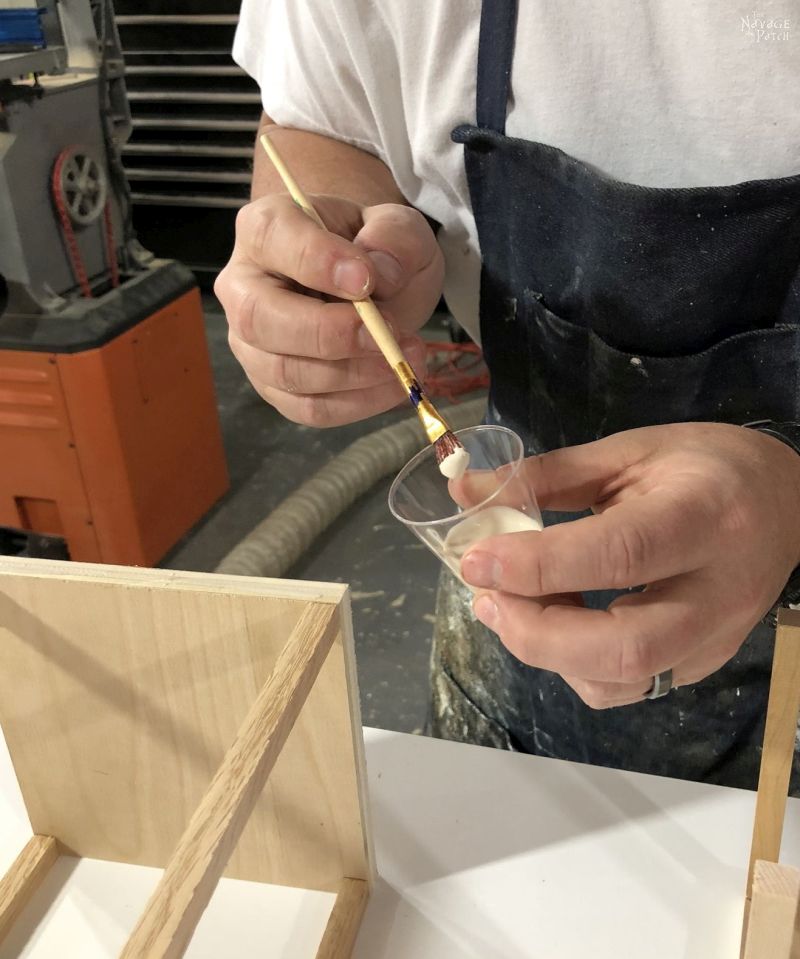
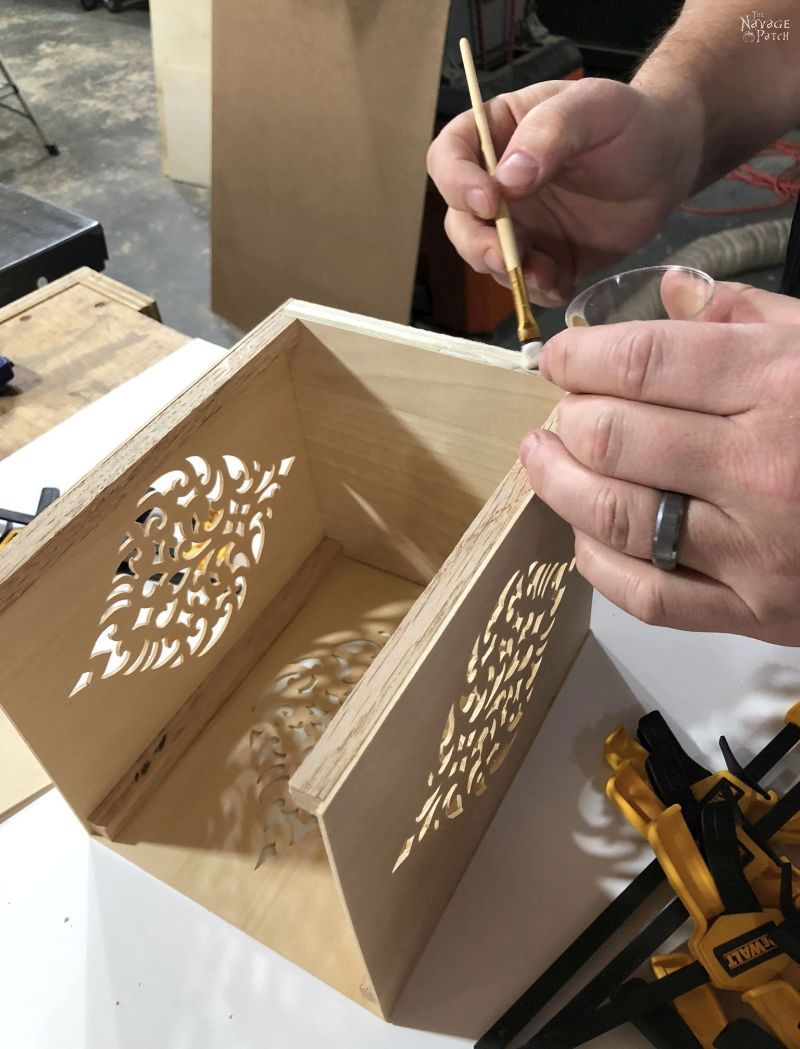
With the four pillars glued into place, I started gluing the faces on, one-by-one.
I put a bit of wood glue into a small plastic cup.

I then brushed the glue on the parts of the frame onto which I’d place the Cricut-cut face.
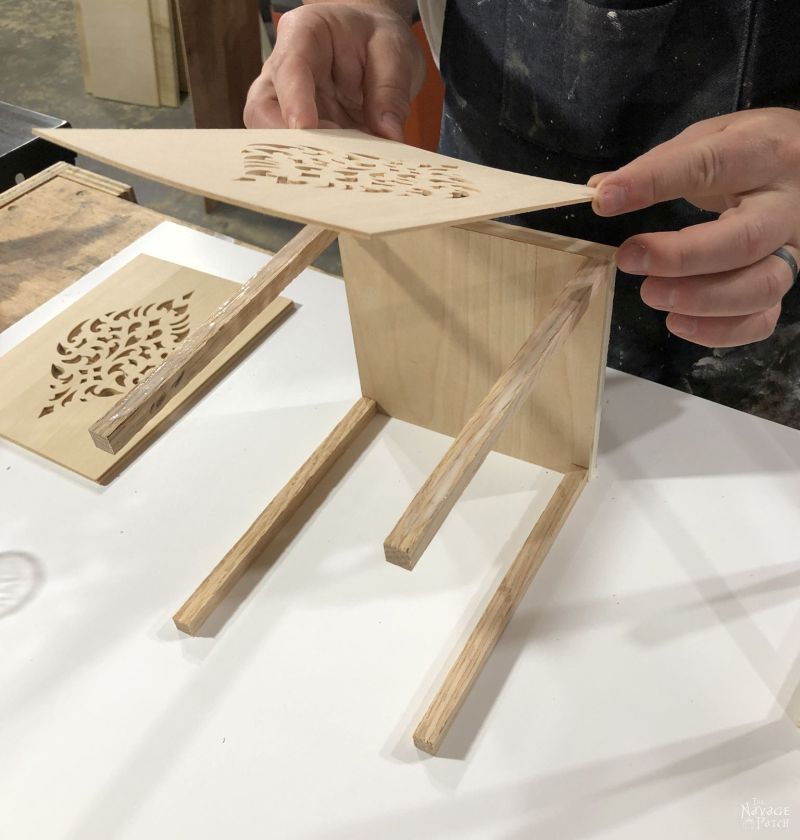
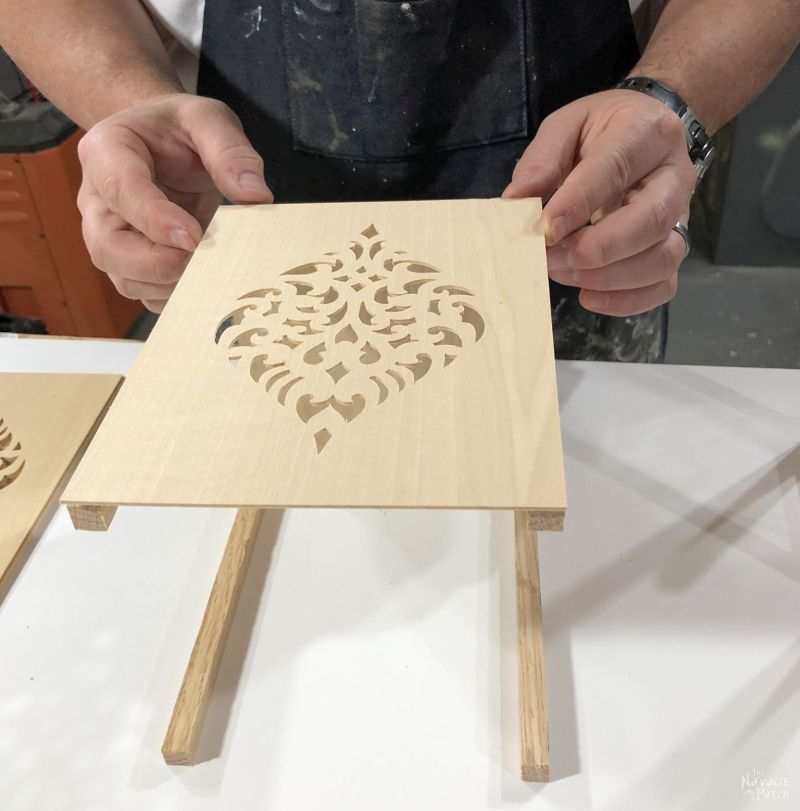
I started with the longer side of the base. The basswood fits perfectly to this face.

I placed the face onto the frame.
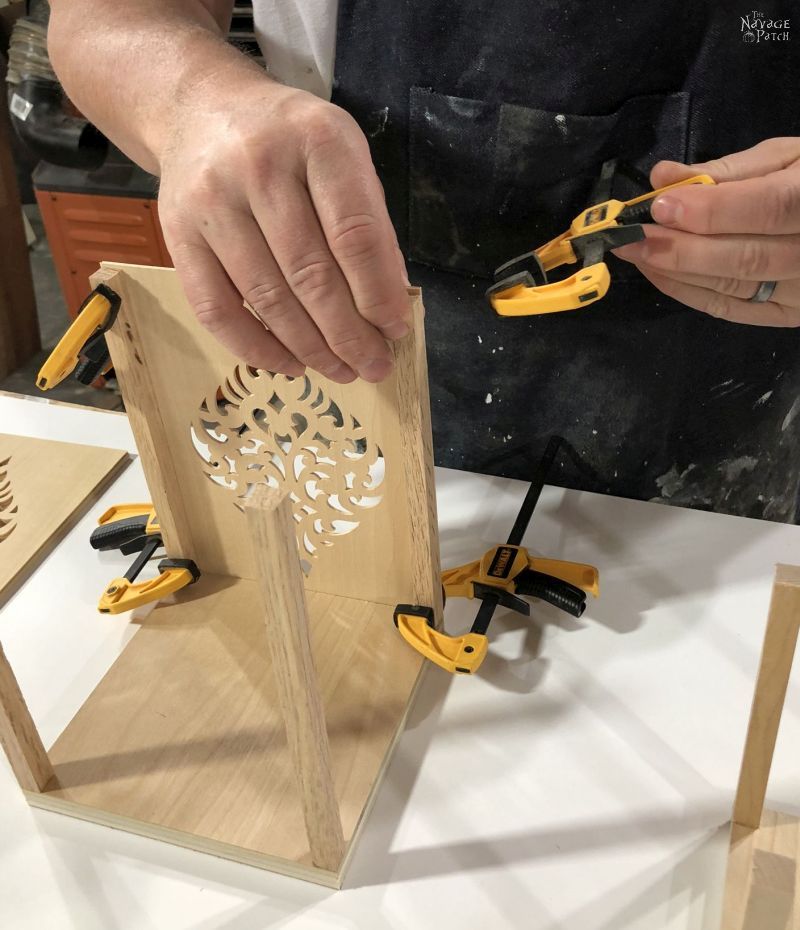
I then tilted the frame so it was standing upright and clamped the face in place.

I used 6 clamps – two on top, two on the bottom and two in the middle. By the way, when Handan bought these little DeWalt clamps a few years back, I laughed at her and made fun of her dinky little clamps. But at some point, I needed those clamps, and I discovered that they’re awesome! So naturally, I stole all of hers and stashed them in the basement.
I’ll buy her some replacements someday if she’s a good girl.
Once the glue had set (about 20 minutes), I moved on to the opposite face.

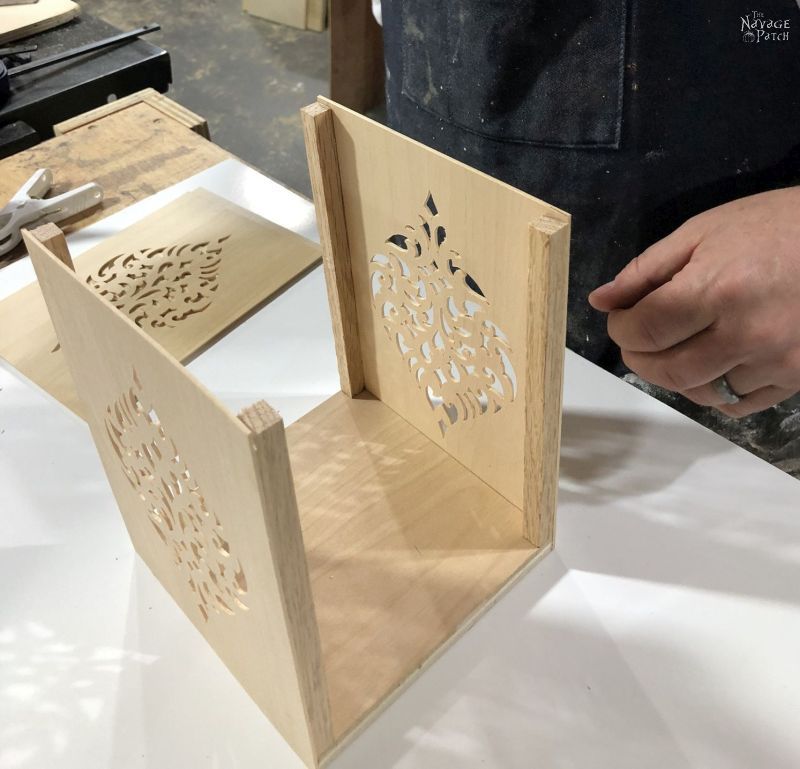

I repeated the process for the third and fourth faces. This is the shorter side of the base. But since it has two 1/16 inch basswood pieces on either side, the face being glued on will still fit perfectly.


The small clamps wouldn’t fit around the entire candle holder, so I used some heavy scrap hardwood I had to act as a clamp for the final face.

When the glue had dried, I lightly sanded the edges anywhere the fit wasn’t perfect. The basswood is very fragile, so sanding must be done carefully.
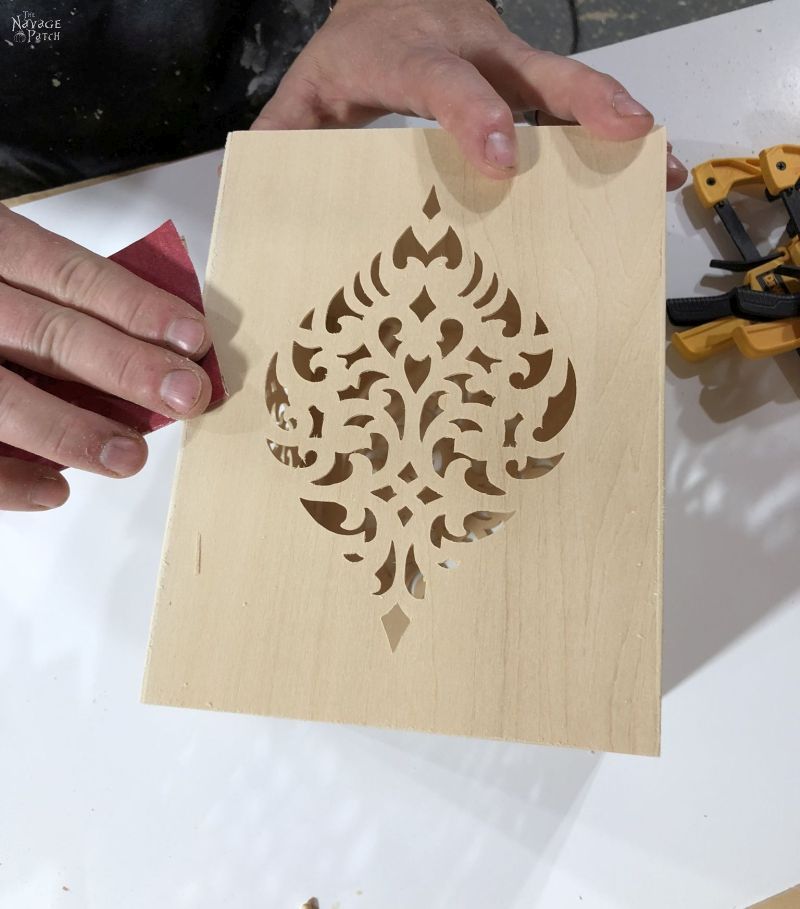
I got rid of the dust by any means necessary.


My DIY Moroccan candle holders were built! The next and final step was to seal them with spray shellac. This would have the added benefit of darkening their color a bit.
But first! Handan strikes again!
Help me caption this photo in the comments!

Since it was raining and 40 degrees, I had to shellac my Moroccan candle holders in the garage. Not sure what’s up with my left arm and fist. Chalk it up to “Handan strikes again.”
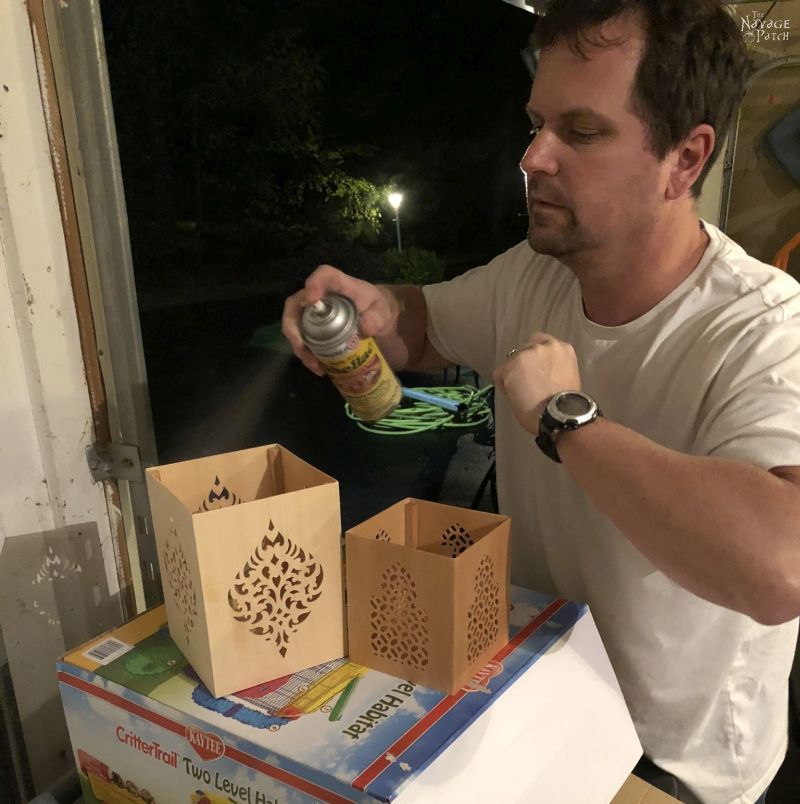
The clear shellac really warmed up the candle holders. I’ll bet amber would look amazing, too!

After 3 coats of shellac, I brought my candle holders inside the next morning. That’s when we discovered warping along the top edge. I quickly cut some dowel pieces to fit along the upper edge between the pillars, and the problem was solved.
Let’s take a look at some beauty shots! First, the day view…


…now, the night view!

*******
As usual, here is some information on these free downloadable Moroccan patterns: we created today’s freebies as JPG, PNG and SVG files which are resizable and compatible with Cricut and all other cutting machines.

Now it’s time to click on the button below to download today’s freebies – they are all in the “SVGs – Stencils” section of The VIP Patch.
take me to your
amazing freebies library
If you’re not a Navage Patch VIP, you won’t be able to access our Freebies Library. But that can be easily fixed! Subscribe for free on the form below and become a Navage Patch VIP. Once you subscribe, a password will be sent to you in our Welcome email, and that will give you access to The VIP Patch [Freebies Library].
Share it on Pinterest & Facebook!


Love those!
Thanks, Kathy! 🙂
Ooh I love these!
Thanks, Laurie! 🙂
Man! So unbelievably cool! Cricut Dreams…some day! ?
Thanks, Erin! It’s a really fun machine! 🙂
They turned out beautiful. I would have gone a bit darker myself, but they are great!
Thank you, Clovia! We thought about staining them, but decided to go a bit lighter with just the shellac. 🙂
I am having severe Cricut Envy. Beautiful candle holders. I’m also a big fan of the Moroccan style – the architecture, the design, the colours! Big, bold colours are my thing.
And that face? It’s definitely the face of “I always said I’d never do arts and crafts. How did I get here? How did it come to this?” Cricut has brought the man to his knees, but DIY is DIY, right? Either the crafty sort with dinky clamps (I have very similar clamps) or the builder sort who uses power tools. What is a power tool, anyway? A tool that is powered. The Cricut Maker is a power tool! A real man’s tool. Manly *nods*
LOLOLOL – Jay, I love that caption you came up with!
LOLOL!
“Oh, great, beautiful…Moroccan Light…” I’m coming… YOU DID AN OUTSTANDING JOB..just delightful!! franki
Thank you, Franki! 😀
Absolutely gorgeous! I love reading your posts.
I read your posts about your travels. I lived overseas many years ago, for two years in Thailand. Your stories brought back a lot of memories. I didn’t see anything about what led up to your return to the states. Did I miss something? Are you going to bring your story up to the present? I hope you do!
Thanks for the entertainment!
Hi Sabrina, The story is not finished! We got so busy with “real” blog posts and projects, that I haven’t had time to add to it in a while!
WOW GREG AND HANDAN JUST WOW XX
Thank you, Chris! 🙂
WOW!!! Fantastic! I have a silhouette, and it can’t cut balsa wood 🙁
Thank you! 😀
I love the lanterns! Gorgeous. But your video with the bird stole the show! I watched it 3 times then showed it to my family. They were just as entranced as I was.
Thank you so much, Zoe! Which bird video do you mean? I have two of them – one with a blue jay and one with a hummingbird! 🙂
Does your wife appreciate all that work you do for her? I’m sure she does, but the last two or three things you’ve created are fantastic…you’re a lucky lady, Handan!
She certainly does, Cindy! She’s a lucky lady, and I’m a lucky guy! I couldn’t do any of these projects without her help – she’s the brains and the idea generator for this blog, I’m just the muscle 😀
Beautiful. Thanks for sharing
Thank you so much, Harjith! 🙂
These are beautiful and I also prefer the more concentrated looking 🙂 photos. Great work on the Cricut Maker, can’t wait to get one!
Thank you, Mara! Yeah, I like the more concentrated guy, too. The other one looks like an idiot, lol! 🙂
Oh, I am SO stinkin’ impressed! Even if our styles are *not* Moroccan (I know… de horror!), this is the perfect inspiration to create these with our own style! Your post made me giggle, and kept me engaged the whole time… and I followed you on your social media. 😉 Saw this by way of your feature at Morning Cup… would absolutely be blessed if you would consider sharing with us each week at Tuesday Turn About (the newest link party on the block). This week’s very first party closes tonight at midnight, PST! Hope to see you there!
Hi Julie, thank you so much! I’m so sorry for this late reply. I will absolutely tell Handan about your party! 🙂
Amazing!
Thank you so much! 🙂
These are beautiful and at the moment I’m trying to make some cool Ramadan decor for my house and will definite try making this one. Thank you for sharing it. Also I was wondering could these SVGs be used to create a paper lantern?
Thank you, Shazia! Yes, the SVGs would be perfect for a paper lantern, and truthfully that would be much easier! Ramadan Mubarak!
Hello! I am wondering why my cricut maker will NOT cut through the 1/16 Basswood with 14 passes. I even changed the pressure setting to “More”. It is not cutting even half of the way through. Knife blade is new and I calibrated before starting. Do you have any thoughts? Thanks.