
DIY IKEA Tarva Hack
Here is a quick and easy DIY IKEA Tarva hack suitable for any skill level! All it takes is a little stain, a little paint and some new hardware!
There is a fine art to choosing just the right makeover.
First and foremost, the makeover must fit the space for which it is destined.
It must also fit the man, or in this case, the boy for whom it is intended.
And finally, since we are now professional bloggers (ooh la la!), the makeover must meet budget constrictions and time constraints.
Back in the early days, when The Navage Patch was still a mewling little brat of a blog, thrashing about and making loud noises, I would sometimes spend months on a furniture makeover.
Months!
Months of my life wasted on this thing that is currently mothballed in a storage room!
Precious weeks and days I’ll never get back because I had to make this ridiculous thing!

I’m so lucky that I have a wife like Handan.
She saw that I was spiraling out of control with my projects. At the rate I was going, I’d only have 4 projects a year to show you guys!
She taught me how to make things simpler.
She taught me how to make things quicker.
And thus, our Simple Stupid movement was born.
Our mission is to bring you guys the best projects, done in the simplest manner possible.
It’s better for us.
And it’s better for you!
Because I can say with 100% certainly that none of you went out and tried to duplicate this!
So when it came time to hack Barish’s IKEA Tarva 6-drawer dresser, we needed it to be quick (because we have a lot of irons in the fire), we needed it to be budget-friendly (because despite how many times I beg for it, no one has yet sent me a million-dollar check), and we needed it to look great (because…do I really need to explain this one?).
On a side note, why is it a “hack” when it’s IKEA but a “makeover” when it’s any other brand of furniture? If you know, please let us know in the comments!
We weighed a few options for this IKEA Tarva hack, some more involved than others, but in the end, Simple Stupid came out on top.
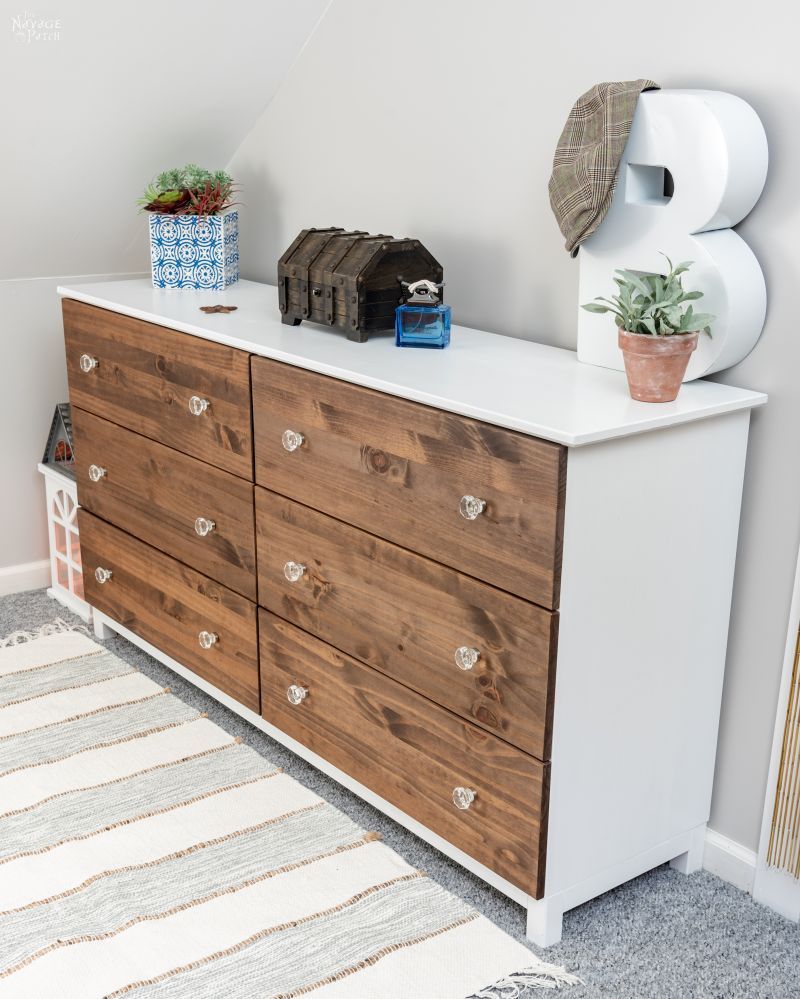
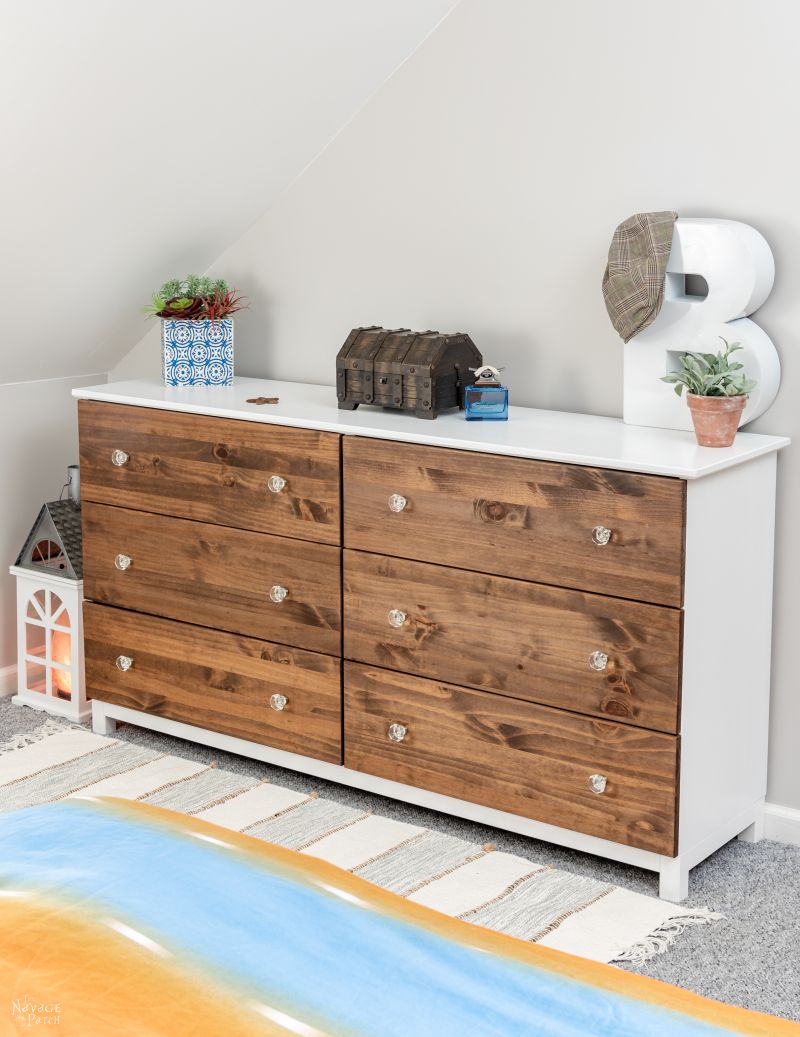
A little paint, a little stain and 12 new knobs.
Sure, we could have made it more complicated. But what would that have gained?
Here is the 6-drawer Tarva in its pristine state:

It is a simple, functional chest of drawers.
And it is just begging for a makeover! Excuse me, it is just begging for a hack!
We bought this piece for Barish nearly 6 years ago, and he has used it in his bedroom in its unfinished state ever since. We always knew we’d do something to it…we just never imagined it would take so long to get to it!
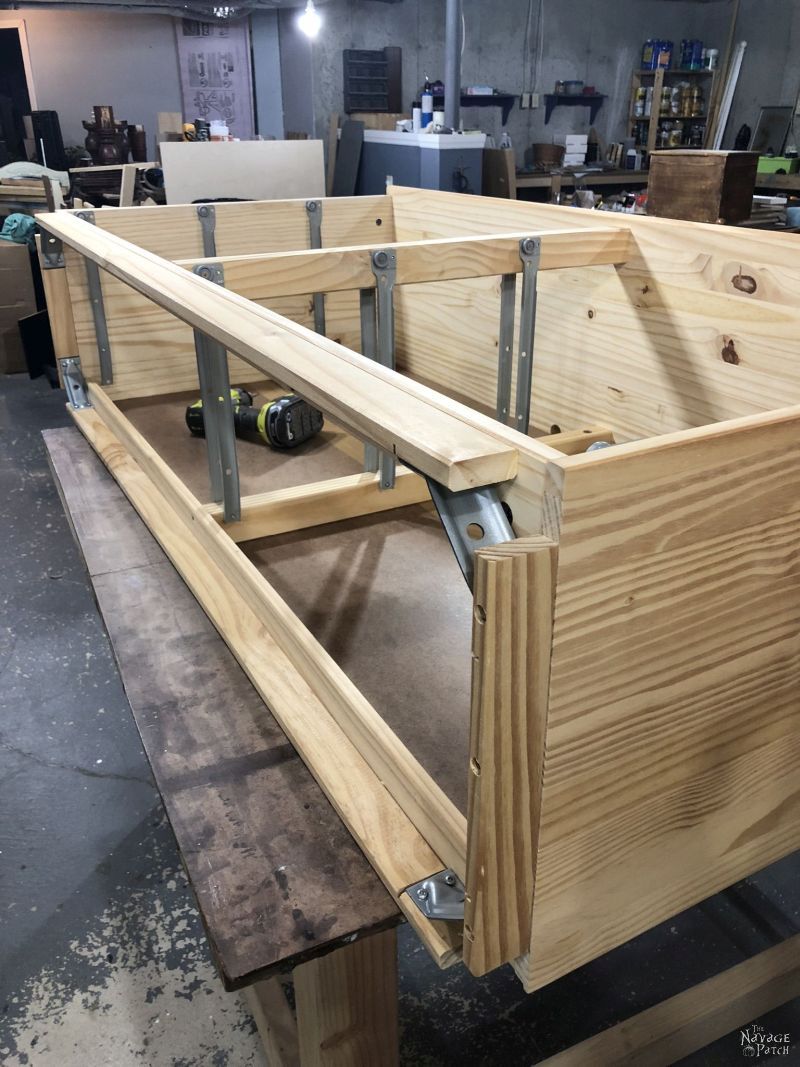
With Barish’s help, we carried the drawers and the carcass into the basement. I put the carcass up on my work table and had a look.

The feet would have to be removed. We wanted to final piece to be a little shorter so it wouldn’t interfere with the sloped walls of Barish’s second room.
I lightly sanded the sides and top with a random orbit sander and 220 grit paper. Though it would be painted, 6 years of finger grease wouldn’t help matters.
After sanding, I applied a coat of primer, since I’d be painting it with Benjamin Moore Aura paint left over from another IKEA hack I’ll soon be sharing.
When it comes to primer, you’ll find none better than shellac-based Zinsser B-I-N.


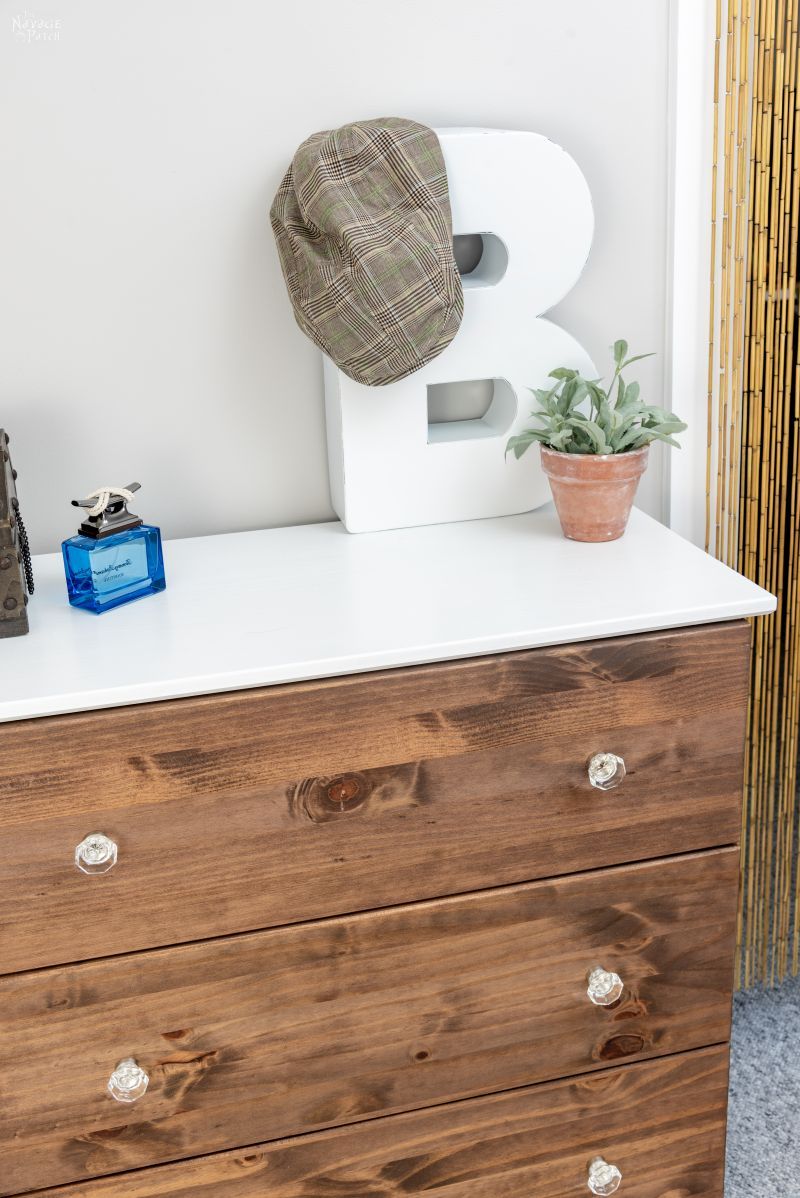
When the primer had dried, I applied two coats of paint in Chantilly Lace color with a satin sheen. I used a small foam roller to prevent brush marks.
Between coats of paint, I turned my attention to the drawers. They’d be getting stain.

I removed the knobs, the drawer slides and the bottoms from each drawer.

To keep the look in Barish’s two rooms consistent, I used Minwax Special Walnut stain on the drawers. Although I’m partial to the Rustoleum/Varathane line for most stains, Minwax hit it out of the park with Special Walnut!

The next day, I reassembled the drawers, except for the knobs. Handan really wanted glass knobs for the drawers, and we searched Amazon until we found the ones she loved most.
Of course, they were a little pricier than we wanted.
But I know my wife.
We could have saved on the knobs, but every time she’d go into Barish’s room, she’d look at the dresser and wish she had bought the better knobs.
I told her that she could break the budget a little bit for this project and splurge for the glass knobs she wanted.
We bought a box of 20, because we’ll also be using them on the other IKEA Kallax hack that I’ll soon be sharing.

With the knobs installed, I turned back to the painted pieces. I cut about 4 1/2 inches off each leg.
And then I re-attached the legs.

We all carried the drawers and carcass back up to Barish’s room. Handan and I placed the carcass in its place, and I inserted the drawers.

And that was it! It’s one of the simpler IKEA Tarva hacks, but we all love the way it turned out.
What do you think?


We love it when you share our posts on Facebook and Pinterest!


looks good!
Thanks, Rev! 🙂
Love it! Where is the rug in front of the dresser from?
Thank you, Kailee! We got that rug at TJ Maxx 🙂
Looking good! Simple is always the best, especially when it comes to the minimalist lines of IKEA furniture. It also paid to splurge on the knobs. I have a thing for changing out drawer hardware myself–always looking for the perfect knob or bail pull once I get a piece of furniture.
We agree, Laurie! We’re done with the complicated projects! Handan’s right there with you on the drawer hardware – she’s nuts about it, lol! 😀
Really nice!!! Wish I had someone as handy as you.
Thank you, Marcia! 🙂
I cannot believe that desk is in the storage room! WHAT?! lol I have to say that it is true that I would not replicate that job, but that post did teach me a lot about veneer, which I had not been fond of before I read it.
Anyhoo…alrhiugh MUCH simpler, I also love this IKEA…transformation. 😉
Thank you, Claudine! Yeah that desk is a real conundrum. It doesn’t really fit with our decor, but I couldn’t sell it for the price that most people might be willing to pay, lol! So in storage it shall stay until we can figure out what to do with it 🙂
Great job as always guys! I love those glass knobs!.
Thank you, Sandy! 🙂
I love how well the stain used and the rug compliment each other. Well done!
Thank you, Mary! A happy accident! 😀
Great makeover umm I mean hack. But now you can’t fit the vacuum under the dresser…
Hmmmmm…you make a good point. Now I’ll have to DIY a smaller vacuum! 😀
Hmmm. This is terrific and I love the motivation of “simple stupid”…. but,
In your take-somewhat-longer projects you impart a lot of knowledge and creative stimulus, and frankly, I miss it. Learning along with you in your attempts and perseverance, and being super entertained at the same time, is what made your blog unique and wonderful. So, pleeeese, don’t go all formula on us.
Formula is for swaddled toothless babies, Derry – you won’t find any here! 🙂 That said, with Barish’s room makeover, there was only so far we were willing to go off the beaten path. It’s a teen boy’s room, and we needed to keep it simple and cheap. That furniture won’t be around forever, and none of it is likely to become an heirloom, lol!
Now, regarding Simple Stupid, there’s a learning curve even with those projects. What may seem easy at the time often turns into a confusing mess or a waste of time and effort. Our next IKEA hack will go into that very subject. Pinterest was all aglow with a bunch of bloggers touting a bullshit wonder product that was supposed to repair dents and scratches in IKEA furniture. We tried it, and it was utter hogwash. Waste of time, money and effort. In the end, we changed course and did the project in a more difficult manner. We’re always striving to strike the proper balance between great and innovative content (that doesn’t take months to create), funny and entertaining writing (that doesn’t carry on for 4 or 5 pages) and projects that other “normal” people can do. Of course, by “normal” I mean “non-blogger,” because only a lunatic would choose this life! :p
Don’t worry, Derry – I won’t become some plain vanilla writer. I’ll do my best to keep you guys laughing. And look, you can yap all you want about inspiring projects, but we all know that you’re here to catch a glimpse of my Calvin Kleins! :D:D:D:D
You found me out! LOL! Point taken and I’m so glad you won’t go all vanilla!
Any project you no longer want will be gladly accepted! I love that desk and a wine rack/bar would never be turned away! You have yet to do a project I didn’t like/love.
We’ll put ’em on a train bound for Canada! 🙂
Nicely done! Is that real wood?
You realize Barish will probably never move out! ?
I am 70 yrs. old and I have never been or even seen a ikea store not have I ever owned a piece of furniture or décor or anything ikea but I sure do have a lot of envy for all of the hacks I have ever seen and this is definetly one of them xx
Thank you, Chris! Hey, if you’ve made it this long without IKEA, I think you’re safe to keep going without it. However, if you find yourself driving along an interstate one day and you pass an IKEA, pull off and pop in and join the throngs of youngsters giggling their way through the maze of furniture! 🙂
I like the salt lamp in the metal lamp! I am going to have to do that (and I saw the perfect metal lamp at Michael’s yesterday on sale!).
Yes, I love that too! Those salt lamps are the best!
Your workshop is magical and a place of beauty – there isn’t any task that you couldn’t accomplish in that space! Every project is executed with perfection. Love you all and always fun to see what you are up to. Sending love and hugs from Southern California! ??
Well, thank you so much, Naomie! It’s true that I shoot for perfection, but I so rarely achieve it, lol! Many many mistakes have been made in that little workshop, lol! 😀
I have to agree somewhat with Derry, I enjoyed the longer posts because I learned so much and became inspired to do some of my own crazy things. I understand that isn’t for everyone, but don’t drop them altogether – it’s what makes your blog stand out from others! That, plus you know how to write (and use proper English)! Also, don’t forget Handan’s pajama counter!!!
Don’t worry, Karen, I will still have longer posts! 🙂
This project turned out beautiful and I love the look of the glass knobs. When my kids were teenagers they either wouldn’t have cared or noticed or they would have nixed the idea.
Thank you, Darla! Barish has been quite accommodating with our style choices. Of course, he may just be agreeing with us to get us out of his room, lol! 😀
Awesome job! Keep up the great posts.
Thank you so much, Carolyn! 🙂
Great job! The dresser turned out lovely. I love the look of the dark wood with the white, and those pretty little knobs.
Super job! Love it
Thank you so much, Harjith! 🙂
I would happily scrounge around in your basement like a happy little piggy looking for truffles. It must be a true dragon’s hoard down there! You could pay an entry fee and give tours. How I wish I had a nice big area/room/shed where I could work on things. Alas, it’s braving the elements for me (and that’s why I’m usually inside not doing a thing!)
I have a Hemnes chest of drawers from IKEA that I love but also have started to look at critically. I have two white bookcases, a white bed, a white bedside table, white wardrobe, white, white, white. I jazzed them up a bit with some nice burnished handles but so far that’s been it. Your blog is a constant source of inspiration and I find myself wanting to try all kinds of things!
I hope you’ve got more IKEA hacks in the future!
You’re welcome to scavenge any time, as long as you leave with at least 500 pounds of stuff! 😀
The knobs don’t go with the dresser
Phew! Good thing it’s not in your house then!! 🙂