
Guest Bathroom Renovation Reveal
Well, it took longer than we expected, but our guest bathroom renovation is finally finished. Let’s have a look at the finishing touches and see how it turned out.
CONTINUED FROM>>
Holy crap, we did it!
Fifty three days. Dozens of trips to Home Depot. Gallons of coffee. Thousands of swears. A little bit of blood, and a flagon of tears.
There were days of dark despair when nothing seemed worth it – not the project, not the house, not the blog, none of it. There was misery and sore backs and bruised knees. But there were also little victories and small celebrations. It was an emotional seesaw.
A Turk would have called this project an “Ottoman March.” It’s their way of saying “two steps forward, one step back.” The phrase comes from the old Ottoman Empire attack march. You can see it performed at Topkapi Palace in Istanbul in the video below.
Handan and I will both go on record saying that this was unequivocally the worst project we’ve ever tackled. I don’t believe in curses, but if I did, I’d be sure there was someone in the swamps of Louisiana with a voodoo doll, a photo of our bathroom and assorted hairballs from the old sink. You know Murphy’s Law – it states that anything that can go wrong will go wrong. I’m declaring a new one: Greg’s Law. It states that anything that can or can’t go wrong will still go wrong. This project was plagued with problems up to the very last action of installing the new toilet paper holder.
But it’s over.
Done.
Finito.
I promised that when we finished, I would throw a cow on the grill and guzzle a martini, and that is exactly what I did. Behold!

So let’s take a look at how things turned out. This post won’t have many process pictures. Near the end, we were like mindless drones, working on autopilot, just trying to survive the job. Taking pictures was not a priority.
*****
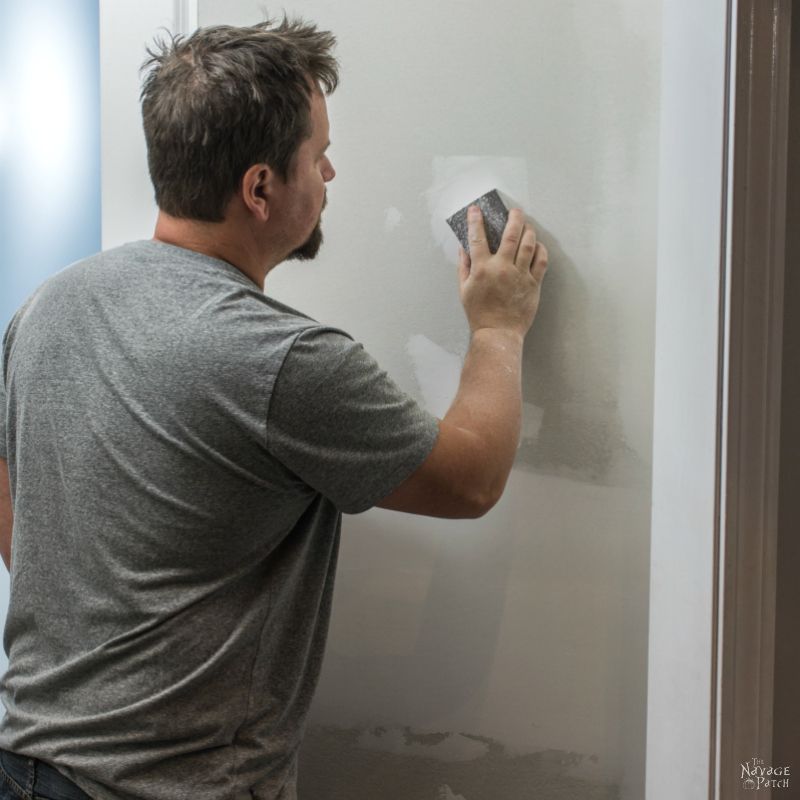
Almost all DIY jobs end with caulk, and this one was no exception. Caulk makes a good thing even better. I taped the bottom edge of the baseboard and the floor directly under the baseboard. There would be no overlap of caulk on the baseboard. It would look like a continuation of the baseboard right to the tile floor. Most caulking gives a sloped concave bead. I wanted a straight edge of caulk.

Instead of using a finger or rounded tool to remove the excess caulk, I made a small, thin square of wood and ran it along the caulked edge.

I peeled away the tape, revealing a nice, straight edge of caulk.

This is a handy technique that I’ve used in the past to fill gaps that wood filler can’t handle.
And, hey, that’s it for the process pictures for this post! Awesome, right? Now we can get to what we all have been waiting for these past two months!
But first, let’s revisit how things were. Here is how the bathroom looked when we moved in.
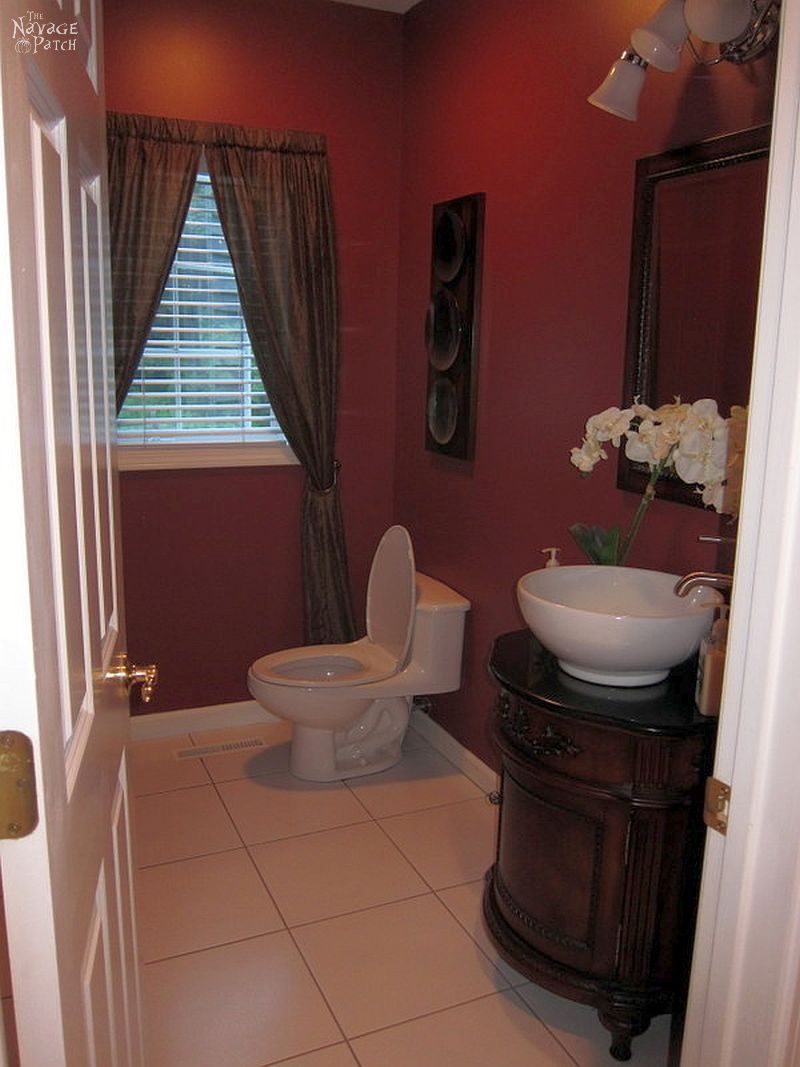
It had a rich and elegant look, which didn’t exactly fit with our style. What is our style, you ask? Good question. Hmmmm…well, my style might be described as flabby chic. And when Handan is around, there’s a good bit of gabby chic. Let’s call it Flabgab Style.
As was our tendency at the time, we painted those red walls to a dark-ish blue. A couple of years later, Handan painted the mirror frame.
Not a bad bathroom at all. But why leave something perfectly good alone when you can go muck it up for months?
Do you remember why we started this project? Do you recall the catalyst that set everything in motion? I was all set to hang something over the toilet and write a post about it. Then we decided to paint the walls. Then we figured we’d swap the tiles for the ones we found at the dump the year before. Then we agreed that a new toilet would be a grunting success. Then I opened my mouth and set off a series of events culminating in a pocket door. And then we declared that board and batten wainscoting would be just the thing improve our meaningless lives.
It was one hell of a Saturday.
Oh, right, the thing over the toilet! It’s there now. You’re going to finally see the [name withheld] Anthropologie-inspired hanging storage cabinet!
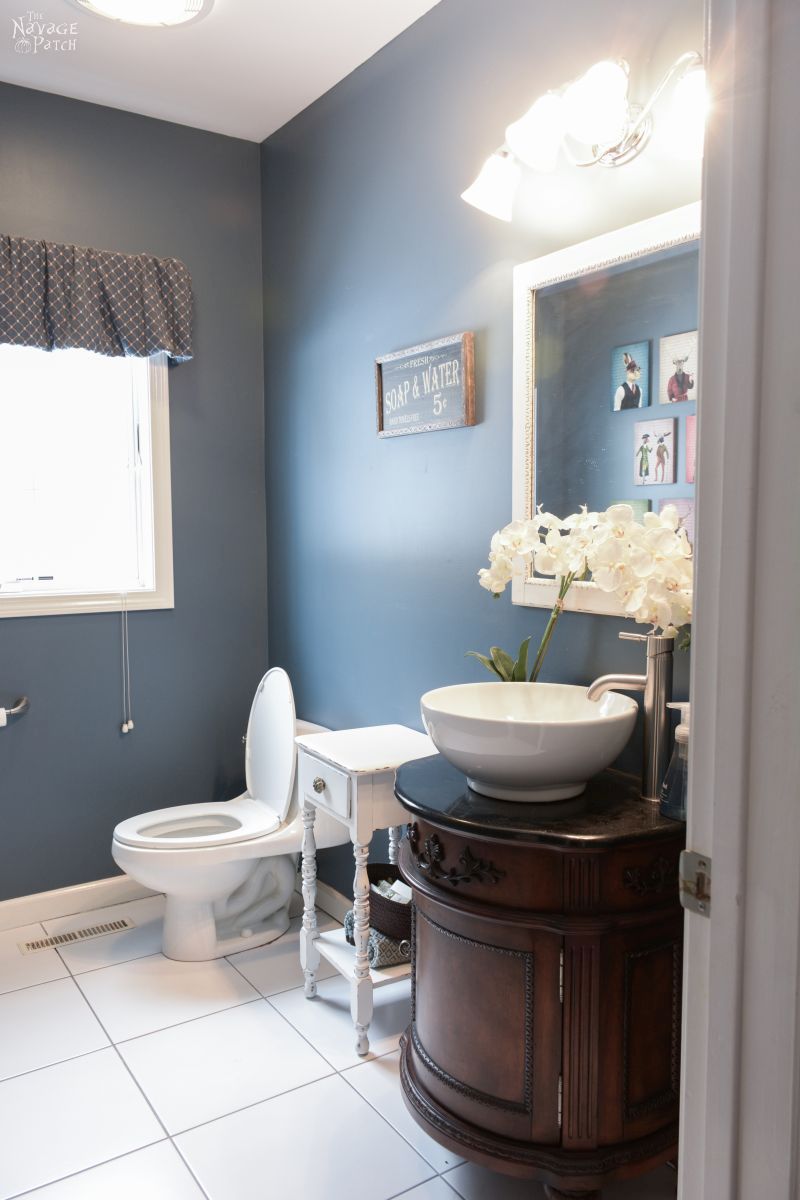
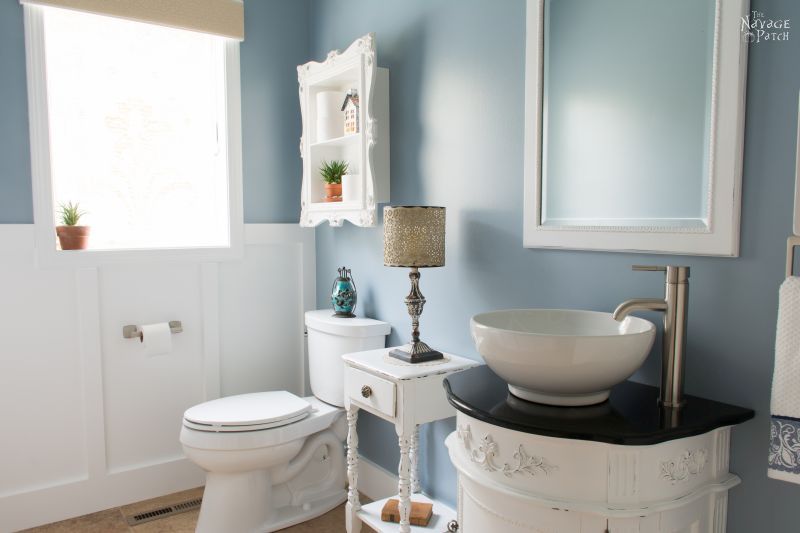
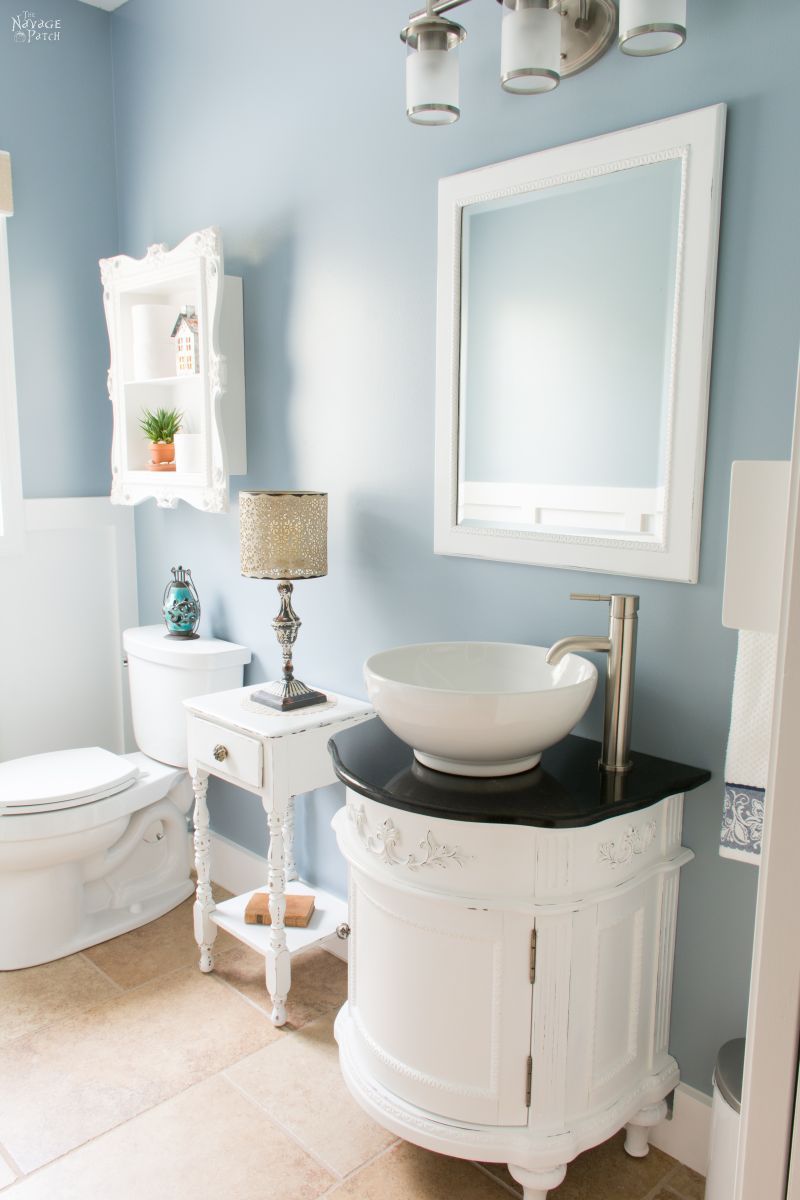
Let’s take a peek at the whole room. I just got back from the camera store with a new wide angle lens so I could fit the whole room into a single shot. It’s tough to photograph small rooms, but this new lens is awesome! Our room makeovers are really going to shine from now on.
The overall look we wanted was a mix of American coastal and Turkish Mediterranean cottage. The American influence is evident in the board and batten and the vanity light. The Turkish component comes from the window treatment and valance, the potted plants and the candle lamp.

It’s hard to believe it’s the same room.

Creating board and batten wainscoting like this couldn’t be simpler. We went basic for ours, with no 1/4 round moldings and no top rail. We simply used 1 x 6 boards for the bottom rail, 1 x 4 boards for the top rail, and 1 x 3 boards for the vertical stiles. The space between the stiles is just drywall painted with the same color as the stiles.

Handan painted the vanity and re-painted the mirror with pure white paint.

She was having a hard time painting the curved surface of the vanity without leaving brush marks, so she developed a technique to achieve a smooth and level finish. She first painted the surface as she normally would, then she dipped a second brush in water and brushed over the painted area with the watered brush. The water thinned and leveled the paint on the vanity, and she was able to get a perfectly smooth finish. Handan is OCD bonkers when it comes to brush marks, so she was bouncing off the walls with joy after discovering her new method. A little light distressing helped pop the appliques and give relief to the white.
We bought a new vanity light to complement the coastal look we were going for. To me, it evokes a ship’s light or a lighthouse.

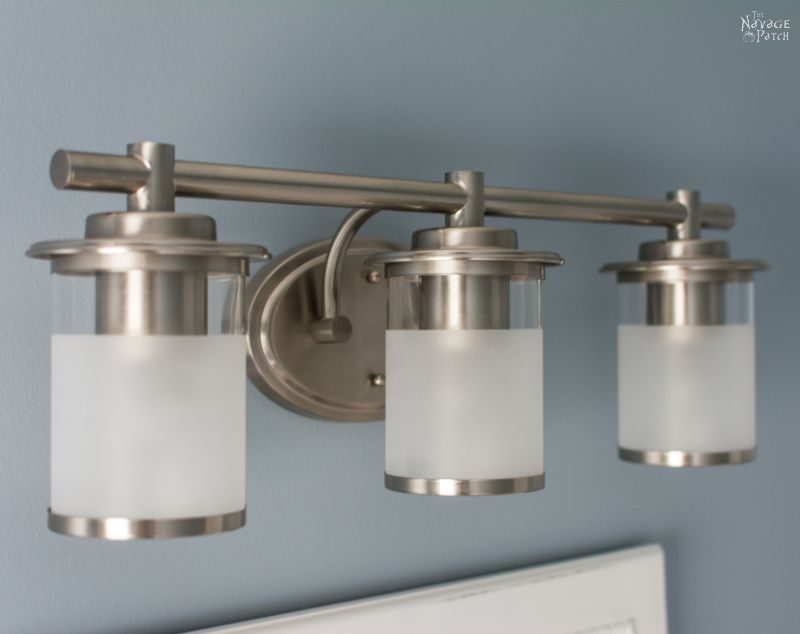
I added a dimmer switch, so we could keep things warm and cozy at night.


That sailboat on top is my nod to American nautical style. I love sailboats and ships.


The sink is the same, but we replaced the black stones with blue glass. I love the look.

We bought a matching towel holder and toilet paper holder. Handan picked the towel to bring in a deeper Mediterranean blue.

The window treatment was hand-crocheted in Turkey by Handan’s mother, and is an authentic representation of the Turkish cottage style.


Turks love to have flowers, plants and herbs on their window sills, usually potted in terra cotta.

I built a valance out of 1/2 inch plywood that Handan then painted white. While it looked good as it was, we decided to bring a little more of the cottage style by wrapping the valance with some roll crochet that Handan got at Hobby Lobby.

Handan put an LED lantern on the toilet tank to introduce another color to the room.

And above that lantern hangs the Anthropologie-inspired storage cabinet. Here’s a link to how I made it.

Handan bought a set of two metal houses, the small one shown above that holds a tea light, and a bigger one that holds a pillar candle.

Handan refinished the little table way back in the days before The Navage Patch. She did a beautiful job painting it – not a brush mark to be found!


That book on the bottom is one of my oldest possessions. It is a book of astronomy called The Sidereal Heavens and Other Subjects Connected with Astronomy written by Thomas Dick and published in 1840.
When I was in fifth or sixth grade, I took a sudden and passionate interest in astronomy. I asked for a telescope and subscriptions to a few of the day’s prominent astronomy publications. In the classified section in the back of an issue of Astronomy Magazine sometime in 1983, I happened upon an advertisement for a couple of old astronomy books, one of them pictured above (the other is lost to time). I was 11 years old, but I remember it well. The books were offered by a man named Ken. I wrote to him and expressed interest. He wrote back indicating that they were still available. I sent him a check for their quoted price and eagerly awaited my prizes.
Great, so why is an ancient astronomy book sitting on the bottom shelf of a table in the guest crapper? Because it looks good in a photograph…duh!
The lamp on the table is one of my favorite things that Handan has ever found for the house (by “found” I mean found online, not at the dump). It holds an LED pillar candle, and it is perfect at night.

And, ahhhhh, my pocket door. My lovely, perfect pocket door. It almost cost me my sanity, you know. But it was so worth it.

And here are the rest of the shots, in no particular order.


We did it! 😀
We love it when you share our posts on Facebook and Pinterest!

Very well done, and I am sure worth the aggravation in the end! I forwarded the post to my husband about the trick to getting a flawless finish when using caulking. Hope he takes it well….
Thank you, Helen! It was so worth it!
What a bathroom ! I’i m green with envy, think i need a Greg and Handon about the house. Love the bathroom , love the blog ,by the way Greg the Murphy’s law thing beat you to it , declared Caths law years ago, anything that can go wrong will definitely go wrong.
Thank you, Catherine! I guess we’ve all had those Cath’s law moments, eh? 🙂
i know this almost busted your bawls 🙂 but dang it is so nice i could sit on the pot until i had a ring on my butt xx love it
I intend to start taking my meals in there to really get my money’s worth 🙂
Ooohhhhhh????
What a beautiful result!
Hi Derry, I must have missed your comment when you wrote it, so I apologize for the late reply, but thank you so much!
You did it! The room looks amazing and you and Handan did not kill eachother in the process! lol The room really is beautiful and that door…..
Thank you, Claudine! Yup, lesser couples would divorce over a project like that, lol!
Looks great I am inspired!
Thank you, Claudine!
Great job, Greg. It’s amazing the wonderful results you get when half the time you admit that you don’t know what the heck you’re doing. If you lost your sanity over the pocket door, no great loss, since it’s obvious you half crazy already to have started it. LOL
I’m a little concerned about the wood subfloor. It may have been the reason for the cracks in the previous tile. But, yeah, once you’d done it, I wouldn’t have redone it either. There are some errors of judgment living at my house too.
P.S. Just adding to your carpentry knowledge, stiles are only the upright ones, The horizontal ones are rails.
Thank you, Chris! I think the wood sub-floor will be okay there. The cracks in the previous tile occurred around the register, where the tiles had been cut to fit. Thank you for correcting my terminology – I’ve updated the post!
As frustrating as this project was for you the end result is fantastic! I love your colour choices! Thank you Handan for the tip on getting rid of brush strokes. I plan on painting my kitchen cupboards this summer and I am very concerned with seeing brush-marks. For the person that chose “not bad”, I’d love to see your work. I think this bathroom looks as good as if a contractor was hired! I can’t wait to see what you guys do next!
P.S. I love the cupboard that stated it all!
Thank you so much, Giselle! I think we’re done with big indoor projects for a while. It’s time to move outside for the summer and enjoy the weather and blog about the yard! We’ll still have some little indoor projects as well, I’m sure.
Wow! Nice job, and I know it took a lot of work with the two of you working together. I know you enjoyed that Martini while you were grilling. Have you ever tried a Martini with lemon zest? I really enjoy reading your posts.
Thank you, Gail! I enjoyed that martini and all the others I’ve drank. I put a twist of lemon peel in my martini, but I’ve never tried the zest. That sounds great, and I’ll be trying it tonight!
We’re “in the throes” of gutting and re-doing our daughter’s house next door…they would luv this bathroom!! Good WORK!! franki
Thank you, Franki! Good luck with your daughter’s renovation!
That was soooo worth the wait guys. Love it!!! Maybe one day the hubby and I will be brave or stupid enough to tackle something like this. In the meantime, we’re just going to be admiring from a far 😉
Thank you, Michelle! just stock up on beer and bbq, and you guys will be just fine!
The room looks amazing. And the window treatment that Handan’s mother made is beautiful! I admire your all’s dedication. I would have scrapped the project after the first weekend. Wait, that’s not true. I never would have started it in the first place. 🙂
LOL, thanks, Jen! 😀
Wow! It’s stunning. I love all the detail – the window treatment, the Anthropologie inspired cabinet, the lamp. I’m also in love with the color you chose. Fantastic job!
Thank you, Amy!
It looks fan-freaking-TASTIC! I’ve really enjoyed following along during this re-do. That’s a pretty neat idea on how to accommodate the outlet and switches!
Thank you, April!
The look and style of the room is just perfect and beautiful. I’d love to install a pocket door in our bathroom and I hope I’m brave enough to tackle it one day! Great job
Thank you , Angie! The pocket door is tough, but it is doable. Good luck if you try it!
I love the paint color. Great ideas
Thank you, Susan!
Oh this is such a beautiful room. It feels so fresh and clean and interesting. I am curious tho..did you or did you not caulk around toilet? I get so many …..yes you should or no you shouldn’t…lucky guests,they will never leave! ?
Thank you, Bernice! No, we didn’t caulk, nor was the toilet we removed caulked. I don’t see any reason why you couldn’t do it. I suppose it is just personal preference.
Thank you. Still thinking about your beautiful bathroom!
I have boys, both sons and grandsons… so I caulk under the toilet. I use a clear bath/kitchen silicone caulk pushed well under the edge of the base. This way I know no “liquids” seep under the base to fester and smell in the future. Some people will tell me that this will prevent water from showing me a failed wax seal but I prefer to take my chances with that. The odor is much more of a sure thing.
Your bathroom turned out well and I really enjoy your posts. I’ll keep reading.
Thank you so much! Good call on caulking as a pee-blocker!
Curious, what is the purpose of the glass “stones” in the sink? All I could think of is my guests spitting toothpaste on them!
Hi Chey, it’s a great question. There is absolutely no purpose other than they look good. When we moved in, there were black stones in there. We kept those stones until the renovation, and then decided to swap them out for blue glass. If we had overnight guests, I’d pull them out, so they wouldn’t feel like they had to wash toothpaste off of them, lol!
Simply BEAUTIFUL!!! I love the colors. My favorite item? The wooden boat! 😉
Thank you Jaime! I love that boat too! 🙂