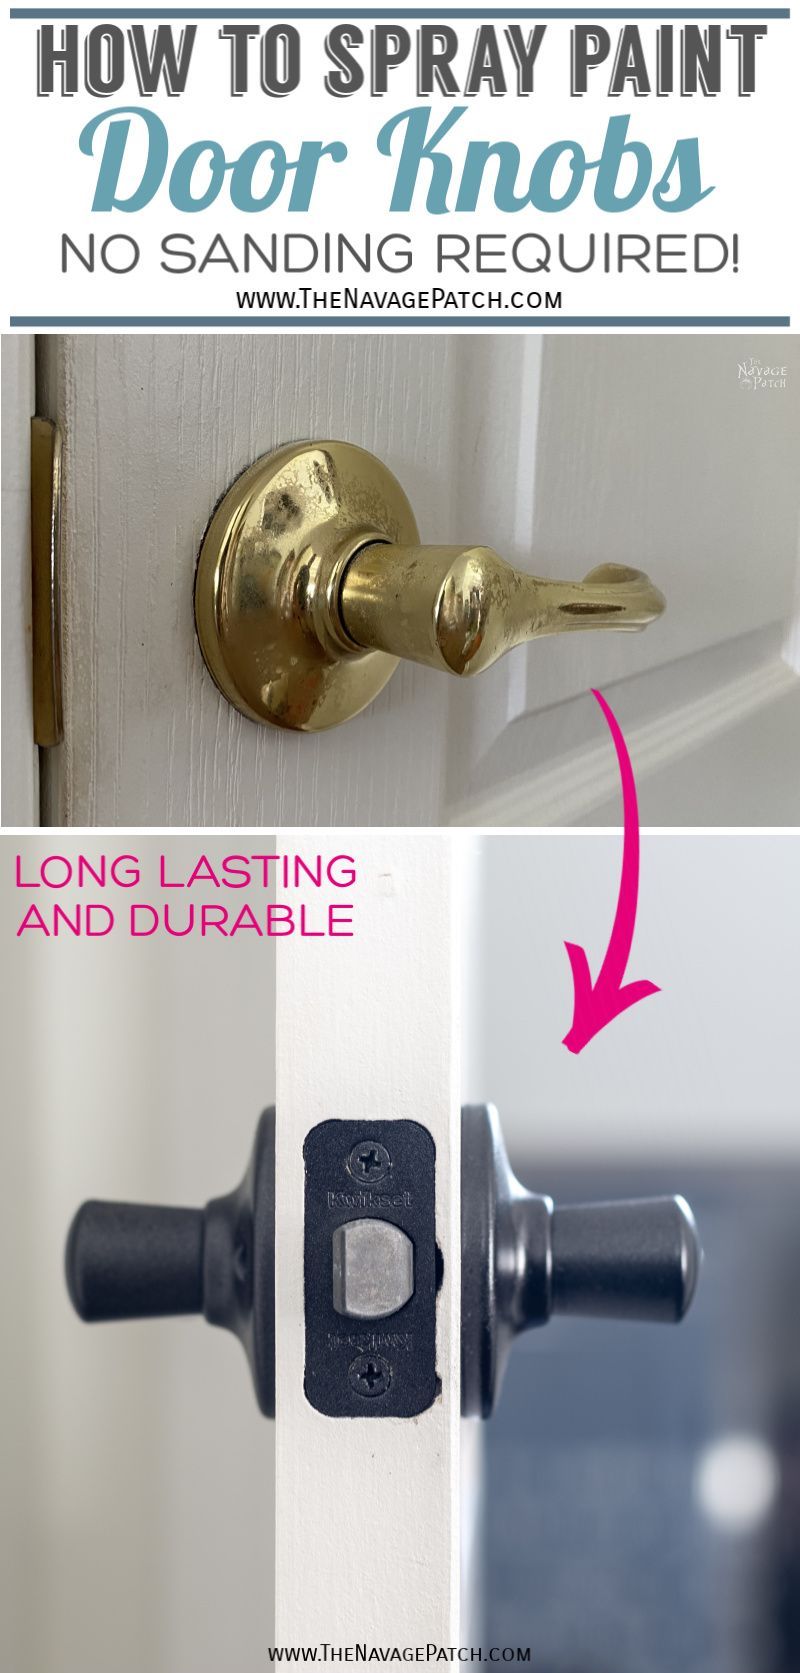
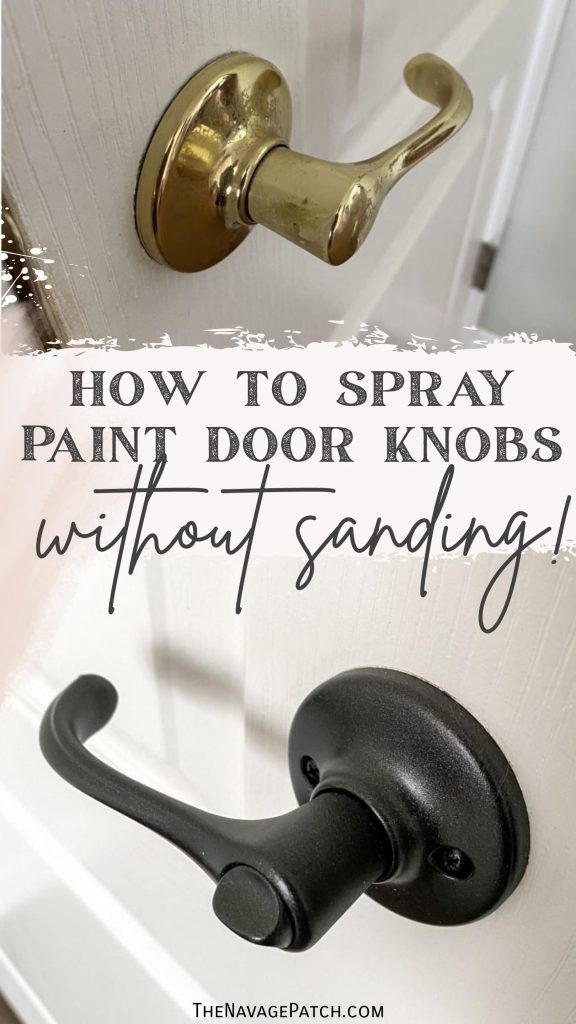
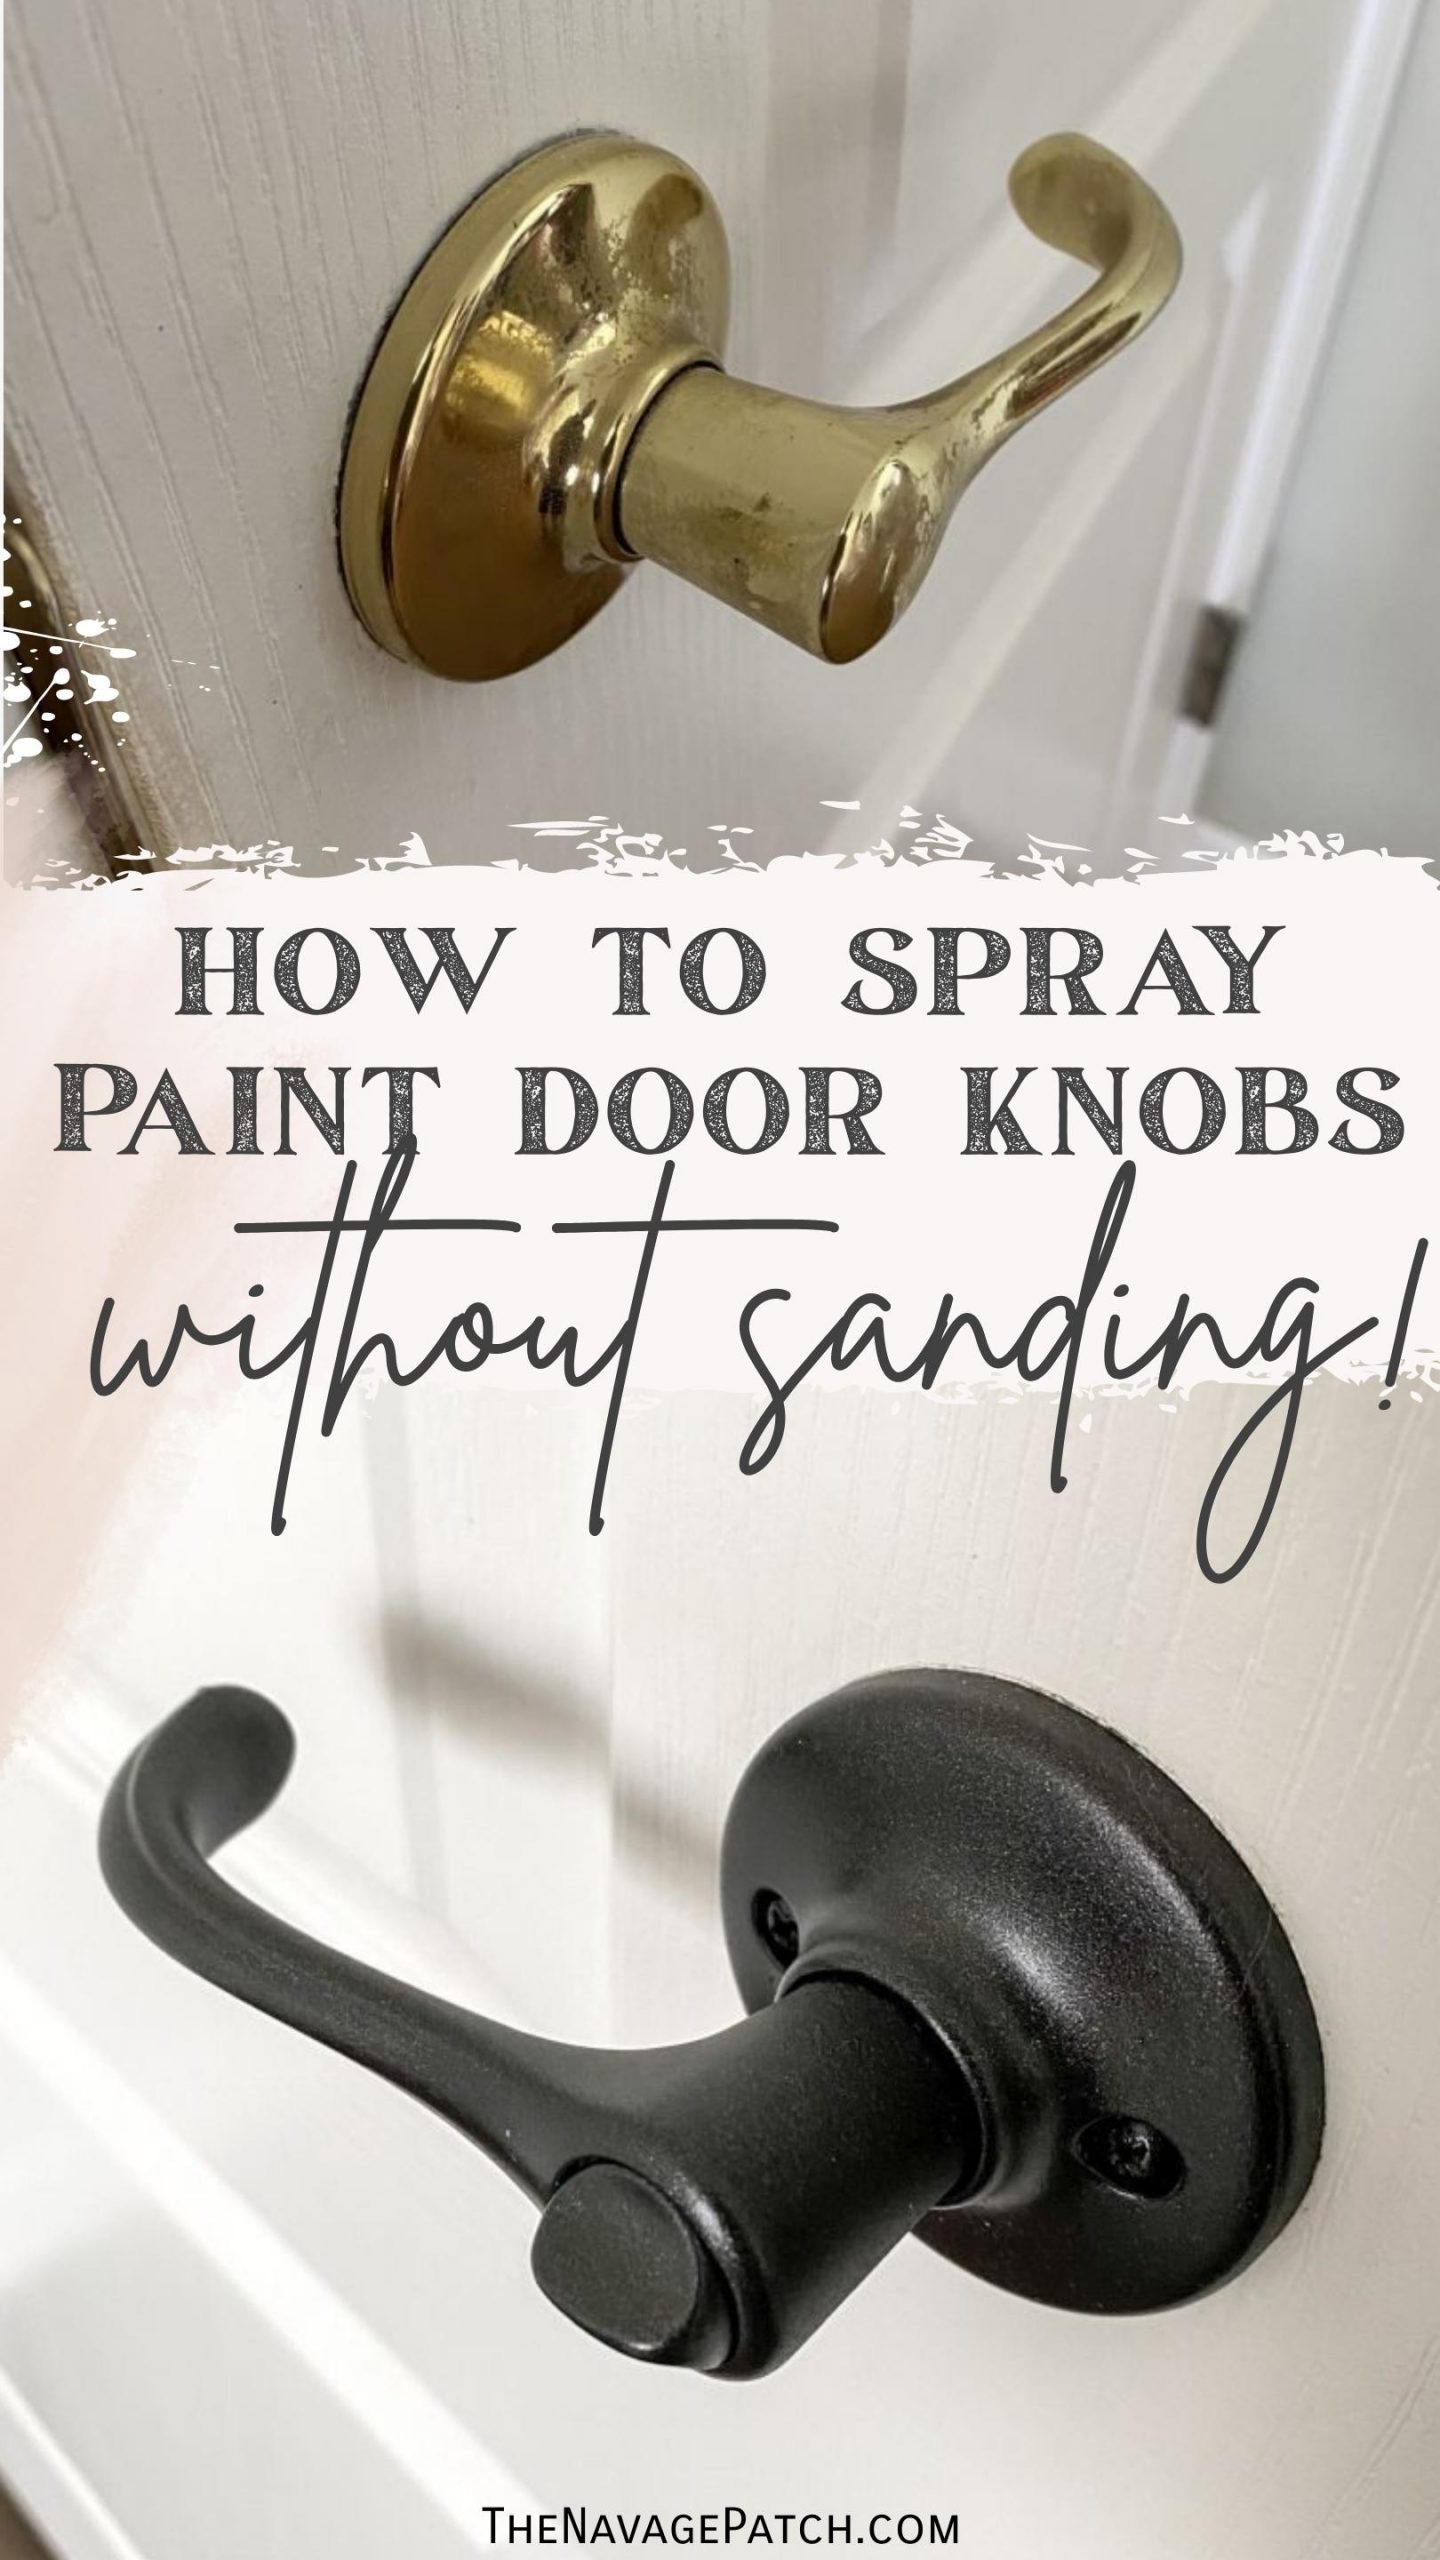
How to Spray Paint Door Knobs (Without Sanding!)
Learn how to spray paint door knobs and handles the easiest way ever with this simple little trick! Best Part? NO sanding involved!
Live and learn, right?
When we bought our first house in Connecticut, Handan and I had yet to set sail on the wild and stormy seas of DIY. Instead, we nestled in the safe harbor of ignorance, and like obedient little consumers, we paid through the nose for things we wouldn’t dream of buying today.
For instance, when confronted with the old brass door handles in our first house, our immediate reaction was to throw up our hands in surrender, hop in the car and hightail it to Home Depot where we plunked down a hefty wad of cash on 16 of these Schlage door handles.
Expensive? Yes.
Necessary? Not at all!
Fast forward seven years, and we’re once again faced with a new house and all the expected and unexpected expenses that it comes with.
When it came to assessing the interior door hardware – 20 sets of 20-year-old brass door handles – we knew there’d be some changes.
Big changes.
But we had no intention of going the Schlage route again. That would have put us out over $500. Maybe not much when compared with a new hardwood floor, but it’s enough to cover the paint I’ll be using on our interior walls.
Our door handles may look a little tired and dated, but they work perfectly.

Press down and pull. Why fix (or replace) what ain’t broke?
But they could use a little sprucing up, wouldn’t you agree?

So.
Spray painting it would be.
But.
BUT!
Search the web for how to spray paint door knobs and you’re going to find a handful of variations on the same theme.
They all go something like this: clean the knobs (or handles), sand them, prime them and paint them.
Sand them.
I’m looking at 20 sets in this house.
That’s FORTY handles.
Do you think I’m going to sit around and sand 40 bleeping door handles?
Madam, I’m married to Handan, aka the Commandant!
This is a woman with a Honey-Do list (aka the Babes-Do List) that is so long and far-reaching that she migrated it to an interactive online calendar that stretches out for years!
Years, madam!
I suppose it’s a blessing though, right?
I’ll never suffer a moment of boredom, as one glance at the Babes-Do List will jolt me into action.
Anyway, do you think the Commandant would stand idly by while I lounge about the house scuffing door handles in my underwear while listening to opera music on Pandora?
Please.
She considers my time to be more valuable than that, and so too is yours, madam!
But placing a value on my time doesn’t change the fact that sanding is a necessary step to make the paint stick to an otherwise smooth metal surface!
Or is it?
What if there were another way to accomplish what sanding does – scuff the surface so the primer and paint have something to grab onto – without actually sanding?
(there is)
(there totally is)
There is. And I’m going to show you how it’s done.
Okay, we’ve established that scuffing the metal is necessary, because primer and paint won’t adhere to smooth, non-porous surfaces (well, not for long, anyway). The trick is to scuff the surface without sandpaper, and this is how we’re going to do it.
I really wanted to spray paint our door handles, but I really didn’t want to sand those handles, so I started thinking about painting metal. In the world I’m familiar with – the DIY world – all the advice about painting metal hinges on the need for sanding.
Like I said – not gonna do it.
So when the world I know fails to offer up a solution, I look to other worlds (Handan is a master of this). In this case, I thought, who paints a lot of metal?
Car guys and car girls.
And then I asked myself, do they sand every fender and body panel first?
And though I didn’t know the answer for sure – after all I’m a regular DIY Joe who also dabbles in crafting – I guessed they might not.
A little digging into the painting habits of car guys and car girls led to the discovery of self-etching primer. It’s an automotive primer that has an acidic component that etches (scuffs) the metal to allow the primer to bond with it. From there, the paint is able to bond to the primer.
It could work for painting my door handles!
It would work for painting my door handles!
The science was sound, so I bought a couple of cans and prepared to paint our brass door handles.
How to Spray Paint Door Knobs without Sanding
SUPPLIES LIST
Affiliate links are provided below. Full disclosure here.
- Metal door knobs or handles
- TSP cleaner
- Plastic tub
- Cleaning rag
- Masking tape
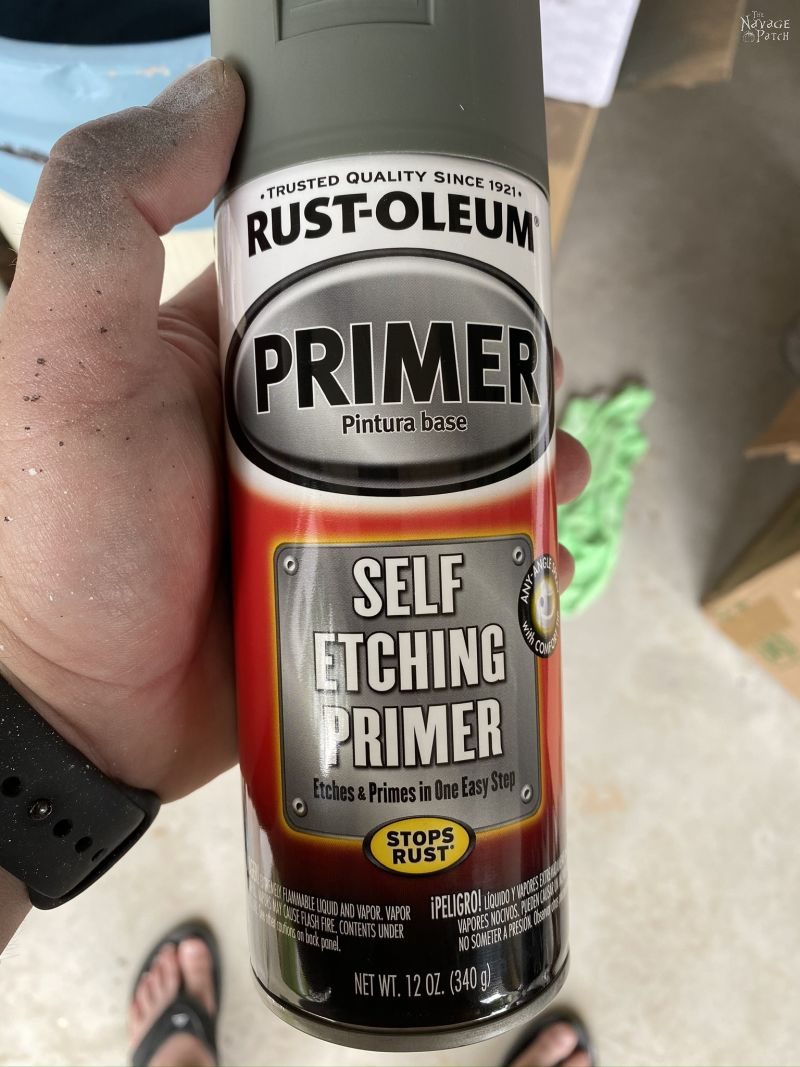
- Rustoleum Self-Etching Primer
- Rustoleum Oil Rubbed Bronze spray paint (or any color of your choice)
- Oil Rubbed Bronze latch strikes (you can find cheaper ones at Home Depot)
- Empty Cardboard box or scrap Styrofoam (optional but handy)
- Nitrile gloves
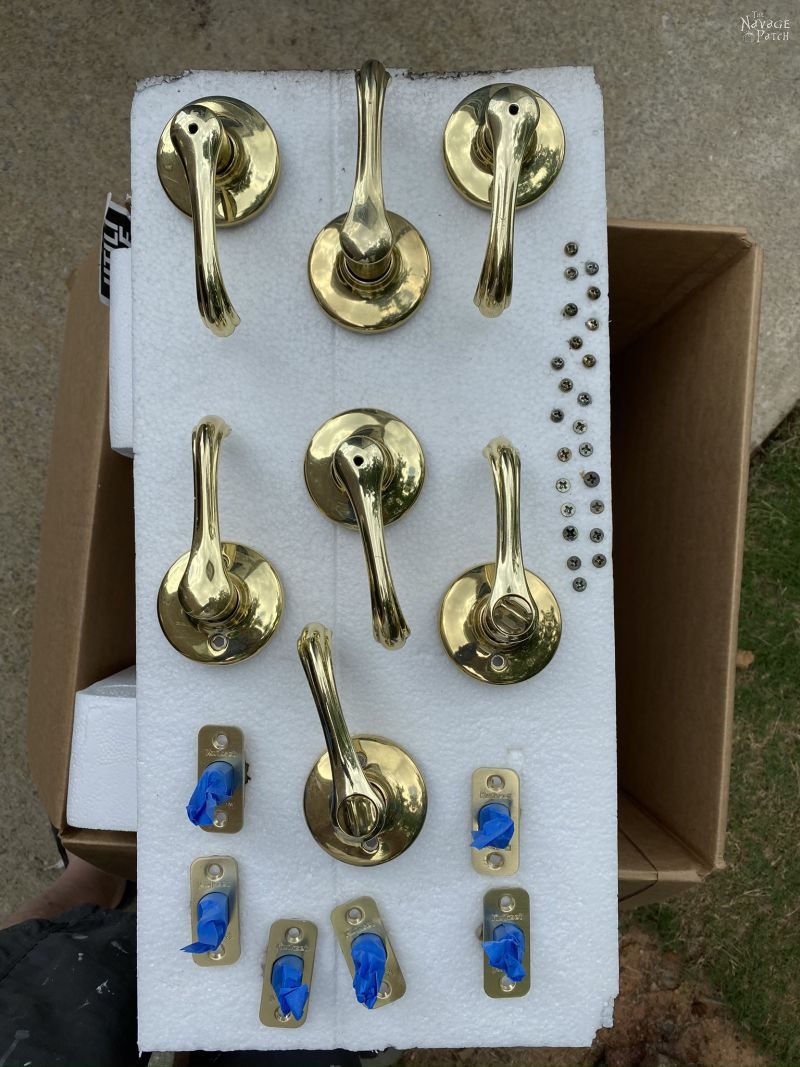
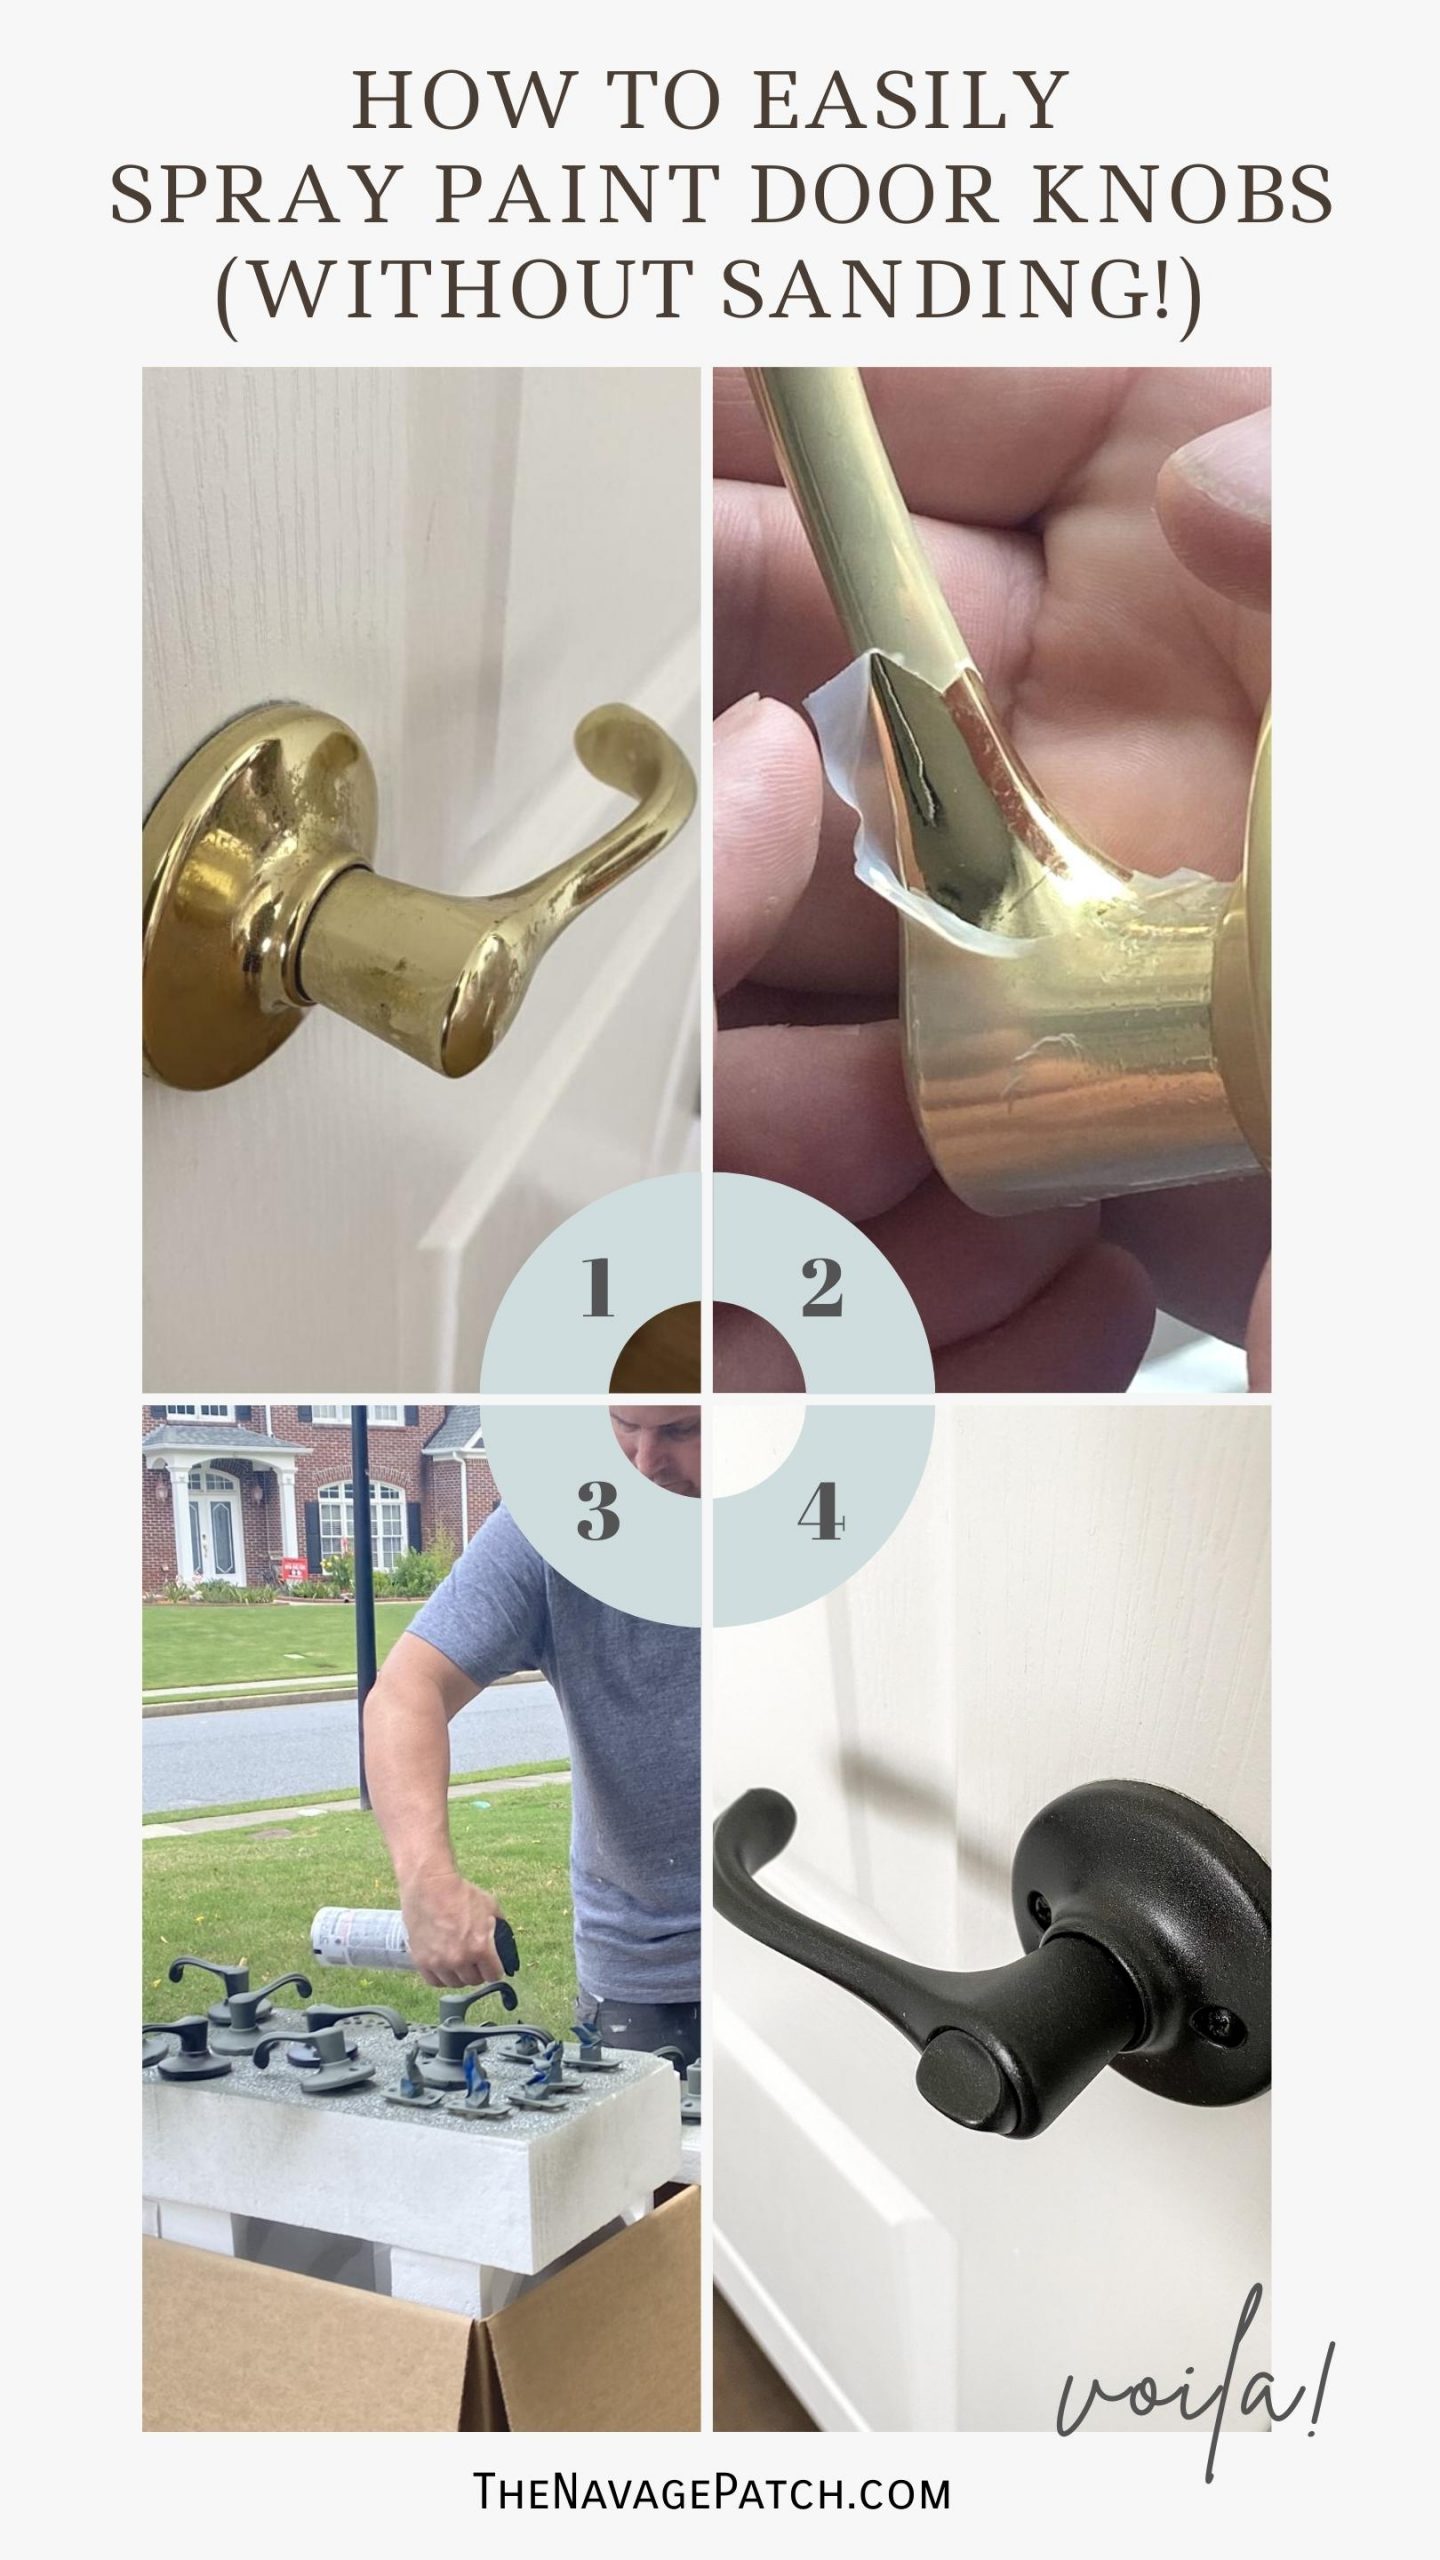
Step 1 – Remove the door knobs
I know, I know – it seems pretty duuuhhhhh, but I’d rather spell it out than have an angry reader bitching at me because her husband sprayed etching primer all over her beloved french doors.
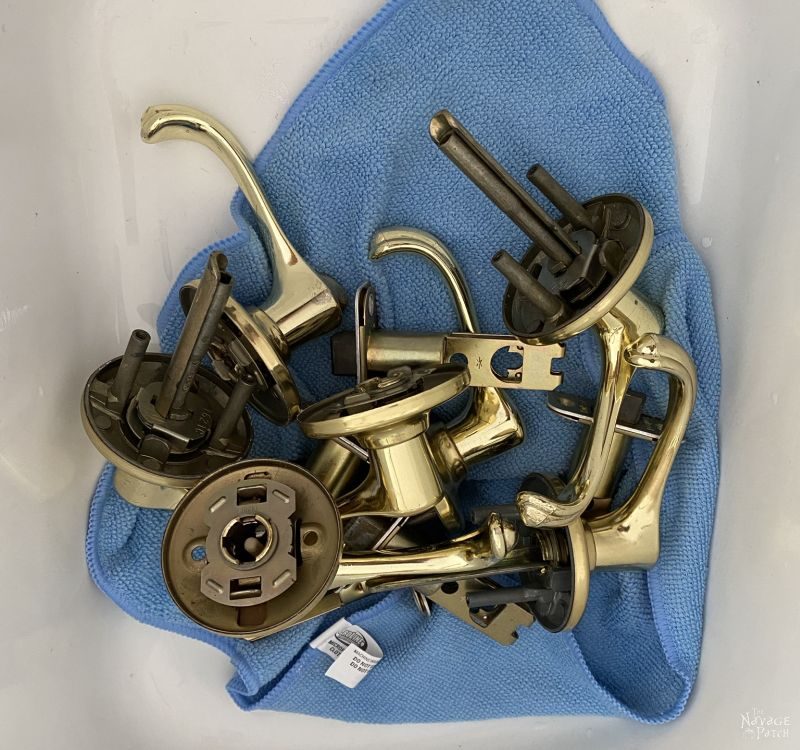
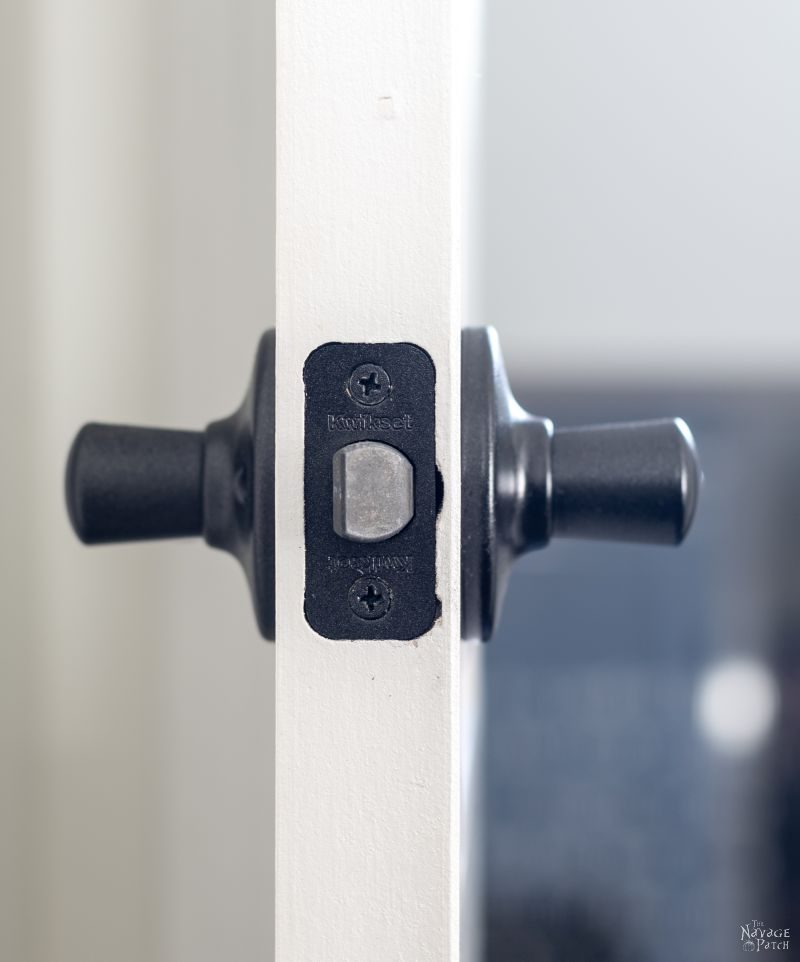
Be sure to keep the screws and the latch mechanism, but you can toss the latch strike plate. There’s no paint on earth that will stand up to that much abuse. We replaced our latch strike plates with new ones. They’re very inexpensive at Home Depot, or you can pay a little more and get them from Amazon (also linked in the Supplies List).
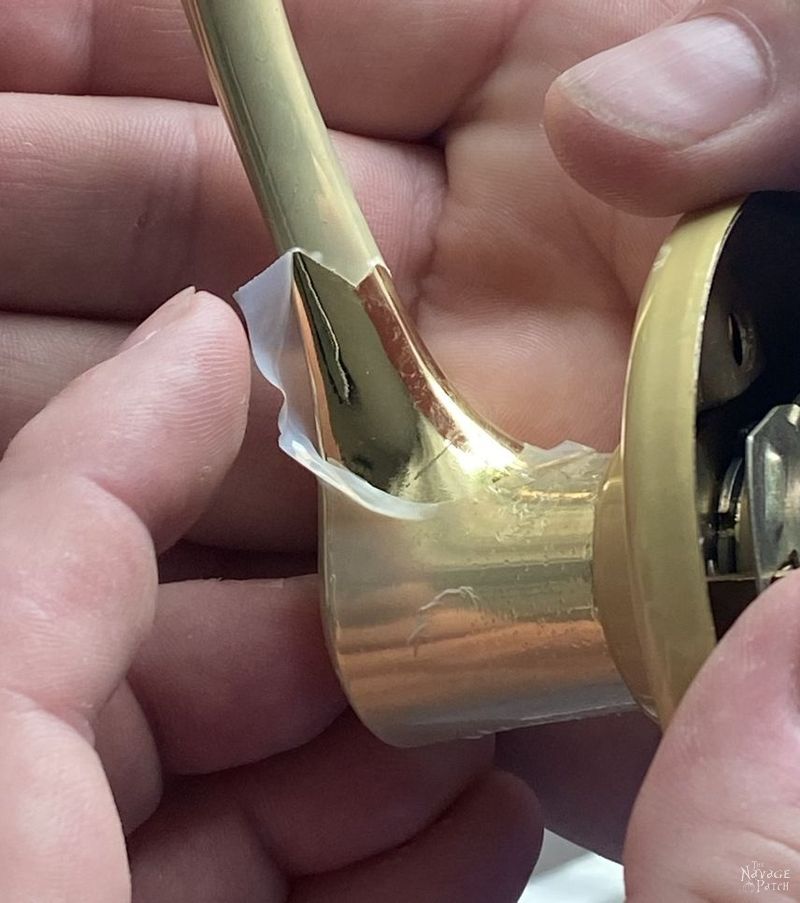
Step 2 – Remove the top coat of the door handles
If your plated door knobs and handles are coated with a protective top coat, the primer won’t actually etch, since the acidic component only etches metal. No worries – there is a super easy way to remove the top coat from your door handles. Check our “How to Remove Polyurethane from Door Knobs” post to see how we easily did it without sanding the top coat.
Step 3 – Wash the handles
To clean and degrease my handles, I turned to the world’s greatest degreaser – TSP. A teaspoon of this stuff could flatten all the oiled-up pompadours of an Elvis convention.
Updated note about self-etching primer: a couple of readers pointed out that plated door knobs and handles may be coated with a protective top coat. If that is the case, the primer won’t actually etch, since the acidic component only etches metal. Depending on what the top coat is, you may be able to dissolve it with acetone (if it is lacquer), or denatured alcohol (if it is shellac). But if they are coated with polyurethane (which is most likely the cast), watch the video below to see how we easily removed the poly from our handles without sanding.
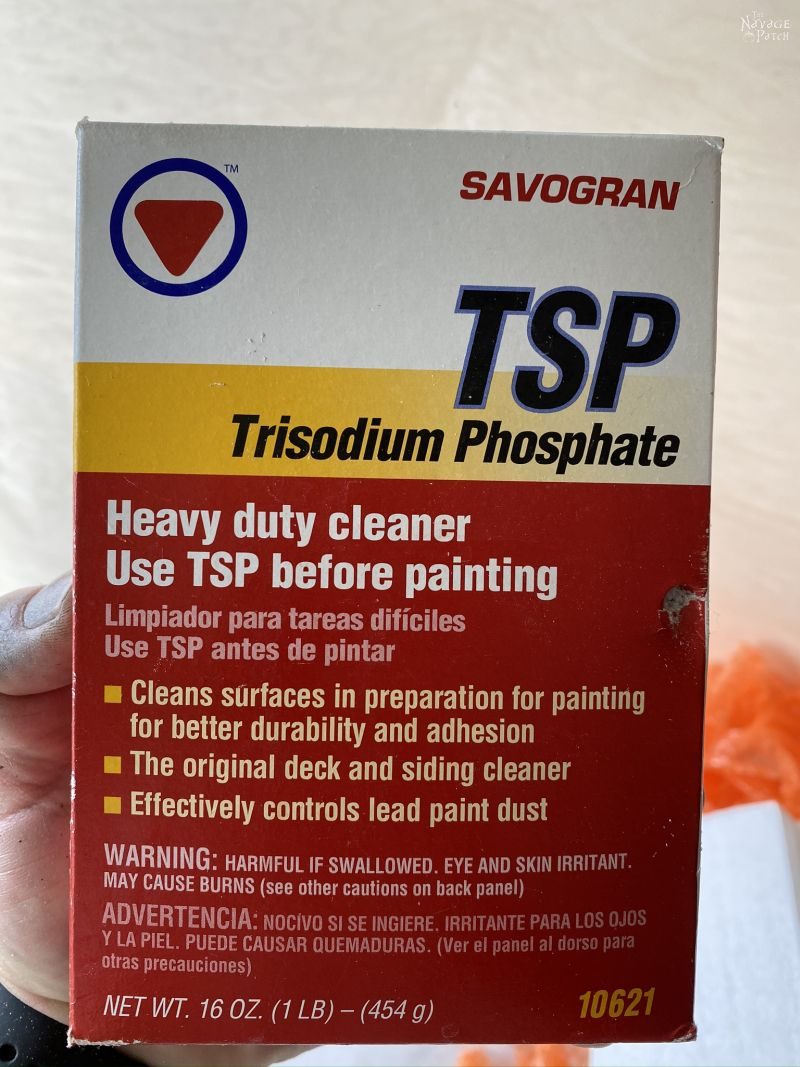
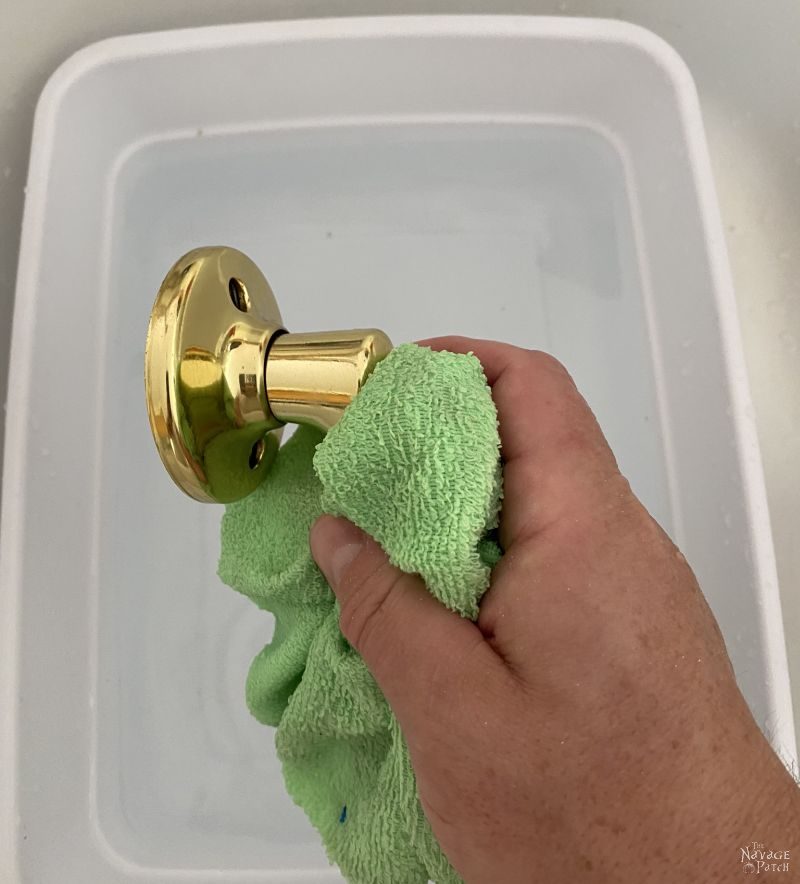
I filled a small plastic tub with warm water and added a bit of TSP.
Next, I dumped in the hardware to have a wee soak.

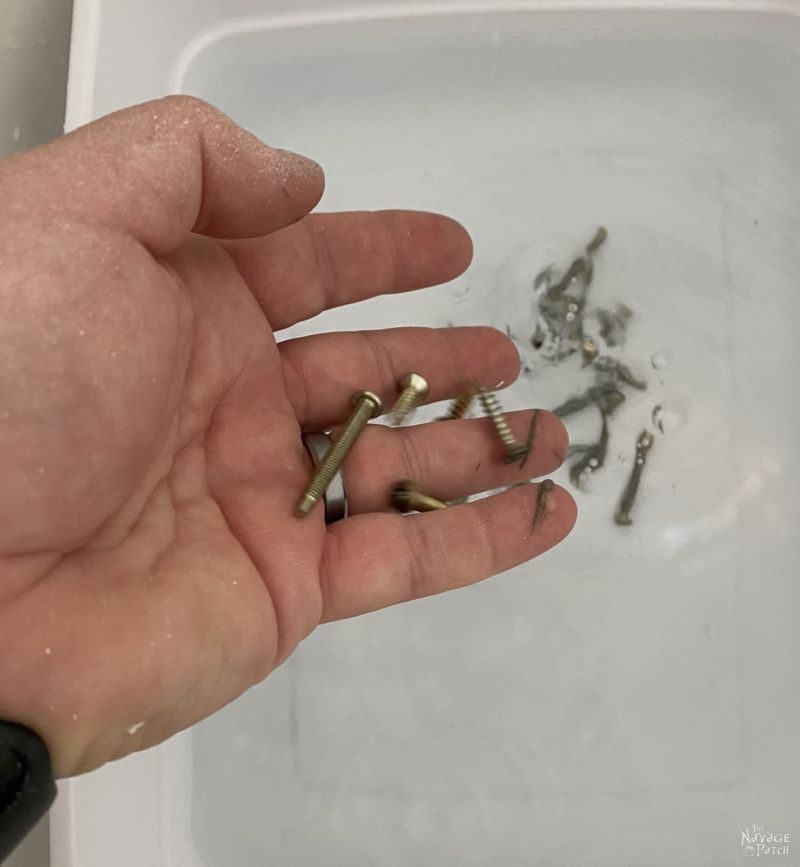
While the screws sat soaking in their chemical bath, I dipped a microfiber cloth in the TSP solution and cleaned the handles.
Note about TSP: it’s pretty hardcore stuff, and you should definitely wear nitrile gloves when using it.
Why aren’t I wearing gloves, you ask?
Madam, I like to live dangerously. My wedding ring is proof of that, amiright? Eh? [You indeed love living dangerously, don’t you? – Handan]
Oh crap, she heard me.
RUN!
Step 4 – Tape the latch
Since the latch will be constantly rubbing against the latch strike, there’s really no point in painting it. Tape it off with masking tape.
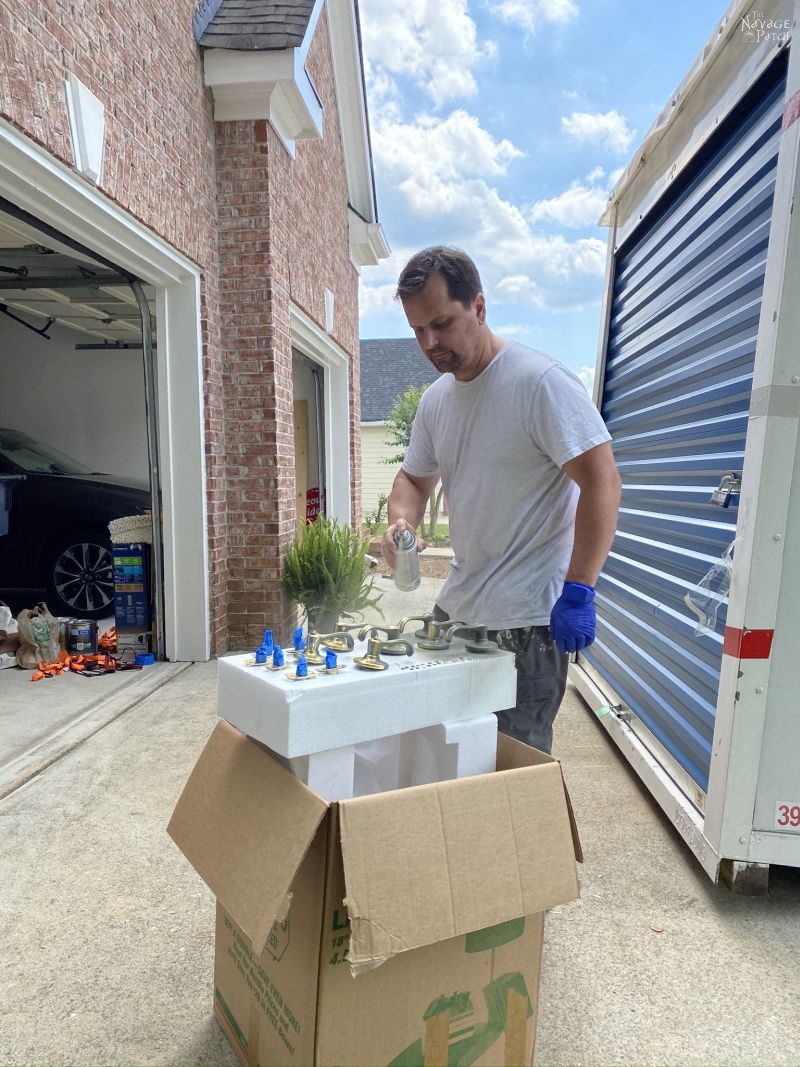
Step 5 – Arrange the door handles and hardware for priming
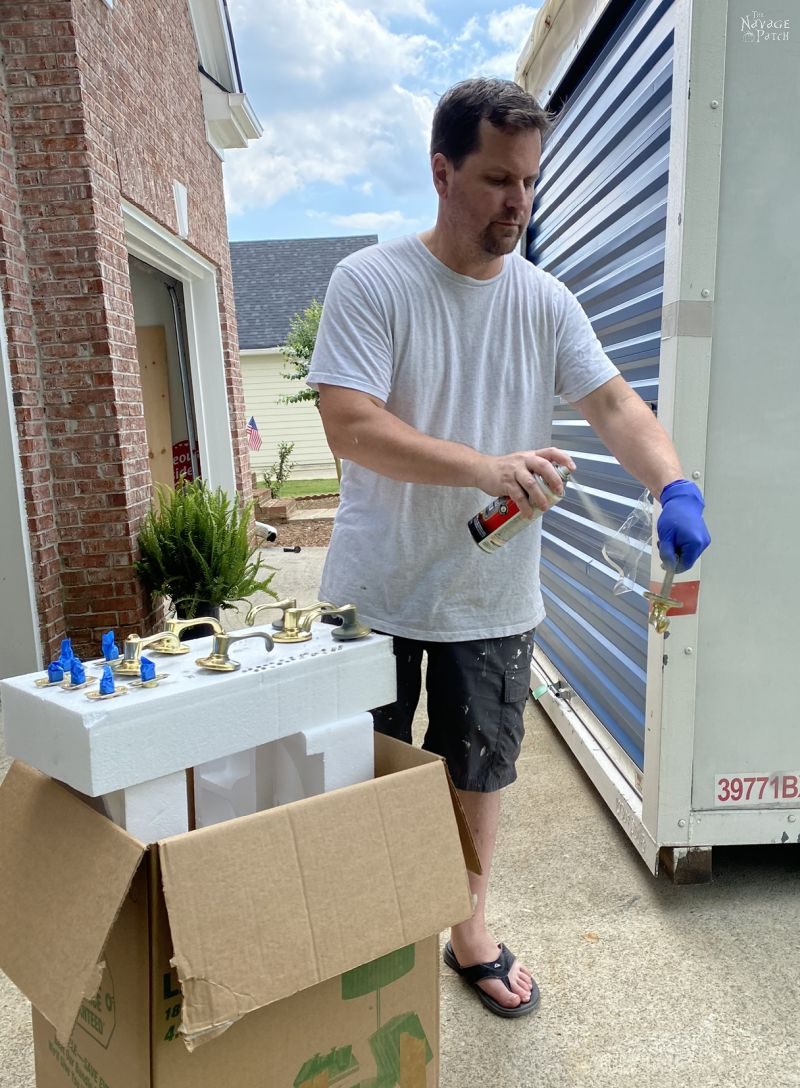
After the door handles and screws have thoroughly dried, arrange them on a cardboard box or piece of Styrofoam for painting. I used Styrofoam, and I pushed the handles and screws into the foam block. This not only secures the pieces while painting, but it serves to mask off the screw threads and internal components of the door handles.
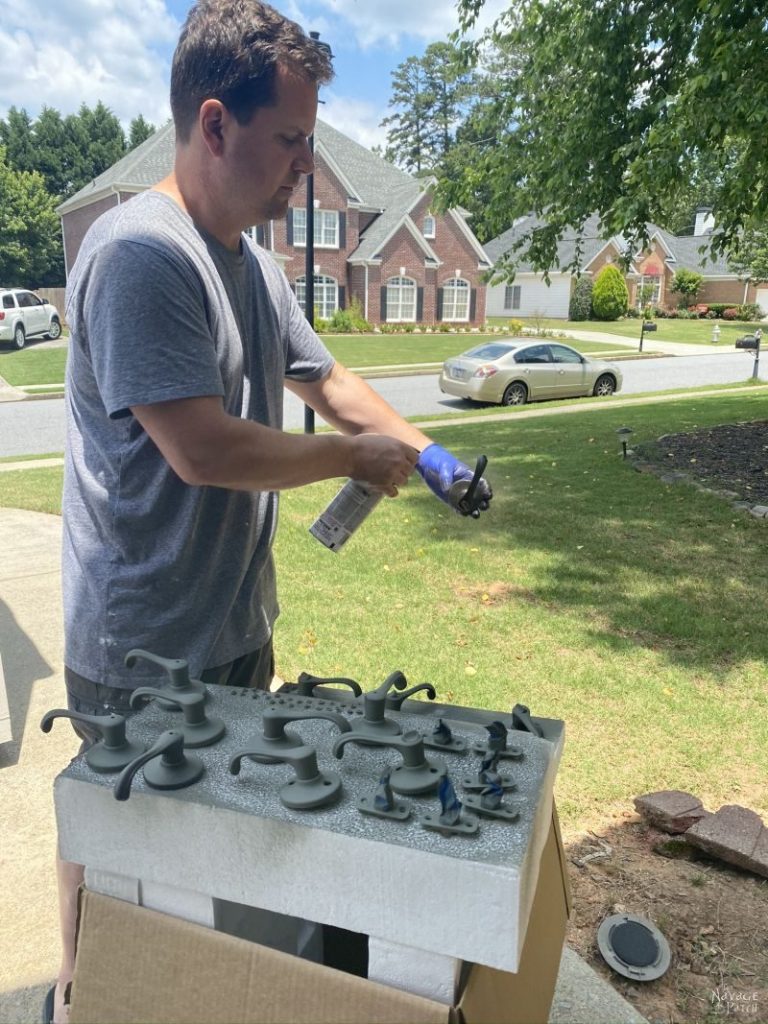
Step 6 – Prime the door handles with self-etching primer
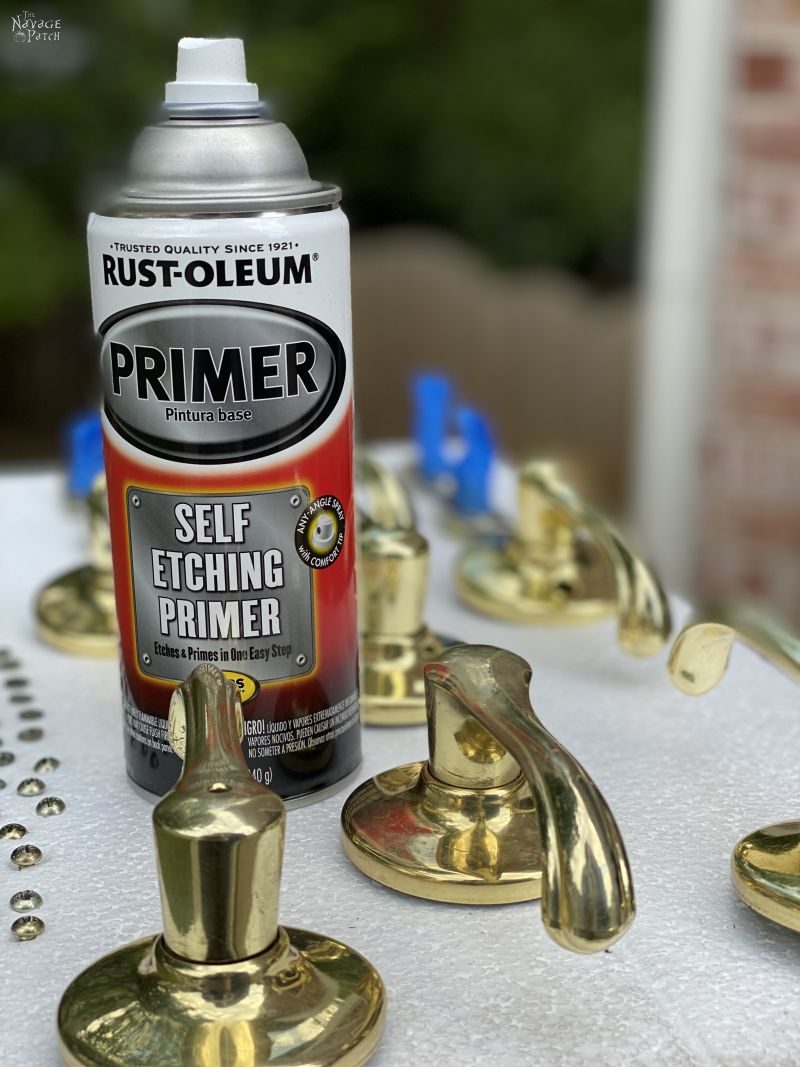
Picking one at a time, I sprayed the underside while holding the handle with a gloved hand.
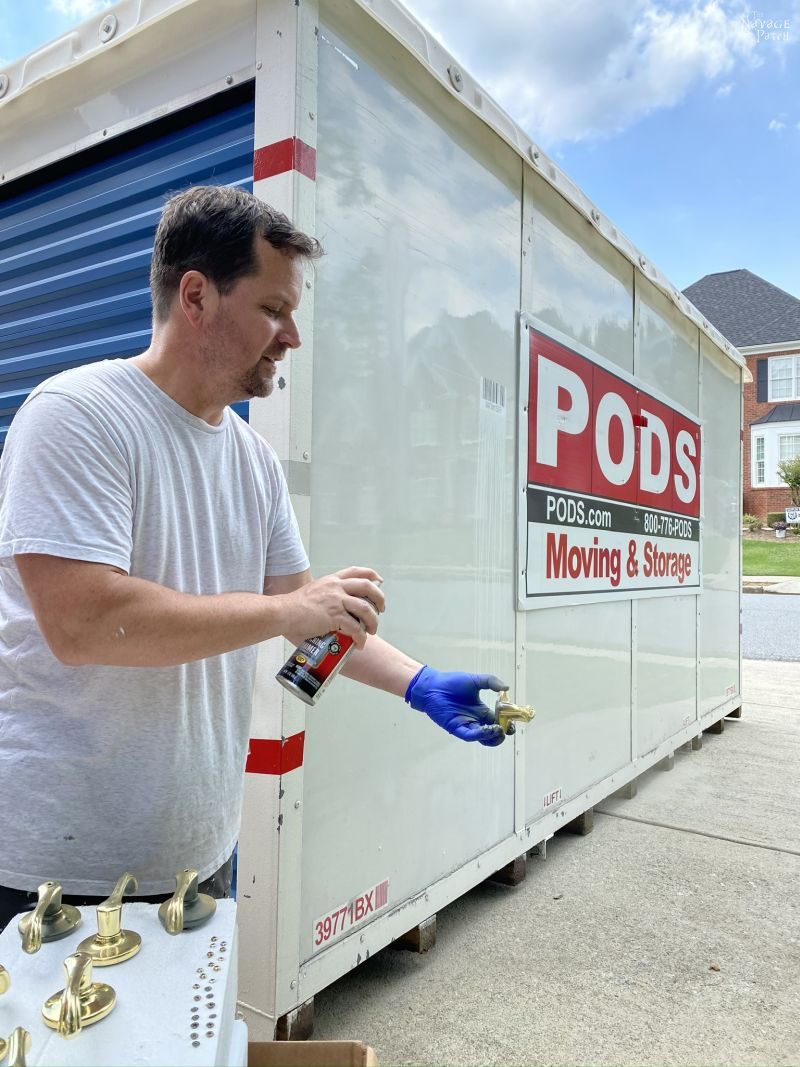
Once I got decent coverage on the underside of the handle, I placed it back on the Styrofoam block. When all the undersides were primed, I sprayed the tops and the screw heads with a light coating of primer. After a few minutes, I gave them a second light coat.
A note about the self-etching primer: the technical data sheet says to either dry or wet sand with 400 grit after the primer has dried. Anyone reading that may be wondering how I can say “no sanding involved” when the technical data sheet says otherwise. But remember, this product is for auto parts, and auto parts need to be smoother than a baby’s business end. We don’t need that level of extreme smoothness, so we can skip the sanding step and go right to painting.
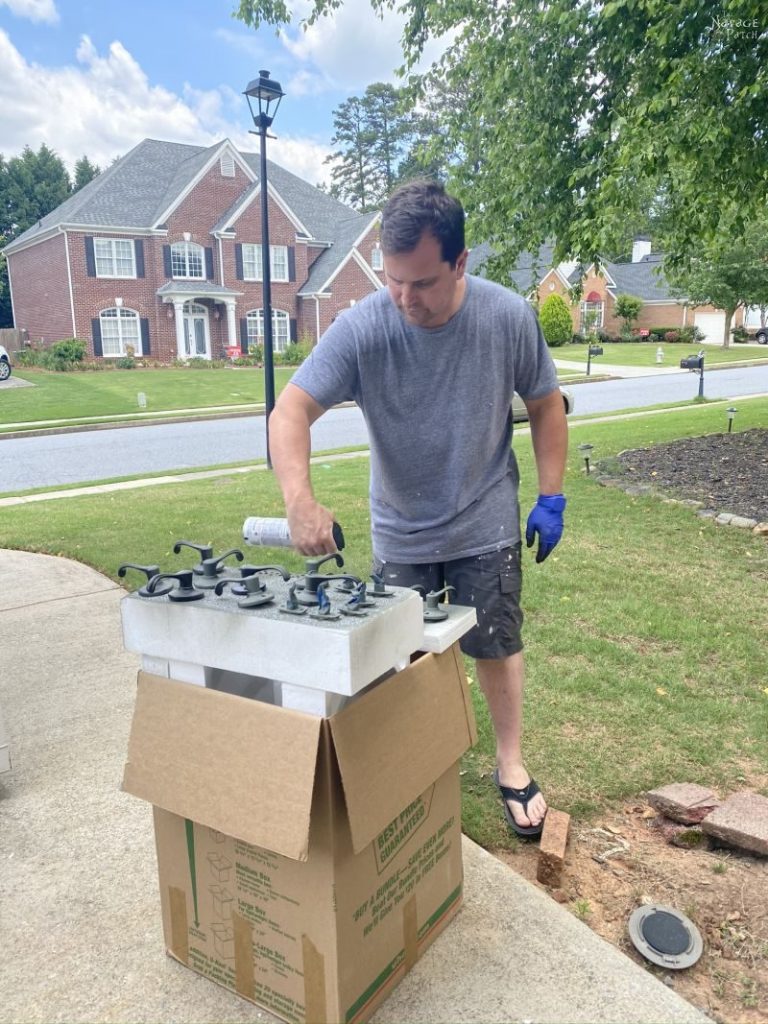
Step 7 – Spray paint the door handles
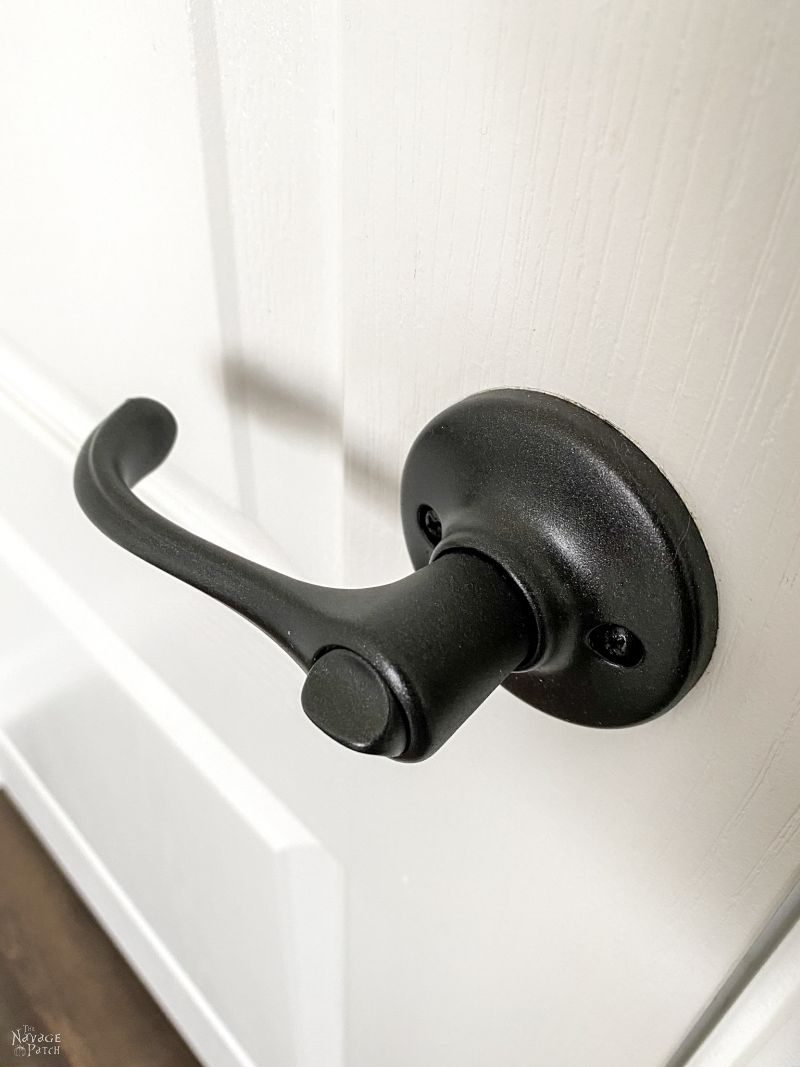
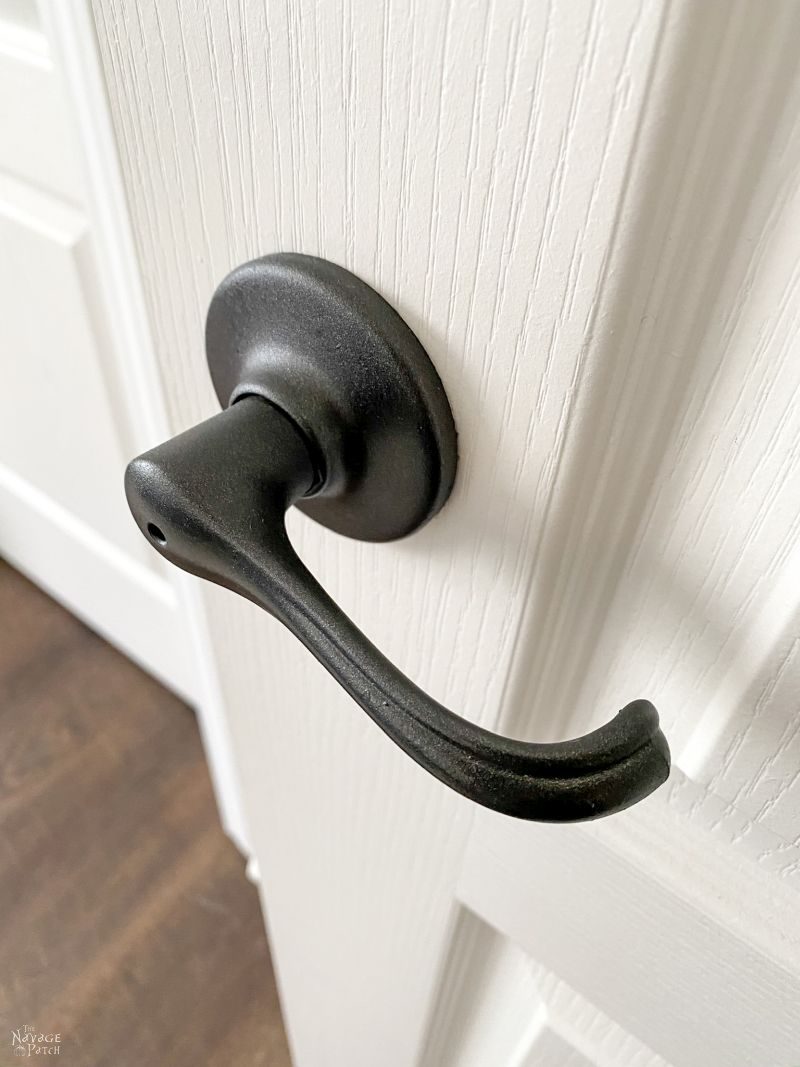
After letting the primer dry overnight (this wasn’t necessary – you can paint after 4 hours), I spray painted the door handles in the same manner that I primed them. As with all spray paints, multiple thin coats are better than one heavy coat. I sprayed 3 light coats of oil rubbed bronze on my door handles
Step 8 – Let cure and reinstall
Because door knobs and handles are high-use items, I like to let them cure for a few days before reinstalling them, and then I use them gently for as long as possible, up to a couple of weeks. Paint dries in a couple of hours, but doesn’t fully cure for about a month.
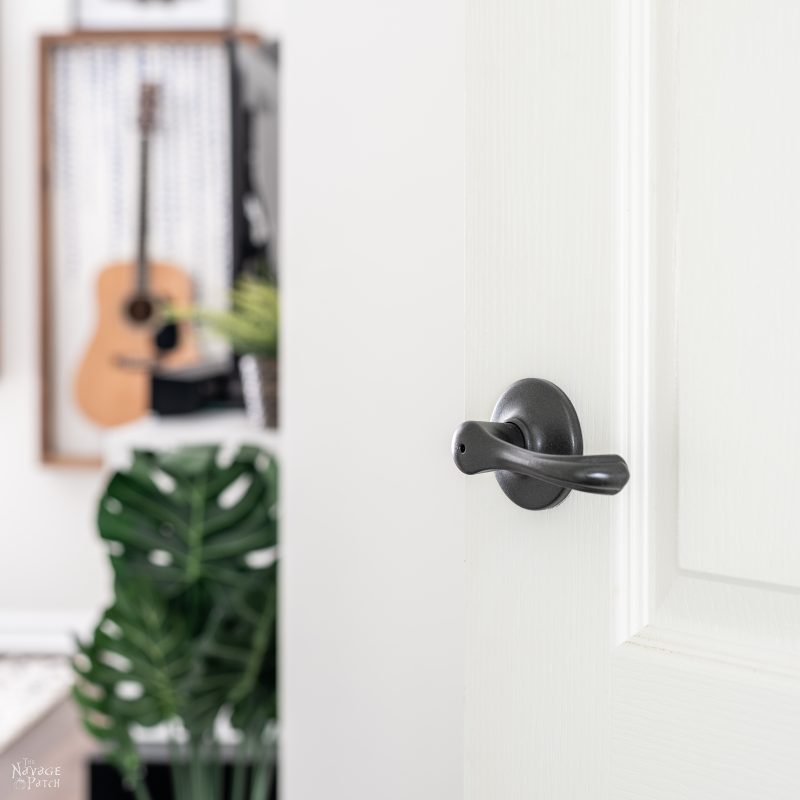
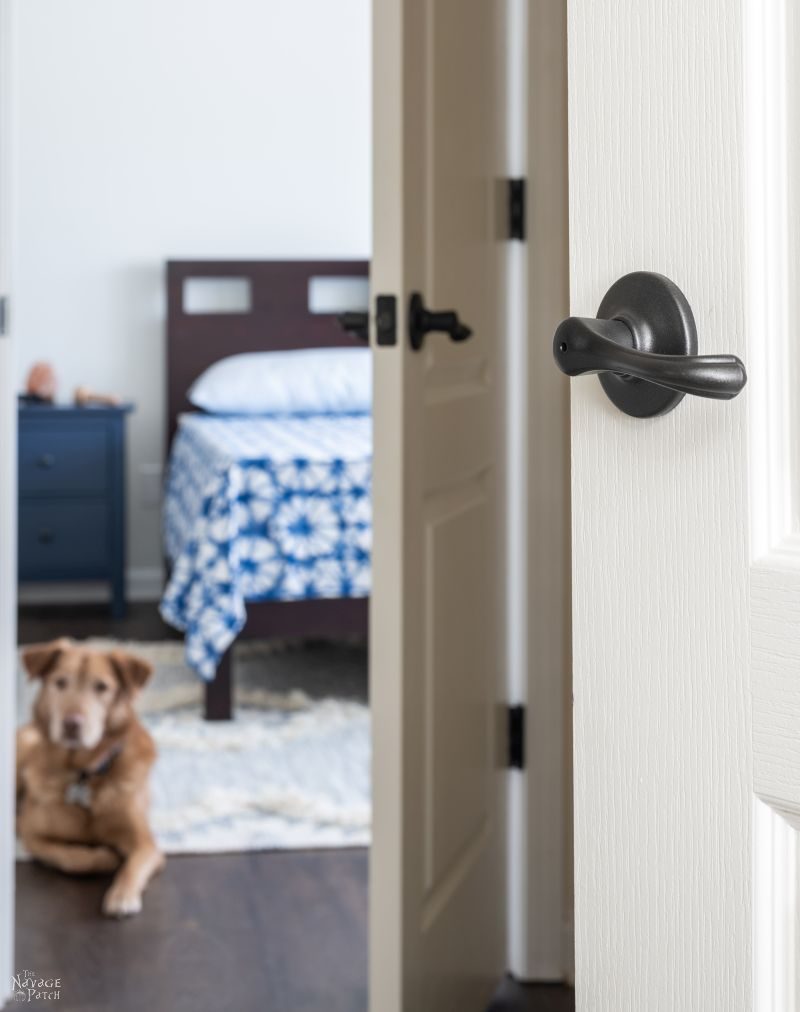
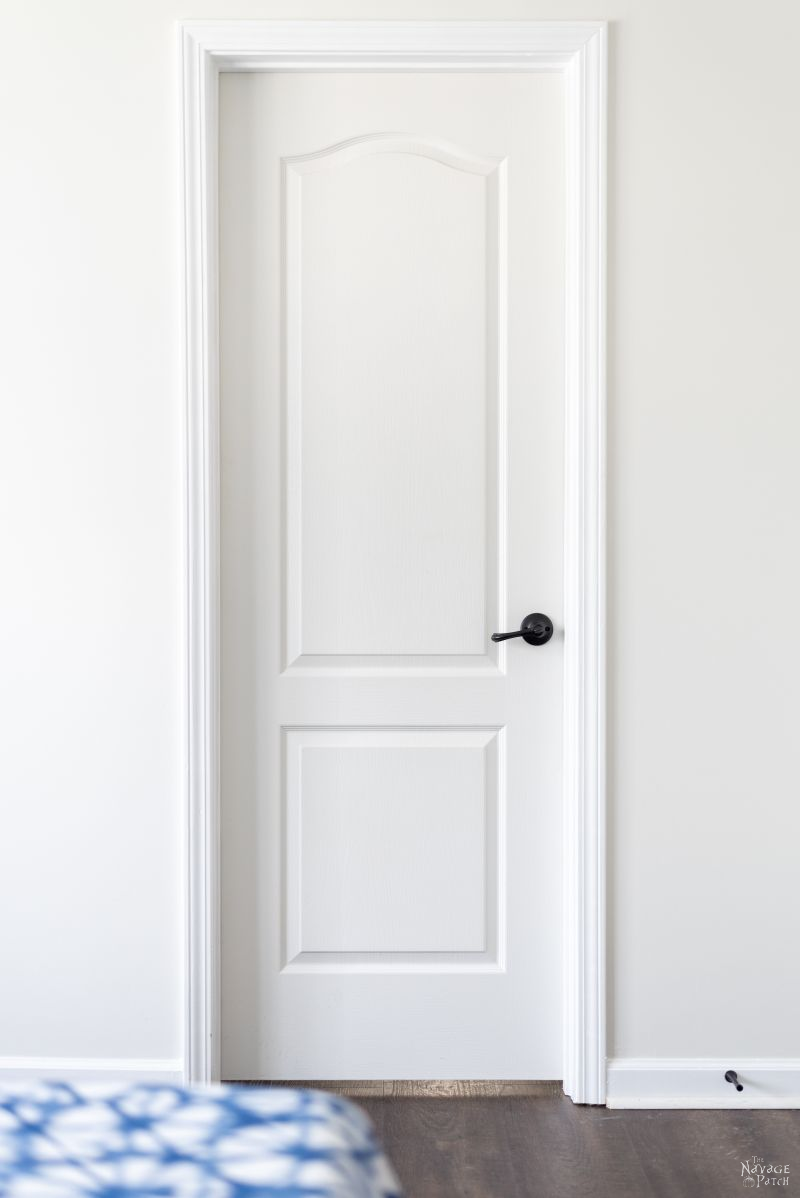
So far, I’ve only spray painted the door handles to Baris’s doors (well, most of them, anyway – I haven’t tackled his bathroom yet). Still, that’s 6 sets (8 once I get the bathroom done)! The kid has doors coming out the wazoo in this house!
Here’s how the updated doors look. You’ll catch a few glimpses of The Boy’s new Royal Quarters. I’ll have more to show you about that soon.
We love to see our DIY projects out in the wild! If you try this DIY project and take a picture and post it on Instagram, be sure to tag us – thenavagepatch
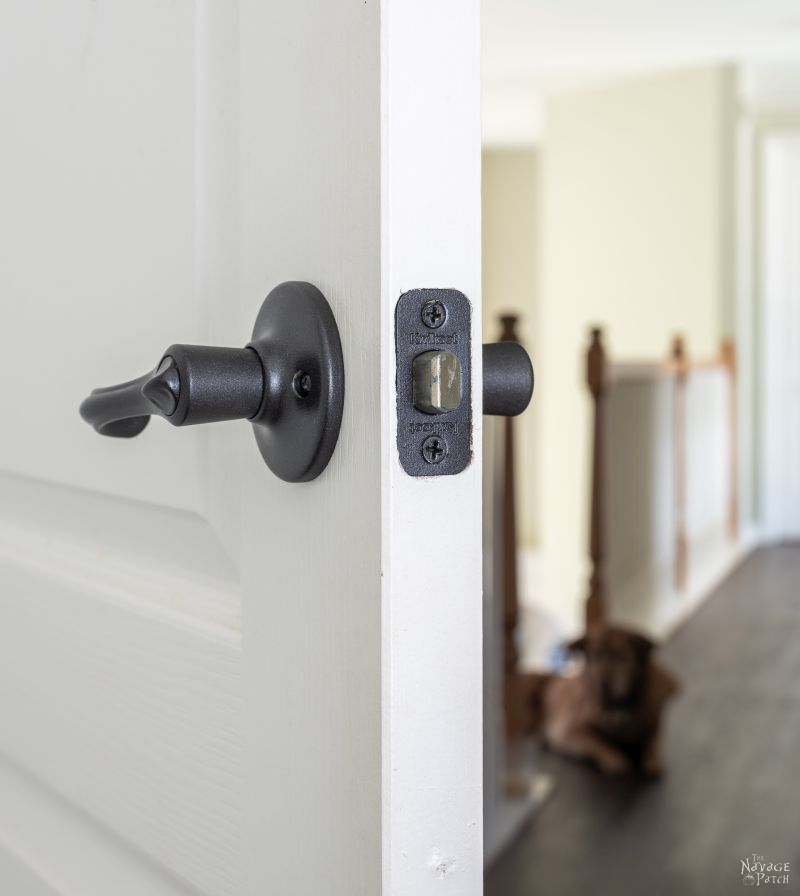
As for the old hinges – I threw them out and bought new oil-rubbed bronze ones from Amazon. They are cheap enough that it made more sense to replace them rather than de-grease, prime, paint, re-grease and re-install.
For those following along, here’s how we stand with the short-term project list.
THE NAVAGE PATCH SHORT-TERM GOALS LIST 2020
Install radon mitigation systemBring power and light to the basementInstall hardwood floors on the first floor Phase 1Pantry makeover – DIY pantry shelvesInstall hardwood floorson the first floor Phase 2Stain the staircase posts and handrailsKitchen remodelInstall kitchen backsplashBuild workbenchesBuild dog feeding stationBuild floating shelvesPaint interior walls, trim and bedroom ceilingsDining room makeover- Change living room fan
- Change foyer chandelier
Paint interior door knobs(this post)Baris’s room setup& related projectsOffice setup & related projectsChange front door lantern and install a second onePaint front doorRemove big shrubs near front door- Replace the ghost window
Share it on Pinterest & Facebook!

Hi, these are beautiful. You did an excellent job. Just wondering if you painted the hinges in the same manner. If so, did you take the doors completely off or just remove 1 hinge at a time, then replace it and remove the hinge? Thank you for your posts. Love them!
Hi Janet, I forgot to mention that I didn’t paint the hinges because they need to be greased for smooth operation. To paint them, I’d have to degrease them, paint them and then grease them again. Furthermore, they get a lot of use, so even if I went through the trouble, the paint would probably peel. We replaced those hinges with new oil-rubbed bronze ones. They are cheap enough on Amazon – you can get an 18-pack for $26.
Ha! Great minds, Janet! I wondered about the hinges, too! Greg, it’s so fun for me to lie on my couch and read all about your hard work on my Kindle! ? Seriously, though, I use your posts as a refence book for DIY info, because there is so much, it’s like the “Navage DIY Encyclopedia”! Thanks!
LOL, I wish I could be lying on a sofa right now! 🙂
A man after my own heart. It’s much cheaper to paint rather than replace them. When I bought my last townhouse my motto was “if it doesn’t move spray paint it.” LOL
LOL, I love your motto, Gail! 😀
Thanks for this! I love finding out about helpful products. 🙂 Can the tsp be used on wood? I’m just wondering if it would be good to use on kitchen cabinets prior to painting.
I LOVE the idea of being able to paint metal without the sanding and priming! Yay for spray cans of stuff! (paint, primer, whatever!!)
Hi Jana, I’ve used TSP on painted wood with great results, but I’m not sure how it would work on bare wood. If your cabinets are already painted, it would work very well. It’s also excellent for degreasing and cleaning walls before painting!
It’s great to learn about a product like this. I’ve seen where some people have updated a light fixture by painting it and it looks like this would be great for doing that too.
I’ll be posting about that very topic either this week or next! 🙂
I’m sold! They look great.
Thanks, Melanie!
I’m sold! They look great and I never would have thought of self etching primer! Thank you.
How do you know if your handles have a top coat that you need to remove? I’m hoping to spray paint the builder grade basic chrome handles before my builder even installs them! But not sure if it have a top coat that I need to remove? TIA
Hi Britt, grab a small knife and scrape one of the handles. If white stuff peels up, that’s poly!
Hi Greg..just wondering…would this method work for an exterior door handle? I have one exterior “black” handle, that either the paint had been chipped or it came from the factory like that and water has gotten under the paint and it’s started to rust. Are any of the items you purchased for exterior handles?
Tough to say for sure, Colleen. The weather wreaks havoc on everything!
That brass is lacquer clear coated, so the etching primer doesn’t really get to the bare metal it needs to work. Rather than TSP, use lacquer thinner and a brass brush to both degrease and remove the clear coat at the same time. Then the self etching primer can really do its job. The etching property is mild, it will not go through that clear lacquer coating.
Hi Charles, thanks for the information! I wasn’t aware that handles got a clear-coating after brass plating. That said, these handles are 20 years old, and I don’t see any evidence of a clear coating. In many cases, the brass plating had worn off or scratched off to reveal the metal underneath. So I think for these handles, the self-etching primer was able to do its thing on the metal. I’ll be sure to look out for a clear coat in the future though!
Nice job, as usual. I had never heard of self-etching primer. Now I am just WAITING for an opportunity to work it into a conversation and sound knowledgable; both my kids have homes and lots of DIY projects! This grandmother just doesn’t look like someone who would know this stuff!
LOL, happy to help up your conversation game, Kathy! 😀
The brass is coated but not necessarily with lacquer as that last comment suggests. Lacquer it’s old school, today they use a type of Urethane that like lacquer does have to be removed before prepping for paint.
Metals do have to scuffed up and yes, metal car panels are sanded to bare metal before priming.
Self etch primer MUST be topped with a neutral base primer before top coating. Or the paint won’t stick for long.
Your steps should be:
1) remove coating
2) sand with 320
3) etch prime
4) neutral prime
5) top coat
6) clear coat (to protect the base color paint)
7) final sand up to 3200 depending on final look desired.
8) buff to a high shine if so desired.
Question is, why would you want to paint solid brass to begin with? Plated brass I could see painting, not solid brass.
But thanks for sharing.
Cheers…
Hi Chase, thank you for this information. As I told Charles, I wasn’t aware that the handles may have been clear-coated after they were plated with brass. That said, any clear coating on ours seems to have been worn off over the years. To address some of your points – according to the Rustoleum can and their technical data sheet, their self-etching primer does not need to be followed by a neutral base primer. The TDS says to follow the self-etching primer with spray paint after 4 hours. I understand why those working on auto parts need all the sanding and the meticulous steps – there is no finish as beautiful as that on a car! However, this is a simple DIY project, and the handles do not need to have that new-car finish. As to your question about painting solid brass – our handles are brass plated, but I use the term “brass” loosely to include them. If they were real, solid brass, well…I’d make the call about painting them or leaving them only after taking a good hard look at their style and condition. Painting solid brass is not as egregious a sin in the DIY world as some projects I’ve seen where folks have found or bought antique pieces of furniture with gorgeous book-matched veneer and then slapped a bunch of chalk paint on it and called it a day. Gives me palpitations every time I see it, lol! Anyway, thanks again for your input. You and Charles both taught me something I didn’t know, and I appreciate that!
Here here! I loved your post btw…
Thank you so much, Kylie! 🙂
You nailed this one!!! franki
Thanks, Franki! 🙂
I am painting my brasses – supposed- on a buffet that are worn and pitiful. I am going to try this stuff and see how they do. Thanks for the tip!
You’re so welcome, Glyniss – I hope they turn out good! 🙂
What a great idea! They look beautiful. It’s wonderful to have the option to change the finish as styles change. Love your blog! I have learned so much from you since I discovered it a year ago.
Thank you so much, Stephanie! We love having you with us! 🙂
Oh how I wish I’d seen this a couple of years ago….replaced all my downstairs knobs (doors, cabinets and drawers) of plated polished nickel for oil rubbed bronze. Talk about a small fortune. BUT…I now know better. Thank you!!
Yeah, it’s crazy how expensive they are! But now you know! 🙂
Like you all, I did this project once before at a different home. I used liquid deglosser on the handles instead of tsp, which held up well after the rustoleum oil rubbed bronze spray paint treatment.
I have to so this again on a new home and will definitely use this method, it will hold up better.
I agree – the tsp plus the etching primer should give a better hold. Good luck! 🙂
We did this exact thing with the brass fixtures in our home… lights, door knows, cabinet knows and even bath fixtures and trim. Saved us a ton of money and is wearing extremely well even after 5 years. I enjoy your blog so very much and love seeing all the work you and Handan do. Amazing stuff!
Thank you so much, Karen! (And SO sorry about how late this reply is, lol!)
They look wonderful, great job.
Thank you, Gladys! 🙂
Another briliant, entertaining blog and another great job, they look like a completely different set of handles. I have 5 doors behind my desk in the living room at the moment waiting for lock down to end so the carpenter can come back and fit them.
Ugh, it can’t end soon enough for you, Catherine. Hang in there!
Thank you for taking the time to figure this stuff out. I hate to sand things like door handles. I will definitely try your technique.
Oh and by the way, love, love, love that furry helper you caught in the pictures.
You are most welcome, Tammy! Yep, our two furjerks have been a tremendous help, lol! 😀
Hi! Just out of sheer laziness – would it work to keep these on the door, cover everything with tape/plastic and do the same steps without removing the knobs from the door?
Hi Kelsey, I suppose it could work, but the two big issues would be 1) how would you spray the inside faces – the ones facing the door? and 2) all that spray paint indoors would cause a lot of nasty fumes, and you’d most likely have clouds of primer and paint drifting and settling over a wide area. By the time you taped off the handles and protected the surrounding area, you could have just removed the handles in the first place.
Hey there. Thanks for the great info. I’m j retested in trying this. How are the door knobs holding up?
So far, so good, Gina!
Love these so much! Thanks for sharing! I currently have mine in the drying stages of the final coat as I type 🙂 What are your thoughts on a clear coat afterwards to protect them more or do you think it’s unnecessary? We have 5 kids ages 5-14 so things tend to take a beating over here haha!
Hi Lorie, thank you! For our house, I deemed a top coat unnecessary, but for your situation, I think it might be a good idea. Again, like the paint, several thin coats will protect far better than one thick one. Good luck! 🙂
Thank you so much!
How did you keep the handles from sticking and not turning once they dried?
I didn’t do anything special, Susan. They didn’t stick.
Did you do this to any exterior doors? How have yours held up?
I’m planning on painting the brand new brass handles on my back patio door. It won’t be severely exposed to the elements since we have a covered patio. Since they are new handles I’m thinking sanding with #2 steel wool before applying the self etching primer. What do you think of that?
Hi Emily, I haven’t done this for exterior doors. I agree that sanding your brand new ones would be a good idea, and if they are exposed at all to the elements, you’re going to want to put on a few light coats of sealant with UV protection.
Love this idea. I’ve been looking for the etching spray.. Cant seem to buy from link. When I look up product 249322 it shows grey-green. Is that okay or should be looking for straight grey.
It’s actually gray. Not sure why is shows different in the picture. Good luck!
What does the texture feel like? Is it flat and smooth to the touch?
When sprayed correctly with light coats of primer and paint, yes. But sometimes Rustoleum ORB wants to spurt out thick – I think some cans are just bad – when that happens it leaves a noticeable texture. That only happened on a few with what I suspect was a bad can of paint. The rest are smooth to the touch.
Hey, looking to do this to our handles but the Rust-Oleum brand is hard to get at the moment (in NZ anyway) are there any other brands you’d recommend to do the self etching? (I don’t want to sand!)
Thanks 🙂
Rustoleum is the only brand I have experience, but I know there are other self-etching primers out there if you search for them!
Hi, Greg.
I used your method and it ‘was’ turning out really well but then I moved the styrofoam into my garage before they were fully dried and they fell over in transit and all got a bunch of styrofoam pieces stuck to them now on one side. Can you suggest a remedy to this? I was thinking I’d have to sand them (fine grit) where the styrofoam is sticking until it’s smooth and then repaint. Do you think I need to reapply the primer first? Thanks!
Hi Rebecca, oh no, that’s the worst (and I’ve done it too)! If you can’t pick them off with tweezers or your fingers, sanding lightly would be a good solution. If you’ve scuffed the metal and the area is small, I’d say just hit it with the paint.
Hi! How have these held up?
Hi Aimee, we moved after a year and a half, but they held up great until then!
I am getting ready to paint all of my door hardware as well, except I have to take it a step further and paint the hinges too. My parents gave the their old(er) house and all the lovely bright brass and orange oak that came with it.
I’ve had a lot of luck using Krylon Fusion spray paint. Not much prep work and the finish is very durable. I’ve even used it on brass plumbing fixtures and that has lasted over 7 years now.
I love the look of your hardware finish so I may have to try it on mine.
Thanks
Krylon is great! Been using it for the past couple of years with great success!
Well it seems as if it has been almost 4 years since you did this project so I’m curious as to how the door handles are holding up?
Hi Shirley, we moved out after about a year and half, so I can’t say for sure, but they looked great then!
This is such a handy guide! I love the idea of refreshing my door knobs without all the hassle of sanding. Can’t wait to try out the tips! Thanks for sharing!