DIY Floating Shelves
DIY Floating Shelves are easy to build, and their clean simplicity looks great on any wall. Brackets and lumber are all you’ll need!
It all Floats These Days…
Not content with the floating desk I built for our son, my babes has recently been yammering on (and on and on and on…) about floating shelves.
You know, before this summer, I was blissfully unaware of the entire “floating” ecosystem of furniture, and I felt like my life was pretty good despite my ignorance.
But now?
Now it’s floating this and floating that, how ’bout a floating cowboy hat?

When did hardware become so uncool? I like hardware! The bigger, the better!
But apparently everything needs to stick straight out of a wall these days.

Okay, fine. I can play that game. Where’s my damn floating toilet? I’m tired of squatting over a ground-based toilet like some sort of grunting ape. I want that porcelain bowl to float before my eyes like a shimmering mirage in the Arabian desert!
While my toilet dreams remained unfulfilled (floating or solid gold – I would have taken either), Handan roped me into this DIY floating shelves project.
My Wife Floats the Idea for…Floating Shelves
When it comes to me getting rope-a-doped into one of my babes’ harebrained schemes (I’m kidding, they’re always good projects), it always starts with one of two utterances.
- “Does my babes know what he’ll be making for me? Hey? Hey? Does he?” [No! No I don’t! If I had those kind of powers, I would have conjured myself into a different room before you could ask!]
- “Soon I will be asking you to build {insert project name}” [Gah! Why soon? Why not now? Just get it over with and put me out of my misery, woman!]
This floating shelf business started with number 1.
“Does my babes know what he’ll be making for me? Hey? Hey? Does he?” I eyeballed her warily. Things could go off the rails quickly with her next sentence.
“Uhhhhh,” I said, articulating as best I could my feelings about the topic.
“He’ll be making me some floating shelves to go above the dog-feeding station! It’s so easy, my babes. I already bought the brackets!” Damn, she had this thing planned out.

As is often the case when my serene torpor is harpooned by the specter of impending physical work, I gave my babes the hairy eyeball, muttered something noncommittal and attempted to slip out of the room before she hooked me like a trout.
Too late.
“Let’s go to Lowe’s and get the wood,” she said.
I cast a longing eye towards the sofa, and then I stole a glance at the refrigerator. So close, yet so far.
I knew when I was whipped, so I sighed the sigh I’d sighed a thousand sighs before, grabbed my keys and wallet and turned towards the door.
“Ho-kay, my babes,” I said, “Let’s go.”


DIY Floating Shelves
SUPPLIES LIST
Affiliate links are provided below. Full disclosure here.
- Floating shelf brackets
- 2 x 8 or 2 x 10 lumber, depending on how deep you want your shelves
- 1/2 inch drill bit (needs to be at least 6 inches long – I used this woodboring auger bit)
- Drill
- Stud finder
- Tape measure
- Level or laser level
- Kreg Multi-Mark (optional)
- Trim square (optional)
- Doweling jig (optional)
- Sandpaper or random orbit sander (60-220 grit paper or discs)
- Pre-stain (I used Varathane)
- Stain of your choice (I used Minwax Special Walnut)
- Polyurethane (optional)
Okay, you’ll notice that the brackets come with drywall anchors. Don’t let this fool you. These brackets must be screwed into a stud. The problem is that the screw holes in the mounting plates are spaced 1 3/8 inches apart at the center.

Step 1: Find the Studs
Studs are 1 1/2 inches wide. That doesn’t leave a lot of room for error, especially if you’re using a piece of crap stud finder like those Zircons sold at Home Depot and Lowe’s. I have two of them (different models), and I had to turn the wall into swiss cheese by drilling test holes in order to find the studs.
More on that in a minute, but instead of risking two potentially weak screws driven into the edges of a stud, I decided that one in the middle and one in anchored drywall would be better. Okay, back to the Zircon…
I’ve never seen a more useless and inaccurate tool!
I passed the same spot a dozen times and got a dozen different readings for the center of the stud – some of them wildly off!
In the end, I had to just drill a series of exploratory holes with a small drill bit across the wall. It was the only way I could be sure of anything.
I’m not the kind of simmering rage-pot who carries around a mental shit list, but if I did, Zircon would hold the number one spot. You build stud finders, for crying out loud! They literally have ONE job! GAH! What a dismal product failure!
A Better Stud Finder
I’ve since bought this stud finder. The entire internet assures me it is the best one in the universe. Time will tell, but I do have high hopes.
Update 2022: I’ve been using it since I wrote this post, and it indeed is the best stud finder in the universe!
Anyway, whether you use a decent stud finder or just engage in some serious drywall wildcatting, it helps to drill and explore on the level line you want to hang your brackets on.
The Almighty Laser Level
This is best accomplished with a self-leveling laser level.
I’d never seen one of these gizmos before Carlos and Manuel (they work for Tony at Atlanta Custom Finishes) used one when they installed the backsplash tile in my new kitchen. Then the next day, San showed up to do some electrical and lighting work, and he had one, too!
The universe was definitely trying to tell me something.
After borrowing Manuel’s for this floating shelf project, I understood that the universe really wanted me to have one.
So I asked my babes.
And she said yes!
Step 2: Mark and Pre-Drill
So I measured and marked along my laser line. I didn’t actually know how to use it properly at this point, so I only got a good vertical line. I ended up measuring off of that. But at least I knew that the vertical line ran up the center of a stud.


Step 3: Install the Shelf Brackets
Once I had the brackets installed, I measured and marked the shelf. I had already made the bottom shelf. I didn’t take pics of that as I was trying to figure it all out myself.
It worked!

Okay, using the bottom as a reference, I placed the top directly above it standing on its back edge.

Step 4: Mark Bracket Insertion Point
I then scribed two lines on either side of the bracket with a pencil.

After this, I headed down to the basement for the real fun.
Shelves like this require a 1/2-inch-wide hole that’s 6 inches deep. Time to start boring some wood!
But first, a lesson.
Pay Attention to the Bracket!
Fortunately for me, the 8-foot board I bought divided into exactly three shelves. Handan only wanted two. That left an extra just in case I messed up.
And I did.
In a way.
I measured and drilled correctly, but I failed to notice that the bracket rod is not mounted in the center of the screw plate. I had drilled the hole in the exact middle of the thickness of the 2 x 10. Because of the small shift in placement, it meant that the bracket was visible when I mounted the shelf.
What kind of monster does this?
One shelf wasted, two to go.
Step 5: Center Bracket on Shelf Edge
To prevent this on the remaining boards, before drilling, I first placed the bracket on the board’s edge.

When I had it placed so the bracket was completely within the borders of the wood, I set my Kreg Multi-Mark to the midpoint of the rod. I then used that measurement to draw a line across the two lines I had scribed upstairs along the rod. This gave me the exact location of where I should drill. Please excuse the out-of-focus pic – my babes was playing around with portrait mode on my iPhone, and got a little too close. 🙂

Nothing left to do but drill!
Step 6: Drill the Bracket Holes
For this job, I chose a 6 inch woodboring auger bit. It has a little pointy screw top to make starting the cut a breeze.

Now, the key here is to drill straight into the board – no loosey-goosey left-right or up-down. To help with the left-right sway, I used a trim square.

Fortunately my drill has a built-in level to help with the up-down drift. If your drill has no level, just take your best guess or have someone else eyeball it from the side.
Or, if you’re feeling saucy and don’t mind tossing a few more bucks at the project, get yourself a doweling jig.
If I had one, I’d have used it.
But I don’t.
Yet.
These woodboring drill bits take some getting used to. They grab hold and plunge right into the wood, taking you along with them. They are fast and efficient, though!
Hold tight!


I repeated this on the other side.


After drilling the holes, I took the shelf upstairs to make sure it fit.
Step 7: Sand, Stain and Seal the Shelf
Satisfied, I took both shelves back down to the basement and sanded them with a random orbit sander using 60, 80, 100, 150, and 220 grit discs.
Next, I applied pre-stain and let it sit for 30 minutes, after which I stained them with Minwax Special Walnut.
If you wish, you can follow up with a few coats of polyurethane.
I skipped that step, as Handan was frothing at the mouth to have these damn floating shelves installed, and I feared for my safety if I didn’t deliver the goods ASAP.
Step 8: Install the Shelf on the Brackets
When the stain had fully dried later that day, I installed them for my babes. She wouldn’t even wait until the next day!

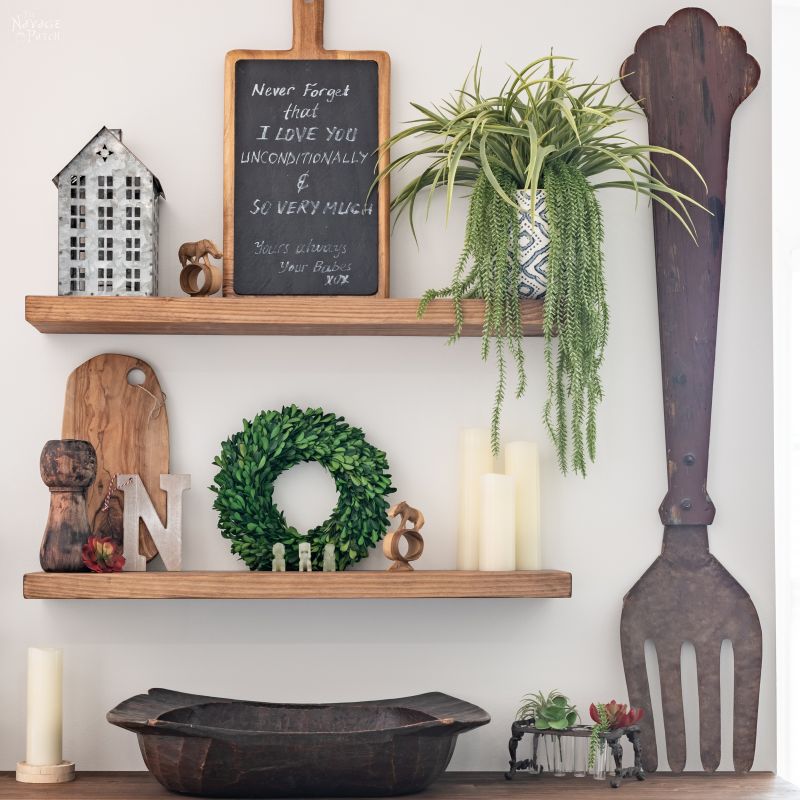
And here they are – genuine DIY floating shelves!

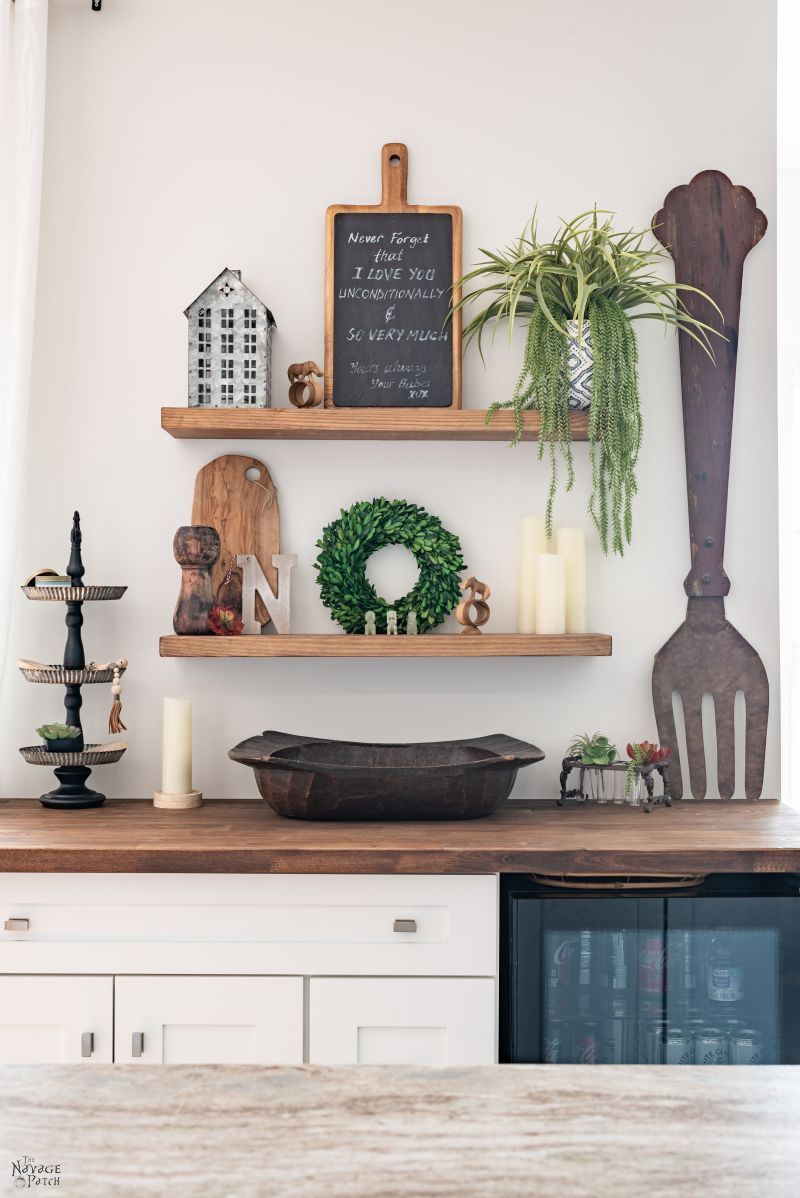
My babes finally has a place to display the Halloween gnomes I’m making for her. Stay tuned for that post coming real soon!


What do you think? Will you be trying this in your home?


Now that she has her floating shelves, I wonder how long it’ll be before get my floating porcelain throne?


Looks outstanding!, and YEA!!!! for something new for Halloween!
Thanks, Wendy! Yep, the Halloween posts are coming! 🙂
You will love the new stud finder!
Oh I can’t wait to use it, Lynn!
Awesome project! Did you guys paint the colourful wooden spoons in the dough bowl too?
Thanks, Sara! Nope, we bought those at Kroger! 🙂
They look nice. I love floating shelves. I also like ones with brackets so it depends on the look I’m going for. I have a Zircon stud finder and my hubby always curses it. I have no issues with it and find the studs with it all the time. I think they just don’t like men. LOL Let us know how that other stud finder works. Maybe hubby will be given one if he keeps knocking my Zircon. He already has a laser level I gave him years ago right before a hardware floor install project we did in our upstairs hallway. It was so needed when trying to line up new planks with existing ones in two bedroom doorways on walls that were not plumb. Not a fun time that was.
Ugh, Zircon is the devil. I will definitely be singing the praises of my new stud finder once I have a project that requires finding studs!
Looks great! Do you feel like they are really solid? I’m interested in putting these in my kitchen and wonder if they would hold up to the daily use of heavy dishes and glassware.
They are solid, but if I were putting dishes, I would do two things: 1) buy a piece of thicker pine (like 2″ thick) from a woodshop so I could mount the brackets vertically (both screws in the stud) and 2) make the shelf longer – at least 32 inches – so I could use 3 brackets per shelf (or more if you go even longer. Studs are placed every 16 inches, so keep that in mind when choosing a length.
Great tips……thank you so much!
I’ll be honest with you. I couldn’t pay attention to what I’m sure are perfectly lovely shelves once I caught a glimpse of that honking big fork! I. Must. Have. One. Or two. Or preferably a fork/knife/spoon set. May I please trouble you for the details of where such outsized cutlery can be obtained?
Hi Carly,
We got ours from HomeGoods about 6 years ago. But I managed to find similar ones on Etsy, Amazon and Wayfair if you’d like to check them out:
Similar Spoon & Fork Set on Etsy
Similar Spoon & Fork Set on Wayfair (I love the color of the wood on these)
Beautiful Spoon, Fork & Knife Set on Amazon (this set is my favorite)
Other choices on Amazon
Other choices on Wayfair
Other choices on Etsy
I hope this helps! 🙂
Thanks so much for taking the time to track down these links! By the way, I agree with your assessment of the best option. =0)
I will be building these THIS WEEKEND… perfect! And? Your new stud finder? My husband was concerned for the self-esteem of our TWO Zircons, because I constantly called them every filthy name I could invent. I finally took it upon myself to get your stud finder. Oh, how we adore it!
Oh cool! Good luck! I can’t wait to use my new stud finder – I’ll find an excuse to do so this weekend! 🙂
Hey Greg! Here is your floating toilet. You should have known that SOMEONE would invent one! LOL
Holy crap! (Literally) How am I just learning of this now?
That is awesome! Think how much easier it would be to clean around your toilet!?!?!!!
I am wondering where you got the boards, I am finding it difficult to locate them in a store. What species of wood did you use?
Hi Debra, I got the board at Home Depot (Lowe’s also carries them) – it’s a simple 2×10 used in construction. I bought an 8 foot board and cut it into 3 equal pieces (only used 2)
I love your blog it always makes my day! Love the shelves.
Thank you, Carla, you’re comment made my day! 🙂
Hi. I’m new to DIY, full of questions and paralyzed by fear. For the brackets, you said you anchored one in the stud and the other in the drywall. Could I turn the bracket sideways and anchor both to the stud? Would that allow me to put heavier objects on the shelf? Is there a recommended weight limit?
Hi Jane, don’t worry, there’s nothing to fear! Messing up is part of DIY, so don’t stress about it! Now, regarding the brackets – yes, you could certainly turn them sideways, but if you’re using any sort of 2 x lumber like we did, the bracket will show. These brackets are 2 inches wide, so turning them sideways will make them bigger than 2 x lumber (which is really 1 3/4 inches thick). You can get pine boards that are 2 inches (or thicker) at a proper wood shop. Give a quick search online to see if any are in your area. Most wood shops will cut your boards to size, as well, sometime for a nominal fee. Good luck, and don’t worry!
I used 1/2” threaded studs drilled 7/16”holes then threaded them 2-3/4” into the studs. All 12 pieces cost $10. Used Poplar wood. Used a friend’s drill press to drill the holes for the studs in the shelves. Used countersunk screws at an angle to catch the threaded rods and lock shelves into place. They came out perfect! I have pics.
That sounds like a great build. I’d like to see pics. Can you send to greg@thenavagepatch.com? Thanks!
I loved your DIY floating shelves tutorial! The step-by-step instructions were super clear, and I can’t wait to try this out in my living room. The mixed materials look so modern and chic. Thanks for the inspiration!