Kitchen Remodel Progress
So I wasn’t planning on doing a kitchen remodel update post, but as I was scrolling through my phone photos yesterday, I realized that I had boatload of pics ranging from floor repair and staining to ceiling and wall painting to actual cabinet installation. I took almost 200 photos!
Now when reveal time comes, I’m sure you’ll want to skip the soup and salad and get right to the meat and potatoes.
So here’s your soup and salad!
In case you missed it because, oh I don’t know, you were hiding from the ‘Rona under a rock or something – we’re doing a wee bit of work in our kitchen.
Here’s the post wherein the old kitchen is dismantled and tossed out on it’s blond oaken ear.
And here’s the post wherein my babes hatches a plan for a new kitchen – glorious Culinary Command Center from which I will dominate and delight every taste bud in this house and beyond for decades to come.
Before we could install even the smallest latch, we first needed to repair and refinish the wood floors in the kitchen so they matched the beautiful wood floors around them.
James from Peach State Hardwood sent a crew over to patch up the floors under the old island, sand, stain and finish.

In a just world, in a decent world, in a world in which house builders knew the meaning of the words “plumb,” “level,” and “square,” the knotheaded ninnyhammers who built this house would have installed the hardwood floor first and then built the kitchen island on top of it. But no, these slack-jawed screwsniffers saw fit to build the island wall directly onto the subfloor and then lay the flooring around it.

“So what’s the big deal?” you say? “Just throw some new hardwood planks in there and call it a day!”
Madam, might I gently remind you that the men who built this house – the men who laid the planks of red oak that would become the kitchen of which I will soon be in command – were gibbering dolts who doubtless spent their free time drinking unripened moonshine and catcalling the local wildlife.
You see, madam, there’s a problem hidden in that bi-colored mess.
As we learned when James’s first crew arrived for a quick repair and refinish (though I think we suspected it already in our hearts), something was deeply amiss in that unfloored area under the old island wall.
The two young men tasked with this quick in-and-out called in the boss, and we all had a little meeting of the minds in our empty kitchen.
James pointed out the problem: the floorboards on either side of that long island wall gash don’t meet up.
He explained the ways to properly start a hardwood floor installation – all of them rely on the assumption that the house may not be square (I’m starting to see a trend here).
But in this case, he said the flooring guys – likely the same guys who built everything else – started laying boards directly against the interior kitchen wall.
This was mistake number one, as any initial un-squareness would have been carried across the room.
Mistake number two – and this is the one that really caused the clusterfish – was that two guys must have started two separate lines of flooring, one on either end of the room.
Because of the unsquare conditions, the guy laying flooring on the far end of the room (the top of the picture above) eventually drifted so far off course that he was one full board width off from the guy laying flooring on the near side of the room.
I took the pic below after they started the first attempt at a fix. You can see it best by looking at the dark board at the left edge of the unfloored area. It starts as full width and then whittles down to a point.

Put another way, over the course of about 12 feet – the length of the old island – the floor drifts off course by the width of a floorboard.
This presented a pretty big problem, as the affected area was just outside of the boundary of the new island.
The crew tried their best to solve the issue.

But the drift was just too much for these guys. They were skilled in standard repair (which this was not) and restoration.

With the last board placed in unsecured, you get a better idea of the problem.

Here it is from another angle.

What starts as two board-widths finishes the run as one.
As good as these guys were at their job, this repair was out of their league.

To their credit, they knew when they were beat. They didn’t try to force a solution that would have ended up looking terrible. They cleaned up and left for the day, and James called in the Big Guns – his installation crew. They would arrive the next morning.

What’s a feller to do with a free afternoon? Paint some ceilings, of course! The ceilings didn’t look too bad, but hey, in for a penny, in for a pound, right?

Besides, at this point, painting a ceiling is old hat for this salty chubster. Barely a year ago I quivered in fear at the thought – now I paint ceilings for breakfast!

No ceiling is safe from my 18-inch White Dove roller!

The next morning brought lead installer Rayan and one of his crew. I remember speaking with Rayan when he and his full crew installed the floors in our living room, dining room and office. Turns out we both lived in Boston in our younger years. He’s a soft-spoken guy, and he knows his stuff when it comes to installing hardwood floors.
I had total confidence when he tackled the first job, so when I saw him again in the kitchen, I breathed a sigh of relief.
“No problem,” Rayan said.
“You can fix it?” I said.
“Easy,” he said.
Handan and I high-fived in the kitchen and then left the two guys to work their magic.
The relief and peace-of-mind we felt has become almost commonplace with the contractors down here. We never doubted Rayan for a second. And as you’ll read about later in this post, it’s a feeling we’ve had over and over with our cabinet installer San, as he keeps solving problem after problem with a smile on his face.
I’ll spare you the technical details of Rayan’s solution, but basically he was able to reverse the installation direction and push the problem to the left (in the picture below) so the real eyesore would be covered by the island. Even so, he did such a good job, that even if it weren’t covered by the island, the eye would never notice it, unless you were specifically searching for the flaw.

We had a few days between Rayan’s repair and Nathan’s refinishing, so what’s my go-to activity when I’ve got free time?
You guessed it, madam! Gold star for you!
PAINTING!
We love the color I painted our bedroom so much that we decided to use it in the kitchen. It’s Sherwin Williams/HGTV Bohemian Lace – an utterly pretentious name for a clean and simple white.
Here’s one last look at the old wall color.


I have no pictures of Nathan and his crew sanding, staining and sealing. They sealed off the kitchen with plastic sheeting to keep the dust and fumes from escaping, and besides, I documented the process pretty thoroughly in our Hardwood Floor Installation post.
For a week, those plastic sheets stayed up, and we stayed out of the kitchen.
During that time, my ZLINE range was delivered, and a great weight lifted from my shoulders.

I had originally ordered this range back in April (Handan has actually been planning this kitchen since we went under contract on this house) – before we even owned the house! I bought it on Build.com, and it was due to be delivered the day after closing – May 5th.
Over the ensuing weeks, the delivery date kept getting pushed further and further back, until it settled on June 26th.
Back then, this was cause for great concern, as we thought the kitchen would be long finished by then.
But it turned out to be a blessing, as nothing ever goes according to plan, and our kitchen was delayed the moment we ordered the cabinets from Home Depot thanks to Covid-induced supply chain disruptions and the fact that every Homebound Holly is getting her kitchen remodeled these days.
But then June 26th came and went with nary a delivery nor a peep from Build.com.
I hopped on a chat with them and got the unnerving answer that they had no earthly idea where on this planet my range might be.
Gee.
Golly.
Gosh.
(The words above have been edited to so as not to offend the delicate sensibilities of our Gentle Readers)
When my blood had finished boiling, I gave a quick search in Home Depot and Lowe’s. The reason I ordered from Build.com in the first place was that the range I wanted was out of stock at both big box stores.
But this time?
Jackpot.
Lowe’s had it in stock, and they could get it to me within a week.
I informed the woman at Build.com that I wanted to cancel my order. This clusterfish was no fault of hers, and I didn’t hold it against her. I simply told her it was absurd to wait this long without hearing a peep about a $5000 appliance.
Once I got my cancellation confirmation, Handan and I hopped in the car and drove to Lowe’s to order the range. We had a 10% coupon that could only be used in-store. Turns out, we didn’t need it because they were running an Independence Day promotion, and we got $500 deducted automatically, which turned out to be a little more than 10%.
So yeah, I had my range, and boy was I happy about it!
But there was still the matter of the cabinets. They were scheduled to be delivered in that same week. I wasn’t stressed, exactly, because unlike Build.com, the shipping company for the cabinets had been calling me for weeks – a simple robocall confirming the delivery date.
I loved getting that call.
And then the call got even better.
It was the same nice robot lady, but this time, she gave a time along with the date.
There was just one small tiny little problem. There would be a lot of boxes, and they couldn’t go inside yet, as the floors weren’t cured.
And our garage was a box-filled disaster area.
I guess in my mind I was just planning to drive the one garaged car onto the street and load up the other garage bay with boxes, but Handan came up with a much better solution.
We had a half-emptied POD container in the driveway. Handan told me to finish emptying it and then tell the delivery guys to fill it with the cabinets.
I was so simple and brilliant, and my dinosaur brain wouldn’t have thought of it in a million years.
When the delivery truck arrived, I ran out to meet them.
This was it!
My cabinets!
My kitchen!
My Culinary Command Center!
All of my hopes and dreams were swaddled in cardboard aboard that truck.
They backed up the driveway and began unloading boxes.


Box after box after box…

They nearly filled the damn POD!

At this point, I had everything for my new kitchen except for the microwave.
I let out a big sigh of relief, but I still didn’t know what was in those boxes and if they were undamaged.
San arrived the next Monday, ready to start the installation. If you haven’t met San yet, please go and read my Kitchen Demolition post. Like James of Peach State Hardwood, San is one of the best contractors I’ve ever had the pleasure of working with. Whereas James owns a business with several crews working for him, San is a one-man show.

I asked him about that as he was setting up the cabinets.
He told me that in cabinet installation work, the tiniest error – the merest fraction of an inch that you may be off by – will multiply across the installation and lead to an unfixable disaster.
A poor cabinet installation can’t be fixed. It must be completely removed and re-installed.
He said he can’t trust that anyone else would do it perfectly.
And as I watched San work, I completely understand his reasons.
I have never in my life seen such a meticulous craftsman as San.
He started by unboxing almost everything and then getting a rough layout of the cabinets.


As the cabinets came together, so too did our dream.

There was a brief moment when I thought maybe I could install the cabinets. After watching San, I realize that there is no way in hell I’d ever attempt it. The complexity and precision is mind-blowing!
And of course, the house isn’t square, the floors aren’t flat and the cabinets, though beautifully made, are not perfect. They were built by humans, and here and there, an area will stick up 1/16 inch or so above the other areas.
Small errors.
And as San said, those small errors can spell disaster in cabinetry.

But San is patient.
With his army of levels, he adjusted and shimmed his way to perfection.


I never knew how important the common shim was to a cabinet installer. It is their lifeline!
Here is my fireclay farmhouse sink! (Oooooh, farmhouse! I’m sooooo trendy!)

Now if everything seems to be going swimmingly with this cabinet installation…well, it it!
BUT!
It wouldn’t be a proper Navage Patch project if there weren’t some sort of major issue.
And there is.

Did you spot the problem in the picture above?
Let’s have a closer look. One of these things is not like the other.

Let’s look inside and see just what the heck is going on.

What the heck? That top cabinet face frame is too narrow on the left side, and because of that, the door is too big!
I brought these photos to Debbie – our Home Depot cabinet designer and a fantastic woman too boot – and she was as confounded as we were. She said she’d never seen such an error in all her years in cabinetry. She vowed to speak to the KraftMaid rep and asked if I would put the pictures and description in a formal email that she could forward to KraftMaid.
Me? Write something?
Heheheh, of course I would!
Do you remember when I told you in my Hardwood Floor Installation post that I don’t judge a company or a person by their mistakes but on how they react to those mistakes? When James’s crew from Peach State Hardwood messed up in a couple of places, my first reaction wasn’t anger.
They are human beings, and human beings are flawed.
I oughta know. Not only am I a deeply flawed human, but I don’t think I’ve ever completed a project without some sort of pretty major error or complication.
So when I saw the mistakes in the floor, my first reaction was to call James and let him know.
Most people on this earth want to do the right thing, given the chance.
And James didn’t disappoint.
He spent the extra time and effort, and he got our floors perfect.
I was willing to give KraftMaid the same opportunity.
And they didn’t disappoint either.
It warms my heart when a big company takes the time to understand how important a project is to their customer. Whether it’s a small $5000 update or a full $100,000+ remodel, when a company shows that they care and that they listen, they win lifelong fans and devotees.
I think KraftMaid is one of those companies.
I laid out two scenarios for them: replace the full cabinet or replace the door and include a spacer for the face frame. They chose the quickest fix, which was to replace the door and send special hinges that would compensate for the smaller face frame.
Normally, a new cabinet door would take over a week, but I was able to impress upon them my need, and they agreed to put a rush on the order.
All in all, I’m satisfied with their response to my problem, and I think we’ll have a great relationship with the company going forward.
I had read some negative words about KraftMaid here and there while we were researching cabinets, but so far, I can report only positives about the company. Keep that in mind if any of you are considering a kitchen remodel. It also helps to forge a good relationship with your designer, as he or she probably has close ties to their KraftMaid representative, and that relationship can come in handy in case you encounter a problem.
Okay, back to the installation.
San made a ton of progress in three days.


One of the best parts about his installation is his solution for under-cabinet lighting and the top-cabinet lighting.
We had always planned for top-cabinet lighting behind the frosted glass doors, but we weren’t planning on under-cabinet lighting, because with the Home Depot installer’s pricing, it would have added thousands of dollars to the project.
Sans’ solution is genius, and he did it for a fraction of the cost.
He used inexpensive puck lights, and he mounted them underneath the cabinets. He did the same thing for the in-cabinet lights up top, but with those, he recessed the lights into the top of the cabinet.
Here’s a look under the cabinet. He also gave us a few power outlets that are perfectly hidden underneath the cabinets.

And here’s the best part about those lights. You may be wondering what we’ll do if one ever dies.
Here’s the answer.

Just unscrew that wall plate, and there’s the wiring!

San has been perfecting his craft for years. He has thought of everything!
Here’s how the lights look when lit.

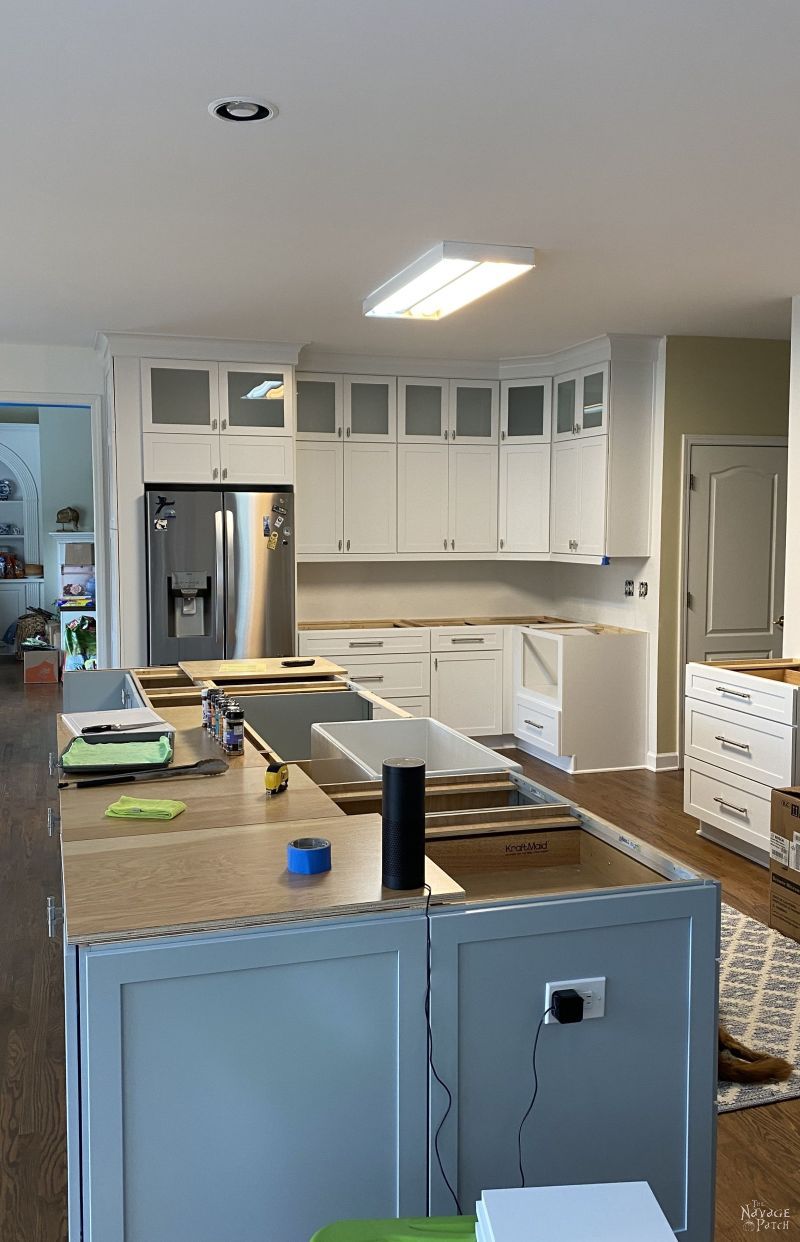
Over where my range will be, the work is far less complete. Before San can go any further with the cabinet and range installation, we first need granite and then tile.

That box in between holds our new microwave. It’s a pull-out drawer jobbie. I had no idea such a thing existed until we designed this kitchen!
It will go here.

San did all he could, but now he needs the granite to be installed before he can proceed.
Here is where we stand right now.


The girls seem to like it, too.

She’s seen enough. Time to sleep.

Or maybe it’s just the rug we threw down. We’re still figuring out what size and pattern rugs we’d like to have.
San moved the gas line to its new location, just waiting for the ZLINE range!


The next day, Scott from Atlanta Stone Systems came to measure for the granite.
I thought the measurement process would be just a dude with a tape measure and a notepad. In and out in five minutes.
Holy crap, was I wrong!
Unfortunately, Scott’s visit coincided with a video conference with Baris’s new high school, so I couldn’t take any pictures, but from what I saw in the brief moments I stole away, this was one high-tech measuring session!
Scott was armed with a tripod-mounted laser measurement system that took incredibly precise measurements all around the kitchen. When finished, Scott had generated a schematic on his iPad that had all the measurements and graphics the fabrication team would need to make our slabs fit perfectly.
Now, about those slabs…
I mentioned in the Kitchen Remodel Plan post that we’d likely be going with Black Galaxy granite four the under-cabinet countertops, and yes, that is what we settled on.
Though the Blue Volga looks more impressive in slab form, we actually want these counters to be a little more understated. We also wanted to have those flecks of copper for a very specific reason that won’t become clear until sometime after the reveal post.
As for the island…
Well, it turns out that “white granite” isn’t a thing.
And I don’t mean it isn’t a thing in the sense that it isn’t popular.
It doesn’t really exist, at least not where we looked. At best, there were light grays, but those tended to be a little monochromatic and uninteresting.
To get the white that I was dreaming of, apparently you have to go with marble. So we found a slab we loved and got a custom quote.
At almost $10,000, that quote made our choice very easy. Granite it would be!
You will have to wait and see the slab we picked in the reveal post.
Handan loved it from the moment she saw it. That should tell you all you need to know about it.
Because I was so stuck on the “white” thing, I poo-pooed her selection at first.
But as it became clear that my marble dreams would never be, I started to look at her slab with a less prejudiced eye.
I could see why she liked it and how she thought it would add new color and bring out existing colors in the kitchen.
We can’t wait for the fabrication to finish. In about a week, we should have our granite installed, and then San can finish the incredible job that he has started.
Soon, I will have my Culinary Command Center, and taste buds up and down the block will be swooning at my feet!





So happy for y’all, such great ideas and the absolute gift to find the contractors you have is just wonderful. It’s fun to experience experts doing their job isn’t it? Blessings to you all.
Thank you, Linda! It really is great to find contractors like ours!
It is going to be gorgeous! Love it so far!!!! Thanks for sharing! Picking out the slab is the best part, we needed 2 full slabs for our kitchen. I felt like a queen wandering through the aisles of granite!!!
Oh yeah, picking out the granite was a lot of fun! We can’t wait to see it ourselves and share it with the world!
I love your blog!! I thing you two were made for each other. I did notice that Handan didn’t have on her PJ’s. Your kitchen is beautiful. You are not going to have time to do your projects cause you will be in the kitchen. Can’t wait to see your back yard. Do you have a pool? I am very jealous of your whole home. It’s all beautiful. Thanks for always sharing your projects.
Hi Jill, thank you so much! Handan was wearing actual pants because we had San in the house, lol! No pool at this house. Been there, done that, no thank you, lol!
I have had Black Galaxy granite kitchen countertops for 12 years now and I still think they are the best looking countertops of all time. I do not like the “busy” effect that pattern/veining countertops add to the overall aesthetic of a kitchen but love the look of luxury which I think you get with Black Galaxy granite. I think you have made a wise choice. Best wishes on your new adventures.
Thank you, Judy, we agree on the Black Galaxy. I can’t wait to see it!
Love your dream kitchen. Can you tell me what color your island is? It looks gray but I’m not sure if that is the lighting or it actually is a color. Can’t wait to see it finished!
Thank you, Sara! That island color is Rocky Mountain Sky – it is KraftMaid color that they made with Behr, so you can get it at Home Depot.
All those drawers! I am so envious! The first post I ever read of yours was on Hometalk. You had built pull-outs for your cabinets. I was so impressed that I tried to convince my boyfriend that they’d be a piece of cake to replicate. He did not agree. I eventually purchased metal pull-outs on Amazon and I love them. They aren’t as good as a full drawer but until I get my dream kitchen they will do. If it wasn’t for you I would never had known they even existed. I have to say thank you for the idea, and a great blog to follow! I can’t wait to see the countertops. Everything looks awesome so far!
I know – so many drawers! It’s going to be awesome – I can’t wait to fill them! I remember when you found us, Giselle – you’ve been with us from the beginning! 🙂
What incredible vision the both of you have !! Amazing and inspirational. Seems to me like things are zooming along, I’m sure not so much for you two— but for us, your gentle (gentile) readers zoomazoomzoomzoom. I find myself distracted by the National Audubon clips running in the background. Blue Jays — Hummingbirds — what can’t you do, Mr. N ?? And thank you for helping with my vocabulary. I’ve been pronouncing “clusterfish” completely wrong. ?
Oh, believe me, Cheryl, they’re zooming along for me too! I really got lucky with the wildlife at the old house. Not sure if this neighborhood will have the same. We’ll see! I did save a turtle crossing the road the other day, though! 😀
Tell me about kitchens…I waited over 30 years…ordered KraftMaid cabinets…slate…bit, omg…the doors. What an issue we had…after FOUR different deliveries, and STILL not correct hinges…hubs drew a schematic & their rep said…”our machines are set up wrong… now, I see “the problem!” IOVE MY CABINETS! Good Luck!! franki
LOL, persistence paid off in the end, it seems!
I’m avidly following along with your kitchen remodeling and collecting lists of sourcing along the way. Can’t wait for the next post. My cabinets are in excellent shape but I am going to have them painted and, hopefully, an island installed.
Given the area where you live (if I am correct) you needn’t worry about the lack of wildlife. Plenty of rabbits, squirrels, deer, raccoons, and all kinds of birds from hawks to hummingbirds. Lots of diversity for a ‘city” setting.
Keep those contractors coming. I still need other references.
Oh, and where did you find the hardware on the cabinets? I love it!
Oh good! I’m glad we’re helping you on your kitchen remodel journey, Connie! We got the hardware from Amazon – much cheaper there! Stay tuned for a post after the reveal – we’re going to be doing something really cool with the hardware to give an incredible upscale look! 🙂
I love watching your progress and process. In my old house, the butcherblock (1979) counter top was 3″ too short on one end, 3″ too long on the other end of the L. How do you make a mistake like that? The carpenter built a nice “block” to fill in the hole which provided storage space and the other gaposis housed 2 L bottles of soda! That old paint color was awful (I secretly liked the Victorian red of the old dining room, though!).
LOL, how did they make that error! Worse, how could they not fix it?? Yeah that old yellow was terrible, and as for the dining room, you aren’t alone. I remember one or two others who liked it, too! 🙂
Cat call here….Are those cabinet uppers taller than 36″? I am doing mine in a very similar style, but have a limit of 36″. Love the two toned cabinets too!
This will truly be one dream kitchen! I love the idea of combining 2 colors – makes the design and decorating potential so much more fun! Thank you for taking us step-by-step through all the highs and lows of the process and sharing what you’ve learned from the experience. You are such an inspiration for creative projects of all magnitudes and your writing style and ample photos takes it all to a new level. Wishing you and your family all the best in your new home!