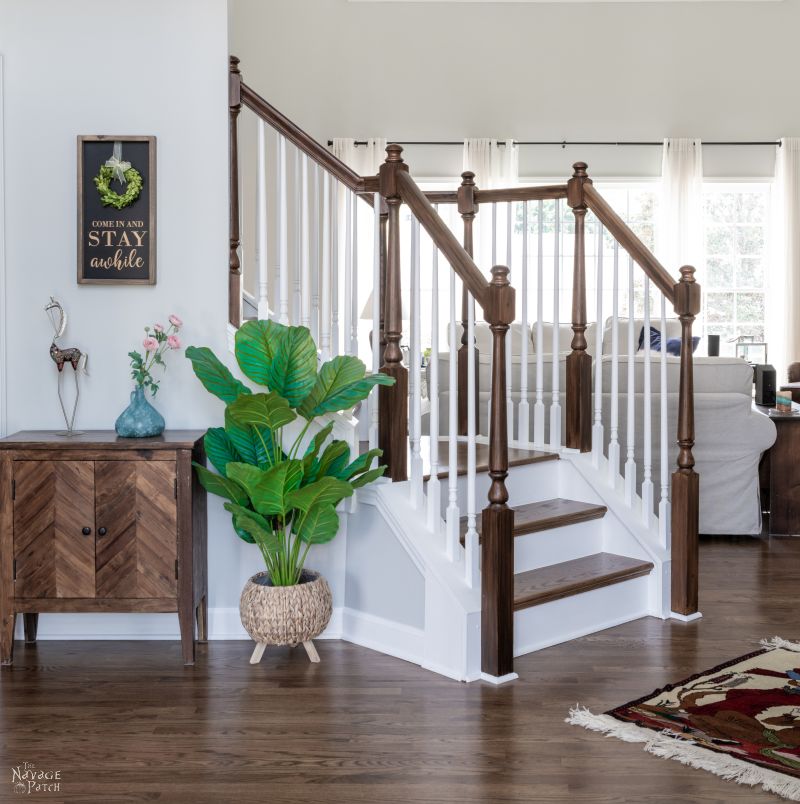
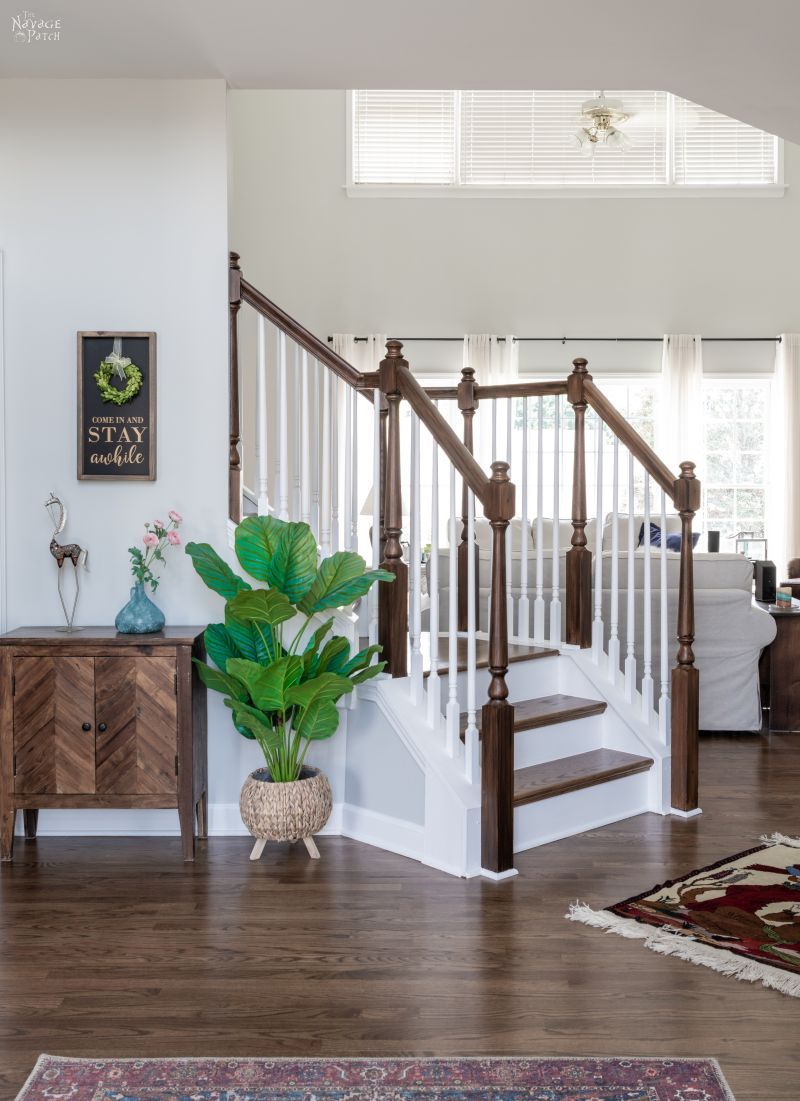
Staircase Makeover
Our staircase makeover is finally finished! From old carpet to hardwood and golden oak to rich provincial, it’s a beautiful update to our new(ish) home!
Oh, c’mon, it’s not that long!
I mean, if it was a year or more, sure, but this staircase makeover only took eleven months!
On a geologic or cosmic timescale, that’s not even the blink of an eye!
But I suppose on a human timescale, it might be a wee bit long for a simple staircase makeover. Okay, look, I may have procrastinated a bit and sat on my butt when I should have been working. And it’s certainly within the realm of possibility that I chose a potato chip over a paintbrush on one or two occasions. Aaaand it’s entirely possible that I thought more about jelly donuts than gel stain on those cool winter weekend mornings snuggled in my bed.
I will say in my defense though, madam, there were a lot of little things to paint and stain that necessitated a lot of crawling and bending and crab-shuffling and grunting.

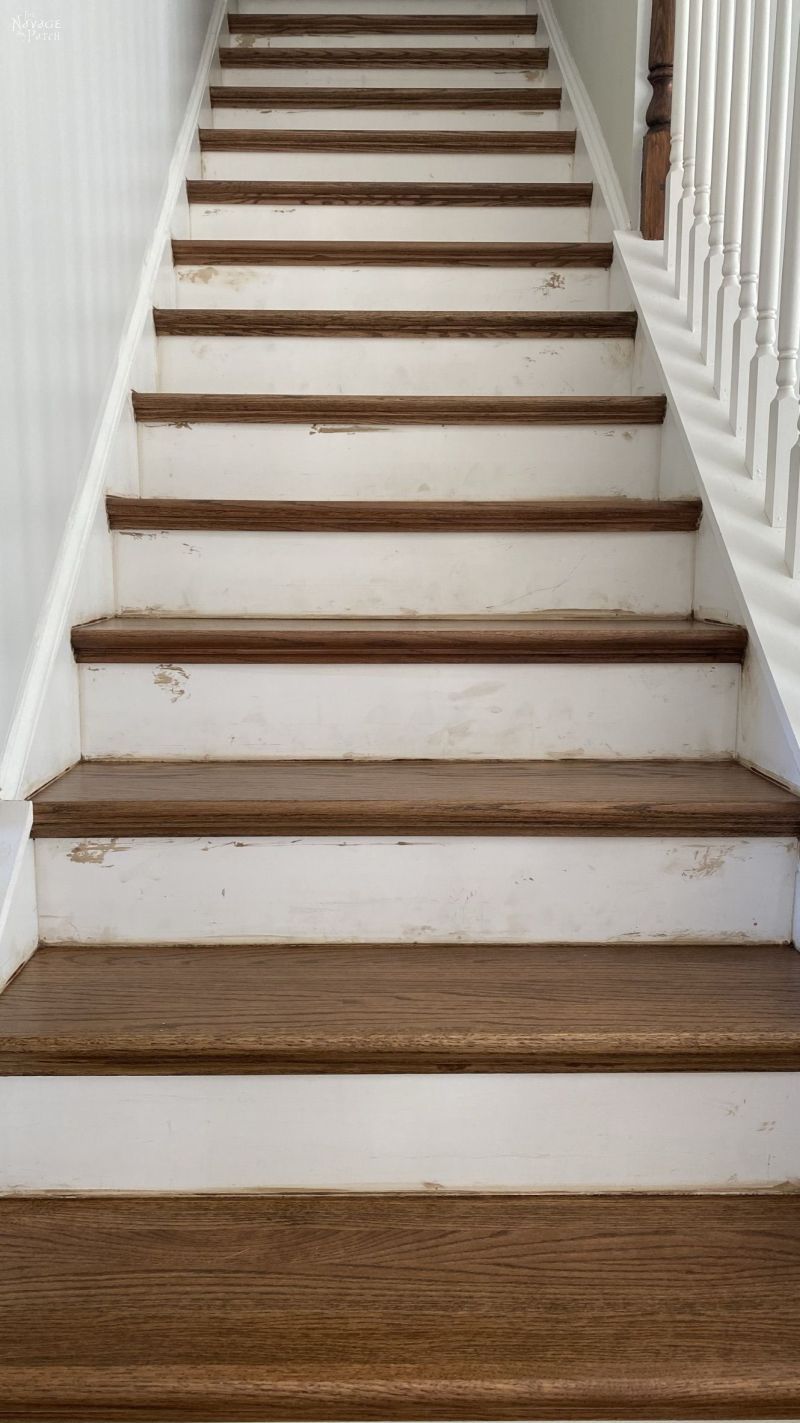
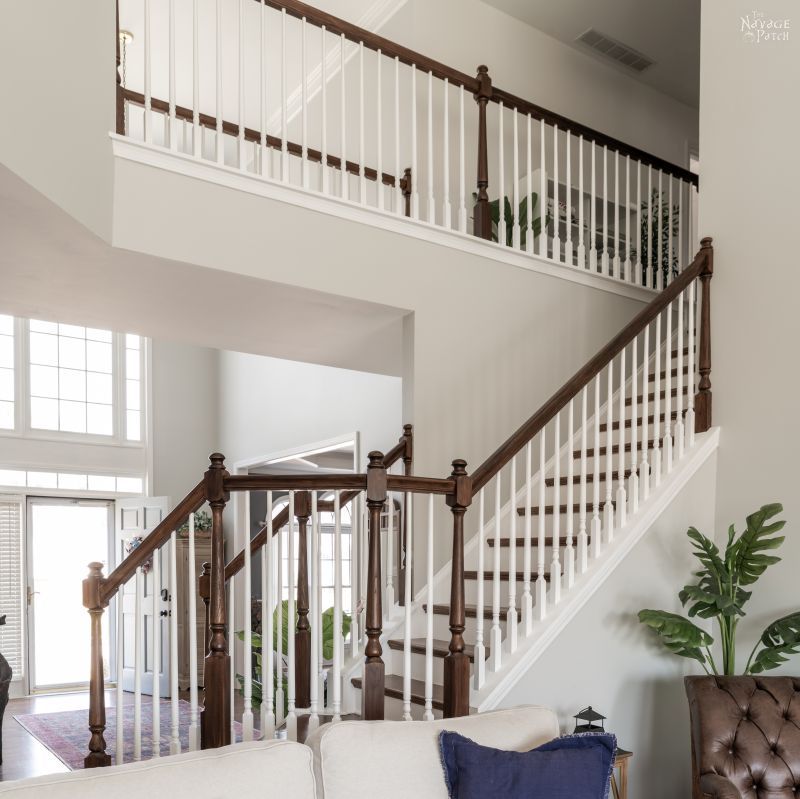
So by now, most of you know how this particular makeover story started. You’ll recall that when we moved into this house about a year ago, most of the first floor floor was carpeted, including the stairs.
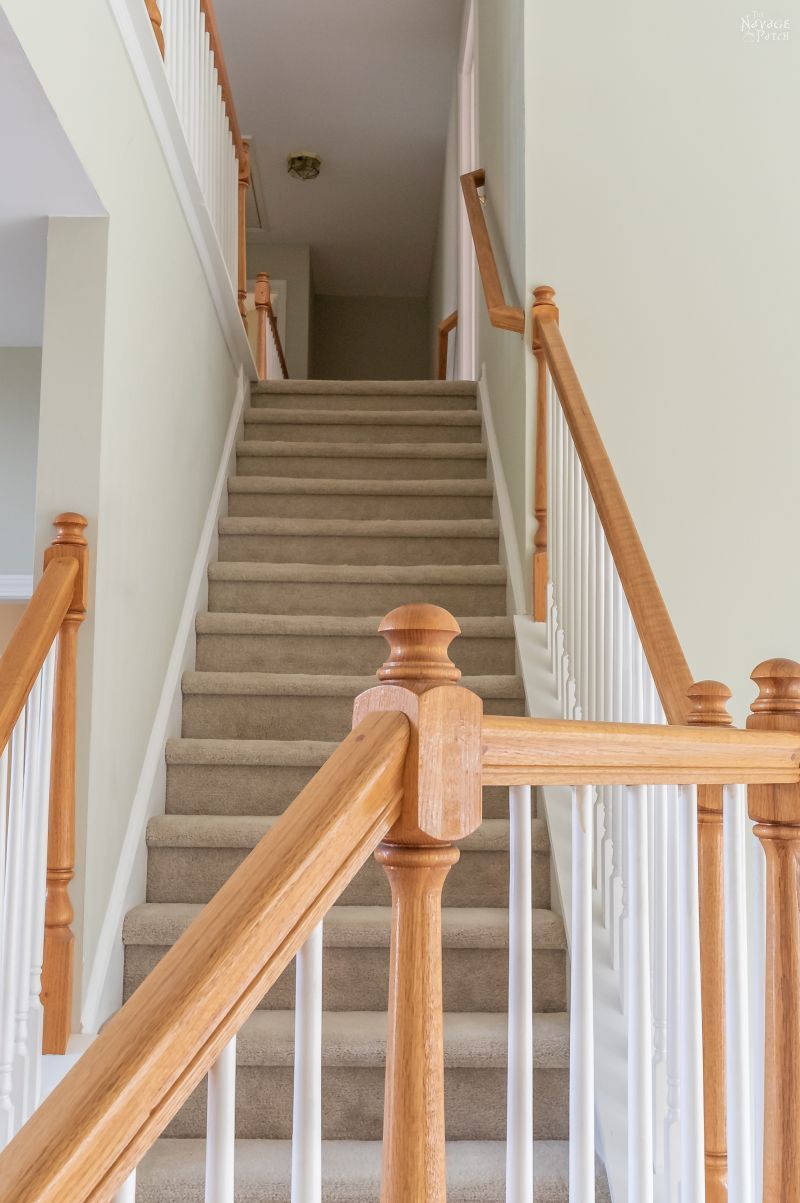
Carpeted stairs certainly feel good (especially on old feet), but this particular carpet was 20 years old. It had served admirably, but it was time to pull it up and put it out to pasture…or wherever old carpet goes to rest.
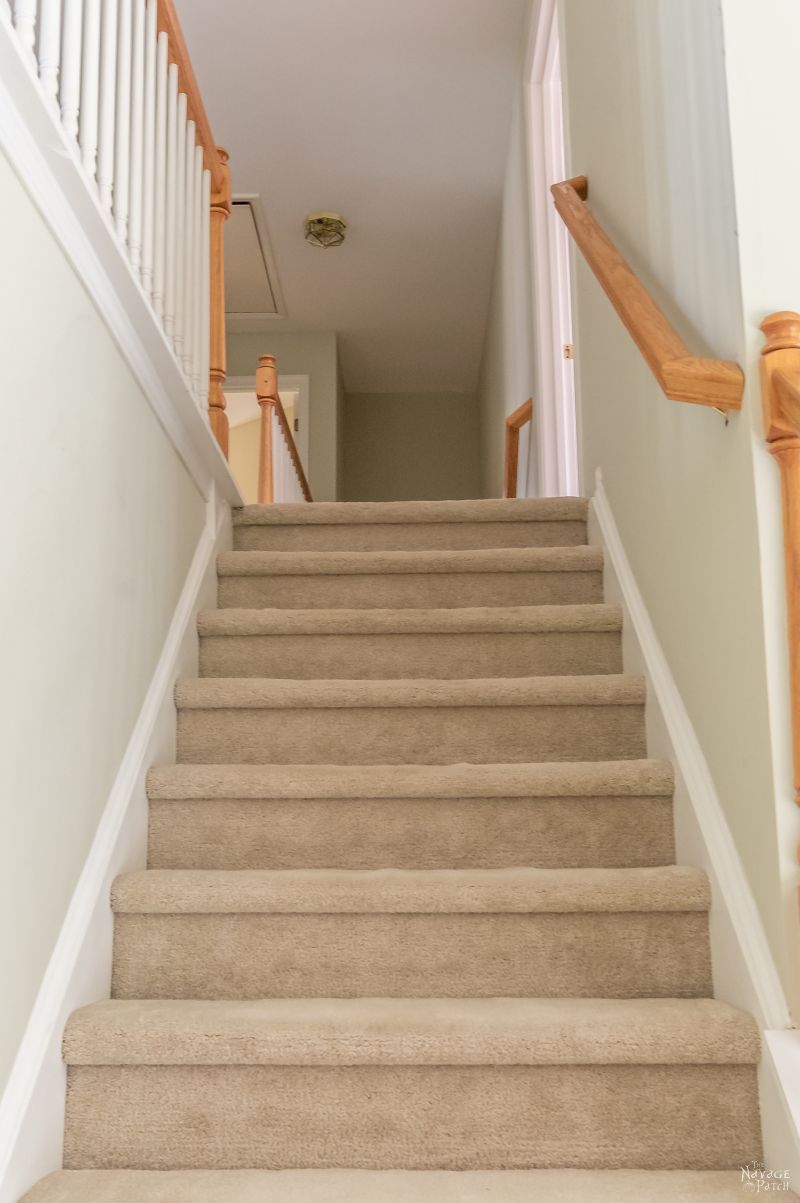
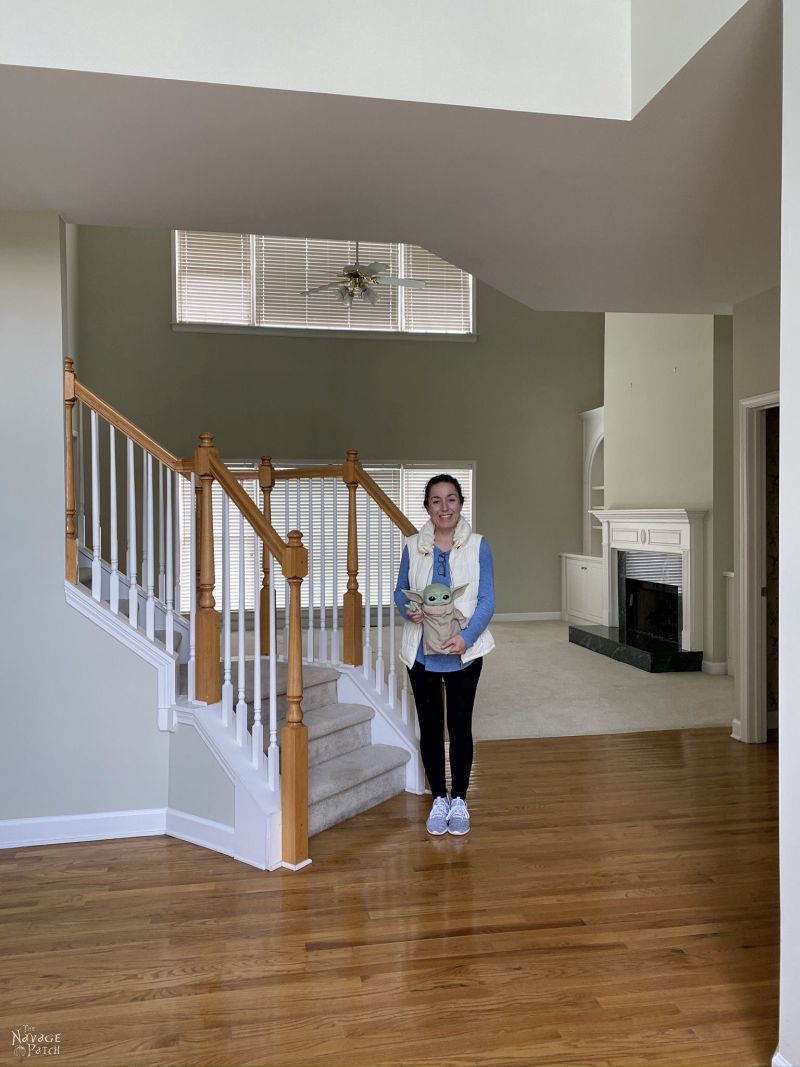
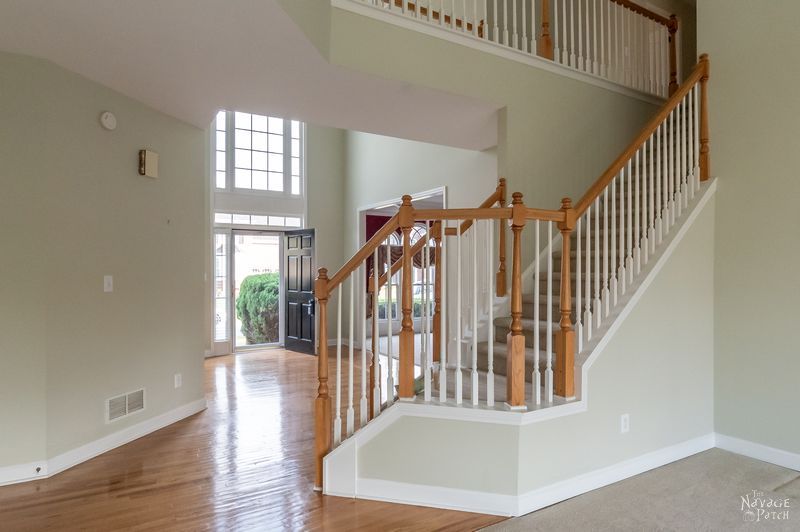
Besides the carpet, there were the golden oak balusters and handrails.
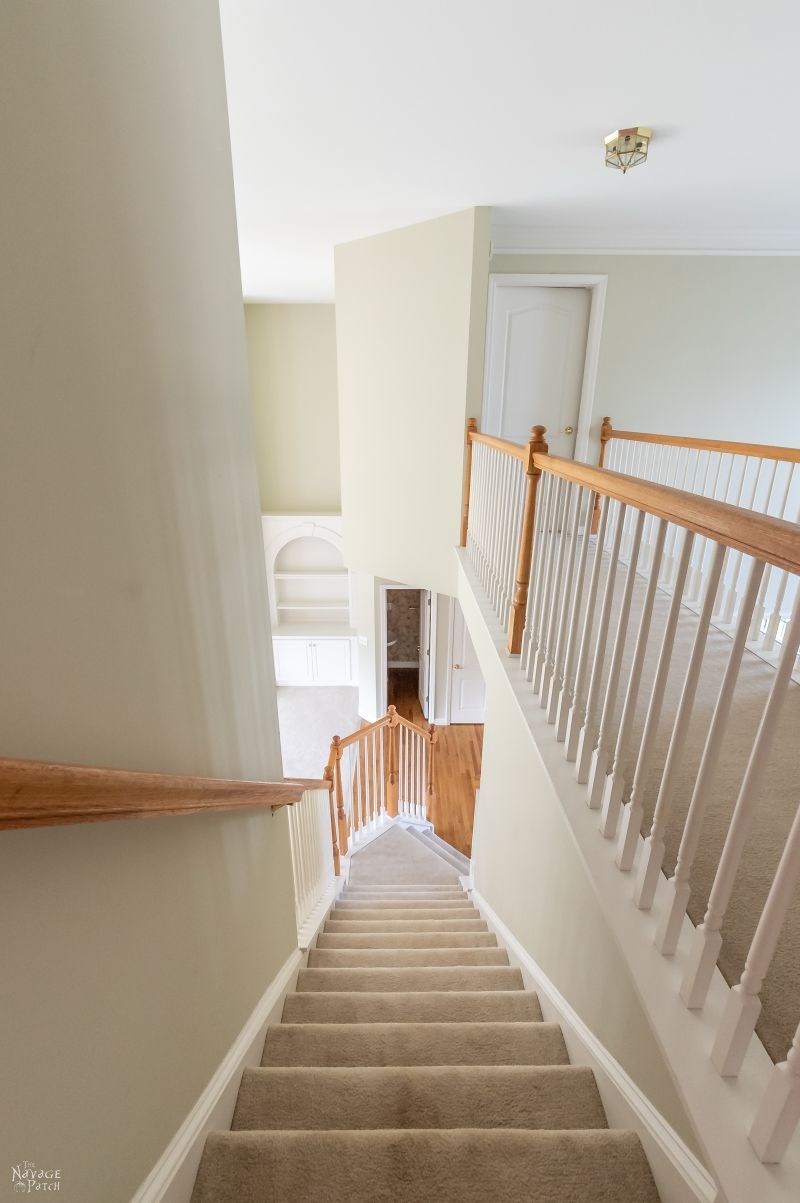
Miles of golden oak, as far as the eye could see! I mean no offense to golden oak and those who love it, but it just doesn’t work for me.
Still, it was our new home, and we loved it!
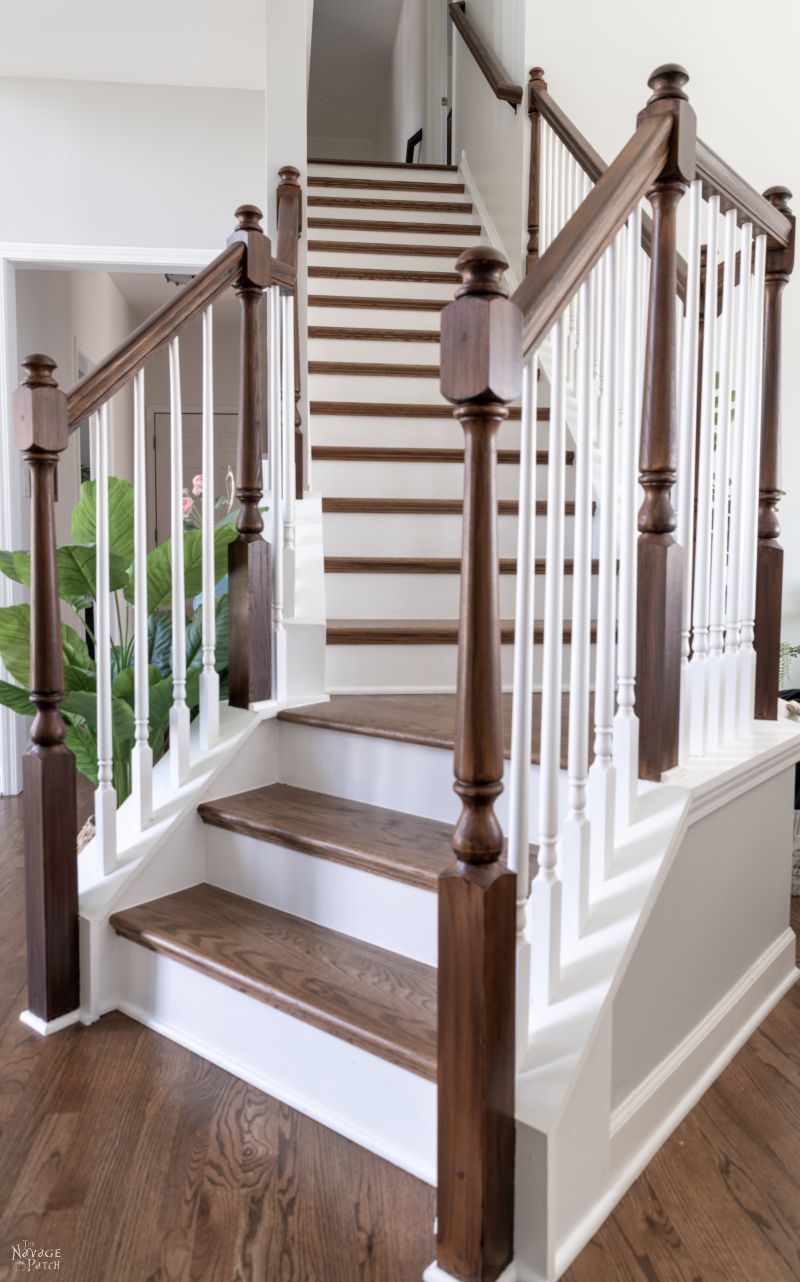
This staircase makeover was officially set into motion when we had all the carpets ripped up and replaced with hardwood floors. This included new oak stairs.
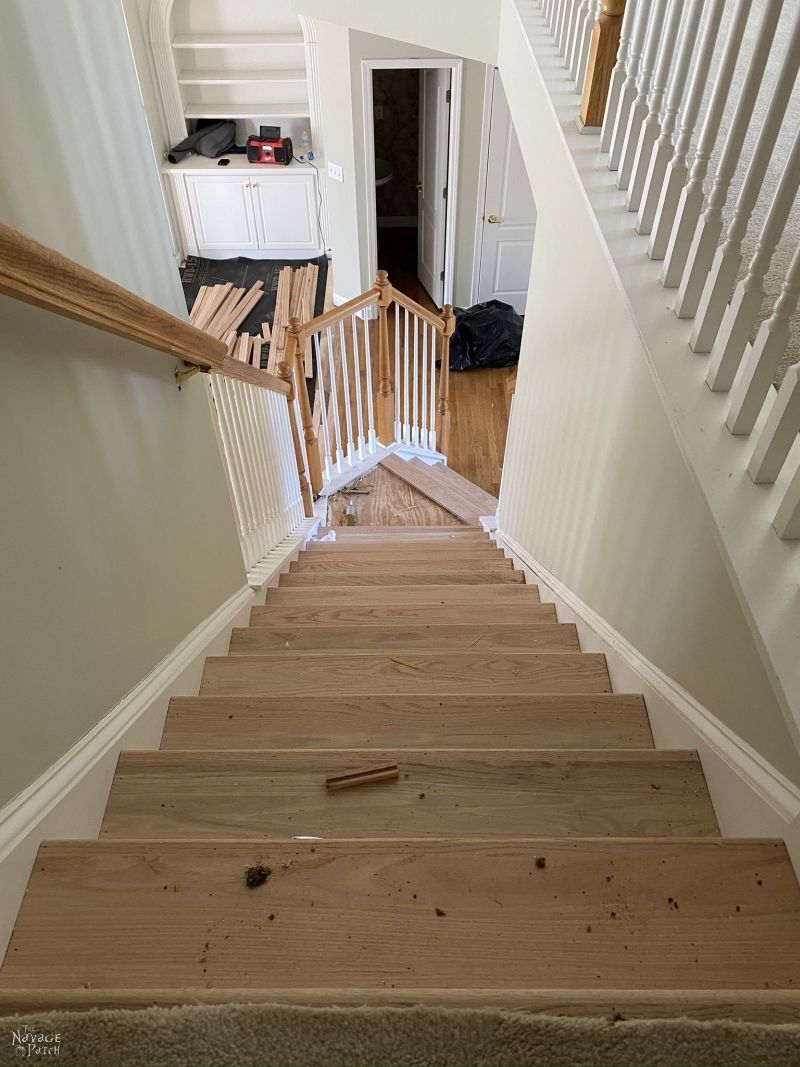
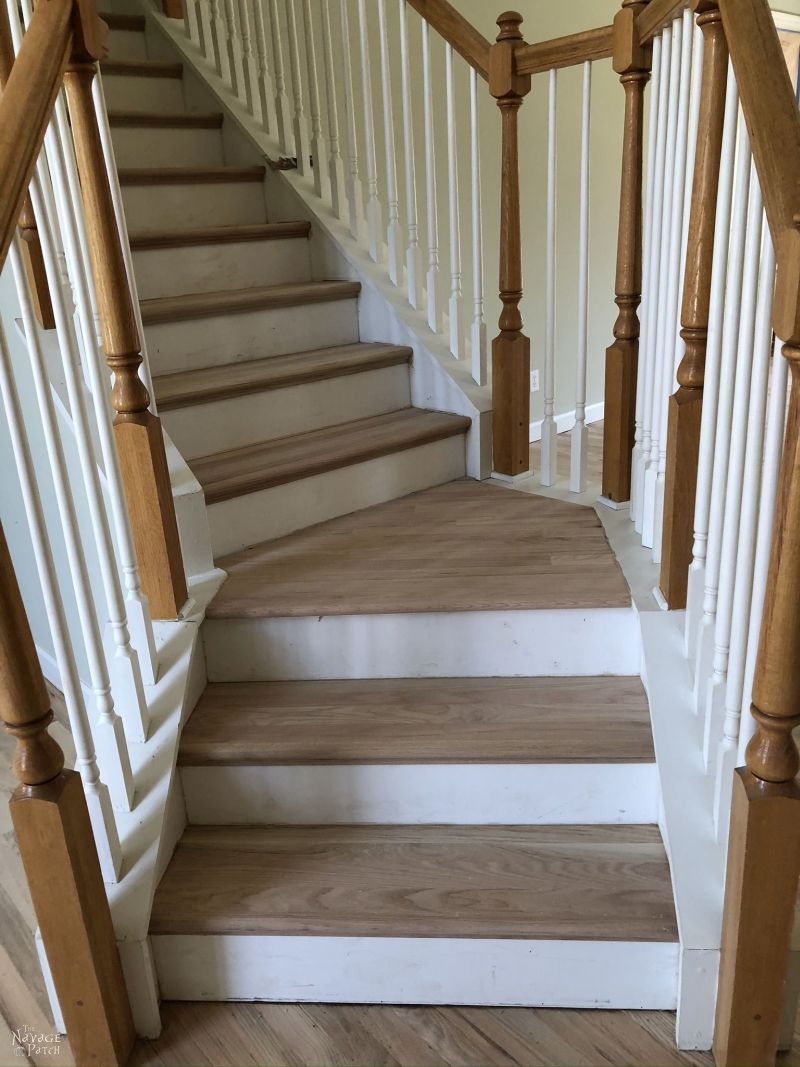
After the flooring crew stained the new floors and stairs, my part of the makeover began. I was left with stained-splattered risers, stained-splattered trim, golden oak balusters and handrails and dirty spindles. Ignore the stained baluster in the picture below. I took this pic after starting the makeover.
So before the flooring crew began their work, the company’s owner asked if I wanted the balusters and handrails stained to match the new floors. He said that his guys didn’t do that work, but he subcontracts the job out to someone who does. The subcontractor prices by the foot, and this job was estimated to be about $3500. If I’d been drinking milk when he told me that, it would have shot out my nose at an alarming velocity and splattered on the walls.
The price was ludicrous (or so we thought), and I informed him that I’d do it myself. After all, I’m a DIYer, and that’s what we do! $3500 indeed!
Right?
Well, let me just preface the rest of this post with the following statement:
For a staircase this size (remember there’s a catwalk upstairs, plus another staircase off the kitchen that I’m not showing), I’d advise you to think very carefully before committing to what I did. For a small staircase, I say go for it! Do it yourself! But for a large one like ours, only embark on this, ummm, adventure, if you have more time than money. If you have more money than time, for the love of Pete, just hire someone to do it for you!
So, with that disclaimer, let’s proceed!
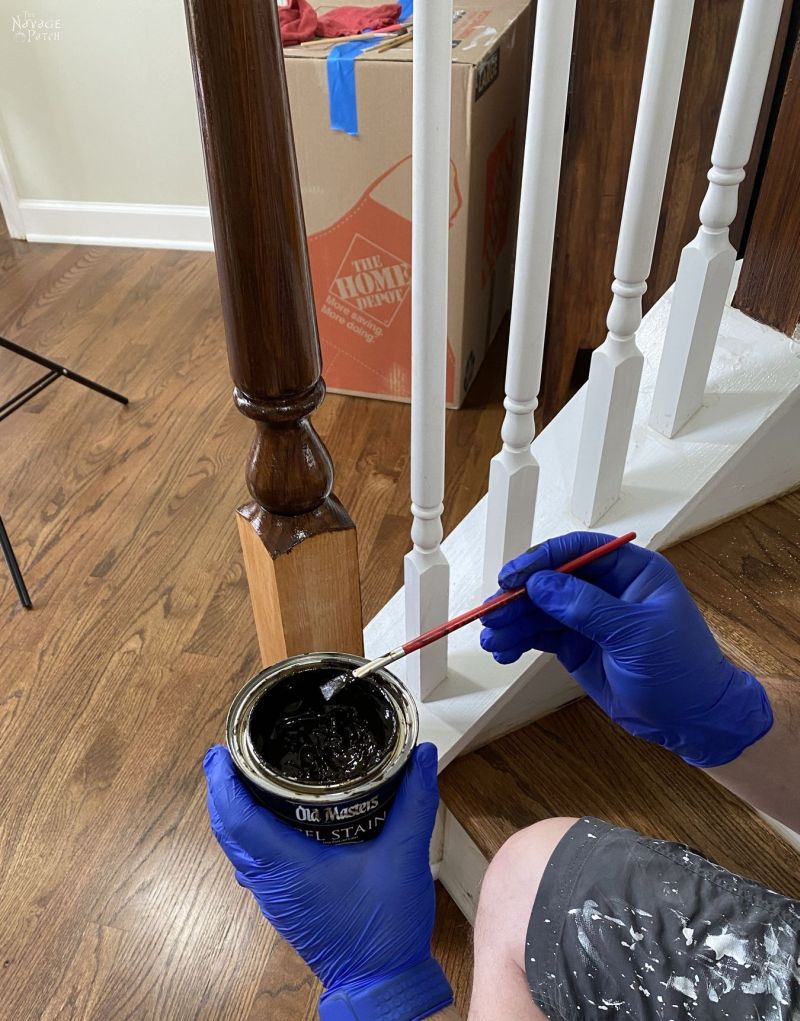
My first order of business was to stain the balusters, and I was faced with a choice. I could sand every baluster and handrail (they were covered, and I mean glopped with dried and drippy polyurethane) down to bare wood and then stain them. I looked at the number of balusters and all the curves, nooks and crannies and estimated I’d be sanding myself into an early grave if I took that route.
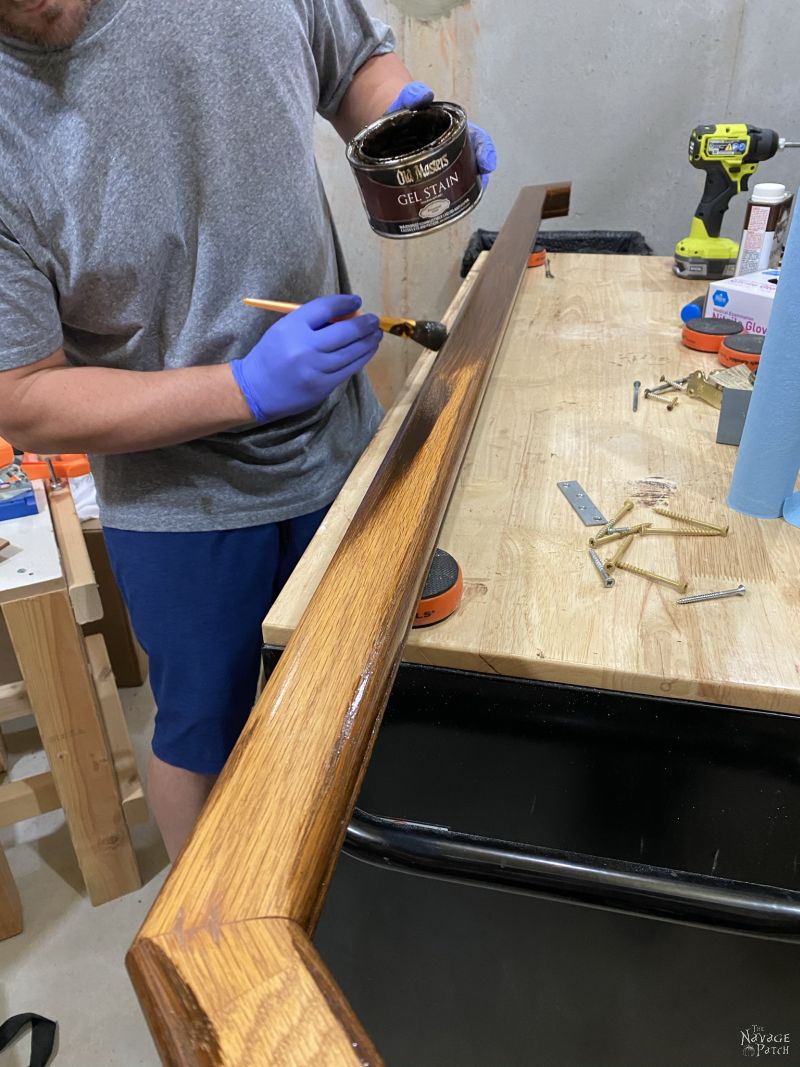
The second method was to use gel stain on top of the old finish. I chose the gel stain.
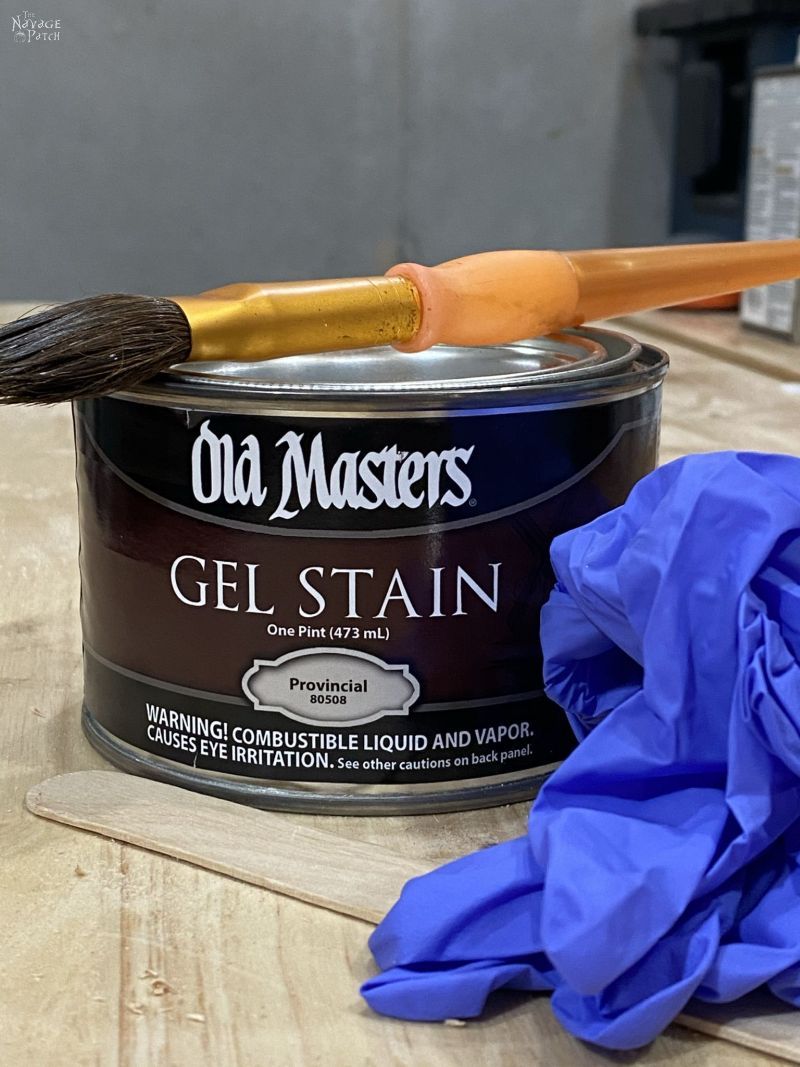
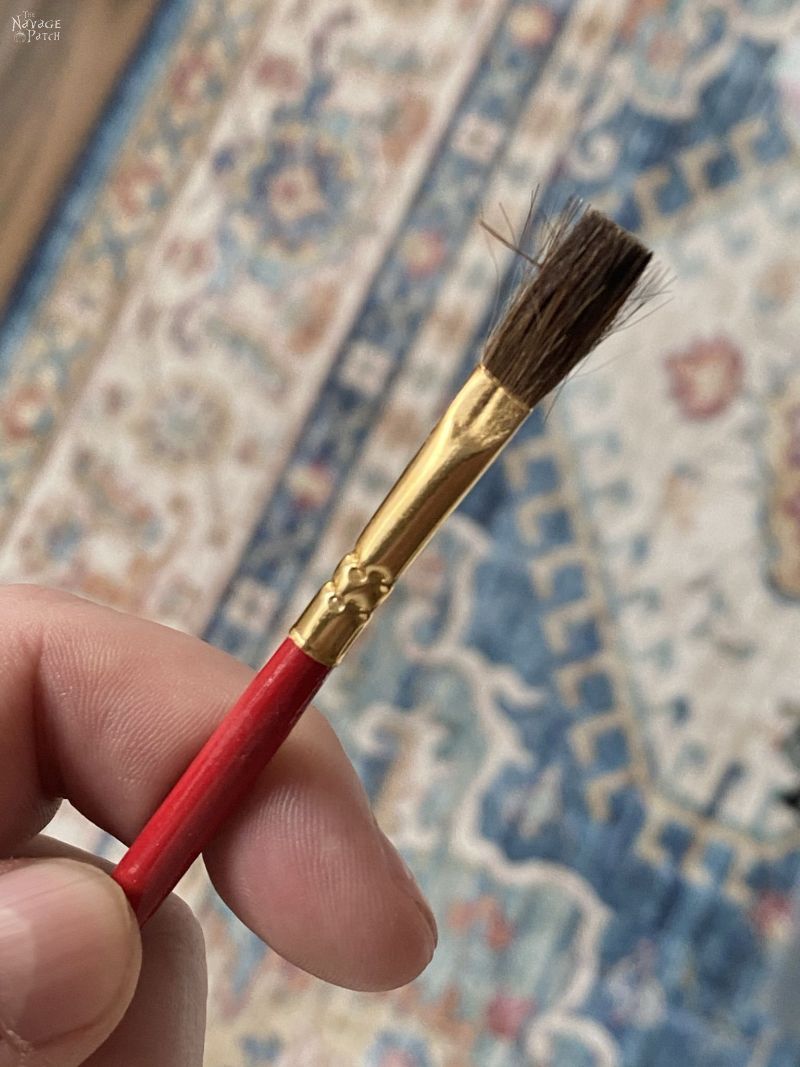
I played around with a few different methods of applying the gel stain – rag, foam brush, various paint brushes – and discovered that the easiest and best method was to use a small, soft-bristled brush. When I say “soft-bristled,” I mean it – like, the absolute softest bristles I could find in the 100 or so small paint brushes we have littered around the house.
Thus began my March of Misery, as I tackled each baluster with a paint brush more suited to kindergarten watercolors than serious DIY.
But needs must, madam, so I soldiered on with my pipsqueak paintbrush and began my labors.
It was a slow and tedious affair. Every stroke had to be re-stroked and stroked again for good measure to ensure proper blending and streaking. I’d call it a labor of love, but that would be unfair to the institution of love.

There is an art to gel staining a baluster. It’s not a matter of simply slathering on the goo, patting yourself of the back and calling it a day. The gel stain must be massaged and coddled and handled just so, or you’ll end up with a streaked nightmare that will cause children and spouses to scream in terror and and wail in dismay.
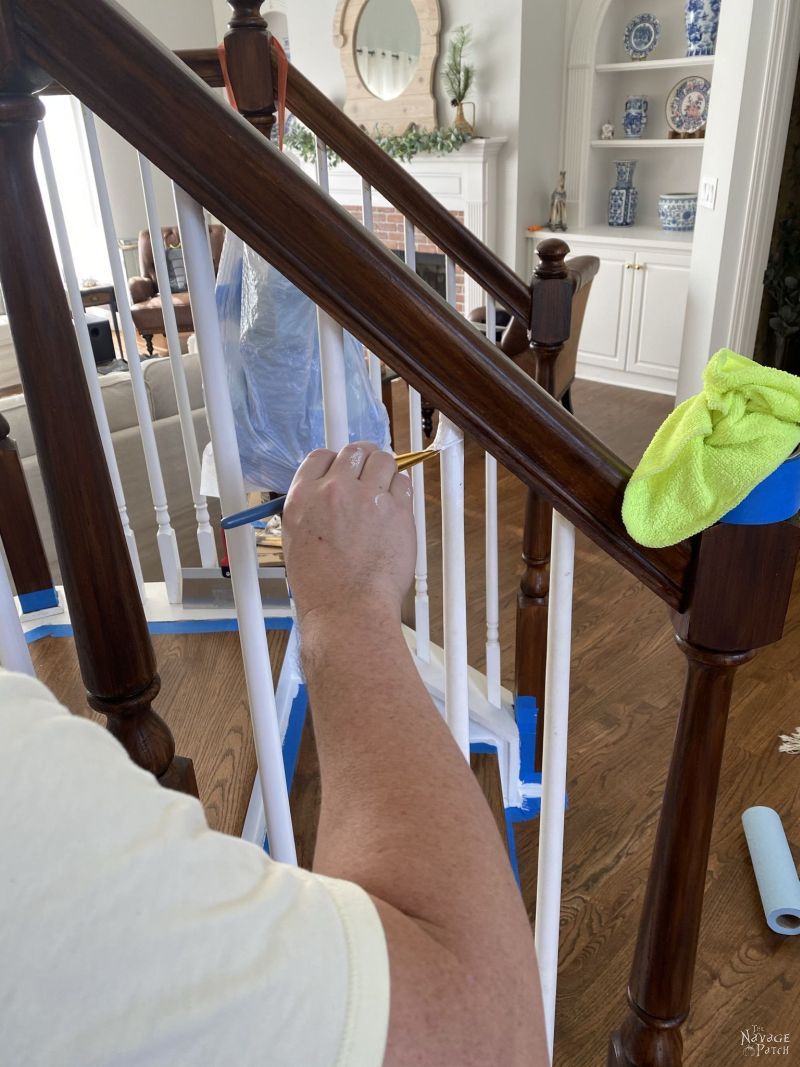
When I got to the balusters upstairs, things got even more…interesting.
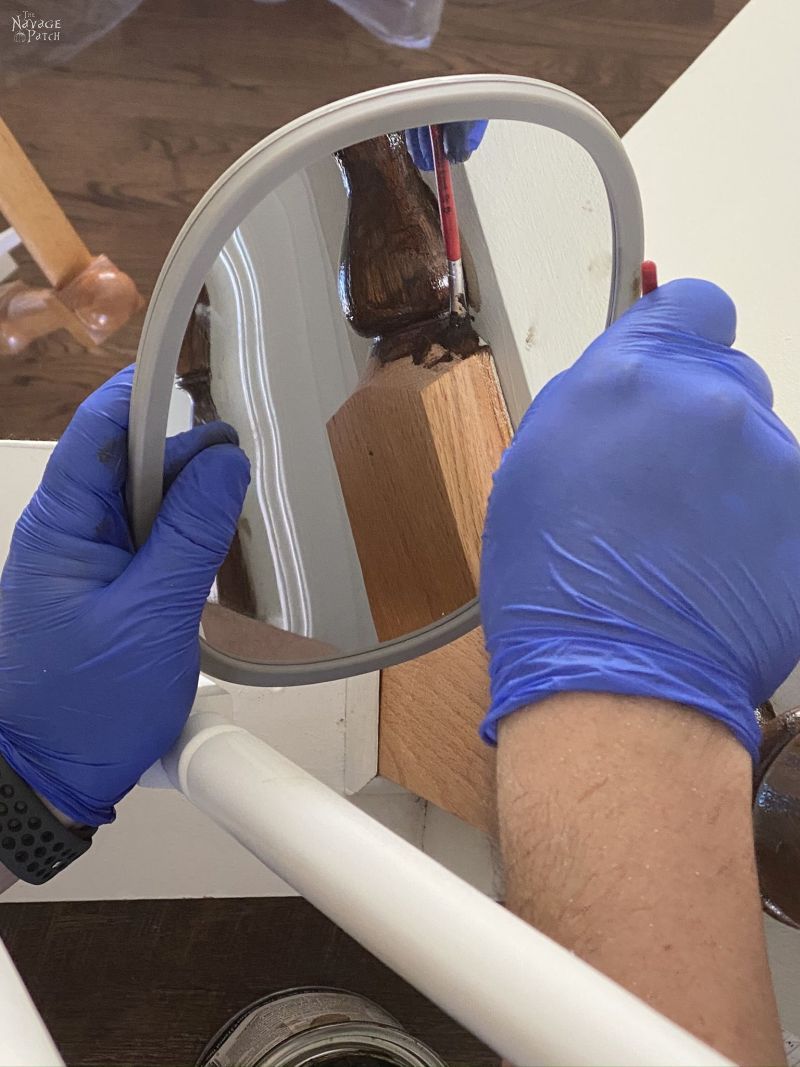
There were a few balusters over the staircase that I had to get creative with. In hindsight, I probably could (should) have brought out my multi-position ladder to reach those areas, but either I didn’t think of it or the laziness was running strong in me that day, because I took a page from the prison handbook and stained them with the help of a mirror.
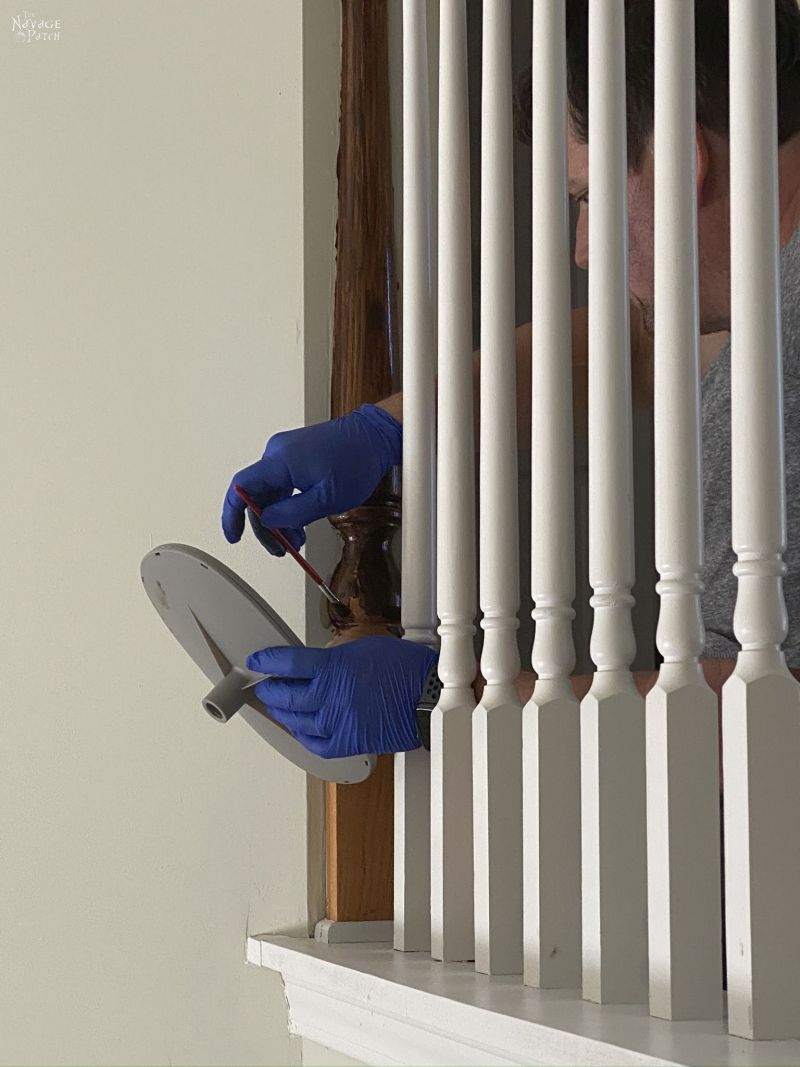
This was no easy task, as my brain interpreted the signals it received from the mirror entirely backwards.
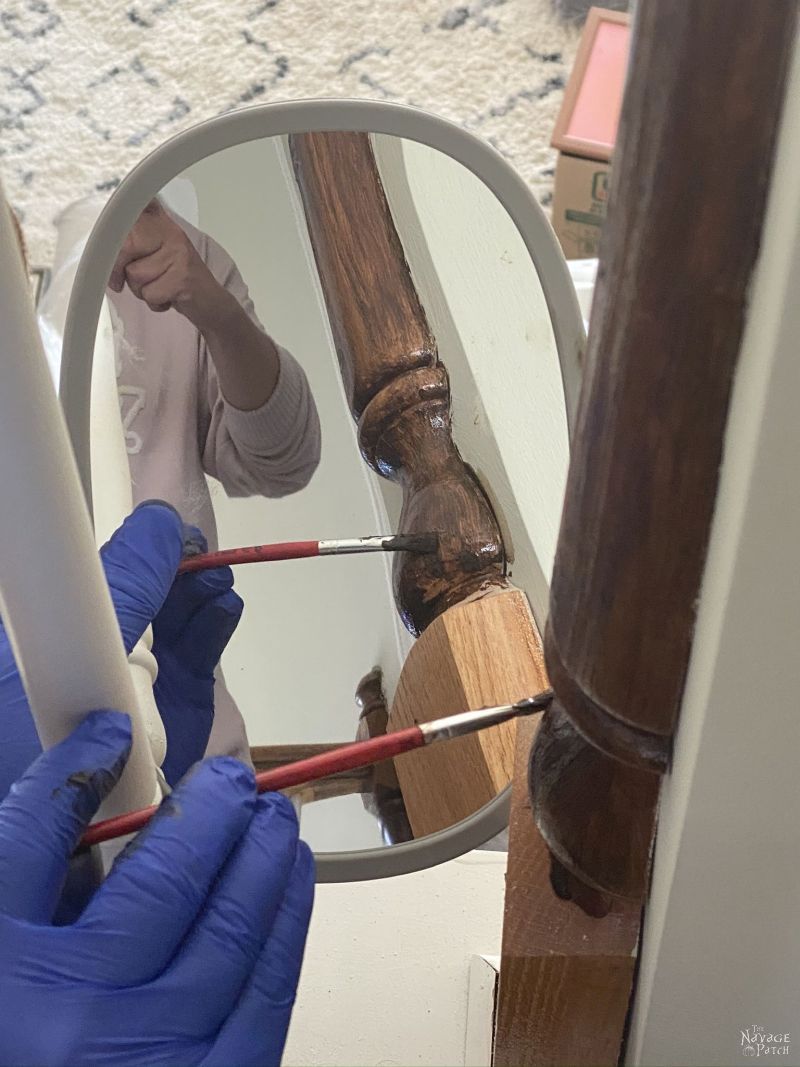
The stain on the wall was no big deal – I hadn’t yet painted that part of the house, so it would all get covered over once I made the final push to finish the living room, foyer and upstairs hallway walls.
When I finally did paint those walls, I did so on the ladder, so it was much easier to paint around the balusters – no mirror needed! In hindsight, I should have used the ladder instead of the mirror when staining the balusters, but it’s a handy trick if you ever need to paint or stain something you can’t see!
After I finished those upstairs balusters, Handan suggested I use a bigger brush. She thought it might make the job a little easier. I agreed, but I didn’t have a suitably soft brush in a bigger size. A quick trip to Michaels gave me a new lease on life – a $25 ultra-soft watercolor brush.
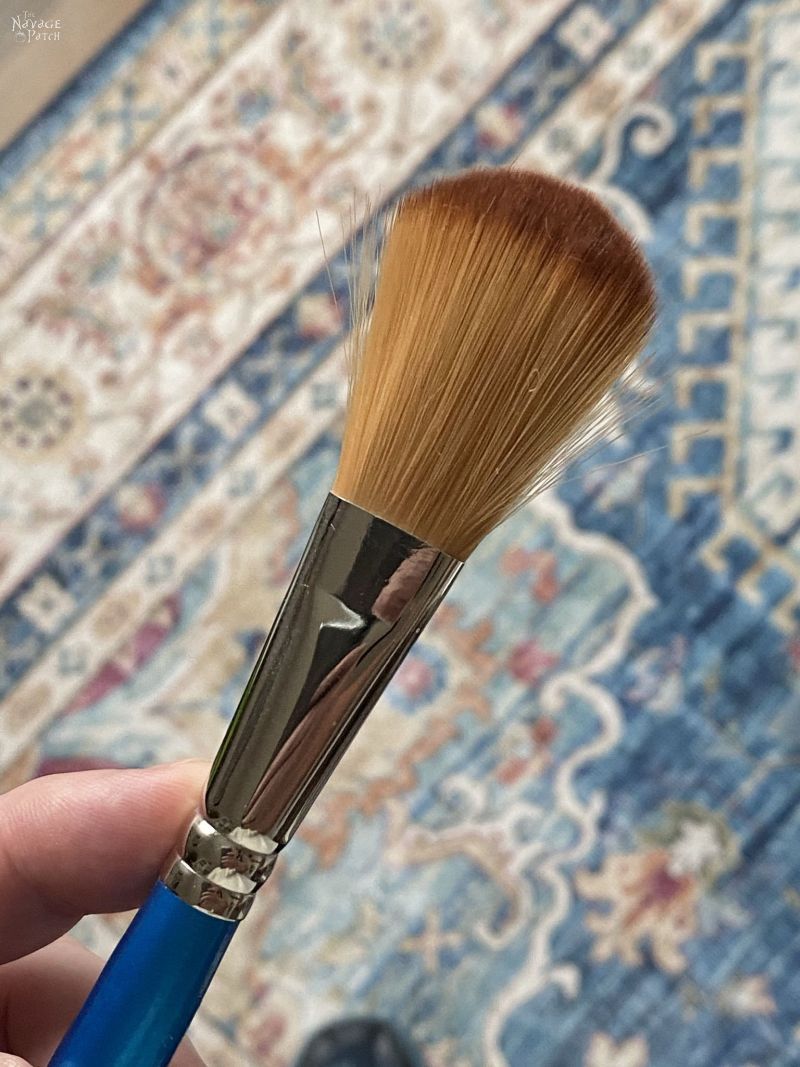
Oh, what a difference! It cut my staining time in half! And just in time, too. I used it for the remaining few balusters, and then it was time to do the handrails – the miles and miles of handrails.
For the handrails with spindles, I found it was much less messy if I first taped all the spindles before the awkward job of staining the underside of each handrail.
For the handrails attached with brackets to a wall, I simply removed them and took them to the basement to stain.
When the staining was finished, I turned my efforts to painting the spindles. I used another small paintbrush – with hard bristles this time. To be honest, I thought the spindles would be much harder than they actually were. They were a breeze compared to the balusters!
As you can see by the tape on the stair treads, I painted spindles concurrently with painting the stair risers – the subject of my last post.
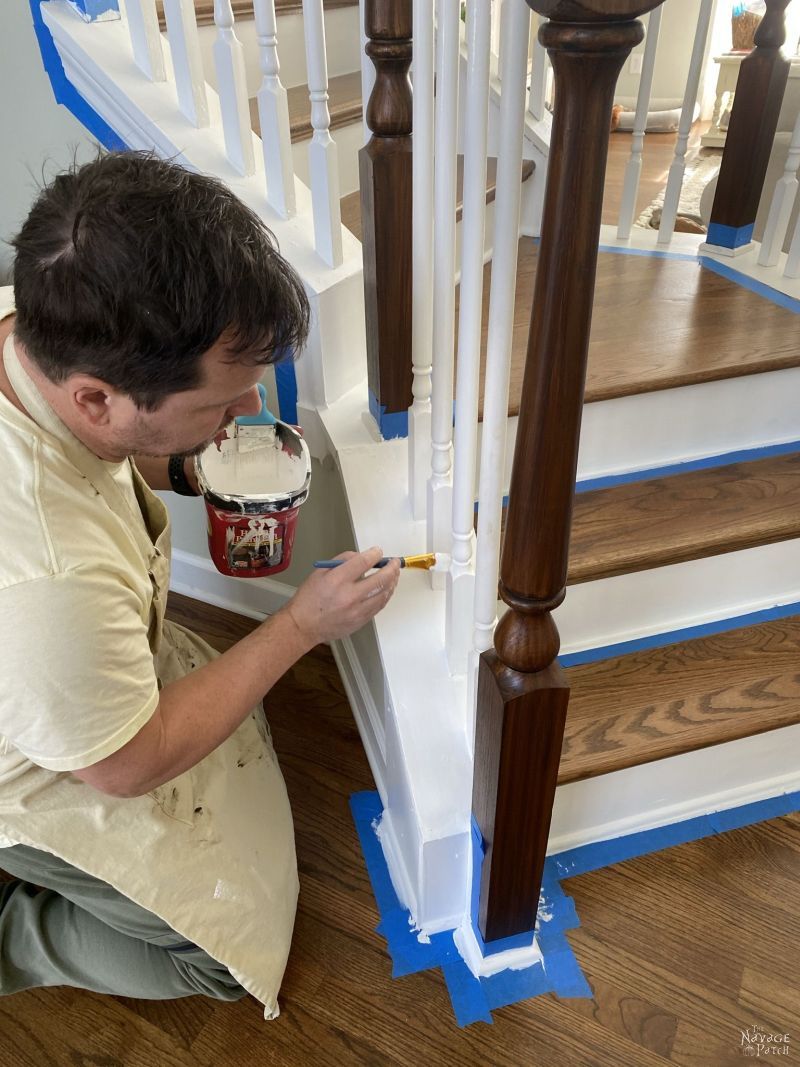
Also during this time, I finally finished all the wall painting that I had started the week we moved in last May. (Well, not all – I still have a guest bedroom, a master bath and a master closet to paint, but close enough!)
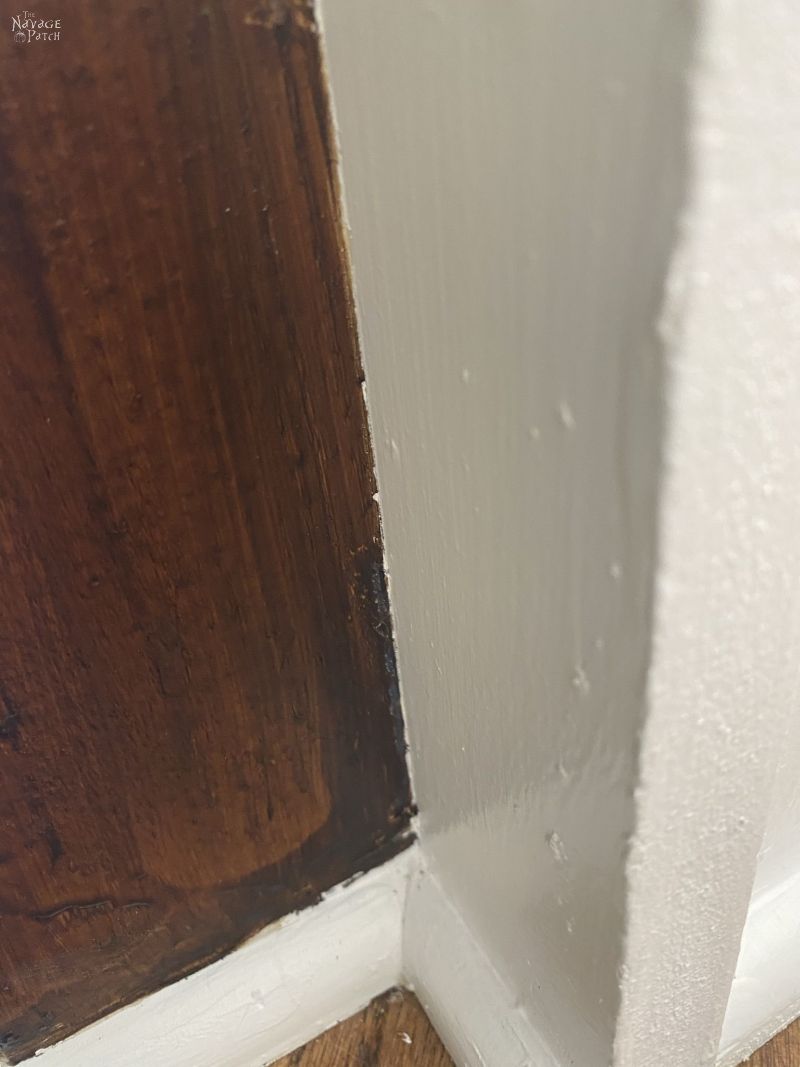
I discovered as I painted the trim that sometimes my tape seal wasn’t good enough to keep paint off of the balusters, like in the picture below.
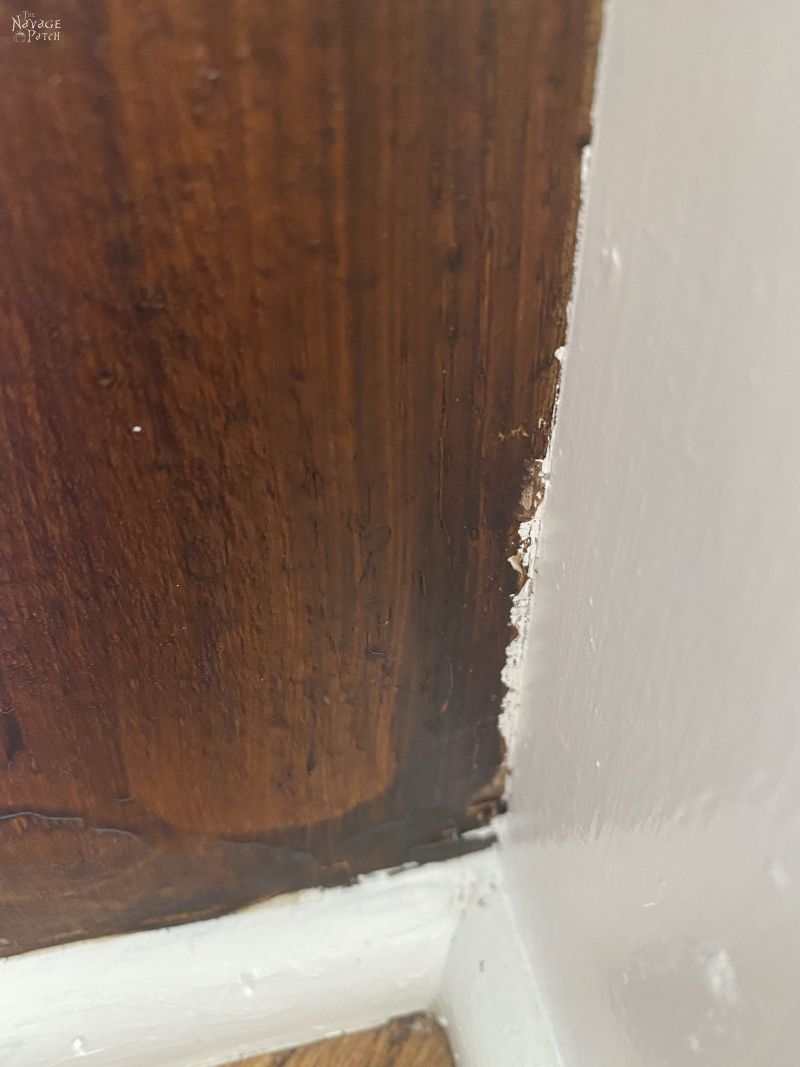
I tried scraping, but it tended to remove the gel stain as well, so I turned to another handy trick I have for hiding blemishes with wood and stain.
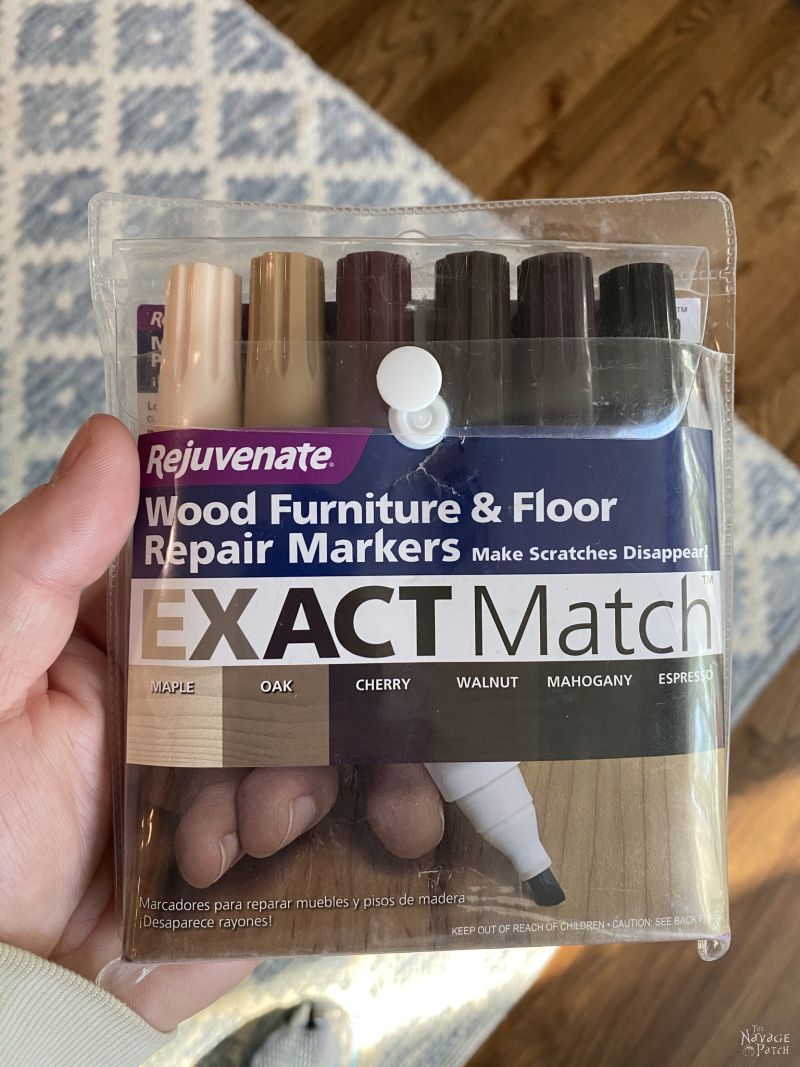
These repair markers are perfect for minor cover-ups, and they’re much easier to use than stain.
First, I taped off the trim and then ran the marker over the white paint bleed.
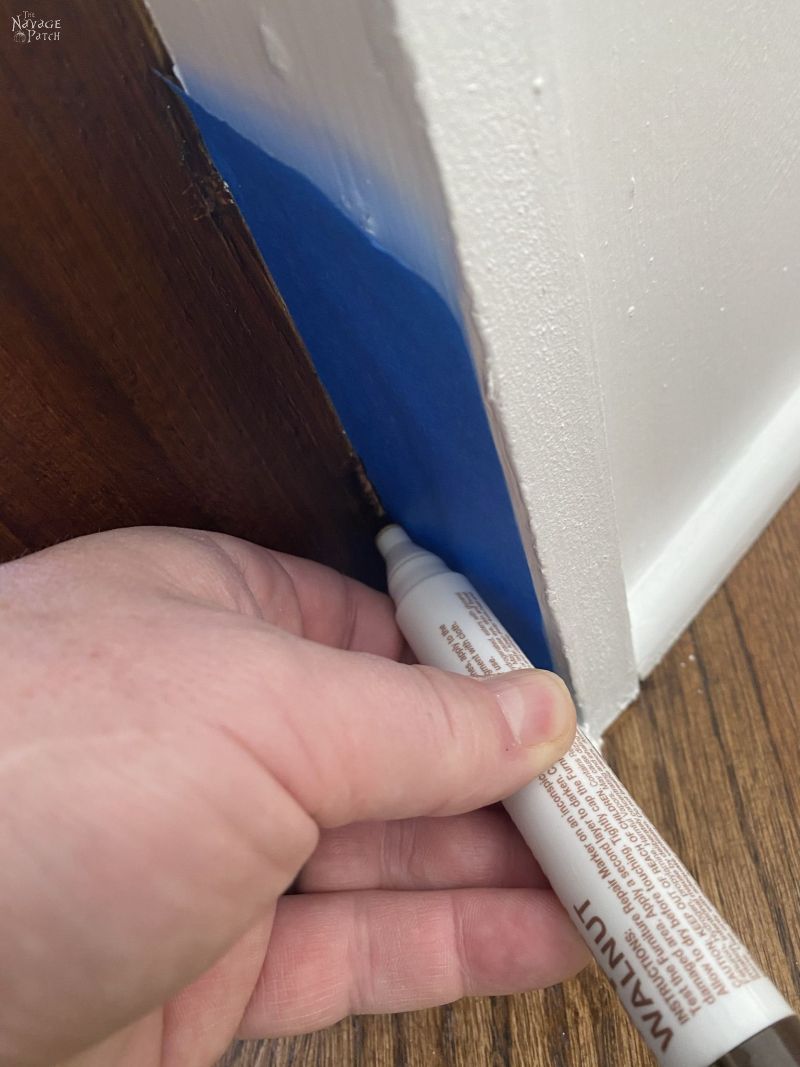
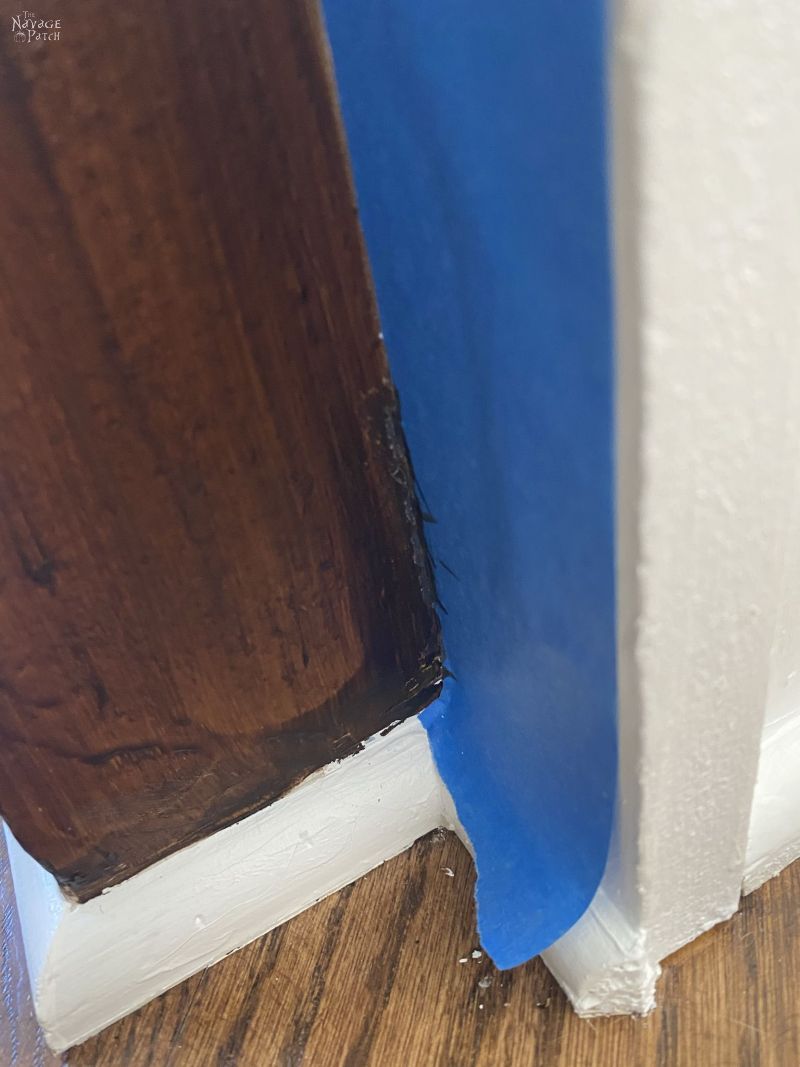
From eye height, it’s a perfect match!
Though it took almost a year working in fits and starts, the staircase makeover is done!
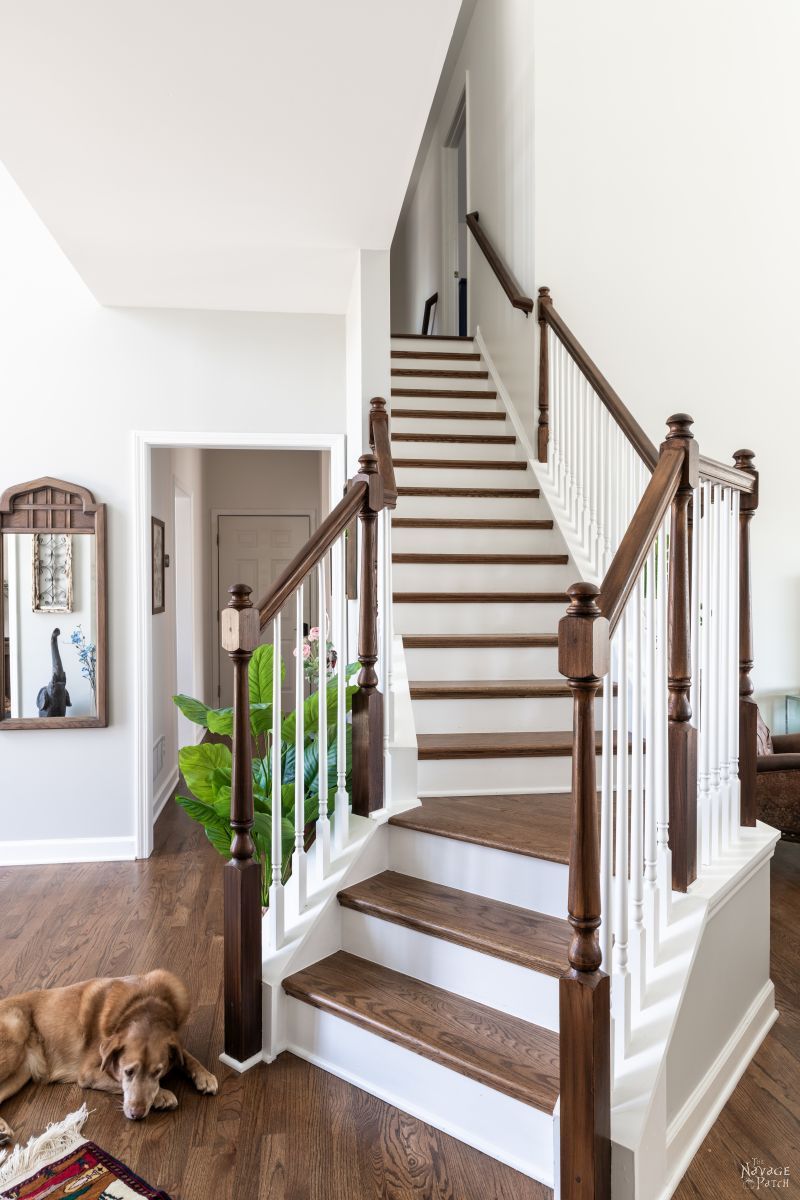
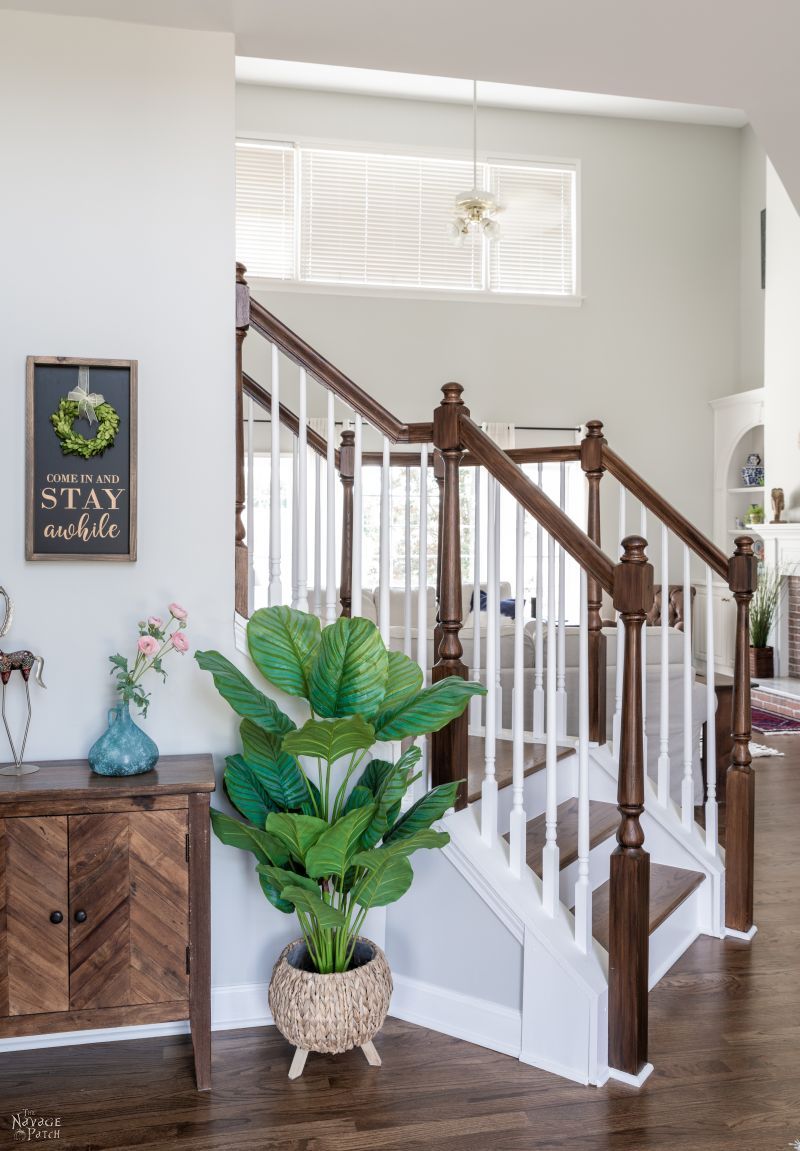
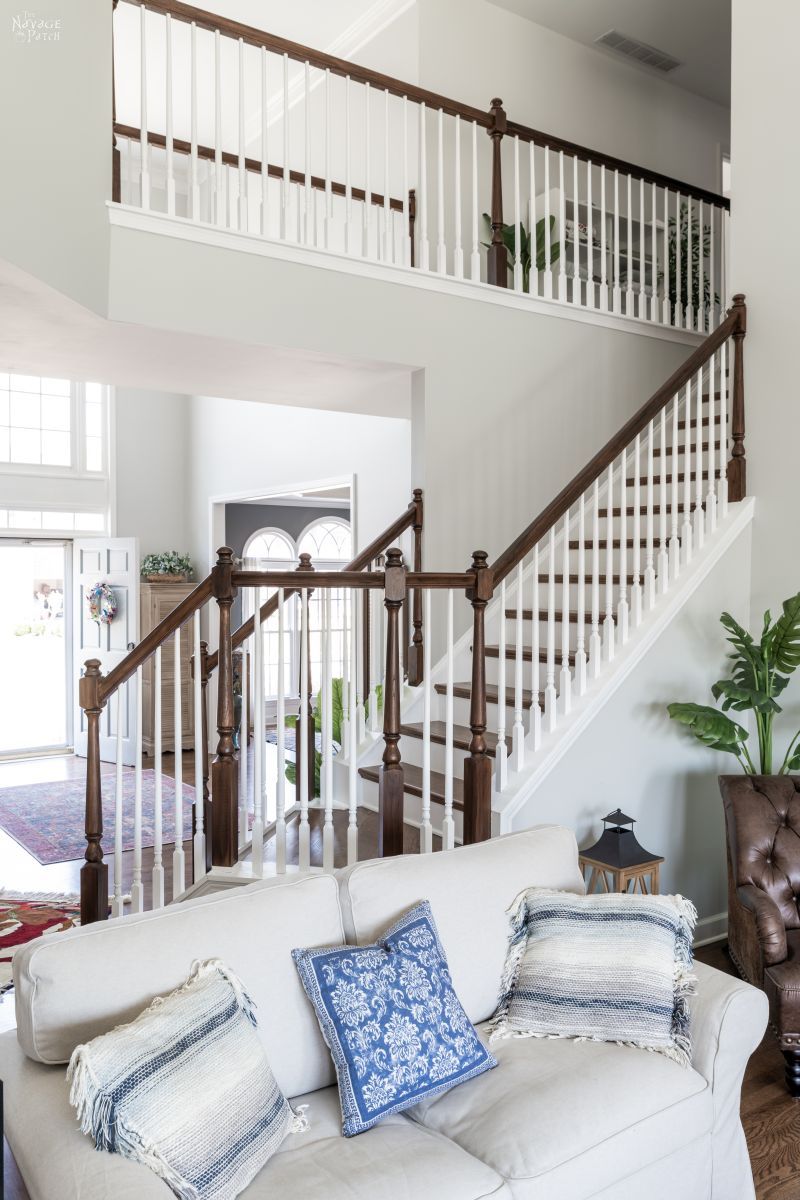
It took longer than I imagined, and it was a lot harder than I anticipated, but my babes and I love the way it turned out!

We love it when you share our posts on Facebook and Pinterest!


One GIANT step for mankind!!! BRAVO for “sticking to it!!” That was monumental & looks that way, too!!! franki
Thanks, Franki -it was a chore!
You. are. a. saint. NEVER in a million years could I have that kind f patience. I really believe I would have lived with the oak! Good for you!!!!!
Next time, I’ll be hiring someone, lol! 🙂
Great job. It looks amazing!!
Thank you, Fran!
It’s stunningly beautiful! I’d just sit there and look at it all day long!
Thank you for sharing your amazing journey!
Thank you so much, Lila!
I can see way it took so long, but the results look fabulous. That’s a lot of railing to deal with, but hey, you got more than one blog post out of it. That alone makes it worth the work.
LOL, exactly! I could have written several posts documenting my procrastination throughout the year, lol! 🙂
It looks soooooo elegant! Great job!
Thank you, Marcia! 🙂
It looks great, another job well done!
Thank you so much, Madeline! 🙂
You did a fantastic job! It looks great! I commend you for your perserverance! We too had the lovely golden oak rails and balusters on our staircase in our house. We knew that we did not have the patience and or time to tackle it, so we opted to pay to have them refinished and matched to our new hardwood floors when they were installed. I’m sure our marriage was saved by that decision or at least our sanity!
Oh, you are a smart woman, Audra! I committed to this project without having a clue what I was getting myself into! 😀
Wow, that monster project turned out Beautiful!! You did a fantastic job!
When I was looking for Dixie Dirt (thanks for that) I stumbled on Zibra paint brushes. The round is super soft and made specifically for spindles (I used it for painting a relief pattern). I realize this is after the fact, but it’s pretty awesome and well priced (mine was less than $10).
This is why we love your site, you guys not only help, you also provide inspiration!
Oh wow, really! I’ve had so many of you guys tell us that we’ve introduced you to a product right after you finish the project it was intended for. Welp, now I’m on the receiving end, lol! But thanks for the tip, Mo! I’ll keep an eye out for that brush. We do love Zibra brushes!
What a beautiful añd stunning project! It takes a lot of patience to take this on so Congratulations. I wish I had stairs so I could have them look likes yours. I just finished painting my house, and it took a lot of patience to do just that. Great job Greg!
Thank you so much, Melody! It does take patience and a bit of work, but the end result makes it all worthwhile!
It looks so amazing! Great job
Thank you, Dee! 🙂
So, I’m understanding you didn’t have to sand the banister or railing at all before using the gel stain?? I am contemplating refinishing my stair banister and railings but am hesitant. Thanks for your help and response!
It is beneficial to run a little sandpaper just to scuff up the finish a bit – it helps the gel stain stick. But I’ve used it without sanding and it’s been fine. I did sand only a little to get rid of some of the annoying polyurethane bumps that were already on there, and that had the added benefit of scuffing the finish a bit. But it’s nothing like sanding off the finish or anything like that. Really just 5-10 minutes of work for our entire handrail and baluster system.
Totally went from bland to grand! Gives your entryway the wow factor! Great job Greg!???
Thank you so much, Cindy Lee – that’s exactly what we wanted! 🙂
Beautiful! Can’t believe you’ve been in the house a year already
I know, right? Where the heck did the year go, lol! 😀
Beautiful results. Well, you just settled the question of whether to attempt our staircase railings myself. At 75 and with back issues I think I had better find someone who will do it. From your description, it sounds like I would be in bed for a month afterward.
Seriously, $3500 is unbelievable! I think I will be getting multiple estimates. I’m hoping I have less spindles etc. than you do but my staircase is very much like yours complete with catwalk and golden oak. Fortunately, our runs are not as long as yours so less rails and spindles.
It will be awhile since kitchen has to be remodeled and floors replaces.
Wish me luck.
I’m sure you can find someone cheaper, Connie. Good luck with your entire remodel – sounds like a big project! 🙂
Your staircase looks fantastic! I’ve been wanting to update our staircase, and this post has given me some inspiration! Also, could you share the wall paint brand and color?
Thank you, Penny! The gray wall color is Icy Avalanche – it’s a Sherwin Williams HGTV color we got at Lowe’s.
What an undertaking! You did a fantastic job and it looks great. Bet you had a Martini or two after you finished…….or maybe while you were working on it. LOL
Thank you, Gail! Oh, you bet – there were many martinis enjoyed after working on this project! 🙂
It looks great, Greg. I love the darker stained hand rails and I’m so happy you stained the treads and took the carpet off! You have a lovely home.
Thank you so much, Barbara! 🙂
Your staircase looks tremendously fantastic!! I wish we didn’t rent our house, I would love to do our staircase. You are such an inspiration. I always read every post from you. There a requite a few times you have cracked me up with your posts. Keep them coming!!!
That is so nice to hear – thank you, Ellen! I will certainly keep ’em coming your way!
The staircase looked beautiful before, but your hard work made it a real showcase. I love all your projects that you make. I have made some of your holiday projects and everyone loves them.
We are going to redo our kitchen and I know you mentioned you got your cabinets at Home Depot. I love them and would like them for our kitchen. I know you said they are by Hampton Bay, but there a few selections to pick from. I’m thinking Hampton Bay Cambridge White. Am I right?
Hi Gertie, thank you so much! So our kitchen cabinets did come from Home Depot, but they are made by Kraft Maid. We used Hampton Bay in our laundry room. Good luck with your kitchen! It’s a really fun process!
Utterly dramatic and GORGEOUS!! Well done! ~and the crowd goes WILD!!~
Thank you so much, Carla! 🙂
Amazing job!! I did ours a few years back with gel stain too but we don’t have nearly as much rails/balusters//posts as you! Great idea with the mirror – I can’t even remember how I did ours above the entryway. Great post as always!
Thank you, Lynn! Yeah, necessity is the mother of invention, lol! 🙂
Gorgeous results! I am going to do ours. One question… do you wipe the stain at all? Or paint it on and let dry? How long to dry?
No, you don’t wipe it off, Wendy. Therein lies the art. You have to brush it with a soft brush to blend the color and avoid brushmarks. It only takes about a day to dry (unless it’s really humid).
Great job! An enormous undertaking…but so worth it.
I do the painting in our home and thankfully we live in a Ranch style home… No steps = no spindles!
Oooooh, lucky you, Margie, lol! I can only dream! 🙂
Looks fabulous! Can you please let me know if you used regular old white paint or some type of special paint on the risers? We are having a terrible time with ours. We keep repainting but then we turn around twice and they are covered with scuff marks. Thanks!
P.S. Greetings from CT – it is 60 degrees and raining. 🙂
Hi Laura, I use Sherwin Williams Infinity (Lowes) in ultra pure white color. I’d recommend something with a little more sheen though, if you’re looking for easy cleanability. Scuff marks are a given. I don’t know of any paint that can resist them! Glad you guys are finally getting some warm weather up there!
What a spectacular transformation. You have the patience of a saint! You are so detailed and precise in all of your projects. That’s a lot of house to take care of. It’s a full time job doing all of this home improvement! You are an inspiration.
You are a stitch in time ?. I can’t read one of your post without cracking up, you definitely have a way with words!
You must be a saint to finish such a tedious job like that!
Thank you, Debbie, I’m so happy to hear it! 🙂
I LOVE this. I too have a similar situation, but I’m working on wall color first (baby steps!). Can you tell me what paint color your walls are? I love how it looks with your stain. I’m trying to find a color that will tone down the yellow undertone of my provincial stain.