How to Paint a Front Door (& Repair it, Too!)
Learn how to paint a front door 2 ways and repair rotted areas. It’s an easy DIY project that will totally transform your entry and up your curb appeal.
What is it with front door colors in the South?
When we moved to Georgia, we noticed a ton of black doors.
It seemed like every brick house had one.
Now, to me, all those black doors looked classic and stately – a little same-same after a while, maybe – but handsome nonetheless. I don’t remember seeing so many up North, so I found them to be an interesting change. Digging into the significance of a front door’s color, I learned that a black front door brings elegance and calmness to a home and serves as a protective barrier.
All good stuff, right?
Well, not to my babes.
She’s got a superstition against black doors. She heard something bad about them from a friend long ago and it stuck with her. Something about it bringing bad luck and sickness to a home or some such.
Not good stuff.
So one of the first things I had to change in Georgia was the black door color. Of course, I also had to repair a bunch of rotted wood, and I’ll get to both in a moment.
Then, when we moved to Florida, we started to notice a lot of brown doors. Now brown doors mean something different entirely.
Take, for example, our brown door.
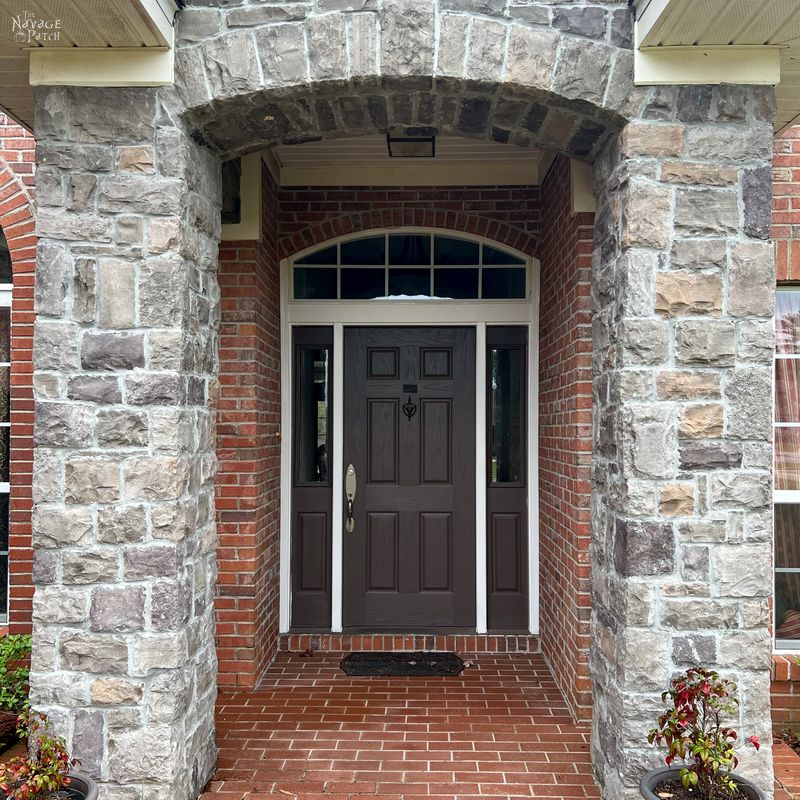
According to those who know such things, a dark brown door like that means there are some very private and introverted people living inside.
Ummm…have you met us??
Besides the clearly wrong message our front door was sending, it just didn’t look good. The house has too much red going on already anyway – red brick, red roof, red mulch, red landscape rocks. A brown door on all that red just wasn’t cutting it.
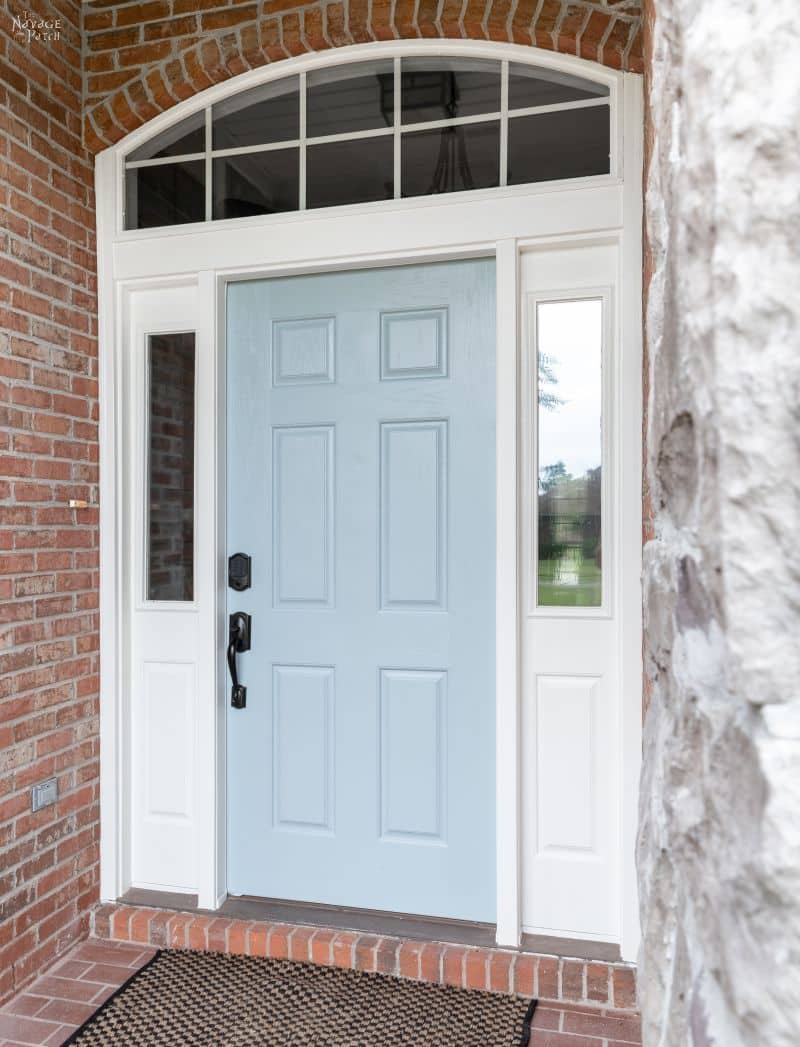
So we decided to paint it with the same color we used in Georgia – Stardew by Sherwin-Williams. I’ll show you how I sprayed the Florida front door, and then we’ll take a look back at the Georgia door, which I rolled.
How to Paint a Front Door
Method 1 – Painting a front door with a Paint Sprayer
August 2022
On the plus side, this brown door was in terrific shape, so I didn’t have to make any major repairs before painting.
Since we no longer wanted the door knocker nor the little plaque hanging above, I removed those and filled the holes with wood filler.

When the wood filler had hardened, I removed the door and brought it around to the garage so I could work on it. Since this house doesn’t have a storm door, I covered the door-hole to keep the heat, bugs, snakes, frogs and whatever else slithers, crawls, hops, jumps and flies out of the house.

I sanded down the wood filler and then lightly sanded the entire door with 220 grit. Since it had been painted multiple times in the past with latex paint, I only wanted to scuff the latex. If you sand latex too much, it’ll start to peel, but because it’s basically rubber, you’ll end up in a losing game of sand-the-rubber. Just a scuff is more than enough!

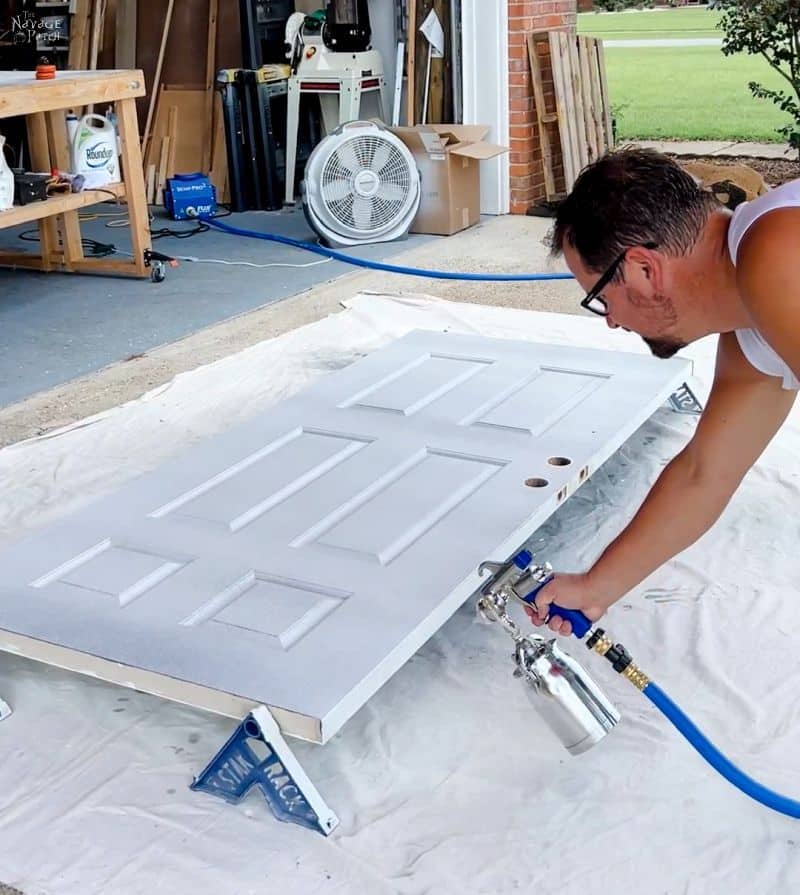
When we moved to Freeport, my babes bought me one of the most useful tools ever to help with door, window and plywood painting. These Stack Racks make painting two sides of multiple doors a breeze. Though I wasn’t painting multiple doors, they still made tackling both sides of our front door so much easier!

Instead of using a foam roller, I used my new paint sprayer for this door, and let me tell you right now, I will never use anything else to paint a door ever again!

Spraying instead of brushing or rolling gives an unparalleled finish. I can’t believe I’ve been using rollers for so long when a much better alternative was right at my fingertips!
Okay, so we’ve had a Wagner sprayer for years, and it’s good, don’t get me wrong. But we recently upgraded to a Fuji Spray Semi-Pro 2 paint sprayer, and holy guacamole – it is a revelation! Yes, it is pricier than the Wagner, but if you’re faced with a kitchen full of cabinets to paint or any other large painting project, it is a worthwhile investment. It is so easy to use that it will allow you to do yourself what you may have otherwise hired pros to do. I still have a lot of interior walls to paint, and I’m planning on tackling them with my Fuji Spray. I’ll write about that when it happens.

For both the paint and primer for this project, I switched to Sherwin-Williams Emerald Urethane Trim Enamel.

This is a fundamentally different type of paint and primer than latex. It does not dry to a rubbery finish. It is an ultra-durable paint that is perfect not only for trim and cabinets, but for doors, too.
After thinning the primer with water, I sprayed a couple of light coats. As with all primer, I wasn’t trying to turn the door white. I was just giving something more for the paint to bite onto.

Flipping is easy with Stack Rack!

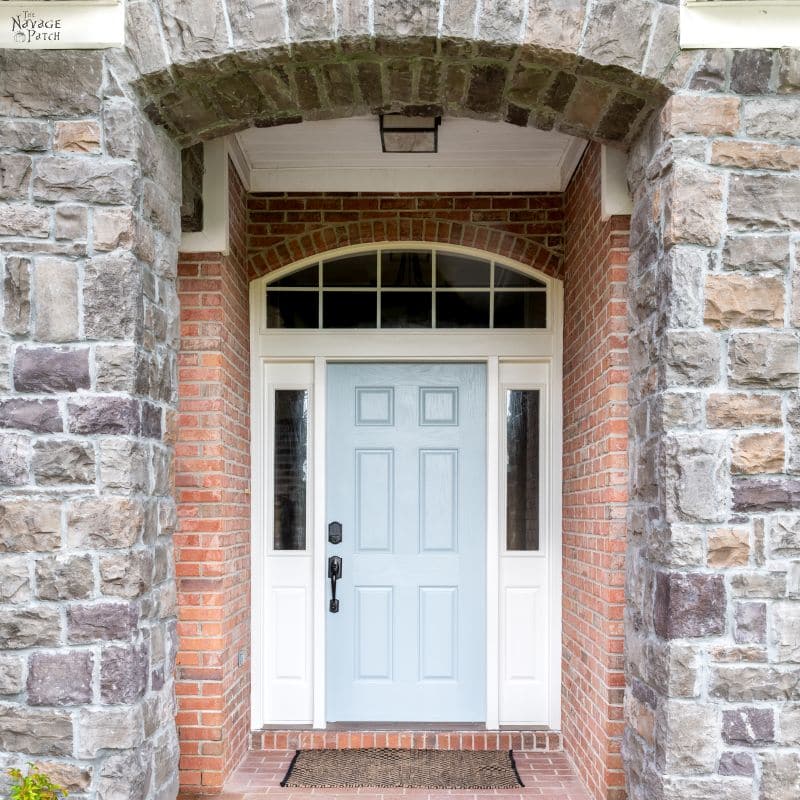
When the primer had dried, I painted the door with the same color we used in Georgia, Sherwin-Williams Stardew. We only had it for two years (not even) in Georgia, so we weren’t nearly sick of it yet! 🙂

The color above looks a little weird because I’m under a red umbrella, and it’s giving a red cast to everything around it.
Look how beautiful the paint lays on the door – no brush or roller marks in sight and no drips.

After several light coats of Stardew, I reinstalled our front door.
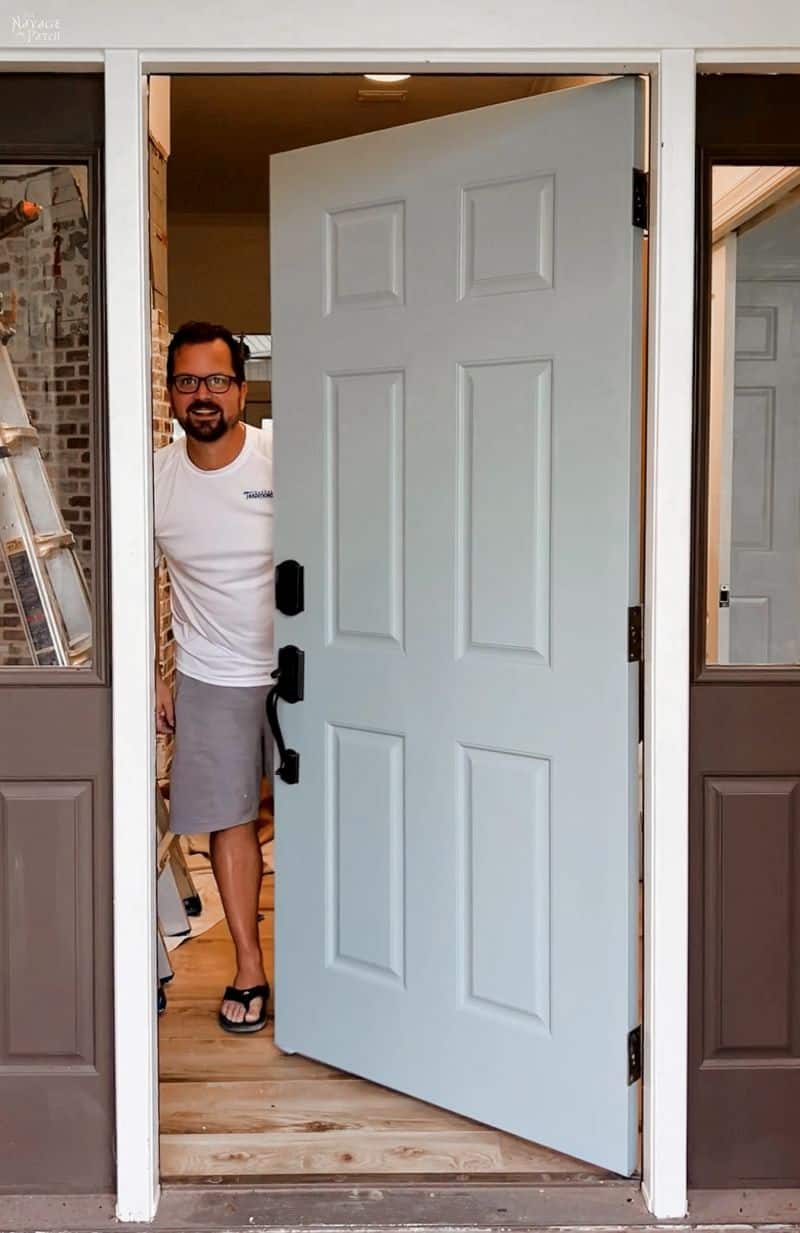
Bonus: painting the side panels
We decided white would be a better choice for the side panels than blue. To make the job easier, I used the same trick I used when painting our French doors in Connecticut.
This trick makes painting around glass panels a breeze.

If you’d like to learn more about how to paint French doors the easy way (or any glass-paneled door, window or side panel), check out the post below.
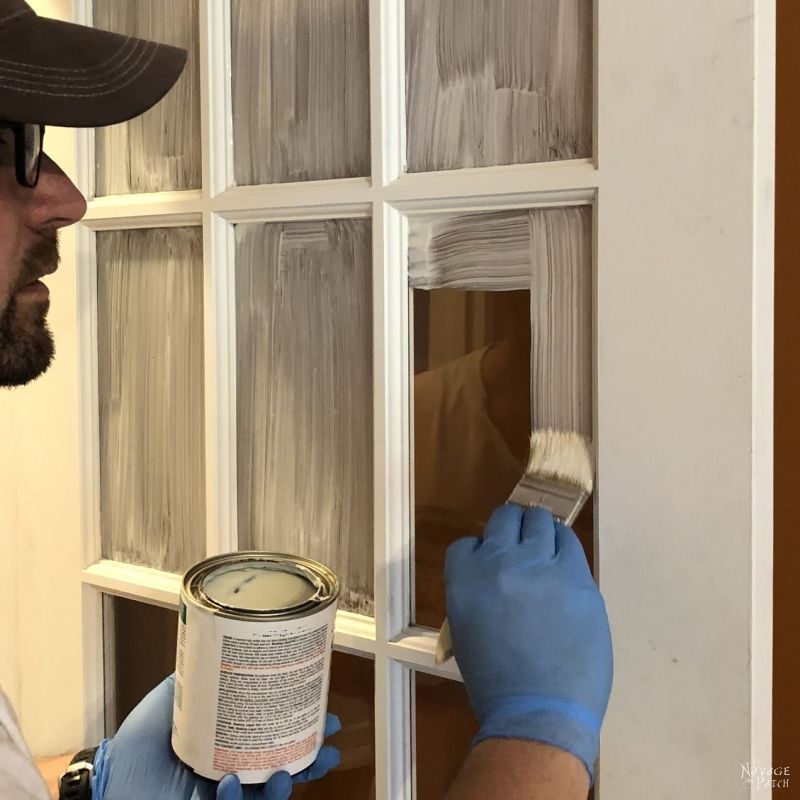
This Fuji Spray paint sprayer is so precise, I only needed minimal masking to paint the side panels. One of the great benefits of a higher-end paint sprayer is a more precise spray pattern with minimal overspray.


The Peel…

The Reveal…


Method 2 – Painting a front door with a roller
August 2020
Our Georgia door looked like this when we moved in.

Besides being the wrong color, this wooden door was rotting away along the bottom edge. Before I could paint it, I had to fix it.
With Handan’s help, I removed the door from its hinges, and we carried it outside and set it up on sawhorses. Some people like to paint doors where they hang. I even used to do it. But they’re so much easier to work on when they’re lying flat than standing up, so these days, I always take them off the hinges, even if I’m just painting and not repairing.
I removed the old door sweep. The wretched thing had been worn down to the nub over the years.

Go ahead and feast your eyes on those nearly-bald legs, madam. Some women struggle their whole lives with razors and waxes and never have legs as smooth and silky as mine.
Genetics, ladies. I hit the jackpot when it comes to premature balding of the legs. And if you think mine are smooth, you should see my dad’s. He’s the envy of the blue-haired set in Connecticut.
Okay, okay, eyes up here, madam. There’s rotten wood that needs fixing!
How to repair rotted wood on a door

Normally, this would be a job for a rotted wood restorer, but as I did this repair shortly after moving in, and I didn’t have my shop fully set up, I just used what I had on hand, and that was CA (super) glue. Lots and lots of CA glue. I buy it in big bottles – it’s much cheaper that way. I also use an instant hardener – absolutely fantastic stuff. Creates a powerful exothermic reaction that gets so hot it smokes. Just don’t get the glue and the hardener on your skin. It burns like hell, and you get to watch your skin smolder.
Ask me how I know.
Anyway, CA glue and insta-set works wonders on rotten wood.
I just flooded the whole area. Note that I’m using the thinnest CA glue, so it really penetrates into the rotten areas.

Once I had it good and soaked with CA glue, I poured in some hardener.

That white stuff is boiled and hardened CA glue that has reacted with the hardener. The rest of that wood is now hard as a rock.

I sanded the excess CA glue in preparation for the wood filler.

Ahhh, Bondo – my favorite wood filler. This is the 70s muscle car of wood fillers. Other wood fillers perform like Yugos in comparison.

Bondo is a two part filler that uses a red cream as a catalyst.

I mixed it up quick and set to work. Bondo sets fast – you only have at most a few minutes to work with it before it begins to harden.

Artistry was not an option. I just gooped it on and spread it around.

Good enough!

I let it harden for about 30 minutes. I could see that it would need a second coat in one spot.


I used my detail sander to remove the excess before the second coat.

Then I mixed up another small batch and spread it on to fill the remaining gap.


Thirty minutes later, I sanded it again until the filler was flush with the rest of the door.

With the rotten wood fixed and filled, I moved the sander to the rest of the door. Scuffing up the black paint would help the new paint adhere better. I think I was using 100 grit sandpaper for this, but anything would be fine from 60-220 grit.

After running the sander over all the flat areas (I quickly hand-sanded the recessed parts), I cleaned the whole door with Krud Kutter Gloss-Off. I like to use this stuff whenever I can when painting over an existing glossy surface. It does a great job of removing shine by creating tiny etches all over the finish when applied.

Method 2 – Painting a front door with a roller
Even though many paints come as paint-and-primer-in-one these days, it’s a good idea to use a dedicated primer for something as high-use and exposed as a front door. If you want the best adhesion, you can splurge for Zinsser BIN, a shellac-based primer. I didn’t have any in the basement, but I did have Zinsser 123, so I settled for that. With the sanding and deglossing prep I did, it would be more than adequate for the job.
You don’t need a thick coat of primer – just enough to cover the surface a bit to improve adhesion. In other words, you don’t need this much:

Hey, what can I say? I got a little excited, okay?
Anyway, with the repaired area primed to the bejeezus, I dialed it back for the rest of the door.

When the primer was dry, I started painting. The key here (as with all painting) is multiple thin coats. I put a total of 4 thin coats of paint on this front door.

Painting doors is a breeze with foam rollers, and they leave the smoothest finish outside of spraying.
For the recessed parts, I used the tip of the roller.


I didn’t worry about getting full coverage on the first coat. Thin coats, little bit at a time, build it up slowly.
It’s torture for me to paint like this. I grew up in the school of “one coat, thick as hell.” But trust me, it’s worth it if you want a paint job that will last!

When the final coat was dry to the touch, we moved the door inside to dry further in the air-conditioned house. You may have heard that it gets a tad hot and humid here in the summer, and that can make outdoor painting a maddening endeavor.

But, hey! Look at that repair job! You’d never guess that wood was rotten and falling off.

Okay, so normally in this situation, I’d just go out and buy new hinges in oil-rubbed bronze like I did when painting our interior handles. But these hinges are some wackadoodle hybrid of square and rounded corners the likes of which I couldn’t find in any store.
After a fruitless search, I gave up and decided to paint them.
A little sanding, a little Zinsser BIN spray and then a few coats of Rustoleum ORB, and they were ready to rock.
But this is the only picture I took. 🙁

Just before reinstalling the hinges, I added a new door sweep.

With Baris and Handan’s help, I re-installed the door, and then I re-installed the knob and deadbolt.
Okay, so if you’ve read our Easy DIY Fall Wreath post, you’ve already seen the newly-painted front door in action. Here are some more pics.


Stardew is a beautiful color – especially on our front door! It complements the brick perfectly.


Your entry way is so welcoming and 1000X better than it was. That paint color is gorgeous. The symmetry is so nice. The flag(s) look great. You have really been busy , getting so much accomplished on that list.
Thank you, Carla! It’s been the busiest summer I can recall, lol! We love the way everything is coming together around here, and now that some of the major projects are completed (or close), we finally have time for crafts again! 🙂
Looks great!! I actually laughed out loud at “pudding brain in a watermelon skull!” The idea of the flag mounting on top of the junction box was genius!! It looks so classic!! And gives an element of elegance to the home!!
LOL! Thanks so much, Anne! 😀
This post is very helpful! We bought a 20 year old house last fall that has quite a bit of rotten wood. The details of filling in the door that you shared will translate well to some rotting window sills and other wood pieces we have. We are in a mountain community (in north Georgia) in a frame home with lots of shade, and all the humidity and rain has done some damage over the years.
I enjoy your dry humor – it keeps me coming back!
Hi Kim, I’m happy to hear you found this post helpful! Minwax also makes a wood hardener that you can find at Home Depot. And like I said, CA glue works just as well (especially for smaller areas)! Good luck with your projects. I expect I’ll be dealing with more rotten wood in the future, too. This climate is sure conducive for it!
The new colour is definitely much better, it looks great with the bricks. And thank you for showing how you repair rotten wood. I thought that it would have to be replaced with new wood, never heard of fixing it with glue, so thank you for the useful information!
Did you paint just the front side of the door? What if you have to paint the both sides and the door is horizontal? Would you paint a layer, then turn the door and paint the other side, then a second layer, turn the door, etc? Or would you paint all the layers on one side, then turn the door and paint the other side? I have to paint a lot of internal doors soon.
Thank you, Valentina! Good question! Painting both sides takes a bit more time. I like to finish one side first and let it cure overnight. I then put soft towels or rags on the sawhorses to protect the new paint. Like you, I too have started painting all of our interior doors. I started this way – using sawhorses – and then I got fed up with it. I have a much easier method now, but it involves a paint sprayer. I’ll be sharing that post at some point in the near future.
what the heck is a ghost window? Ghost to enter or exit???
LOL, check out our Empty House Tour post to learn all about our ghost window! 🙂
My wish has been granted. That one light placed on the brick was upsetting my sense of balance and perfect placement. I mean, who places a light away from the door. So, with the removal of the gargantuan shrubs (that only looked good at Halloween), the PERFECT placement of the new light fixtures and the lovely door color, I am once again experiencing the lovely calm of perfection. Okay, so that’s a little overboard but it really is beautiful. Great job, Greg!
Thank you, Connie! Our aim is to bring balance and harmony to the universe, lol! 🙂
Nice! Looks so much better, especially with that overgrown hell hedge gone. I prefer the blue over black too, it makes yours stand out against a sea of sameness.
Agreed! Maybe we’ll start a trend on our street and become the black sheep of the subdivision by not having black doors!
You guys are amazing. Such vision. I love what you are doing with the house. Thank you for the blog, tips, and letting us enjoy your journey. You guys need to have a DIY show.
If I may ask, where did you find the two tall black planters on the front porch? I have been looking for those exact planters since I saw them at Sam’s Club a year ago.
Thank you, Stephanie, you are so welcome! You can find those same planters at Home Depot for $65: https://rstyle.me/+a26AY59p4-DmWgBZZY-J7A and at Walmart for $98: https://rstyle.me/+KDE2fpKPZw9-f2KrbeCE5Q and Amazon for $118: https://rstyle.me/+47rsElOqrgSF_zehzi32zQ
Well my Southern Yankee friend, as always job well done.
I hope you kept some of those winter clothes you will need them. I still after 23 years in the South get a kick out of the snow flurry panic. School will close the day before just because it might snow. Bread and milk will disappear off the grocery shelves. And I know it’s because they don’t have the snow removal equipment here, that we Yankees are used to, but it’s still good for a chuckle now and then.
Oh and red doors are supposed to be good luck, in case you need to paint your back door. And hey we all need a little good luck coming in through the back door once in a while. Keeps our bases covered I figure. Can’t wait for the next post.
Thank you so much, Melita! I’m looking forward to winter – I have a feeling it’s going to be right up my alley down here – cool but not much snow!
Looks great!!! I much prefer the blue door to the black door! Black would get so hot if you needed to shove it open with a bare arm because your hands were full! Where is the picture of the front of the house without the nasty bushes? I can tell they are gone but what does it look like??!!
Thank you, Susan! Ahhhh, you’ll have to wait a bit longer for that picture – it’s getting its own post! 🙂
I believe the blue door will keep the haints away. In case you’re too yankee, a haint is a ghost.
I wish it would chase away the haint that’s stuck in the big window above the door! Unfortunately, that particular vapor-spirit is going to cost >$5000 to chase off!
You sure are knocking off items on your list! Love the door color, too. Good to know how to fix rotten wood. I should not be trusted with Crazy Glue, though. I have learned the hard way that I do better with Super Glue Gel as it moves slower than I do and I can usually outrun it! It doesn’t run so I can reposition things a bit, also. Looking forward to seeing your house “done up” for Halloween!
We’re busy as beavers around here, Kathy – the neighbors must think we’re nuts! We’re looking forward to Halloween, too! Just hope the kids can come around this year!
The door looks great! And, inspiring… my black front door has had marks from old sticky tape for years. But…how long did you have the door off the hinges? I’d be nervous about only having my storm door there over night.
Keep up the good work!
Hi Alison, we only had it off for that one day. I started in the morning and had it back on in the afternoon. It’s definitely something you want to start in the morning so you have enough time to finish!
Awww maaaann! Why didn’t you tell me about that rotten wood hardening miracle stuff BEFORE I gave away that really cool rocker?? Sigh!
OK, so you mention two ways to do it… the Bondo hardening product you paint on (I’ve been reading up on it now for the next cool but rotten item) and the CA glue chemistry experiment. If you had your choice of the two, which is better / easier / stronger? Thanks for all your expertise & insights!
Love that door & how it’s all shaping up. As usual, the Navages will soon be the envy of the neighborhood!
Hi Julie, okay before this door, it’s been a long time since I’ve used traditional hardener. Long enough, in fact, that I forgot what I last used it on! I’ve been looking at the price of hardeners vs CA glue & insta-set, how much of each you need, etc. From a cost standpoint, there’s not too much difference. The CA glue route may be a little more expensive, but it has one big advantage: speed. Most hardeners take a few hours to cure. My method is instant. But how long will my fix last? I have no idea. I just made it up on the spot. But since it’s just the corner of a door, and not something structural, I think it will hold up just fine. You could go down a huge rabbit hole with hardeners. Ask the “wood experts,” and they’ll poo poo the products from Bondo, Varathane, Minwax etc as not being strong enough and being manufactured for speed instead of long-term strength. They will tell you that the only way to properly treat rotten wood is with complicated two-part epoxies. But remember, most of us aren’t repairing holes in boats or anything super critical – we just need to harden some soft wood, fill the gap, paint it and get on with life. So all in all I give my vote to CA glue and insta set, because I use that stuff everywhere and on everything, not just rotted wood. Good luck to you!
Excellent advice! Thanks so much for taking the time! Good luck with your next project… looking forward to reading all about your adventures!
Why are you replacing the ‘ghost window’? I think it is beautiful 🙂
We like it, too, but eventually, it’ll have to go. But it’s definitely sticking around for this Halloween! 🙂
The curb appeal looks great! Can’t wait to see the whole front! I have a door bottom that needs attention and your instructions are great. But I’m trying to figure out the purpose of the glue/hardener. Is it to prevent more rot by sealing it? Can bondo be used alone? Or will it not stick to the rotten wood?
Hi Marlene, the Bondo is thick, so it would be sitting on top of soft wood. By hardening the soft wood, it gives a solid foundation for the Bondo.
I would love to see a post about how you re-positioned the wiring for the new sconces. My house is full of awkwardly-placed lights and I am intimidated by the question of how to move the electric source to the more desirable location or locations. How did you run the wire through/past brick and wood trim to get the new lights installed?
Hi Sarah, that was a complicated job, so we hired a professional electrician to do it for us. He had to cut four holes in the interior wall just inside the doorway – 1 at floor level on either side of the door and 1 at lantern level on either side. He then ran wire up from the basement to the floor level holes. from there, he was able to fish the wires up to the lantern level holes. From there, it was easy. As long as there are walls with empty space between them, you can run wiring pretty much anywhere. But with wiring jobs like this one, it’s a good idea to let a pro handle it!
Wowzers! What a difference a paint color makes. It looks so inviting!? Your handy work is on point.??? Just one question. What is going on??Black Galaxy originally on the counters, Blue Volga on the counters (which to me, looks like celestial bodies), Jupiter on the island, and then, Stardew on the front door! Is there a “Universal” theme happening????I know you caught that! Can hardly wait to see more!
LOLOL! I never put all of them together like that! Now that you’ve brought it to our attention, I’m sure I’ll be consciously looking for more galactic-themed products! 🙂
Hahahaaaa I’m just browsing and don’t need to paint yet, but sure enjoyed the smooth legs note. I didn’t know men can have hairless legs too!
Unfortunately yes, lol!
very helpful, especially with the photos at each step odf the repair and painting. Thank you
You’re welcome, Elisabeth!
Don’t need to paint or repair a door but your writing makes me read all your post ( and comments too). I’m originally from Panama City and your tshirt and pop-up ads from there have now made me homesick. Guess a trip is in the planning.
Thanks, Debi! Oh yeah, we love PCB! It’s a vacation only 40 minutes away! 🙂
Loved that color (and the galactical theme😉) at the Georgia home! Love it on the new house as well!! It’ll keep those universal blessings coming! 😊 p.s. Your biceps in the first picture remind me of Hans and Franz…. We’re here to pump you up! 😁
LOLOL! Dana Carvey was one of the greatest on SNL!
Love the new door color; will the sweater hat gnome match??? I now have a mission–to look at the colors of doors here in Maine–my French door entry is still primer white! I love red doors on Cape Codders! Do gray ranches have a particular color??
The sweater gnome is on the side entrance which is white – his hat would get a little lost on the front door! You’re right about New England capes – white cape, black shutters and a red door – it’s a classy look that I love!
Love the color! I really, really am not a fan of painting brick but I might make an exception in that entry area….
Thank you, Glyniss! We will eventually be giving a distressed limewash to the entire house. It will improve it immensely, but the brick will still shine through in places.
Love it! What a gorgeous color! I need to desperately paint our front door but can’t decide on what colors would even look any good! I’m thinking a blue, too, but a more ocean blue. But maybe that’s too vibrant? I don’t know! But you made the right choice, definitely. 👏👏👏
Ocean blue is a prefect choice, Jay, especially in hot climates like yours. I say go for it! Handan approves, too, because it’s like Bodrum, Turkey – or actually anywhere on the Mediterranean and Aegean coasts of Turkey!
Greg,
Have you repaired a whole in an inside door before? If so, do you have a video, or instructions, on how to do it? I hate to have to replace a door for a whole the size of an egg! Thanks
I can help, Pat. Can you send a picture to greg@thenavagepatch.com so I can see what’s going on?