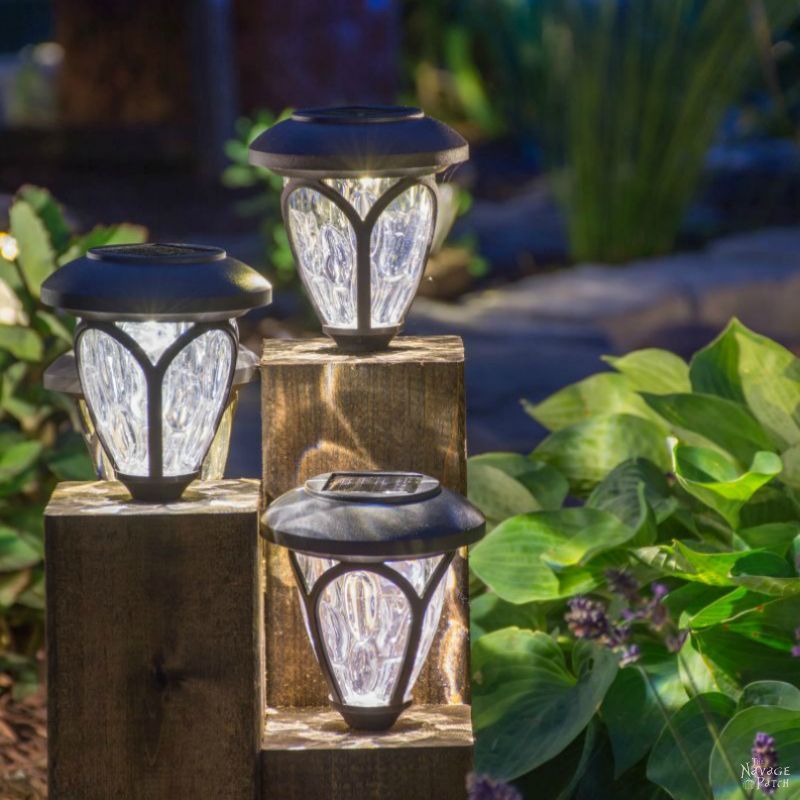
DIY Cedar Cube Solar Landscape Lights
Inexpensive solar landscape lights are great, but they suffer from two major flaws: broken ground spikes and clouded solar panels. In this post, we’ll show you how to upgrade those cheap lights into DIY Cedar Cube Solar Landscape Lights, and we’ll show you a simple trick to clear up those hazy solar panels.
The Problem with Solar Landscape Lights with Ground Spikes
If you’ve ever bought inexpensive solar landscape lights, you’re probably familiar with their Achilles heel: the cheap plastic spike that sticks into the ground.
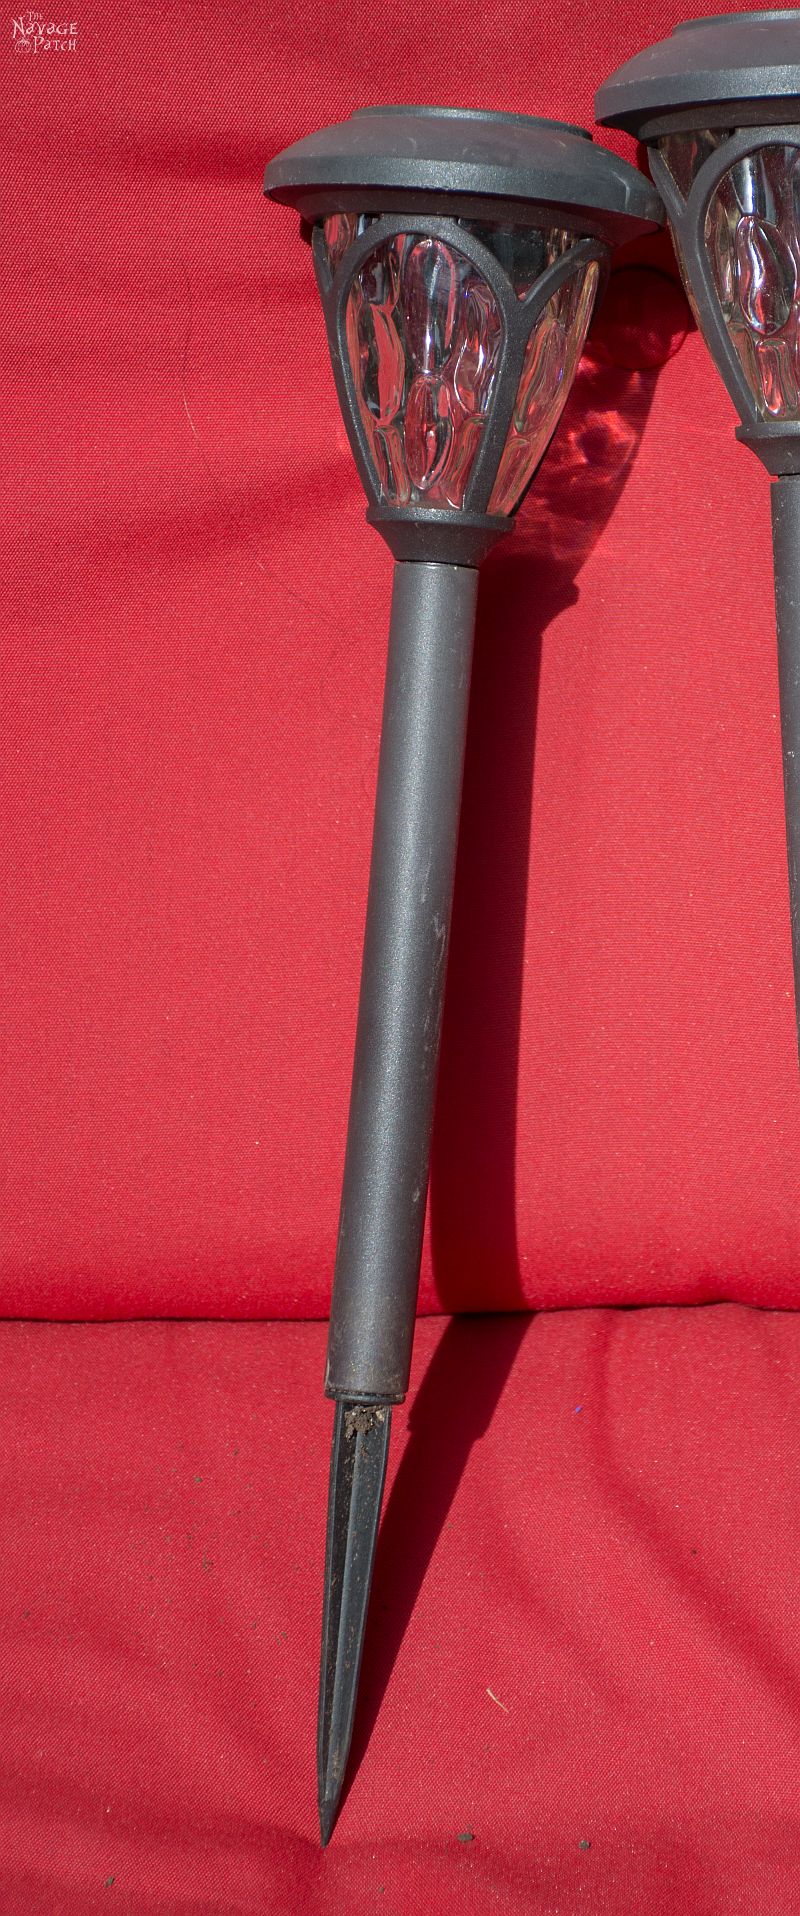
The photo above depicts a rare specimen whose stake has survived a whopping three years. This is akin to a 300 year-old Galapagos tortoise. The problem of premature breakage and lost spikes has plagued all but the remotest and most forgotten of our lights.
Don’t like where you put that light? Want to move it, do you? Well here’s your shaft, but the spike stays in the ground!
Not watching where you’re going? Leg brushed up against the light? That’ll be a broken spike!
Dogs got into your garden? Ran into one of the lights? You better believe that spike’s a goner!
To sum up: Lights: good. Spikes: cheap Chinese crap.
Between the Mostly Excellent Light and the Spike of Counted Sorrows lies the Shaft of Mediocrity. Meh, it doesn’t care one way or the other if it lasts three days or three years. It sits there in the ground, mostly good, but then it may decide to crack or split or calve off a rounded bit of itself like a Greenland glacier birthing icebergs in summer.
Between our squirrel-mad dogs rampaging through the landscaping and my oafish galumphing, it’s a wonder any spikes survived. However, those few unlucky survivors were quickly and efficiently dispatched during Handan’s frequent and unpredictable changes-of-heart concerning design elements and lighting placement.
A Temporary Solution to the Solar Landscape Light Spike Problem
One spring, Handan suggested I fashion new spikes from cedar to replace the lost Spikes of Inferiority. Down into my lair I went and returned with enough cedar stakes to slay several platoons of vampires. But the undead would have to wait, as these spikes were for the soil, not cold, unbeating hearts.
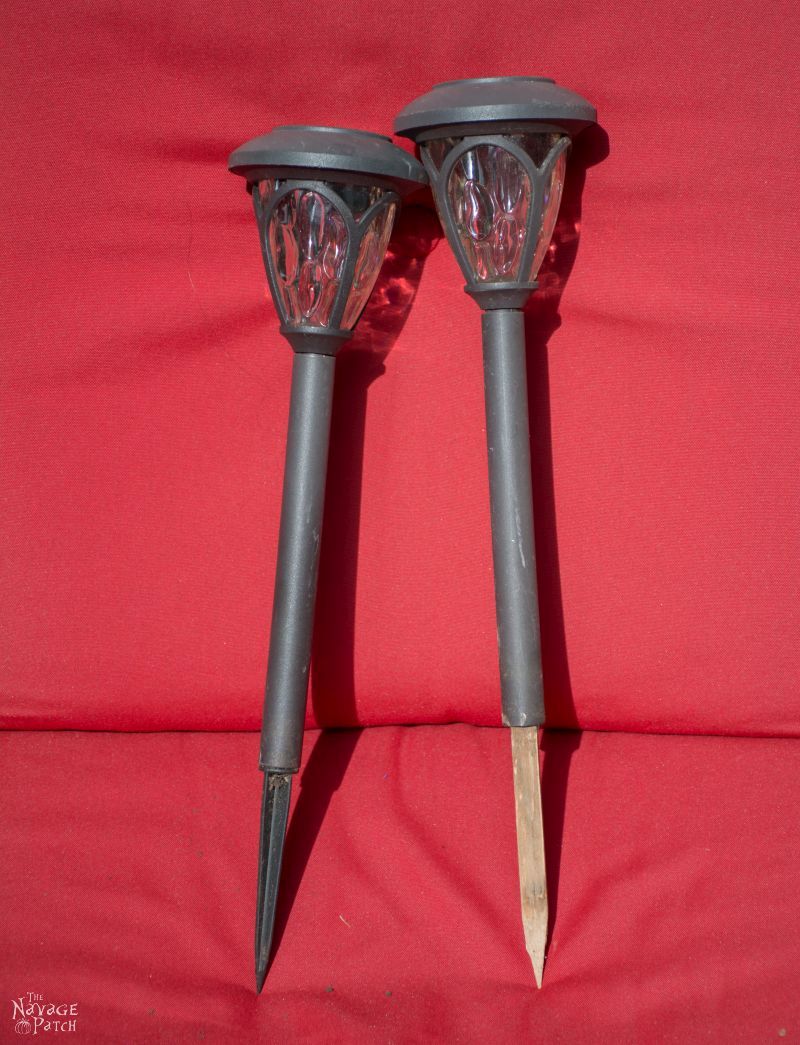
They worked well…for a year. But then, a few of them started to snap when we moved them. Mostly though, they remained strong and resolute – so much so that the Shafts of Mediocrity began to shatter like the adolescent delusions of Millennials entering the real world after two decades of moonbeams, snowflakes and unicorn poop.
Before we go any further, be sure to follow us on Pinterest, YouTube, Facebook and Instagram, and click the subscribe button at the top of this page to sign up for our email list so you’ll never miss a post!
DIY Cedar Cube Solar Landscape Lights – The Final Solution!
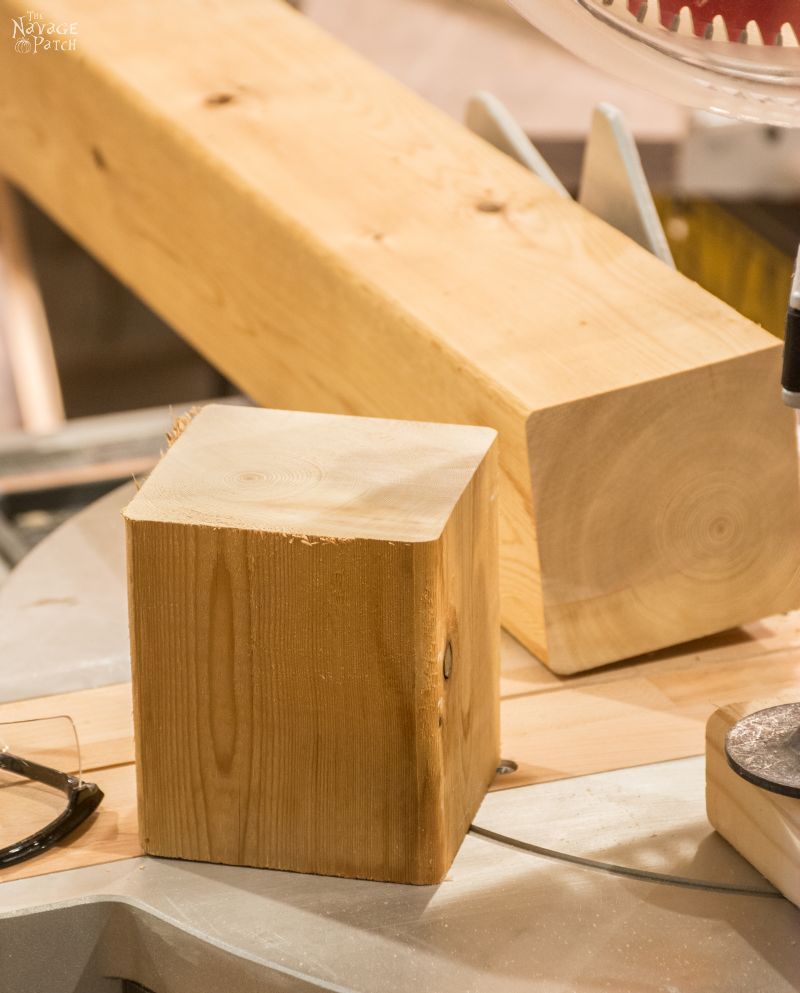
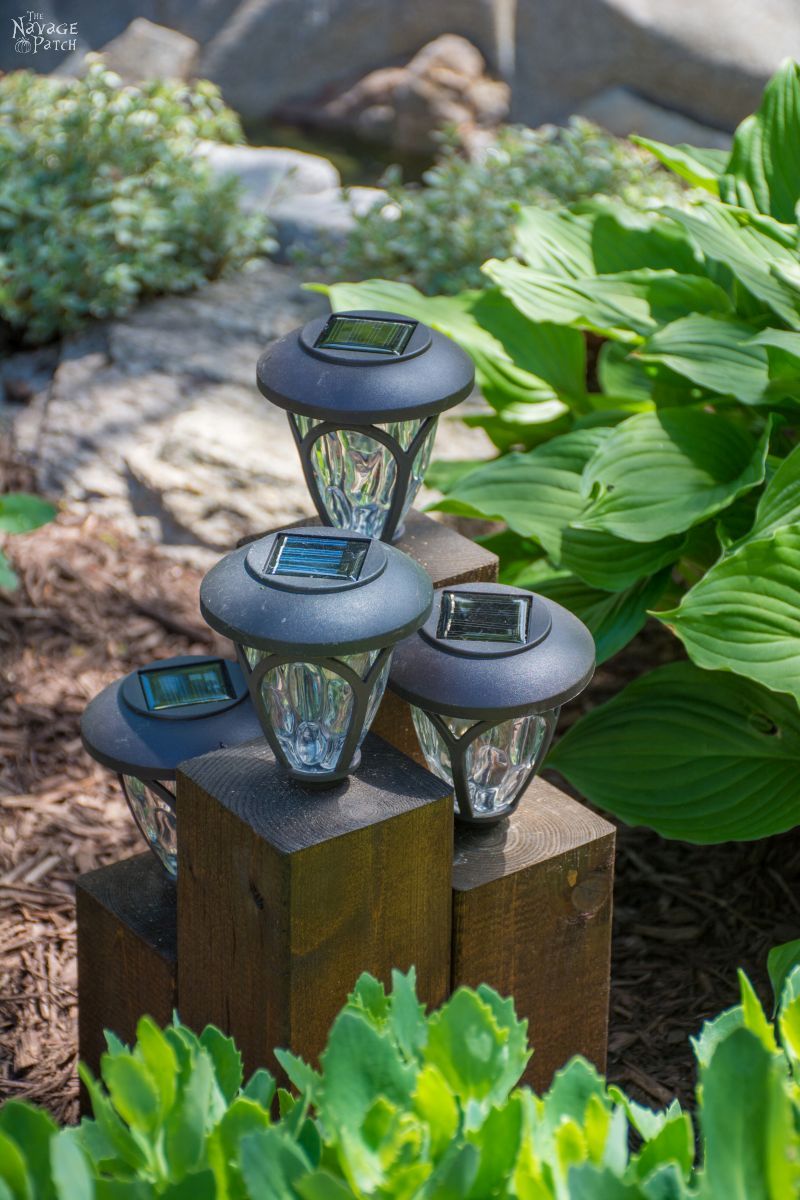
After all the time and effort we put into the landscaping around the pond, we needed a solution. As always, Handan hit upon the answer while I was off chasing bugs and chuckling like a dunderhead. Her idea was to get a few cedar 4x4s and cut them into 4 inch cubes.
Let me clarify: her idea was for me to get a few cedar 4x4s and for me to cut them into 4 inch cubes.
Step 1 – Cut Cubes

Easy enough!
Step 2 – Drill Holes
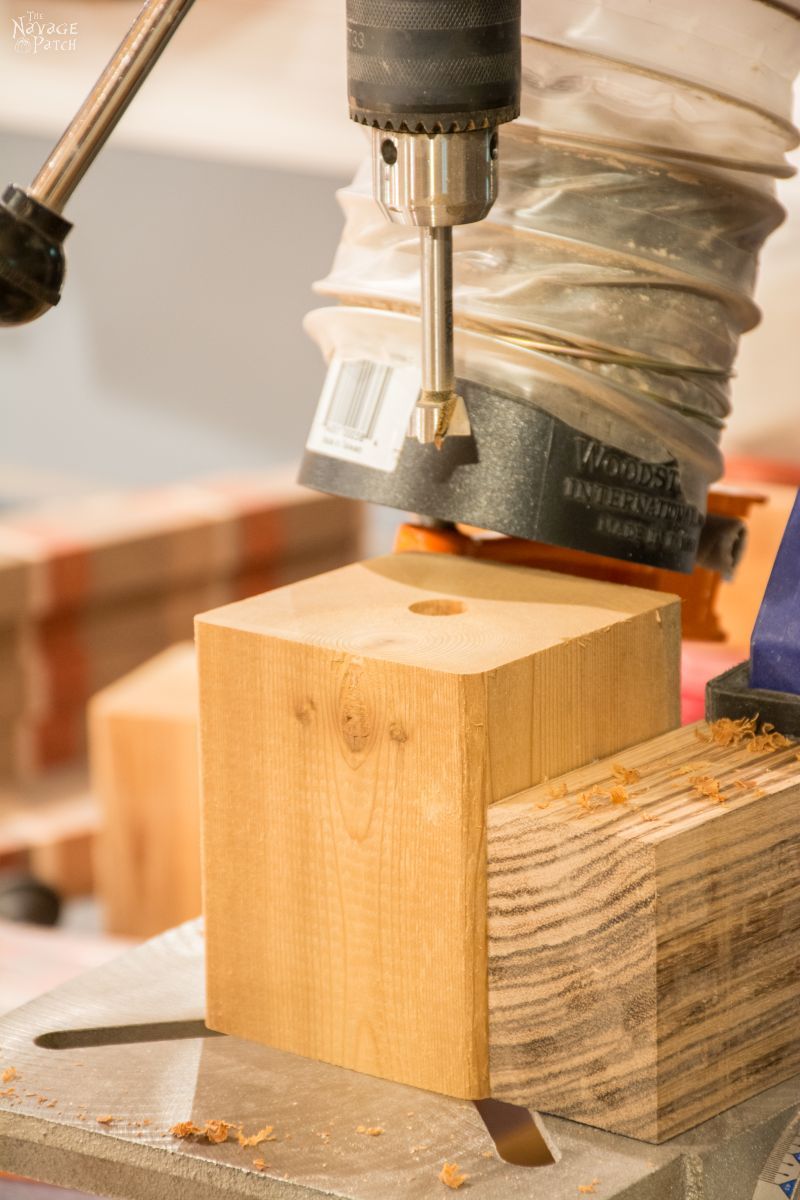
Next I needed to drill holes into the tops of the cubes into which the lights would fit. I measured the diameter of the protrusion at the bottom of one of the lights: 11/16 inch. Really? This kind of drilling is best done with Forstner bits – and I have two full sets of them, ranging from 1/4 inch up to 1 1/2 inches. But guess which size I didn’t have? That’s right! Gold star for you! I didn’t have 11/16 inch, so off to Amazon I went and ordered one. When it arrived, I got to work. I used my drill press and set up stop blocks, so I could quickly position each piece.
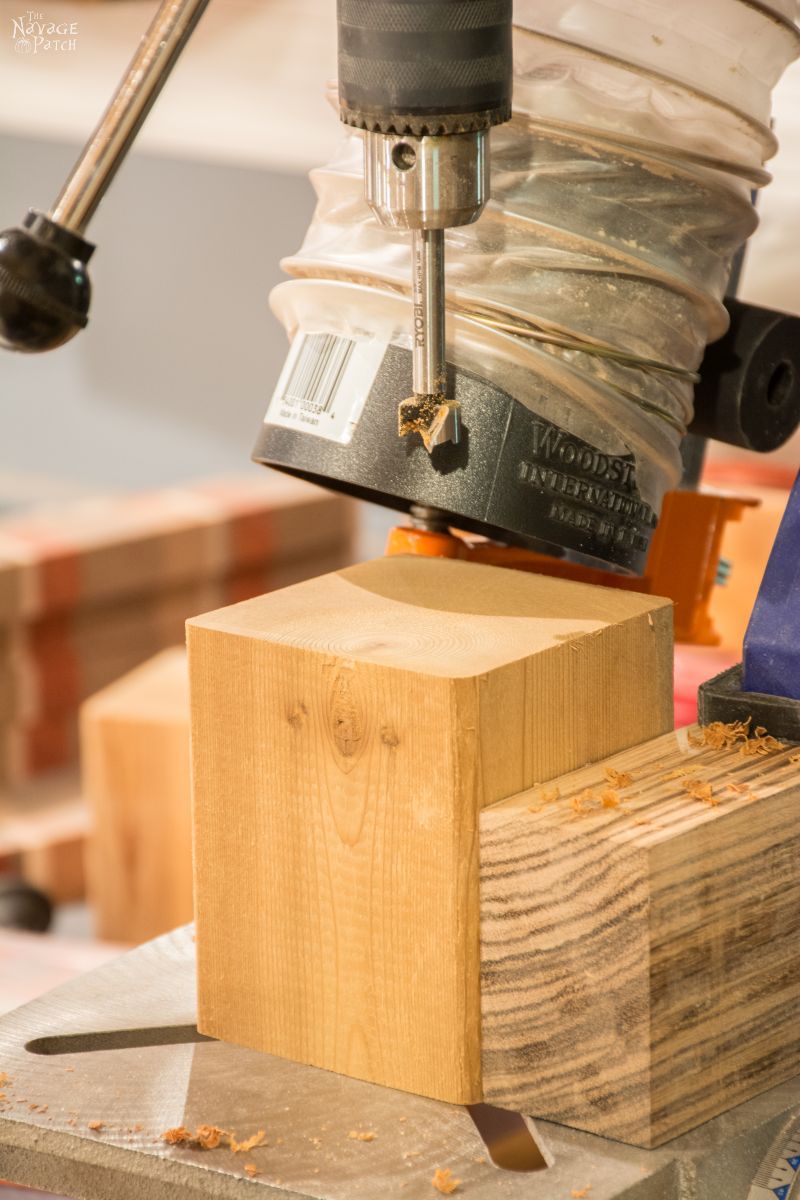
I set a vacuum just above the piece, since Forstner bits create whole ecosystems of wood shavings and debris. Then I drilled the cedar blocks, having set the depth of the drill press to the length of the protrusion at the base of the lights.
All cut and ready to go! Or so I thought…
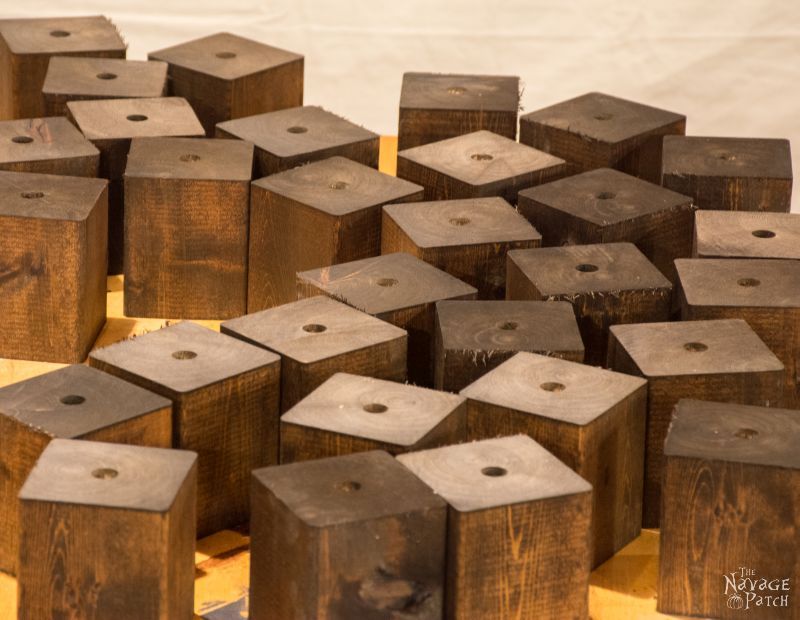
Step 3 – Stain the Cedar Cubes
Handan wanted me to stain the blocks, but as I am inherently lazy, I immediately countered her request by telling her how cool and New Englandy the blocks would look after a year in the elements.
She was having none of it.
Back into the dungeon I went, can of Minwax Dark Walnut stain in hand. Sometime later, I emerged from the vapors with stained blocks. I had to admit she was right about that. [Ha! I am always right! 😉 -Handan]
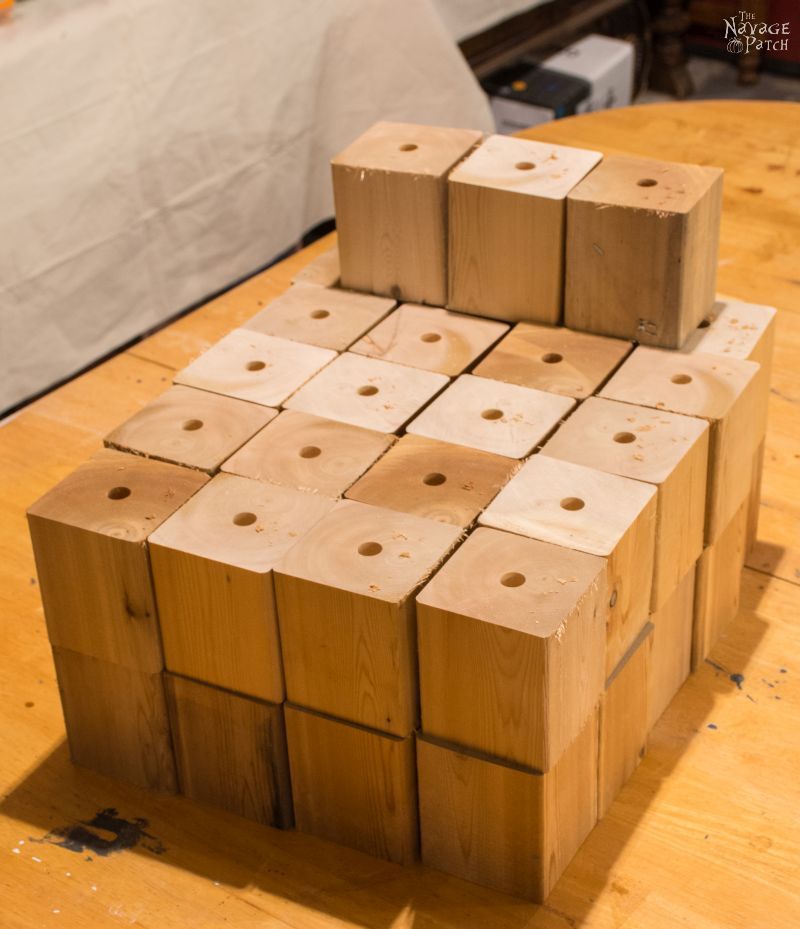
I then got to work building the pillars. I made groups of four and glued them together.
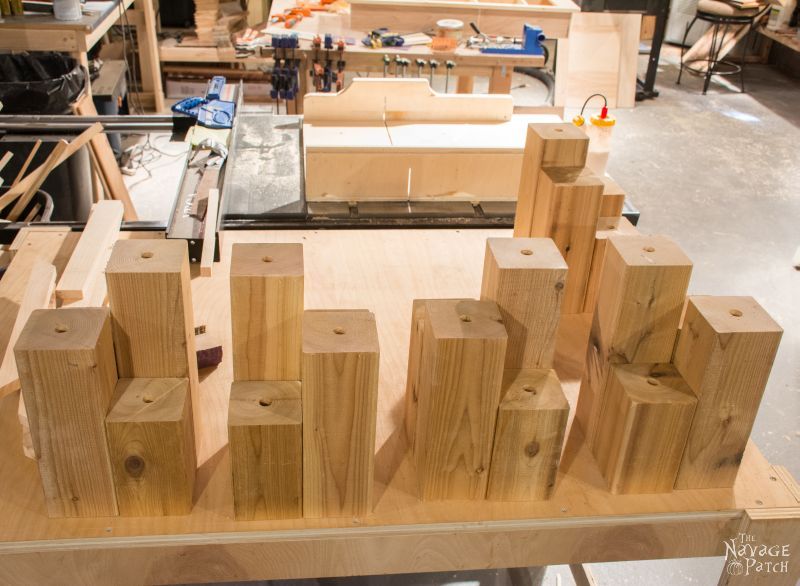
Then I stained them in the same manner as the blocks.
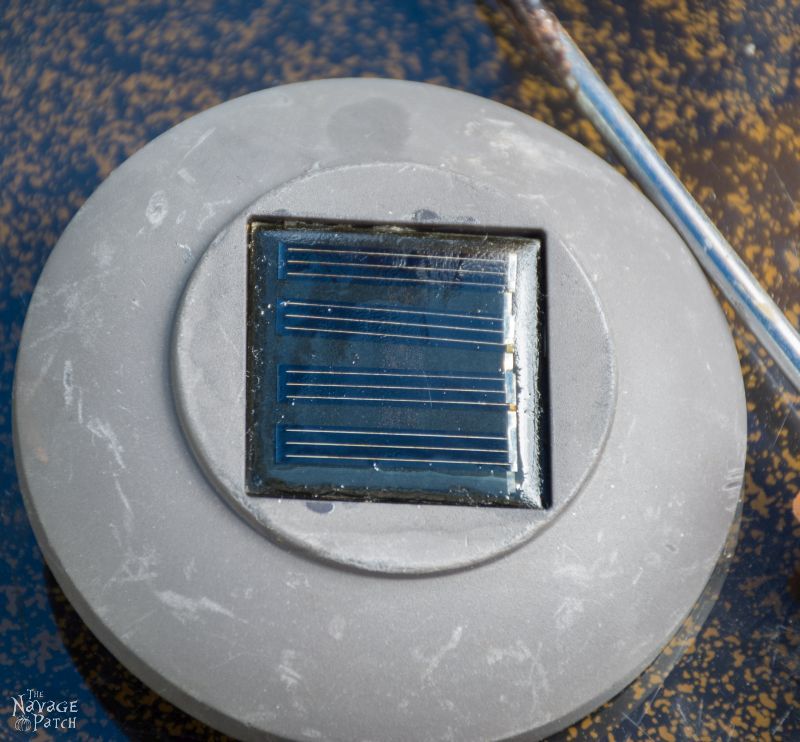
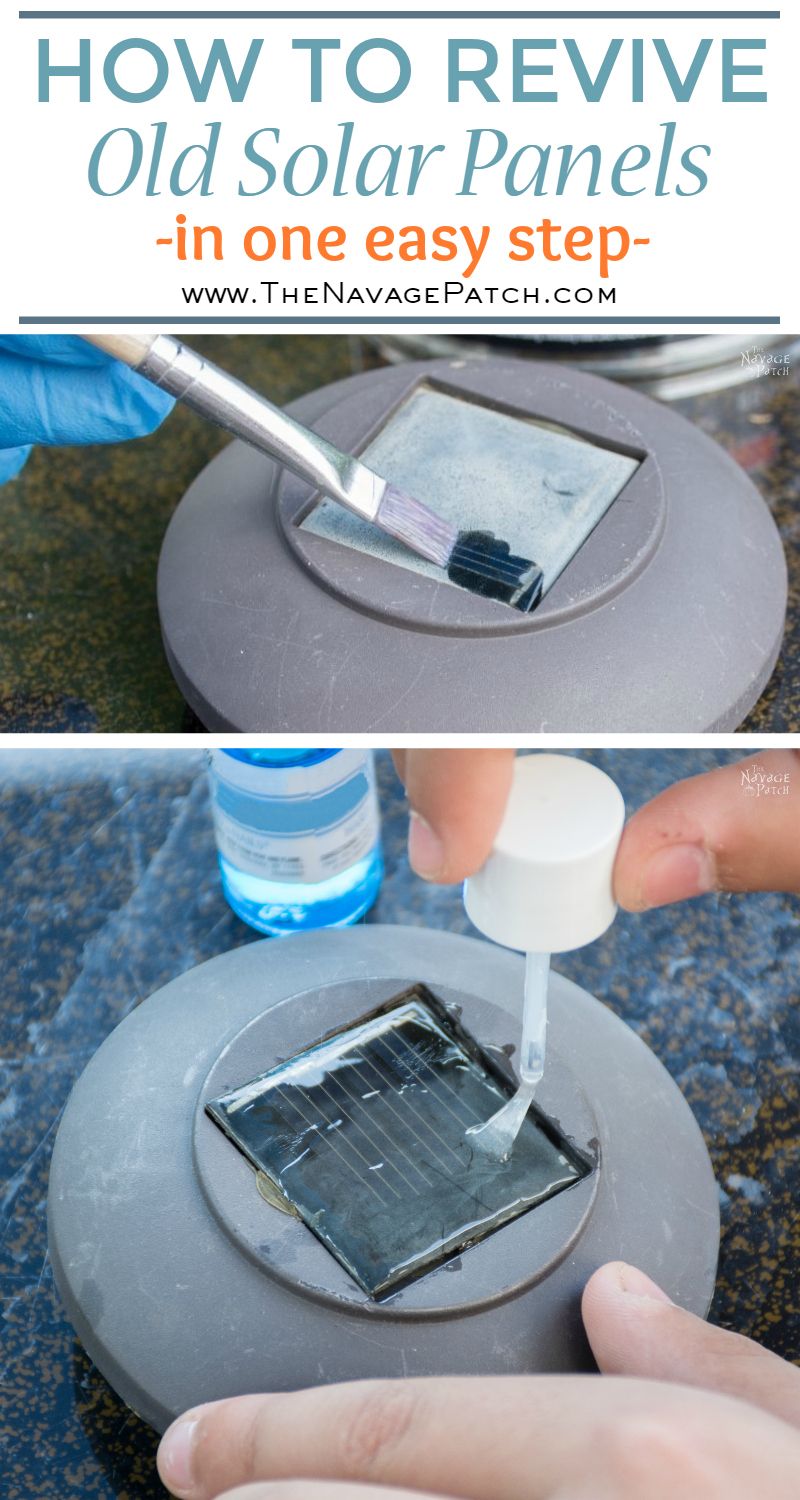
How to Clear Hazy Solar Panels
When the stain had dried, we were ready to give them their lights and place them in the garden, but before we get to that, I want to tell you about another problem these lights suffer from: solar panel degradation. Since the panels are made of plastic, after one year in the elements, the plastic begins to haze. After two or three years, the plastic yellows and warps.
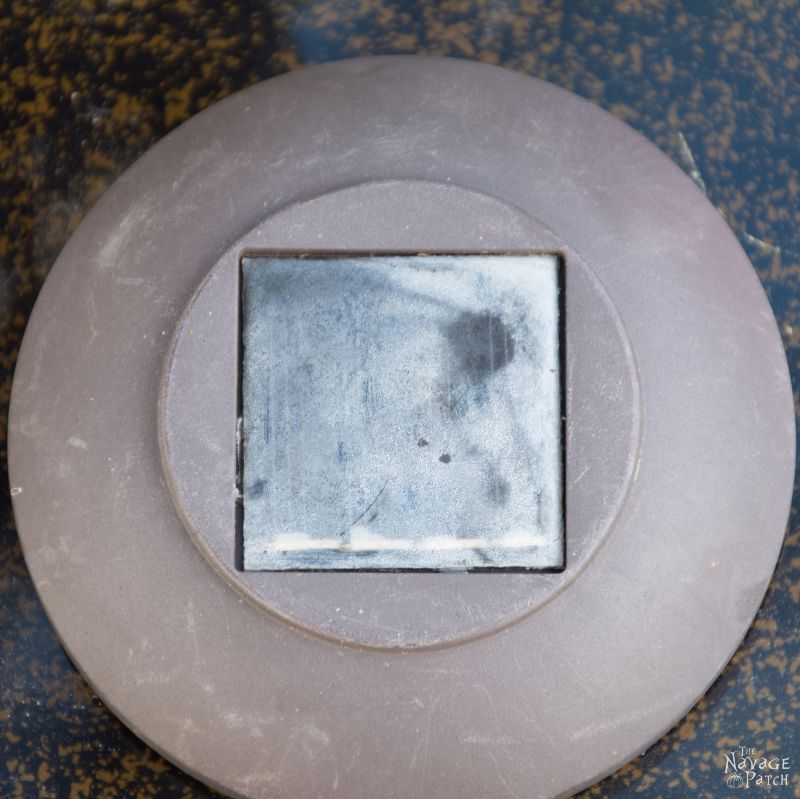
It’s a wonder any light at all manages to get through. The efficacy of the solar panels to charge the batteries is severely impacted.
How to solve this issue?
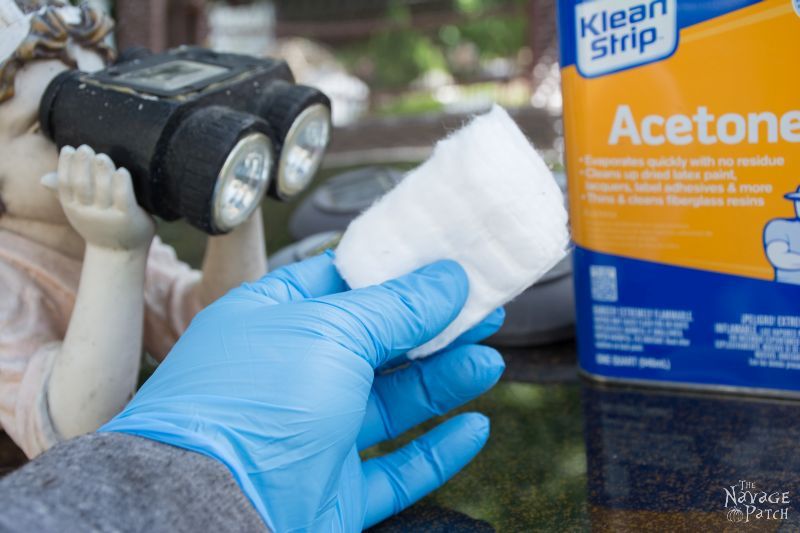
I had read that people were using clear nail polish to cover the solar panels. This seemed reasonable to me. Nail polish is kept in solution with acetone – that’s the nasty smell. It’s also what nail polish remover is made from. Acetone is one hell of a good and nasty solvent. It will melt plastic with ease (which is exactly what it’s doing in that nail polish bottle).
Well, if nail polish worked to restore the panels, and nail polish is mostly acetone, I wondered if straight acetone would also work. It would certainly be cheaper, as one gallon of acetone costs about $15, whereas one gallon of clear nail polish would run about $2700 (not kidding, I did the math).
Clearing Hazy Solar Panels with Acetone
I went to the basement and grabbed my can of acetone, some cotton wipes and a pair of nitrile gloves (acetone is a really nasty organic solvent – it’s a wonder it’s legal for beauty use – oh wait, no it’s no wonder at all. Our government has a long history of green-lighting dangerous products, especially women’s beauty products, but that’s off-topic).
I wiped half…
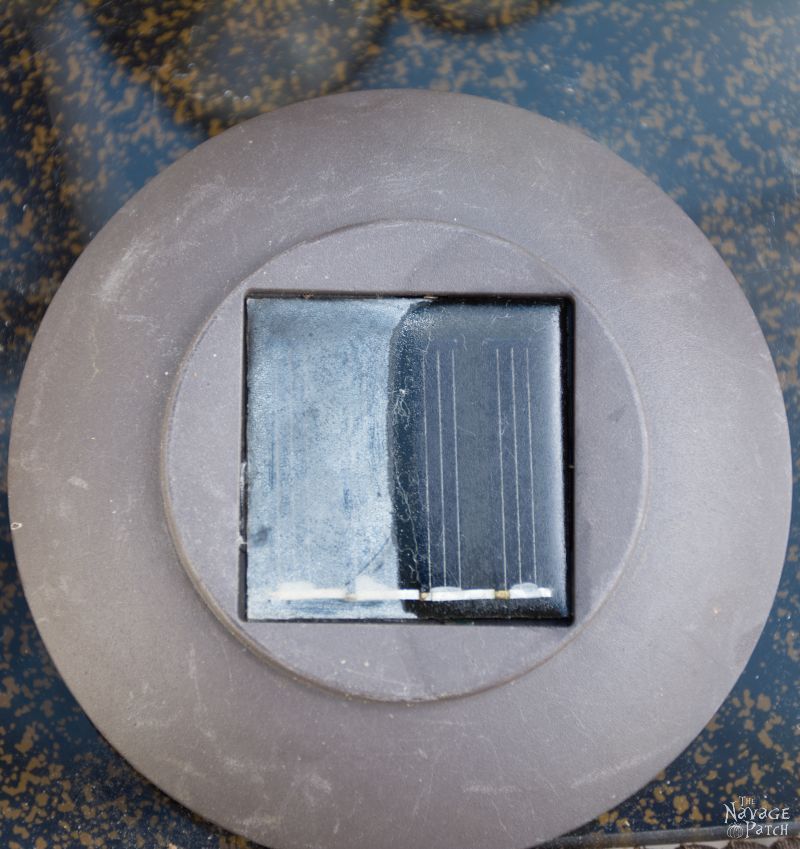
It did a beautiful job of melting away the imperfections, and while it was still wet, it looked great. But acetone is incredibly volatile, which means it evaporates quickly. Because of this, it leaves the surface of the plastic totally matte. It will still allow light to pass, but not as much as a clear or shiny coat. The whole point of a matte finish is to disperse the light waves in all directions. We want light to travel through to the solar cells below.
Okay, so acetone wasn’t the best solution. What else could I try?
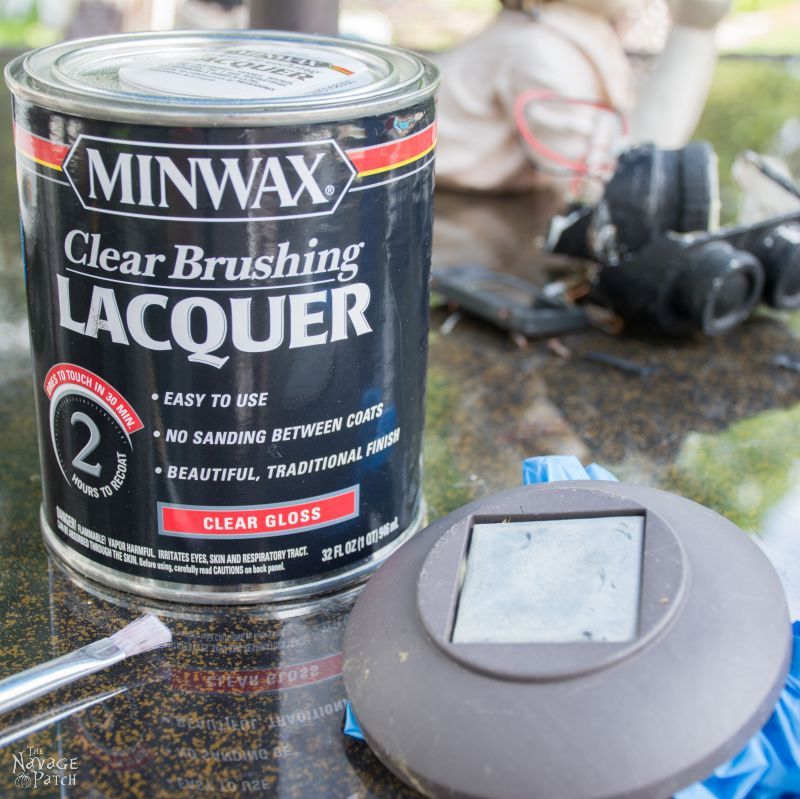
Clearing Hazy Solar Panels with Lacquer
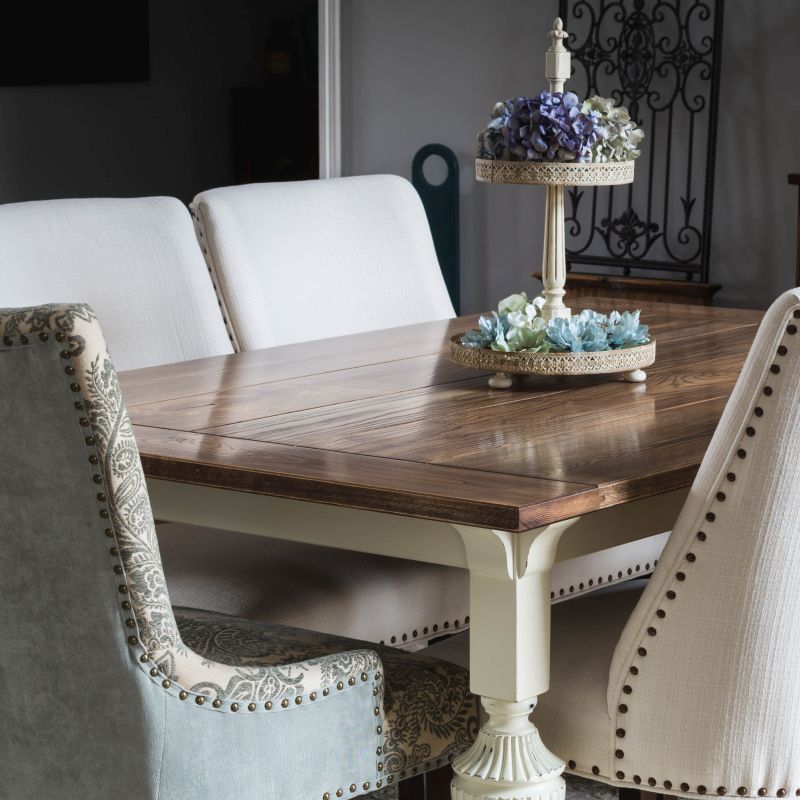
I remembered I had a can of lacquer in the garage, leftover from my umpteenth attempt at finishing an antique dining table we picked up at a tag sale a while back.
Hey you want to see something pretty awesome? Click the picture below to check out what I finally did with that antique dining table!
Anyway, I went and got the can of lacquer. If you think acetone is gnarly stuff….hooooooey! Lacquer makes it seem like roses in comparison. Do NOT use lacquer indoors! I knew that lacquer could also melt plastic, and it would leave a shiny coating, so I grabbed a brush and got ready to try.
Oh, what a joy this was! It was like melting butter with a blowtorch!
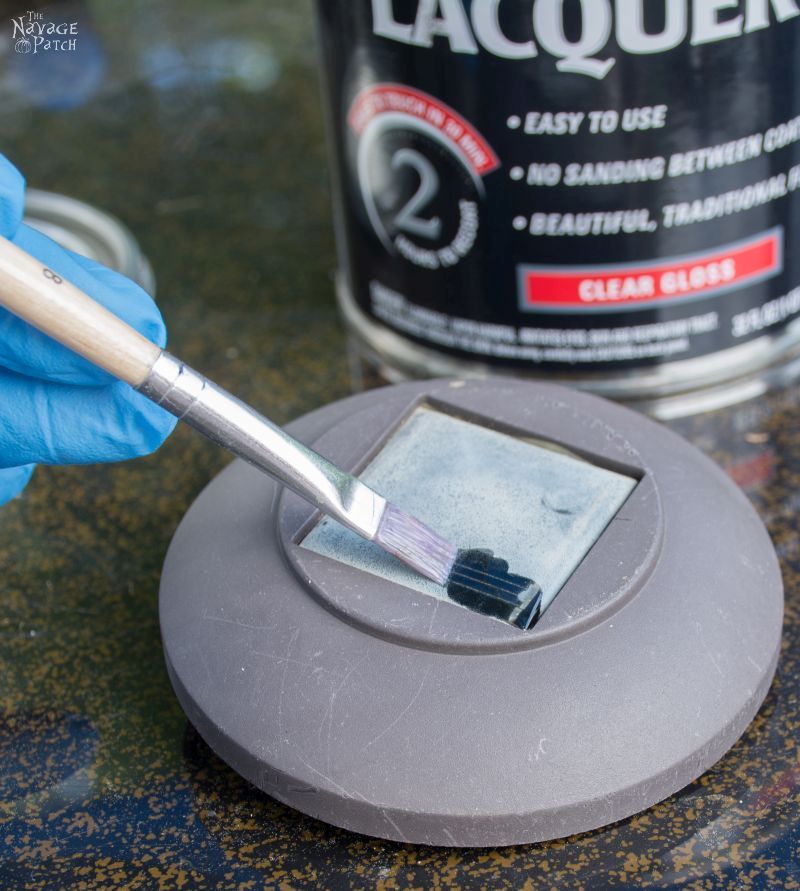
Look at that! Perfectly melted.
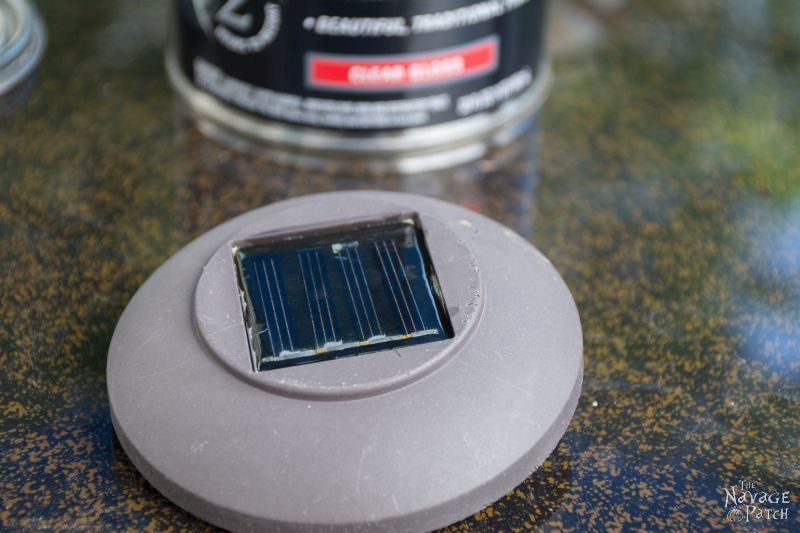
But…what’s that white spot? Did I apply so much lacquer that it completely melted through the plastic and started to eat away at the solar cell? Since I couldn’t see the panel through the haze before I started, I couldn’t be sure.
I decided to lacquer another panel, being careful to use less. It turned out great.
I decided to experiment on the two panels that seemed like the solar cells may have melted. I installed new rechargeable batteries that I had drained the charge from, then exposed the panel to the sunlight. The batteries recharged fine. I’m still unclear as to whether I melted the cells or not, but applying lacquer with a lighter touch solved the problem.
The lacquered cell was shinier than the acetone, but not as shiny as the pics I saw of people using clear nail polish. I thought that I could up that shine with another coat, but I wanted this process to be quick, as we have over 100 lights all around the yard. Cost per gallon: about $50. Much cheaper than nail polish!
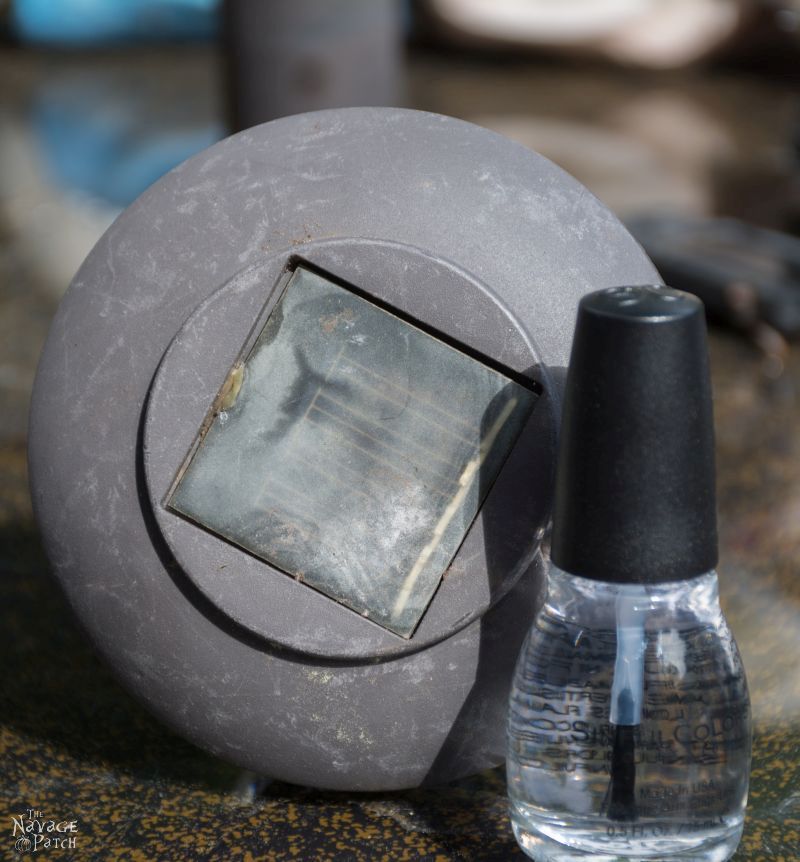
Clearing Hazy Solar Panels with Nail Polish
Next I wanted to try nail polish, so I went to the drug store and started rooting around in the cosmetics section. I may as well have been a donkey shopping in an electronics store for all I understood in that vibrant and sparkly aisle. I was rather unwashed and smelly, having come straight from yard work, and I must have appeared to the female patrons of that aisle like some sort of barnyard animal rooting through a buffet table. At last I found a real bargain: two bottles of clear polish for $3. In fact, the deal seemed a little too good to be true, since all the other bottles were in the $6-$9 range for one measly bottle.
Whatever, I grabbed the cheap stuff and galloped to the register, braying as I went.
My hopes weren’t high, as “you get what you pay for” kept running across my mind.
I was right. This is how it looked after I painted it.
No difference. What the hell was that stuff? No wonder it was two for $3.
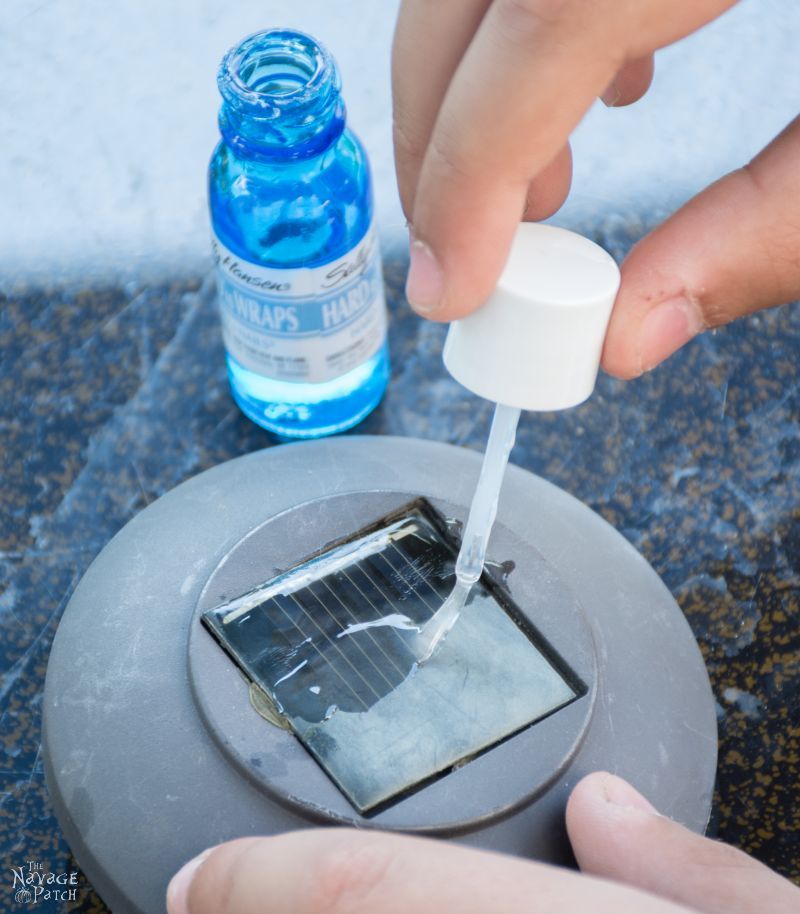
My mom gave me a bottle of Sally Hansen clear nail polish so I could try again. This time, it worked. For this experiment, I was able to employ the services of my minion.
Oh, didn’t you know I had a minion? Indeed. He’s currently on summer vacation, thus haunting my workspaces. Now that he’s practically 13, I feel okay mentioning him in the blog. Handan and I aren’t ones to plaster our kid all over the internet, so you probably haven’t seen him before. His name is Barish, and he’s my step-son, but from now on and forevermore, he will be referred to as my son, because that is how I see him. And as every tradesman must serve an apprenticeship to a master, every son must serve a minionship to his dad.
“Boy!” I called
“Yes, Dad?”
“Come and sit. I need your hands.”
“Okaaaaayyyyyy…?”
“Hold this. Okay, now take this and start brushing it on there. Excellent!”
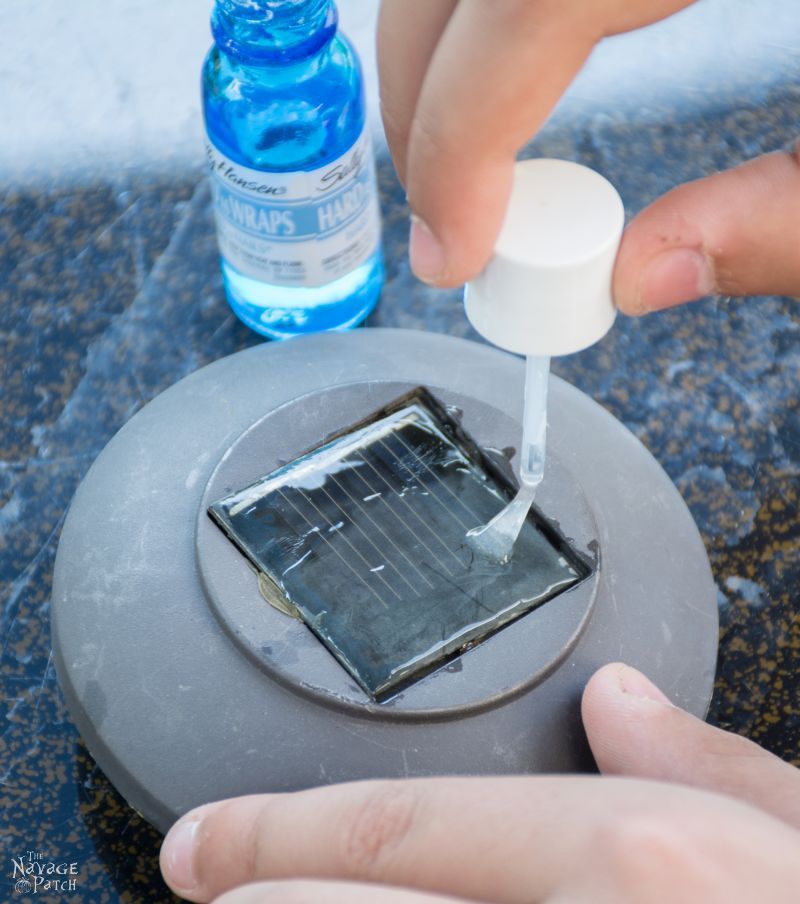
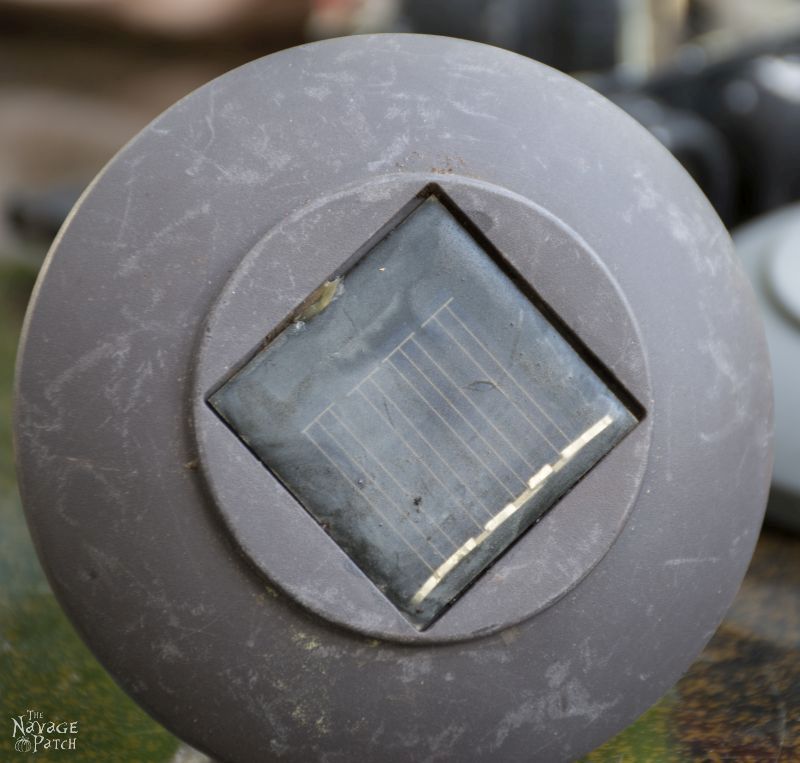
Not bad, not bad! The finish was clear and glossy, though the nail polish didn’t completely melt the plastic, as you can still see some haze underneath the gloss.
The Verdict – Which Product is the Best for Clearing Hazy Solar Panels?
I’m torn between the nail polish and the lacquer, but I’m leaning towards the lacquer.
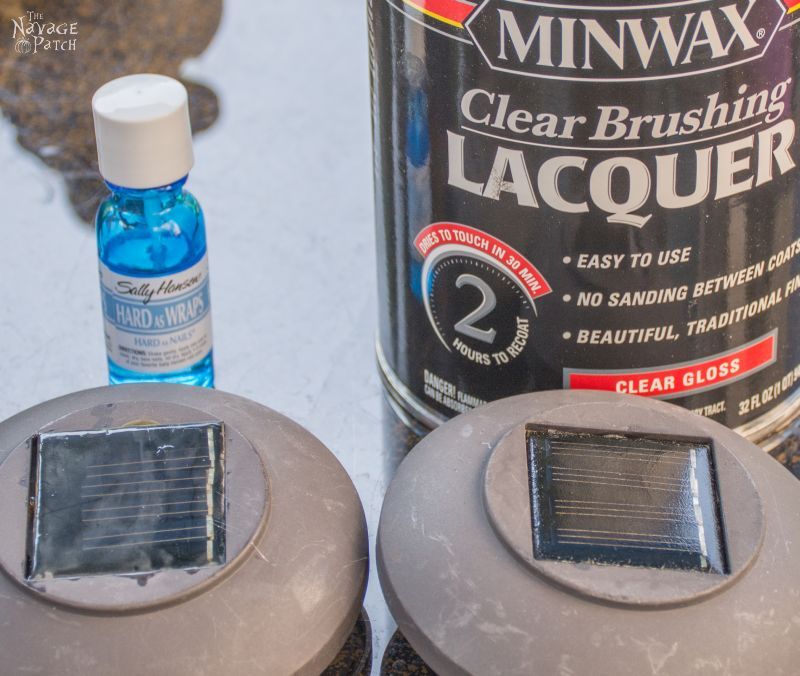
It is cheaper and quicker to apply, but it requires nitrile gloves and good ventilation.
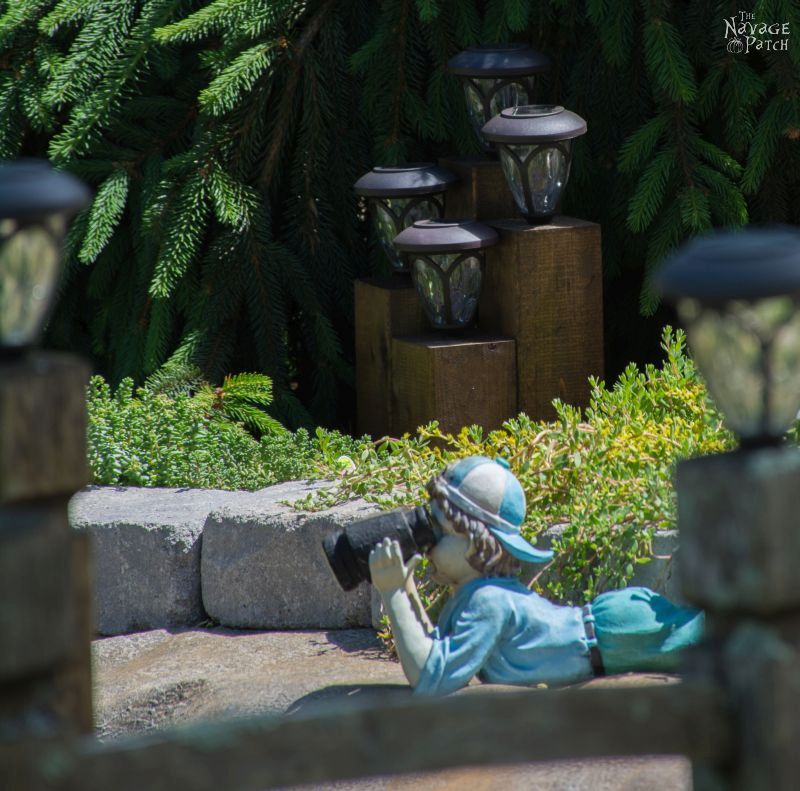
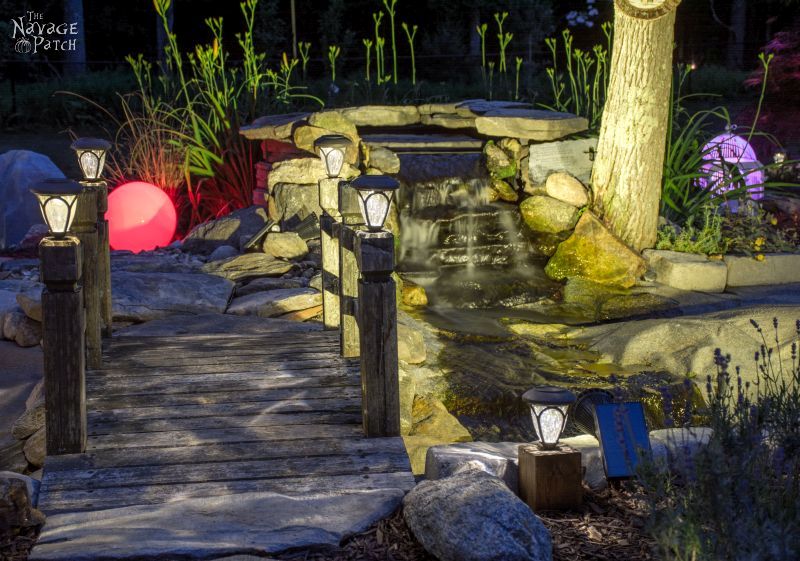
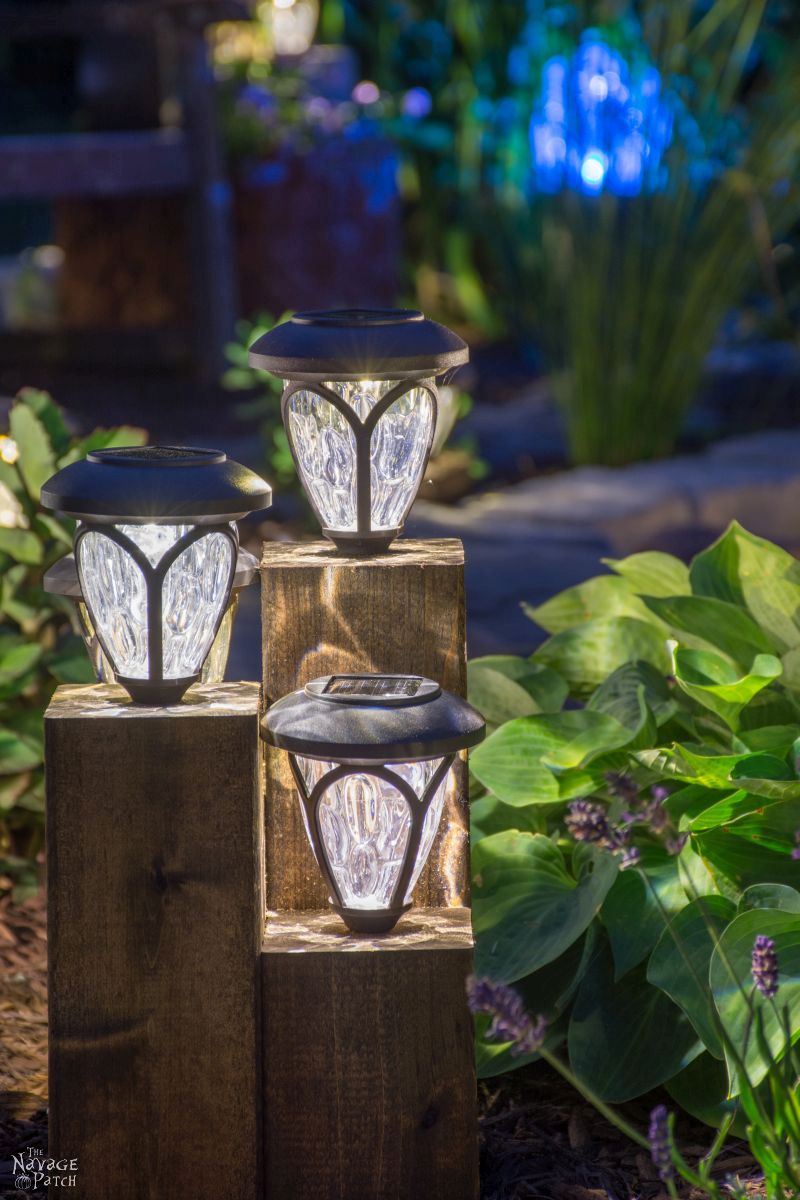
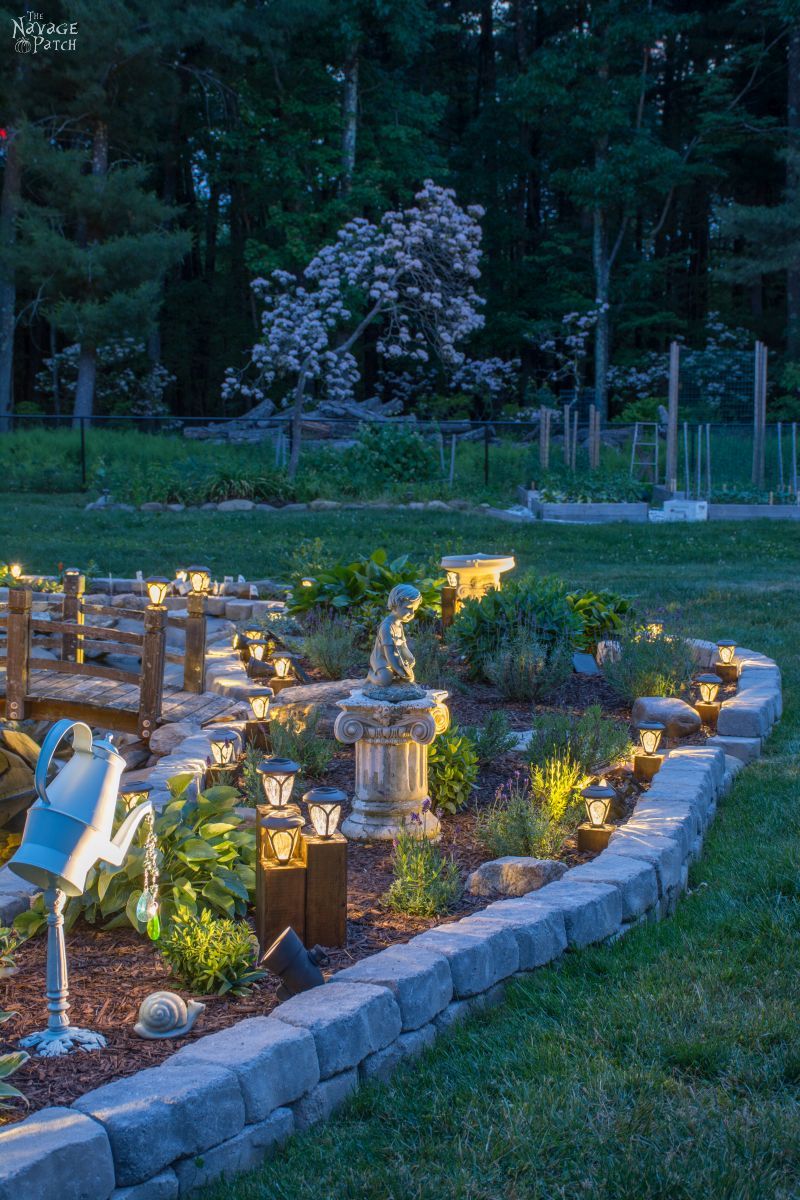
DIY Cedar Cube Solar Landscape Lights in the Garden
Okay now that we’ve learned how to revive our faded cells and now that you’ve met my minion son, let’s get back to those cedar cubes and pillars.
Handan placed them around the garden…
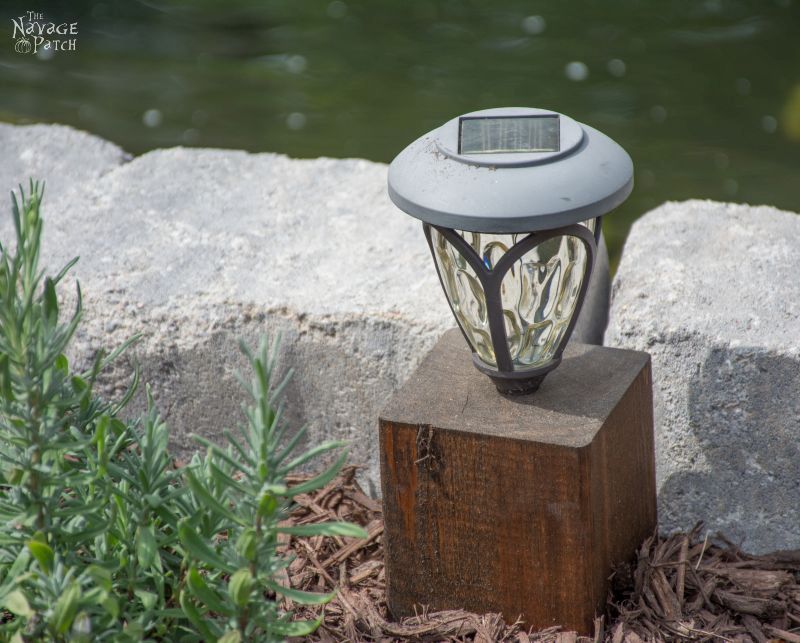
The best part (aside from their handsome and distinguished looks) is that when my clumsy feet or the dogs’ frantic paws knock these lights over, nothing breaks! We need only to right them, then all is well again.
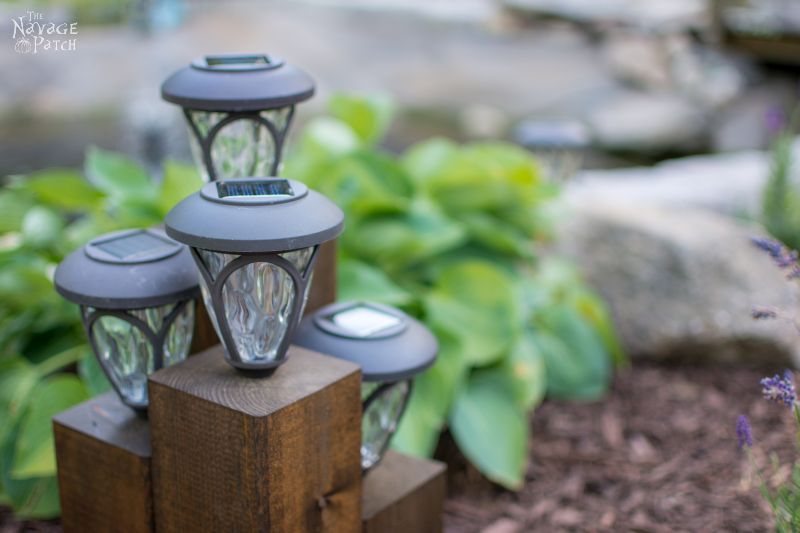
And we waited for nightfall…
Before you leave, here are some more garden decor and lighting ideas for you:
We love it when you share our posts on Facebook and Pinterest!

I absolutely love your lights! Your garden looks beautiful! When I saw the bridge I thought what a perfect spot for a wedding (or a vow-renewal. Hint! Hint!). I can imagine the beautiful pictures you would get! Oh, and every project needs a project manager and that is Handan. I am that manager too! 😉
Aw, man, are our vows up for renewal already? I feel like we just made them! 🙂 Handan is most definitely a project manager at heart, Giselle! You should see her in action!
Really fabulous idea, love it! I have some solar lights stuck into planters and kids from the neighborhood keep playing with them, maybe something like this would be a great solution.
thanks for sharing on craft schooling Sunday!
Thank you, Sara!
I love using cedar blocks for landscaping ! Your landscape lights are fabulous and so easy to do! Love them. Pinned to share. We appreciate you stopping by and sharing your wonderful projects with us each week at Snickerdoodle Sunday!
Thank you, Laurie!
The wood blocks look so much better then the spikes do. I’m properly impressed. I might even be tempted to go and get some spikes in the near future and try again.
Thank you, Stella!
You are so funny relating stories, Greg!! I love visiting your blog to see what Handan and you create, and to have a good time reading.
Thanks for sharing with us at Two Uses Tuesday too, enjoy the rest of the week!
Thank you so much, Pili! You have a great week as well!
These projects are amazing! Your comments alone are worth the reading. The solar light project made me start wondering….you know those fogged by age headlights lens on old cars (mine being one) are plastic aren’t they. Why couldn’t we clear them up using your method? I’m just goofy enough to try a small spot – what do you think? I keep old lizzy sparkling except for those headlights. Thanks for your blog, great fun! DeeCee.
Thank you so much DeeCee! Regarding the headlights – for liability reasons, I can’t recommend altering them in any way, but it seems like you came up with the idea of trying a little spot. I might try that, too – just to see what happens 😉
Use tooth paste to clean your headlights.
I read that tip in home remedies, very handy!
Love this idea!! I wanted to raise mine higher as they got lost when the perennials grew so all I did was pound a rebar pipe into the ground, cut a PVC white pipe to the height that I wanted, placed the pvc pipe over the re bar, took the spike out of the solar light but kept the metal piece, placed the solar light with the metal piece onto the top of the PVC pipe, threading the metal piece onto the rebar to stabilize it and ended up with solar lights about 2 feet off the ground and above my perennials!!
Hugs,
Deb
Hi Deb, that’s a great solution you came up with!
Hey Deb, I did the same thing with PVC pipe only no rebar. I notched the pipe to make it sit straight. Like your rebar idea, thanks, DeeCee
Yep, I use PVC pipe by itself. Cut to height, using an angle cut on one end to drive it into the ground easily. Paint desired color. I leave the lights spike in place and simply put it in the PV C pipe.
Really love this idea – so much more stylish than the spiked lights and we also love your sense of humour and writing style!
Just informed my husband that we’ll be copying this once we have our garden under control – we moved here two years ago but the garden had been pretty much neglected for nine, as it was the previous owners’ second home.
All the best from Devon, U.K.
Thank you so much, Pam! I’m glad you’ll be making them. Send us a pic when you’re done!
Your garden is magical, I would love one but I’m not physically able to keep something so labor intensive looking good, (no minion).????????
Thank you, Patt! 🙂
What were the lengths of the posts that you cut? The four-piece ones?
12, 10, 8, and 6 inches
Thanks, also will you be posting your instructions for the coiled copper wind chime?
Hi Cassie,
I was just working on that post, and hopefully I will finish it early next week if not before. [Although I am working on improving my English it still takes me shorter doing a project than writing it. :-)]
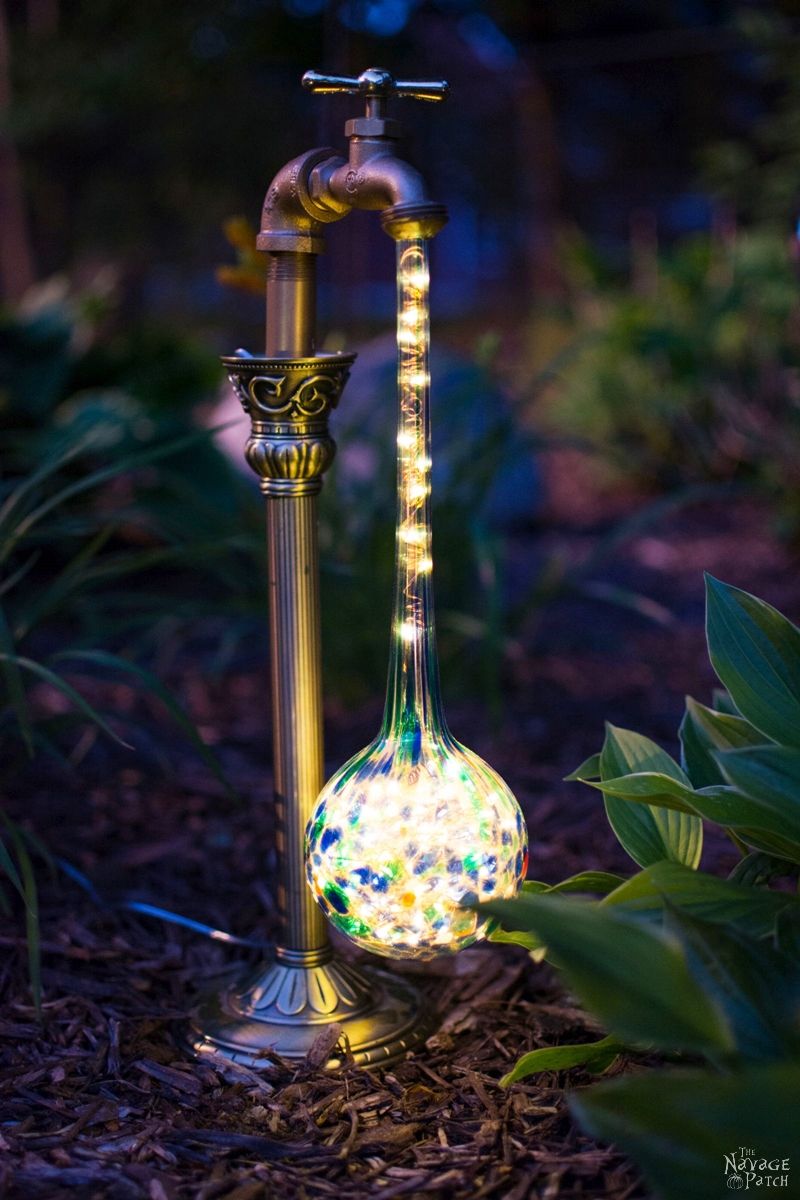
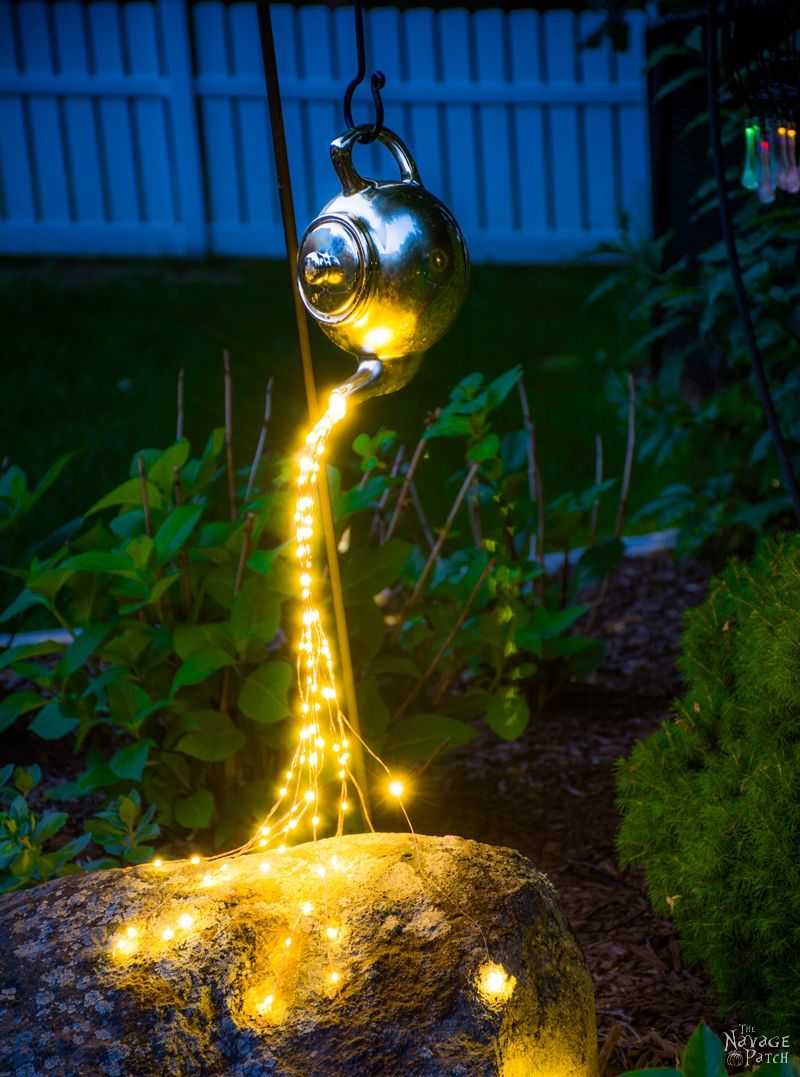
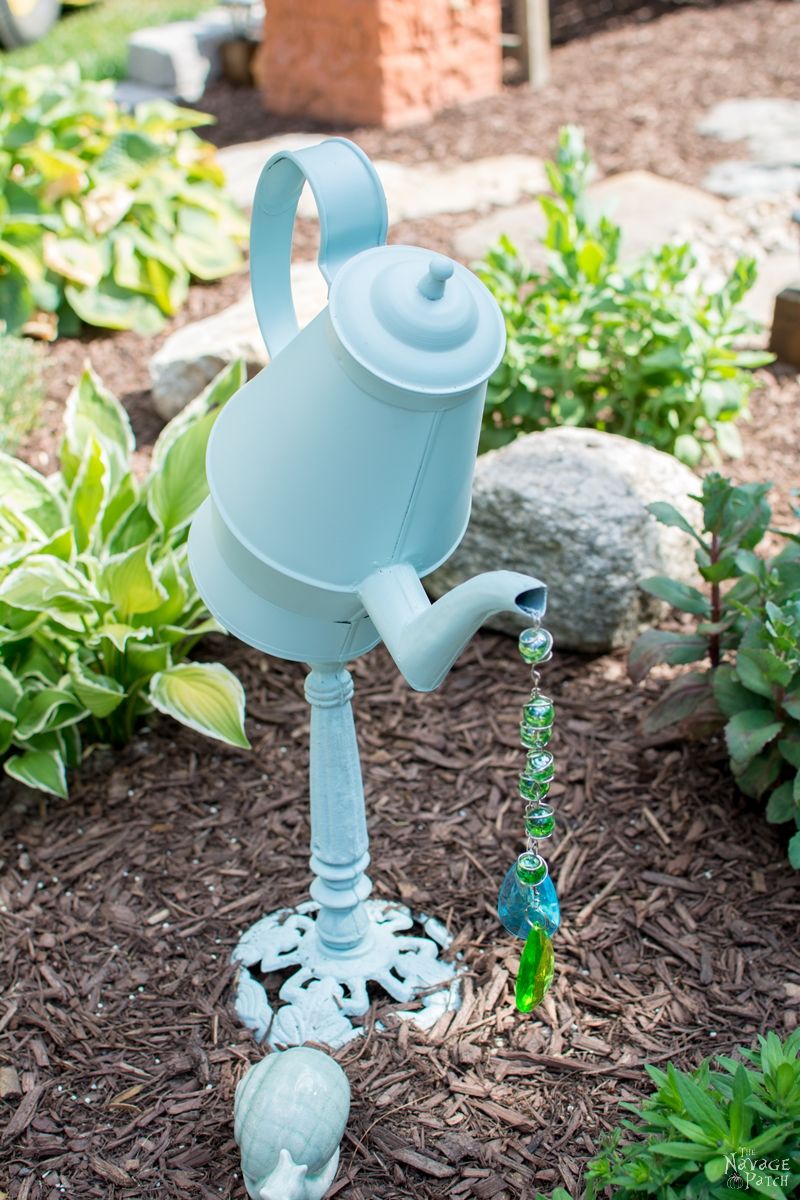
Hi Handan – was noticing your whimsical watering can – do you have a link for that as well! I have an old iron lamp stand, plus a few watering cans hanging around – would like to try and meld the two together to make something similar. Just looking for a jumping off point. Thanks!
Hello Cathy,
Here is the link for that post: https://www.thenavagepatch.com/diy-garden-decor/ The watering can decor is on the second page of that post.
If you like that watering can idea, I also have spilling lights which you may want to try. It is a very easy project and it looks awesome in any garden. here is the link for that one: https://www.thenavagepatch.com/diy-spilling-solar-lights/
And as the last but not least, you may want to check my waterdrop solar lights as people seem to really love that one: https://www.thenavagepatch.com/diy-waterdrop-solar-lights/
I hope all this info helps 😉 Have a great day!
Hi Handen – again thank you so much for all the links. Can’t wait to do the fairy lights teapot. I’m wondering did you just put the solar panel behind the rock, or was it attached to the teapot somewhere? Thanks much!
Hi Cassie, it is hidden behind the rock. Luckily those solar panels generally come with a long enough cord 😉
Hi Greg,
Love your creative mind. My husband has bought 3 sets of lights and the summer just arriving. 🙁 With your creative posted I will consider passing this great idea on to my husband. I have one question….are there spikes on those lights that are on the cedar?
Thank you, Gina! No, the spikes and tubes are gone. There is a little nub at the base of the lights which would normally slide into the top of the tube….that is what goes into the cube.
How did you attach the lights to the cube?
Hi Jan, the end of the light fits right into the hole drilled into the top of the cube.
WOW!!! Love this-many times the lights need to be higher than the standard spike-to be accents, rather than edging…adds a whole new element of beauty and drama to the garden! Thanks for sharing!
Thank you, Anne!
What is the height diff between the cluster of blocks?
12, 10, 8 and 6 inches
I love this project…so much nicer looking than the “crappy” tubes. Your garden looks fabulous.
I especially love the old coffee server on a post with jewels stung together to look like water. Did you also make that? If so, do you have instructions for that?
Thank you, Terri! It just so happens that Handan’s last post was all about that pot. Check it out here https://www.thenavagepatch.com/diy-garden-decor/
These lights are aresome! so creative!
Thank you, Lori!
They look really nice in groups! Do the dogs not try to pee on them everytime they pass?
Thank you, Sarah! Our dogs are girls, so they prefer to go out into the lawn and kill my grass when they pee 🙂
Your lights look great, especially in groups! But I am wondering if the dogs dont use them everytime they walk by?
Hello Sarah! Luckily, we have girls. Hence they are not that much interested in the lights 😉
What a creative idea! I’ve been looking for a project like this to really give my moon garden a pretty pop at night. Definitely going to give it a try 🙂 Thank you for linking up to Dishing It & Digging It this week!
Thank you, Angie!
So much nicer than just sticking them in the ground! Thanks for sharing on the Pleasures of the NW’s DIY party!
Thank you, Helen!
What a great idea! These would be great in my flowers beds or even just around the pool. I may just have to make me some. Thanks for sharing!
Thank you, Linda!
Great idea, your garden is on of the most beautiful I have seen!
*one
Thank you, Maureen!
Beautiful project and I love the way you write!
Thank you so much, Sandra! 🙂
Very cool idea! I’ve often thought about adding solar lights around our garden, but they are just so flimsy. I’m going to have to pass this idea along to my husband 😉 Thanks for linking up with Merry Monday this week!
Thank you, Emily!
What a great look! Brilliant idea. I’ve pinned this one for future reference 🙂
Sinea ♥
Thank you, Sinea!
I sooo love these!! I noticed how amazing they looked in your backyard project, and was dying for you to share how to make them. Thank you so much for sharing this. I can’t wait to make my own.
And thank for the tip on the lacquer. I used clear nail polish on my solar lights last year, and I had to reclean & reapply this year as it wore off in the elements. I can’t wait to try your tip on mine!
Thank you so much for sharing to the Monday Mish Mash Link Party!!
Thank you, Amy, and good luck with your lights!
This post is packed with great advice. I don’t have near the amount of landscaping lights that you have, but I’d love to be able to use them for more than a year. The plastic posts are an issue, they either snap off or I have to dig into the bed, killing off plants, to retrieve them. This is a perfect solution and I love how you made them into multi level lights! They look great.
Second, I am going to try your clear nailpolish trick. I have a teenage girl, so I’m pretty sure we have several bottles of clear nail polish hanging around. Can’t wait to try it. Brilliant!
Thank you Nikki! As usual,all glory and gold to Handan for the idea. I’m just the lumbering lummox who carries out her orders 🙂
Gerg, what a beautiful, relaxing, romantic get-away in your own backyard. 🙂 *sigh*
Since it did come up here…Would or could you use the Lacqure on your headlights to get them back to the way they were when new?
Thank you, Linda! I’d be wary of using anything on headlights, as they are specifically designed to refract light in certain ways, and the lacquer could interfere with the intended refraction pattern.
Thank you. I had a feeling not, didn’t hurt to ask.
Love the blocks! We started using piece of 1/2″ conduit cut the right length and pounded into the ground. The light posts fit right over the top so no more problems with broken spikes in the ground. We live in the Rocky Mountains so most of the plastic posts that come with the lights didn’t make it through trying to pound them into the ground.
Thank you, TJ! Conduit is a great solution, too. Anything but those awful plastic spikes!
Thanksfir laquer/polish idea. I have 4 “used up lights” that are sitting on my front porch…have been for 2 months. I was reluctant to throw them away …. Glad I didn’t
Great idea! Did you glue the lights into the cedar or are they just sitting there? I have a lamp post out front that doesn’t work any more and I wonder if something like your idea might work. What do you think?
You have a new follower – keep up with your great ideas and thank you.
Hi Jo – the lights are just stuck in there with friction. Thanks for reading and commenting!
I LOVE your garden and the refreshed lighting is stunning.
Thanks for posting start to finish. I love the trial and error comments also, it helps others decide on compounds ahead of time.
Thank Your Minion and Spouse. You did a beautiful job.
Thank you so much!
Thanks Handan – that is wonderful! Your English is perfect as well. If you need some help with translating I would be pleased to assist you. 🙂
Greg, would this same technique work on those dang cheap headlight lens???
I’ve been asked that before. It certainly might, but I have to go on record as saying “don’t mess with your headlights!” 🙂
I love y’all’s romantic backyard beautiful backyard. We are moving soon to Montana and I can’t wait to get our backyard going. Thank Y’a;; so much for all the two of you have showed all of us <3
Thank you, Linda! Oooh, I’m jealous…Montana is beautiful country!
Lovely! Great idea for those I usually end up buying new ones every single year ;( I’d be pleased if you visited my blog sometime and linked up your DIY’s to my new linky party, Support Your Fellow Crafter on Monday’s! Thank you so much!
Thank you, Ginger! I’ve forwarded the info to Handan re: your party. I hope you’ll be naming it “The Super Stinky Linky Party!”
Love what you did with the wood blocks! It looks very professional. Thanks for the tips re: nail polish and laquer! So glad they turned out nicely for you. Thanks for sharing at Vintage Charm! Kathleen | Our Hopeful Home
Thank you, Kathleen!
Greg omg unicorn poop! I have solar string lights and 1 string stopped working. I was thinking of trying the headlight restoration thing ,you know with the super fine sandpaper. I’ll try it and tell you how it goes. You sound like my husband,happy wife happy life. I’m thankful for sweet generous husbands like you. Almost peed my pants reading your blog! Thanks!
Thank you so much, Didi! Let me know how the sandpaper works out, and next time, visit the restroom before reading! 🙂
You could easily save your clear fingernail polish bottle and fill it with the lacquer and go around your garden and just polish them where they are. (I don’t know how the brush would hold up, but it would be worth a try)
Your garden is lovely. But like you, I have several, several lights! (3 acres worth)
Hi Joanne, that is a good idea! Much easier than pulling them all and then replacing them – especially for 3 acres of lights!
Absolutely love this project! Greg, I love your writing. Hilarious. I laughed out loud on your millennial comment. Pining this for when my cheap solar lights bite the dust!
Hi Kathleen, I’m so sorry for the late reply! Thank you so much for your comment! I love hearing that I make people laugh – it keeps me going. Thanks so much for stopping by, and I hope to hear from you again.
You just saved from throwing out the majority of my solar lights. Over the winter they will get new posts and a cleanup with lacquer. This was such a well written article that I now have to go back and read all the ones I’ve missed. You and your wife make a lovely couple and your Dad attitude is right on.
Wow, great timing! I’m so happy to help! I’m glad you found us, Karen – we look forward to hearing from you again!
Your garden is beautiful and my dream! I have a few lights in my “hankie-size” yard that never make it a full season. But, I have kept most of them (you know, I’ll find a use for them one day) and ta-da here you are. I purchased a decorative light item last year that is very similar to your cedar blocks, but they used landscape timber blocks and as added decoration, wrapped rope around the center of the timbers after they were connected. Can’t wait to get out and start painting with nail polish so I will have plenty of lights this year!
Thank you so much, Paula! Good luck with your lights – I’m sure the nail polish will clear those solar panels right up!
I also appreciate a keen sense of humor such as yours. Thanks so much!!
Thank you, Carolyn!
I love your humor as much as ur project! ?
Thank you, Sandi!
How did you attach the lights to the post?
Hi Betty, the lights slide into the holes I drilled in the cedar cubes and friction holds them in place.
Really like several of the projects. I’m new to your site and it has some definite “must do’s”. Since this is my first time, what is the protocol to print one of these projects? Saw some free printable, but not the ones I would be interested in. I assume the others have a cost and that’s understandable.
I’ll save the link to this cedar block light project, but many others I like…ahhh a summers worth of ideas + travel will keep me very busy..
Thanks
Hi Mike – no cost on our site – everything is free. The printables you mentioned are for framing. But it sounds like you just want to print the blog post of certain projects you’re interested, is that correct? If so, you can just print the page (or pages) right from you web browser.
Wow what a beautiful garden you guys have, and thanks so much for the tutorial on how to make these great solar lights and also how to keep them bright. I have not gotton any solar lights because I see them broken and missing in other peoples yards and htey are so blasy blah to boot. I love things that are different and this is it! Also, I have noticed that some solar lights seem to fade over time. willl the nail polish trick end the fading/yellowing of the lights and is it ok to do this step when I first get my lights?
Thank you, Pam! Yes, putting a sealant on when you first get the lights will help them last longer. Good luck with yours!
I enjoyed reading your blog and the light project is great. I was wondering if you think putting an outdoor polycrylic sealer on a new solar would help preserve it and make it last longer?
That’s a great question, Carol. Yes, a sealant will make them last longer, but I would use either lacquer or clear nail polish. Polycrylic may work, but the solvents in the lacquer and the acetone in the nail polish actually melts a thin layer of the plastic panel to not only help adhesion, but to clear up any haziness as well. My feeling is the the polycrylic would just sit as a layer on top of the plastic and tend to flake off over time.
This is one of the best projects I have seen on Hometalk. It solved a problem, is esthetically beautiful and very useful. I probably would have just replaced the non functioning lights but you found a solution to the hazy light cell issue. Great job.
Thank you so much, Marcia! 🙂
Great project and all, but really you are a great writer. I usually skip through the paragraphs of blogs to get to the results at the end, but I really enjoyed reading the process this time!
Thank you, Amity! I do try to make the projects interesting to read about, lol! 🙂
I agree with Amity … great project … we have no garden (and even IF we put our solar lights in/on cedar blocks, I’m pretty sure the lawn “care” guys would ruin those as well as they’ve ruined the 1st 3 sets I had around the cement patio/pergola area) but absolutely LOVED reading the post .. hilarious and informative at the same time. I’m still smiling.
By the way … these are gorgeous, as is your garden! 🙂
.
Thank you, Linda! Hmmmm, remind me never to call your lawn care guys, lol! 🙂
Oh my Lord you are absolutely hilarious! I LOVE reading about your escapades while doing your diy’s!! And on top of that your garden is absolutely stunning!! I currently just rent so I’m basically limited on what I can do but one day hope to have my own place nd can make it look even the tiniest bit like your garden! I absolutely love fairy gardens so am in the (slow) process of making over my don’t garden into a fairy garden and will definitely be using some of your solar lighting ideas!!
Hi Cheryl, thank you so much! We’d love to see your fairy garden when it’s done!
I have been all over the internet looking for that same light. I love it but it’s nowhere to be found. Help please?
The exact lights we used in this post are no longer made. We bought them back in 2014 at Home Depot. They seem to change the design a bit every year or two, unfortunately.
What great ideas. Absolutely beautiful designs. I am going to try some, I love retirement. I am signing up for a woodworking class. Now, if they only had a creative class.
Hi!
Did you ever end up painting the plastic one it faded? And, would it be wise to put the lacquer on when you first get the lights? Just wondering! Oh, and one more thing: canyou cut the lengh down if needed?
Thanks so much!!
Hi Christy, you can certainly paint them, though I’m not sure how long the paint would last out in the elements. As for applying the lacquer to new solar panels – I believe that might make them last longer. I will have to try it on our next new batch. If you want to cut the length of the light posts, you’d have to do it very carefully, as the plastic is hollow and brittle. Could be done, though.
What a gorgeous couple!
Not only are you gorgeous, you are very talented,!
Not only are you gorgeous and talented, I am wondering why you are not writing books???!!! That may be your even bigger talent. You have a wonderful way with words that makes a reader want more. If you have written a book, I would want to know because I would surely buy it.
Wow! Thank you, Joyce – you just made my day! About that book…I just started one. Since it’s my first, I’ve no idea how long it will take, but I will surely keep everyone in the loop as the project gels.
This article is hilariously written, great way to make light of an annoying situation lol 🙂 I’m going to do this, and your garden is absolutely beautiful! Bravo.
Thank you so much, Rachel! This is seriously the easiest garden light hack out there, but what a difference!
I love the idea of the cedar blocks. Now that they have been in place for a couple of years I am wondering how they have been holding up? I worry about the indent you drilled and how rain water might collect there and age the wood quicker? Or is it just pretty inexpensive to replace them?
Hi Conrad, they’re holding up great. A few have developed cracks or splits down the side, but they still work and they still look good. And yes, if needed, they are easy to replace!
Sir.do you have a video of how to replace a small rectangular solar panels with on off bottom Thank you
I just wanted to say thank you so much for this post. We made some for the corners of our driveway., and they turned out great!
You are so very welcome, Lori! 🙂
This project turned out to be a wonderful diy for the wife and I, however, we ran into a problem with the solar lights detecting each other and turning off. At one point we had 4 lights doing a strobe effect and turning off and on. It was hilarious. How did you defeat the problem? I was thinking about cutting a square of weedmat to put over the solar cell. Hopefully the sun can shine through a bit and still charge the battery while dimming the light receptor….? Your thoughts?
Hi Chris, yeah the problem is they’ve changed the design of those lights since I wrote that post. They’ve made them bigger and brighter, and this can lead to exactly the problem you describe. I came up with a fix for it, but there are a few photos to show, so I will email it to you.
Hey, thanks greg, your idea was great but i came up with a remedy before i saw your reply. I ended up cutting a circle out of thin plastic weedmat and glueing it to the top of the lights to cover the solar cell. It has tiny holes in it so it prevents the lights from detecting each other but still allows the sun to shine thru and charge the battery, it works great. Thanks and keep the ideas coming.
That is an awesome idea – thanks for sharing it here!
Hi. Great ideas!
What are the heights of the groupings of 3 lights?
Thanks
I enjoy your writing—very fresh and amusing! Please write comedy. And great job on reviving your garden lights! ????
Thank you so much, Carolyn! I love to write funny stuff, and I love it even more when people read it and like it! 🙂
All the ‘trying so hard to be funny’ that I come across on DIY Blogs makes me roll my eyes. Yours, however was downright chuckle-to-myself-worthy. Thank you!! And so weird because I had just noticed this last week how awful the cells were looking on my rechargeable lights and then your post showed up randomly on Pinterest. Nope, I hadn’t even googled how to fix this problem so google isn’t stalking me, but I did think what a waste of money and how they would all need replacing ASAP. Thanks very much all the great info. My husband might not be so grateful though when I show him this post and what’s expected of him lol.
Well thank you so much, Becky! It’s comments like yours that keep me going! I’m happy to hear that my humor is appreciated, and I’m thrilled to hear that you can salvage all those solar lights! 🙂
I loved this project. I have posts that I saved to do this with my solar lights. I used rubbing Alcohol to clean the tops of my lights then used the clear polish on top. I’ve also heard you should bring the lights in over the winter if you live in a cold area.
Thanks, Liz! Yes, it is a very good idea to bring them in to overwinter!
Is there a tip for solar panels when they are new to keep them from fogging? Thank you. Really love your posts.
There sure is, Victoria – it’s in this post!
Wow, these are so beautiful! I’ve noticed the solar light spikes break so often and it’s so frustrating. I’m in the process of a backyard renovation which is the perfect time to try this DIY. Thanks for sharing!
Thank you, Ashley! 🙂
Oh, for heavens sake- quit wasting people’s time with you self importance and just use plain white tooth paste.
But my self-importance is so very important to me!
I hope you’re planning to write a book. Like I honestly don’t even know how I got here and I have zero patience but I just read this entire post and went from hating life to laughing hysterically. Thanks friend.
Well, good! I’m delighted to hear that I helped turn your day around, Amanda! If you haven’t seen it already, check out our “About Us” section. It’ll lead you on a grand adventure you might enjoy! 🙂
Ty so much this is great! I dont knoknow why I didnt think of this…?. We had cordless phones that got all cloudy NC my aunt always yours make up and the strongest sunblock possible…she couldn’t see the id number so I used clear nail polish to clean it up… I wish I was thinking outside the box instead of the throwing them away…. I’ll be looking for more great ideas from you from now on…. ty
Glad you found it useful, Hope! 🙂
Just found these last week. We have made one in the 4-inch blocks. The plan is to make 5. However, We am thinking about making a couple in the 6 in blocks and use larger lights. Once we got the holes drilled, (had a hard time finding the right size bit) Nothing from China has USA measurements so plan on that problem. Then the gluing and clamping and waiting. We couldn’t find cedar posts so used ground contact and it took the stain well. I am pleased with the first completed one but wish I had opted to use 6-inch posts from the start. Our house is pretty long and think the larger ones would look better.
LOL, I hear you on the drill bit problem! Happy to hear they worked out for you though. Six inch lights would look great!
You have a beautiful yard. Thanks for the input. I have found that my lights turn white due to the calcium in my well water. The best way to clean them is Lime-a-way. Almost completely turns them back to original. Very easy.
Thank you, Margaret and good tip about the lime-away!
Just wondering or maybe challenging you. I have a set of 100 solor fairy lights. I had them around my deck last summer and left them trhough the winter. They stopped working. perhaps a short but how can I discover where and how do I fix. Any ideas?
Oooooh, that’s a tough one, Valerie. It could be so many things, but because they are solar…and assuming they weren’t moved around when outside, I’d venture to guess it might be a battery issue. Yes, solar lights are powered by batteries which get recharged by the sun. Usually when solar lights fail, it’s because the cheap Chinese batteries they come with have either stopped accepting charge or they’ve split open and leaded their vitals all over the inside of the light. Unscrew the solar panel box and find the battery. If you see a lot of rust-colored goop, that’s your problem, Remove the battery, throw it away and clean the battery box as best you can. Then take a non-solar battery (they are usually AA) and load it in. See if the string works. If so, huzzah! Just buy another solar-rechargeable battery, and you’re back in the game.
Was tootling through Pinterest looking for garden art ideas and came across your article. I have been sitting with an old set of solar lights with exactly that problem of the cloudy solar panel. And on the table was a bottle of clear nail varnish. I thought I’d give it a go. And yes indeed. It certainly seems to have worked. I’ll try it out tomorrow – nighttime over here in the UK. Thanks for an excellent and very timely tip.
WooHoo! Glad to be of service, Wendy! 🙂
Greg, I think it was about six years ago when I stumbled upon your first posting of the cedar garden lights project. That was when you got me, hook, line, and sinker. I was so impressed with the idea that I immediately made many for myself. Well, sir, six years later they are still going strong and look just as amazing as the day I made them. I modified your plan just a bit by anchoring the single and grouped pillars to 12″ x 12″ paver stones to keep them stable from romping dogs and high winds. Those babies are heavy and not going anywhere. I hid the paver stone bases with the gravel, mulch, and other natural materials that are already a part of my landscaping. One of the things I appreciate most about these lights is that the solar lights, themselves, are easily replaced, if necessary. Some of them line the walkway to the front of my home and others grace the area around the water feature in my backyard. They’ve received a ton of compliments from passersby, some of whom have asked if they can copy the idea. I always credit your DIY design prowess and refer them to your blog. I’m an avid fan of your creativity and the thoughtful approach you apply to your projects. Thank you for all the inspiration and congratulations on your new home!
Hi Julie! Well, I’m thrilled to hear from one of our original readers! AND I’m so happy to hear you’re still using your landscape lights! We left ours in Connecticut, but Handan and I were just talking the other night about making some more for our new house – it’s a great design, and I love your modification! Thanks for writing, and I hope to hear from you again soon!
I am SO jealous of your yard. Beautiful!!! And I am going to go right out and turn all my solar lamps into those chic cedar cube lamps now. Thank you for sharing
Thank you so much, Leslie! That was two yards ago, so who knows what it looks like now, lol! We hope to make our Florida yard even better when we’re all finished with it! 🙂
Try looking on YouTube on how to restore auto headlights. Sandpaper is the key. Removing the hazy plastic
Thank you, I’ll have a look!
Dollar tree green scrub pads, dawn and a little baking soda cleans the lights well with light handed scrubbing rinse dry. Careful not to get water in light. Spray lights litely with Rustoleum clearlet dry maybe another coat. You can spray the whole top and gives it some life too. I’ve made my yard light up with your cedar light how to. Every one loves them
Great tip, Carolyn! 🙂
I re-posted to my FB page. I LOVE solar lighting and lighting in general (along with things that has bling!! Anything that sparkles attracts fish and old ladies, guess I fit the one category!) and it makes me mad when the glass gets cloudy, so will try the lacquer, that seems like it would last longer. Sometimes I have used nail polish on things and it either turns yellowish or peels off. Love the way you write, your humor cracks me up, (but it’s a short trip for me!) and your garden looks fabulous. Not sure if the pictures were before you moved from Connecticut, but I think so. I am sure you have created a great place, wherever you are!! From Connie in central Calif. near Yosemite Nat’l Pk.
Hi Connie, those pics are from CT. I’ve found an even easier way to clear the solar panels – SPRAY lacquer! Each light takes one second to clear!
Wow! Very informative and impressive lines. Landscape lighting installers did a fantastic job highlighting our outdoor space, adding ambiance and security. Highly recommend their expertise for enhancing any property’s aesthetics.
Thank you for all the experimentation, so we don’t have to do it!!
I also had problems with the plastic stakes. A simpler, though less beautiful solution than yours, is to use a 10-12″ piece of rebar in place of the fragile stake. The hollow post of the solar lights just slide over them and stay in place.
My husband did a similar project but used log rounds from our neighbors tree that came crashing down taking out both our side and back fence plus some small trees that our landscaper had planted a year earlier. I will try the lacquer on some of the older solar lights. Thanks for testing this out,
Way to make lemonade out of lemons! 🙂
If this question is a repeat,
I apologize.
I was 🤔…..
Why cut so many 4″ cubes,
when you made different heights?
Why not just cute the cubes in the heights you needed?
btw, GORGEOUS landscape!
Thanks for sharing your expertise! I won’t have to re-invent the wheel, you have done all the leg work. Thanks again!
My pleasure – good luck!
This is exactly what I’ve been planning to do except I’m drilling a hole in the bottom for a piece of rebar to stick in the ground to stabilize it. My solar lights currently suffer frequent assault from the garden hose.
That’s a great hack Vicky!
It’s so much easier to get a spray can Of , Rust-Oleum Clear Lacquer and go across that Solar Collector ,, SO Much Easier .