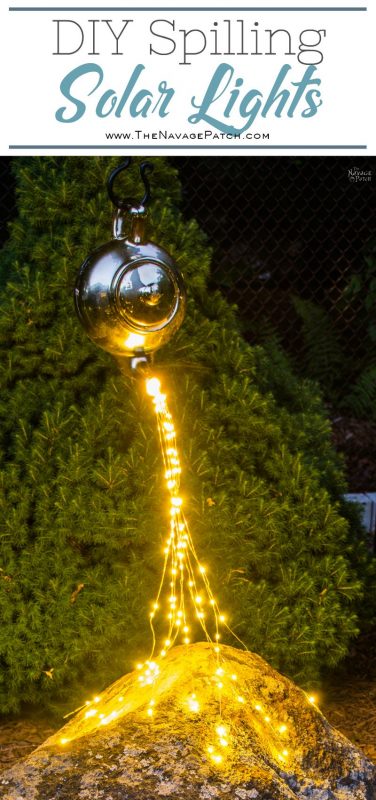
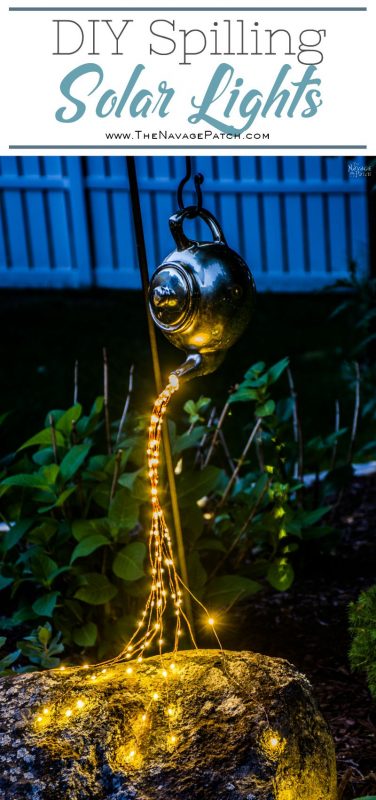
DIY Spilling Solar Lights (aka Teapot Lights)
DIY Spilling Solar String Lights will make your garden sparkle at night! This is a quick and EASY project that you’ll love to look at each and every night!
Summer nights are all about light here at The Navage Patch! And we’ve found that the best way to bring some sparkle to our garden is by using solar fairy lights in our DIY garden lighting projects.
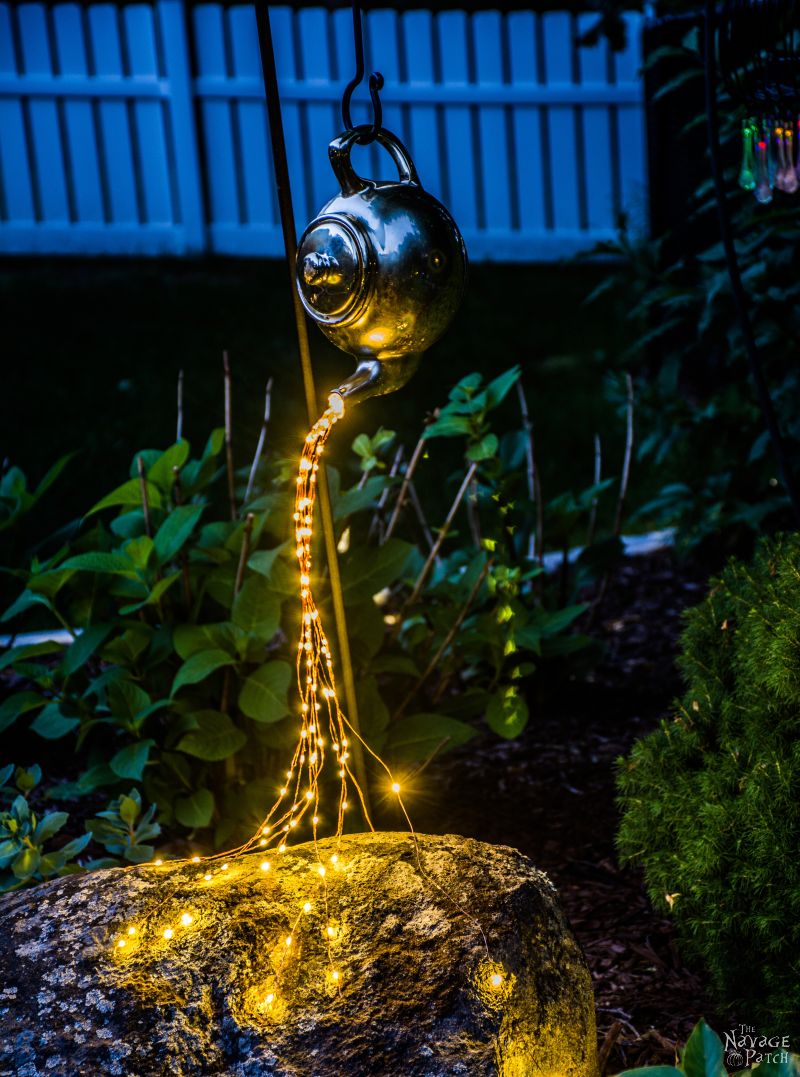
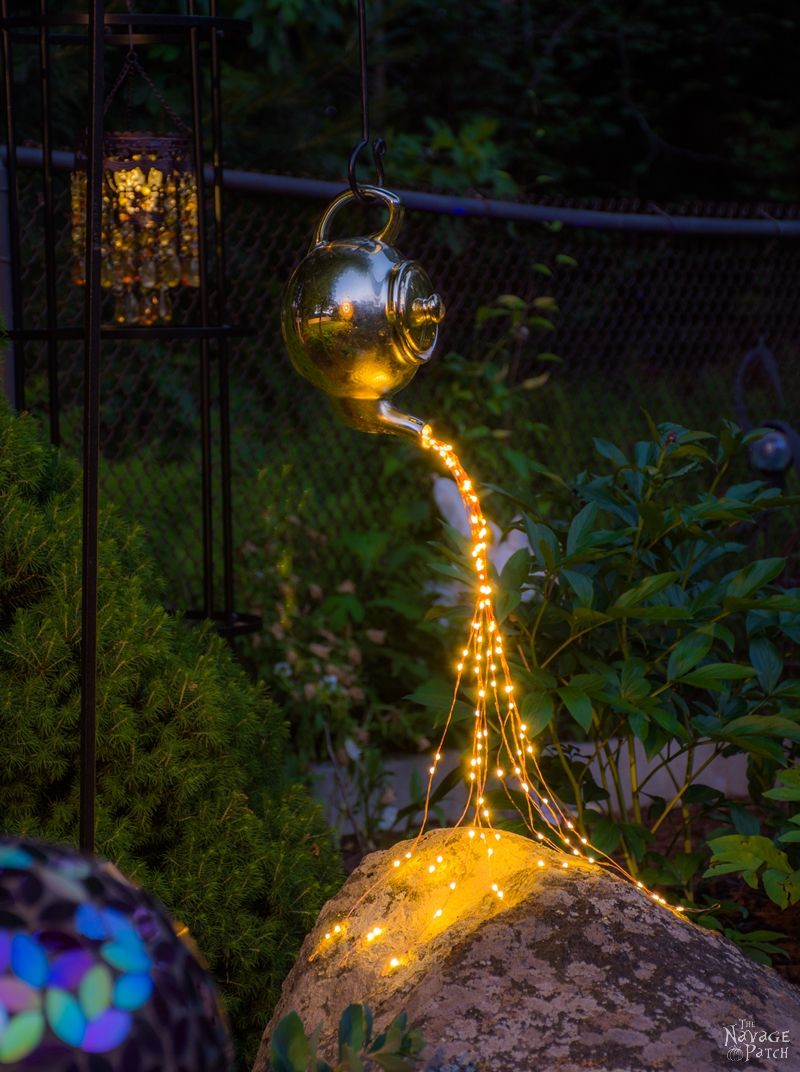
Do you remember the coffee pot garden decor I posted about last year? The one with the gems pouring from the spout? Well, last year, I actually wanted to make a solar light with that coffee pot. But by the time I received the solar lights I bought, I already finished my DIY Garden Decor post, hence that project had to wait for our side yard makeover. And now with our side yard done, I finally put that idea into action and made my DIY Spilling Solar Lights.
So what do you think? It does make a big statement, doesn’t it?
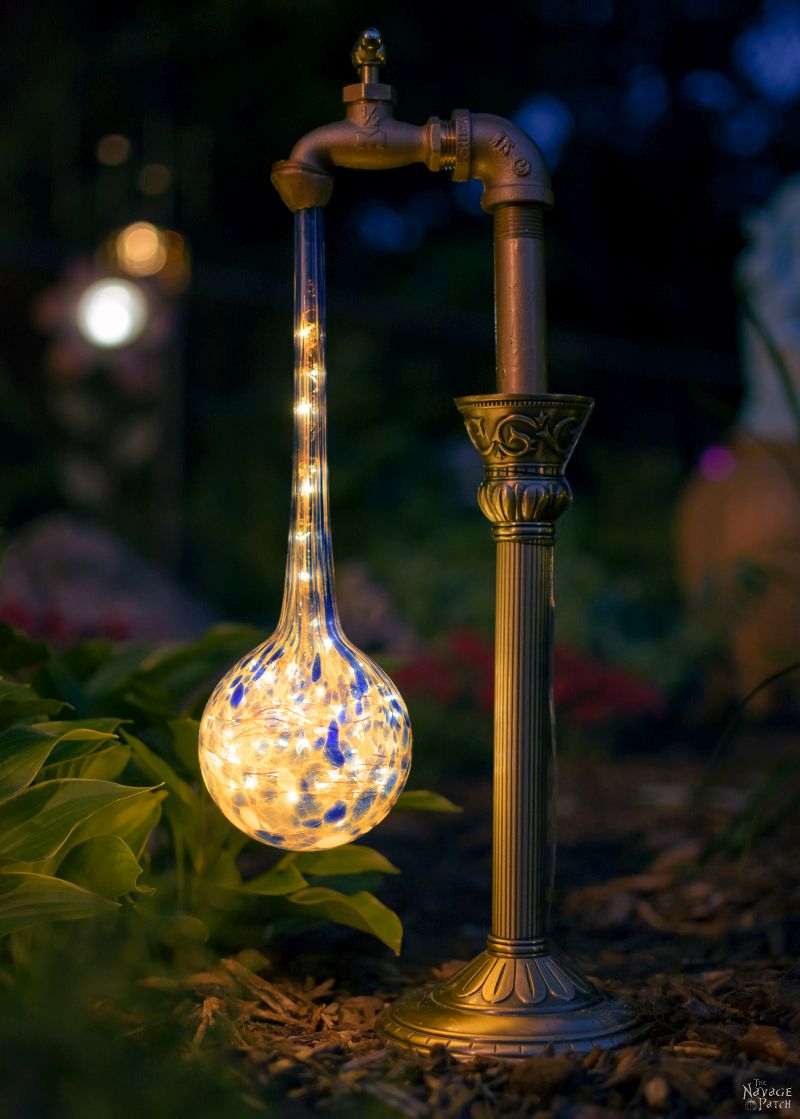
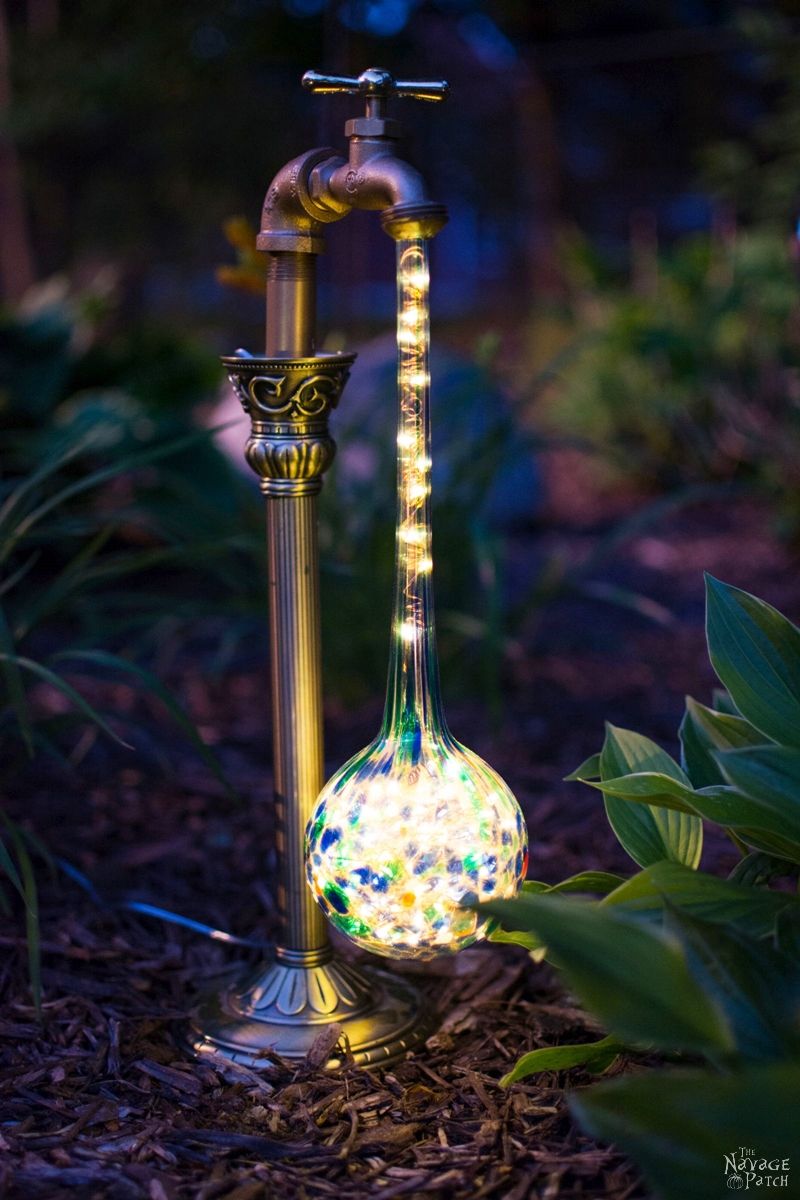
By the way, making this one is much easier than making the DIY Waterdrop Solar Lights.
I know, right? How much easier can it get? Well, let’s get on with the tutorial so you can decide for yourself, shall we?
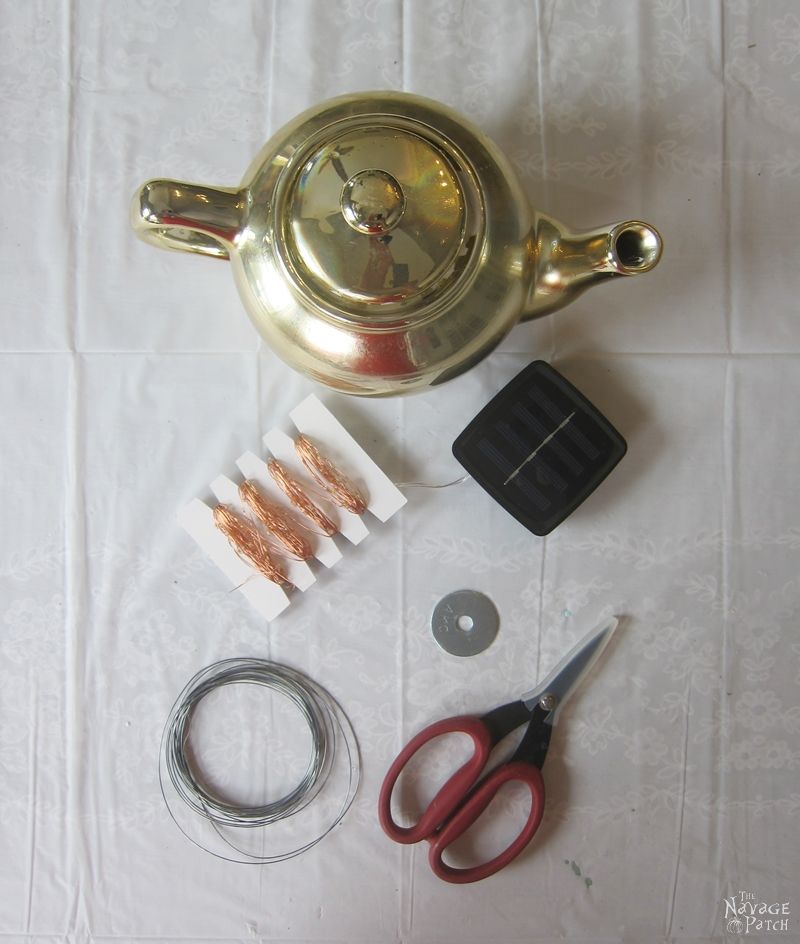
DIY Spilling solar String lights SUPPLIES LIST
Affiliate links are provided below. Full disclosure here.
- Solar powered LED string lights (I used 50-foot long – 150 LED solar lights. You can go for shorter ones with fewer LED lights, or longer ones with more LED lights. It all depends on how much bling you want to bring to your garden.)
- An old teapot (if you don’t have an old one and can’t find any at tag sales or thrift stores, they have these cute small ones or slightly bigger ones on Amazon.)
- A shepherd’s hook (I used a 48 inch one),
- Craft wire,
- A large size washer,
- Hot glue,
- Snips or a wire cutter.

Before getting into the steps, let me tell you up-front: this is a very easy project, but the post is picture heavy! You see, due to my limited English (as it is not may native tongue) I had a hard time explaining the steps, hence I had to take a lot of pictures along the way [*ahem* – who took a lot of pictures along the way?? -Greg] which makes it a long post. But I promise, this is one of the easiest projects ever! 😉
Ok, now that my long post and language disclaimers are out of the way, let me show you how I made my spilling solar fairy lights.
DIY Spilling Solar String Lights Tutorial
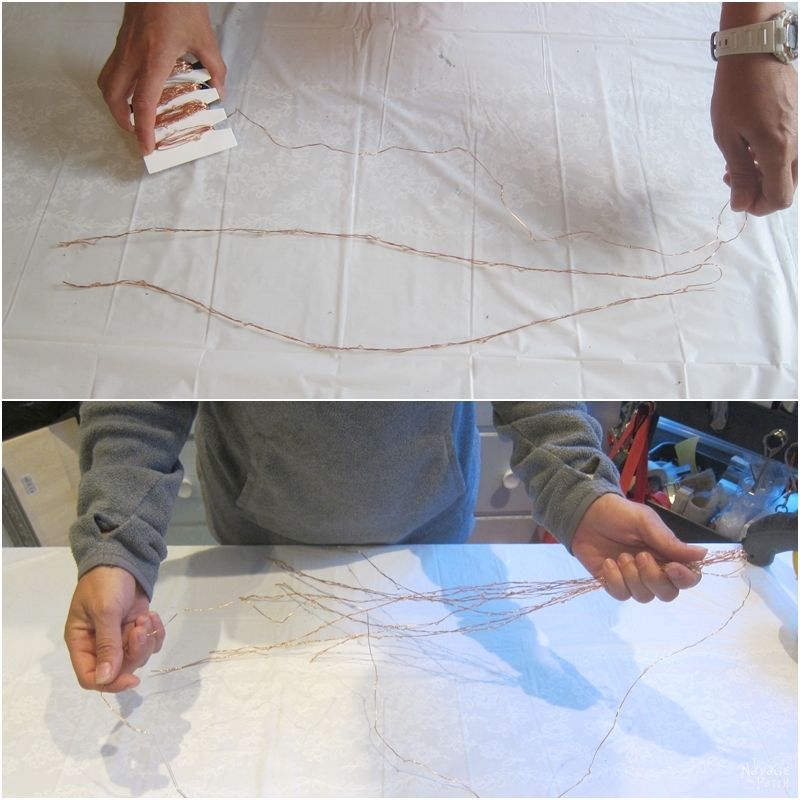
Step 1 – Make streamers from the solar fairy lights
I started unwrapping my string lights to have a 40-inch-long section to work with.
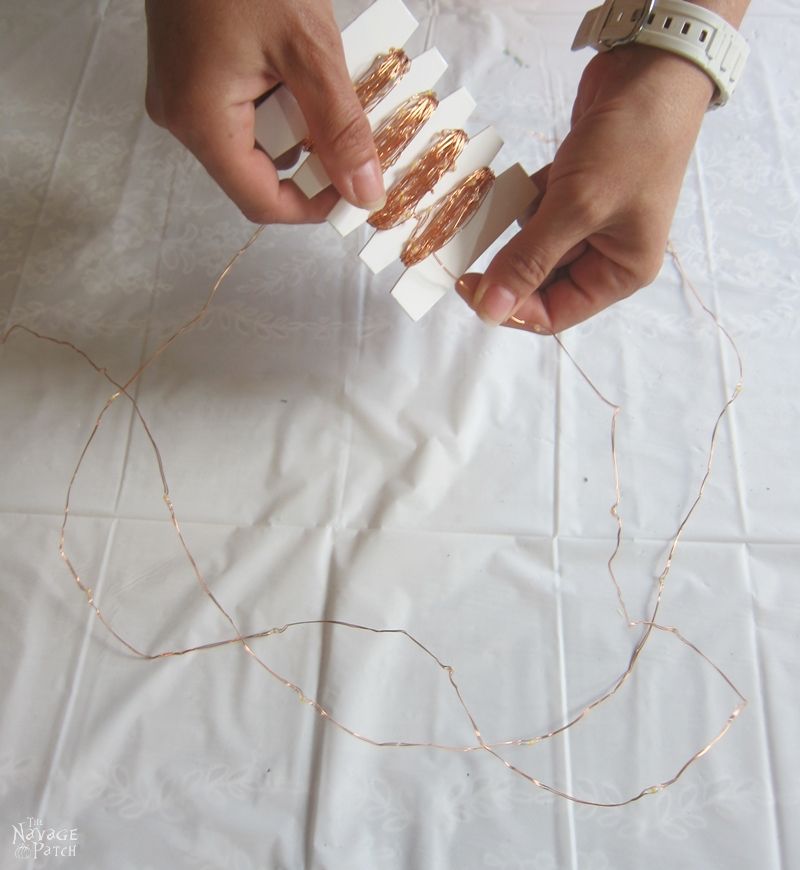
Once I had about 40 inches unwrapped, I slightly bent it into two as seen in the picture below.
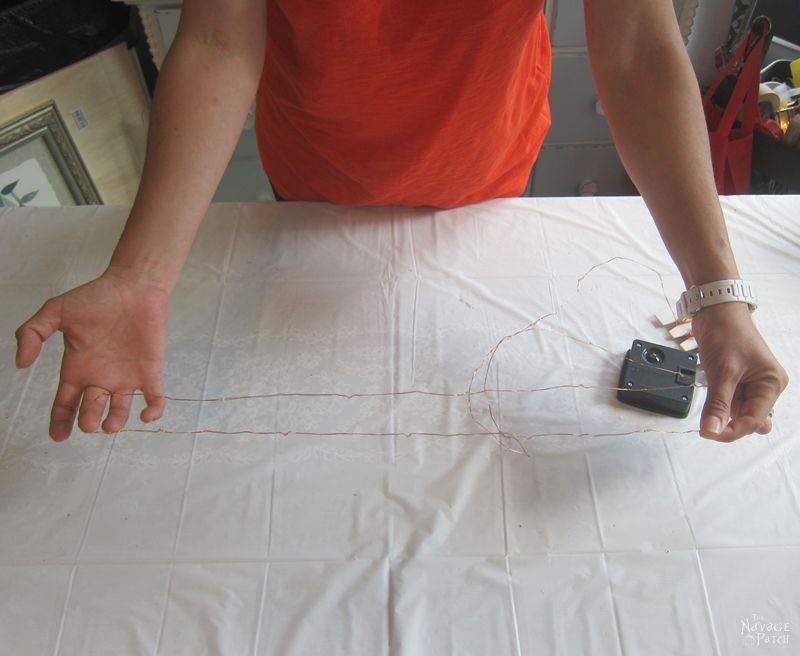
Then, while holding one end of the string lights steady, I started winding the other end. That was so the 40-inch-long section of string lights would act and behave as a 20-inch-long single streamer of light.
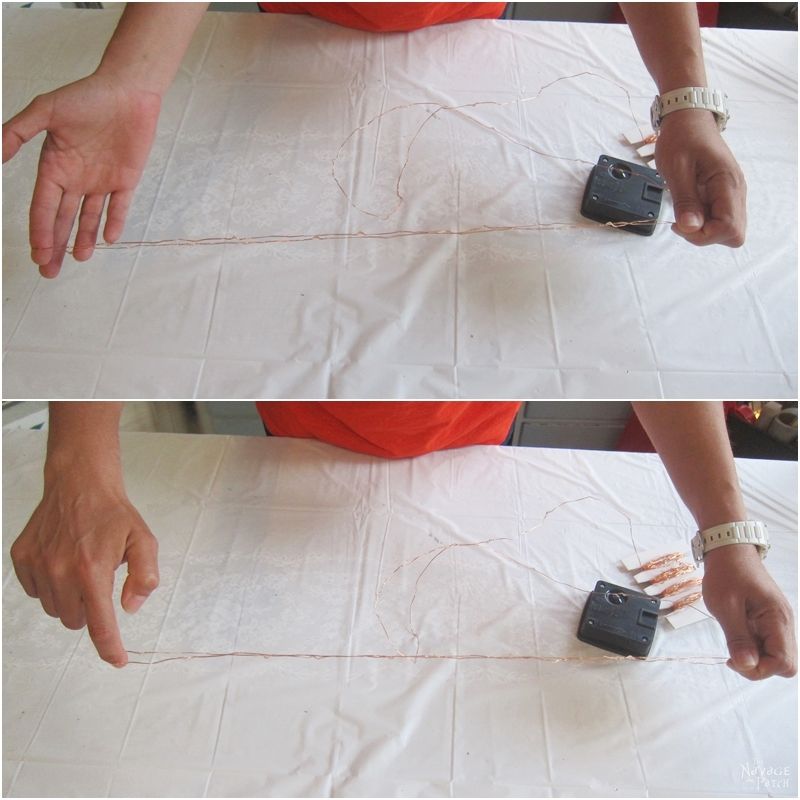
Once I was done with the first section, I unwrapped and measured another approximately 40-inch-long section of string lights by holding it against the first wound string (or the first streamer, as I would say).
Then again, I started winding that second section of string lights as shown in the picture below.
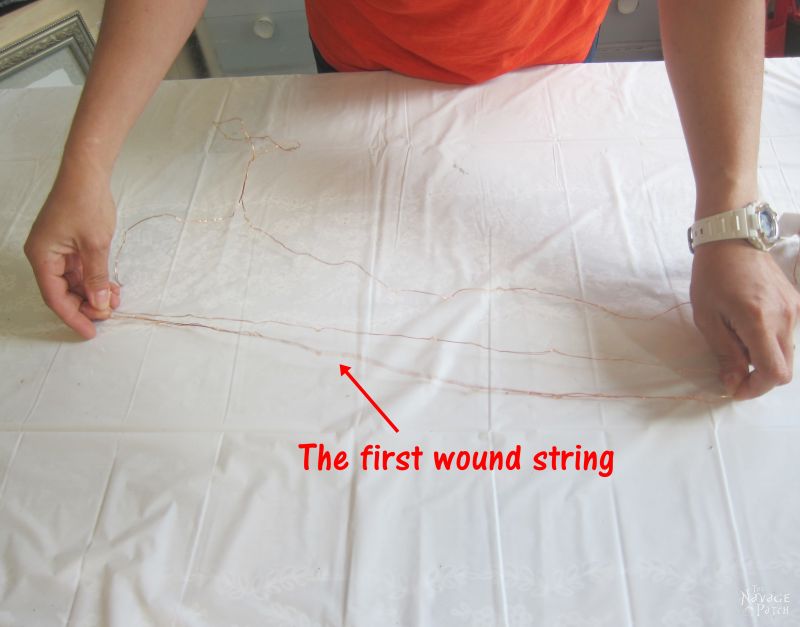
And as you may have guessed, I carried on with the same steps until the whole coil of string lights were wound and turned into streamers as shown in the picture below. As you can see, the streamers have 2 different ends: one is free floating, while the opposite ends are connected/bunched.
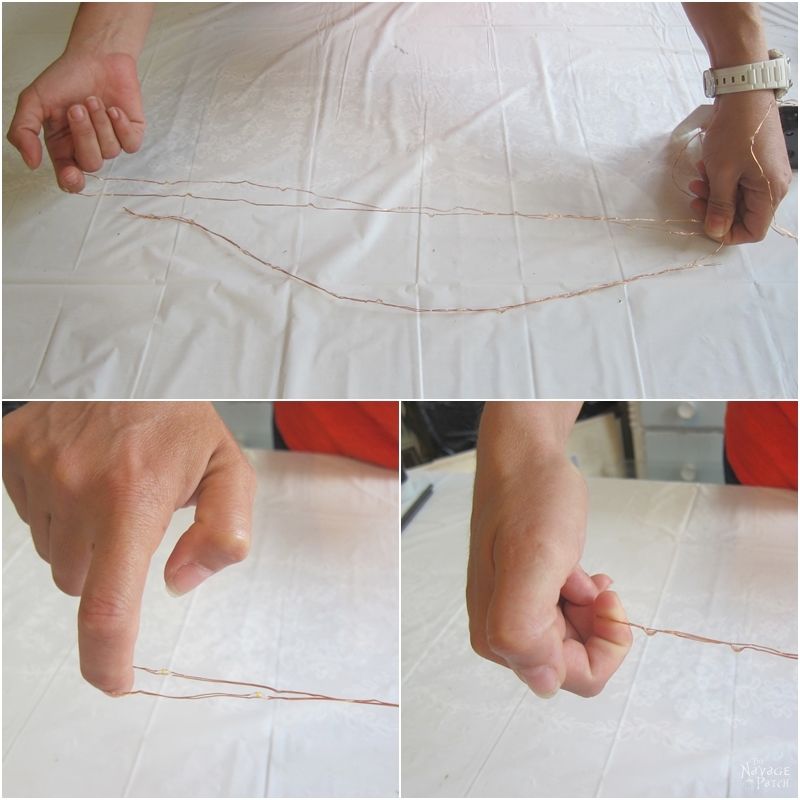
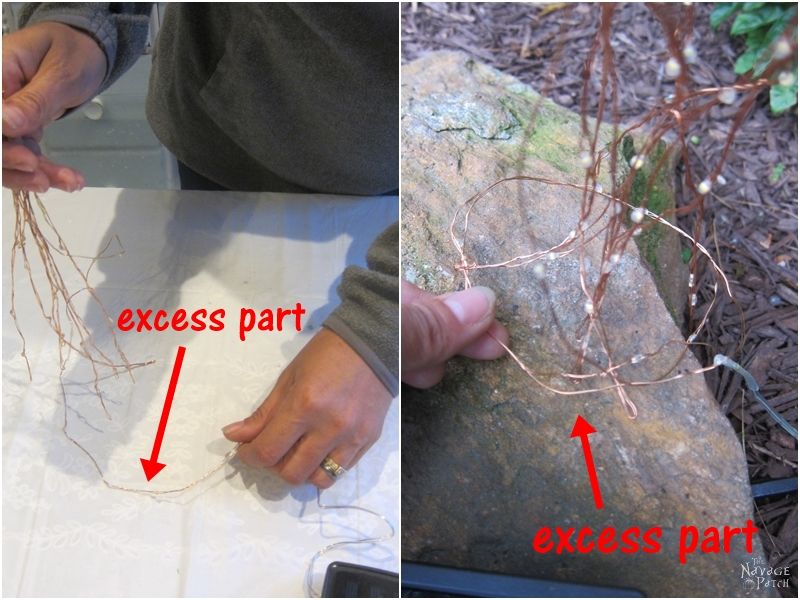
What to do with excess solar string lights
When I reached the end, I realized that my measuring wasn’t accurate enough, hence I was left with some excess lights -excess as in it was not enough to make another (approx) 20 inch long streamer. If you also have any excess lights, instead of redoing the whole thing all over again, you can do what I did: I made a small circle with that part, and placed it at the bottom of the streamers. That little circle now looks like a small water puddle (or should I say light puddle) and gives the whole thing a greater bling 😉
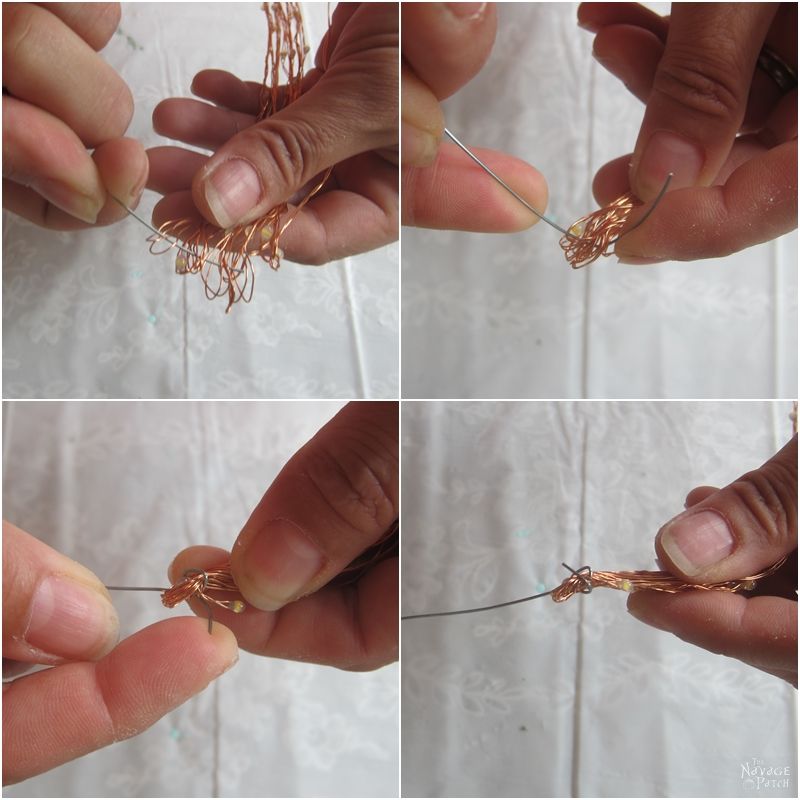
Step 2 – Gather and secure the streamers
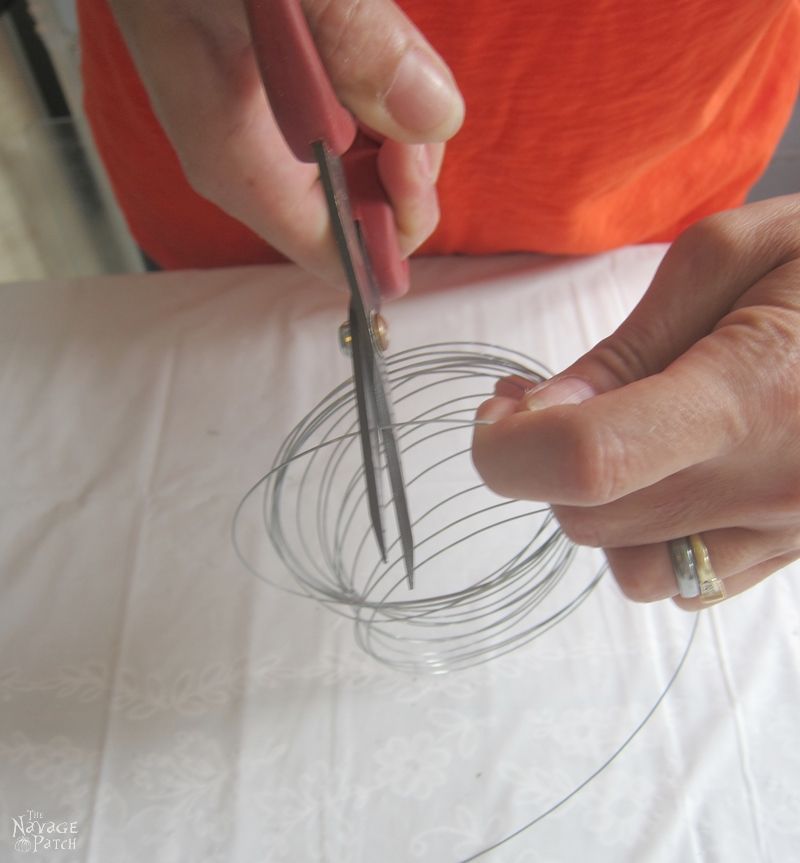
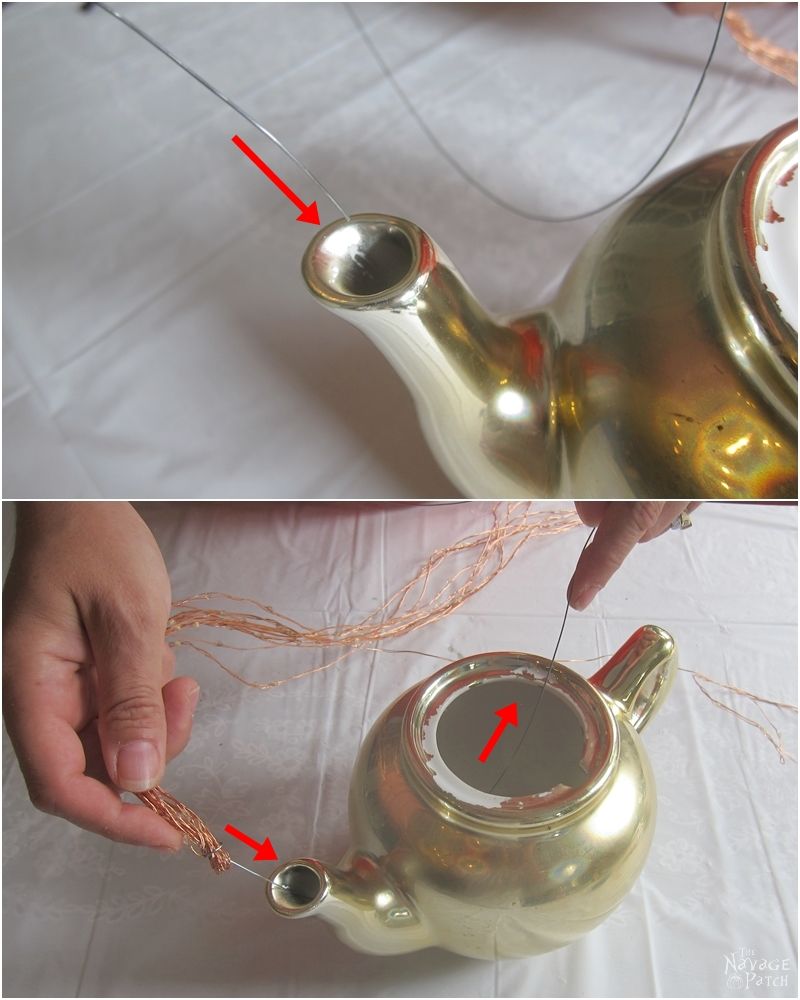
Once I finished making all the light streamers, I started working on putting the whole thing together. With my snips, I cut approximately 20-25 inches of craft wire.
Using the wire I just cut, I wrapped the connected/bunched ends of the light streamers as shown in the pictures below.
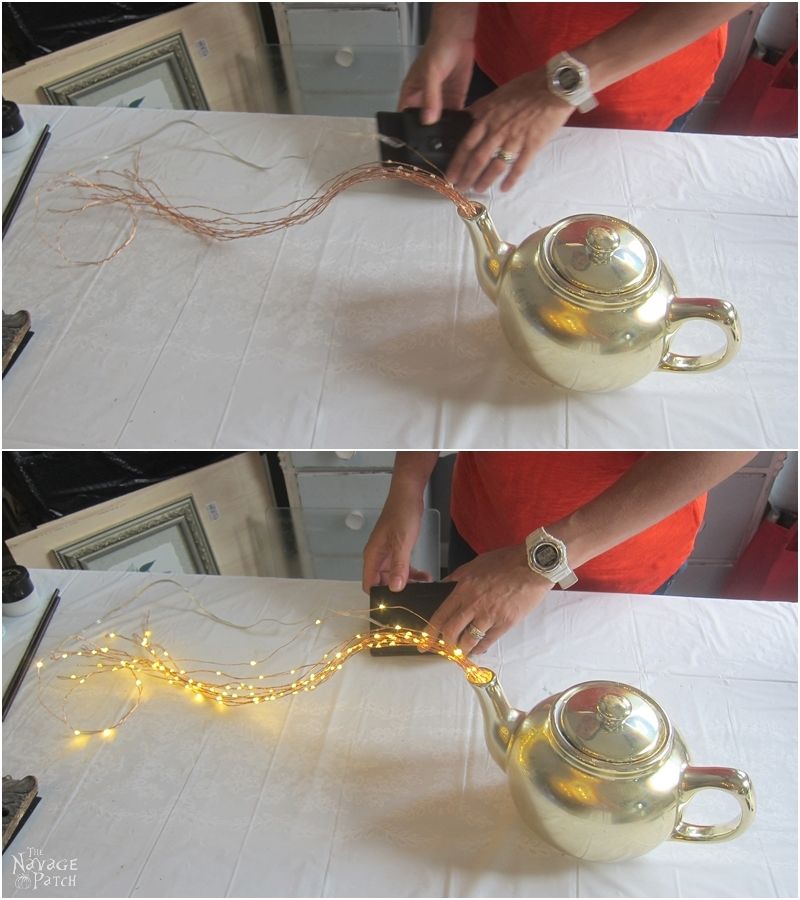
Step 3 – Insert solar string light streamers into teapot
Next, I pushed the other end of the craft wire through the spout.
Step 4 – Secure streamers
To secure the lights’ position right where I liked at the spout, I wrapped the craft wire around a large washer as shown in the pictures below.
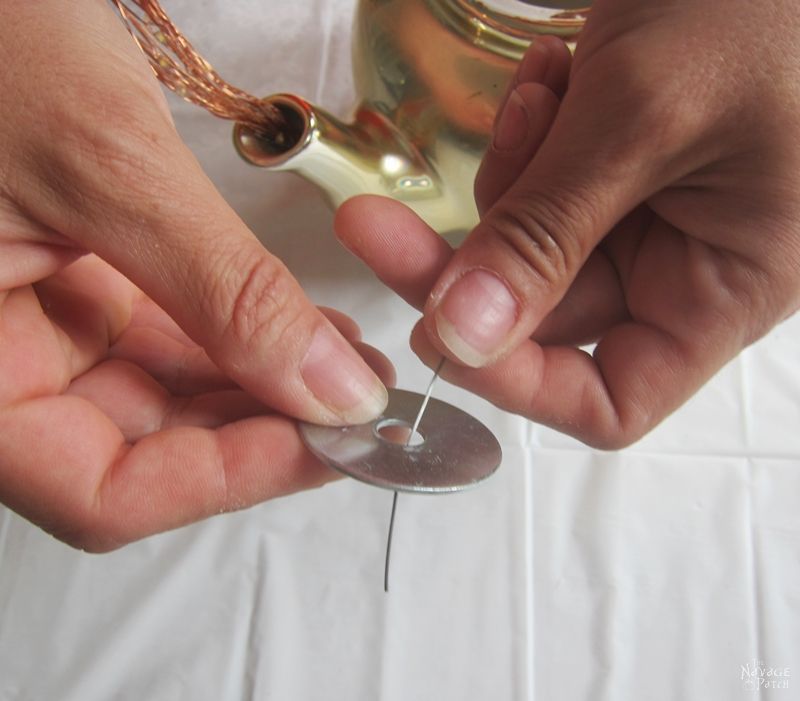
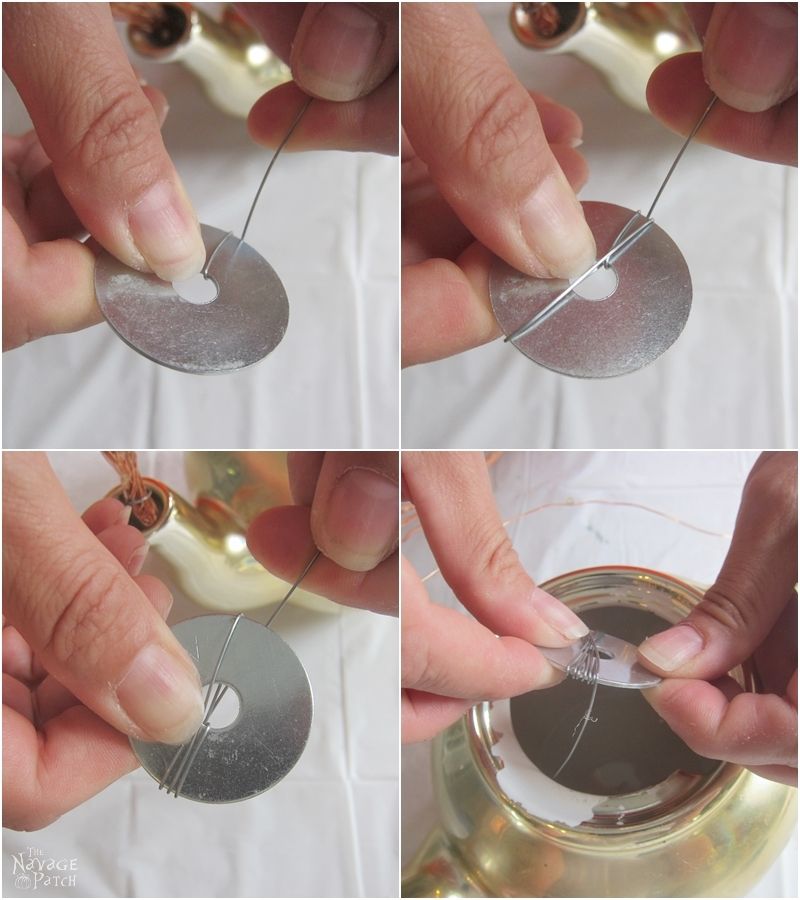
I carried on wrapping until the washer was holding the lights in place.
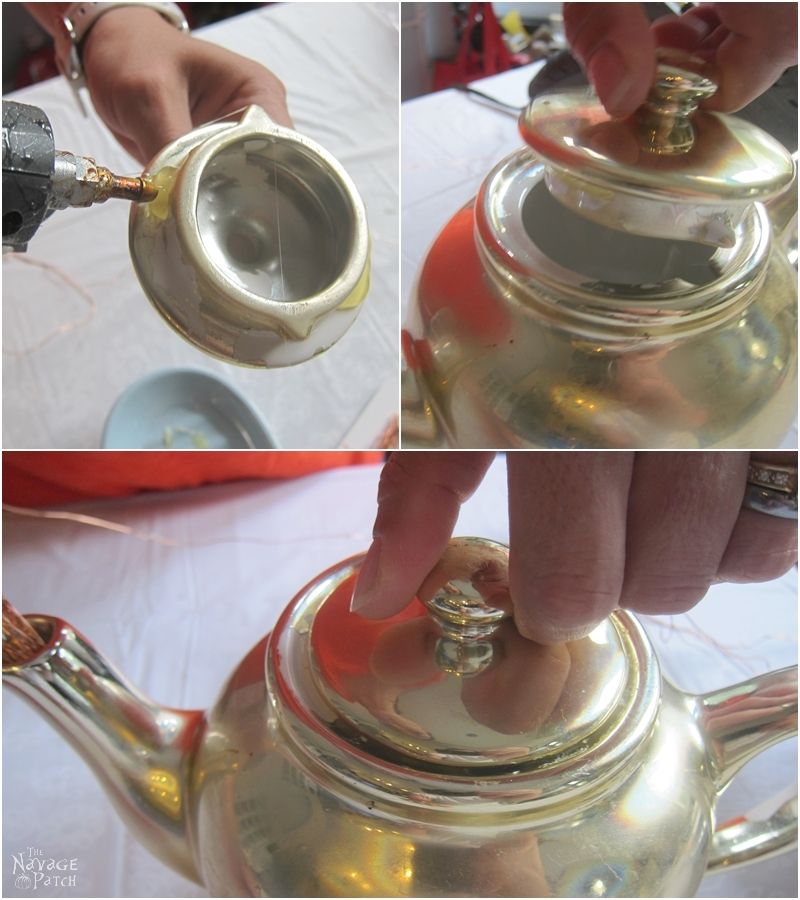
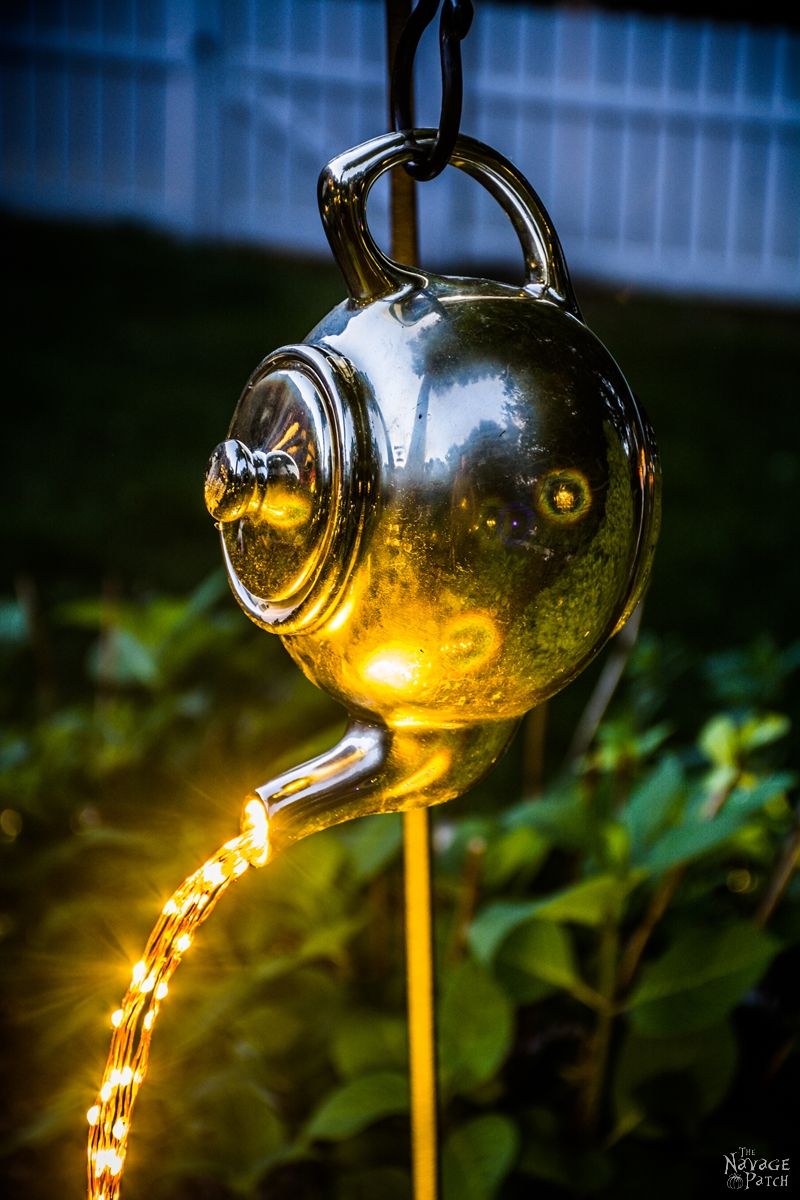
Step 5 – Glue teapot lid
When I was done with the wire and the washer, I hot glued the lid on the pot, and with that my DIY Spilling Solar Lights were ready.
Before placing it in our garden, I tested my lights to see if everything was working. By the way, this is off topic, but it kind of reminds me of the Aladdin’s lamp. I wish it was…maybe then I could finally have the money tree that I keep dreaming about since last fall. hahahaha 😀 Anyway…back to the tutorial…
Step 6 – Place DIY spilling solar fairy lights in garden
As the last step, I took the teapot out in the garden, hung it on a 48 inch shepherd’s hook, arranged the streamers to my liking and placed the solar panel on the mulch (somewhere behind the rock) where it can get charged easily.
Annnndddd ladies and gentlemen….(drum roll!) I present to you my magical teapot lights, aka DIY Spilling Solar Lights 😀
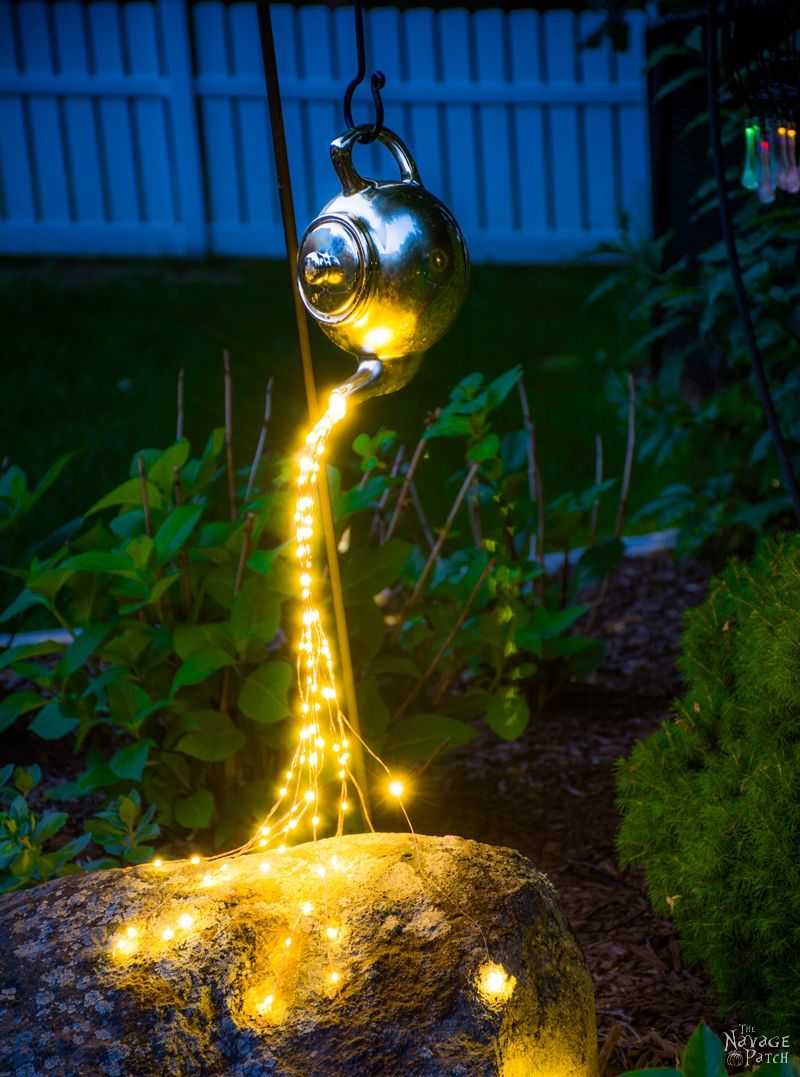
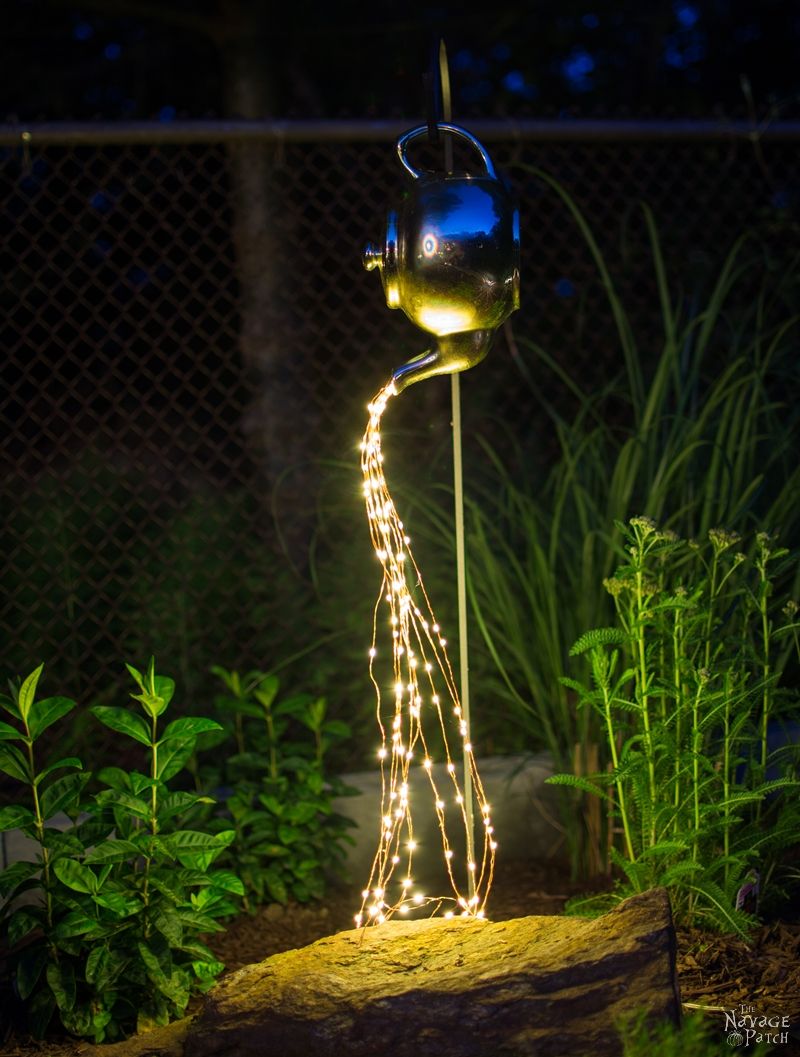
I am so enjoying the night scenery of our side yard – when these spilling lights turn on at night, I feel as if I am in a fairyland.
Let’s hope Greg gets back to earth soon enough, so you can see the complete look of our side yard.
Before you leave, here are some more garden decor and lighting ideas for you:
DIY Cedar Cube Landscape Lights
Handan, xo
We love it when you share our posts on Facebook and Pinterest!
So pretty! I love all your crafts Handan, you are so creative and talented!
Thank you so much, Giselle! Your comment made my day!! 🙂
Hi Handan, could you tell me – where did you put the solar panel attached to the lights so it could charge in the daytime please?
Hi Cathie,
I put the solar panel on the ground (on the mulch) right next to the rock that the lights are spilling on. Since the solar panel’s cord is long enough, it can be easily hidden away from view.
I hope this info helps 🙂
I truly enjoy reading your posts. Thanks to your inspirations, I have made several projects repurposed from things that I probably would have thrown out or given away. Thank You, Sincerely Cindy
That is such a beautiful idea! Your English seems to be very good, Mrs. N. I truly appreciate your efforts and the creativity you express. Oh, yes. I also appreciate your humor with your husband. You are an incredible couple.
Pam, thank you so much indeed! I am trying my best, but for me some projects are easier to make and show with pictures than explaining them. I guess I’d better start using the power of video more often 😉
I want to do this for table decoration for our annual tea party. Any suggestions. I would use battery operated lights instead of solar.
Hi Helen, If you are going to use battery operated lights, then I would make them either with this light set https://amzn.to/2H5wW8C, or this light set https://amzn.to/2H7z6oj. Since both of these light sets have individual strings, it would save you time. You could simply put these lights into your teapot and thread the strings through the spout. Within minutes you could have your teapot lights ready 😉
Oh damn it Handan ! You got to stop giving me ideas, my brain is overloaded, my bungalow and garden aren’t big enough and i’m not getting any work done because i’m spending too much time playing at crafts! NO don’t stop.
Thank you so much, Catherine! I am pretty much the same these days – brain is overloaded!! LOL.
Let Greg gaze lovingly at his new grill, you’ve got this magical solar light tea pot to stare at and enjoy. Handan, you hit yet another one outta the park. I’m off to look for old tea pots at the thrift store. I want my garden to grow up and be just like yours! 🙂
Thank you so much, Susan! Oh there is no getting between him and his grill – otherwise I might lose my hair with that heat. LOL. 😀
Such a cool idea, Handan! I pinned – I want
Thank you so much, Marie! Between the spilling solar lights and the waterdrop ones our side yard finally looks great at nights 🙂
I didn’t see where you place the solar power source. Can you explain? This is lovely, by the way! I just might have to try it!
Thank you so much, Esther! As the cord of the solar battery pack is long enough, I just left it on the ground behind the rock that the lights are spilling on. If you put your lights in the garden, it would be easy to camouflage the cord and the solar battery with mulch or rocks. 😉
I loved the idea and the photos looked great! How did you hide the solar battery black box so that it gets enough light during the day?
Thank you so much, Helen! As the cord of the solar battery pack is long enough, I just left it on the ground behind the rock. As the lights are in the garden, it is easy to camouflage the cord and the solar battery with mulch or rocks.
Delightful idea! Thanks for sharing, this adds such a magical ambiance to the area outside.
Thank you so much, Diane! It indeed adds a wonderful ambiance! 🙂
Where did you get your solar lights and do you know if they come in different colors?
Hello Gloria, I bought them on Amazon, and yes they do come in different colors. Here is the link to the ones I used: http://amzn.to/2tyYzzw
And here is the link to the colored ones: http://amzn.to/2tz6DQN
I hope this info helps! 🙂
Another winner Handan, it looks beautiful. I need to see if we can get some of those string lights here in South Africa. I’ve only seen the old style ones that look like Christmas lights. These are soooo much better. Oh and your English is perfect 😉
Thank you so much, Michelle! I got quite a bit of help when writing this one. Throughout the post, it was pretty much like “Hey Babes, what am I doing with the lights right now?” or “Hey Babes, what is this part called?” – hahahaha 😀
Hello! Im going to try everything im so exited that i can not wait to start ilove to use all tipes of deccor in my yard im a. garden person like to b yard admire the nature tks in advance for more ideas.?
That teapot w/solar lights is soooo adorable!! I read maybe 80 reviews on the site for purchasing these great looking lights. A number of people commented that the wires are fragile, & that you have to be careful or you might break the wire connections!! I’m thinking of how you folded the wires over & twisted them together… which created such a lovely effect…. but… did you have to be very careful, lest you break the wire?? A number of reviews said that their lights only lasted for a few days… or a few weeks… A couple people recommended replacing the batteries with better quality batteries… I love what you created…Thank you!! It would be so perfect for my magical garden. I’m probably going to buy some of the lights & be very careful working with them!!
Hi Carol, I am so glad you like them. Yes the lights look a bit fragile, however, they are stronger than they look. Twisting the lights wouldn’t hurt them at all, but I would bend them with a little care, just in case [I also bent them nice and slow ;-)]
As for the rechargeable batteries, so far I am using the ones the lights came with, and they last at least until midnight, if not longer (I go to bed latest at midnight). But if and when the lights don’t last that long, then changing the batteries would be my first action too 😉
I love this and especially with solar lights. Where did you put your solar panel? I missed that part.
Thank you so much, Janet! I put the solar panel on the ground (on the mulch) right next to the rock that the lights are spilling on. Since the solar panel’s cord is long enough, it can be easily hidden away from view. 🙂
Wow, absolutely fabulous
Thank you so much, Ivory! 🙂
Hi Handan. Love your spilling lights t-pot. You didn’t mention painting the t-pot.First did you paint it and if so what kind of paint did you use? If not what kind of paint would you use if you had to paint one? I suspect it would have to be a paint for glass. Does paint for glass come in a spray?.Thanks and keep up your great ideas.
Hi Wilma,
Thank you so much!
No I didn’t paint my teapot. I bought mine from our local thrift store as is, so it was already golden color like that. But if you want to paint yours, Rust Oleum Metallic Gold color (http://amzn.to/2uTEZOg) is the exact matching color of my teapot.
Now as to how to paint glazed ceramic: it is a hard task I have to say, because glaze would be resistant to most things you throw at it. Hence the only way I see that is possible is sanding the glaze or at least scuffing it as much as you can, so the paint could stick. Best way to paint is either using oil based spray paint or first using primer (http://amzn.to/2uhYY5F) then using any spray paint you like.
Yes there are spray glass paints out there (http://amzn.to/2w43CGu), but glass is a much easier surface to paint than a glazed surface. So even glass paints might not be sticky enough.
If you think sanding the glaze would be a rather hard task, then you may want to try glass etching creams, as that might help a little 😉
I hope this helps! 🙂
where did you put the solar light thingy?
Hello Marilyn, I believe you are asking where I placed the solar panel. If so, I put the solar panel on the ground (on the mulch) right next to the rock that the lights are spilling on. Since the solar panel’s cord is long enough, it can be easily hidden away from view.
This is the cutest thing ever! I love it. Thank you
Thank you so much, Marsha! Your lovely comment is much appreciated! 🙂
Handan, I just read this article in curiosity, and then it led me to looking more into you guys, and found by a simple click out of curiosity, your article number 8, in the picture mode, “Handan-Night_Shift” in Afghanistan, and read it!! It was wonderful! You guys did some great deeds there! It was like reading a very interesting book.
I found you personally, to be quite intelligent, ingenuitive, and a real go getter, especially when it comes to work! You can handle rough jobs, leadership, even in consequences, and ability to communicate with people! When you said it would be done, it was, and there were no errors involved! I wish I could have met some people like you when I was working.
I shall be looking into more of those pictures with stories attached. I personally only saw one error on your ability in English, and it was not really critical.
Thank you so much, Russell! This is such a heart warming comment! I am so glad you started reading our story as Greg wrote it in a wonderful way. Have you read the whole story yet? In case you haven’t it starts here: https://www.thenavagepatch.com/about-us/
Thank you so much once again. Your comment indeed made my day! 🙂
I love the idea. However, I can not find the solar lights you used. Where can I order them ?
Thank you so much, Susan! You can order them from Amazon. For your convenience here is the link to the exact light: http://amzn.to/2vj9wVG
Handan, this project is OH so oh oh ohhhh so cuuuute!! Thanks for sharing… I’m heading to the store to find some solar light strings after this!!
Thank you so much, Bonnie! Your comment made my day! 😀
I love this tutorial and your teaching- thanks so much! Do you cut the solar wire in 40 inch segments, or just fold & twist the entire length intib40 inch segments?
Thanks,
Rachelle
Thank you so much, Rachelle! Oh no, I don’t cut the wire lights. Like you said I fold & twist the entire length into 40 inch segments. 🙂
Thanks! I just couldn’t think that through for myself 😉
Teapot is done-thank you! Pictures tomorrow- rainy & drab for 2nd day in North Florida, so no charge for lights. I am so excited! Thank you again- you are one *fantastic* teacher ?
Thank you so much, Rachelle! I bet it turned out beautifully!
My garden/yard is like a fairy land, but this spilling teapot idea, IS THE BEST THING EVER!!!!!!! I have teapots and sprinkling cans with blue jewels spilling out, and some with crystals spilling out, but this idea is so exciting!!!!! I will be making several tomorrow for myself and friends. Thank you so much for sharing this, Handan. VERY CLEVER!!!!
Thank you so much, Dudie! Your comment made my day!! Much appreciated indeed! 🙂
Handen, I absolutely love this idea and it looks beautiful at night. You are so creative! And all your crafts are very wallet friendly. It all looks very simple but I don’t understand where you put the washer in the teapot. Yes, I’m a blonde. Lol! After you wire the lights to the washer, are the lights heavy enough that they pull the washer toward and against the inside mouth of the spout without having to glue it? Depending on how long it takes to get the solar lights, this will be a project I do when my husband goes golfing. Thanks honey.
Thank you so much, Kathie! LOL – you made me laugh out loud! You’ve seen where I wrap the wire around the washer, right? I try to wrap that wire as much as possible, so that the washer stays against the inside mouth of the spout. And as you said, once I hang the teapot, due to the weight of the lights and the washer itself, the washer stays against the inside mouth of the spout. So no gluing is needed 😉
I appreciate you going to the trouble if explaining how you fixed the lights. I had already started this with a watering can, but couldn’t quite figure out how to get the lights in the spout holes. Easy with the wire you used. THANKS!!
I am so glad you are giving these solar lights a try. I am sure they will look great in your garden! 🙂
I know I’m late again but, I saw this on your IG and came here for details. Love this and I’m going to try it! I’ve never done anything like this in my life! Thank you so much! ❤
Thank you so much, Kelly! I am sure you’ll enjoy every second of this project as it is really a fun and easy project 🙂
Love the water drop! I’ve made 3. keeping one. going to raffle or auction off the other 2 for fundraisers! can’t wait to see how they do! they are so cool! might have to try the watering can! thanks! Terry
Thank you so much, Terry! Oh I am so glad you tried the waterdrop solar lights! I am sure they look stunning 🙂
What a fun project! I love tea pots, or tea cups for the outside. I need to bring them back out! Love your outdoor space.
Maria
Thank you so much, Maria! 🙂
I have a teapot-themed garden this year- made a teapot trellis for Cup & Saucer vines in the front yard from 2 living trees.?. This little addition to the back garden allows me to have a ‘teapot theme’ instead of just some random decorations.
Ohhhh I can’t wait to see photos!!! #SoExcited
I’ve had 2 out side taps with metal pipe stems ( 36″) sitting for literally 20 years in my stash. They are from a house I used to own that was built in 1939. All the taps back then had the long stems. I’d originally wanted to make inside lights/lamps with them but when the solar lights became easily available I thought that I’d use them for outside but of course other projects shoved them to the back of the pile. Your instructions are sooo easy to understand, the photos are such a help that I’ve decided that this will be my first project once I’m moved into my new residence. I couldn’t believe it when you said that English was your second language! Your ability to write instructions clearly is better than many whose English is their first language. Keep up the great humour as well. Thanks for inspiring me to get my tookas into gear. Thanks. 🙂
Oh I am so happy that you’ll be trying this project, Pat! I’m sure you’ll love it. Thank you so much for your lovely comment and good luck with your project! 🙂
Happy Dance!!!
The tea pot is gorgeous! and I love the water spout too! Thank you for such great ideas!
Thank you so much for your lovely comment, Linda! 🙂
I love both of your garden lights ideas. The water drop is cool but doesn’t the weight of the glass want to tip over the candlestick/holder?? Again with the teapot, none of mine are lightweights, it would tip over the 3 ft post they were on. Ideas for weight distribution would be soooo appreciated. I will be making these especially the water drops – got lots of glass bulbs and a litany of various types of teapots. Did you buy your posts or were they from a different project. sorry for the long post, I’m excited. Gonna hit the dollar store tomorrow.
Hi Teresa, sorry I couldn’t get back to you earlier. Both candlesticks I used were heavy brass, hence they carry the weight and the whole thing doesn’t tip over. That said, some of our readers who tried the same project couldn’t find heavy candlesticks, and instead they used old lamp bases which are usually heavier than candlesticks. And as a better idea, some of our readers didn’t even bother with a candlestick, and just used longer steel pipe. To anchor it to the ground they hammered a rebar into the ground and slide the steel pipe over it.
I hope this info helps and good luck with your project! I’m sure it will look fantastic!! 🙂
How creative! I love it! I am going to subscribe and share this on my Dream Bubble Shop Crafters Hub!
Thank you so much, Cathy! I hope you’ll enjoy our other garden projects too! 🙂
I can’t figure out how to do the lights. They look separate but you said not to cut. How do they get the “flow” look when they are all connected?
Hi Kristi, the lights are not separate as I used only one 50-foot long lights to do this. They give the illusion of being separate as I turned them into streamers. If you check the pictures above you’ll see that I’m unwrapping 40-inch sections of the 50-foot lights and winding it around itself to turn it into a streamer. There is no cutting, because if you cut, the lights won’t work. Once I finish making one steamer, I move on the next 40-inch section of the light and work on that. And so it goes, till I reach the end of the lights. As it is hard to explain, I suggest following the step-by-step pictures. Especially the ones on the first page as they show the entire process for making those streamers.
Where can you buy the solar tea lights? I love the teapot idea I need to make it. I live in Canada
Hi Vera, I’m sorry for the late reply. You can find them on Amazon. Just search for “150 LED solar fairy lights” it will bring up a bunch.
I hope helps! 🙂
I love tea pot with lights but I would like to make it with a watering can do you have instruction for that project? Thank you for all your projects. Mary
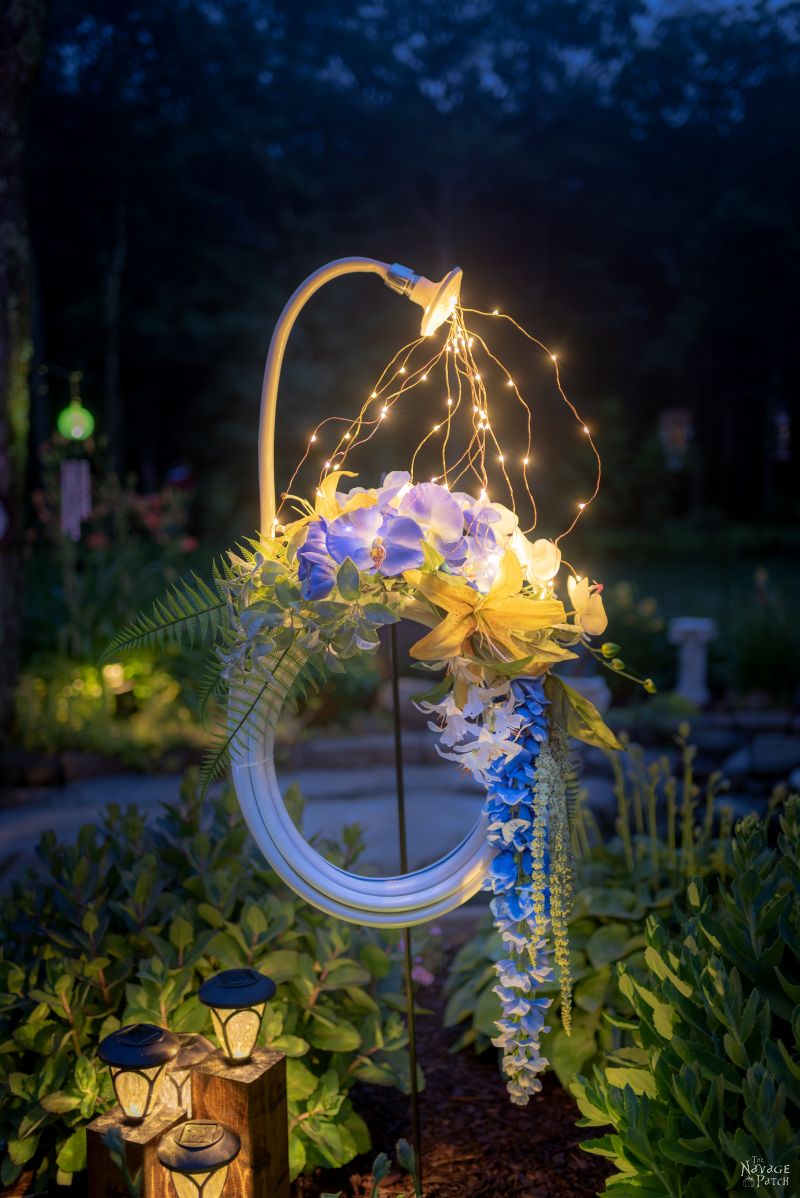
Thank you so much, Mary! I made a lighted garden hose wreath recently and used a watering can nozzle for it. So you can check how I added the lights on that post (link is below) as it will have the same principle with adding the lights to a watering can.
https://www.thenavagepatch.com/lighted-garden-hose-wreath/2/
Hi Devin, I believe it has to do with your browser or internet connection. On slow speed connections sometimes web pages can’t download properly, therefore either pictures won’t show or the page format won’t download properly, which will lead to that kind of issue.
I have a silver tea pot going to spray paint it gold. Have had it for a while not really knowing what to do with it????? NOW111 I know Thank You so much:-)
Thank you so much, Amy! Please remember to send a picture or two when you finish your teapot lights as we’d love to see how it turned out!
This is adorable. I should try something like this once I get my side yard flower bed planted. Maybe I’ll check consignment shops for an old metal teapot.
I keep doing inside projects and gardening gets pushed aside. This spring hopefully. (ha, we’ll see because dining and living room wainscoting that I want to install keeps beckoning me).
I just recently found your blog and have been enjoying all your fun posts.
Thank you so much, Laurie! You won’t believe how easy this project is. You can be done with it within 30 minutes or less as there is not much to it: fold the lights a bunch of times, tie them up with a wire, place them in the teapot’s spout and hang the teapot with a shepherd’s hook. So if you find a nice looking teapot, I’d say give it a try, because it looks fantastic in a flower bed.
I made this teapot fairy light project with a few modifications due to the teapot I picked up at a thrift store. I also found blue lights on Amazon that I love. I placed succulents in an old cracked birdbath. Oh my goodness, I LOVE the effect at night. I wish I could have added a picture, but regardless, this light feature is part of my backyard “Happy Place.” I so enjoy reading your blog. Greg and Handan, you have so many creative tutorials; what a great team you make.
Awesome! I’m so happy it turned out great. Send us a pic to my email – greg@thenavagepatch.com. 🙂
J’aime beaucoup ce que vous faites. Merci de le partager avec nous.
Bonne journée !
Francine Lebel
Drummondville (Qué)
francinelebel@hotmail.com
Merci beaucoup, Francine! 🙂
Are these truly solar lights?
Or are the battery operated lights?
Hi Donna,
Yes they are solar lights. If you’d like to see exactly what I used, please click on the product link given in the post.
I hope this info helps! 🙂
Handan
Hi Donna, they are both. All solar lights are battery operated. The solar panel acts as a charger for the rechargeable batteries, and the batteries power the lights.
I’ve always wanted to do this. I’m a visual learner,so your pictures were awesome. Thanks so much!
You’re welcome, Patty!