DIY Dollar Tree Christmas Signs (& Free SVGs)
These DIY Christmas Signs are a Dollar Tree makeover that look like they came from Hobby Lobby. Our free SVGs make these signs stand out from the crowd!
On those occasions when The Kommandant forces me to accompany her to Dollar Tree, I often find myself aimlessly wandering the aisles and wondering just where on earth all that stuff comes from.
(China)
Well, duh, obviously, at least for most of it. But I still marvel at some of the products that sell for a dollar. My mind tries to calculate profit margins throughout the supply chain.

Someone makes the thing in some faraway land.
He or she needs to be paid. Or perhaps the thing is manufactured by robots. Still, the robot needs to be paid in electricity and a factory roof over its metallic head.
Next, the company that employs the man who made the thing needs to sell a whole bunch of things to Dollar Tree Corporate. In order to do so, they need to package the things and put them on a truck or a train.
From there, a group of someones must load them onto a boat. Those someones need to be paid.
The captain of the big, slow boat needs money for fuel, time and his crew of burly someones who help him pilot the boat halfway around the world.

Those someones then sit in their cabins smoking cigarettes after weeks crossing the Pacific Ocean while some American someones unload the cargo at the Port of Long Beach, California.
The cargo containers are again distributed onto the American rail and highway system, and another group of someones drives them to Dollar Tree Warehouses around the country.
At some point, a call is made, and another truck leaves the warehouse and delivers its load of China’s Finest to your local Dollar Tree where it is sold for the inauspicious sum of One American Dollar.
I’m an economics major, and my mind still reels at how this business model is not only sustainable, but thriving!
Each visit offers a giddy new trip down an economic rabbit hole.
Lately, I’ve been thinking about the sentiment signs they sell.
Who makes them?
More to the point, who comes up with the sentiments?
Is there a Sentiment Think Tank hidden somewhere deep in the mountains of remote western China where scholars convene to conjure bland sentiment and mushy platitudes?
Today’s project started with two such pieces:

“Life Begins with Coffee”
I mean, it’s true and all, but who decorates with that? It’s like hanging a sign that reads, “I Breathe Air”
And the other is more puzzling: “So Fresh, So Clean”
Are you supposed to put it in the bathroom, next to the sink as a testament to brushed teeth?
Or maybe it’s supposed to be a commentary about your bum after a good grunt-and-wipe on the porcelain throne? [No silly – it’s a sentiment for laundry room, but you wouldn’t know anything about that, would you? LOL – Handan]
Wherever it may be intended for, two places are automatically off the list: my son’s room and my kitchen.
And then there’s this gem. I snapped a pic of this doozy while The Great Blue Handan was on one of her Dollar Tree hunting trips.

Best I can tell, it’s motivational wall art for serial killers, encouraging them to never stop slaying. Well, at least until the sun goes down, and then I guess they can stop slaying and start relaxing. As for the pink phone? I don’t know, maybe it’s China’s way of encouraging those wayward criminals to reach out and touch someone. Oh, wait! They’re already doing that. Yeesh, I don’t know – I think DT needs to call China and ask what the hell they were thinking with this one.
Look, my point is this – Dollar Tree is great for a lot of things, but sentiment-writing is not one of them.
Fortunately, we’re here to help with that!
You see, what they are good at is providing cheap stuff just begging for a makeover.
So while I look at “So Fresh, So Clean” and cringe, Handan looks at it and sees an opportunity.

DIY Dollar Tree Christmas Signs
SUPPLIES LIST
Affiliate links are provided below. Full disclosure here.
- Dollar Tree sentiment sign (or a piece of 16 x 2 1/2 x 3/4 wood)
- Scraper (optional depending on your sign)
- Goo Gone (optional depending on your sign)
- White paint (we used DecoArt Americana Chalky Paint in White)
- Red paint (we used DecoArt Americana Chalky Paint in Rouge)
- Vaseline (we got ours from the Dollar Tree)
- Small paint brushes
- Damp rag
- Clear wax (recommended, especially if using chalk paint)
- Cricut Joy or other cutting machine
- Permanent adhesive vinyl or any other vinyl of your choice
- Christmas sign sentiments SVGs (available in The VIP Patch)
- Scissors
- StrongGrip transfer tape
How to make Christmas Signs from Dollar Tree Sentiment Signs
First things first – I had to clean the sentiment sign.

I removed the metal strips. They’re just held in place with glorified thumb tacks, so I used a putty knife to pry them up. I put them aside, as I’d be re-installing them later.


I peeled off the “Fresh” applique and tossed it directly into the trash. Fresh, indeed!

The “Fresh” sticker left a not-so-fresh smear of sticky good behind. Nothing a little Goo Gone couldn’t handle!


I thought about hanging this in Baris’s room, had a good laugh about the notion and then carried on with my craft.

I painted two signs white.

It took three coats to fully cover the old writing.

And I painted two signs red, again with three coats.

I showed this one to Handan. Told her I improved upon the original. Oddly, she didn’t agree!


Surely, she would agree with this one!

Now, the plan was to paint each one again, but this time paint white over red and red over white. I’d then distress them a little to show the color underneath. A really easy way to do this is first to apply petroleum jelly where I wanted the distressing to be. The paint won’t adhere to those areas, and I could just rub it off with a damp rag.

I just used a little here and there, mainly along the edges and corners.


I also added some in the middle. If I had to do it over, I might skip the petroleum jelly on the face, or at least make it less, so it wouldn’t interfere with the lettering I’d be applying later.

Next, I painted the red signs white.


Three coats covered the red entirely.

And after applying petroleum jelly to the white signs, I painted them red.


After the third coats had dried, I wiped away at the corners and edges with a damp rag.

The paint came off easily and left beautiful distressing.


At this point, it would be a good idea to wax the signs, especially if using chalk paint like I did. I didn’t wax, and I ran into some minor issues with the paint peeling off when I removed the transfer sheets. I was able to minimize it after the first try, but waxing the signs before applying the vinyl lettering would likely solve the problem entirely.

I re-installed the metal pieces.

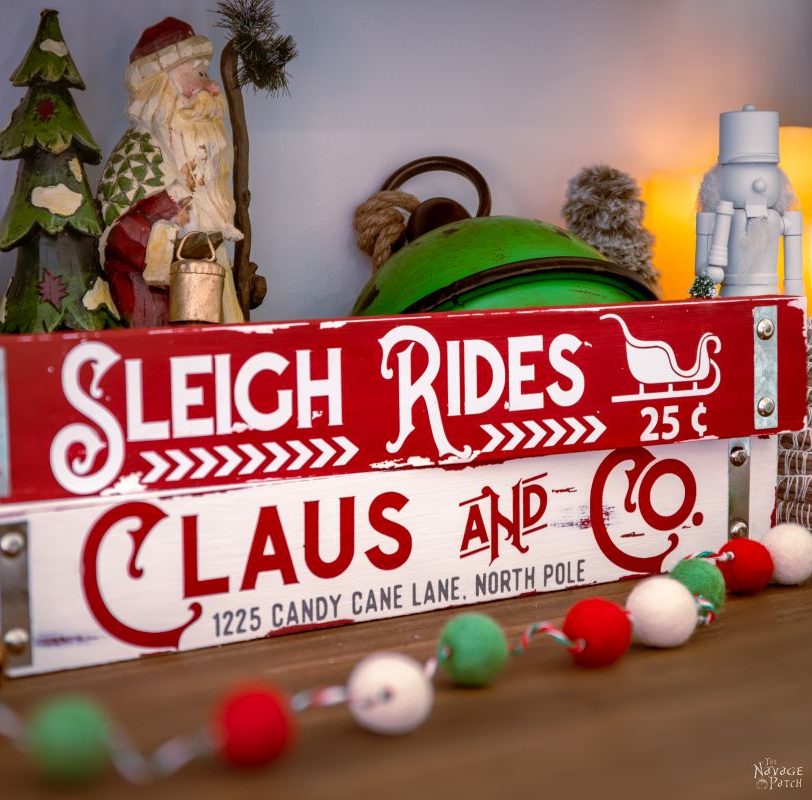
And my signs were ready for some non-bland Christmas sentiments worthy of The Navage Patch.

For the first sign, I chose simple white permanent vinyl on a red sign.


The SVG was layered so I could make different parts different colors, so I first grouped the layers in Design Space. [Note: In the early new year, we will be preparing a tutorial on how to work with SVG files and layers in Cricut Design Space, so that your vinyl would always be cut perfectly -Handan]
By the way (no this is not a sponsored post), I’ve really come to love our Cricut Joy – it’s now my go-to for holiday crafting projects. I love the size and portability, but I especially love being able to work directly from my phone. It really makes it so easy!


I resized the sentiment to 12 inches – we found that’s a perfect size for these signs – and then I rotated it 90 degrees.


All lined up and ready to cut!

I used Cricut Smart Vinyl for this one, but you can use any vinyl cut to size with Joy’s mat.


Here’s the design after weeding and transfer it onto the Strong Grip transfer tape. Here’s the only thing I’m not crazy about with Cricut’s selection of vinyl and transfer tape: The Joy’s permanent Smart Vinyl is so strong that it is impossible to transfer to any other transfer tape than the Strong Grip. But the Strong Grip transfer tape is so strong that it doesn’t want to let go of the vinyl…plus it tends to peel paint. Now this gripe is only for the smart vinyl/strong grip transfer tape combo. Glitter vinyl doesn’t stick as much to the transfer tape, so it’s a bit easier to work with.
But hey, Cricut! How about a transfer tape in between regular and strong? And how about making the Smart Vinyl a little easier to transfer to the transfer tape?
K? Thanks, Bye!

So here’s the strong grip tape on the sign. I made the mistake of pressing down all over the transfer tape and even running a brayer over it.

And here you can see how much paint the transfer tape took with it. It’s named well. It transferred the paint from my project to itself!
It’s all good though. Nothing a little paint applied with an even littler brush couldn’t solve.

For the next Christmas sign, I used glitter red vinyl (awesome stuff) and regular gray permanent vinyl.
Had no issues with the red glitter. As I just mentioned, the strong grip tape sticks just the right amount to it. And to prevent peeling paint, I only pressed down on the letters, nowhere else on the transfer tape.


By the third Christmas sign, I was feeling like an old pro at this stuff, so I upped the ante to three colors – glitter red, glitter black and regular gray.

We grouped the SVG layers to have three groups.

I clicked the eye icon to hide the other two groups so I could first print the main words in black. Then I attached this groups individual layers so everything would be in the correct place when cutting.

I cut and loaded a strip of black on a long Joy mat.


Here it is with transfer tape on it.

I placed it gently on the sign and only pressed on the letters.

Peeling was much easier!

I kept the transfer tape – I’d be able to use it again.

Next, I isolated the pole and gingerbread man layers and I attached these two layers. I used glitter red for this group.


Weeded and on the transfer tape.

I peeled the transfer tape and positioned it on the Christmas sign.

A careful peel and no stripped paint.

For the last layer, I used the gray permanent vinyl.

It was a little difficult to transfer to the tape, and then again, the transfer tape was a little difficult to peel.

But my babes suggested I use Cricut’s little scraper tool to run over the letters, and it made a big difference!

As a final trick, I found that peeling the transfer tape straight back at a 180 degree angle gave the best results.

Okay, you’ve suffered enough of of my chewed and chubby fingers and boring tutorial. Let’s get to the beauty shots, already!


We love to see our printables out in the wild! If you display our free printables in your home or use our free SVGs in your projects, and take a picture and post it on Instagram, be sure to tag us – thenavagepatch

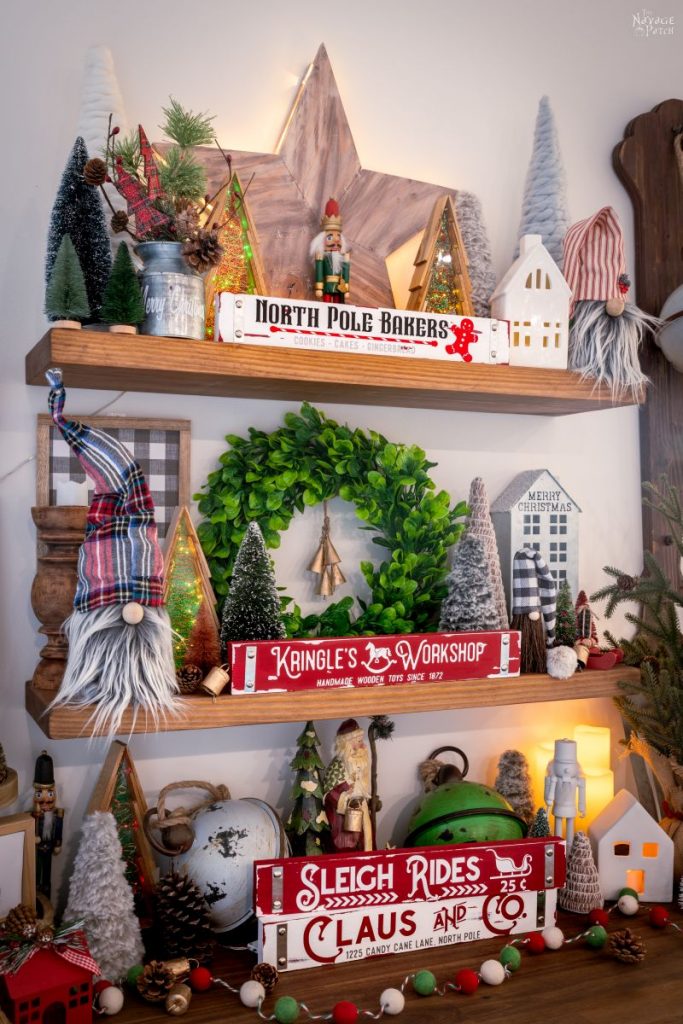
Remember our Epoxy Wood Shim Trees? Check it out, if you haven’t seen them!


And here’s the Christmas gnome who founded the Gnoman Empire. Good lord, I never would have guessed where this whole gnome thing was headed when I made him last Christmas!


And the star up there…I remember making that for Handan when she was all, “My babes, will you make a me some rustic stars? Pleeeeeaaase?” I saw her rustic star and raised her a lighted masterpiece, lol! 😀

We staged our Dollar Tree Christmas signs on our kitchen shelves, but they will look great anywhere in the house – kid’s room, guest bathroom, on a desk, on top of a dresser etc. They are sure to bring some Christmas cheer where ever you put them.


We hope you like our DIY Dollar Store Christmas signs! We’ll be back real soon with some more Christmas crafts and even sooner with some fun vintage Christmas printables!
FREE Christmas Sign SVG Files
We created today’s FREE Christmas Sign SVG designs as JPG, PNG and SVG files which are resizable and compatible with Cricut and all other cutting machines.
Now go ahead and click on the button below to download today’s freebies – they are all in the “Christmas” and “SVGs – Stencils” section of The VIP Patch.
take me to your
amazing freebies library
If you’re not a Navage Patch VIP, you won’t be able to access our Freebies Library. But that can be easily fixed! Subscribe for free on the form below and become a Navage Patch VIP. Once you subscribe, a password will be sent to you in our Welcome email, and that will give you access to The VIP Patch [Freebies Library].
Share it on Pinterest & Facebook!


The sentiment sign writers must be the same people who write the fortune tags for fortune cookies. They all sit in some little office churning these things out.
It does boggle the mind how the Dollar Store turns profits. Quantity wins out I guess.
Yep, quantity over quality these days, it seems. But, props to DT for trying to up the quality too.
My new cricut arrives Monday and I can’t wait to try your fabulous crafts
Woo Hoo. Congrats, Tracy! 🙂
Greg, I love, love these signs AND your detailed descriptions! Stubby fingers & all.
Thank you both for the free SVG’s!!
Blessings, Jan, in Arizona
LOL, thanks, Jan! 😀
Those are awesome!! Thanks for the instructions!! Now I have to get thru Thanksgiving, and will be making these for little gifts for Christmas!!❤️❤️
Thank you, Shelley! 🙂
Love the signs, and the styling on the floating shelves. For the record, “So Fresh, So Clean” is an Outkast song. Not sure how it got co-opted for laundry room/bathroom decor, but every time I see one of those signs I get the song stuck in my head. Here’s a link to the video so you too can enjoy that particular earworm on a regular basis!
https://www.youtube.com/watch?v=-JfEJq56IwI
You’re welcome! =0)
LOL, Handan and I were talking about the song last night, and I told her that I’m sure our demographic would be clueless about Outkast, so I didn’t mention them in the post. Thanks, for proving me wrong, Carly! :D:D:D
Thank you for being so creative and sharing that creativity with all of us!
It is our pleasure, Jonnel! 🙂
They are wonderful. These signs are not in stores here and I can not find them on the DT website.
Can you point me in the right direction>
Also please elaborate on the wonderful sleigh you have on the left side of your floating shelf display.
Hi Angelika, I see on DT’s website that they have sentiment signs that are 12 inches long and they have some that are 18 inches long. Neither is ideal, but they can do in a pinch. Your best bet would be to go to Home Depot or Lowe’s and have them cut up a 1 x 3 x 8 board for you. The actual dimensions of that board are 3/4 inch x 2 1/2 inches x 96 inches. Ask them to cut you six 16″ pieces from the board, and you’re good to go! As for the toboggan, we got that last year at Target for $3. Not sure if they have it this year. Good luck! 🙂
I like all the tutorials but I mainly read because of the writing. You are a gifted writer, my friend. I am REEALLLYY looking forward to Cricut tutorials for beginners (also known as the Chronically Busy, or the Cricut Owners Who Don’t Have Enough Interest to Really Learn it Without a Blog Post). Thanks for this one. I’m going to give this one a try.
Thank you so much, Linda! I’m always so happy to hear that my writing is appreciated! Okay, you’ve given us something to think about re the Cricut tutorials. Look for those in the new year!
Oh, my gosh, Greg! You have me laughing out loud until I am crying! Some things are left better not translated, right! Too funny!
Thanks, Tina! 😀
THANK YOU for sharing this! I had ordered a case of 18x2x1 signs from Dollar Tree with a project in mind. When I received the case, 6 or 8 of this style sign was mixed in with them and I didn’t know what to do with them. It’s only February, but I’m going to get busy making some Christmas project next week with these SVGs. Would love to see more Dollar Tree repurposing projects. Thanks!
You’re welcome, Krissy! I’m so happy DT’s mixup worked out to your advantage! 🙂
Awesome site and info! You two rock!!
Thank you so much, Dana! 🙂
Please make me a VIP!
We signed you up, Frankie! Welcome to the VIP Patch! 🙂
I made the Christmas signs for my daughter last year, they were a hit. They look great stacked. I’d asked her what color she wanted and she said “ALL!”, so red/white/green it was. Mine didn’t have the little metal pieces and I didn’t do the chippy paint effect but they look fantastic! I bought a few more from DT this past Summer and hoping I will get a set this year. Thank you for the great files!
Awesome to hear! You are so very welcome, Jean! 🙂
Please sign me up! I couldn’t get the subscribe button to work
Will do!