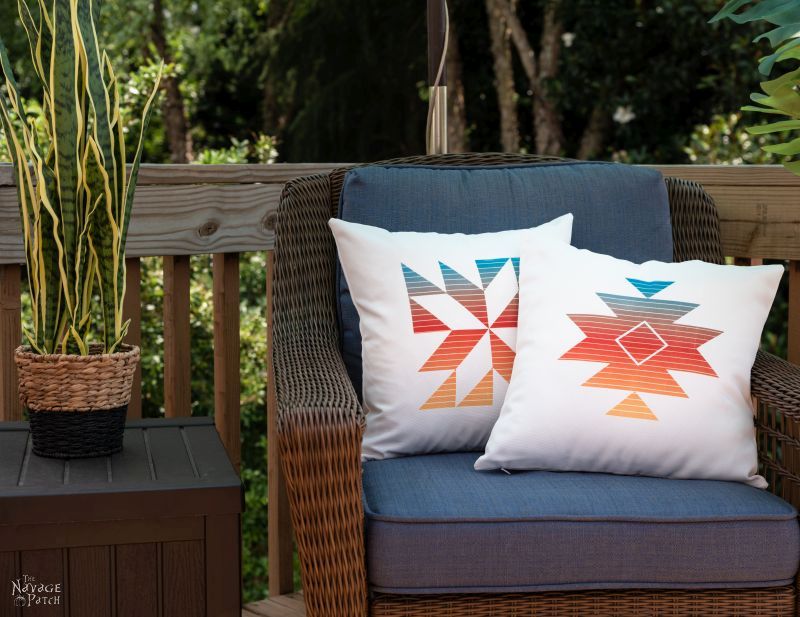
DIY Outdoor Pillows (& Free SVGs!)
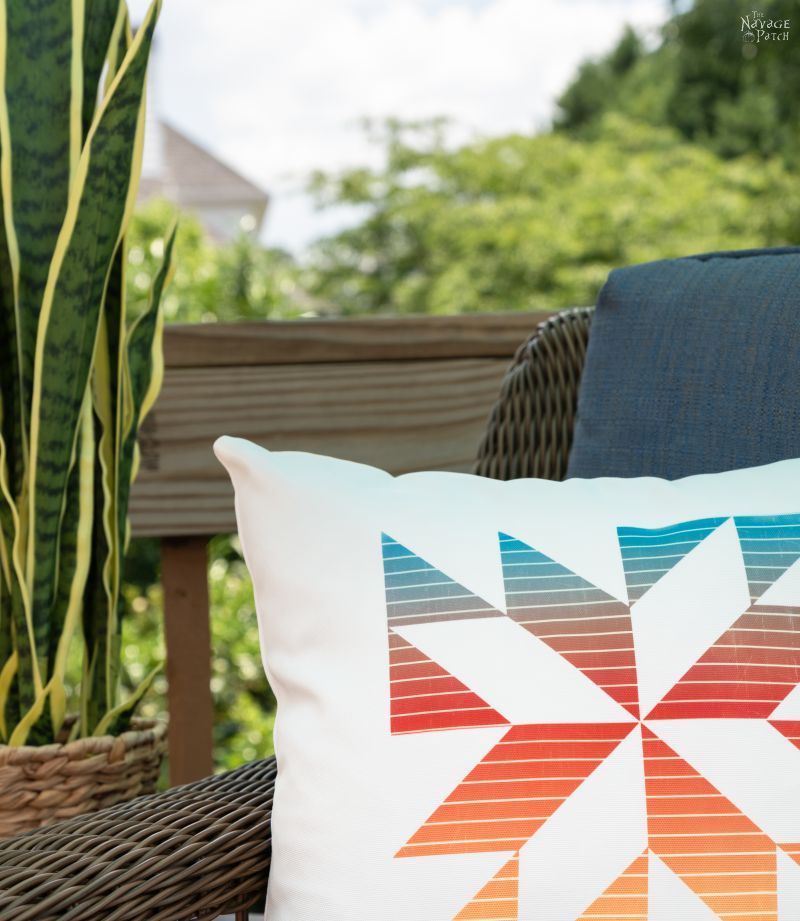
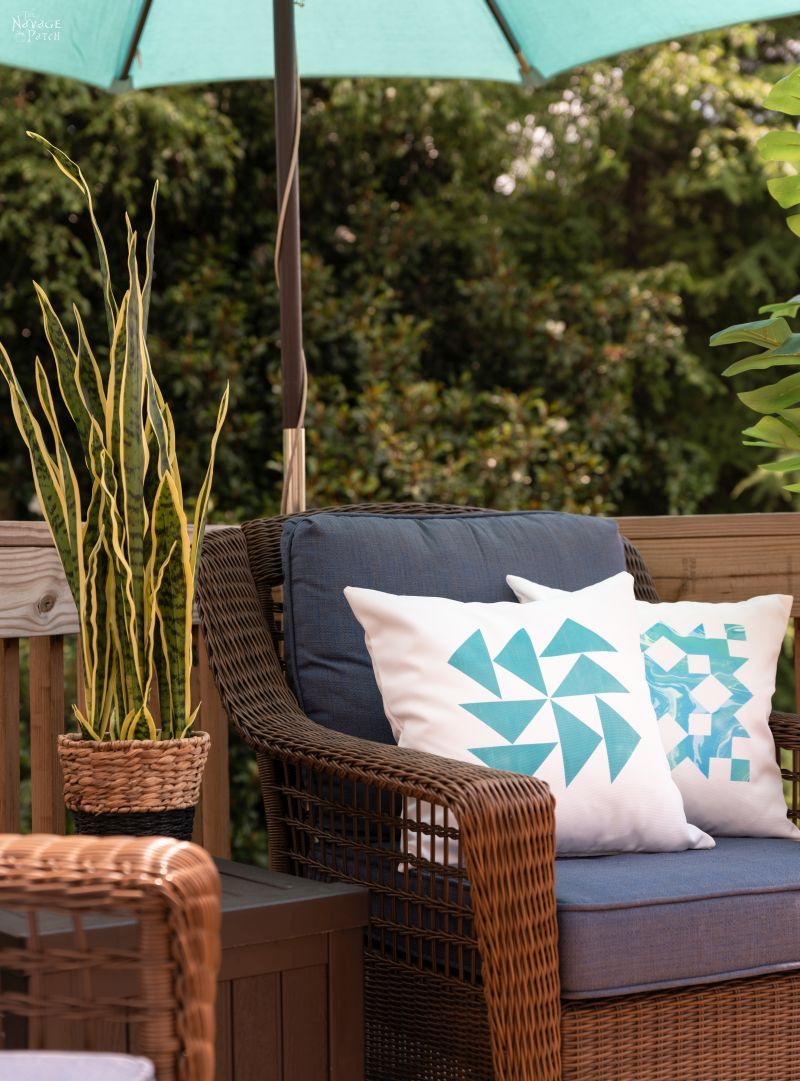
These DIY Outdoor Pillows have beautiful barn quilt patterns that really pop with Infusible Ink color! 12 SVG patterns free to download!
It was bound to happen sooner or later.
When something outgrows its environment, it seeks more suitable accommodations.
A hermit crab will ditch its old shell to find a bigger one as its body grows.
A growing family may move from an apartment to a small house to a bigger house as mommy and daddy discover the wonders of makin’ littluns.
And wolves will spread out and seek new territory when their population gets too dense. Too dense for wolves is like one he-wolf per 100 square miles. Wolves are kinda ornery that way. It’s a wonder the he-wolves ever find a suitable gaggle of she-wolves. But, this is a craft and DIY blog, not Mutual of Omaha, so I’ll just leave it at that.1

As with animals (and human animals), so it is with our growing collection of throw pillows. They’ve taken over our bedroom, Baris’s bedroom, the living room, the craft room…and don’t get me started on the un-finished guest room. It’s both a dumping ground and suspected breeding ground for the filthy little buggers. There are all sizes fraternizing in the empty guest room, most of them shamelessly nude – lying around without covers in all sorts of unseemly positions.
It’s no surprise then that the logical next step for this infestation of polyfill, foam and feather is to claim new territory. Since the inside is full, the only place to expand is outside.
Oh sure, any Cathy Cashwad can waltz into Home Depot and buy outdoor pillows, but what about those of us who like to DIY our pillows? Until recently, the best option would be to use heat transfer vinyl. But even the best HTV still feels like HTV in the end.
Then Cricut introduced its line of Infusible Inks, and suddenly, there was a better way! But just because the ink won’t run on a pillow design doesn’t mean the pillow is suited for the Great Outdoors. For a pillow to be truly worthy of long-term use on that patio chair, we need a few things:
- A pillow cover made of polyester, as cotton would become waterlogged after the first rain. And guess what kind of material Infusible Ink needs to work. Yep! Polyester!
- A waterproof (that’s the claim – the best you’ll find in practice is “water-resistant”) pillow insert with polyester fill. Water will get through the cover (it’s a porous weave, after all), but it should be almost entirely blocked by the insert’s cover. And any water that breaches that final barrier will not be able to soak into the polyester fill.

Let’s take a look at how we made our DIY outdoor pillows with Cricut Infusible Ink and learn the secrets of a successful outdoor pillow along the way.
1If you understood my Mutual of Omaha’s Outdoor Kingdom reference, congratulations! You are at least as old as I am!
DIY Outdoor Pillows with Cricut Infusible Ink

SUPPLIES LIST
Affiliate links are provided below. Full disclosure here.
- Cricut Maker, Maker 3, Explore Air 2 or Explore 3
- Barn quilt DIY outdoor pillow SVGs (available free in the VIP Lounge)
- Cricut Infusible Ink transfer sheets
- Cricut StandardGrip mat
- Brayer (optional)
- Cricut Infusible Ink pillow covers (white)
- Cricut EasyPress 2
- Outdoor water-resistant pillow inserts (see more info in Step 5 before buying)
- Scotchgard Sun and Water Shield

Note: though the EasyPress 2 we used has official dimensions of 10 inches x 12 inches, those measurements are taken at the widest points (the heat press tapers in at the corners), so it’s best to size these barn quilt designs to about 9 inches (they are square) in Cricut Design Space. We sized ours to 9 3/4 and had to do a double press – something not recommended by Cricut (or us, for that matter – it’s too easy to screw up).
This is a sponsored conversation written by me on behalf of Cricut. The opinions and text are all mine.
DIY Outdoor Pillows Video Tutorial (play it with sound! ?)
DIY Outdoor Pillow Written Tutorial
Step 1 – Cut
We used our new Cricut Maker 3 to cut the Infusible Ink designs for our DIY outdoor pillows.

This machine has been a joy to work. Since Infusible Ink is not a Smart Material and needs a cutting mat, the cutting speed is the same as Cricut Maker, but the transport speed is amazing!

Step 2 – Weed
These barn quilt designs are incredible easy to weed!


I put the design aside and prepared the pillow cover.
Step 3 – Prep pillow cover

Centering my design has always been a problem, but I came up with a solution that worked great with these geometric designs. Instead of ironing out all of the fold-creases, I ironed all around the middle, leaving a small crease cross.

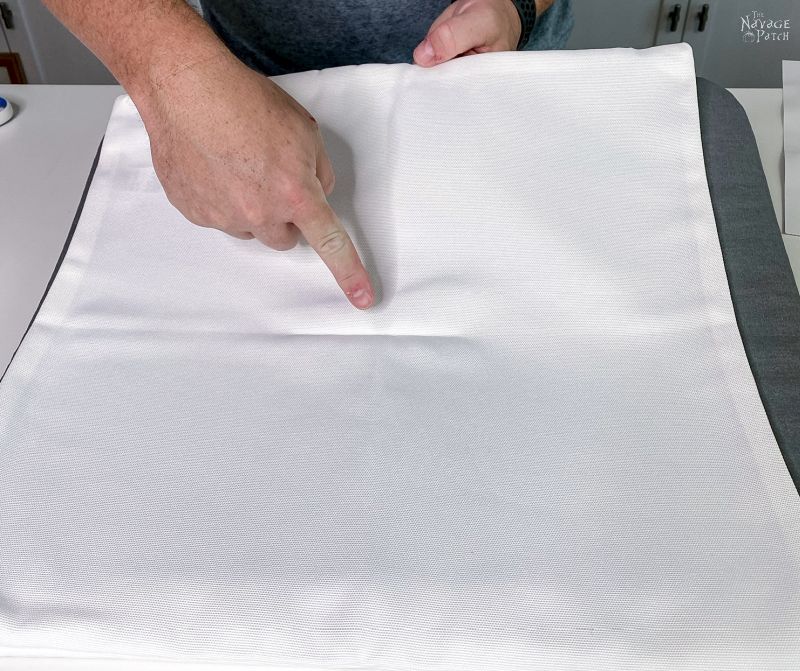
That little cross made it a cinch to center the design. But first, I inserted some heavy cardstock and cleaned the cover with a lint roller – important steps when working with Infusible Ink! The cardstock will prevent any of the ink from infusing into the other side of the pillow cover, and the lint roller will remove dust particles that can block the transfer of infusible to the spots on which they sit. this results in white spots on your completed project.

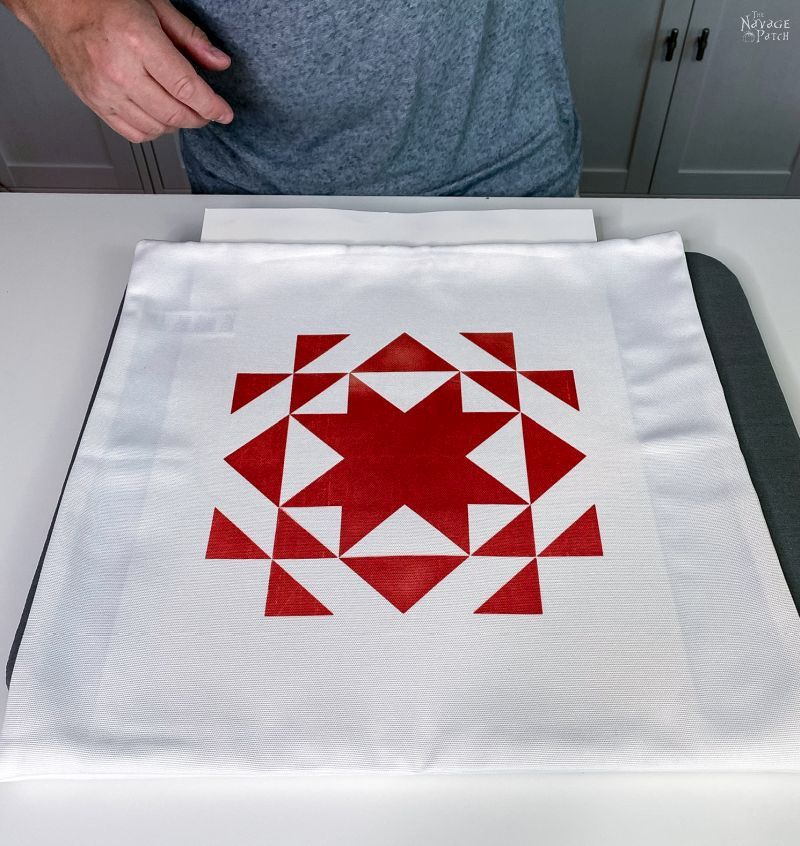
Step 4 – Press
I centered the design and pressed the transfer sheet against the pillow case.

After covering the transfer sheet with a sheet of butcher paper, I pressed it at 385 degrees for 60 seconds.

It’s best to wait until the pillow cover has cooled before removing the transfer tape. You made it this far, it’d be a shame to ruin the pillow cover with a ghosted image because you were impatient!

Okay, look, I may or may not have removed some of the transfer sheets early…but I’ve got a good technique, so my design didn’t ghost! Do as I say, not as I do. My actions get me in more trouble than they’re worth sometimes! ?
Step 5 – Stuff
I stuffed the outdoor pillow inserts into the covers. These inserts are great. Not only are they water-resistant, but they’re anti-fungal as well, so any water that gets through the cover won’t ferment into a stinky mess inside the pillow.
HOWEVER. They run small. So unless you’re into limp and skimpy pillows, I’d recommend going a size up. I’ve linked to 20×20 pillow inserts in this post. I haven’t tried all the brands, but I’m willing to bet dollars to donuts that every one of those outdoor pillow inserts listed on Amazon is made in the same Chinese factory, so I’m betting upsizing is a safe bet, regardless of the “brand.” Furthermore, all the comments I’ve read lead me to the same conclusion: size up or cozy up to a flaccid pillow all summer. The choice is yours!
Step 6 – Protect
Anything fabric outside needs a coat of two of Scotchgard, and these DIY outdoor pillows are no exception.

We had a few cans of Scotchgard Heavy Duty Water Shield on hand, so I used one to protect the pillows. Ideally, I’d have used Scotchgard Sun and Water Shield, as it also has a UV barrier to protect against fading, but in the interest of saving money, I just used what I had. I can always pick up a can of the Sun and Water Shield at some point in the future and give the pillows another coat. Until then, we can turn the pillows over when we’re not outside.
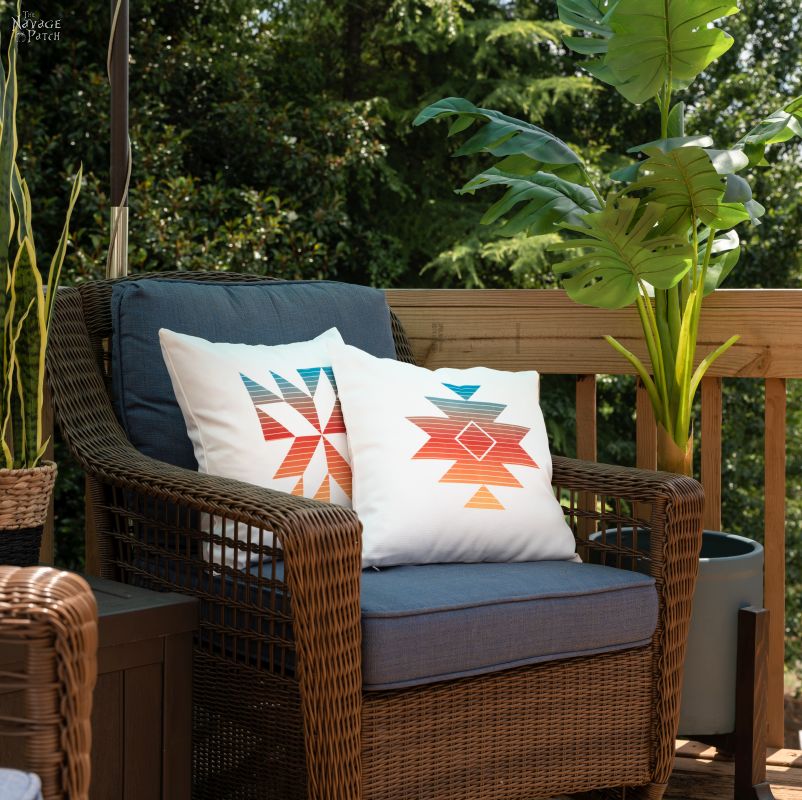
Once the Scotchgard dried, our DIY outdoor pillows were ready for action. Be sure to scroll through all the beauty shots, as I have an update on how the pillows fared during their first tropical storm.

We love to see our printables out in the wild! If you display our free printables in your home or use our free SVGs in your projects, and take a picture and post it on Instagram, be sure to tag us – thenavagepatch
How Did Our DIY Outdoor Pillows Perform in Heavy Rain?
As luck would have it, Tropical Storm Claudette was slated to give us a little whack the day after I took the beauty shots.
Perfect.
I took in all the chair cushions. Though they are “outdoor cushions,” they soak up heavy rain like a sponge and then release that water onto the butts of anyone foolish enough to sit on them too soon after a storm. On the empty chairs, I placed one of our new DIY outdoor pillows. The game was afoot.
The rain came at night.
Strong, tropical rain. The kind of rain you see in Vietnam and India and Florida. The kind of rain that puts a gleam in the eye of guys named Noah.
I smiled in bed and dreamed of dry pillows.
The next morning I bolted out of bed like a kid on Christmas morning. I ran out to the deck…

The pillow was still there! Victory number one – it hadn’t took wing on the wind during the night!
I stepped closer. Water beads!
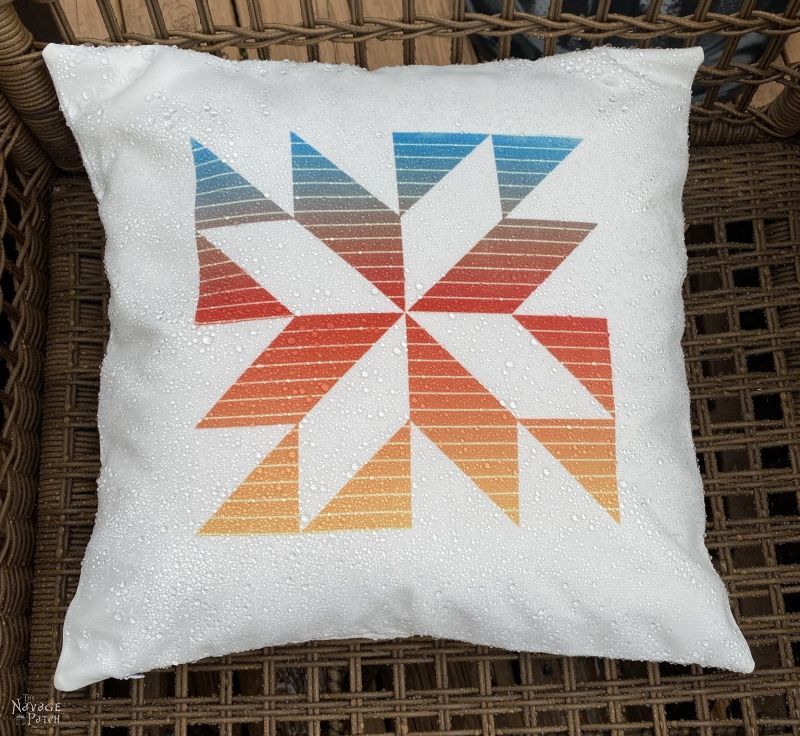
Victory number two – the Scotchgard was guarding!
To a degree.
I picked up the pillow, and it felt like it weighed about 5 pounds. My heart sank.
But it was weird – I could feel the water inside the pillow cover just sloshing around. With the zipper facing down, I unzipped the cover, and the water fell out all at once.
Could it be?
I called Handan over and asked her to open the zipper of the pillow insert. Meanwhile, I dried my hands.

With dried hands, I reached into the pillow. The fill was dry! I felt the inside of the cover. It was damp, but not soaking, so some moisture got through, but not enough to wet the fill. And even if it did, that polyester fill wouldn’t hold onto a single drop. Success!
My lesson learned and my advice to you is to crack open the zipper of the pillow cover just a bit. This will allow water to drain more easily from the space between the cover and the insert.

Now, you may be wondering after this test if Scotchgard is even needed. I say yes – for two reasons.
- Scotchgard with UV protection will keep the colors bright.
- It will help keep the pillow dry from light rains and dew.
The rain I tested these on was anything but normal, and I would have been floored if they were dry throughout. Even our store-bought outdoor pillows and cushions take on water. What makes them “outdoor” is that the water drains and evaporates quickly – either on its own or with a helping squeeze.
All in all, we love our DIY outdoor Infusible Ink pillows and look forward to years of good use!
Free Barn Quilt DIY Outdoor Pillow SVGs
We created today’s FREE Outdoor Pillow SVG designs as JPG, PNG and SVG files which are resizable and compatible with Cricut and all other cutting machines.
Now go ahead and click on the button below to download today’s freebies – they are all in the “SVGs – Stencils” section of The VIP Lounge.
take me to your
amazing freebies library
If you’re not a Navage Patch VIP, you won’t be able to access our Freebies Library. But that can be easily fixed! Subscribe for free on the form below and become a Navage Patch VIP. Once you subscribe, a password will be sent to you in our Welcome email, and that will give you access to The VIP Lounge [Freebies Library].
Share it on Pinterest & Facebook!


Hahaha! Got that Mutual of Omaha reference in a heartbeat! FYI: you can enjoy the old way of enjoying the”wild-kingdom “ once again! RFD-Tv or the cowboy Channel- originating in TX, I believe, is airing those old shows on Sunday 8 pm! Lol. Who knew?! Cloaked in all of their Politically incorrect nuances- this show has emerged once again as simple family entertainment!
I really love these pillows- but am woefully dumb when it comes to Infusible Inks and presses- also- I own a Cameo Silhouette, but have still enjoyed your svg’s! I will see if I can utilize these beautiful patterns in some other way to brighten the world! Thanks for your enthusiasm and joy for Life, your posts brighten my Alberta, Canada Days immeasurably! May you and your Family Enjoy a Beautiful Day !
LBB
I loved those shows when I was a kid! I also loved David Attenborough’s nature shows. I hope you’ll find a good use for the SVGs with your Cameo! 🙂
LOL, I was thinking “Mutual of Omaha? Who’s going to get THAT reference? Boy, Greg are you dating yourself!” But I saw you clarify further into the post. Just one teeny correction- it’s Mutual of Omaha’s Wild Kingdom. So I guess I am a tad older than you – or maybe much older if I use the word ” tad”!
Great tutorial on outdoor pillows! I’m about to start an update on ours!
Thanks and enjoy your great outdoors with Handan and Baris!
Ah, good catch, Susan – I’ve updated the post with your correction. We will endeavor to enjoy the outdoors here despite the crippling humidity and vengeful mosquitoes, lol! 🙂
Loved the Mutual of Omaha reference! And the crack about Noah.
?
The “Dancing with Doggies” part of the video was AWESOME!!! Brought a huge smile to my day. (I don’t even own a Cricut or Silhouette or any such machine — even when your posts feature crafts based on these, I still read them — I come for the well-written, entertaining, and humorous writing — and now the entertaining video trailers!) (P.S. Handan has some good dance moves!)
I’m glad you liked it, Cynthia! Handan is actually an amazing dancer – that was her first time on film, so she was a little too nervous to break out all the moves. We’re both getting used to video, so it will hopefully only get better from here! 🙂
I swear this post is giving me 1970s/early 80s vibe. Reading about your pillows made me think of Star Trek and the trouble with Tribbles episode. And bonus, I have Marlin Perkins’s voice in my head now, thanks ?
These turned out awesome. I wonder how the transfers would do on plain Sunbrella fabric? Hmmm…
I know, right? Those colors are totally retro! And it’s funny you mention The Trouble with Tribbles, because I was thinking about it when I wrote that intro! Having Marlin’s voice in your head isn’t a bad thing at all. As for the Sunbrella fabric…is it polyester? Infusible Ink needs polyester, preferably white. If so, then, yeah, give it a bash! 🙂